本文内容来自王松老师的《深入浅出Spring Security》,自己在学习的时候为了加深理解顺手抄录的,有时候还会写一些自己的想法。
验证码登录也是项目中一个常见的需求,但是Spring Security并未提供自动化配置方案。所以需要开发者自行定义。这里我们通过自定义认证逻辑实现添加登录验证码功能。
生成验证码我们使用开源库kaptcha,首先引入kaptcha依赖,代码如下:
        <dependency>
            <groupId>com.github.penggle</groupId>
            <artifactId>kaptcha</artifactId>
            <version>2.3.2</version>
        </dependency>
然后对kaptcha进行配置:
@Configuration
public class KaptchaConfig {

    @Bean
    public Producer kaptcha() {
        Properties properties = new Properties();
        properties.setProperty("kaptcha.image.width", "150");
        properties.setProperty("kaptcha.image.height", "50");
        properties.setProperty("kaptcha.textproducer.char.string", "0123456789");
        properties.setProperty("kaptcha.textproducer.char.length", "4");
        Config config = new Config(properties);
        DefaultKaptcha defaultKaptcha = new DefaultKaptcha();
        defaultKaptcha.setConfig(config);
        return defaultKaptcha;
    }
}
配置一个Producer实例,只要配置一个生成的图片验证码的宽带、长度、生成字符、验证码的长度等信息。配置完成可以在Controller中定义一个验证码接口了:
    @Autowired
    private Producer producer;

    @GetMapping("/vc.jpg")
    public void getVerifyCode(HttpServletResponse resp, HttpSession session) {
        resp.setContentType("image/jpeg");
        String text = producer.createText();
        session.setAttribute("kaptcha", text);
        BufferedImage image = producer.createImage(text);
        try (ServletOutputStream out = resp.getOutputStream()) {
            ImageIO.write(image, "jpg", out);
        } catch (Exception e) {
            e.printStackTrace();
        }
    }
这个验证码接口中,主要做了两件事:
- 生成验证码,并将文本存入HttpSession中
- 根据验证码文本生成验证码图片,并通过IO流写出到前端。
接下修改登录表单,加入验证码,代码如下:
<!DOCTYPE html>
<html lang="en">
<head>
    <meta charset="UTF-8">
    <title>自定义登录</title>
    <link href="//maxcdn.bootstrapcdn.com/bootstrap/4.1.1/css/bootstrap.min.css" rel="stylesheet" id="bootstrap-css">
    <script src="//maxcdn.bootstrapcdn.com/bootstrap/4.1.1/js/bootstrap.min.js"></script>
    <script src="//cdnjs.cloudflare.com/ajax/libs/jquery/3.2.1/jquery.min.js"></script>
</head>
<style>
    #login .container #login-row #login-column #login-box {
        border: 1px solid #9C9C9C;
        background-color: #EAEAEA;
    }
</style>
<body>
<div id="login">
    <div class="container">
        <div id="login-row" class="row justify-content-center align-items-center">
            <div id="login-column" class="col-md-6">
                <div id="login-box" class="col-md-12">
                    <form id="login-form" class="form" action="/doLogin" method="post">
                        <h3 class="text-center text-info">登录</h3>
                        <div class="form-group">
                            <label for="username" class="text-info">用户名:</label><br>
                            <input type="text" name="uname" id="username" class="form-control">
                        </div>
                        <div class="form-group">
                            <label for="password" class="text-info">密码:</label><br>
                            <input type="text" name="passwd" id="password" class="form-control">
                        </div>
                        <div class="form-group">
                            <label for="kaptcha" class="text-info">验证码:</label><br>
                            <input type="text" name="kaptcha" id="kaptcha" class="form-control">
                            <img src="/vc.jpg" alt="">
                        </div>
                        <div class="form-group">
                            <input type="submit" name="submit" class="btn btn-info btn-md" value="登录">
                        </div>
                    </form>
                </div>
            </div>
        </div>
    </div>
</div>
</body>
在登录表单中增加一个输入验证码的输入框,验证码的图片地址就是我们在Controller中定义的验证码接口地址。
接来下就是验证码的校验了。经过前面的学习,我们已经了解到身份认证实际上就是在AuthenticationProvider的authenticate方法中完成的。所以,验证码的校验,我们可以在该方法执行前进行,需要配置如下类:
/**
 * @author tlh
 * @date 2022/11/18 22:14
 */
public class KaptchaAuthenticationProvider extends DaoAuthenticationProvider {

    @Override
    public Authentication authenticate(Authentication authentication) throws AuthenticationException {
        HttpServletRequest req = ((ServletRequestAttributes) RequestContextHolder.getRequestAttributes()).getRequest();
        String kaptcha = req.getParameter("kaptcha");
        String sessionKaptcha = (String) req.getSession().getAttribute("kaptcha");
        if (kaptcha != null && kaptcha.equalsIgnoreCase(sessionKaptcha)) {
            return super.authenticate(authentication);
        }
        throw new AuthenticationServiceException("验证码输入错误");
    }
}
这里重写authenticate方法,在authenticate方法中从RequestContextHolder获取当前请求,进而取到验证码参数和存储在HttpSession中的验证码文本进行对比。比如通过的话就执行父类的authenticate方法,不通过的话就抛出异常。
我们将我们定义的KaptchaAuthenticationProvider通过配置类放入Spring的IOC容器中去:
/**
 * @author tlh
 * @date 2022/11/18 21:22
 */
@Configuration
public class KaptchaConfig {

    @Autowired
    private UserDetailsService userDetailsService;

    @Bean
    public AuthenticationProvider getAuthenticationProvider() {
        KaptchaAuthenticationProvider kaptchaAuthenticationProvider = new KaptchaAuthenticationProvider();
        kaptchaAuthenticationProvider.setUserDetailsService(userDetailsService);
        return kaptchaAuthenticationProvider;
    }
}
这里需要注意的是我们在创建AuthenticationProvider的是需要一个UserDetailsService,这里的UserDetailsService是我们在前面学习的通过MyBatis从数据库中加载用户信息的时候定义的,如果有疑惑的的伙伴可以在去回顾下。
/**
 * @author tlh
 * @date 2022/11/17 23:52
 */
@Component
public class MyUserDetailsService implements UserDetailsService {

    @Autowired
    private UserMapper userMapper;

    @Override
    public UserDetails loadUserByUsername(String username) throws UsernameNotFoundException {
        User user = userMapper.loadUserByUsername(username);
        if (user == null) {
            throw new UsernameNotFoundException("用户不存在");
        }
        user.setRoles(userMapper.getRolesByUid(user.getId()));
        return user;
    }
}
最后在SecurityConfig中配置AuthenticationManager,代码如下:
/**
 * @author tlh
 * @date 2022/11/16 21:11
 */
@Configuration
public class SpringSecurityConfig extends WebSecurityConfigurerAdapter {

    @Autowired
    private AuthenticationProvider authenticationProvider;

    @Override
    protected void configure(HttpSecurity http) throws Exception {
        http.authorizeRequests()
                //放行验证码生成接口
                .antMatchers("/vc.jpg").permitAll()
                .anyRequest().authenticated()
                .and()
                .formLogin()
                .loginPage("/login.html")
                .loginProcessingUrl("/doLogin")
                .successHandler(getAuthenticationSuccessHandler())
                .failureUrl("/login.html")
                .usernameParameter("uname")
                .passwordParameter("passwd")
                .permitAll()
                .and()
                .csrf().disable();
    }

    @Bean
    @Override
    public AuthenticationManager authenticationManagerBean() throws Exception {
        ProviderManager providerManager = new ProviderManager(authenticationProvider);
        return providerManager;
    }

    /**
     * 登录成功处理器
     *
     * @return
     */
    private AuthenticationSuccessHandler getAuthenticationSuccessHandler() {
        return new AuthenticationSuccessHandler() {
            @Override
            public void onAuthenticationSuccess(HttpServletRequest request, HttpServletResponse response, Authentication authentication) throws IOException, ServletException {
                response.setContentType("application/json;charset=utf-8");
                Map<String, String> respMap = new HashMap<>(2);
                respMap.put("code", "200");
                respMap.put("msg", "登录成功");
                ObjectMapper objectMapper = new ObjectMapper();
                String jsonStr = objectMapper.writeValueAsString(respMap);
                response.getWriter().write(jsonStr);
            }
        };
    }
}
另外需要注意,在configure(HttpSecurity)方法中给验证码接口配置放行:antMatchers("/vc.jpg").permitAll()。配置完成后,启动项目,浏览中输入:localhost:8080/login.html,就能看到如下图:
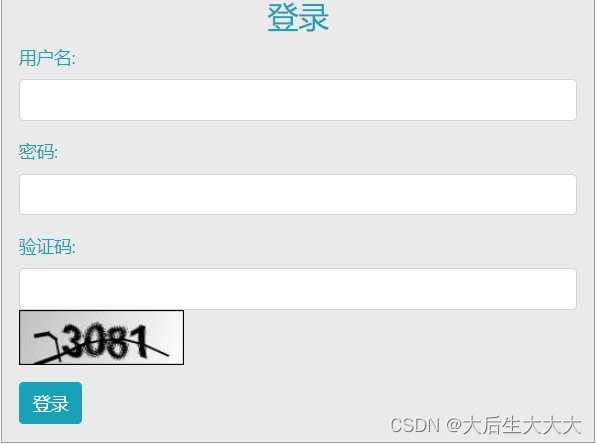
此时,输入正确的用户名、密码以及验证码就可以成功登录。