文章目录
- 1、CIELAB 色彩空间
- 2、作色问题定义
- 3、Caffe 模型
- 4、代码实现——Image
- 5、代码实现——Video
- 6、参考
1、CIELAB 色彩空间
Lab颜色空间,也称为Lab色彩空间或CIELAB色彩空间,是一种基于人类视觉感知特性的颜色模型。它是在1931年国际照明委员会(CIE)制定的颜色度量国际标准的基础上建立的,并在1976年经过修订和完善。Lab颜色空间以其独特的优点在多个领域得到广泛应用。
Lab颜色空间是一种颜色-对立空间,它包含三个维度:L、a和b。
-
L:表示亮度(Luminosity),取值范围为0到100,对应从纯黑到纯白的亮度变化。
-
a:表示颜色对立维度之一,通常与绿色到红色的范围相对应,取值范围为-128到+127,其中负值表示绿色方向,正值表示洋红方向。
-
b:表示另一个颜色对立维度,通常与蓝色到黄色的范围相对应,取值范围同样为-128到+127,其中负值表示蓝色方向,正值表示黄色方向。
2、作色问题定义
参考文章
Zhang R, Isola P, Efros A A. Colorful image colorization[C]//Computer Vision–ECCV 2016: 14th European Conference, Amsterdam, The Netherlands, October 11-14, 2016, Proceedings, Part III 14. Springer International Publishing, 2016: 649-666.


为了简化计算,Lab 颜色空间的 ab 空间被量化为 313 个 bin,如下图所示。而不是为每个像素找到 a 和 b 值,因为这种量化,我们只需要找到一个介于 0 和 312之间的 bin 编号。另一种思考问题的方式是我们已经有了取值从 0 到 255 的 L 通道,我们需要找到取值在 0 到 312 之间的 ab 通道。所以颜色预测任务现在是变成了多分类问题,其中每个灰色像素有 313 个类别可供选择。

3、Caffe 模型

colorization_release_v1

colorization_release_v2

colorization_release_v2_norebal

4、代码实现——Image
# This code is written by Sunita Nayak at BigVision LLC. It is based on the OpenCV project.
# It is subject to the license terms in the LICENSE file found in this distribution and at http://opencv.org/license.html

#### Usage example: python3 colorize.py --input greyscaleImage.png

import numpy as np
import cv2 as cv
import argparse
import os.path

parser = argparse.ArgumentParser(description='Colorize GreyScale Image')
parser.add_argument('--input', help='Path to image.', default="greyscaleImage.png")
args = parser.parse_args()

if args.input==None:
    print('Please give the input greyscale image name.')
    print('Usage example: python3 colorizeImage.py --input greyscaleImage.png')
    exit()

if os.path.isfile(args.input)==0:
    print('Input file does not exist')
    exit()

# Read the input image
frame = cv.imread(args.input)

# Specify the paths for the 2 model files
protoFile = "./models/colorization_deploy_v2.prototxt"
weightsFile = "./models/colorization_release_v2.caffemodel"
# weightsFile = "./models/colorization_release_v2_norebal.caffemodel"

# Load the cluster centers
pts_in_hull = np.load('./pts_in_hull.npy')

# Read the network into Memory
net = cv.dnn.readNetFromCaffe(protoFile, weightsFile)

# populate cluster centers as 1x1 convolution kernel
pts_in_hull = pts_in_hull.transpose().reshape(2, 313, 1, 1)
net.getLayer(net.getLayerId('class8_ab')).blobs = [pts_in_hull.astype(np.float32)]
net.getLayer(net.getLayerId('conv8_313_rh')).blobs = [np.full([1, 313], 2.606, np.float32)]

#from opencv sample
W_in = 224
H_in = 224

img_rgb = (frame[:,:,[2, 1, 0]] * 1.0 / 255).astype(np.float32)
img_lab = cv.cvtColor(img_rgb, cv.COLOR_RGB2Lab)
img_l = img_lab[:,:,0] # pull out L channel

# resize lightness channel to network input size
img_l_rs = cv.resize(img_l, (W_in, H_in)) #
img_l_rs -= 50 # subtract 50 for mean-centering

net.setInput(cv.dnn.blobFromImage(img_l_rs))
ab_dec = net.forward()[0,:,:,:].transpose((1,2,0)) # this is our result

(H_orig,W_orig) = img_rgb.shape[:2] # original image size
ab_dec_us = cv.resize(ab_dec, (W_orig, H_orig))
img_lab_out = np.concatenate((img_l[:,:,np.newaxis],ab_dec_us),axis=2) # concatenate with original image L
img_bgr_out = np.clip(cv.cvtColor(img_lab_out, cv.COLOR_Lab2BGR), 0, 1)

outputFile = args.input[:-4]+'_colorized.png'
cv.imwrite(outputFile, (img_bgr_out*255).astype(np.uint8))
print('Colorized image saved as '+outputFile)
print('Done !!!')
cluster center
// 来自 pts_in_hull.npy 的 313 个 ab 聚类中心(已经转置)
static float hull_pts[] = {
    -90., -90., -90., -90., -90., -80., -80., -80., -80., -80., -80., -80., -80., -70., -70., -70., -70., -70., -70., -70., -70.,
    -70., -70., -60., -60., -60., -60., -60., -60., -60., -60., -60., -60., -60., -60., -50., -50., -50., -50., -50., -50., -50., -50.,
    -50., -50., -50., -50., -50., -50., -40., -40., -40., -40., -40., -40., -40., -40., -40., -40., -40., -40., -40., -40., -40., -30.,
    -30., -30., -30., -30., -30., -30., -30., -30., -30., -30., -30., -30., -30., -30., -30., -20., -20., -20., -20., -20., -20., -20.,
    -20., -20., -20., -20., -20., -20., -20., -20., -20., -10., -10., -10., -10., -10., -10., -10., -10., -10., -10., -10., -10., -10.,
    -10., -10., -10., -10., 0., 0., 0., 0., 0., 0., 0., 0., 0., 0., 0., 0., 0., 0., 0., 0., 0., 0., 10., 10., 10., 10., 10., 10., 10.,
    10., 10., 10., 10., 10., 10., 10., 10., 10., 10., 10., 20., 20., 20., 20., 20., 20., 20., 20., 20., 20., 20., 20., 20., 20., 20.,
    20., 20., 20., 30., 30., 30., 30., 30., 30., 30., 30., 30., 30., 30., 30., 30., 30., 30., 30., 30., 30., 30., 40., 40., 40., 40.,
    40., 40., 40., 40., 40., 40., 40., 40., 40., 40., 40., 40., 40., 40., 40., 40., 50., 50., 50., 50., 50., 50., 50., 50., 50., 50.,
    50., 50., 50., 50., 50., 50., 50., 50., 50., 60., 60., 60., 60., 60., 60., 60., 60., 60., 60., 60., 60., 60., 60., 60., 60., 60.,
    60., 60., 60., 70., 70., 70., 70., 70., 70., 70., 70., 70., 70., 70., 70., 70., 70., 70., 70., 70., 70., 70., 70., 80., 80., 80.,
    80., 80., 80., 80., 80., 80., 80., 80., 80., 80., 80., 80., 80., 80., 80., 80., 90., 90., 90., 90., 90., 90., 90., 90., 90., 90.,
    90., 90., 90., 90., 90., 90., 90., 90., 90., 100., 100., 100., 100., 100., 100., 100., 100., 100., 100., 50., 60., 70., 80., 90.,
    20., 30., 40., 50., 60., 70., 80., 90., 0., 10., 20., 30., 40., 50., 60., 70., 80., 90., -20., -10., 0., 10., 20., 30., 40., 50.,
    60., 70., 80., 90., -30., -20., -10., 0., 10., 20., 30., 40., 50., 60., 70., 80., 90., 100., -40., -30., -20., -10., 0., 10., 20.,
    30., 40., 50., 60., 70., 80., 90., 100., -50., -40., -30., -20., -10., 0., 10., 20., 30., 40., 50., 60., 70., 80., 90., 100., -50.,
    -40., -30., -20., -10., 0., 10., 20., 30., 40., 50., 60., 70., 80., 90., 100., -60., -50., -40., -30., -20., -10., 0., 10., 20.,
    30., 40., 50., 60., 70., 80., 90., 100., -70., -60., -50., -40., -30., -20., -10., 0., 10., 20., 30., 40., 50., 60., 70., 80., 90.,
    100., -80., -70., -60., -50., -40., -30., -20., -10., 0., 10., 20., 30., 40., 50., 60., 70., 80., 90., -80., -70., -60., -50.,
    -40., -30., -20., -10., 0., 10., 20., 30., 40., 50., 60., 70., 80., 90., -90., -80., -70., -60., -50., -40., -30., -20., -10.,
    0., 10., 20., 30., 40., 50., 60., 70., 80., 90., -100., -90., -80., -70., -60., -50., -40., -30., -20., -10., 0., 10., 20., 30.,
    40., 50., 60., 70., 80., 90., -100., -90., -80., -70., -60., -50., -40., -30., -20., -10., 0., 10., 20., 30., 40., 50., 60., 70.,
    80., -110., -100., -90., -80., -70., -60., -50., -40., -30., -20., -10., 0., 10., 20., 30., 40., 50., 60., 70., 80., -110., -100.,
    -90., -80., -70., -60., -50., -40., -30., -20., -10., 0., 10., 20., 30., 40., 50., 60., 70., 80., -110., -100., -90., -80., -70.,
    -60., -50., -40., -30., -20., -10., 0., 10., 20., 30., 40., 50., 60., 70., -110., -100., -90., -80., -70., -60., -50., -40., -30.,
    -20., -10., 0., 10., 20., 30., 40., 50., 60., 70., -90., -80., -70., -60., -50., -40., -30., -20., -10., 0.
};
Class rebalancing
输入图片
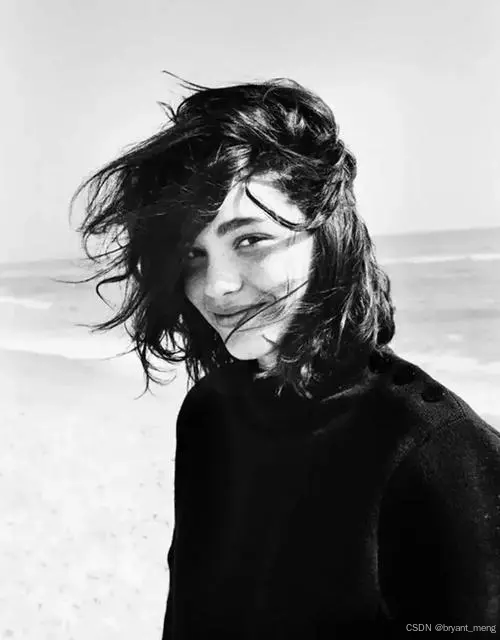
v2 without re-balance

v2 with re-balance

输入图片
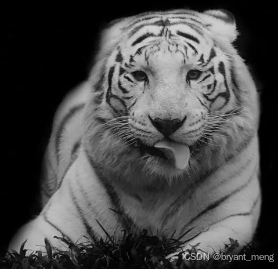
v2 without re-balance

v2 with re-balance

输入图片
v2 without re-balance

v2 with re-balance

输入图片
v2 without re-balance

v2 with re-balance

输入图片

v2 without re-balance

v2 with re-balance

输入图片

v2 without re-balance

v2 with re-balance

输入图片

v2 without re-balance

v2 with re-balance

可以观察到引入 color rebalance 后,整体画面变得更黄
5、代码实现——Video
# This code is written by Sunita Nayak at BigVision LLC. It is based on the OpenCV project.
# It is subject to the license terms in the LICENSE file found in this distribution and at http://opencv.org/license.html

#### Usage example: python3 colorizeVideo.py --input greyscaleVideo.mp4

import numpy as np
import cv2 as cv
import argparse
import os.path

parser = argparse.ArgumentParser(description='Colorize GreyScale Video')
parser.add_argument('--input', help='Path to video file.')
args = parser.parse_args()

if args.input==None:
    print('Please give the input greyscale video file.')
    print('Usage example: python3 colorizeVideo.py --input greyscaleVideo.mp4')
    exit()

if os.path.isfile(args.input)==0:
    print('Input file does not exist')
    exit()

# Read the input video
cap = cv.VideoCapture(args.input)
hasFrame, frame = cap.read()

outputFile = args.input[:-4]+'_colorized.avi'
vid_writer = cv.VideoWriter(outputFile, cv.VideoWriter_fourcc('M','J','P','G'), 60, (frame.shape[1],frame.shape[0]))

# Specify the paths for the 2 model files
protoFile = "./models/colorization_deploy_v2.prototxt"
# weightsFile = "./models/colorization_release_v2.caffemodel"
weightsFile = "./models/colorization_release_v2_norebal.caffemodel"

# Load the cluster centers
pts_in_hull = np.load('./pts_in_hull.npy')

# Read the network into Memory
net = cv.dnn.readNetFromCaffe(protoFile, weightsFile)

# populate cluster centers as 1x1 convolution kernel
pts_in_hull = pts_in_hull.transpose().reshape(2, 313, 1, 1)
net.getLayer(net.getLayerId('class8_ab')).blobs = [pts_in_hull.astype(np.float32)]
net.getLayer(net.getLayerId('conv8_313_rh')).blobs = [np.full([1, 313], 2.606, np.float32)]

#from opencv sample
W_in = 224
H_in = 224

while cv.waitKey(1):

    hasFrame, frame = cap.read()
    frameCopy = np.copy(frame)
    if not hasFrame:
        break

    img_rgb = (frame[:,:,[2, 1, 0]] * 1.0 / 255).astype(np.float32)
    img_lab = cv.cvtColor(img_rgb, cv.COLOR_RGB2Lab)
    img_l = img_lab[:,:,0] # pull out L channel

    # resize lightness channel to network input size
    img_l_rs = cv.resize(img_l, (W_in, H_in))
    img_l_rs -= 50 # subtract 50 for mean-centering

    net.setInput(cv.dnn.blobFromImage(img_l_rs))
    ab_dec = net.forward()[0,:,:,:].transpose((1,2,0)) # this is our result

    (H_orig,W_orig) = img_rgb.shape[:2] # original image size
    ab_dec_us = cv.resize(ab_dec, (W_orig, H_orig))
    img_lab_out = np.concatenate((img_l[:,:,np.newaxis],ab_dec_us),axis=2) # concatenate with original L channel
    img_bgr_out = np.clip(cv.cvtColor(img_lab_out, cv.COLOR_Lab2BGR), 0, 1)

    vid_writer.write((img_bgr_out*255).astype(np.uint8))

vid_writer.release()

print('Colorized video saved as '+outputFile)
print('Done !!!')
输入视频
greyscaleVideo
结果
colorization_release_v2_noreba
Result-colorization_release_v2
可以观察到引入 color rebalance 后,整体画面变得更黄
6、参考
-
OpenCV进阶(9)基于OpenCV的图像着色
-
图像着色领域可有什么经典论文?