今天看到关于时间序列预测知识点,竟然要收费!本着开源第一的思想,自己也找到相关的代码尝试一下写几个通用的模版。
模型想要
输入:Input = (input_size, hidden_size),其中:input_size = time_stemp,因为是单个变量因此hidden_size = 1;
输出: output_size; 输出的步长;
1 数据预处理
一般数据都是按照时间步长展开,然后每一步可能有很多的特征。
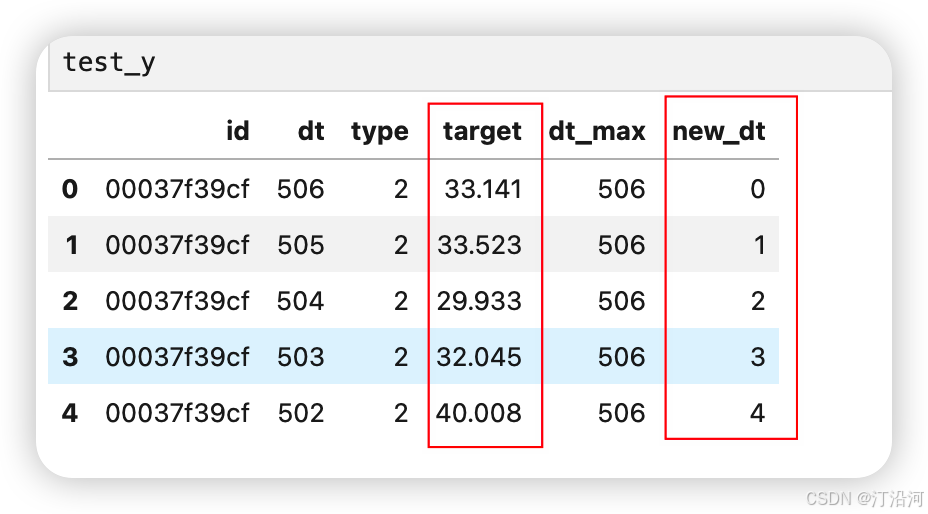
比如下面的(来自科大讯飞的比赛数据,想要的可私聊):target:就是目标,new_dt 就是时间。
输出处理模块:通过这个模块就会得到一个 X =【batch_size,time_stemp, 1】y=[batch_size,output_size],batch_size 就是样本的个数;
def create_dataset(X, n_steps_in, n_steps_out):
    # n_steps_in 输入步长
    # n_steps_out输出步长
    print(f"Input data shape before processing: {X.shape}")

    Xs, ys = [], []
    for i in range(len(X) - n_steps_in - n_steps_out + 1):
        Xs.append(X[i:(i + n_steps_in)])
        ys.append(X[(i + n_steps_in):(i + n_steps_in + n_steps_out)])

    Xs = np.array(Xs)
    ys = np.array(ys)

    print(f"Xs shape after processing: {Xs.shape}")
    print(f"ys shape after processing: {ys.shape}")

    return Xs, ys
2 LSTM模型
import numpy as np
import pandas as pd

from sklearn.model_selection import train_test_split

from tqdm import tqdm
from sklearn.preprocessing import LabelEncoder
#import h3
import seaborn as sns
import warnings
warnings.filterwarnings('ignore')
from tqdm import tqdm

from tensorflow.keras.preprocessing.sequence import TimeseriesGenerator
from tensorflow.keras.models import Sequential, Model
from tensorflow.keras.layers import Flatten, Reshape, LSTM, Dropout, Dense, Bidirectional, BatchNormalization, Input, LayerNormalization, GRU, Conv1D, Concatenate, MaxPooling1D, MultiHeadAttention, GlobalAveragePooling1D, Activation, SpatialDropout1D, Lambda
from tensorflow.keras.losses import MeanSquaredError, Huber
from tensorflow.keras.optimizers import Adam
from tensorflow.keras.callbacks import EarlyStopping, ModelCheckpoint, ReduceLROnPlateau
import warnings
import tensorflow as tf
from tensorflow.keras.regularizers import l2


train_df = pd.read_csv('../data/dataset/train.csv')
#train_df = train_df[train_df.dt<100].reset_index(drop=True)
test_df = pd.read_csv('../data/dataset/test.csv')
#train_df['target_div_dt'] = train_df['target'] / train_df['dt']

df_all = pd.concat([train_df,test_df])
df_all['dt_max'] = df_all.groupby('id')['dt'].transform('max')
df_all = df_all.sort_values(['id','dt']).reset_index(drop=True)
df_all['new_dt'] = df_all['dt_max']-df_all['dt']
df_all = df_all.sort_values(['id','new_dt']).reset_index(drop=True)
df_all.tail()
train_df = df_all[~df_all['target'].isna()].reset_index(drop=True)
test_df = df_all[df_all['target'].isna()].reset_index(drop=True)

# 构建训练数据
def create_dataset(X, n_steps_in, n_steps_out):
    print(f"Input data shape before processing: {X.shape}")

    Xs, ys = [], []
    for i in range(len(X) - n_steps_in - n_steps_out + 1):
        Xs.append(X[i:(i + n_steps_in)])
        ys.append(X[(i + n_steps_in):(i + n_steps_in + n_steps_out)])

    Xs = np.array(Xs)
    ys = np.array(ys)

    print(f"Xs shape after processing: {Xs.shape}")
    print(f"ys shape after processing: {ys.shape}")

    return Xs, ys


def create_model(input_shape, output_length,lr=1e-3, warehouse="None"):

    model = Sequential()
    model.add(Input(shape=input_shape))

    model.add(Conv1D(filters=32, kernel_size=3, activation='relu', padding='same', kernel_regularizer=l2()))
    model.add(BatchNormalization())
    model.add(Dropout(0.4))
    model.add(LSTM(units=64, activation='relu', return_sequences=False))
    model.add(Dense(output_length))
    model.compile(loss=MeanSquaredError(), optimizer=tf.keras.optimizers.RMSprop(learning_rate=lr, rho=0.9))

    return model

# 迭代损失
def plot_loss(history, warehouse):
    plt.figure(figsize=(8, 6))

    # training and validation loss
    plt.plot(history.history['loss'], label='Training Loss', color='blue', linewidth=2)
    plt.plot(history.history['val_loss'], label='Validation Loss', color='orange', linewidth=2)

    # minimum validation loss
    min_val_loss = min(history.history['val_loss'])
    min_val_loss_epoch = history.history['val_loss'].index(min_val_loss)
    plt.axvline(min_val_loss_epoch, linestyle='--', color='gray', linewidth=1)
    plt.text(min_val_loss_epoch, min_val_loss, f'Min Val Loss: {min_val_loss:.4f}',
             verticalalignment='bottom', horizontalalignment='right', color='gray', fontsize=10)

    plt.title(f'Training and Validation Loss for Warehouse: {warehouse}', fontsize=16)
    plt.xlabel('Epoch', fontsize=14)
    plt.ylabel('Loss', fontsize=14)
    plt.legend(fontsize=12)
    plt.grid(True)

    plt.xticks(fontsize=12)
    plt.yticks(fontsize=12)
    plt.tight_layout()

    #plt.savefig(f'training_validation_loss_{warehouse}.png', dpi=300)

    plt.show()


n_features = 1  # 因为这是一个一维序列
n_steps_in = 70  # 输入序列的长度
n_steps_out = 10  # 预测序列的长度
# 数据预处理
# 数据预处理

# 随机种子
tf.random.set_seed(42)
import numpy as np
np.random.seed(42)
import random
import os
error_df = {}
def set_random_seed(seed_value):
    # Set `PYTHONHASHSEED` environment variable at a fixed value
    os.environ['PYTHONHASHSEED']=str(seed_value)
    # Set `python` built-in pseudo-random generator at a fixed value
    random.seed(seed_value)
    # Set `numpy` pseudo-random generator at a fixed value
    np.random.seed(seed_value)
    # Set `tensorflow` pseudo-random generator at a fixed value
    tf.random.set_seed(seed_value)
set_random_seed(42)
import keras

class PrintCallback(keras.callbacks.Callback):
    def __init__(self, print_every=1):
        super(PrintCallback, self).__init__()
        self.print_every = print_every

    def on_epoch_end(self, epoch, logs=None):
        if (epoch + 1) % self.print_every == 0:
            print(f"Epoch {epoch + 1}: loss={logs['loss']:.4f}, val_loss={logs['val_loss']:.4f}")

# 使用示例
print_every_n_epochs = 5  # 每 5 个 epoch 打印一次
error_id = []
for id in tqdm(train_df.id.unique().tolist()):
    try:
        temp_df = train_df[train_df.id==id].reset_index(drop=True)
        X = temp_df.target.values
        x_test = X[-n_steps_in:]
        train_X,train_y =  create_dataset(X,n_steps_in,n_steps_out)
        X_train, X_val, y_train, y_val = train_test_split(train_X, train_y, test_size=0.2, shuffle=True)
        model = create_model(input_shape=(n_steps_in, 1),output_length=n_steps_out,lr=1e-3)

        callbacks = [
        PrintCallback(print_every=print_every_n_epochs),
        EarlyStopping(monitor='val_loss', patience=25, restore_best_weights=True),]


        history = model.fit(
                X_train, y_train,
                epochs=150,
                batch_size=64,
                #validation_split=0.2,
                validation_data=(X_val, y_val),
                callbacks=callbacks,
                verbose=0
            )
        test_y = model.predict(x_test.reshape((-1,n_steps_in)))
        test_df.loc[test_df.id==id,'target'] = test_y[0]
        error = mean_squared_error(best_sub[best_sub['id']==id]['target'],test_y[0])
        error_df[id] = round(error,4)
        print(f'linear model {id} VS best sb ERROR = {error}')

    except Exception as e:
        error_id.append(id)
        print(f'error id = {id}',e)
    break
    pass
训练很抖:多加点归一化吧;
import matplotlib.pyplot as plt
plot_loss(history,warehouse=id)

3 GRU
GRU 模块要比LSTM稳定的多;
def create_model(input_shape, output_length,lr=1e-3, warehouse="None"):

    model = Sequential()
    model.add(Input(shape=input_shape))

    model.add(Conv1D(filters=32, kernel_size=3, activation='relu', padding='same', kernel_regularizer=l2()))
    model.add(BatchNormalization())
    model.add(Dropout(0.4))
    model.add(GRU(units=64, activation='relu', return_sequences=False))
    model.add(Dense(output_length))
    #model.compile(loss=MeanSquaredError(), optimizer=tf.keras.optimizers.RMSprop(learning_rate=lr, rho=0.9))
    model.compile(loss=MeanSquaredError(), optimizer=tf.keras.optimizers.RMSprop(lr=lr))


    return model

4 TCN
模型:收敛的也很快!运行起来很流畅!
def create_model(input_shape, output_length,lr=1e-3, warehouse="None"):

    model = Sequential()
    model.add(Input(shape=input_shape))

    model.add(Conv1D(filters=32, kernel_size=3, activation='relu', padding='causal',dilation_rate=1, kernel_regularizer=l2()))
    model.add(BatchNormalization())
    model.add(Dropout(0.4))

    model.add(Conv1D(filters=64, kernel_size=3, activation='relu', padding='causal',dilation_rate=1, kernel_regularizer=l2()))
    model.add(BatchNormalization())
    model.add(Dropout(0.4))

    model.add(Conv1D(filters=32, kernel_size=2, activation='relu', padding='causal',dilation_rate=1, kernel_regularizer=l2()))
    model.add(BatchNormalization())
    model.add(Dropout(0.2))
    model.add(Flatten())
    model.add(Dense(output_length))
    #model.compile(loss=MeanSquaredError(), optimizer=tf.keras.optimizers.RMSprop(learning_rate=lr, rho=0.9))
    model.compile(loss=MeanSquaredError(), optimizer=tf.keras.optimizers.RMSprop(lr=lr))


    return model