为了学习在vue3中如何使用axios,我借Sider Fusion的帮助搭建了基于node的简易测试环境。
Axios 是一个基于 Promise 的 HTTP 客户端,通常用于浏览器环境,但它也可以在 Node.js 环境中使用。因此,可以在 Ubuntu 的 Bash 环境下通过 Node.js 使用 Axios。
步骤:
-
安装 Node.js 和 npm:
如果您尚未安装 Node.js,请通过以下命令安装(通常会包括 npm):sudo apt update sudo apt install nodejs npm您可以检查安装是否成功:
node -v npm -v创建项目:创建一个新的目录并进入:
-
mkdir my-axios-app
cd my-axios-app
初始化 npm:
-
初始化一个新的 npm 项目:
npm init -y安装 Axios:
-
使用 npm 安装 Axios:
npm install axios编写 Axios 脚本:
-
创建一个新的 JavaScript 文件,如
app.js:nano app.js打开
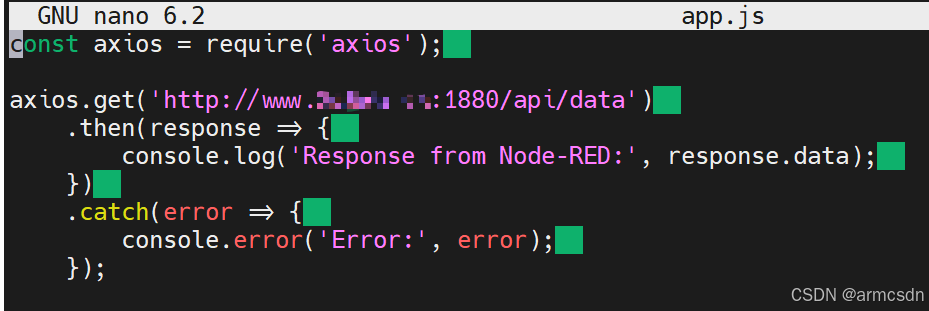
app.js,然后添加以下代码:const axios = require('axios'); axios.get('http://www.xxxxx.cn:1880/api/data') .then(response => { console.log('Response from Node-RED:', response.data); }) .catch(error => { console.error('Error:', error); });运行脚本:
-
使用 Node.js 运行脚本:
node app.jsNodeRed节点


-
[
    {
        "id": "6f67ed6250fc6293",
        "type": "tab",
        "label": "流程 4",
        "disabled": false,
        "info": "",
        "env": []
    },
    {
        "id": "cbeb42c4ff466487",
        "type": "debug",
        "z": "6f67ed6250fc6293",
        "name": "debug 20",
        "active": true,
        "tosidebar": true,
        "console": false,
        "tostatus": false,
        "complete": "false",
        "statusVal": "",
        "statusType": "auto",
        "x": 600,
        "y": 200,
        "wires": []
    },
    {
        "id": "71b003bcbda86c27",
        "type": "function",
        "z": "6f67ed6250fc6293",
        "name": "function 10",
        "func": "msg.payload = { message: \"Hello from Node-RED!你好\" };\nreturn msg;",
        "outputs": 1,
        "timeout": 0,
        "noerr": 0,
        "initialize": "",
        "finalize": "",
        "libs": [],
        "x": 430,
        "y": 200,
        "wires": [
            [
                "cbeb42c4ff466487",
                "a7ce06a8882a6108"
            ]
        ]
    },
    {
        "id": "06cfce3558445895",
        "type": "http in",
        "z": "6f67ed6250fc6293",
        "name": "",
        "url": "/api/data",
        "method": "get",
        "upload": false,
        "swaggerDoc": "",
        "x": 250,
        "y": 200,
        "wires": [
            [
                "71b003bcbda86c27"
            ]
        ]
    },
    {
        "id": "a7ce06a8882a6108",
        "type": "http response",
        "z": "6f67ed6250fc6293",
        "name": "",
        "statusCode": "",
        "headers": {},
        "x": 610,
        "y": 260,
        "wires": []
    }
]
实际代码测试及结果,url请换成自己的域名

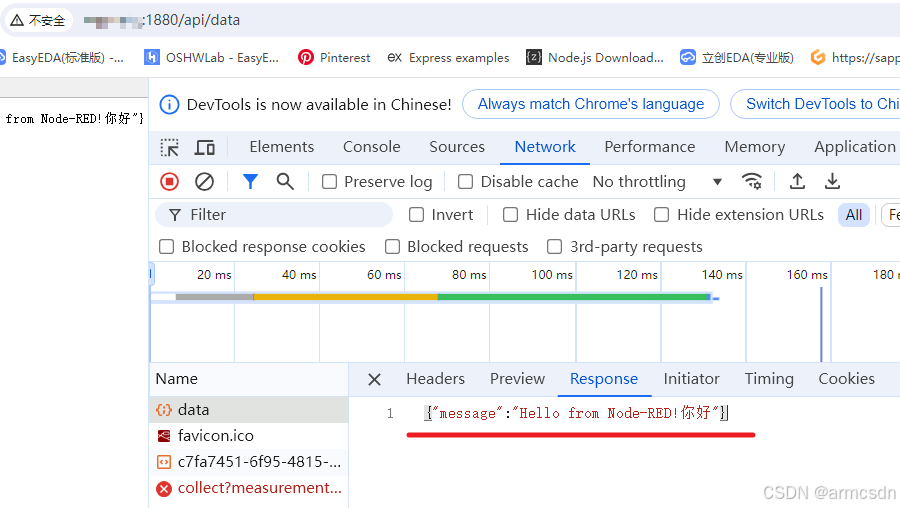
nodered返回的结果
使用POSTMAN测试及结果

Google Chrome测试及结果


