JazzEE(2)
- 8、异常
- 引入try-catch
- catch中如何处理异常
- try-catch-finally
- 多重catch
- 异常的分类
- throw和throws区别
- 小案例
- 重载和重写的异常处理
- 自定义异常
- 9、常用类
- 包装类
- 引入
- Integer
- String类
- String字符串内存
- StringBuilder类
- 可变和不可变
- 常见方法
- StringBuffer和StringBuilder区别
- 时间处理的类
- Date
- 日期转换
- Calendar
- Math
- 枚举类
- 10、集合
- 数据结构
- 集合引入
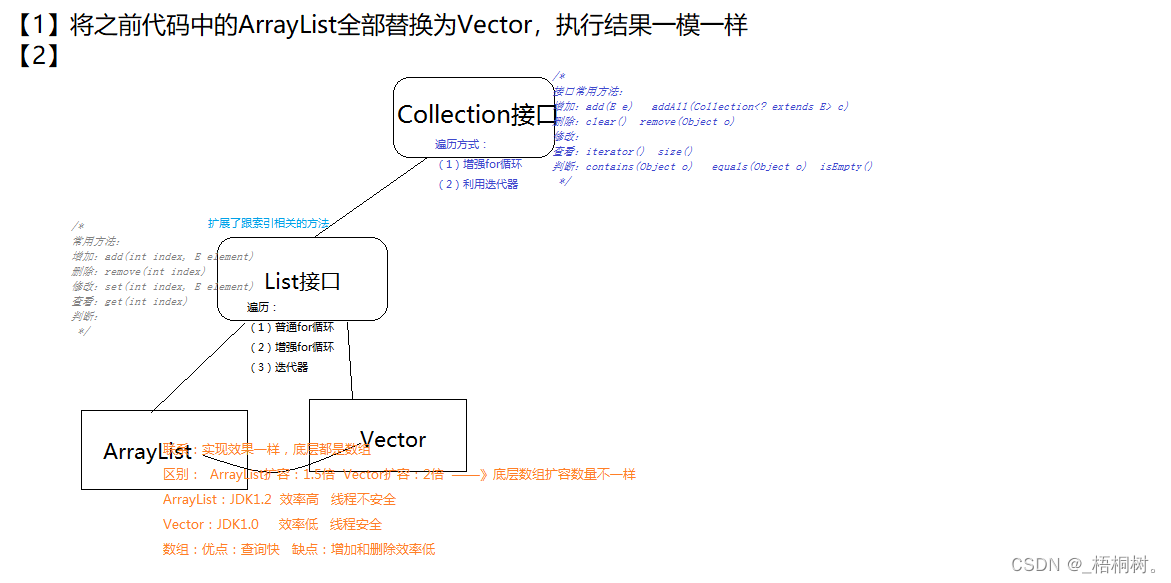
- Collection接口
- 第一个子接口List
- 实现类:ArrayList
- 源码
- 自己模拟一个ArrayList
- 将自定义的引用数据类型存入ArrayList集合
- 实现类:Vector
- 泛型
- 基本应用
- 扩展:
- 泛型类:
- 泛型方法:
- 泛型接口:
- 泛型受限:
- 实现类:LinkedList
- 基本代码
- 扩展
- 模拟LinkedList
- 面试:iterator(),Iterator,Iterable关系
- ListIterator
- 第二个子接口Set
- HashSet
- 深入理解HashSet
- 复习
- TreeSet
- 完整结构图
- Map接口
- HashMap
- TreeMap
- Map结构图
- 源码
- HashMap,HashSet
- TreeMap,TreeSet
- 验证红黑树
- Collections工具类
- 11、IO流
- File类
- IO的引入
- 最终:文件的复制
- 分解:文件----》程序
- FileInputStream
- 分解:程序----》文件
- FileOutputStream
- 将上面两步骤合为一起:完成复制
- 编码总结
- 节点流,处理流:BufferedInputStream,BufferedOutputStream
- 字符流:FileReader,FileWriter:文件的复制
- System类对IO流的支持
- 转换流
- 数据流:专门操纵基本数据类型的
- 对象流:专门操纵引用数据类型的
- 文件夹的复制
- 12、多线程
- 程序,进程,线程
- 线程创建的三种方式
- 第一种:继承Thread类
- 设置线程名字
- 龟兔赛跑
- 买火车票
- 第二种:实现Runnable接口
- 扩展:静态代理模式
- 龟兔赛跑
- 买火车票
- 第三种:实现Callable接口
- 总结
- 线程的生命周期
- 控制线程常用方法
- 优先级
- join
- sleep
- yield()
- setDaemon
- stop
- 线程安全、通信,线程池
- 线程安全问题
- 习题
- 线程同步的缺点
- Lock锁
- 线程组
- 线程之间的通信问题
- 分解1:
- 分解2:
- 分解3:
- 线程池
- 队列
- 线程池
- 内置线程池
8、异常
引入try-catch
【1】完成求商功能:
public class Test {
    public static void main(String[] args) {
        //功能:键盘录入两个数,求商。
        //拿来一个扫描器:
        Scanner sc=new Scanner(System.in);
        System.out.print("请从键盘录入第一个数:");
        int num1=sc.nextInt();
        System.out.print("请从键盘录入第二个数:");
        int num2=sc.nextInt();
        //求商:
        System.out.println("商为:"+num1/num2);
    }
}
【2】测试:

在测试过程中,发现程序很可能出现问题。
在正常的程序中出现不正常的现象—》异常。
【3】将程序的漏洞都堵上:处理异常:if_else形式
public class Test {
    public static void main(String[] args) {
        //功能:键盘录入两个数,求商。
        //拿来一个扫描器:
        Scanner sc=new Scanner(System.in);
        System.out.print("请从键盘录入第一个数:");
        if(sc.hasNextInt()){//判断第一个数是否是int类型数据
            int num1=sc.nextInt();
            System.out.print("请从键盘录入第二个数:");
            if(sc.hasNextInt()){//判断第二个数是否是int类型数据
                int num2=sc.nextInt();
                if(num2==0){//如果第二个数为0,那么进行提示:
                    System.out.println("除数不能为0!");
                }else{
                    //求商:
                    System.out.println("商为:"+num1/num2);
                }
            }else{
                System.out.println("请录入一个整数!");
            }
        }else{
            System.out.println("请录入一个整数!");
        }
    }
}
上面用if-else堵漏洞,有什么缺点吗?
(1)代码臃肿。
(2)即使我加了很多if-else进去,很可能出现一种情况就是有的漏洞没堵上。
【4】基于上面的缺点,java给我们提供了一种处理异常的机制:
"异常三连"try-catch-finally
【5】try-catch:
在上面的异常中,控制台上的异常怎么看:
(1)看第一行:异常的类型。
(2)看最后一行:异常出现的位置
上面的代码出现了几种异常:
(1)Exception in thread “main” java.lang.ArithmeticException: / by zero
(2)Exception in thread “main” java.util.InputMismatchException
捕获:处理:try-catch:
public class Test2 {
    public static void main(String[] args) {
        System.out.println("------开始使用计算器:-------");
        try{
            //功能:键盘录入两个数,求商。
            //拿来一个扫描器:
            Scanner sc=new Scanner(System.in);
            System.out.print("请从键盘录入第一个数:");
            int num1=sc.nextInt();
            System.out.print("请从键盘录入第二个数:");
            int num2=sc.nextInt();
            //求商:
            System.out.println("商为:"+num1/num2);
        }catch(Exception ex){
            System.out.println("你的程序有错啊!");
        }
        System.out.println("---谢谢你使用计算器---");
    }
}
可能出现情况:
(1)我的代码没有异常:那么只走try中代码,然后不走catch,程序继续往下走。
(2)我的代码有异常:
a.假如你的异常对象 catch后面()中的类型可以匹配,异常进行捕获,执行catch后面{}中的代码
b.假如你的异常对象 catch后面()中的类型不匹配,异常不可以进行捕获,直接抛出异常,程序中断,之后的代码也不会再执行了
catch中如何处理异常
public class Test2 {
    public static void main(String[] args) {
        System.out.println("------开始使用计算器:-------");
        try{
            Scanner sc=new Scanner(System.in);
            System.out.print("请从键盘录入第一个数:");
            int num1=sc.nextInt();
            System.out.print("请从键盘录入第二个数:");
            int num2=sc.nextInt();
            //求商:
            System.out.println("商为:"+num1/num2);
        }catch(Exception ex){
            //第一种:什么都不写。
            //第二种:自定义异常信息:
            //System.out.println("你的代码有问题!");
            //第三种:打印
            //System.out.println(ex);//java.util.InputMismatchException 证明Exception中重写了toString方法。
            //System.out.println(ex.toString());
            //System.out.println(ex.getMessage());打印:后面的异常信息
            //ex.printStackTrace();//异常的堆栈信息全部进行打印
            //第四种:
            //throw ex;将信息抛给调用者,在当前这个题里,调用者为虚拟机,那么就将处理异常的方式抛给
            //虚拟机了,虚拟机做了:(1)将异常堆栈信息进行打印 (2)中断程序
        }
        System.out.println("---谢谢你使用计算器---");
    }
}
try-catch-finally
/*
1.System.out.println("---谢谢你使用计算器---");在什么情况下不执行:
(1)throw ex;
(2)catch没有进行正常的异常捕获
(3)遇到return
2.怎么才能让System.out.println("---谢谢你使用计算器---");无论如何都执行:
finally
3.一般什么代码放入finally中:
关闭数据库资源,关闭IO流资源,关闭socket资源。
4.只有一种情况会让finally中的代码不执行:
System.exit(1);// 终止当前正在运行的 Java 虚拟机。
5.return和finally是否冲突?不冲突:
执行顺序先finally再走return
 */
public class Test3 {
    public static void main(String[] args) {
        System.out.println("------开始使用计算器:-------");
        try{
            Scanner sc=new Scanner(System.in);
            System.out.print("请从键盘录入第一个数:");
            int num1=sc.nextInt();
            System.out.print("请从键盘录入第二个数:");
            int num2=sc.nextInt();
            //求商:
            System.out.println("商为:"+num1/num2);
            //加上return
            return;
            //System.exit(0);// 终止当前正在运行的 Java 虚拟机。
        }catch(ArithmeticException ex){
            System.out.println("你的代码有问题!");
        }finally {
            System.out.println("---谢谢你使用计算器---");
        }
    }
}
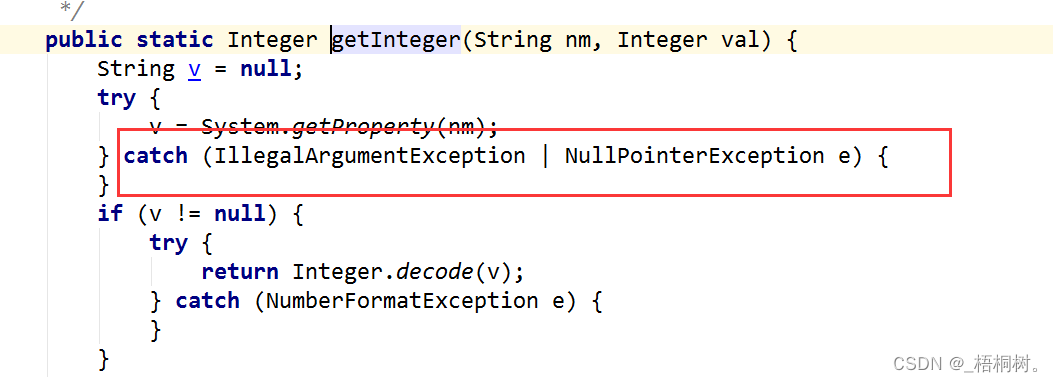
多重catch
/*
多重catch:多个catch依次匹配执行,Exception接收放在最后,一般都是先子类,再父类。
 */
public class Test3 {
    public static void main(String[] args) {
        System.out.println("------开始使用计算器:-------");
        try{
            Scanner sc=new Scanner(System.in);
            System.out.print("请从键盘录入第一个数:");
            int num1=sc.nextInt();
            System.out.print("请从键盘录入第二个数:");
            int num2=sc.nextInt();
            //求商:
            System.out.println("商为:"+num1/num2);
        }catch(ArithmeticException ex){
            System.out.println("除数不能为0!");
        }catch(InputMismatchException ex){
            System.out.println("输入的类型不是整数类型!");
        }catch(Exception ex){
            System.out.println("代码出现问题!");
        }finally {
            System.out.println("---谢谢你使用计算器---");
        }
    }
}
在源码中看到,还有这种写法:
异常的分类
【1】层次:
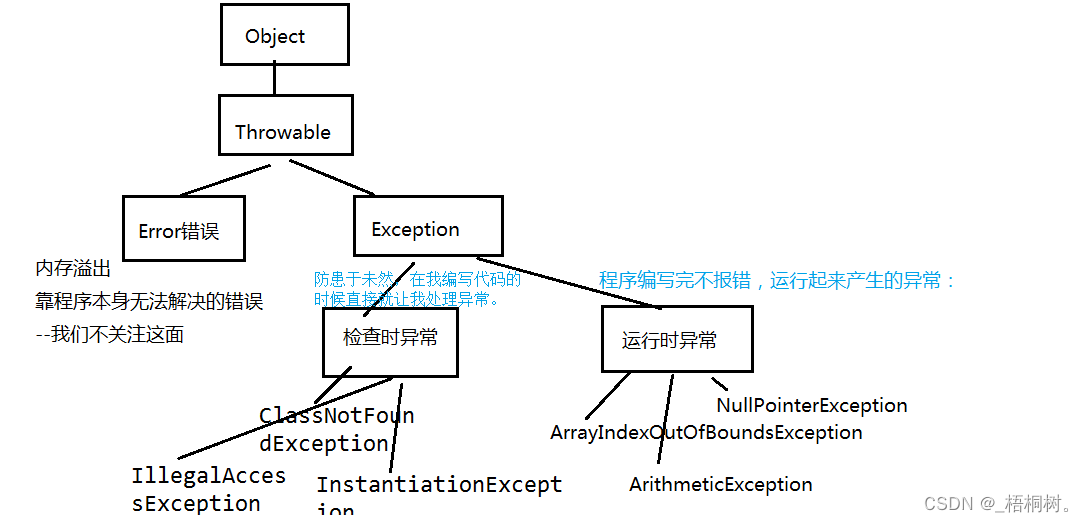
【2】代码:
package com.bjsxt.test02;
public class Test {
    public static void main(String[] args) throws ClassNotFoundException, IllegalAccessException, InstantiationException {
       //运行时异常:
        //int[] arr={1,2,3};
        //System.out.println(arr[3]);//运行时异常:ArrayIndexOutOfBoundsException
        //int num=10/0;
        //String s=null;
        //String newStr=s.toUpperCase();
        //System.out.println(newStr);
        //检查时异常:防患于未然,在我编写代码的时候直接就让我处理异常。
        //第一种处理方式:利用try-catch进行捕获。
        /*try {
            Class.forName("com.bjsxt.test01.Test").newInstance();
        } catch (ClassNotFoundException e) {
            e.printStackTrace();
        } catch (IllegalAccessException e) {
            e.printStackTrace();
        } catch (InstantiationException e) {
            e.printStackTrace();
        }*/
        //第二种处理方式:在方法的声明处将异常类型添加上,意味着别人在调用这个方法的时候:
        //告诉别人这个方法中可能会出现哪种错误。
        Class.forName("com.bjsxt.test01.Test").newInstance();
        //快捷键:alt+enter
    }
}
throw和throws区别
package com.bjsxt.test02;
import java.util.Scanner;
/*
throw跟throws区别:
(1)位置不同:
throw:方法内部
throws:方法的声明之后
(2)内容不同:
throw+异常对象
throws+异常的类型
(3)作用不同
throw:异常出现的源头
throws:在方法的声明处,告诉方法的调用者 这个方法中可能出现某种异常,那么谁调用谁处理。
 */
public class Test2 {
    //功能:两个数相除,当除数为0的时候 让程序出现异常。
    public static void main(String[] args)  {
        try {
            a();
        } catch (Exception e) {
            e.printStackTrace();
        }
    }
    public static void a() throws Exception {
            devide();
    }
    public static void devide() throws Exception {
        Scanner sc=new Scanner(System.in);
        System.out.print("请从键盘录入第一个数:");
        int num1=sc.nextInt();
        System.out.print("请从键盘录入第二个数:");
        int num2=sc.nextInt();
        if(num2==0){//除数为0
            //制造异常:
            //制造运行时异常:
            //throw new RuntimeException("除数不能为0");
            //制造检查时异常:
            throw new Exception("除数不能为0");
        }else{//不等于0 就输出商:
            System.out.println("商为:"+num1/num2);
        }
    }
}
小案例
package com.bjsxt.test03;
public class Student {
    private String name;
    private int age;
    private String sex;
    public String getName() {
        return name;
    }
    public void setName(String name) {
        this.name = name;
    }
    public int getAge() {
        return age;
    }
    public void setAge(int age) {
        this.age = age;
    }
    public String getSex() {
        return sex;
    }
    public void setSex(String sex) throws Exception {
        if("男".equals(sex)||"女".equals(sex)){
            this.sex = sex;
        }else{
            //不正常,制造异常:
            //throw new RuntimeException("你的性别录入错误!");
            throw new Exception("你的性别录入错误!");
        }
    }
    public Student(String name, int age, String sex) {
        this.name = name;
        this.age = age;
        //this.sex = sex;
        try {
            this.setSex(sex);
        } catch (Exception e) {
            e.printStackTrace();
        }
    }
    public Student() {
    }
    @Override
    public String toString() {
        return "Student{" +
                "name='" + name + '\'' +
                ", age=" + age +
                ", sex='" + sex + '\'' +
                '}';
    }
    public static void main(String[] args) {
        Student s=new Student();
        s.setAge(19);
        s.setName("lili");
        try {
            s.setSex("lkjhlkjhlkj");
        } catch (Exception e) {
            e.printStackTrace();
        }
        System.out.println(s);
        Student s2=new Student("feifei",20,"asdfasdf");
        System.out.println(s2);
    }
}
重载和重写的异常处理
【1】重载跟异常无关:
package com.bjsxt.test04;
//重载:跟异常无关
public class Test {
    public void a(int age) throws Exception{
    }
    public void a(String name) throws Exception{
    }
}
【2】重写跟异常:
package com.bjsxt.test04;
//重写:子类异常类型<=父类异常类型
public class Person {
    public void eat() throws Exception{
        System.out.println("----1");
    }
}
class Student extends  Person{
    public void eat() throws RuntimeException{
        System.out.println("------2");
    }
}
自定义异常
【1】自定义异常继承自Exception:
public class MyException extends Exception {
    public MyException() {
    }
    public MyException(String message) {
        super(message);
    }
}
public class Student {
    private String name;
    private int age;
    private String sex;
    public String getName() {
        return name;
    }
    public void setName(String name) {
        this.name = name;
    }
    public int getAge() {
        return age;
    }
    public void setAge(int age) {
        this.age = age;
    }
    public String getSex() {
        return sex;
    }
    public void setSex(String sex) throws MyException {
        if("男".equals(sex)||"女".equals(sex)){
            this.sex = sex;
        }else{
            throw new MyException("性别错误!!!");
        }
    }
    public Student() {
    }
    @Override
    public String toString() {
        return "Student{" +
                "name='" + name + '\'' +
                ", age=" + age +
                ", sex='" + sex + '\'' +
                '}';
    }
    public static void main(String[] args) {
        Student s=new Student();
        s.setAge(19);
        s.setName("lili");
        try {
            s.setSex("lkjhlkjhlkj");
        } catch (MyException e) {
            e.printStackTrace();
        }
    }
}
【2】自定义异常继承RunTimeException:
public class MyException extends RuntimeException{
    public MyException() {
    }
    public MyException(String message) {
        super(message);
        System.out.println("出现异常");
    }
}
public class Student {
    private String name;
    private int age;
    private String sex;
    public String getName() {
        return name;
    }
    public void setName(String name) {
        this.name = name;
    }
    public int getAge() {
        return age;
    }
    public void setAge(int age) {
        this.age = age;
    }
    public String getSex() {
        return sex;
    }
    public void setSex(String sex){
        if("男".equals(sex)||"女".equals(sex)){
            this.sex = sex;
        }else{
            throw new MyException("性别错误!!!");
        }
    }
    public Student() {
    }
    @Override
    public String toString() {
        return "Student{" +
                "name='" + name + '\'' +
                ", age=" + age +
                ", sex='" + sex + '\'' +
                '}';
    }
    public static void main(String[] args) {
        Student s=new Student();
        s.setAge(19);
        s.setName("lili");
       s.setSex("lkjhlkjhlkj");
    }
}
9、常用类
包装类
引入
【1】引入:
以前定义变量,经常使用基本数据类型:
基本数据类型就是一个数,加点属性,加点方法,加点构造器
就是将基本数据类型这个数进行了一个封装,产生了一个类,----包装类
【2】
基本数据类型 对应的包装类 继承关系
byte Byte —>Number----> Object
short Short
int Integer
long Long
float Float
double Double
char Character Object
boolean Boolean Object
【3】都已经有基本数据类型,为啥还要包装类?
(1)面向对象的思维,最擅长的就是操纵各种类,假如把基本数据类型编程包装类,以后可以操纵类。
(2)之前我们学习的数组,装东西的,装基本数据类型和引用数据类型都可以。
但是以后我们要学习 集合,装东西的,但是只能装引用数据类型。
【4】现在学习了包装类,是不是以后就不用基本数据类型了?
不是。
Integer
【1】在使用Integer包装类的时候,不用导包直接使用:

【2】层次关系:

继承关系:Integer—>Number---->Object
实现接口:直接实现Comparable:当中一定实现了一个方法:compareTo方法–》内部比较器
间接实现自Serializable:
【3】常用属性:
//常用属性:
        System.out.println(Integer.MAX_VALUE);
        System.out.println(Integer.MIN_VALUE);
        //"物极必反"原则:
        System.out.println(Integer.MAX_VALUE+1);
        System.out.println(Integer.MIN_VALUE-1);
【4】构造器:
 //构造器:
        Integer i1=new Integer(12);//int--->Integer
        Integer i2=new Integer("你好");//String--->Integer
(1)int类型做参数的构造器:

谁调用了这个构造器,已经告知你这个构造器中很可能出现异常:
只要我们传的实参不是全数字 就会抛出异常。
【5】自动装箱和自动拆箱:
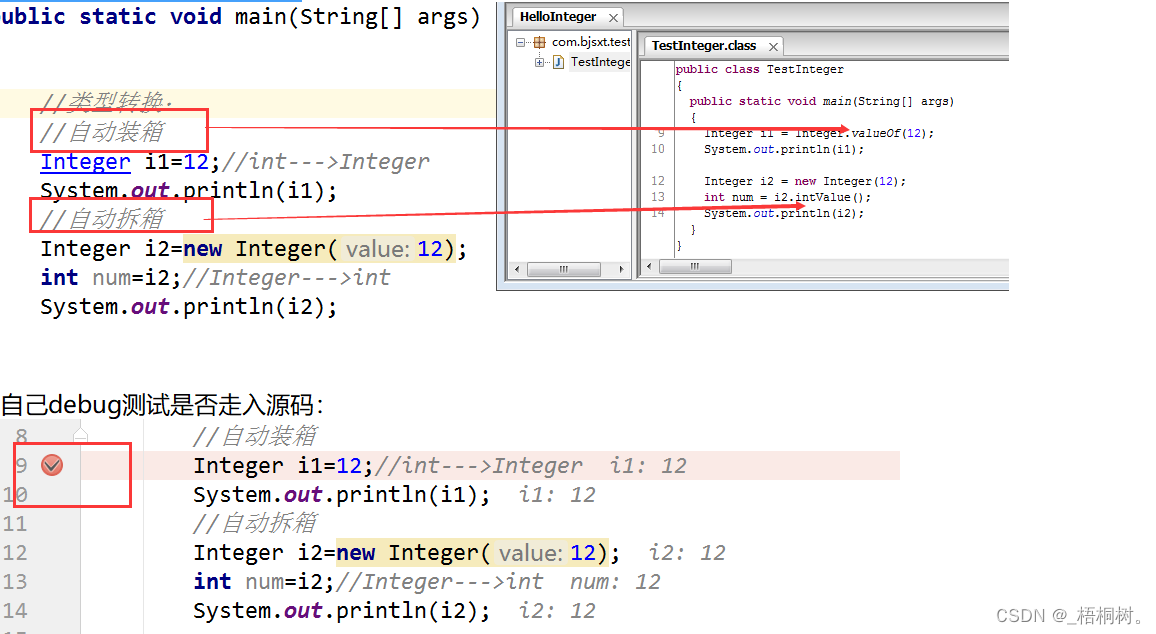
//类型转换:
        //自动装箱
        Integer i1=12;//int--->Integer
        System.out.println(i1);
        //自动拆箱
        Integer i2=new Integer(12);
        int num=i2;//Integer--->int
        System.out.println(i2);
【6】常用方法:
(1)compareTo:
Integer i1=new Integer(22);
        Integer i2=new Integer(12);
        int num=i1.compareTo(i2);//源码:return (x < y) ? -1 : ((x == y) ? 0 : 1);
        System.out.println(num);
(2)equals:
a.比较的是new关键字创建的对象 :
Integer i1=new Integer(12);
        Integer i2=new Integer(22);
        System.out.println(i1==i2);//比较左右两侧地址值  :false
        System.out.println(i1.equals(i2));//true
        //equals重写Object中的equals方法,里面比较的是:具体的封装的那个value值是否相等

b.自动装箱的包装类:
 Integer i1=129;
        Integer i2=129;
        System.out.println(i1==i2);
        /*
        ==比较的左右两侧的数值:
        数:-128~127之间:  比较的是就是数 (在cache数组中的数)----》true
        数不在-128~127之间:底层就创建对象  ==比较的就是左右的地址值。--->false
         */


(3)intvalue():
 Integer i1=new Integer(12);
        int num= i1.intValue();//Integer--->int
        System.out.println(num);
(4)parseInt:
int num=Integer.parseInt("1asdfasdf");//String--->int
(5)toString:
Integer i=new Integer(12);
        System.out.println(i);
        System.out.println(i.toString());//Integer---->String
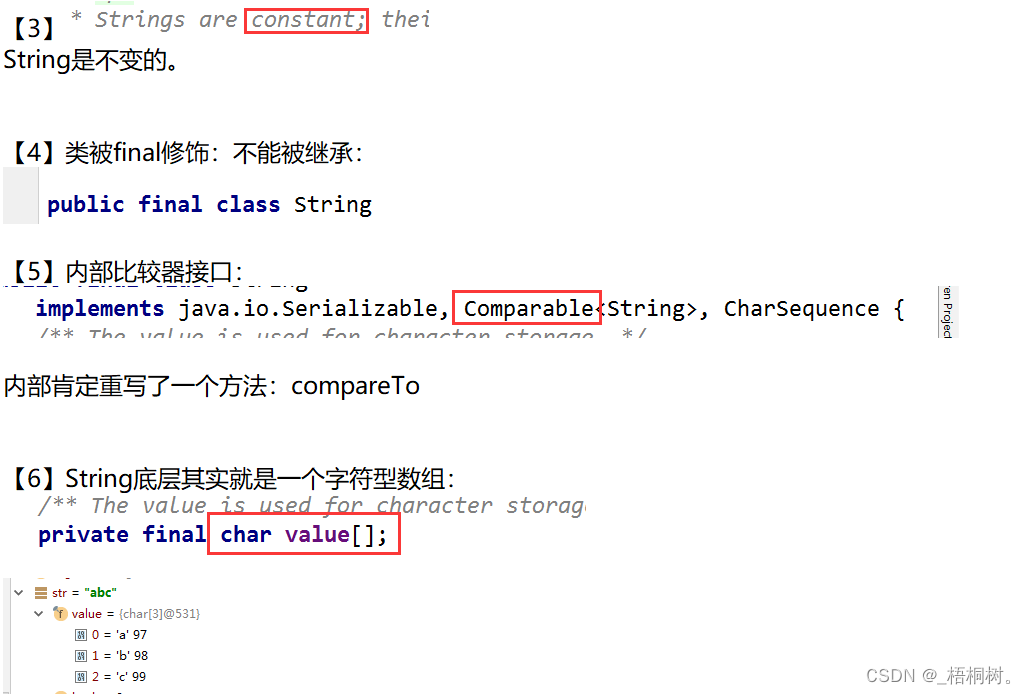
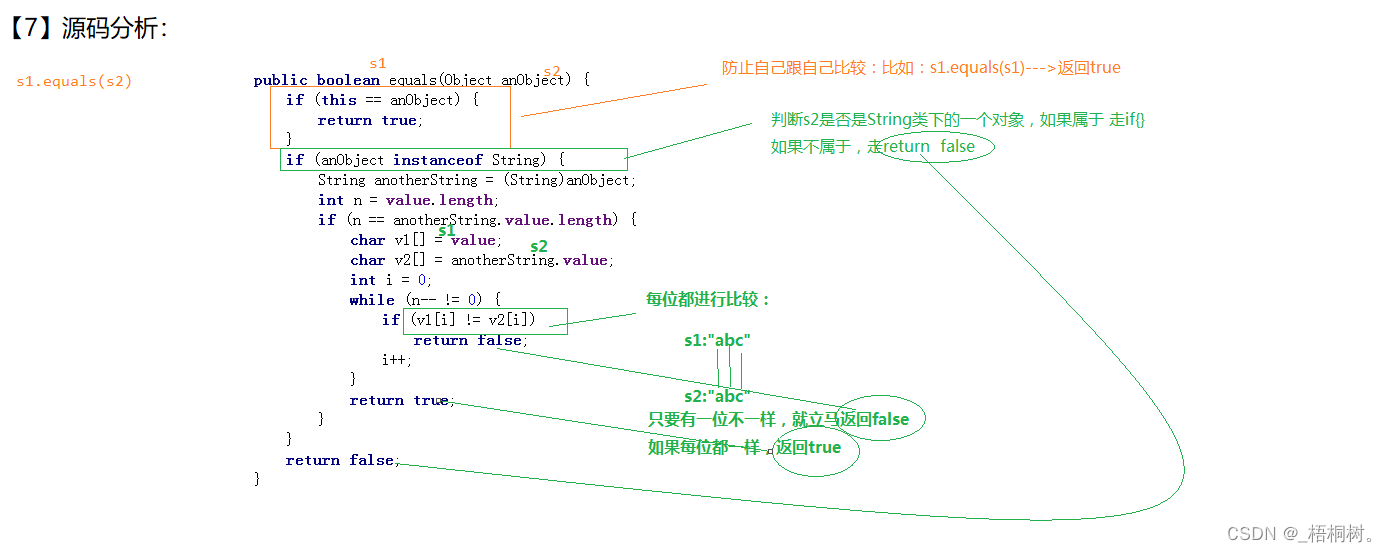
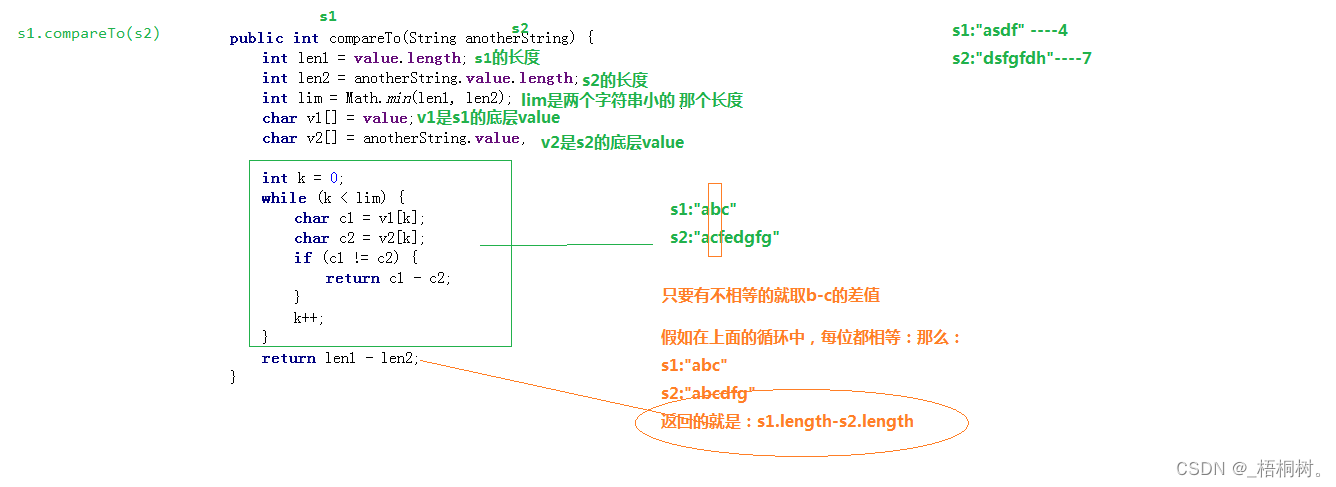
String类
【1】属于java.lang包下,可以直接使用不需要导包
【2】

String str=“abc”;
(1)"abc"是靠三个字符组成:‘a’ ‘b’ ‘c’—>“abc”
(2)“abc”—>String类下的具体的一个对象。
package com.bjsxt.test02;
import java.util.Arrays;
public class Test {
    public static void main(String[] args) {
        //字符串---》引用数据类型
       // String str="你好java,\n2019!";
        /*String s1=new String();
        String s2=new String("abc");
        System.out.println(s2);
        String s3=new String(new char[]{'a','b','c'});
        System.out.println(s3);*/
        /*String s4="abcdef";
        System.out.println(s4.length());//6
        System.out.println(s4.isEmpty());
        String s5="";
        System.out.println(s5.isEmpty());
        String s6=null;
        System.out.println(s6.isEmpty());*///报错:NullPointerException
        /*String s="asdfgj";
        System.out.println(s.charAt(3));;//f*/
      /*  String s1=new String("aec");
        String s2=new String("abc");
        System.out.println(s1==s2);//false
        System.out.println(s1.equals(s2));//比较内容的值是否相等
        int num=s1.compareTo(s2);
        System.out.println(num);*/
       /* String s="abcdefghijk";
        String newStr=s.substring(3);//字符串的截取:
        System.out.println(newStr);
        String ss=s.substring(3,7);//[3,7)的截取:
        System.out.println(ss);*/
       /*String a="abc";
       String b="def";
       String s=a.concat(b);//字符串的拼接
        System.out.println(s);*/
       /*String a="abcdaf";
       String b=a.replace('a','j');
        System.out.println(b);*/
        /*String a="basdg";
        System.out.println(a.contains("bas"));;*/
        /*String a="a-b-c-d-e-f";
        String[] str=a.split("-");
        System.out.println(Arrays.toString(str));
        String b="iahajaka";
        String[] str2=b.split("a");
        System.out.println(Arrays.toString(str2));*/
       /* String a="abc";
        System.out.println(a.toUpperCase().toLowerCase());;*/
      /* String a="aaaa";
        System.out.println(a.toString());*/
      String a="   asds dsg df dg   ";//去除首尾空格
      System.out.println(a.trim());;
      String s=String.valueOf(12);
        System.out.println(s);
    }
}
String字符串内存
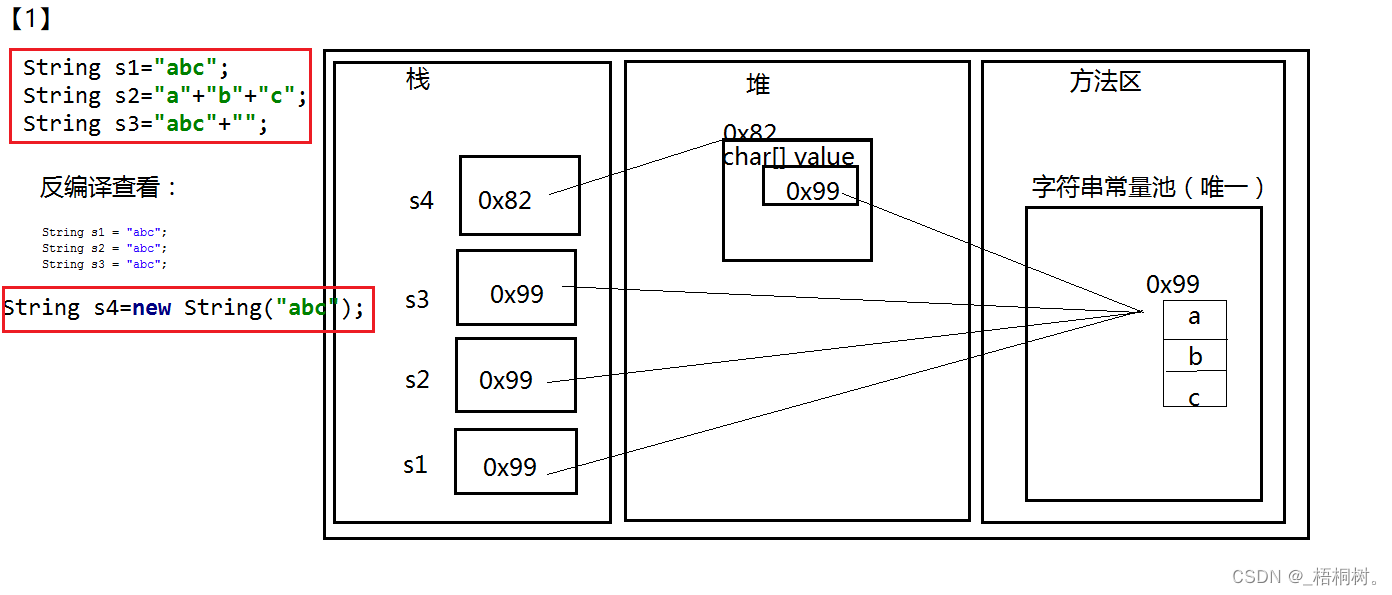
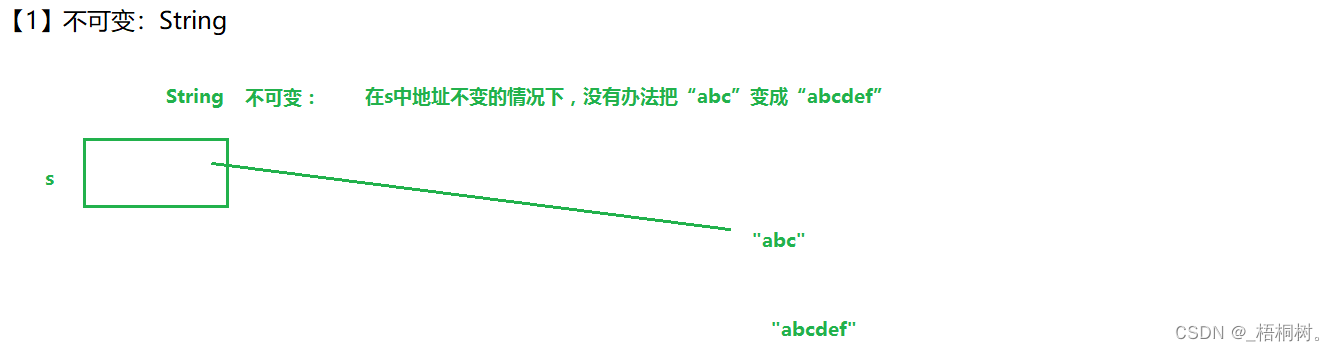
总结:
(1)
“a”+“b”+“c”---->“abc”
“abc”+“”—>“abc”
这种给定的字符串,会进行编译器优化,直接拼成完整的字符串 。直接在方法区的常量池中开辟空间,然后地址给了栈中的变量,不会在堆中开辟空间。
(2)用new关键字创建对象:
就会在堆中开辟空间。
(3)有变量参与运算进行字符串拼接的时候,会在堆中开辟空间。
面试题:
public class Test {
    public static void main(String[] args) {
       String s4=new String("abc");
       String s1="abc";
       String s2="abc";
        System.out.println(s1==s4);
        System.out.println(s1==s2);
    }
}
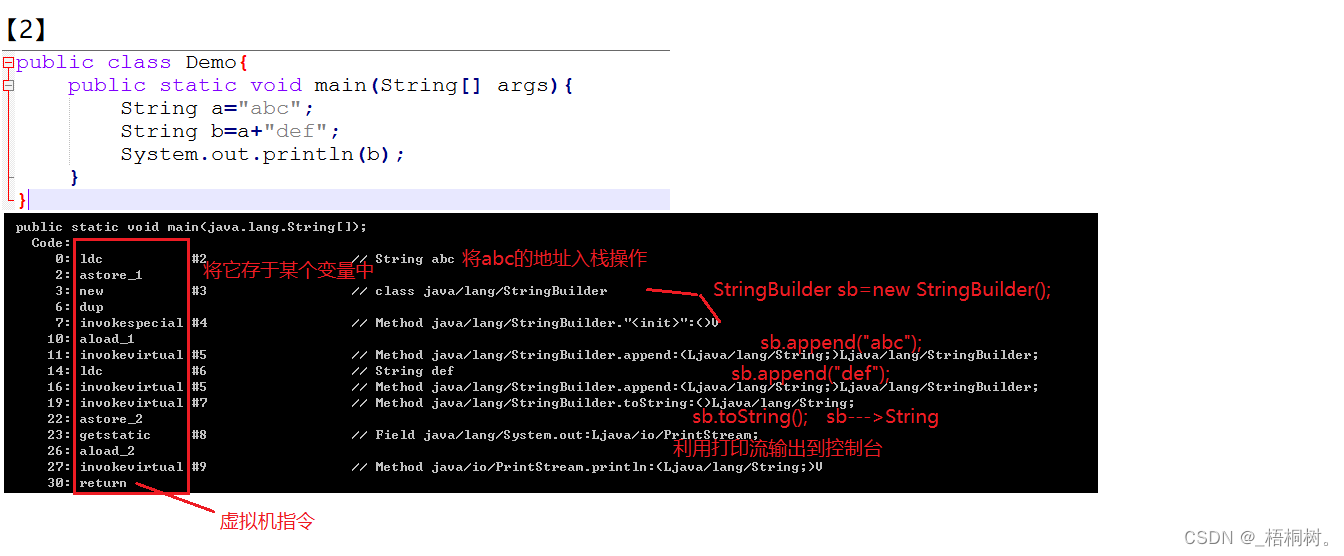
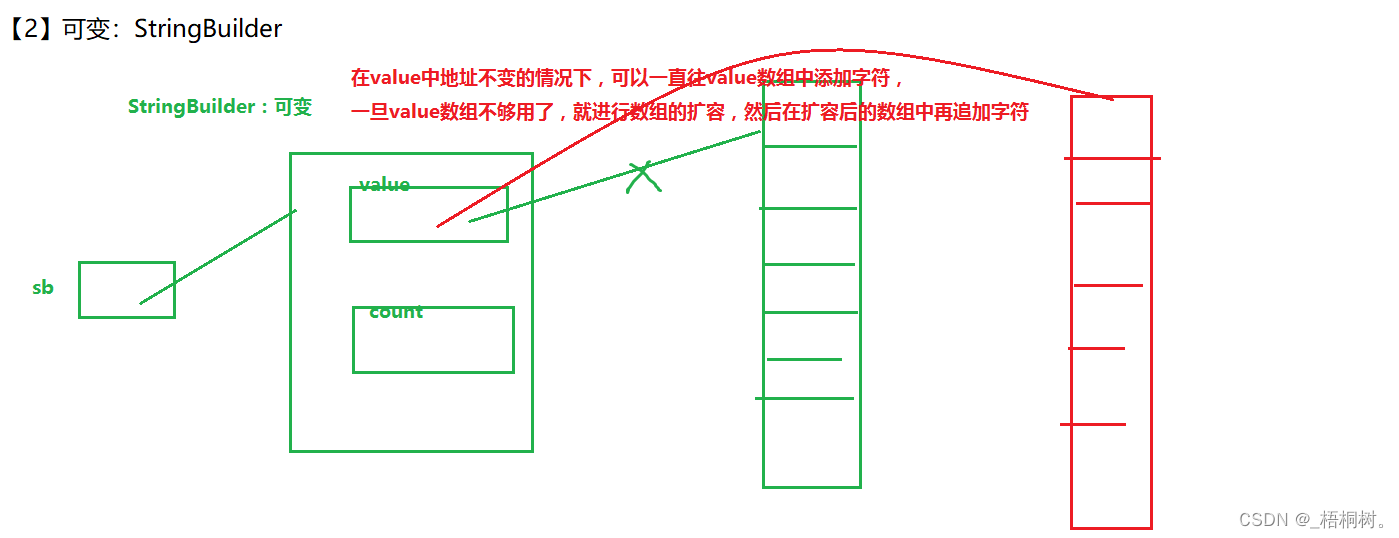
StringBuilder类
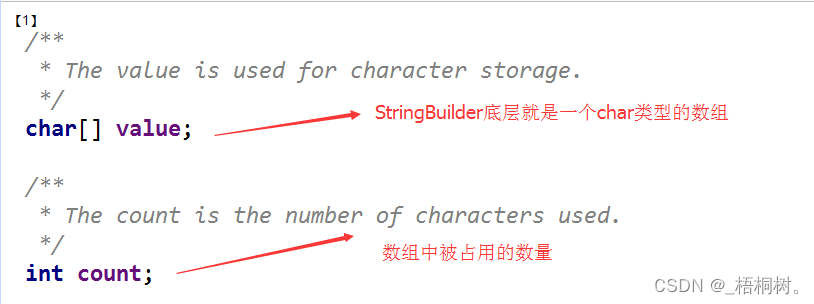
【2】
StringBuilder源码自行查看,然后自行画图:
public class Test {
    public static void main(String[] args) {
        String a="abc";//不可变字符串
        StringBuilder sb2=new StringBuilder();//底层char类型数组长度为16
        StringBuilder sb=new StringBuilder("abc");//可变字符串
        sb.append("ttttttt");
        sb.append("uuuuuuuuuuuu");
        sb.append("aaaaaaaaaaaaaaaaaaaaaaaaaaa");
    }
}
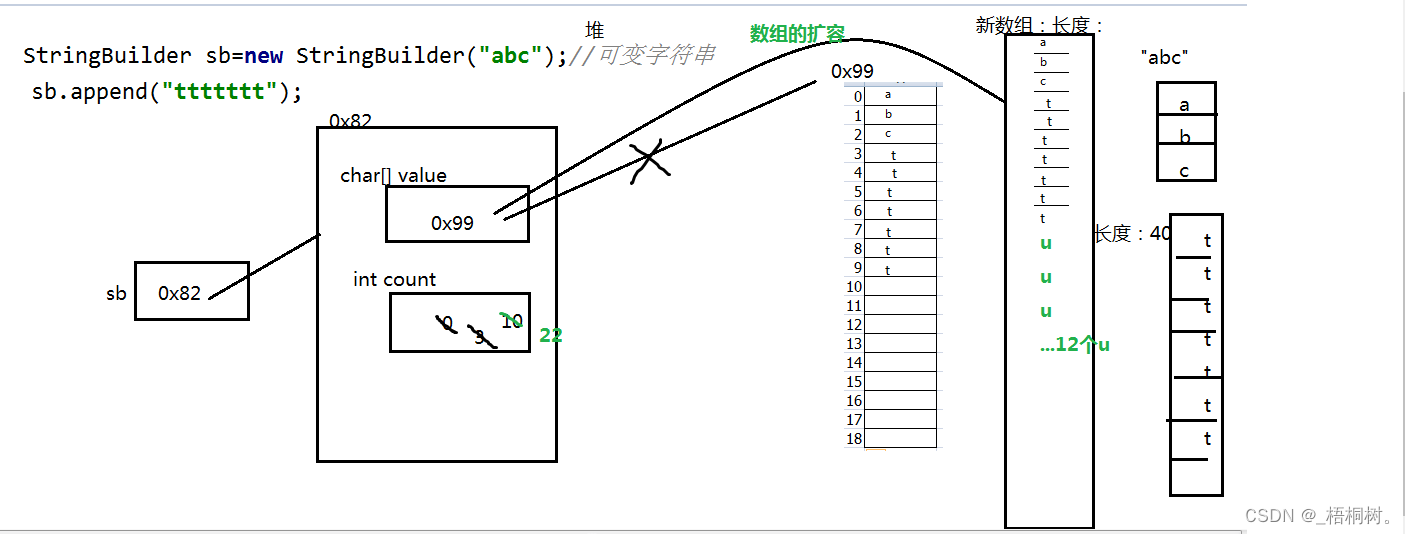
可变和不可变
常见方法
public class Test {
        public static void main(String[] args) {
                StringBuilder sb=new StringBuilder("nihaojavawodeshijie");
                //增
                sb.append("这是梦想");
                System.out.println(sb);//nihaojavawodeshijie这是梦想
                //删
                sb.delete(3, 6);//删除位置在[3,6)上的字符
                System.out.println(sb);//nihavawodeshijie这是梦想

                sb.deleteCharAt(16);//删除位置在16上的字符
                System.out.println(sb);//nihavawodeshijie是梦想

                //改
                StringBuilder sb1=new StringBuilder("$23445980947");
                sb1.insert(3, ",");//在下标为3的位置上插入 ,
                System.out.println(sb1);
                StringBuilder sb2=new StringBuilder("$2你好吗5980947");
                sb2.replace(3, 5, "我好累");//在下标[3,5)位置上插入字符串
                System.out.println(sb2);
                sb.setCharAt(3, '!');
                System.out.println(sb);
                //查
                StringBuilder sb3=new StringBuilder("asdfa");
                for (int i = 0; i < sb3.length(); i++) {
                        System.out.print(sb3.charAt(i)+"\t");
                }
                System.out.println();
                String str=sb3.substring(2,4);//截取[2,4)返回的是一个新的String,对StringBuilder没有影响
                System.out.println(str);
                System.out.println(sb3);
        }
}
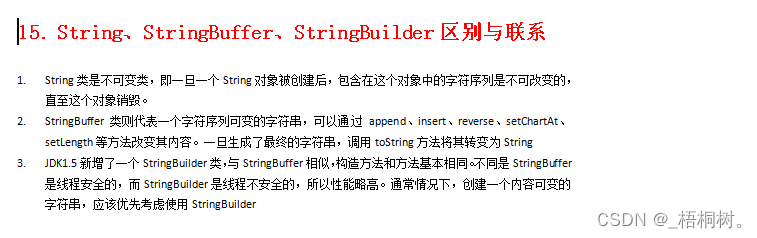
StringBuffer和StringBuilder区别
【1】StringBuiler:JDK1.5开始 效率高 线程不安全
【2】StringBuffer:JDK1.0开始 效率低 线程安全
联系:查看StringBuffer源码:底层依旧是数组的扩容。
时间处理的类
Date
package com.bjsxt.test01;
import java.util.Date;
public class Test {
    public static void main(String[] args) {
        //创建一个java.util.Date对象:
        Date d=new Date();
        System.out.println(d);
        System.out.println(d.toString());
        System.out.println(d.toGMTString());
        //这个方法可以使用。但是这个方法过期了,过时了,废弃了。
        System.out.println(d.toLocaleString());
        System.out.println(d.getYear());//2019-1900=119
        System.out.println(d.getMonth());//返回的值在 0 和 11 之间,值 0 表示 1 月。
        System.out.println(d.getTime());//1556586936921
        long time01=System.currentTimeMillis();
        System.out.println(time01);
        //问题:以后让你获取这个毫秒数,你优先用哪个方法?下面的。因为下面的方法被static修饰了,可以直接用类名.方法名直接调用,不用创建对象。
        //创建java.sql.Date对象:
        java.sql.Date date=new java.sql.Date(1556586936921L);
        System.out.println(date);//2019-04-30
        /*
        (1)java.util.Date和java.sql.Date区别:
        java.util.Date  :年月日 时分秒
        java.sql.Date  :年月日
        (2)java.util.Date和java.sql.Date联系:
         Date 继承自java.util.Date
         */
        //sql--->util:
        Date d2=date;
        //util--->sql:
        java.sql.Date d3=(java.sql.Date)d2;
        java.sql.Date d4=new java.sql.Date(new Date().getTime());
        //sql.Date常用方法:String--->Date
        java.sql.Date d5=java.sql.Date.valueOf("2019-3-8");
    }
}
日期转换
【1】引入:
//String--->java.util.Date:
        //1.String-->java.sql.Date
        java.sql.Date d1=java.sql.Date.valueOf("2017/3/8");
        //2.java.sql.Date--->java.util.Date
        java.util.Date d2=d1;
        System.out.println(d2);
        //上面的valueOf方法,传入的字符串必须格式为:年-月-日 格式,这样就有限制了。
【3】两种最常用的方法:
public class Demo {
public static void main(String[] args) {
//日期格式化对象:
//DateFormat df=new DateFormat();抽象类不可以直接创建对象:
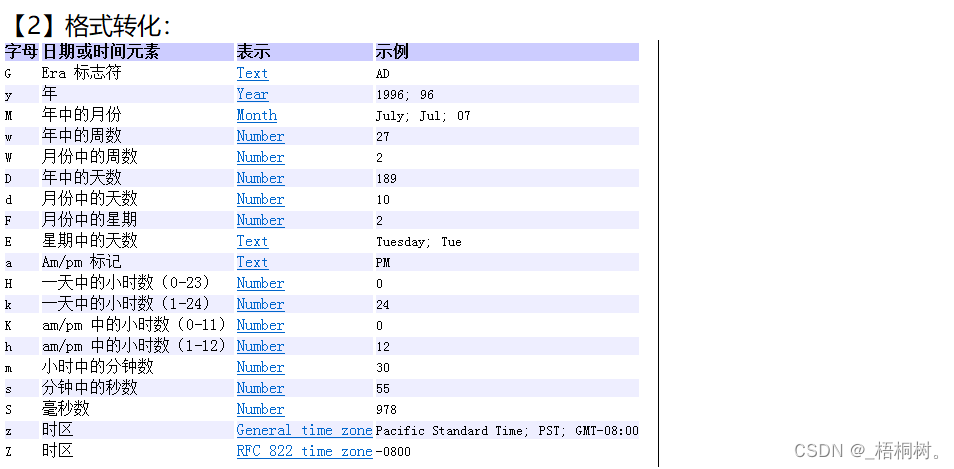
DateFormat df=new SimpleDateFormat("yyyy-MM-dd HH:mm:ss");
//String--->Date
try {
Date date=df.parse("2018-3-6 12:36:29");
System.out.println(date);
} catch (ParseException e) {
e.printStackTrace();
}
//Date--->String
String str=df.format(new Date());
System.out.println(str);
Date d2=new Date();
System.out.println(d2.toString());
System.out.println(d2.toLocaleString());
System.out.println(d2.toGMTString());
}
}
Calendar
Calendar这个类非常强大,关于日期的方法他都可以处理,但是
因为我们操作日期 基本就操作到年月日 时分秒,之前学的Date就已经够用了。
Calendar实际开发用的相对较少。
【1】基础代码:
package com.bjsxt.test03;
import java.util.Calendar;
import java.util.GregorianCalendar;
public class Test {
    public static void main(String[] args) {
        //Calendar是抽象类,不可以直接创建对象,可以用下面两种方法:
        Calendar cal=new GregorianCalendar();
        Calendar cal2=Calendar.getInstance();
        System.out.println(cal.toString());
        //日历类的常用属性读取:
        System.out.println(cal.get(Calendar.YEAR));//2019
        System.out.println(cal.get(Calendar.MONTH));//3---四月
        System.out.println(cal.get(Calendar.DATE));//30
        System.out.println(cal.get(Calendar.DAY_OF_WEEK));//3
        System.out.println(cal.getActualMaximum(Calendar.DATE));
        System.out.println(cal.getActualMinimum(Calendar.DATE));
        //属性设置:
        cal.set(Calendar.YEAR,2001);
        cal.set(Calendar.MONTH,4);
        cal.set(Calendar.DATE,10);
        System.out.println(cal);
        //String--->Calendar:
        //String--->Date:
        java.sql.Date d=java.sql.Date.valueOf("2019-3-5");
        //Date--->Calendar:
        cal.setTime(d);
        System.out.println(cal);
    }
}
【2】练习:
package com.bjsxt.test01;
import java.util.Calendar;
import java.util.Scanner;
public class Test {
    public static void main(String[] args) {
        //1.键盘录入提示信息:
        /*Scanner sc=new Scanner(System.in);
        System.out.print("请输入你想要查看的日期:(提示:请按照例如2019-3-7的格式)");
        String strDate=sc.next();
        System.out.println(strDate);*/
        //2.将上面接收的String---》Calendar:
        //2.1String--->Date
        java.sql.Date d=java.sql.Date.valueOf("2019-1-24");
        //2.2 Date---》Calendar:
        Calendar cal= Calendar.getInstance();
        cal.setTime(d);
        //System.out.println(cal);
        //3.输出日历的星期:
        System.out.println("日\t一\t二\t三\t四\t五\t六\t");
        //4.遍历   1-本月最大天   的数字:
        //5.先求出本月最大天数:
        int maxDay=cal.getActualMaximum(Calendar.DATE);
        //System.out.println(maxDay);
        //9.求出当天日期:
        int nowDay=cal.get(Calendar.DATE);
        //10.求出本月的第一天 是 一周中的第几天:
        //10.1:将日期置成本月的第一天:
        cal.set(Calendar.DATE,1);
        int dayOfWeek= cal.get(Calendar.DAY_OF_WEEK);
        //System.out.println("一号是本周第"+dayOfWeek+"天");
        //11.求出一号前面的空格数:
        int space=dayOfWeek-1;
        //7.引入一个计数器,用来计算换行:(每7个一换行)
        int count=space;
        //12.遍历space:
        for(int i=1;i<=space;i++){
            System.out.print("\t");
        }
        //6.遍历:
        for(int i=1;i<=maxDay;i++){
            //8.在当天日期上加上*
            if(i==nowDay){
                System.out.print(i+"*\t");
            }else{
                System.out.print(i+"\t");
            }
            count++;
            if(count%7==0){
                System.out.println();
            }
        }
    }
}
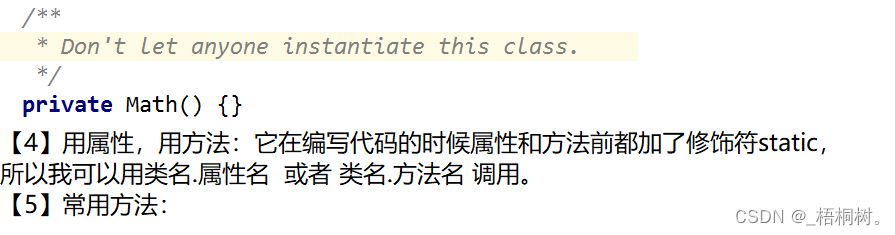
Math
【1】java.lang包下 不需要导包直接使用
【2】类被final修饰,不能被继承
【3】意味着在外面不能创建Math类的对象:
Math m=new Math();—不能
public class Demo {
    public static void main(String[] args) {
        System.out.println("随机数:"+Math.random());
        System.out.println("绝对值:"+Math.abs(-30));
        System.out.println("向上取值:"+Math.ceil(9.1));
        System.out.println("向下取值:"+Math.floor(9.9));
        System.out.println("四舍五入:"+Math.round(8.5));
        System.out.println("最大值:"+Math.max(3,6));
        System.out.println("最小值:"+Math.min(3,6));
        System.out.println("次幂:"+Math.pow(3,6));
    }
}
【6】静态导入:
可以将类名省略,然后import +static +那个包下那个类下的所有内容 (*) 。
假如在静态导入后,本类有同名方法,优先调用本类的方法。
package com.bjsxt.test01;
import static java.lang.Math.*;
public class Demo {
    public static void main(String[] args) {
        System.out.println("随机数:"+random());
        System.out.println("绝对值:"+abs(-30));
        System.out.println("向上取值:"+ceil(9.1));
        System.out.println("向下取值:"+floor(9.9));
        System.out.println("四舍五入:"+round(8.5));
        System.out.println("最大值:"+max(3,6));
        System.out.println("最小值:"+min(3,6));
        System.out.println("次幂:"+pow(3,6));
    }
    public static int random(){
        return 10;
    }
}
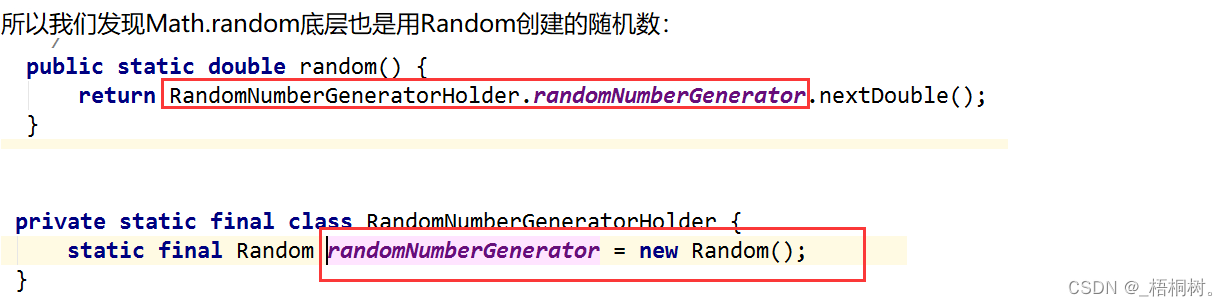
【7】Random随机数类
Math.random()----->[0.0,1.0)
(1)利用有参构造器创建对象:
从结果发现,每次传入的参数(seed种子)只要是一样的,那么产生的结果也是一样的。
要想产生的随机数不一样,必须传入的种子就不一样。
public class TestRandom {
    public static void main(String[] args) {
        Random r=new Random(System.currentTimeMillis());
        for (int i=1;i<=10;i++){
            System.out.println(r.nextInt());
        }
    }
}
(2)利用空构造器创建对象:
表面上我们在用空构造器创建对象,实际上底层还是调用了有参构造器,
并且传入的参数每次创建对象都不一样:

public class TestRandom {
    public static void main(String[] args) {
        Random r=new Random();
        for(int i=1;i<=10;i++){
            //System.out.println(r.nextInt(10));
            System.out.println(r.nextDouble());;
        }
    }
}
枚举类
【1】class—>类
interface—>接口
enum---->枚举 -----》全部都是引用数据类型
【2】引入:
public enum Gender {
    男,女;
}
package com.bjsxt.test02;
public class Student {
    //属性
    private int age;
    private String name;
    private Gender sex;
    //提供相应的setter,getter方法:
    public int getAge() {
        return age;
    }
    public void setAge(int age) {
        this.age = age;
    }
    public String getName() {
        return name;
    }
    public void setName(String name) {
        this.name = name;
    }
    public Gender getSex() {
        return sex;
    }
    public void setSex(Gender sex) {
        this.sex = sex;
    }
    //构造器
    public Student() {
    }
    public Student(int age, String name, Gender sex) {
        this.age = age;
        this.name = name;
        this.sex = sex;
    }
    //toString:
    @Override
    public String toString() {
        return "Student{" +
                "age=" + age +
                ", name='" + name + '\'' +
                ", sex='" + sex + '\'' +
                '}';
    }
    public static void main(String[] args) {
        Student s=new Student();
        s.setAge(19);
        s.setName("lili");
        s.setSex(Gender.女);
        System.out.println(s);
        Student s2=new Student(22,"feifei",Gender.女);
        System.out.println(s2);
    }
}
【3】总结:
只能够取特定值中的一个
使用enum关键字
所有的枚举类型隐性地继承自 java.lang.Enum。(枚举实质上还是类!而每个被枚举的成员实质就是一个枚举类型的实例,他们默认都是public static final的。可以直接通过枚举类型名直接使用它们。)
public enum Gender extends java.lang.Enum 隐性地继承自 java.lang.Enum
Gender继承自Enum类,Enum类继承自Object类,所以枚举类Gender也是一个类。
强烈建议当你需要定义一组常量时,使用枚举类型
尽量不要使用枚举的高级特性,事实上高级特性都可以使用普通类来实现,没有必要引入复杂性!
public enum Gender {
    男,女;
    /*public void show(){
        System.out.println("assadf");
    }*/
}
class Test{
    public static void main(String[] args) {
        //创建枚举类对象:
        Gender a=Gender.女;
        //a.show();
        System.out.println(a);//Enum类中重写了toString
    }
}
【4】枚举结合switch
package com.bjsxt.test02;
public class Demo {
    public static void main(String[] args) {
        /*
        可以:int,byte,short,char,String,枚举类
        不可以:long,float,double,boolean
         */
        Gender a=Gender.女;
        switch (a){
            case 女:
                System.out.println("是女");
                break;
            case 男:
                System.out.println("是男");
                break;
        }
    }
}
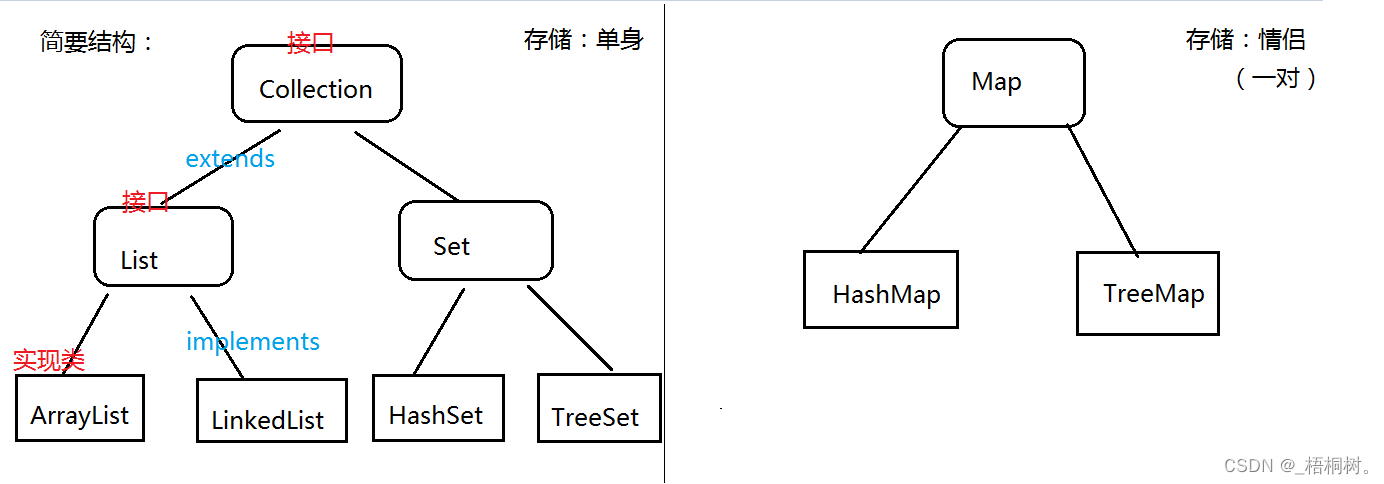
10、集合
数据结构
集合引入
【1】为什么使用集合?
举例:存储学生的成绩
以前:用数组 缺点:长度一旦确定就没有办法再修改了,所以如果删除或者增加元素,大量移动元素的位置。
特点:数组只能放一种数据类型,可以是基本数据类型也可以是引用数据类型
引入一个方法东西的-------》容器(集合)
优点:增加删除元素效率高
特点:一个集合可以方法多种数据类型,(但是一般我们都使用泛型,让他只放一种类型。)
但是它只可能放引用数据类型。
所以:集合能不能放int类型数据?不能。int类型可以进行自动装箱,转成包装类的Integer类型方放入集合。
【2】我们学习的集合,是各种各样的集合,为啥要学习不同的集合?
数据结构不一样,导致集合不一样,特点不一样。
【3】集合有哪些?简要结构图:
【4】集合的应用场景:
当需要将相同结构的个体整合到一起的时候,就考虑使用集合。
Collection接口
package com.bjsxt.test01;
import java.util.ArrayList;
import java.util.Collection;
import java.util.Iterator;
public class Test {
public static void main(String[] args) {
/*
接口常用方法:
增加:add(E e) addAll(Collection<? extends E> c)
删除:clear() remove(Object o)
修改:
查看:iterator() size()
判断:contains(Object o) equals(Object o) isEmpty()
*/
//Collection:接口不能创建对象:
Collection col=new ArrayList();
col.add(11);
col.add("aaaa");//表面上是int类型数据,实际12进行了自动装箱 然后我放入的是Integer数据
//Integer i=12; col.add(i);
col.add(33);//Double
Collection col2=new ArrayList();
col2.add(11);
col2.add(22);
col2.add(33);
//col.addAll(col2);
System.out.println(col.equals(col2));//true:证明底层一定重写了equals,比较的是具体的元素的值。
System.out.println(col==col2);//false:一定返回的是false,因为比较的是地址的值。
System.out.println("------------------");
col.remove("anc");
System.out.println(col/*.toString()*/);
System.out.println("集合中放的元素的个数:"+col.size());
System.out.println( col.contains(11));
/*col.clear();
System.out.println(col*//*.toString()*//*);
System.out.println("集合中放的元素的个数:"+col.size());
System.out.println(col.isEmpty());*/
System.out.println("-----------集合的遍历:-----------------");
//方法1:普通for循环:---不行:因为没有提供 根据索引获取元素的 方法
/*for(int i=0;i<=col.size()-1;i++){
System.out.println(col);
}*/
//方法2:增强for循环:
for(Object o:col){
System.out.print(o+"\t");
}
System.out.println("\n---------------------------------");
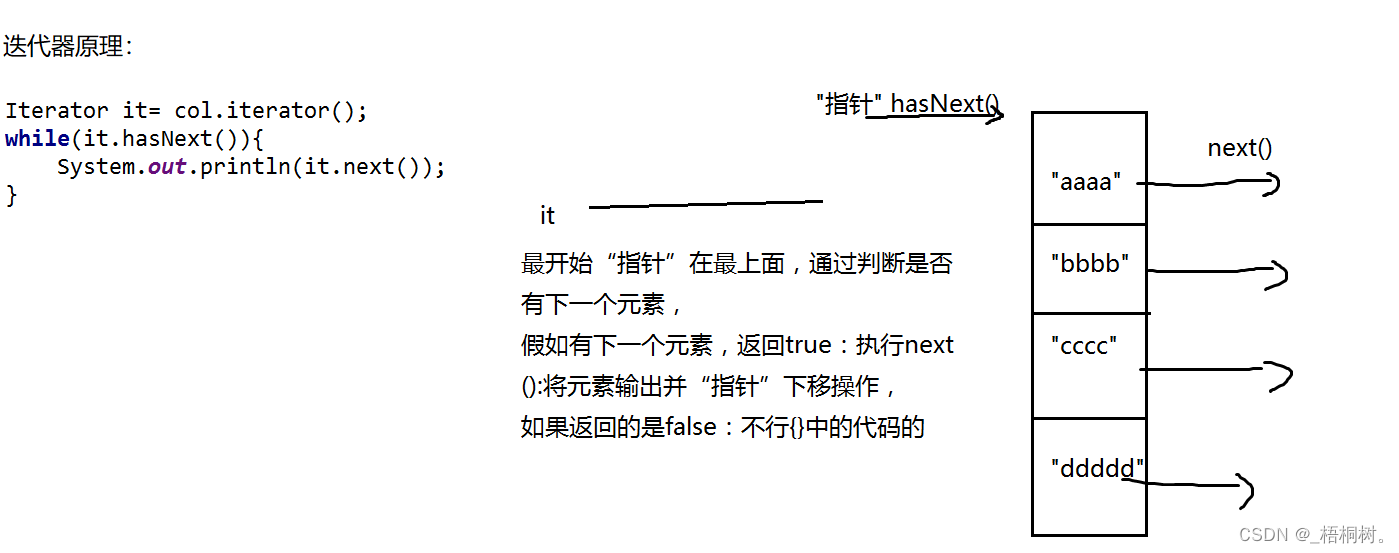
//方法3:iterator() 迭代器:
Iterator it= col.iterator();
while(it.hasNext()){
System.out.println(it.next());
}
}
}
第一个子接口List
package com.bjsxt.test01;
import java.util.ArrayList;
import java.util.Iterator;
import java.util.List;
public class Demo {
    public static void main(String[] args) {
        List list=new ArrayList();
        /*
        常用方法:
        增加:add(int index, E element)
        删除:remove(int index)
        修改:set(int index, E element)
        查看:get(int index)
        判断:
         */
        list.add(12);
        list.add(82);
        list.add(20);
        list.add(38);
        list.add(1);
        list.add(1,666);
        list.remove(1);
        list.set(2,999);
        System.out.println(list);
        System.out.println(list.size());
        System.out.println(list.get(3));
        //对List集合的遍历:
        //方式1:普通for循环:
        System.out.print("[");
        for(int i=0;i<=list.size()-1;i++){
            if(i!=list.size()-1){
                System.out.print(list.get(i)+", ");
            }else{
                System.out.print(list.get(i)+"]");
            }
        }
        System.out.println("\n----------------------");
        //方法2:增强for循环:
        for(Object o:list){
            System.out.println(o);
        }
        System.out.println("\n----------------------");
        //方式3:迭代器:
        Iterator it = list.iterator();
        while(it.hasNext()){
            System.out.println(it.next());
        }
    }
}
实现类:ArrayList
源码
总结:ArrayList底层就是数组,那些方法其实就是对数组进行增删改查操作。
【1】
public class Test2 {
    public static void main(String[] args) {
        //创建一个ArrayList对象:
        ArrayList al=new ArrayList();//调用构造器,底层数组是{},长度为0
        第一次调用add方法:
        al.add("abc");
    }
}
总结:调用空构造器和第一次add做了什么事?
首先将底层的数组扩容为长度为10 ,然后在长度为10的新数组中添加元素:
public class ArrayList{
        //ArrayList底层是一个Object类型的数组
        transient Object[] elementData;
        //这个Object类型的数组被使用的数量。
        private int size;
        //就是一个空的Object的数组
         private static final Object[] DEFAULTCAPACITY_EMPTY_ELEMENTDATA = {};


        //空构造器:底层数组 长度0
        public ArrayList() {
        this.elementData = DEFAULTCAPACITY_EMPTY_ELEMENTDATA;
                //赋予了一个{}数组---->this.elementData = {}
    }


        public boolean add(E e) {//实际参数:"abc"
        ensureCapacityInternal(size + 1);  // 经历了这个方法,底层已经将数组扩容为10了
        elementData[size++] = e;//elementData[0]="abc"   然后size+1操作
        return true;
    }

        private void ensureCapacityInternal(int minCapacity) {//1
        ensureExplicitCapacity(calculateCapacity(elementData, minCapacity));
                //ensureExplicitCapacity(10)
    }

        private static int calculateCapacity(Object[] elementData, int minCapacity) {//参数:{},1
        //  现在elementData == DEFAULTCAPACITY_EMPTY_ELEMENTDATA满足,返回的是true,走这个if了
                if (elementData == DEFAULTCAPACITY_EMPTY_ELEMENTDATA) {
                        //return Math.max(10,1);---->10

            return Math.max(DEFAULT_CAPACITY, minCapacity);
        }
        return minCapacity;
    }
         private void ensureExplicitCapacity(int minCapacity) {//参数:10
        modCount++;
        // overflow-conscious code
        if (minCapacity - elementData.length > 0)//10-0》0--》if是执行的
            grow(minCapacity);//grow(10)
    }


        private void grow(int minCapacity) {//minCapacity:10

        int oldCapacity = elementData.length;//oldCapacity:0
        int newCapacity = oldCapacity + (oldCapacity >> 1);//newCapacity:0
        if (newCapacity - minCapacity < 0)//if(0-10<0)-->这个分支走:
            newCapacity = minCapacity;//newCapacity:10
        if (newCapacity - MAX_ARRAY_SIZE > 0)//不走
            newCapacity = hugeCapacity(minCapacity);//不走
        //完成了数组的扩容,将原来的{}数组复制到长度为10的新数组中
                //并且将ArrayList底层的老数组变成了长度为10的新数组。
        elementData = Arrays.copyOf(elementData, newCapacity);
    }


}
【2】
public class Test2 {
    public static void main(String[] args) {
        //创建一个ArrayList对象:
        ArrayList al=new ArrayList();//调用构造器,底层数组是{},长度为0
        第一次调用add方法:
        al.add("abc");
        al.add("ggg");
        al.add("ggg");
        al.add("ggg");
        al.add("ggg");
        al.add("ggg");
        al.add("ggg");
        al.add("ggg");
        al.add("ggg");
        al.add("ggg");
        al.add("asdfasdfasdf");//放入第11个字符串:
    }
}
public class ArrayList{
        //ArrayList底层是一个Object类型的数组
        transient Object[] elementData;
        //这个Object类型的数组被使用的数量。
        private int size;
        //就是一个空的Object的数组
         private static final Object[] DEFAULTCAPACITY_EMPTY_ELEMENTDATA = {};


         public boolean add(E e) {//参数:"asdfasdfasdf"
        ensureCapacityInternal(size + 1);  // 经历完这个方法,底层数组已经扩容为新的长度为15的了
        elementData[size++] = e;//elementData[10]="asdfasdfasdf"  然后进行size+1操作 size:11
        return true;
    }


        private void ensureCapacityInternal(int minCapacity) {//11
                //calculateCapacity(长度为10的老数组,11)
                //ensureExplicitCapacity(11)
        ensureExplicitCapacity(calculateCapacity(elementData, minCapacity));//
    }

        private static int calculateCapacity(Object[] elementData, int minCapacity) {
        if (elementData == DEFAULTCAPACITY_EMPTY_ELEMENTDATA) {//分支不走
            return Math.max(DEFAULT_CAPACITY, minCapacity);
        }
        return minCapacity;//走这个返回11
    }


         private void ensureExplicitCapacity(int minCapacity) {//11
        modCount++;
        // overflow-conscious code
        if (minCapacity - elementData.length > 0)//11-10>0--->走
            grow(minCapacity);//grow(11)
    }


         private void grow(int minCapacity) {//minCapacity:11

        int oldCapacity = elementData.length;//oldCapacity:10
        int newCapacity = oldCapacity + (oldCapacity >> 1);//newCapacity:15 :扩容长度是原来的1.5倍
        if (newCapacity - minCapacity < 0)//不走
            newCapacity = minCapacity;//不走
        if (newCapacity - MAX_ARRAY_SIZE > 0)//不走
            newCapacity = hugeCapacity(minCapacity);//不走
        //底层老的数组 从长度为10变成了长度为15
                //并且ArrayList底层数组的指向  指向了新的长度为15的数组
        elementData = Arrays.copyOf(elementData, newCapacity);
    }

}
【3】al.isEmpty();
【4】al.clear();
 public void clear() {
        modCount++;

        for (int i = 0; i < size; i++)//对数组进行遍历
            elementData[i] = null;//数组中的每个位置都置为null
        size = 0;//数组中被占用的数量size置为0
    }
【5】al.remove(“abc”);
public boolean remove(Object o) {//参数:“abc”
if (o == null) {//不走
for (int index = 0; index < size; index++)
if (elementData[index] == null) {
fastRemove(index);
return true;
}
} else {//走这个
for (int index = 0; index < size; index++)//对数组进行遍历
if (o.equals(elementData[index])) {//找数组中有没有元素"abc"
//假如找到了才走下面的方法
//fastRemove:删除这个元素了
//fastRemove(这个元素对应的索引)
fastRemove(index);//fastRemove(0)
return true;
}
}
return false;
}
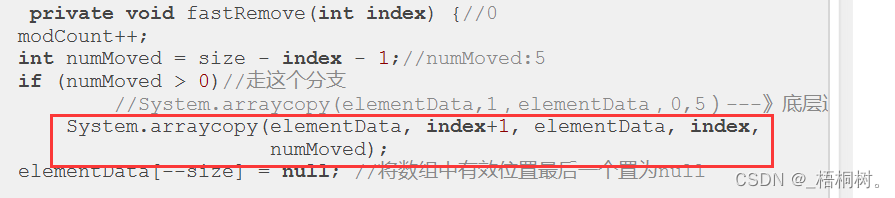
private void fastRemove(int index) {//0
modCount++;
int numMoved = size - index - 1;//numMoved:5
if (numMoved > 0)//走这个分支
//System.arraycopy(elementData,1,elementData,0,5)---》底层通过数组的复制完成了删除操作
System.arraycopy(elementData, index+1, elementData, index,
numMoved);
elementData[--size] = null; //将数组中有效位置最后一个置为null
}
【6】al.get(3);
public E get(int index) {//3
        rangeCheck(index);
        return elementData(index);//elementData(3)
    }

         E elementData(int index) {
        return (E) elementData[index];//elementData[3]
    }
自己模拟一个ArrayList
package com.bjsxt.test02;
import java.util.Arrays;
public class MyArrayList {
    //MyArrayList底层也是一个Object类型的数组:
    Object[] value;
    //数组中被使用的数量:
    int count;
    //空构造器:
    public MyArrayList(){
        //value=new Object[10];
        this(10);
    }
    //有参构造器:
    public MyArrayList(int length){
        value=new Object[length];
    }
    //添加add方法:
    public void add(Object o){
        value[count]=o;
        count++;
        //进行数组的扩容:
        if(count>value.length-1){//长度不够
            //扩容方式1:Object[] newObj= Arrays.copyOf(value,20);
            //扩容方式2:有新数组:
            Object[] newObj=new Object[value.length*2+1];//10*2+1==21
            //将老数组中的东西 复制 到新数组中:
            for(int i=0;i<=value.length-1;i++){
                newObj[i]=value[i];
            }

            //将value的指向:指向新的数组:
            value=newObj;
        }
    }
    //重写toString
    @Override
    public String toString() {
        StringBuilder sb=new StringBuilder();
        sb.append("[");//拼接左面的[
        for(int i=0;i<=count-1;i++){
            sb.append(value[i]+",");//将数组遍历拼接
        }
        sb.setCharAt(sb.length()-1,']');//将sb字符串最后的,替换为]
        return sb.toString();
    }
    //增加一个计算数组中元素数量的方法:
    public int length(){
        return count;
    }
    //判断是否为空:
    public boolean isEmpty(){
        return count==0;
    }
    public static void main(String[] args) {
        //创建一个我自定义的数组的对象:
        MyArrayList list=new MyArrayList();//底层数组长度为10
        list.add("abc");
        list.add("dddd");
        list.add("fdffff");
        list.add("fdffff");
        list.add("fdffff");
        list.add("fdffff");
        list.add("fdffff");
        list.add("fdffff");
        list.add("fdffff");
        list.add("fdffff");
        list.add("dddddddddddddddd");
        list.add("33333");
        System.out.println(list);
        System.out.println("集合中元素的数量:"+list.length());
        System.out.println(list.isEmpty());
    }
}
练习:
list.remove(“abc”);
思路:
(1)将后一位移到前一位
(2)
将自定义的引用数据类型存入ArrayList集合
【1】代码:
package com.bjsxt.test03;
import java.util.ArrayList;
import java.util.Iterator;
public class Student {
    //属性
    private int age;
    private String name;
    //方法
    public int getAge() {
        return age;
    }
    public void setAge(int age) {
        this.age = age;
    }
    public String getName() {
        return name;
    }
    public void setName(String name) {
        this.name = name;
    }
    //构造器
    public Student(int age, String name) {
        this.age = age;
        this.name = name;
    }
    //main方法:
    public static void main(String[] args) {
        //创建一个ArrayList集合对象:
        ArrayList al=new ArrayList();
        Student s=new Student(19,"feifei");
        al.add(s);
        al.add(new Student(21,"lulu"));//匿名对象存入集合
        al.add(new Student(22,"lili"));
        //遍历:
        //普通for
        //增强for
        //迭代器:
        Iterator it = al.iterator();
        while(it.hasNext()){
            Student o=(Student)(it.next());
            System.out.println(o.getName()+"----"+o.getAge());
        }
    }
}
【2】代码尝试改动:

实现类:Vector
泛型
基本应用
package com.bjsxt.test03;
import java.util.ArrayList;
import java.util.Iterator;
public class Student {
    //属性
    private int age;
    private String name;
    //方法
    public int getAge() {
        return age;
    }
    public void setAge(int age) {
        this.age = age;
    }
    public String getName() {
        return name;
    }
    public void setName(String name) {
        this.name = name;
    }
    @Override
    public String toString() {
        return "Student{" +
                "age=" + age +
                ", name='" + name + '\'' +
                '}';
    }
    //构造器
    public Student(int age, String name) {
        this.age = age;
        this.name = name;
    }
    //main方法:
    public static void main(String[] args) {
        //创建一个ArrayList集合对象:
        //加入泛型:作用:限制放入集合中元素的类型的,将类型限制为同一种类型
        //加入泛型,其实就是对编译期间生效,在编译期间就不允许我添加其他的类型了!泛型在JDK1.5之后出的

        ArrayList<Student> al=new ArrayList<Student>();
        al.add(new Student(21,"lulu"));
        al.add(new Student(22,"lulu2"));
        al.add(new Student(23,"lulu3"));
        /*al.add("abc");
        al.add(12);
        al.add(8.3);*/
        //增强for遍历:
        /*for(Object o:al){//Object o=学生对象
            System.out.println(o);
        }*/
        //加了泛型之后,遍历更加简单了,直接用泛型类型接收即可
        for(Student s:al){
            System.out.println(s);
        }
    }
}
扩展:
就是为了让你能看懂API:
不是为了让你自己写代码用的。
泛型类:
package com.bjsxt.test04;
public class FanXing<AA> {
    //FanXing其实就是一个普通的类,然后我加了<A>之后就变成了一个泛型类
    //<>中的字母可以是什么?随意,但是在API中一般叫E
    //<AA>就好像是一个占位符,就是告诉别人这里加了泛型,但是这个类型是什么还不确定
    //什么时候确定呢?创建对象的时候才确定
}
class A{
    public static void main(String[] args) {
        //创建一个普通类的对象:
        FanXing fx=new FanXing();
        //加上泛型:
        FanXing<Integer> fx2=new FanXing<Integer>();
        FanXing<String> fx3=new FanXing<String>();
    }
}
泛型方法:
package com.bjsxt.test04;
public class FanXing<AA> {
    //普通方法:可以
    public void a(){}
    //方法的参数是AA,AA的类型确定吗?确定,AA在创建对象的时候就已经确定了
    public void b(AA a){}
    //方法的参数是BB,BB的类型确定吗?BB类型不确定
    //帮我们解决了 不同数据类型做参数的重载问题
    public <BB> void c(BB b){}
    //static修饰的方法,先于对象存在
    //先于对象存在,不知道AA是啥,因为AA的类型要在对象创建后才确定的
    //public static void d(AA a){}
    //BB无论有没有对象,BB的类型都不确定,所以加static无所谓
    public static <BB> void e(BB b){}
    public void f(AA[] a){}
    public <QQ> QQ[] g(QQ...q){
        //参数为可变参数,内部当做数组处理:
        for(QQ a:q){
            System.out.println(a);
        }
        return q;
    }
}
class A{
    public static void main(String[] args) {
        //创建一个对象:
        FanXing<Integer> fx=new FanXing<Integer>();
        //AA的类型确定为Integer
        fx.b(12);
        fx.c(12);
        fx.c("asdf");
        fx.c(8.9);
        fx.f(new Integer[]{12,34,43});
        fx.g();
        fx.g(12,23,45,45);
        fx.g("asfd","asf","asfasdf");
    }
}
泛型接口:
public interface MyInterface<AA> {
}
class A implements MyInterface {}
class B implements MyInterface<String> {
}
class C<BB> implements MyInterface<BB>{
  public void a(BB b){}
}
泛型受限:
泛型的上限: ? extends A :只要泛型为A或者A的子类都可以传入
泛型的下限: ? super A :只要泛型为A或者A的父类都可以传入
package com.bjsxt.test06;
import java.util.ArrayList;
public class Person {
    int age;
    public Person(int age) {
        this.age = age;
    }
    public Person() {
    }
    @Override
    public String toString() {
        return "Person{" +
                "age=" + age +
                '}';
    }
}
class Student extends Person{
    String name;
    public Student(int age, String name) {
        super(age);
        this.name = name;
    }
    public Student(String name) {
        this.name = name;
    }
    @Override
    public String toString() {
        return "Student{" +
                "name='" + name + '\'' +
                '}';
    }
}
class Test{
    public static void main(String[] args) {
        //创建多个Person对象:将对象放入集合中:
        ArrayList<Person> al=new ArrayList<Person>();
        al.add(new Person(18));
        al.add(new Person(20));
        al.add(new Person(14));
        show(al);
        ArrayList<Student> al2=new ArrayList<Student>();
        al2.add(new Student("nana"));
        al2.add(new Student("feifei"));
        al2.add(new Student("lili"));
        show(al2);
    }
//泛型受限:泛型的上限:只要是Person或者Person的子类 都可以传入
    public static void show(ArrayList<? extends Person> al){
        //对集合进行遍历:
        for(Person p:al){
            System.out.println(p);
        }
        //System.out.println("aaaa");
    }
    /*public static void show(ArrayList<Student> al2){
        for(Student s:al2){
            System.out.println(s);
        }
    }*/
}
实现类:LinkedList
基本代码
【1】基本代码:
package com.bjsxt.test07;
import java.util.LinkedList;
public class Test {
    /*
    LinkedList常用方法:
    增加:addFirst(E e)    addLast(E e)
          offerFirst(E e)   offerLast(E e)
    删除:pollFirst()   pollLast()--->JDK1.6  处理异常的方式更加健壮。
        removeFirst()  removeLast()--->JDK1.2
    修改:
    查看:getFirst()  getLast()
         peekFirst()   peekLast()
    判断:
     */
    public static void main(String[] args) {
        LinkedList<String> list=new LinkedList<String>();
        list.add("aaa");
        list.add("bbb");
        list.add("ccc");
        list.add("eee");
        list.add("ffff");
        System.out.println(list);
        list.clear();
        list.pollFirst();
        list.pollLast();
        /* System.out.println(list);*/
        /*list.removeFirst();
        list.removeLast();*/
      /*  System.out.println(list);*/
    }
}
【2】底层结构:
public class Test {

    public static void main(String[] args) {
        LinkedList<String> list=new LinkedList<String>();
        list.add("aaa");
        list.add("bbb");
        list.add("ccc");

    }
}
【3】遍历:
public class Test {
    public static void main(String[] args) {
        LinkedList<String> list=new LinkedList<String>();
        list.add("aaa");
        list.add("bbb");
        list.add("ccc");
        list.add("eee");
        list.add("ffff");
        //遍历:
        //普通for循环:
        for(int i=0;i<=list.size()-1;i++){
            System.out.println(list.get(i));
        }
        //增强for:
        for(String s:list){
            System.out.println(s);
        }

        //迭代器:
        //理解简单
        /*Iterator<String> it = list.iterator();
        while(it.hasNext()){
            System.out.println(it.next());
        }*/
        System.out.println("-----------");
        //虽然难理解,但是这个好:
        for(Iterator<String> it = list.iterator();it.hasNext();){
            System.out.println(it.next());
        }
    }
}
扩展
添加链接描述
模拟LinkedList
【1】add方法模拟:
package com.bjsxt.test08;
public class Node {//结点类
    //定义属性:
    private Object pre;//结点的前一个元素的指向
    private Object obj;//结点当前的元素
    private Object next;//结点的后一个元素的指向
    //提供setget方法:
    public Object getPre() {
        return pre;
    }
    public void setPre(Object pre) {
        this.pre = pre;
    }
    public Object getObj() {
        return obj;
    }
    public void setObj(Object obj) {
        this.obj = obj;
    }
    public Object getNext() {
        return next;
    }
    public void setNext(Object next) {
        this.next = next;
    }
    @Override
    public String toString() {
        return ""+obj;
    }
}
package com.bjsxt.test08;
public class MyLinkedList {
//这个链表中一定有一个头结点
Node first;
//这个链表中一定有一个尾结点
Node last;
//计数器:
int count=0;
public MyLinkedList(){}
//添加元素:
public void add(Object o){
//如果你放入的是第一个元素:
if(first==null){
//创建一个结点的对象:
Node n=new Node();
n.setPre(null);
n.setObj(o);
n.setNext(null);
//将这个链表的first和last都指向这个新的结点:
first=n;
last=n;
}else{//第二个结点以后都走这个分支:
//创建一个结点的对象:
Node n=new Node();
n.setPre(last);//放入当前链表中的last结点
n.setObj(o);
n.setNext(null);
//在将链表中的最后一个结点的next指向 新创建的结点
last.setNext(n);
//将链表的最后一个结点变成我新创建的结点
last=n;
}
count++;
}
public Object get(int index){
Node n=first;
for(int i=0;i<index;i++){
n=(Node)(n.getNext());
}
return n.getObj();
}
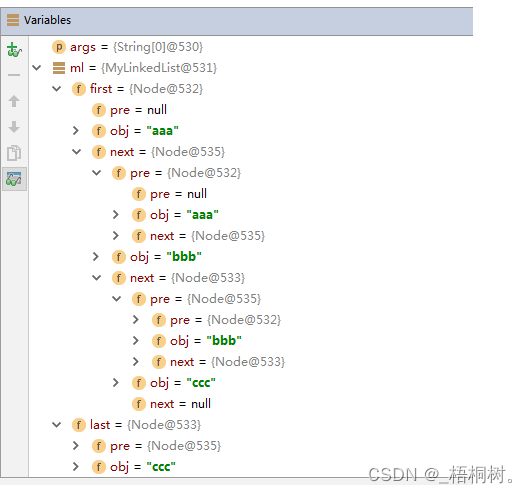
public static void main(String[] args) {
//创建我自定义的链表集合的对象:
MyLinkedList ml=new MyLinkedList();
ml.add("aaa");
ml.add("bbb");
ml.add("ccc");
System.out.println(ml.count);
System.out.println(ml.get(2));;//通过索引得到元素
}
}
【2】源码简单查看:
a.构造器:
public LinkedList() {
    }
b.add第一个元素:
 //假如放入的是第一个结点“aaa”-->first=null  last=null
         void linkLast(E e) {//"aaa"
        final Node<E> l = last;//l:null
                //将我放入的元素封装成为一个Node对象:利用构造器进行赋值:(null,"aaa",null)
        final Node<E> newNode = new Node<>(l, e, null);
        last = newNode;//将链中last指向新的结点newNode
        if (l == null)//走
            first = newNode;//将链中first指向新的结点newNode
        else
            l.next = newNode;
        size++;//size计数器加1
        modCount++;
    }
c.add第2个元素:
//假如放入的是第2个结点“bbb”-->first="aaa"  last="aaa"
         void linkLast(E e) {//"bbb"
        final Node<E> l = last;//l:"aaa"
                //将我放入的元素封装成为一个Node对象:利用构造器进行赋值:("aaa","bbb",null)
        final Node<E> newNode = new Node<>(l, e, null);
        last = newNode;//将链中last指向新的结点newNode
        if (l == null)//不走
            first = newNode;
        else//走
            l.next = newNode;//将“aaa”的下一个指向newNode
        size++;//size计数器再加1
        modCount++;
    }
d.clear()
 public void clear() {
        // Clearing all of the links between nodes is "unnecessary", but:
        // - helps a generational GC if the discarded nodes inhabit
        //   more than one generation
        // - is sure to free memory even if there is a reachable Iterator
        for (Node<E> x = first; x != null; ) {
            Node<E> next = x.next;
            x.item = null;
            x.next = null;
            x.prev = null;
            x = next;
        }
        first = last = null;
        size = 0;
        modCount++;
    }
e.get(index)
size是链表的计数器,size/2将索引分为左右两部分,
如果是左面的部分:正序查找
如果是右面的部分:倒叙查找
 */
    Node<E> node(int index) {
        // assert isElementIndex(index);
        if (index < (size >> 1)) {
            Node<E> x = first;
            for (int i = 0; i < index; i++)
                x = x.next;
            return x;
        } else {
            Node<E> x = last;
            for (int i = size - 1; i > index; i--)
                x = x.prev;
            return x;
        }
    }
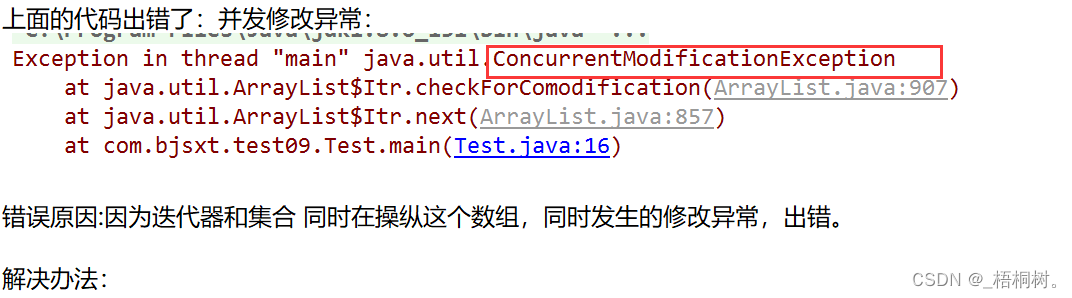
面试:iterator(),Iterator,Iterable关系
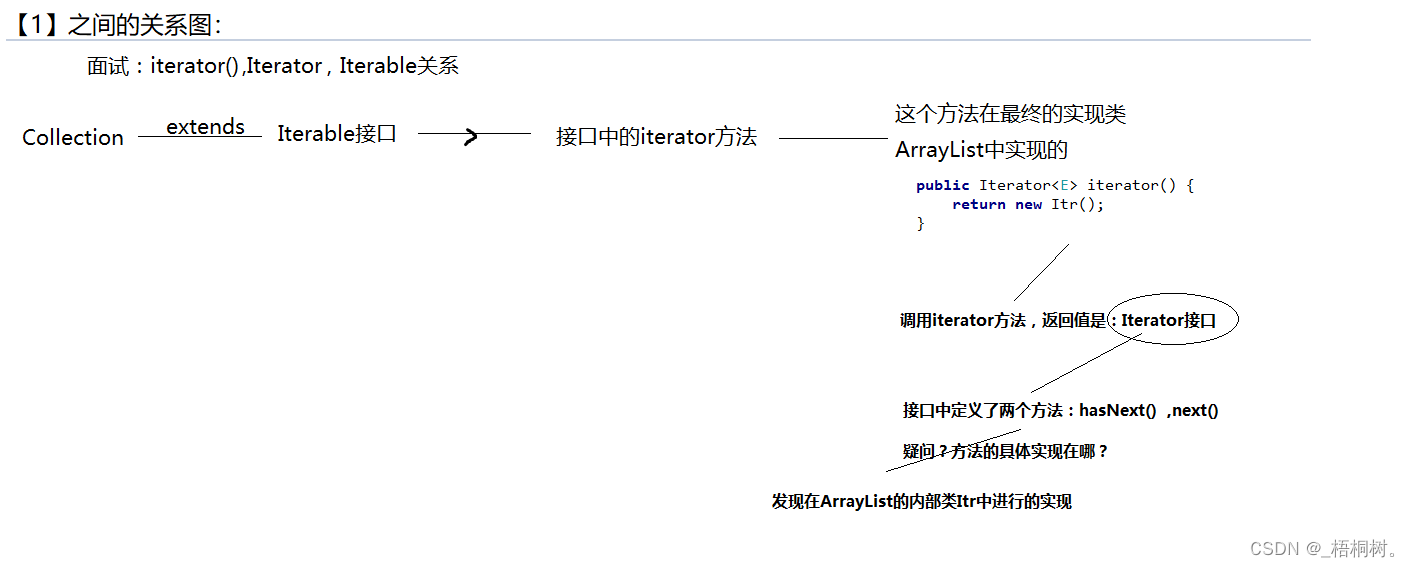
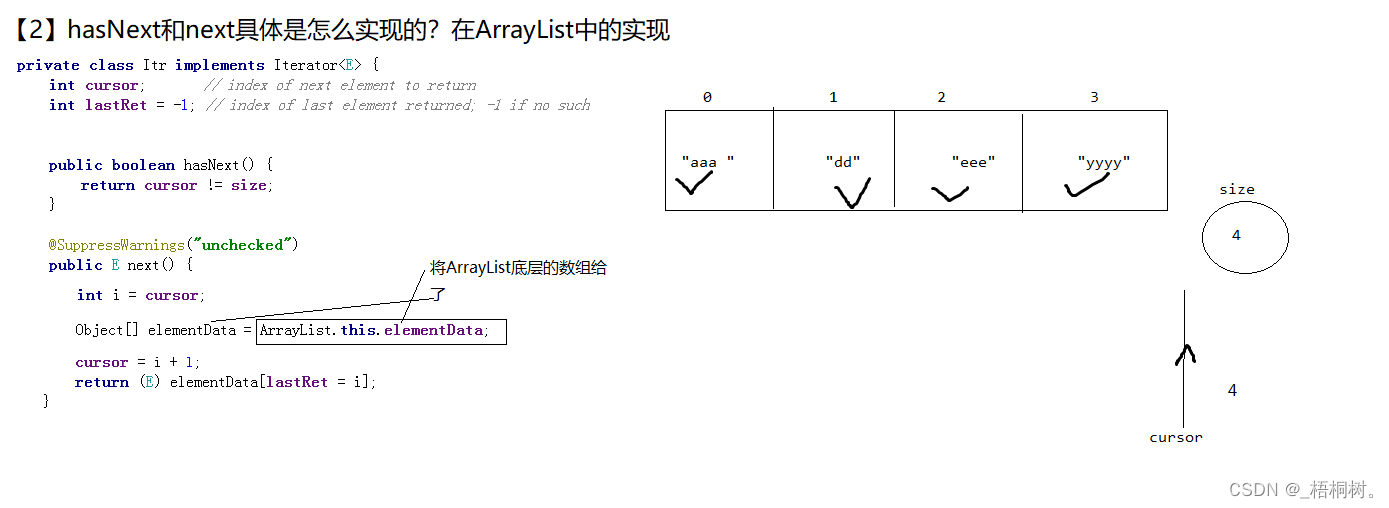
ListIterator
【1】在指定的字符串之后添加一个新的字符串:
public class Test {
    public static void main(String[] args) {
        ArrayList al=new ArrayList();
        al.add("aaa");
        al.add("bbb");
        al.add("ccc");
        al.add("ddd");
        //在“ccc”之后添加一个字符串“eeeeee”:
        Iterator it = al.iterator();
        while(it.hasNext()){
            if("ccc".equals(it.next())){
                al.add("eeeeee");
            }
        }
    }
}
public class Test {
    public static void main(String[] args) {
        ArrayList al=new ArrayList();
        al.add("aaa");
        al.add("bbb");
        al.add("ccc");
        al.add("ddd");
        //在“ccc”之后添加一个字符串“eeeeee”:
        ListIterator li = al.listIterator();
        while(li.hasNext()){
            if("ccc".equals(li.next())){
                li.add("eeeee");
            }
        }
        System.out.println(al);
    }
}
可以进行倒序遍历:
public class Test {
    public static void main(String[] args) {
        ArrayList al=new ArrayList();
        al.add("aaa");
        al.add("bbb");
        al.add("ccc");
        al.add("ddd");
        //在“ccc”之后添加一个字符串“eeeeee”:
        ListIterator li = al.listIterator();
        while(li.hasNext()){
            if("ccc".equals(li.next())){
                li.add("eeeee");
            }
        }
        //System.out.println(li.hasNext());
        //System.out.println(li.hasPrevious());
        //倒着遍历:
        while(li.hasPrevious()){
            System.out.println(li.previous());
        }
        System.out.println(li.hasPrevious());
        System.out.println(li.hasNext());
        //System.out.println(al);
    }
}
第二个子接口Set
HashSet
【1】放入Integer类型数据:
public class Test {
    public static void main(String[] args) {
        //创建一个Set集合:
        Set set=new HashSet();
        set.add(12);
        System.out.println(set.add(26));//true--->放进去了返回true
        set.add(6);
        set.add(7);
        System.out.println(set.add(26));//false--->没放进去返回的是false
        set.add(1);
        System.out.println(set);//特点:唯一,无序
        System.out.println(set.size());//5
    }
}
【2】放入String类型数据:
public class Test {
    public static void main(String[] args) {
        //创建一个Set集合:
        Set set=new HashSet();
        set.add("java");
        System.out.println(set.add("html"));//true--->放进去了返回true
        set.add("css");
        set.add("jQuery");
        System.out.println(set.add("html"));//false--->没放进去返回的是false
        set.add("Mybatis");
        System.out.println(set);//特点:唯一,无序
        System.out.println(set.size());//5
    }
}
【3】放入自定义的引用数据类型:
public class Test {
    public static void main(String[] args) {
        Set set=new HashSet();
        set.add(new Student(18,"nana",180.4));
        System.out.println(set.add(new Student(21,"feifei",160.4)));
        set.add(new Student(27,"lili",150.4));
        System.out.println( set.add(new Student(21,"feifei",160.4)));
        set.add(new Student(16,"lulu",170.4));
        System.out.println(set);
        System.out.println(set.size());
    }
}
public class Student {
    private int age;
    private String name;
    private double height;
    public int getAge() {
        return age;
    }
    public void setAge(int age) {
        this.age = age;
    }
    public String getName() {
        return name;
    }
    public void setName(String name) {
        this.name = name;
    }
    public double getHeight() {
        return height;
    }
    public void setHeight(double height) {
        this.height = height;
    }
    public Student(int age, String name, double height) {
        this.age = age;
        this.name = name;
        this.height = height;
    }
    @Override
    public String toString() {
        return "Student{" +
                "age=" + age +
                ", name='" + name + '\'' +
                ", height=" + height +
                '}';
    }
}
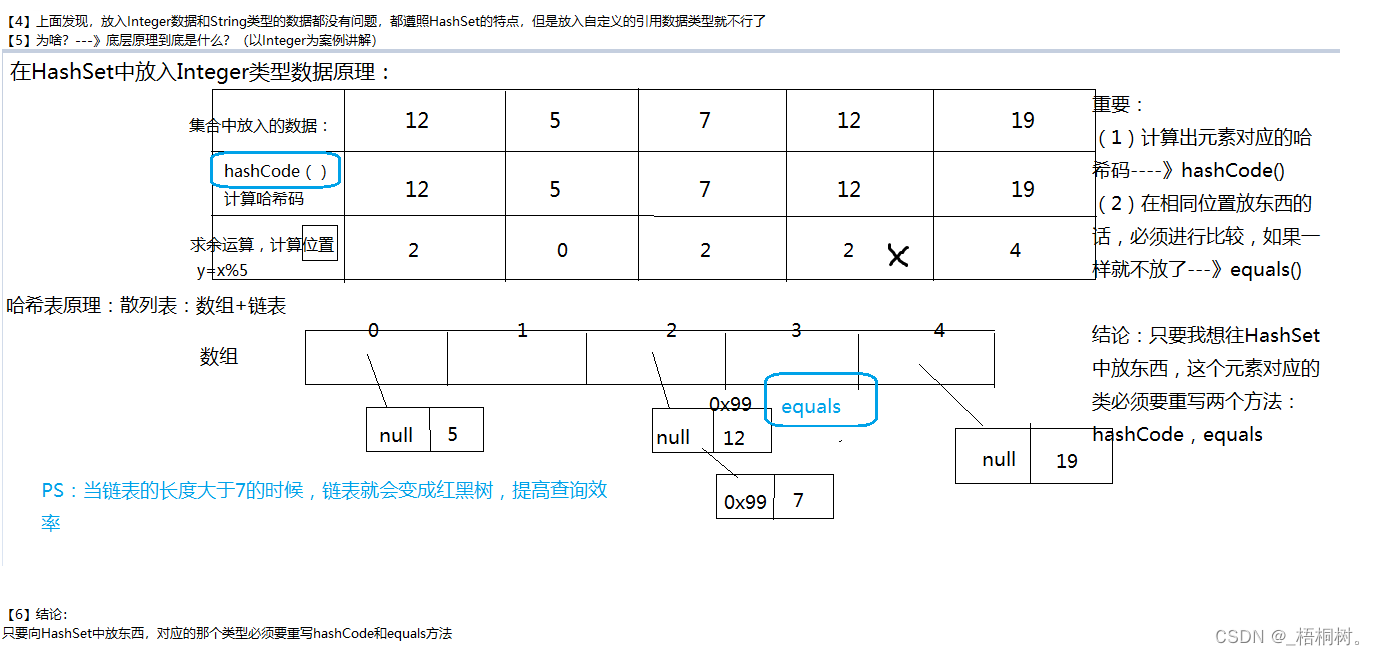
深入理解HashSet
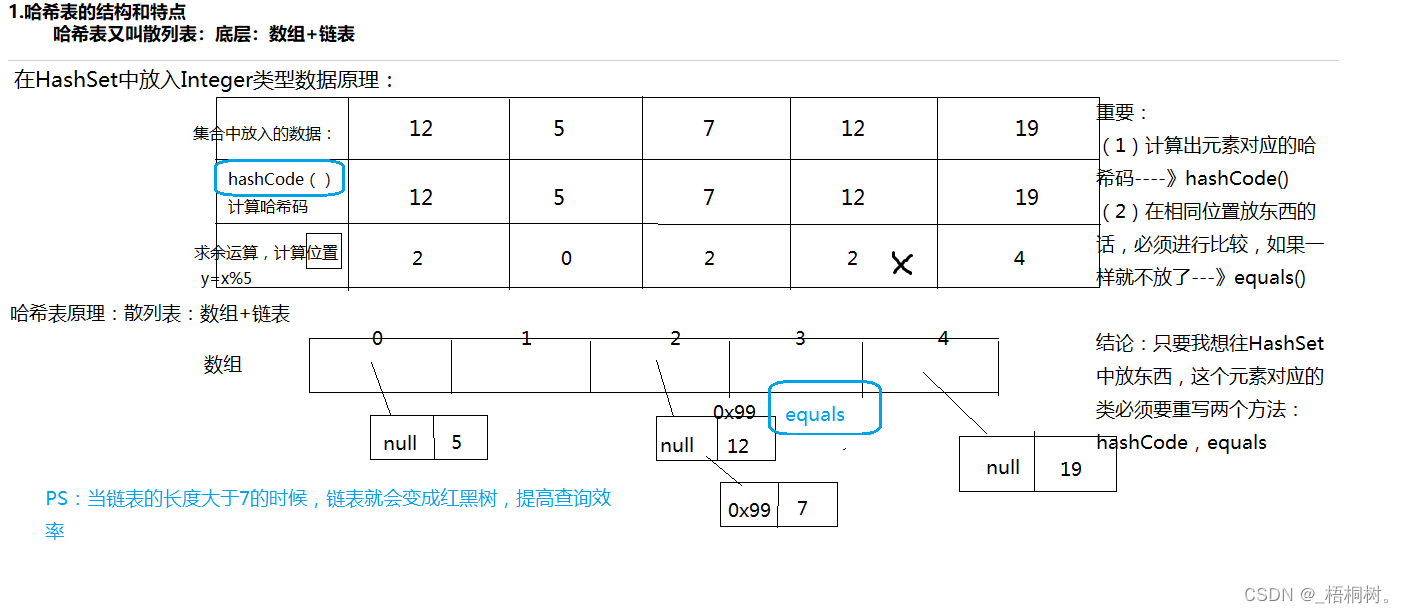
2.哈希表是如何查找数据的,如何添加数据的
1.计算哈希 码(调用hashCode(),结果是一个int值,整数的哈希码取自身即可)
2.计算在哈希表中的存储位置 y=k(x)=x%11 x:哈希码 k(x) 函数 y:在哈希表中的存储位置
3.存入哈希表
情况1:一次添加成功
情况2:多次添加成功(出现了冲突,调用equals()和对应链表的元素进行比较,
比较到最后,结果都是false,创建新节点,存储数据,并加入链表末尾)
情况3:不添加(出现了冲突,调用equals()和对应链表的元素进行比较,
经过一次或者多次比较后,结果是true,表明重复,不添加)
             结论1:哈希表添加数据快(3步即可,不考虑冲突)
             结论2:唯一
             结论2:无序3.哈希表是如何查询数据的
             和添加数据的过程是相同的
             情况1:一次找到   23  86  76
             情况2:多次找到   67  56  78
             情况3:找不到   100 200
             结论1:哈希表查询数据快
4.hashCode和equals到底有什么神奇的作用
hashCode():计算哈希码,是一个整数,根据哈希码可以计算出数据在哈希表中的存储位置
equals():添加时出现了冲突,需要通过equals进行比较,判断是否相同
查询时也需要使用equals进行比较,判断是否相同
5.并且执行了几次?
hashCode是放入几个元素,就执行几次
equals:在相同位置放入元素的时候才会去比较。
6.各种类型数据的hashCode()返回的值是什么?
Integer:返回的就是value值
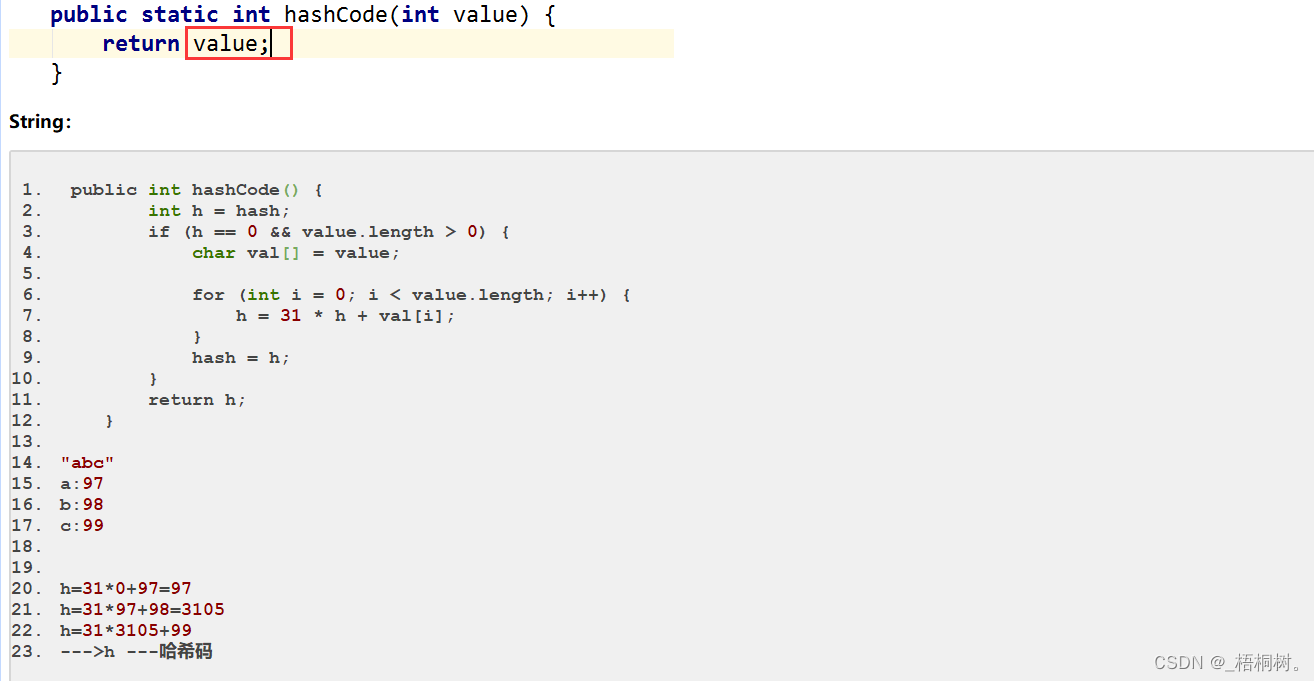

7.equals方法又是怎么比较的呢?
8.如何减少冲突
1)哈希表的长度和表中的记录数的比例–装填因子:
如果Hash表的空间远远大于最后实际存储的记录个数,则造成了很大的空间浪费,
如果选取小了的话,则容易造成冲突。
在实际情况中,一般需要根据最终记录存储个数和关键字的分布特点来确定Hash表的大小。
还有一种情况时可能事先不知道最终需要存储的记录个数,则需要动态维护Hash表的容量,此时可能需要重新计算Hash地址。
装填因子=表中的记录数/哈希表的长度, 4/ 16 =0.25 8/ 16 =0.5 12/16=0.75
如果装填因子越小,表明表中还有很多的空单元,则添加发生冲突的可能性越小;
而装填因子越大,则发生冲突的可能性就越大,在查找时所耗费的时间就越多。
有相关文献证明当装填因子在0.5左右的时候,Hash的性能能够达到最优。
因此,一般情况下,装填因子取经验值0.5。
2)哈希函数的选择
直接定址法 平方取中法 折叠法 除留取余法(y = x%11)
查询相关资料
3)链地址法(数组里面是链表)
当然还有其他的方法:开放地址法,再散列法,建立一个公共溢出区
复习
【1】hashCode()是做什么事的?
放入的类型要重写这个方法,然后返回一个int类型的数,–》哈希码
得到哈希码,根据一个表达式,算出在主数组中的位置。
【2】equals()是做什么事的?
当在相同位置放元素的时候,要先进行比较(只比较是否相等即可,不用比谁大谁小)
【3】底层的计算位置的表达式 真的是取余数那个吗?不一定
y=x%5–没有验证
【4】底层主数组长度是多少??–没有验证
【5】数组长度为16,但是我放了20个元素,现在冲突的概率是不是就大了
有没有处理办法???—》扩容 --没有验证
【6】主数组—》是什么类型的?–没有验证
【7】数组中的那个链表啥样的?结点啥样?–没有验证
【8】链表追加元素 请问在哪加?–没有验证
TreeSet
【1】放入Integer类型数据:
public class Test {
    public static void main(String[] args) {
        Set set=new TreeSet();
        set.add(12);
        System.out.println(set.add(3));;
        set.add(7);
        set.add(9);
        System.out.println(set.add(3));;
        set.add(16);
        System.out.println(set);//有序:按照升序进行排列   无序:没有按照输入顺序进行输出
        System.out.println(set.size());//5:   唯一
    }
}
【3】验证Integer底层真的实现了内部比较器:

【4】放入String类型数据:
public class Test {
    public static void main(String[] args) {
        Set set=new TreeSet();
        set.add("cjava");
        System.out.println(set.add("ejava"));;
        set.add("ajava");
        set.add("djava");
        System.out.println(set.add("ejava"));;
        set.add("bjava");
        System.out.println(set);//有序:按照升序进行排列   无序:没有按照输入顺序进行输出
        System.out.println(set.size());//5:   唯一

    }
}

【5】放入自定义的引用数据类型的数据:
必须实现内部比较器:
package com.bjsxt.test03;
public class Student implements Comparable {
    @Override
    public int compareTo(Object o) {
        //比较规则:
        //按照年龄排序:
        Student other=(Student)o;
        //return -(this.getAge()-other.getAge());
        //按照身高比较:
        //return ((Double)(this.getHeight())).compareTo((Double)(other.getHeight())) ;
        //按照姓名比较:
        //return this.getName().compareTo(other.getName());
        //按照姓名和年龄比较。
        if(this.getName().compareTo(other.getName())==0){//姓名相等了才比较年龄,
            return this.getAge()-other.getAge();
        }else{//姓名不等
            return this.getName().compareTo(other.getName());
        }
    }
    private String name;
    private int age;
    private double height;
    public String getName() {
        return name;
    }
    public void setName(String name) {
        this.name = name;
    }
    public int getAge() {
        return age;
    }
    public void setAge(int age) {
        this.age = age;
    }
    public double getHeight() {
        return height;
    }
    public void setHeight(double height) {
        this.height = height;
    }
    public Student(String name, int age, double height) {
        this.name = name;
        this.age = age;
        this.height = height;
    }
    @Override
    public String toString() {
        return "Student{" +
                "name='" + name + '\'' +
                ", age=" + age +
                ", height=" + height +
                '}';
    }
}
package com.bjsxt.test03;
import java.util.Set;
import java.util.TreeSet;
public class Test {
    public static void main(String[] args) {
        Set set=new TreeSet();
        set.add(new Student("alili",17,170.4));
        set.add(new Student("blili",14,160.4));
        set.add(new Student("alili",12,180.4));
        set.add(new Student("clili",21,140.4));
        set.add(new Student("alili",14,160.4));
        set.add(new Student("elili",10,150.4));
        System.out.println(set);
        System.out.println(set.size());
    }
}
利用外部比较器:
package com.bjsxt.test03;
import java.util.Comparator;
public class Student  {
    private String name;
    private int age;
    private double height;
    public String getName() {
        return name;
    }
    public void setName(String name) {
        this.name = name;
    }
    public int getAge() {
        return age;
    }
    public void setAge(int age) {
        this.age = age;
    }
    public double getHeight() {
        return height;
    }
    public void setHeight(double height) {
        this.height = height;
    }
    public Student(String name, int age, double height) {
        this.name = name;
        this.age = age;
        this.height = height;
    }
    @Override
    public String toString() {
        return "Student{" +
                "name='" + name + '\'' +
                ", age=" + age +
                ", height=" + height +
                '}';
    }
}
class BiJiao01 implements Comparator{
    @Override
    public int compare(Object o1, Object o2) {
        //规则:按照年龄比较:
        Student s1=(Student)o1;
        Student s2=(Student)o2;
        return s1.getAge()-s2.getAge();
    }
}
class BiJiao02 implements Comparator{
    @Override
    public int compare(Object o1, Object o2) {
        //规则:按照姓名比较:
        Student s1=(Student)o1;
        Student s2=(Student)o2;
        return s1.getName().compareTo(s2.getName());
    }
}
package com.bjsxt.test03;
import java.util.Comparator;
import java.util.Set;
import java.util.TreeSet;
public class Test {
    public static void main(String[] args) {
        // BiJiao02 bj=new BiJiao02();
        // Comparator bj=new BiJiao02();//多态
        //将外部比较器跟TreeSet集合利用构造器进行关联。
        //匿名内部类:如果这个比较规则  在项目中只用一次,就用匿名内部类写即可。
        Set set=new TreeSet(new Comparator() {
            @Override
            public int compare(Object o1, Object o2) {
                //规则:按照姓名比较:
                Student s1=(Student)o1;
                Student s2=(Student)o2;
                return s1.getName().compareTo(s2.getName());
            }
        });
        set.add(new Student("alili",17,170.4));
        set.add(new Student("blili",14,160.4));
        set.add(new Student("alili",12,180.4));
        set.add(new Student("clili",21,140.4));
        set.add(new Student("alili",14,160.4));
        set.add(new Student("elili",10,150.4));
        System.out.println(set);
        System.out.println(set.size());
    }
}
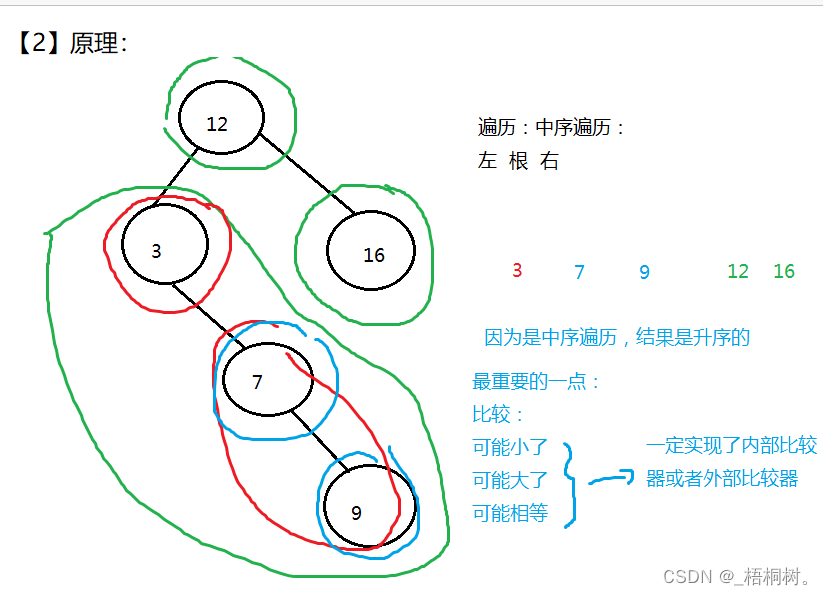
总结:
底层:二叉树
只要是放进去的自定义的引用数据类型,比较实现内部比较器或者外部比较器
完整结构图

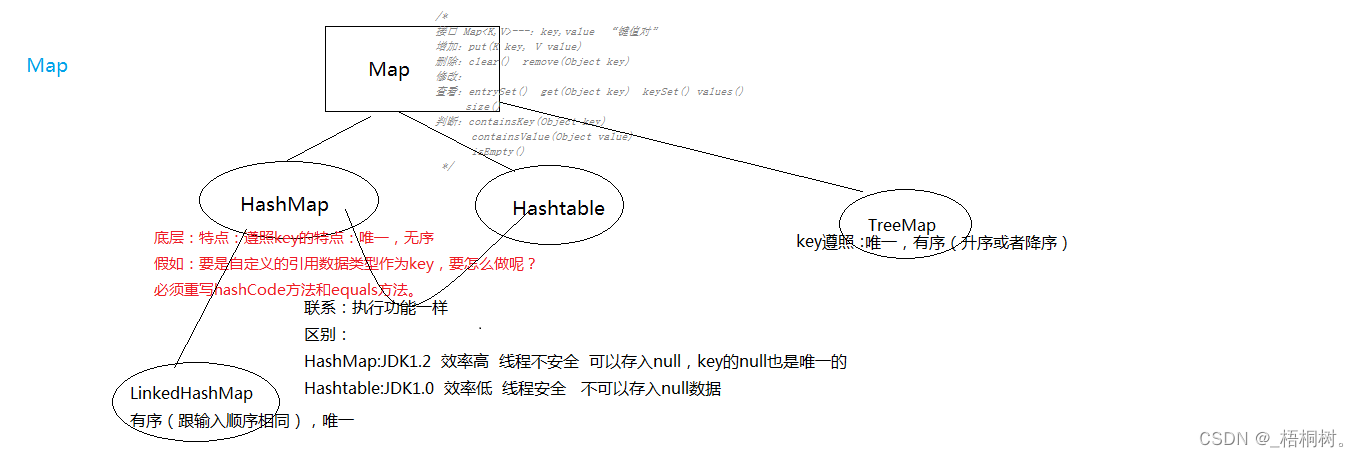
Map接口
HashMap
【1】总结:
HashMap的特点是按照key来说的,无序,唯一
HashMap中提供了各种方法,对于查找的方法很全面:
对key遍历,对value遍历,对key-value的映射键值对 一起遍历的
package com.bjsxt.test01;
import java.util.Collection;
import java.util.HashMap;
import java.util.Map;
import java.util.Set;
public class Test {
    /*
    接口 Map<K,V>---:key,value  “键值对”
    增加:put(K key, V value)
    删除:clear()  remove(Object key)
    修改:
    查看:entrySet()  get(Object key)  keySet() values()
         size()
    判断:containsKey(Object key)
          containsValue(Object value)
          isEmpty()
     */
    public static void main(String[] args) {
        //创建一个Map集合的对象:
        Map<Integer,String> map=new HashMap<Integer,String>();
        map.put(16,"zhaoss");//存入的成对的信息,存入的键值对,都是有映射关系。
        System.out.println( map.put(8,"lili"));//null---这个value把谁替换了
        map.put(4,"nana");
        System.out.println(map.put(6,"lulu"));//lili
        map.put(2,"feifei");
        System.out.println(map.put(8,"ganggang"));//lulu
       // map.clear();
        //map.remove(4);
        /*System.out.println(map);
        System.out.println(map.size());//特点:唯一,无序(按照key来总结的特点)
        System.out.println(map.containsKey(4555));;
        System.out.println(map.containsValue("lili"));
        map.clear();
        System.out.println(map.isEmpty());*/
        //遍历:查看: get(Object key)
        //keySet();对集合的key部分做遍历
        System.out.println("------------");
        Set<Integer> set = map.keySet();
        for(Integer i:set){
            System.out.println(i);
        }
        System.out.println("------------");
        //values()对集合的value部分做遍历
        Collection<String> col = map.values();
        for(String s:col){
            System.out.println(s);
        }
        System.out.println("------------");
        for(Integer i:set){
            System.out.println(map.get(i));
        }
        System.out.println("------------");
        //entrySet()
        //entrySet方法返回值为Set类型,有泛型,泛型为:Entry类型---》这个东西是Map接口的内部接口
        //这个接口又有两个泛型<Integer, String>
        Set<Map.Entry<Integer, String>> set1 = map.entrySet();
        for(Map.Entry<Integer, String> m:set1){
            System.out.println(m.getKey()+"-----"+m.getValue());
        }
    }
}
【2】将代码中的HashMap全部替换为Hashtable,发现结果一模一样
TreeMap
【1】内部比较器:
package com.bjsxt.test02;
import java.util.TreeMap;
public class Test {
    public static void main(String[] args) {
        TreeMap<Student,String> tm=new TreeMap<Student,String>();
        Student s1=new Student("lili",18,160.4);
        tm.put(s1,s1.getName());
        Student s2=new Student("glili",16,160.4);
        tm.put(s2,s2.getName());
        Student s3=new Student("lasdf",18,160.4);
        tm.put(s3,s3.getName());
        Student s4=new Student("ttti",12,160.4);
        tm.put(s4,s4.getName());
        System.out.println(tm);
        System.out.println(tm.size());
    }
}
package com.bjsxt.test02;
public class Student implements Comparable {
    private String name;
    private int age;
    private double height;
    public String getName() {
        return name;
    }
    public void setName(String name) {
        this.name = name;
    }
    public int getAge() {
        return age;
    }
    public void setAge(int age) {
        this.age = age;
    }
    public double getHeight() {
        return height;
    }
    public void setHeight(double height) {
        this.height = height;
    }
    public Student(String name, int age, double height) {
        this.name = name;
        this.age = age;
        this.height = height;
    }
    @Override
    public String toString() {
        return "Student{" +
                "name='" + name + '\'' +
                ", age=" + age +
                ", height=" + height +
                '}';
    }
    @Override
    public int compareTo(Object o) {
        Student other=(Student)o;
        return this.getAge()-other.getAge();
    }
}
【2】外部比较器:
package com.bjsxt.test02;
import java.util.Comparator;
import java.util.TreeMap;
public class Test {
    public static void main(String[] args) {
        TreeMap<Student,String> tm=new TreeMap<Student,String>(new Comparator<Student>() {
            @Override
            public int compare(Student o1, Student o2) {
                Student s1=(Student)o1;
                Student s2=(Student)o2;
                return s1.getAge()-s2.getAge();
            }
        });
        Student s1=new Student("lili",18,160.4);
        tm.put(s1,s1.getName());
        Student s2=new Student("glili",16,160.4);
        tm.put(s2,s2.getName());
        Student s3=new Student("lasdf",18,160.4);
        tm.put(s3,s3.getName());
        Student s4=new Student("ttti",12,160.4);
        tm.put(s4,s4.getName());
        System.out.println(tm);
        System.out.println(tm.size());
    }
}
package com.bjsxt.test02;
public class Student  {
    private String name;
    private int age;
    private double height;
    public String getName() {
        return name;
    }
    public void setName(String name) {
        this.name = name;
    }
    public int getAge() {
        return age;
    }
    public void setAge(int age) {
        this.age = age;
    }
    public double getHeight() {
        return height;
    }
    public void setHeight(double height) {
        this.height = height;
    }
    public Student(String name, int age, double height) {
        this.name = name;
        this.age = age;
        this.height = height;
    }
    @Override
    public String toString() {
        return "Student{" +
                "name='" + name + '\'' +
                ", age=" + age +
                ", height=" + height +
                '}';
    }
}
Map结构图
源码
HashMap,HashSet
【1】看HashMap的空构造器,put方法,get方法:
HashMap<Integer,String> hm=new HashMap<Integer,String>();
public class HashMap<K,V>{//K:--->Integer   V:--->String
        //就是Hash表原理底层最重要的那个主数组:
        //这个主数组是什么类型的:Entry
        transient Entry<K,V>[] table;
        static final int DEFAULT_INITIAL_CAPACITY = 16;//要赋给主数组:长度是16
        static final float DEFAULT_LOAD_FACTOR = 0.75f;//装填因子
        transient int size;//计数器:用来计数放入的元素的数量的
        final float loadFactor;//一会用来接收装填因子的
        int threshold;//用来接收 数组的最大承重  16*0.75=12

        //发现Entry这个类是HashMap的一个内部类
        static class Entry<K,V> implements Map.Entry<K,V> {
                //4个属性:
        final K key;//Integer key;---:键值对的“key”
        V value;//String value---->键值对的“value”
        Entry<K,V> next;//指向下一个结点
        int hash;//哈希码
        /**
         * 构造器:创建Entry对象初始化
         */
        Entry(int h, K k, V v, Entry<K,V> n) {
            value = v;
            next = n;
            key = k;
            hash = h;
        }
        }

        //空构造器:
        public HashMap() {
                //调用了本类的带参构造器  this(16,0.75f);
        this(DEFAULT_INITIAL_CAPACITY, DEFAULT_LOAD_FACTOR);//
    }

        public HashMap(int initialCapacity, float loadFactor) {//(16,0.75f)
        int capacity = 1;
        while (capacity < initialCapacity)
            capacity <<= 1;
        this.loadFactor = loadFactor;//loadFactor=0.75
        threshold = (int)Math.min(capacity * loadFactor, MAXIMUM_CAPACITY + 1);
                //threshold:12

        table = new Entry[capacity];
                //table = new Entry[16]--->主数组长度为16,创建了一个长度为16的主数组
        useAltHashing = sun.misc.VM.isBooted() &&
                (capacity >= Holder.ALTERNATIVE_HASHING_THRESHOLD);
        init();
    }


        //hm.put(12,"aaa");
        public V put(K key, V value) {K:--->Integer   V:--->String
            //对key是否为空的判断
        if (key == null)
            return putForNullKey(value);

                //计算key的哈希码:底层进行了二次散列 :h ^= k.hashCode();为了避免哈希码重复
        int hash = hash(key);

                //计算key最在主数组的位置
                //底层计算:h & (length-1)  其实他就相当于:h%(length-1)取余数
        int i = indexFor(hash, table.length);//  假如人家算出来是:i=3


                //1.假如放入的是第一个元素:table[3]是null  将table[3]给了e
                //2.e=null --》不满足e!=null--->for循环不走


                //9.再次往下标为3的位置上放东西:
                //10table[3]-->0x99-->e  :  e--->0x99
                //11. e!=null-->满足-->走入for循环中
        for (Entry<K,V> e = table[i];
                     e != null;
                     e = e.next) {
                                Object k;
                                //12.底层调用equals进行比较。判断是否一样。
                                //如果一样,走入if
                                //如果不一样

                                if (e.hash == hash && ((k = e.key) == key || key.equals(k))) {

                                        V oldValue = e.value;//将老的value给oldValue变量
                                        e.value = value;//将老的value替换为新的value
                                        e.recordAccess(this);
                                        return oldValue;//将老的value返回,然后可以在控制台输出
                                }
        }

                //3.上面循环不走直接走下面的代码:
        modCount++;
                //4.addEntry(key的哈希码,key,value,元素的位置3)
                //13.开始添加结点:
        addEntry(hash, key, value, i);
        return null;
    }

        //5.参数:(key的哈希码,key,value,元素的位置3)
        void addEntry(int hash, K key, V value, int bucketIndex) {
                //如果size的值大于12这个极限数字了,那么底层的主数组要扩容为原来的二倍
        if ((size >= threshold) && (null != table[bucketIndex])) {
            resize(2 * table.length);
            hash = (null != key) ? hash(key) : 0;
            bucketIndex = indexFor(hash, table.length);
        }
        createEntry(hash, key, value, bucketIndex);
    }
        //6.参数:(key的哈希码,key,value,元素的位置3)
        void createEntry(int hash, K key, V value, int bucketIndex) {

                //14.e:table[3]--->0x99
        Entry<K,V> e = table[bucketIndex];//7.e:null
                //8.table[3]=new Entry(key的哈希码,key,value,null)
                //15.new Entry(哈希码,key,value,0x99)
        table[bucketIndex] = new Entry<>(hash, key, value, e);
        size++;
    }
        //16   new Entry(哈希码,key,value,0x99)
             Entry(int h, K k, V v, Entry<K,V> n) {
            value = v;//value=value
            next = n;//next=null
            key = k;//key=key
            hash = h;//hash=哈希码
        }


        //通过key获取value
        public V get(Object key) {
                //判断key是否为null
        if (key == null)
            return getForNullKey();
        Entry<K,V> entry = getEntry(key);
        return null == entry ? null : entry.getValue();
    }
}
在JDK1.7以前,插入元素是在链表的头插入
在JDK1.8以后,插入元素是在链表的尾部插入
在JDK。18以后,当链表的长度大于8的时候,底层变成了红黑树
【2】HashSet源码:
public class HashSet{


        //底层:是一个Map:
        private transient HashMap<E,Object> map;

        //空构造器:构建Map
        public HashSet() {
        map = new HashMap<>();
    }

        public boolean add(E e) {
                //给set添加元素其实底层就是给map put元素呢
        //put将元素放入map的key位置 ,value位置放入的就是Object对象
        return map.put(e, PRESENT)==null;
    }

        //就是一个Object对象
        private static final Object PRESENT = new Object();

        public Iterator<E> iterator() {
        return map.keySet().iterator();
    }

}
TreeMap,TreeSet
public class TreeMap{


        private final Comparator<? super K> comparator;//comparator用来接收:外部比较器:


        //空构造器:
        public TreeMap() {
        comparator = null;//没有指定外部比较器
    }
        //带参构造器
        public TreeMap(Comparator<? super K> comparator) {
        this.comparator = comparator;//指定外部比较器
    }

        private transient Entry<K,V> root = null;//初始化root为null
        private transient int size = 0;//计算
        public V put(K key, V value) {//添加元素

        Entry<K,V> t = root;


                //t=null意味着这个树中还没有结点呢
        if (t == null) {
                        //比较:自己跟自己比
            compare(key, key); // type (and possibly null) check
//
            root = new Entry<>(key, value, null);
            size = 1;
            modCount++;
            return null;
        }
        int cmp;
        Entry<K,V> parent;
        //将外部比较器给了cpr
        Comparator<? super K> cpr = comparator;
                //判断cpr是不是null
                //不是空---》指定了外部比较器
        if (cpr != null) {
            do {
                parent = t;
                cmp = cpr.compare(key, t.key);
                if (cmp < 0)
                    t = t.left;
                else if (cmp > 0)
                    t = t.right;
                else
                    return t.setValue(value);
            } while (t != null);
        }
                //是空---》指定了内部比较器
        else {
            if (key == null)
                throw new NullPointerException();
            Comparable<? super K> k = (Comparable<? super K>) key;
            do {
                parent = t;
                cmp = k.compareTo(t.key);
                if (cmp < 0)
                    t = t.left;
                else if (cmp > 0)
                    t = t.right;
                else
                    return t.setValue(value);
            } while (t != null);
        }
        Entry<K,V> e = new Entry<>(key, value, parent);
        if (cmp < 0)
            parent.left = e;
        else
            parent.right = e;
        fixAfterInsertion(e);
        size++;
        modCount++;
        return null;
    }


}
验证红黑树
package com.bjsxt.test04;
import java.util.TreeMap;
public class Test {
    public static void main(String[] args) {
        TreeMap<Student,Integer> tm=new TreeMap<Student,Integer>();
        tm.put(new Student(1),1001);
        tm.put(new Student(2),1001);
        tm.put(new Student(3),1001);
        tm.put(new Student(4),1001);
        tm.put(new Student(-5),1001);
    }
}
package com.bjsxt.test04;
public class Student implements  Comparable{
    int age;
    public Student(int age) {
        this.age = age;
    }
    @Override
    public String toString() {
        return age+"";
    }
    @Override
    public int compareTo(Object o) {
        Student s=(Student)o;
        System.out.println(this+"和"+s+"正在进行比较");
        return this.age-s.age;
    }
}
Collections工具类
package com.bjsxt.test007;
import java.util.ArrayList;
import java.util.Collections;

public class TestCollections {
        public static void main(String[] args) {

                ArrayList<String> al=new ArrayList<String>();
                al.add("apple");
                al.add("banana");
                al.add("java");
                System.out.println(al);
                //addAll(Collection<? super T> c, T... elements)
                Collections.addAll(al, "merry","lili","abc");
                System.out.println(al);
                Collections.addAll(al, new String[]{"nihao","jsp"});//可变参数相当于数组
                System.out.println(al);

                //binarySearch(List<? extends Comparable<? super T>> list, T key)
                System.out.println(Collections.binarySearch(al, "lili"));//发现不准确  为什么?因为要对排序后的查找
                Collections.sort(al);
                System.out.println(al);
                System.out.println(Collections.binarySearch(al, "abc"));//发现不准确  为什么?因为要对排序后的查找---返回索引
                System.out.println(Collections.binarySearch(al, "aaaa"));//找不到  返回负数

                //copy(List<? super T> dest, List<? extends T> src)
                ArrayList<String> sl=new ArrayList<String>();
                Collections.addAll(sl, "a","b","c","d","e","a","b","c","d","e");
                System.out.println("==");
                System.out.println(al);
                System.out.println(sl);

                Collections.copy(sl, al);//sl的长度必须大于al的长度的时候在可以进行赋值替换
                System.out.println(al);
                System.out.println(sl);//其实相当于替换


                //fill(List<? super T> list, T obj)
                System.out.println(al);
//		Collections.fill(al, "java");
                System.out.println(al);

                //
                System.out.println(Collections.max(al));;
        }
}
11、IO流
File类
【1】盘符上:什么是文件,什么是文件夹?
有后缀的是:文件
没有后最的:文件夹(目录)
【2】文件,文件夹都可以存放在什么位置上?
C盘第一硬盘
【3】查看文件或者文件夹的属性

public class Test {
    public static void main(String[] args) throws IOException {
        //将程序和文件进行关联:创建File类的对象:
        //File f=new File("d:\\a.txt");
        File f=new File("d:/a.txt");
        //File f=new File("d:"+File.separator+"a.txt");//与系统有关的默认名称分隔符
        //常用方法:
        System.out.println("文件是否可读:"+f.canRead());
        System.out.println("文件是否可写:"+f.canWrite());
        File f2=new File("d:/b.txt");
        System.out.println("比较结果:"+f.compareTo(f2));//按字母顺序比较两个抽象路径名。
        /*if(f.exists()){
            System.out.println("是否删除成功:"+f.delete());
        }else{
            System.out.println("是否创建成功:"+f.createNewFile());//如果不存在,就创建,如果存在,不会重复创建
        }*/
        File f3=new File("d:/a.txt");
        File f4=new File("d:/b.txt");
        System.out.println("地址是否相等:"+(f3==f4));//false
        System.out.println("路径是否相等:"+f3.equals(f4));
        System.out.println("--------------------------------");
        File f5=new File("a.txt");
        if(f5.exists()){
            System.out.println("是否删除成功:"+f5.delete());
        }else{
            System.out.println("是否创建成功:"+f5.createNewFile());//如果不存在,就创建,如果存在,不会重复创建
        }
        System.out.println("绝对路径:"+f5.getAbsolutePath());//在盘符上真正存放的位置
        System.out.println("相对路径:"+f5.getPath());//相对谁而言?相对项目
        System.out.println("toString得到的结果跟相对路径是一样的:"+f5);//toString
        System.out.println("文件的名称:"+f.getName());
        System.out.println("上级目录:"+f.getParent());
        System.out.println("是否是一个目录:"+f.isDirectory());
        System.out.println("是否是一个文件:"+f.isFile());
        System.out.println("是否隐藏:"+f.isHidden());
        System.out.println("文件中的字节数:"+f.length());
    }
}
(2)File类对文件夹进行的操作:
public class Test2 {
    public static void main(String[] args) throws IOException {
        //关联:目录(文件夹)
        File f=new File("d:/bjsxt");
        //常用方法:
        //f.mkdir();//创建单层目录
        //f.mkdirs();//创建多层目录
        //f.delete();//只能删除空文件夹
       /*String[] str=f.list();//对文件夹下的文件或者目录进行遍历查看,得到的就是名字
       for(String s:str){
           System.out.println(s);
       }*/
//用的多:
       File[] files=f.listFiles();
       for(File file:files){
           System.out.println(file.length()+"--"+file.isDirectory()+"----"+file.getPath()+"---"+file.getName());
       }
       /*
 System.out.println("文件是否可读:"+f.canRead());
        System.out.println("文件是否可写:"+f.canWrite());
        File f2=new File("d:/b.txt");
        System.out.println("比较结果:"+f.compareTo(f2));//按字母顺序比较两个抽象路径名。*/
        /*if(f.exists()){
            System.out.println("是否删除成功:"+f.delete());
        }else{
            System.out.println("是否创建成功:"+f.createNewFile());//如果不存在,就创建,如果存在,不会重复创建
        }*/
       /* File f3=new File("d:/a.txt");
        File f4=new File("d:/b.txt");
        System.out.println("地址是否相等:"+(f3==f4));//false
        System.out.println("路径是否相等:"+f3.equals(f4));
        System.out.println("--------------------------------");
        File f5=new File("a.txt");
        if(f5.exists()){
            System.out.println("是否删除成功:"+f5.delete());
        }else{
            System.out.println("是否创建成功:"+f5.createNewFile());//如果不存在,就创建,如果存在,不会重复创建
        }
        System.out.println("绝对路径:"+f5.getAbsolutePath());//在盘符上真正存放的位置
        System.out.println("相对路径:"+f5.getPath());//相对谁而言?相对项目
        System.out.println("toString得到的结果跟相对路径是一样的:"+f5);//toString
        System.out.println("文件的名称:"+f.getName());
        System.out.println("上级目录:"+f.getParent());
        System.out.println("是否是一个目录:"+f.isDirectory());
        System.out.println("是否是一个文件:"+f.isFile());
        System.out.println("是否隐藏:"+f.isHidden());
        System.out.println("文件中的字节数:"+f.length());*/
    }
}
(3)习题:
遍历你某一个文件夹下的所有内容:
public class Test3 {
    public static void main(String[] args) {
        //遍历:d:/bjsxt目录下的所有内容:
        showFile(new File("d:/bjsxt"),1);
    }
    //抽取:对目录进行遍历:
    public static void showFile(File f,int level){
        File[] files=f.listFiles();
        for(File file:files){
            //通过这个level在前面加点"-"
            for(int i=0;i<level;i++){
                System.out.print("- ");
            }
            if(file.isDirectory()){//是一个文件夹
                System.out.println(file.getName());
                //向下进行遍历查看:
                showFile(file,level+1);
            }else{//是文件:
                System.out.println(file.getName());
            }
        }
    }
}
public class Test3 {
    public static void main(String[] args) {
        //遍历:d:/bjsxt目录下的所有内容:
        showFile(new File("d:/bjsxt"),1);
    }
    //抽取:对目录进行遍历:
    public static void showFile(File f,int level){
        File[] files=f.listFiles();
        for(File file:files){
            //通过这个level在前面加点"-"
            for(int i=0;i<level;i++){
                System.out.print("- ");
            }
            System.out.println(file.getName());
            if(file.isDirectory()){//是一个文件夹
                //向下进行遍历查看:
                showFile(file,level+1);
            }
        }
    }
}
IO的引入
【1】File类:关联盘符上面的文件或者文件夹:
做什么事:获取一些属性等信息,还可以对文件(目录)创建删除等操作。
但是:咱们有没有获取文件里面的东西?没有,因为File不能帮我们完成这个事
【2】IO能做的事:程序和数据源之间的桥梁:
分类:

【3】有哪些流:
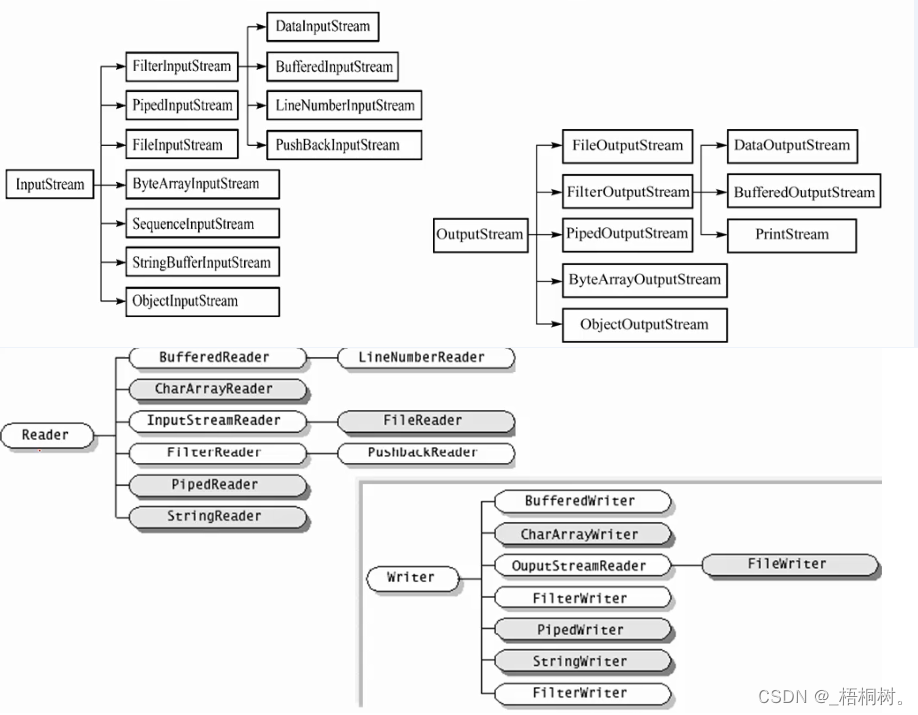
最终:文件的复制
分解:文件----》程序
FileInputStream
【1】利用字节流 :一个字节一个字节的读取数据:
public class Test {
    public static void main(String[] args) throws IOException {
        //1.有一个源文件:
        File file=new File("d:\\bjsxt\\a.txt");
        //2.将一根"管"搭在源文件和程序之间:---》IO流和文件进行关联:
        FileInputStream fis=new FileInputStream(file);
        //3.开始动作:"吸"---》读取:
        /*int n=fis.read();
        System.out.println(n);
        int n2=fis.read();
        System.out.println(n2);
        int n3=fis.read();
        System.out.println(n3);
        int n4=fis.read();
        System.out.println(n4);*/
        int n=fis.read();//每次读一个字节进来
        while(n!=-1){
            System.out.println((char)n);
            n=fis.read();
        }
        //4.关闭流:
        fis.close();
    }
}
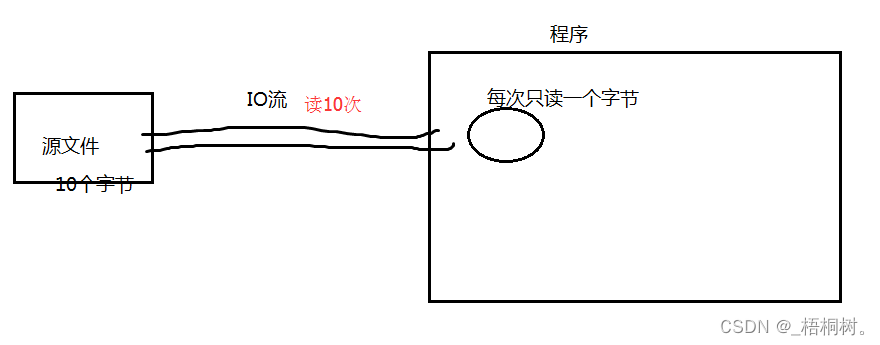
【2】提升效率的方式:利用缓冲数组:
在我这个题里面,我的缓冲数组长度定义为6,
实际在开发中一般定义为:1024的整数倍

public class Test {
public static void main(String[] args) throws IOException {
//1.有一个源文件:
File file=new File(“d:\bjsxt\a.txt”);
//2.将一根"管"搭在源文件和程序之间:—》IO流和文件进行关联:
FileInputStream fis=new FileInputStream(file);
//3.开始动作:“吸”—》读取:
//增加一个数组:
byte[] b=new byte[6];
/int len=fis.read(b);
int len2=fis.read(b);
int len3=fis.read(b);
System.out.println(len);//6
System.out.println(len2);//4
System.out.println(len3);//-1/
int len=fis.read(b);//每次数组中读取元素的数量;
while(len!=-1){
//System.out.println(len);
for(int i=0;i<=len-1;i++){
System.out.println((char)b[i]);
}
len=fis.read(b);
}
//4.关闭流:
fis.close();
}
}

分解:程序----》文件
FileOutputStream
【1】一个字节一个字节的向外传送数据:
public class Test {
    public static void main(String[] args) throws IOException {
        //1.确定目标文件:
        File file=new File("d:/demo.txt");
        //2.在文件和程序中间搭一根”管“
        FileOutputStream fos=new FileOutputStream(file);
       // FileOutputStream fos=new FileOutputStream(file,true);
        //3.将内容写出去:
        String str="abc123你好";
        byte[] bytes=str.getBytes();
        System.out.println("转换为数组的长度为:"+bytes.length);
        for(byte b:bytes){
            System.out.println(b);
            fos.write(b);
        }
        //4.关闭流:
        fos.close();
    }
}
【2】利用数组向外传送数据:
public class Test2 {
    public static void main(String[] args) throws IOException {
        //1.确定目标文件:
        File file=new File("d:/demo.txt");
        //2.在文件和程序中间搭一根”管“
        FileOutputStream fos=new FileOutputStream(file);
        //3.将内容写出去:
        String str="abc123你好asfdasfdasfdasdf";
        byte[] bytes=str.getBytes();
        fos.write(bytes);
        //4.关闭流:
        fos.close();
    }
}
将上面两步骤合为一起:完成复制

public class Test {
    public static void main(String[] args) throws IOException {
        //1.有源文件:
        File f1=new File("d:/a.txt");
        //2.有目标文件:
        File f2=new File("d:/b.txt");
        //3.将一根管怼到源文件上去:
        FileInputStream fis=new FileInputStream(f1);
        //4.将一根管怼到目标文件上去:
        FileOutputStream fos=new FileOutputStream(f2);
        //5.开始动作:
        int n=fis.read();
        while(n!=-1){
            fos.write(n);
            n=fis.read();
        }
        //6.关闭流:
        fos.close();
        fis.close();
    }
}

public class Test {
    public static void main(String[] args) throws IOException {
        //1.有源文件:
        File f1=new File("d:/a.txt");
        //2.有目标文件:
        File f2=new File("d:/b.txt");
        //3.将一根管怼到源文件上去:
        FileInputStream fis=new FileInputStream(f1);
        //4.将一根管怼到目标文件上去:
        FileOutputStream fos=new FileOutputStream(f2);
        //5.开始动作:
        byte[] b=new byte[8];
        int len=fis.read(b);
        while(len!=-1){
            fos.write(b,0,len);//将这个b数组中草[0,len)的位置弄出去--》其实就是将数组中的有效内容输出。
            len=fis.read(b);
        }
        //6.关闭流:
        fos.close();
        fis.close();
    }
}
编码总结
【1】在编辑器中:
utf-8:占用三个字节
bgk(ANSI):占用两个字节
【2】在java中:
无论是字母,数字,汉字等 全部内存都是占用一个字符。
节点流,处理流:BufferedInputStream,BufferedOutputStream
【1】利用FileInputStream,FileOutputStream 一个字节一个字节的读取写出数据:
public class Test {
    public static void main(String[] args) throws IOException {
        //1.有源文件:
        File f1=new File("D:/JAVA_API_1.6_zh_CH.CHM");
        //2.有目标文件:
        File f2=new File("d:/b.CHM");
        //3.将一根管怼到源文件上去:
        FileInputStream fis=new FileInputStream(f1);
        //4.将一根管怼到目标文件上去:
        FileOutputStream fos=new FileOutputStream(f2);
        long startTime=System.currentTimeMillis();
        //5.开始动作:
        int n=fis.read();
        while(n!=-1){
            fos.write(n);
            n=fis.read();
        }
        //6.关闭流:
        fos.close();
        fis.close();
        long endTime=System.currentTimeMillis();
        System.out.println(endTime-startTime);
    }
}
结果:需要的时间很长:
【2】利用FileInputStream,FileOutputStream 利用数组读取写出数据:
public class Test2 {
    public static void main(String[] args) throws IOException {
        //1.有源文件:
        File f1=new File("D:/JAVA_API_1.6_zh_CH.CHM");
        //2.有目标文件:
        File f2=new File("d:/b.CHM");
        //3.将一根管怼到源文件上去:
        FileInputStream fis=new FileInputStream(f1);
        //4.将一根管怼到目标文件上去:
        FileOutputStream fos=new FileOutputStream(f2);
        //5.开始动作:
        long startTime=System.currentTimeMillis();
        byte[] b=new byte[1024];
        int len=fis.read(b);
        while(len!=-1){
            fos.write(b,0,len);//将这个b数组中草[0,len)的位置弄出去--》其实就是将数组中的有效内容输出。
            len=fis.read(b);
        }
        //6.关闭流:
        fos.close();
        fis.close();
        long endTime=System.currentTimeMillis();
        System.out.println(endTime-startTime);
    }
}
【3】用一种效率更高的方式:
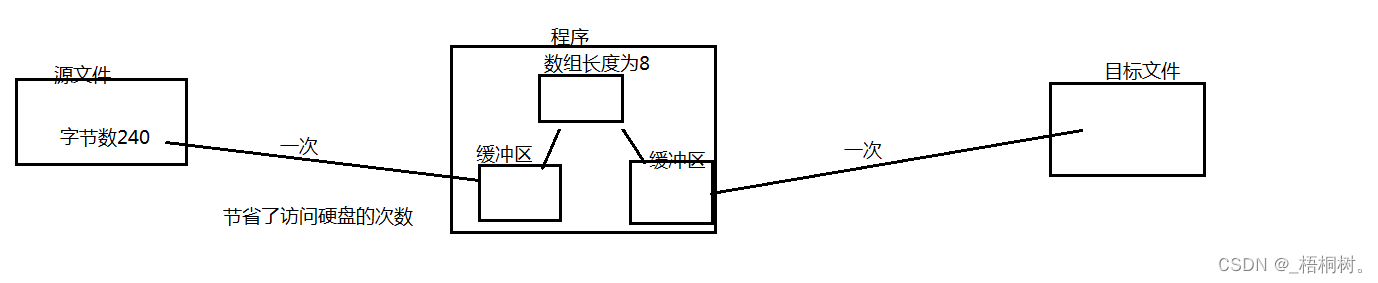
package com.bjsxt.test03;
import java.io.*;
public class Test2 {
    public static void main(String[] args) throws IOException {
        //1.有源文件:
        File f1=new File("D:/JAVA_API_1.6_zh_CH.CHM");
        //2.有目标文件:
        File f2=new File("d:/b.CHM");
        //3.将一根管怼到源文件上去:
        FileInputStream fis=new FileInputStream(f1);
        //4.将一根管怼到目标文件上去:
        FileOutputStream fos=new FileOutputStream(f2);
        //5.在FileInputStream外再套一个管--》提升功能
        BufferedInputStream bis=new BufferedInputStream(fis);//底层缓冲数组默认的大小为8192
        //6.在FileOutputStream外再套一个管--》提升功能
        BufferedOutputStream bos=new BufferedOutputStream(fos);
        //7.开始动作:
        long startTime=System.currentTimeMillis();
        byte[] b=new byte[1024];
        int len=bis.read(b);
        while(len!=-1){
            bos.write(b,0,len);
            len=bis.read(b);
        }
        //6.关闭流://我们关闭流,倒着关闭:
        /*bos.close();
        bis.close();
        fos.close();
        fis.close();*/
        //closeAll(bos,bis,fos,fis);
        closeAll(bos,bis);//直接关闭最高级的流就可以了,可以省略里面那些流
        long endTime=System.currentTimeMillis();
        System.out.println(endTime-startTime);
    }
    public static void closeAll(Closeable...clos){
        for(Closeable cl:clos){
            try {
                cl.close();
            } catch (IOException e) {
                e.printStackTrace();
            }
        }
    }
}
字符流:FileReader,FileWriter:文件的复制
【1】利用FileReader,FileWriter 一个字符一个字符的 复制 数据:
public class Test {
    public static void main(String[] args) throws IOException {
        //1.源文件:
        File f1=new File("d:/a.txt");
        //2.目标文件:
        File f2=new File("d:/b.txt");
        //3.套管:
        FileReader fr=new FileReader(f1);
        FileWriter fw=new FileWriter(f2);
        //4.开始动作:
        int n=fr.read();
        while(n!=-1){
            System.out.println(n);
            fw.write(n);
            n=fr.read();
        }
        //5.关闭流:字符流有缓存机制,
        fw.close();
        fr.close();
        //fw.flush();//冲刷
    }
}
备注:以后不记得哪些流需要关闭,所以我们以后遇到流就管就行了。
【2】利用FileReader,FileWriter 利用字符数组:
public class Test {
    public static void main(String[] args) throws IOException {
        //1.源文件:
        File f1=new File("d:/a.txt");
        //2.目标文件:
        File f2=new File("d:/b.txt");
        //3.套管:
        FileReader fr=new FileReader(f1);
        FileWriter fw=new FileWriter(f2);
        //4.开始动作:
        char[] ch=new char[5];
        int len=fr.read(ch);
        while(len!=-1){
            fw.write(ch,0,len);
            len=fr.read(ch);
        }
        //5.关闭流:字符流有缓存机制,
        fw.close();
        fr.close();
        //fw.flush();//冲刷
    }
}
【3】利用缓冲流::
public class Test {
    public static void main(String[] args) throws IOException {
        //1.源文件:
        File f1=new File("d:/a.txt");
        //2.目标文件:
        File f2=new File("d:/b.txt");
        //3.套管:
        FileReader fr=new FileReader(f1);
        FileWriter fw=new FileWriter(f2);
        BufferedReader br=new BufferedReader(fr);
        BufferedWriter bw=new BufferedWriter(fw);
        //4.开始动作:
        char[] ch=new char[5];
        int len=br.read(ch);
        while(len!=-1){
            bw.write(ch,0,len);
            len=br.read(ch);
        }
        //5.关闭流:字符流有缓存机制,
        bw.close();
        br.close();
    }
}
【4】缓冲流另一种方式:
public class Test {
    public static void main(String[] args) throws IOException {
        //1.源文件:
        File f1=new File("d:/a.txt");
        //2.目标文件:
        File f2=new File("d:/b.txt");
        //3.套管:
        FileReader fr=new FileReader(f1);
        FileWriter fw=new FileWriter(f2);
        BufferedReader br=new BufferedReader(fr);
        BufferedWriter bw=new BufferedWriter(fw);
        //4.开始动作:
        String str=br.readLine();
        while(str!=null){
            bw.write(str);
            bw.newLine();
            str=br.readLine();
        }
        //5.关闭流:字符流有缓存机制,
        bw.close();
        br.close();
    }
}
【5】我想自己处理异常:
public class Test {
    public static void main(String[] args)  {
        //1.源文件:
        File f1=new File("d:/a.txt");
        //2.目标文件:
        File f2=new File("d:/b.txt");
        //3.套管:
        FileReader fr= null;
        BufferedReader br=null;
        BufferedWriter bw=null;
        try {
            fr = new FileReader(f1);
            FileWriter fw=new FileWriter(f2);
            br=new BufferedReader(fr);
            bw=new BufferedWriter(fw);
            //4.开始动作:
            String str=br.readLine();
            while(str!=null){
                bw.write(str);
                bw.newLine();
                str=br.readLine();
            }
        } catch (FileNotFoundException e) {
            e.printStackTrace();
        } catch (IOException e) {
            e.printStackTrace();
        } finally {
            //5.关闭流:字符流有缓存机制,
            try {
                bw.close();
            } catch (IOException e) {
                e.printStackTrace();
            }
            try {
                br.close();
            } catch (IOException e) {
                e.printStackTrace();
            }
        }
    }
}
System类对IO流的支持
【1】代码:
package com.bjsxt.test05;
import java.io.*;
import java.util.Scanner;
public class Test {
    public static void main(String[] args) throws IOException {
        //键盘录入一个数字:
       /* Scanner sc=new Scanner(System.in);
        System.out.print("请录入:");
        int num=sc.nextInt();
        System.out.println(num);*/
        //疑问:键盘录入这个事到底是谁实现的?Scanner sc=new Scanner(System.in);
        //答案:不是Scanner    是: System.in
        /*InputStream is=System.in;//其实就是:将一根管怼到键盘上
        int n=is.read();
        System.out.println(n);*/
        //Scanner sc=new Scanner(System.in);相当于:将一根管怼到键盘上,将键盘录入的数据进行扫描:
        //Scanner sc=new Scanner(new FileInputStream(new File("d:/a.txt")));
        //FileInputStream:一根管怼到硬盘上的文件上去了,然后Scanner扫描器扫这个管里面的内容。
        /*Scanner sc=new Scanner(new FileInputStream(new File("d:/a.txt")));
        while(sc.hasNext()){
            System.out.println(sc.next());
        }*/
        //这根管怼到:显示器上去了---》控制台
        PrintStream ps=System.out;
        ps.print("a");//将内容原样输出在控制台+不换行
        ps.print("b");
        ps.println("d");//将内容原样输出在控制台+换行
        ps.print("e");
        ps.print("o");
        System.out.print("aaaa");
        System.out.println("0000000");
    }
}
转换流
package com.bjsxt.test05;
import java.io.*;
public class Test2 {
    public static void main(String[] args) throws IOException {
        //键盘录入数据,将数据保存到硬盘的文件中去,用一种效率高的方式。
        //键盘:
        InputStream is=System.in;
        //将字节流转换为---->字符流:单向转换:
        InputStreamReader isr=new InputStreamReader(is);
        //需要两个管:
        BufferedReader br=new BufferedReader(isr);
        BufferedWriter bw=new BufferedWriter(new FileWriter(new File("d:/q.txt")));
        //开始动作:
        String str=br.readLine();
        while(!str.equals("byebye")){
            bw.write(str);
            bw.newLine();
            str=br.readLine();
        }
        //关闭流:
        bw.close();
        br.close();
        isr.close();
        is.close();
    }
}
数据流:专门操纵基本数据类型的
【1】利用数据流向外写数据:
public class Test01 {
    public static void main(String[] args) throws IOException {
        DataOutputStream dos=new DataOutputStream(new FileOutputStream(new File("d:/a.txt")));
        dos.writeInt(12);
        dos.writeBoolean(false);
        dos.writeDouble(9.8);
        dos.writeUTF("abcnihao");
        dos.close();
    }
}
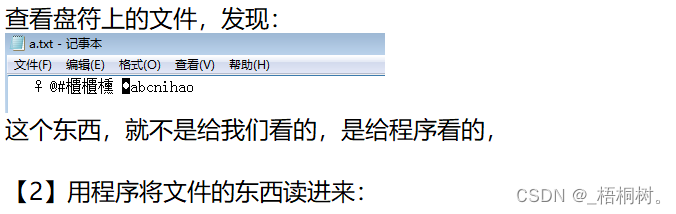
public class Test02 {
    public static void main(String[] args) throws IOException {
        DataInputStream dis=new DataInputStream(new FileInputStream(new File("d:/a.txt")));
        System.out.println(dis.readInt());
        System.out.println(dis.readBoolean());
        System.out.println(dis.readDouble());
        dis.close();
    }
}
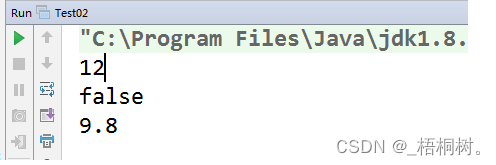
注意上面的问题:
(1)我们是先写出去,再读进来,否则不知道该读什么类型。
(2)读写的时候,顺序不能乱。
在这里插入代码片
【3】比如我想将一个对象的信息写出去:
对象:
拼接字符串:“年龄:18 性别:男 名字:丽丽 ”
现在想到一个问题:能不能将对象直接写出去???可以:
对象流:专门操纵引用数据类型的
【4】引入:对象流:
写出一个对象:
public class Test {
    public static void main(String[] args) throws IOException {
        //创建一个Student的对象,将对象写到文件中去:
        ObjectOutputStream oos=new ObjectOutputStream(new FileOutputStream(new File("d:/a.txt")));
        Student s=new Student("lili",18,160.7);
        oos.writeObject(s);
        oos.close();
    }
}

------》序列化
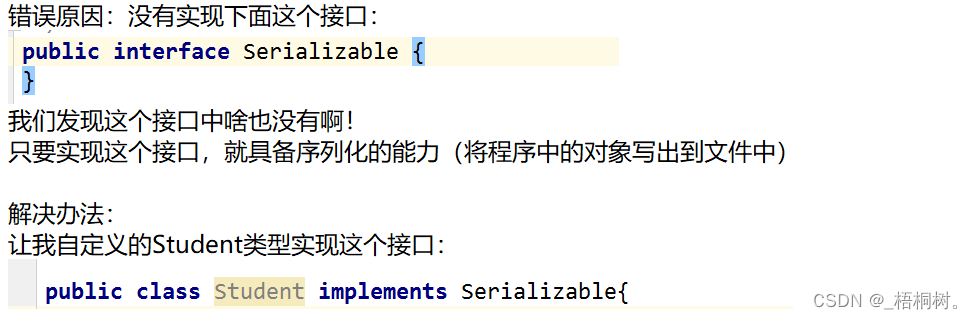
------》反序列化:
public class Test02 {
    public static void main(String[] args) throws IOException, ClassNotFoundException {
        //将文件中的对象读进来:
        ObjectInputStream ois=new ObjectInputStream(new FileInputStream(new File("d:/a.txt")));
        Object o=ois.readObject();
        System.out.println(o);
        ois.close();
    }
}
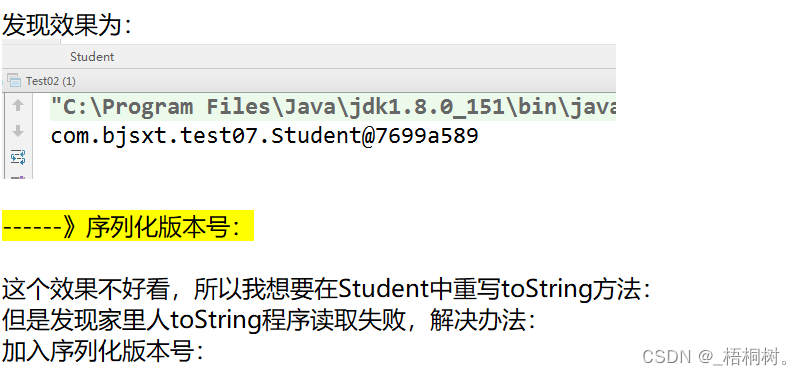
public class Student implements Serializable{
    //加入一个序列化的版本号
    private static final long serialVersionUID = -6237412967763134270L;
    private String name;
    private int age;
    private double height;
    private String sex;
    public String getSex() {
        return sex;
    }
    public void setSex(String sex) {
        this.sex = sex;
    }
    public String getName() {
        return name;
    }
    public void setName(String name) {
        this.name = name;
    }
    public int getAge() {
        return age;
    }
    public void setAge(int age) {
        this.age = age;
    }
    public double getHeight() {
        return height;
    }
    public void setHeight(double height) {
        this.height = height;
    }
    public Student(String name, int age, double height) {
        this.name = name;
        this.age = age;
        this.height = height;
    }
    @Override
    public String toString() {
        return "Student{" +
                "name='" + name + '\'' +
                ", age=" + age +
                ", height=" + height +
                '}';
    }
}
PS:
(1)变量加上transient修饰,就不可以序列化
(2)变量被static修饰,也不可以被序列化
文件夹的复制
package com.bjsxt.test08;
import java.io.*;
public class Test {
    public static void main(String[] args) throws IOException {
        //复制文件夹:
        copyDir(new File("d:/bjsxt"),new File("d:/bjsxt2"));
    }
    public static void copyDir(File srcFile,File targetFile) throws IOException {
        //判断是否有目标文件夹:
        if(!targetFile.exists()){//如果不存在我就创建
            targetFile.mkdirs();
        }
        //开始复制:
        File[] files=srcFile.listFiles();
        for(File f:files){
            if(f.isDirectory()){//如果f是文件夹,复制文件夹:
                copyDir(new File(srcFile+"/"+f.getName()),new File(targetFile+"/"+f.getName()));
            }else{ //如果f是文件,直接复制文件就可以:
                copyFile(new File(srcFile+"/"+f.getName()),new File(targetFile+"/"+f.getName()));
            }
        }
    }
    //提取方法:文件的复制:
    public static void copyFile(File srcFile,File targetFile) throws IOException {
        //选取字节流:
        BufferedInputStream bis=new BufferedInputStream(new FileInputStream(srcFile));
        BufferedOutputStream bos=new BufferedOutputStream(new FileOutputStream(targetFile));
        //开始动作:
        byte[] b=new byte[1024];
        int len=bis.read(b);
        while(len!=-1){
            bos.write(b,0,len);
            len=bis.read(b);
        }
        //关闭流:
        bos.close();
        bis.close();
    }
}
12、多线程
程序,进程,线程
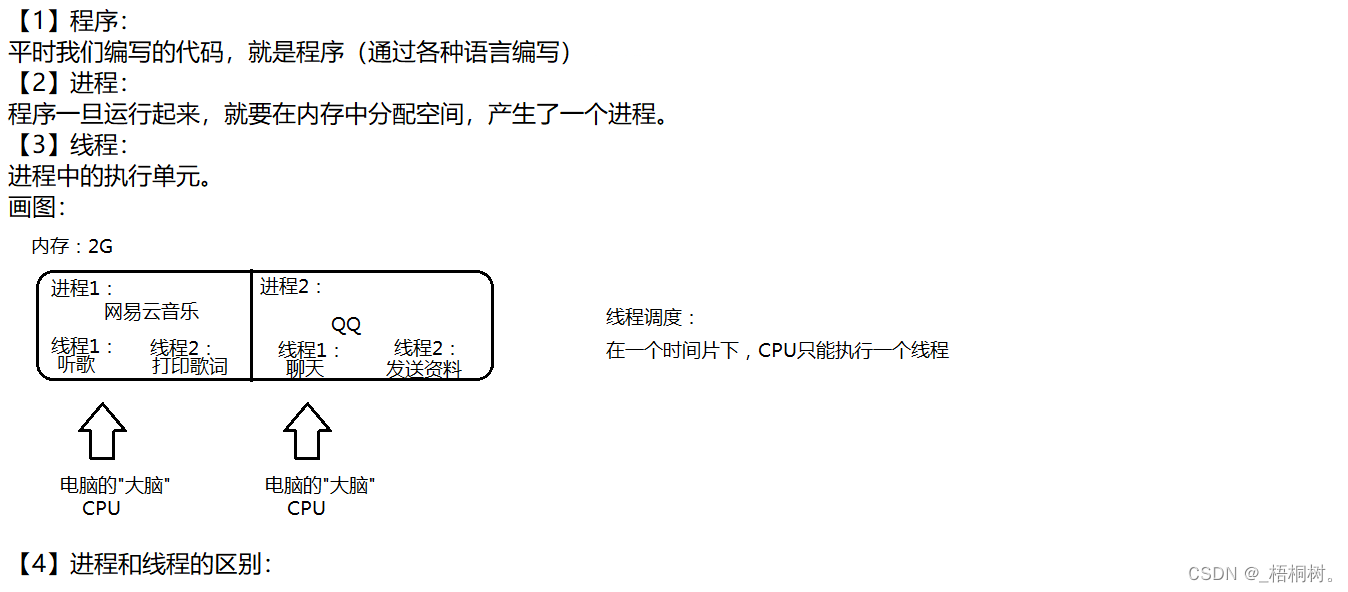
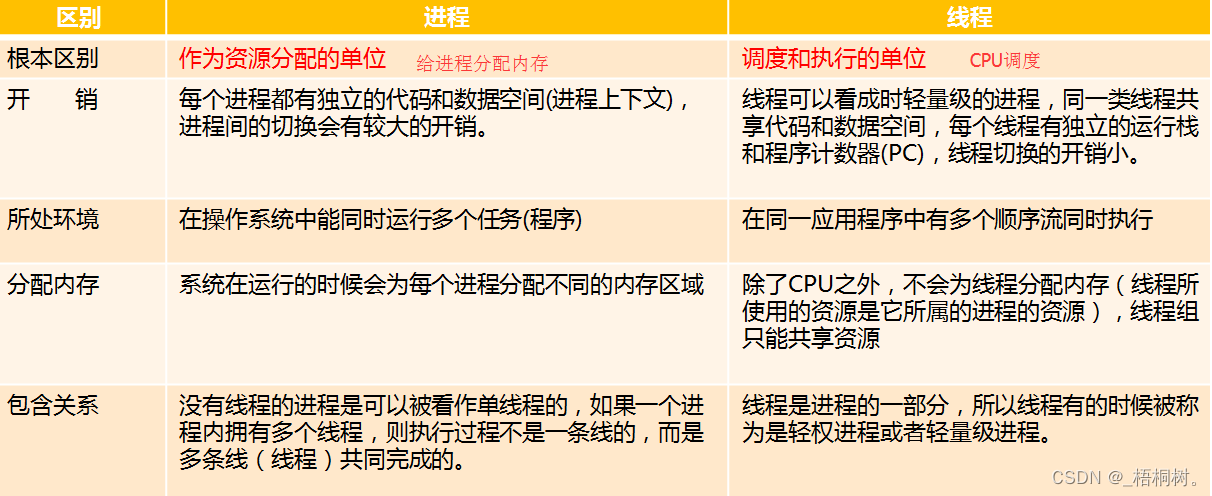
线程创建的三种方式
第一种:继承Thread类
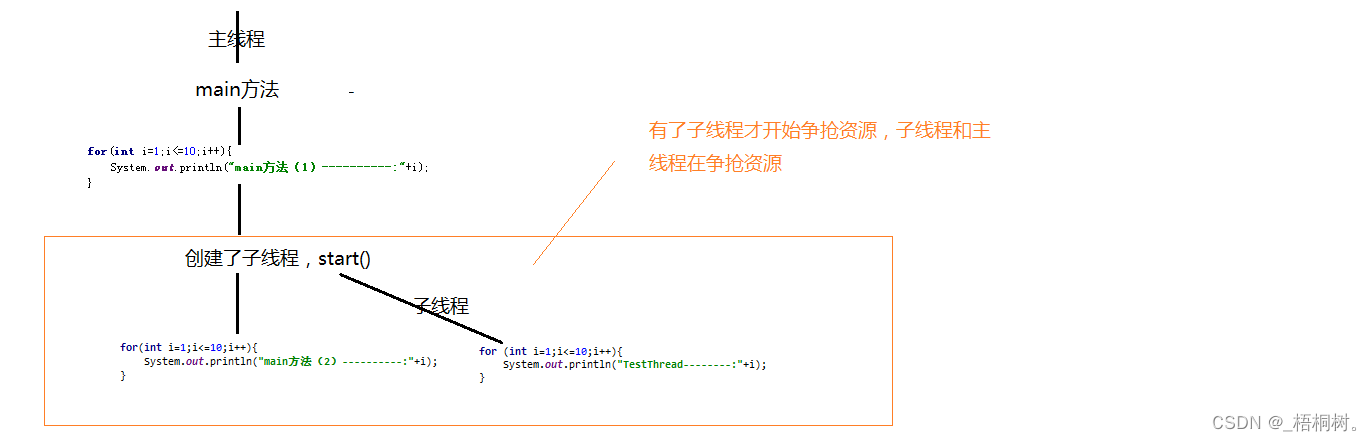
package com.bjsxt.test01;
//TestThread类,继承了Thread,它就具备了多线程的能力
//有个多线程的能力,就可以跟其它的线程争抢CPU资源
//TestThread线程类下的具体的对象就是线程对象。
public class TestThread extends Thread{
    //一会要去争抢资源了,这个线程要做的任务是什么呢?将任务写到run方法中:
    @Override
    public void run() {
        for (int i=1;i<=10;i++){
            System.out.println("TestThread--------:"+i);
        }
    }
}
package com.bjsxt.test01;
public class Test {
    //在我的程序中现在有三个线程:1.主线程  2.子线程tt  3.垃圾回收机制(忽略不计)
    public static void main(String[] args) {//主线程
        for(int i=1;i<=10;i++){
            System.out.println("main方法(1)----------:"+i);
        }
        //创建一个子线程:TestThread的对象:
        TestThread tt=new TestThread();//子线程
        //tt.run();//想要执行子线程的任务
        tt.start();//启动这个线程
        //start方法是父类Thread中的方法:
        //使该线程开始执行;Java 虚拟机调用该线程的 run 方法。
        for(int i=1;i<=10;i++){
            System.out.println("main方法(2)----------:"+i);
        }
    }
}
设置线程名字
【1】利用setName,getName方法:
package com.bjsxt.test01;
//TestThread类,继承了Thread,它就具备了多线程的能力
//有个多线程的能力,就可以跟其它的线程争抢CPU资源
//TestThread线程类下的具体的对象就是线程对象。
public class TestThread extends Thread{
    //一会要去争抢资源了,这个线程要做的任务是什么呢?将任务写到run方法中:
    @Override
    public void run() {
        for (int i=1;i<=10;i++){
            System.out.println(this.getName()+i);
        }
    }
}
package com.bjsxt.test01;
public class Test {
    //在我的程序中现在有三个线程:1.主线程  2.子线程tt  3.垃圾回收机制(忽略不计)
    public static void main(String[] args) {//主线程
        Thread.currentThread().setName("主线程");
        for(int i=1;i<=10;i++){
            System.out.println(Thread.currentThread().getName()+i);
        }
        //创建一个子线程:TestThread的对象:
        TestThread tt=new TestThread();//子线程
        tt.setName("这是第一个子线程:");
        //tt.run();//想要执行子线程的任务
        tt.start();//启动这个线程
        //start方法是父类Thread中的方法:
        //使该线程开始执行;Java 虚拟机调用该线程的 run 方法。
        for(int i=1;i<=10;i++){
            System.out.println(Thread.currentThread().getName()+i);
        }
    }
}
【2】利用有参构造器:
package com.bjsxt.test01;
//TestThread类,继承了Thread,它就具备了多线程的能力
//有个多线程的能力,就可以跟其它的线程争抢CPU资源
//TestThread线程类下的具体的对象就是线程对象。
public class TestThread extends Thread{
    public TestThread(String name) {
        super(name);
    }
    //一会要去争抢资源了,这个线程要做的任务是什么呢?将任务写到run方法中:
    @Override
    public void run() {
        for (int i=1;i<=10;i++){
            System.out.println(this.getName()+i);
        }
    }
}
package com.bjsxt.test01;
public class Test {
    //在我的程序中现在有三个线程:1.主线程  2.子线程tt  3.垃圾回收机制(忽略不计)
    public static void main(String[] args) {//主线程
        Thread.currentThread().setName("主线程");
        for(int i=1;i<=10;i++){
            System.out.println(Thread.currentThread().getName()+i);
        }
        //创建一个子线程:TestThread的对象:
        TestThread tt=new TestThread("子线程01111111:");//子线程
        //tt.run();//想要执行子线程的任务
        tt.start();//启动这个线程
        //start方法是父类Thread中的方法:
        //使该线程开始执行;Java 虚拟机调用该线程的 run 方法。
        for(int i=1;i<=10;i++){
            System.out.println(Thread.currentThread().getName()+i);
        }
    }
}
龟兔赛跑
package com.bjsxt.test02;
public class Tortoise extends Thread{//乌龟
    //加一个有参构造器,一会用来设置线程的名字:
    public Tortoise(String name) {
        super(name);
    }
    //重写run方法:
    @Override
    public void run() {
        while(true){
            System.out.println("我是"+this.getName()+",我在跑,我现在领先了。。");
        }
    }
}
package com.bjsxt.test02;
public class Rabbit extends Thread {//兔子:
    //用来设置线程名字的
    public Rabbit(String name) {
        super(name);
    }
    //重写run方法:
    @Override
    public void run() {
        while(true){
            System.out.println("我是"+this.getName()+",我没有偷懒,我也在跑。。。");
        }
    }
}
package com.bjsxt.test02;
public class Test {
    public static void main(String[] args) {
        //乌龟线程:
        Tortoise tt=new Tortoise("乌龟线程:");
        tt.start();
        //兔子线程:
        Rabbit rb=new Rabbit("兔子线程");
        rb.start();
    }
}
买火车票

package com.bjsxt.test03;
public class BuyTrainTicket extends Thread {
    //属性:(不同窗口共享10张票)
    private static int ticketNum=10;
    //构造器:设置线程名字:设置窗口的名字:
    public BuyTrainTicket(String name) {
        super(name);
    }
    //每个窗口做什么事:写入run方法:
    @Override
    public void run() {
        for(int i=1;i<=100;i++){
            if(ticketNum>0){
                System.out.println("我在"+this.getName()+"买到了从北京到哈尔滨的票,现在票剩余:"+(--ticketNum)+"张");
            }
        }
    }
}
package com.bjsxt.test03;
public class Test {
    public static void main(String[] args) {
        //有几个线程?三个线程。,每个线程就是一个窗口:
        BuyTrainTicket b1=new BuyTrainTicket("窗口1");
        b1.start();
        BuyTrainTicket b2=new BuyTrainTicket("窗口2");
        b2.start();
        BuyTrainTicket b3=new BuyTrainTicket("窗口3");
        b3.start();
    }
}

第二种:实现Runnable接口
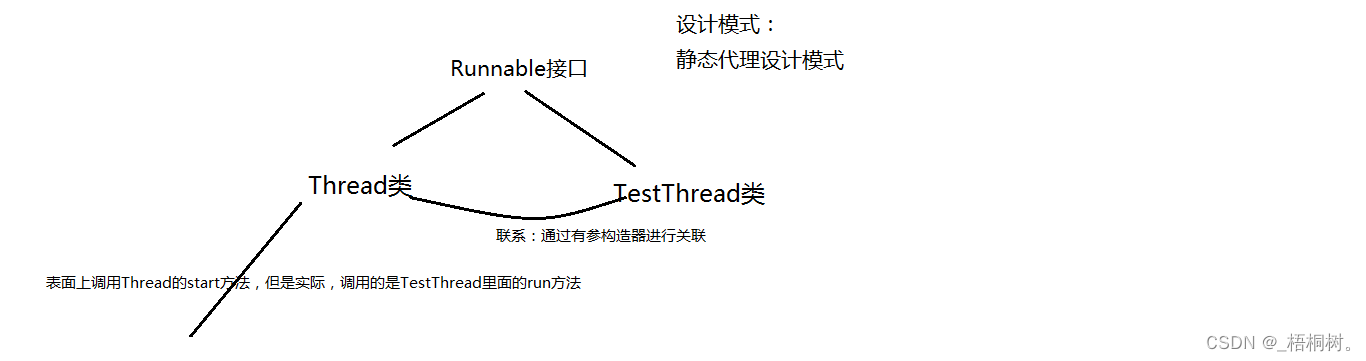
package com.bjsxt.test04;
public class TestThread implements Runnable{
    @Override
    public void run() {
        for(int i=1;i<=10;i++){
            System.out.println(Thread.currentThread().getName()+"------:"+i);
        }
    }
}
package com.bjsxt.test04;
public class Test {
    public static void main(String[] args) {//主线程
        //创建子线程:
        TestThread tt=new TestThread();
        Thread t=new Thread(tt,"子线程");//通过构造器将Thread和TestThread进行了关联
        t.start();
        for(int i=1;i<=10;i++){
            System.out.println("main----"+i);
        }
    }
}
扩展:静态代理模式
【1】案例:
吕鹏昌------》追求一个女生---------》找一个人帮他(赵珊珊)–》家聪聪
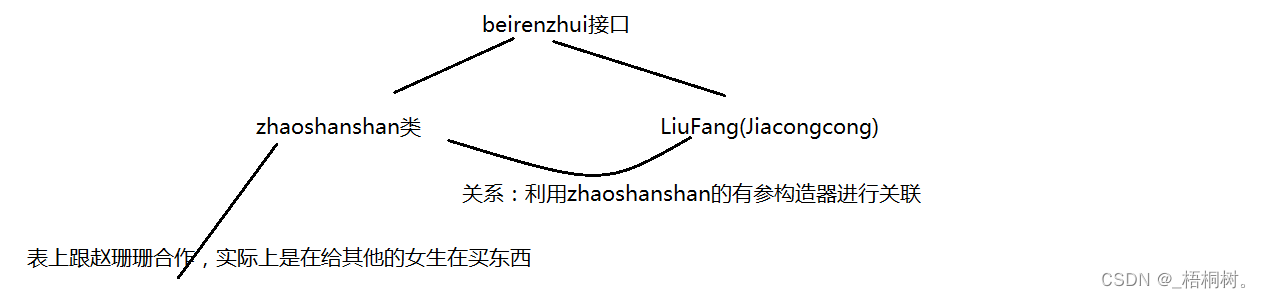
public interface Beirenzhui {//被人追
    void maiHua();//买花
    void maizuanjie();//买钻戒
}
public class JiaCongCong implements Beirenzhui {
    @Override
    public void maiHua() {
        System.out.println("小雏菊。。。。");
    }
    @Override
    public void maizuanjie() {
        System.out.println("Darry ring。。。。。");
    }
}
public class LiuFang implements Beirenzhui{
    @Override
    public void maiHua() {
        System.out.println("玫瑰花");
    }
    @Override
    public void maizuanjie() {
        System.out.println("I do ..");
    }
}
public class zhaoshanshan implements Beirenzhui{
   // private JiaCongCong jcc=new JiaCongCong();
    private Beirenzhui brz;
    public zhaoshanshan(Beirenzhui brz){//Beirenzhui brz=new LiuFang();--->多态
        this.brz=brz;//属性Beirenzhui brz=new LiuFang();
    }
    @Override
    public void maizuanjie() {
        brz.maizuanjie();
    }
    //代理中的方法比被代理的类中多!
    public void findFlower(){
        System.out.println("寻求卖花的合作厂商");
    }
    @Override
    public void maiHua() {
        findFlower();
        brz.maiHua();
        jiesuanMoney();
    }
    public void jiesuanMoney(){
        System.out.println("结算钱。。。。");
    }
}
public class LvPengchang {
    public static void main(String[] args) {
        //让代理赵珊珊给家聪聪买花,买钻戒:
        zhaoshanshan zss=new zhaoshanshan(new LiuFang());
        zss.maiHua();
        zss.maizuanjie();
    }
}
总结:代理:zhaoshanshan 被代理:家聪聪,刘芳
关联:利用代理的有参构造器
代理中方法要比被代理的方法 多!
龟兔赛跑
package com.bjsxt.test06;
public class Tortoise implements  Runnable{//乌龟
    @Override
    public void run() {
        while(true){
            System.out.println(Thread.currentThread().getName()+"一直跑");
        }
    }
}
package com.bjsxt.test06;
public class Test {
    public static void main(String[] args) {
        //乌龟:
        Tortoise tt=new Tortoise();
        Thread t=new Thread(tt);
        t.setName("乌龟");
        t.start();
        //兔子:参数为:匿名内部类
        Thread t2=new Thread(new Runnable() {
            @Override
            public void run() {
                while(true){
                    System.out.println("兔子一直在跑");
                }
            }
        });
        t2.start();
    }
}
买火车票
package com.bjsxt.test07;
public class BuyTrainTicket implements Runnable {
    private int ticketNum=10;
    @Override
    public void run() {
        for(int i=1;i<=100;i++){
            if(ticketNum>0){
                System.out.println("我在"+Thread.currentThread().getName()+"买到了火车票,剩余"+(--ticketNum)+"张");
            }
        }
    }
}
package com.bjsxt.test07;
public class Test {
    public static void main(String[] args) {
        BuyTrainTicket b=new BuyTrainTicket();
        //窗口1:
        new Thread(b,"窗口1").start();
        //窗口2:
        BuyTrainTicket b2=new BuyTrainTicket();
        new Thread(b,"窗口2").start();
        //窗口3:
        BuyTrainTicket b3=new BuyTrainTicket();
        new Thread(b,"窗口3").start();
    }
}
第三种:实现Callable接口
【1】第一种和第二种的run方法的缺点:
public class Test implements  Runnable{
    @Override
    public void run() {

    }
}
缺点1:这个方法没有返回值。
缺点2:不能抛出异常
所以基于上面两个缺点,引入了方式3:
【3】方式3:JDK1.5以后为了解决上述缺点:
好处:call方法可以有返回值,还可以处理异常
缺点:线程创建比较麻烦
get方法是一个阻塞方法,什么时候线程代码执行完毕才会将返回值做一个获取。
package com.bjsxt.test08;
import java.util.Random;
import java.util.concurrent.Callable;
import java.util.concurrent.ExecutionException;
import java.util.concurrent.FutureTask;
public class RundomNum implements Callable<Integer>{//产生随机数的线程
    //对于这个call方法来说,有返回值,返回值的类型跟泛型是一致的,并且对于这个方法是可以抛出异常的
    @Override
    public Integer call() /*throws Exception*/ {
        System.out.println("--------");
        try {
            Thread.sleep(3000);
        } catch (InterruptedException e) {
            e.printStackTrace();
        }
        return new Random().nextInt(10);//生成10以内的随机数
    }
    public static void main(String[] args) throws ExecutionException, InterruptedException {
        //创建线程对象:
        RundomNum rn=new RundomNum();
        FutureTask ft=new FutureTask(rn);
        Thread t=new Thread(ft);
        t.start();
        //获取线程执行的结果:
        //是一个阻塞的方法
        System.out.println("当前线程是否在完成:"+ft.isDone());
        Integer i=(Integer)(ft.get());//接收call方法的返回值的。
        System.out.println(i);
        System.out.println("当前线程是否在完成:"+ft.isDone());
    }
}
总结
第一种和第二种哪个好?
java中只有单继承,所以用第二种实现接口的方式,还可以继承其他的类,
第三种好处:
(1)call方法有返回值
(2)可以抛出异常
线程的生命周期
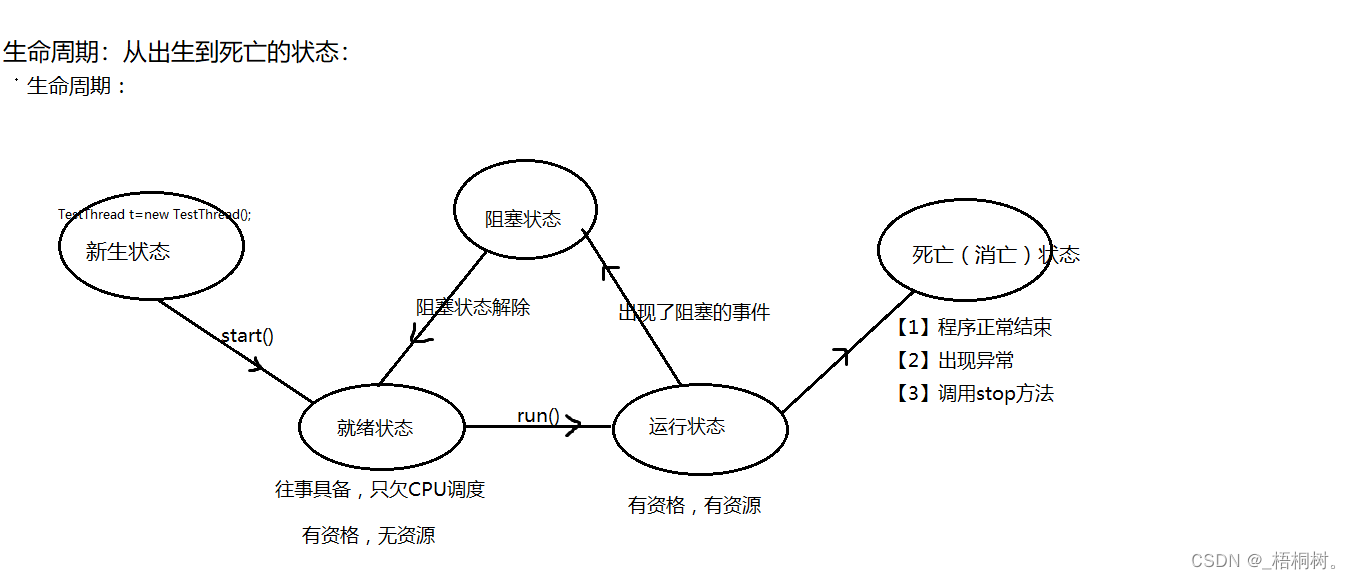
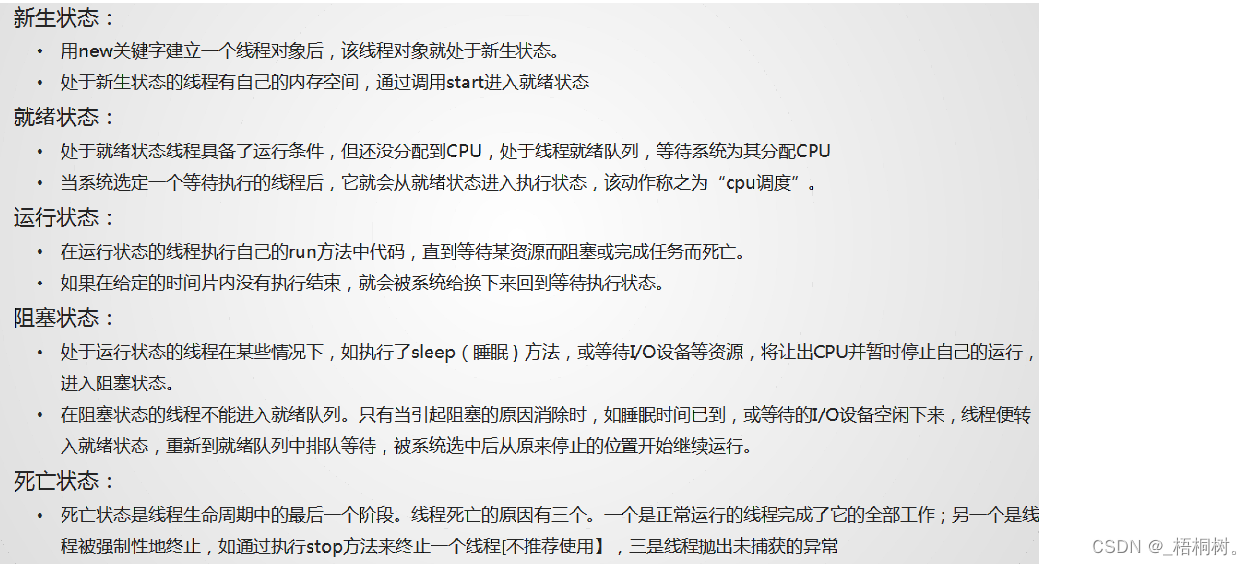
控制线程常用方法
优先级
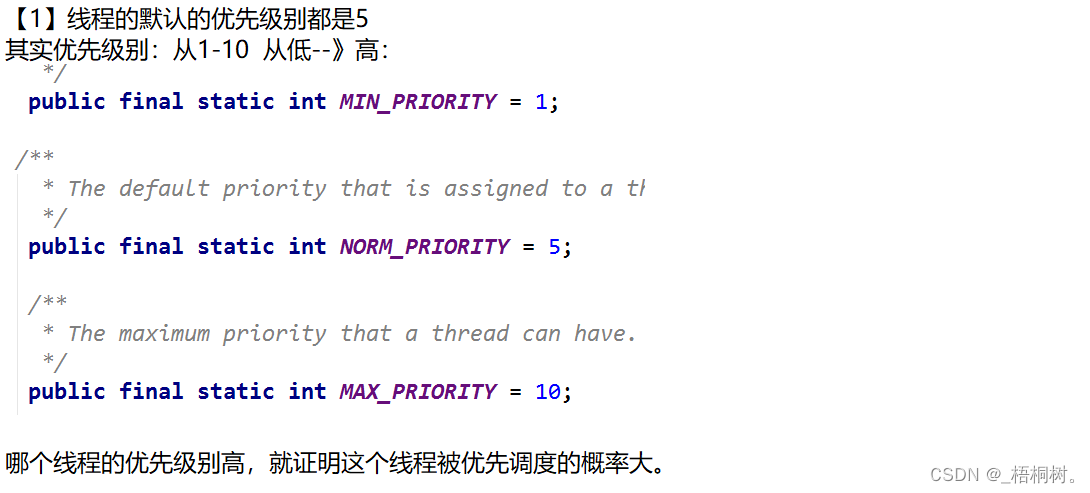
public class Tortoise extends Thread{//乌龟
    //加一个有参构造器,一会用来设置线程的名字:
    public Tortoise(String name) {
        super(name);
    }
    //重写run方法:
    @Override
    public void run() {
        while(true){
            System.out.println("我是"+this.getName()+",我在跑,我现在领先了。。乌龟的优先级级别:"+this.getPriority());
        }
    }
}

package com.bjsxt.test02;
public class Rabbit extends Thread {//兔子:
    //用来设置线程名字的
    public Rabbit(String name) {
        super(name);
    }
    //重写run方法:
    @Override
    public void run() {
        while(true){
            System.out.println("我是"+this.getName()+",我没有偷懒,我也在跑。。。兔子的优先级别:"+this.getPriority());
        }
    }
}

package com.bjsxt.test02;
public class Test {
    public static void main(String[] args) {
        //乌龟线程:
        Tortoise tt=new Tortoise("乌龟线程:");
        tt.setPriority(9);
        tt.start();
        //兔子线程:
        Rabbit rb=new Rabbit("兔子线程");
        rb.setPriority(1);
        rb.start();
    }
}
join
join方法:当一个线程调用了join方法,这个线程就会先被执行,它执行结束以后才可以去执行其余的线程。----“半路杀出个程咬金”
注意:必须先start,再join才有效。
package com.bjsxt.test09;
public class TestThread extends Thread {
    @Override
    public void run() {
        for(int i=1;i<=10;i++){
            System.out.println(this.getName()+"---------"+i);
        }
    }
    public static void main(String[] args) throws InterruptedException {
        for(int i=1;i<=10;i++){
            if(i==6){
                TestThread tt=new TestThread();
                tt.start();
                tt.join();//"半路杀出个程咬金"
            }
            System.out.println(Thread.currentThread().getName()+"-----"+i);
        }
    }
}
sleep
睡眠:
Thread.sleep(3000);//遇到这个方法,程序就被阻塞
//什么时候“睡完了”,这个阻塞就结束了
【1】龟兔赛跑加上裁判倒计时:
public class Test {
    public static void main(String[] args) {
        //裁判:喊: 3.。2  。。。1
        for(int i=3;i>=1;i--){
            System.out.println(i);
            try {
                Thread.sleep(1000);
            } catch (InterruptedException e) {
                e.printStackTrace();
            }
        }
        //乌龟线程:
        Tortoise tt=new Tortoise("乌龟线程:");
        tt.setPriority(9);
        tt.start();
        //兔子线程:
        Rabbit rb=new Rabbit("兔子线程");
        rb.setPriority(1);
        rb.start();
    }
}
【2】完成一个秒表的功能:
package com.bjsxt.test09;
import java.text.DateFormat;
import java.text.SimpleDateFormat;
import java.util.Date;
public class Test {
    public static void main(String[] args) {
        //5.格式化提到while循环之外:
        DateFormat df=new SimpleDateFormat("HH:mm:ss");
        //3.加入死循环,让时间一直显示:
        while(true){
            //实现一个秒表:
            //1.获取当前时间:
            Date d=new Date();
            //2.将时间按照我想要展现的格式展现:进行日期的格式化:
            String strDate=df.format(d);
            System.out.println(strDate);
            //4.停顿一秒:
            try {
                Thread.sleep(1000);
            } catch (InterruptedException e) {
                e.printStackTrace();
            }
        }
    }
}
yield()
package com.bjsxt.test10;
public class TestThread extends Thread {
    public TestThread(String name) {
        super(name);
    }
    @Override
    public void run() {
        for(int i=1;i<=10;i++){
            System.out.println(this.getName()+"---"+i);
            if(i==6){
                Thread.yield();
                //yield:暂停当前线程,使线程进入到就绪状态(不是阻塞,是就绪),进入到就绪状态以后等着CPU的调度,
可能立马被调用,也可能等着被调用。
            }
        }
    }
    public static void main(String[] args) {
        //创建一个线程
        TestThread t1=new TestThread("线程1");
        t1.start();
        //创建一个线程
        TestThread t2=new TestThread("线程2");
        t2.start();
    }
}
setDaemon
设置伴随线程;
皇上 —》陪葬----》妃子
main主线程—》伴随线程----》DemoThread
但是在主线程结束以后,DemoThread “垂死挣扎”了一下,趁这个时间赶紧再执行一点代码:
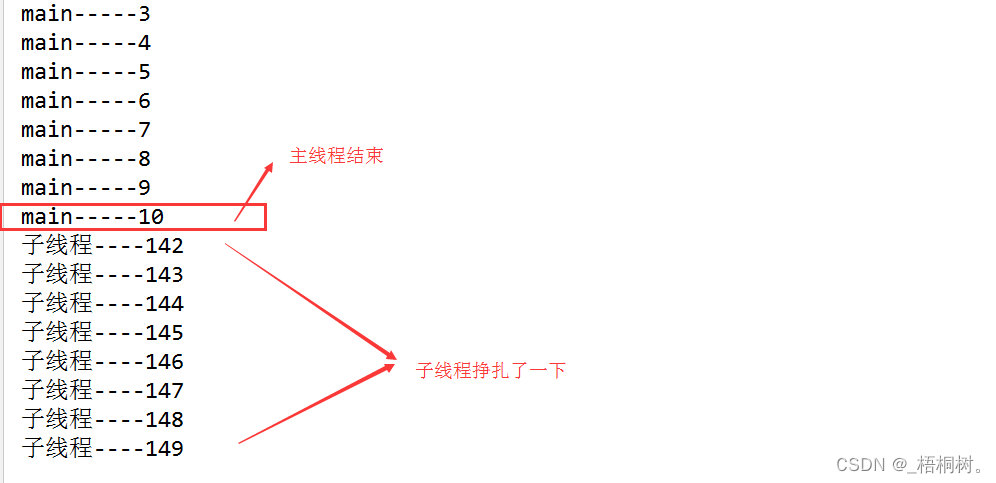
package com.bjsxt.test10;
public class DemoThread extends Thread{
    @Override
    public void run() {
        for(int i=1;i<=1000;i++){
            System.out.println(this.getName()+"----"+i);
        }
    }
    public static void main(String[] args) {
        //子线程创建+启动:
        DemoThread dt=new DemoThread();
        dt.setName("子线程");
        //将子线程设置为伴随线程:
        dt.setDaemon(true);
        dt.start();
        for(int i=1;i<=10;i++){
            System.out.println("main-----"+i);
        }
    }
}
stop
public class Test {
    public static void main(String[] args) {
        for(int i=1;i<=100;i++){
            if(i==6){
                Thread.currentThread().stop();
            }
            System.out.println(i);
        }
    }
}
线程安全、通信,线程池
线程安全问题
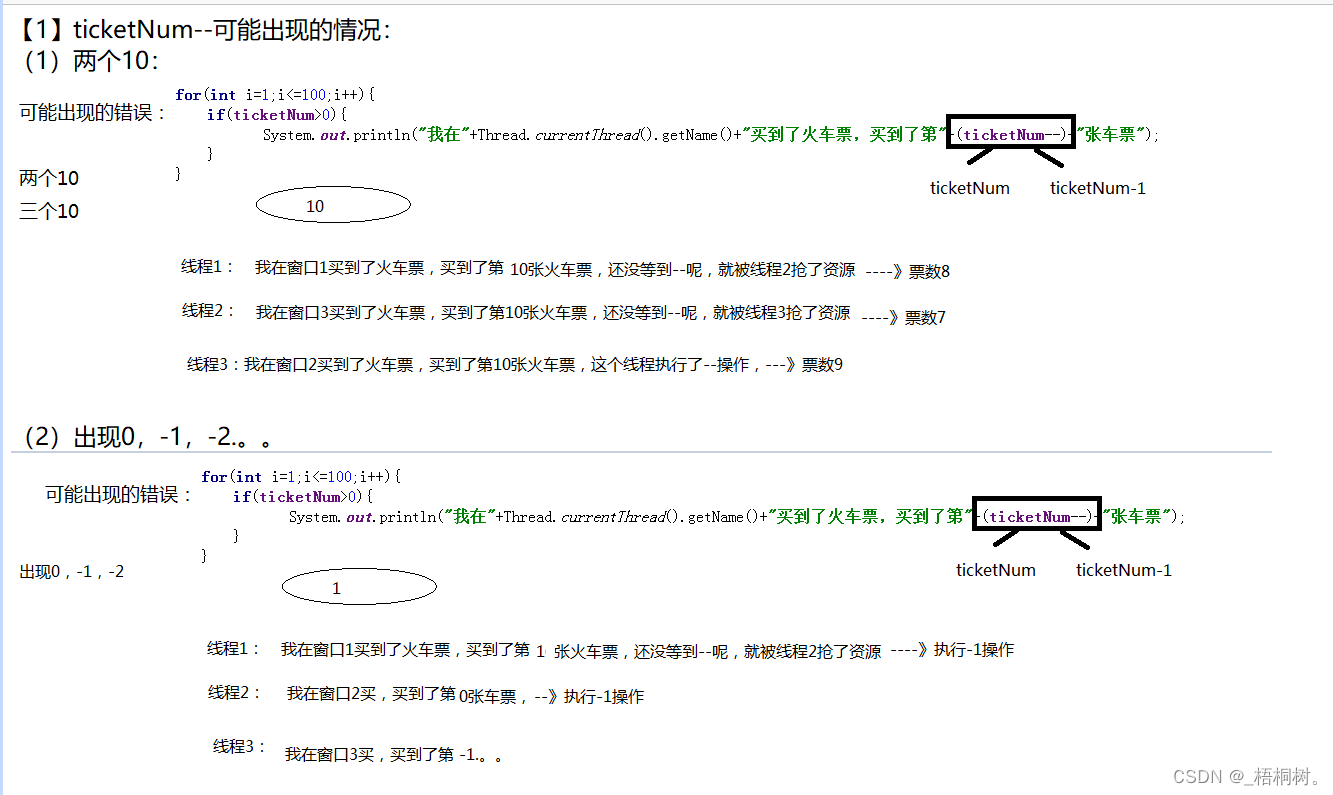
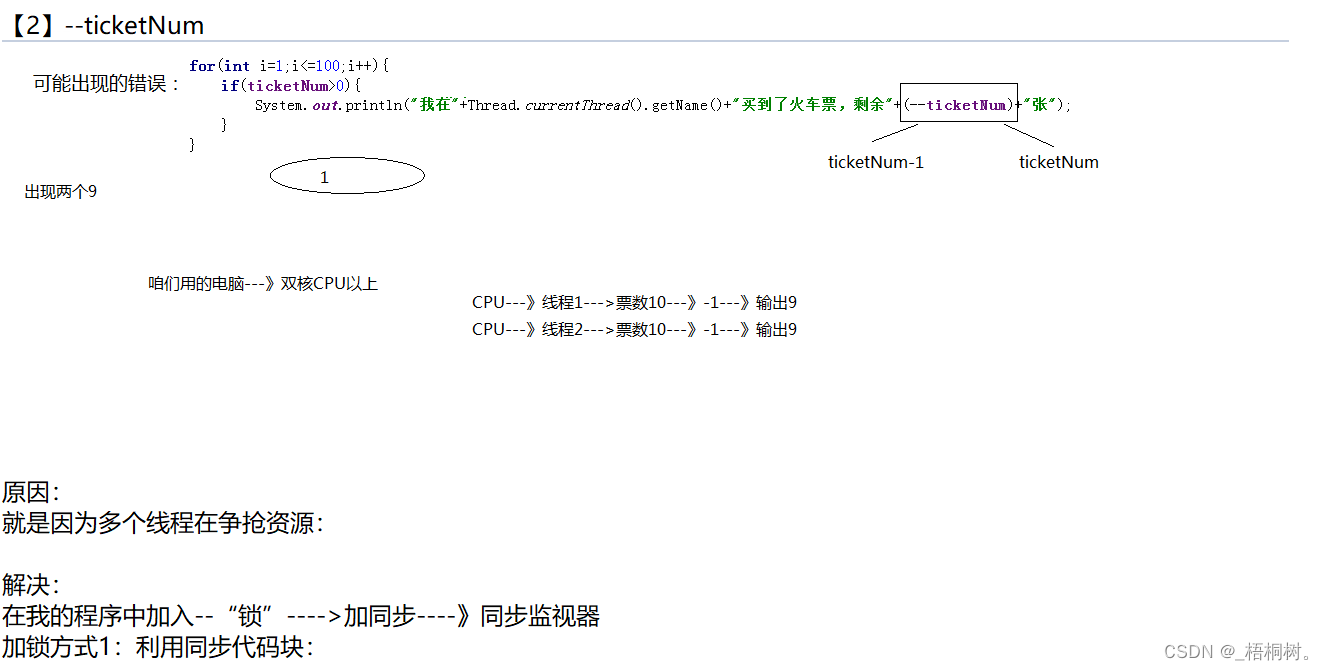
原因:
就是因为多个线程在争抢资源:
解决:
在我的程序中加入–“锁”---->加同步----》同步监视器
加锁方式1:利用同步代码块:
package com.bjsxt.test07;
public class BuyTrainTicket implements Runnable {
    private int ticketNum=10;
    @Override
    public void run() {
        for(int i=1;i<=100;i++){
            synchronized (this){//锁:()中的内容:this
                if(ticketNum>0){
                    try {
                        Thread.sleep(1000);
                    } catch (InterruptedException e) {
                        e.printStackTrace();
                    }
                    System.out.println("我在"+Thread.currentThread().getName()+"买到了火车票,剩余"+(--ticketNum)+"张");
                    //System.out.println("我在"+Thread.currentThread().getName()+"买到了火车票,买到了第"+(ticketNum--)+"张车票");
                }
            }
        }
    }
}
加锁方式2:利用同步方法:
package com.bjsxt.test07;
public class BuyTrainTicket implements Runnable {
    private int ticketNum=10;
    @Override
    public void run() {
        for(int i=1;i<=100;i++){
            buyTicket();
        }
    }
//同步方法谁是锁?  锁的是this,谁调用方法就把谁锁了。
    public synchronized void buyTicket(){
        if(ticketNum>0){
            try {
                Thread.sleep(1000);
            } catch (InterruptedException e) {
                e.printStackTrace();
            }
            System.out.println("我在"+Thread.currentThread().getName()+"买到了火车票,剩余"+(--ticketNum)+"张");
            //System.out.println("我在"+Thread.currentThread().getName()+"买到了火车票,买到了第"+(ticketNum--)+"张车票");
        }
    }
}
加了同步,代码的执行过程是什么样的?
线程1:进入到run方法中,看到程序中有锁,但是没有锁住,然后它将这个锁锁住。
其他的线程可以进来,但是看到锁被锁住了,只能等着,
等到什么时候啊?等到线程1完事了,将锁进行释放,释放完了之后其余的线程就可以将这个锁抢过去了,然后谁抢到谁再加上锁。
--------》
另一个火车票的代码:
package com.bjsxt.test03;
public class BuyTrainTicket extends Thread {
    //属性:(不同窗口共享10张票)
    private static int ticketNum=10;
    //构造器:设置线程名字:设置窗口的名字:
    public BuyTrainTicket(String name) {
        super(name);
    }
    //每个窗口做什么事:写入run方法:
    @Override
    public void run() {
        for(int i=1;i<=100;i++){
            synchronized (BuyTrainTicket.class){//"abc"---只能将引用数据类型作为锁
                try {
                    Thread.sleep(1000);
                } catch (InterruptedException e) {
                    e.printStackTrace();
                }
                if(ticketNum>0){
                    System.out.println("我在"+this.getName()+"买到了从北京到哈尔滨的票,现在票剩余:"+(--ticketNum)+"张");
                }
            }
        }
    }
}
总结:
多线程在争抢资源,就要实现线程的同步(就要进行加锁),
并且这个锁必须是共享的,必须是唯一的。
咱们的锁一般都是引用数据类型的。
目的:解决了线程安全问题。
习题
银行卡:主卡 和 副卡
男主人 女主人—》主卡 和 副卡
package com.bjsxt.test11;
public class AccoutThread implements Runnable{
    //共享账号:
    private Account ac=new Account();
    @Override
    public void run() {
       /*synchronized (this){
           if(ac.getBalance()>=400){
               ac.getMoney(300);
               System.out.println(Thread.currentThread().getName()+"在取款,取款后余额为:"+ac.getBalance());
           }else{
               System.out.println(Thread.currentThread().getName()+"在取款,但是余额不足400,取款失败");
           }
       }*/
        getM();
    }
    public synchronized  void getM(){
        if(ac.getBalance()>=400){
            ac.getMoney(300);
            System.out.println(Thread.currentThread().getName()+"在取款,取款后余额为:"+ac.getBalance());
        }else{
            System.out.println(Thread.currentThread().getName()+"在取款,但是余额不足400,取款失败");
        }
    }
}

package com.bjsxt.test11;
public class Account {
    //共享钱:
    int money=600;
    //取钱
    public void getMoney(int money){
        this.money-=money;//this.money=this.money-money
    }
    //得到余额
    public int getBalance(){
        return money;
    }
}

package com.bjsxt.test11;
public class Test {
    public static void main(String[] args) {
        AccoutThread ac=new AccoutThread();
        new Thread(ac,"男主人").start();
        new Thread(ac,"女主人").start();
    }
}
线程同步的缺点
【1】
线程安全,效率低
线程不安全,效率高
【2】可能造成死锁:
public class TestDeadLock implements Runnable {
    public int flag = 1;
    static Object o1 = new Object(),o2 = new Object();


    public void run(){
        System.out.println("flag=" + flag);
        // 当flag==1锁住o1
        if (flag == 1) {
            synchronized (o1) {
                try {
                    Thread.sleep(500);
                } catch (Exception e) {
                    e.printStackTrace();
                }
                // 只要锁住o2就完成
                synchronized (o2) {
                    System.out.println("2");
                }
            }
        }
        // 如果flag==0锁住o2
        if (flag == 0) {
            synchronized (o2) {
                try {
                    Thread.sleep(500);
                } catch (Exception e) {
                    e.printStackTrace();
                }
                // 只要锁住o1就完成
                synchronized (o1) {
                    System.out.println("3");
                }
            }
        }
    }


    public static void main(String[] args) {
        // 实例2个线程类
        TestDeadLock td1 = new TestDeadLock();
        TestDeadLock td2 = new TestDeadLock();
        td1.flag = 1;
        td2.flag = 0;
        // 开启2个线程
        Thread t1 = new Thread(td1);
        Thread t2 = new Thread(td2);
        t1.start();
        t2.start();
    }
}
疑问1:
(1)
static去掉,还会死锁吗?不会
(2)如何解决死锁?
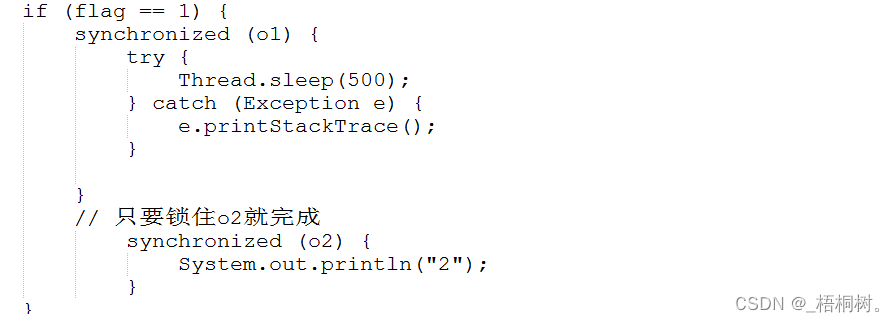
Lock锁
Lock锁:
JDK1.5后新增功能,
与采用synchronized相比,lock可提供多种锁方案,更灵活
    注意:如果同步代码有异常,要将unlock()写入finally语句块

                                    ReentrantLock 类实现了 Lock ,它拥有与 synchronized 相同的并发性和内存语义,
 但是添加了类似锁投票、定时锁等候和可中断锁等候的一些特性。
  此外,它还提供了在激烈争用情况下更佳的性能。


    Lock和synchronized的区别
    1.Lock是显式锁(手动开启和关闭锁,别忘记关闭锁),synchronized是隐式锁
    2.Lock只有代码块锁,synchronized有代码块锁和方法锁
    3.使用Lock锁,JVM将花费较少的时间来调度线程,性能更好。并且具有更好的扩展性(提供更多的子类)

    优先使用顺序:
    Lock----同步代码块(已经进入了方法体,分配了相应资源)----同步方法(在方法体之外)
package com.bjsxt.test07;
import java.util.concurrent.locks.Lock;
import java.util.concurrent.locks.ReentrantLock;
public class BuyTrainTicket implements Runnable {
    private int ticketNum=10;
    //"买来一把锁":
    Lock lock=new ReentrantLock();//多态
    @Override
    public void run() {
        for(int i=1;i<=100;i++){
            //打开锁
            lock.lock();
            try{
                if(ticketNum>0){
                    try {
                        Thread.sleep(1000);
                    } catch (InterruptedException e) {
                        e.printStackTrace();
                    }
                    System.out.println("我在"+Thread.currentThread().getName()+"买到了火车票,剩余"+(--ticketNum)+"张");
                }
            }catch(Exception ex){
                ex.printStackTrace();
            }finally {
                //关闭锁
                lock.unlock();
            }
        }
    }
}
线程组
package com.bjsxt.test12;
public class TestThread extends Thread{
    public TestThread() {
    }
    //两个参数:第一个参数设置线程所在的线程组,第二个参数:设置线程的名字的
    public TestThread(ThreadGroup group, String name) {
        super(group, name);
    }
    @Override
    public void run() {
        for (int i=1;i<=10;i++){
            System.out.println(i);
        }
    }
//设置线程名字
    public TestThread(String name) {
        super(name);
    }
    public static void main(String[] args) {
        TestThread tt=new TestThread();
        tt.setName("这是一个线程名字");
        System.out.println(tt.toString());
        //Thread[Thread-0,5,main]-->线程名字,优先级别,线程组名字:
        System.out.println(tt.getThreadGroup().getName());//main
        System.out.println(tt.getThreadGroup().getParent().getName());//上层组:system
        System.out.println(tt.getThreadGroup().getParent().getParent());//null
        //创建一个线程组:
        ThreadGroup tg=new ThreadGroup("我的线程组哈哈哈");
        System.out.println(tg.getName());
        TestThread t1=new TestThread(tg,"线程1");
        TestThread t2=new TestThread(tg,"线程2");
        System.out.println(t1.getThreadGroup().getName());
        System.out.println(t1.getThreadGroup().getParent().getName());
        t1.start();
        t2.start();
        System.out.println("------------");
        tg.list();
    }
}
线程之间的通信问题
应用场景:生产者和消费者问题
假设仓库中只能存放一件产品,生产者将生产出来的产品放入仓库,消费者将仓库中产品取走消费
如果仓库中没有产品,则生产者将产品放入仓库,否则停止生产并等待,直到仓库中的产品被消费者取走为止
如果仓库中放有产品,则消费者可以将产品取走消费,否则停止消费并等待,直到仓库中再次放入产品为止
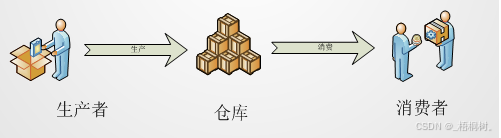
最终代码结果:

代码分析:
商品:被生产者和消费者共享:商品属性:品牌,名字
线程1:生产者
线程2:消费者
分解1:
package com.bjsxt.test13;
public class Product {//商品
    //属性:
    //品牌
    private String brand;
    //名字
    private String name;
    //提供setget方法:
    public String getBrand() {
        return brand;
    }
    public void setBrand(String brand) {
        this.brand = brand;
    }
    public String getName() {
        return name;
    }
    public void setName(String name) {
        this.name = name;
    }
}
package com.bjsxt.test13;
public class ProducerThread extends Thread {//生产者线程
    //共享商品:
    private Product p;
    public ProducerThread(Product p){
        this.p=p;
    }
    //重写run方法:
    @Override
    public void run() {
        for(int i=1;i<=10;i++){
            if(i%2==0){
                //费列罗巧克力:
                p.setBrand("费列罗");
                try {
                    Thread.sleep(100);
                } catch (InterruptedException e) {
                    e.printStackTrace();
                }
                p.setName("巧克力");
            }else{
                p.setBrand("哈尔滨");
                try {
                    Thread.sleep(100);
                } catch (InterruptedException e) {
                    e.printStackTrace();
                }
                p.setName("啤酒");
            }
            //将信息打印:
            System.out.println("生产者生产了:"+p.getBrand()+"----"+p.getName());
        }
    }
}
package com.bjsxt.test13;
public class CustomerThread extends Thread {//消费者线程
    private Product p;
    public CustomerThread(Product p){
        this.p=p;
    }
    //重写run方法:
    @Override
    public void run() {
        for (int i=1;i<=10;i++){
            System.out.println("消费者消费,消费了:"+p.getBrand()+"----"+p.getName());
        }
    }
}
package com.bjsxt.test13;
public class Test {
    public static void main(String[] args) {
        //创建一个共享商品:
        Product p=new Product();
        //创建生产者和消费者线程:
        CustomerThread ct=new CustomerThread(p);
        ProducerThread pt=new ProducerThread(p);
        pt.start();
        ct.start();
    }
}
代码出现的问题:
(1)没有交替生产和消费
正常效果生产一个消费一个,但是现在生产好几个,消费好几个。
(2)打印数据错乱:
哈尔滨 null
哈尔滨 巧克力
费列罗啤酒
分解2:
【1】加锁:利用同步代码块:
package com.bjsxt.test14.test13;
public class Product {//商品
    //属性:
    //品牌
    private String brand;
    //名字
    private String name;
    //提供setget方法:
    public String getBrand() {
        return brand;
    }
    public void setBrand(String brand) {
        this.brand = brand;
    }
    public String getName() {
        return name;
    }
    public void setName(String name) {
        this.name = name;
    }
}
package com.bjsxt.test14.test13;
public class ProducerThread extends Thread {//生产者线程
    //共享商品:
    private Product p;
    public ProducerThread(Product p){
        this.p=p;
    }
    //重写run方法:
    @Override
    public void run() {
        for(int i=1;i<=10;i++){
            synchronized (p){
                if(i%2==0){
                    //费列罗巧克力:
                    p.setBrand("费列罗");
                    try {
                        Thread.sleep(100);
                    } catch (InterruptedException e) {
                        e.printStackTrace();
                    }
                    p.setName("巧克力");
                }else{
                    p.setBrand("哈尔滨");
                    try {
                        Thread.sleep(100);
                    } catch (InterruptedException e) {
                        e.printStackTrace();
                    }
                    p.setName("啤酒");
                }
                //将信息打印:
                System.out.println("生产者生产了:"+p.getBrand()+"----"+p.getName());
            }
        }
    }
}
package com.bjsxt.test14.test13;
public class CustomerThread extends Thread {//消费者线程
    private Product p;
    public CustomerThread(Product p){
        this.p=p;
    }
    //重写run方法:
    @Override
    public void run() {
        for (int i=1;i<=10;i++){
            synchronized (p){
                try {
                    Thread.sleep(100);
                } catch (InterruptedException e) {
                    e.printStackTrace();
                }
                System.out.println("消费者消费,消费了:"+p.getBrand()+"----"+p.getName());
            }
        }
    }
}
package com.bjsxt.test14.test13;
public class Test {
    public static void main(String[] args) {
        //创建一个共享商品:
        Product p=new Product();
        //创建生产者和消费者线程:
        CustomerThread ct=new CustomerThread(p);
        ProducerThread pt=new ProducerThread(p);
        pt.start();
        ct.start();
    }
}
【2】加锁:同步方法:
package com.bjsxt.test15.test13;
public class Product {//商品
    //属性:
    //品牌
    private String brand;
    //名字
    private String name;
    //提供setget方法:
    public String getBrand() {
        return brand;
    }
    public void setBrand(String brand) {
        this.brand = brand;
    }
    public String getName() {
        return name;
    }
    public void setName(String name) {
        this.name = name;
    }
    //生产产品:
    public synchronized void setProduct(String brand,String name){
        this.setBrand(brand);
        try {
            Thread.sleep(100);
        } catch (InterruptedException e) {
            e.printStackTrace();
        }
        this.setName(name);
        //将信息打印:
        System.out.println("生产者生产了:"+this.getBrand()+"----"+this.getName());
    }
    //消费商品
    public synchronized void getProduct(){
        try {
            Thread.sleep(100);
        } catch (InterruptedException e) {
            e.printStackTrace();
        }
        System.out.println("消费者消费,消费了:"+this.getBrand()+"----"+this.getName());
    }
}
package com.bjsxt.test15.test13;
public class CustomerThread extends Thread {//消费者线程
    private Product p;
    public CustomerThread(Product p){
        this.p=p;
    }
    //重写run方法:
    @Override
    public void run() {
        for (int i=1;i<=10;i++){
            p.getProduct();
        }
    }
}
package com.bjsxt.test15.test13;
public class ProducerThread extends Thread {//生产者线程
    //共享商品:
    private Product p;
    public ProducerThread(Product p){
        this.p=p;
    }
    //重写run方法:
    @Override
    public void run() {
        for(int i=1;i<=10;i++){
            if(i%2==0){
                //费列罗巧克力:
                p.setProduct("费列罗","巧克力");
            }else{
               p.setProduct("哈尔滨","啤酒");
            }
        }
    }
}
package com.bjsxt.test15.test13;
public class Test {
    public static void main(String[] args) {
        //创建一个共享商品:
        Product p=new Product();
        //创建生产者和消费者线程:
        CustomerThread ct=new CustomerThread(p);
        ProducerThread pt=new ProducerThread(p);
        pt.start();
        ct.start();
    }
}
现在代码中还有的问题:生产和消费并没有交替进行;
分解3:
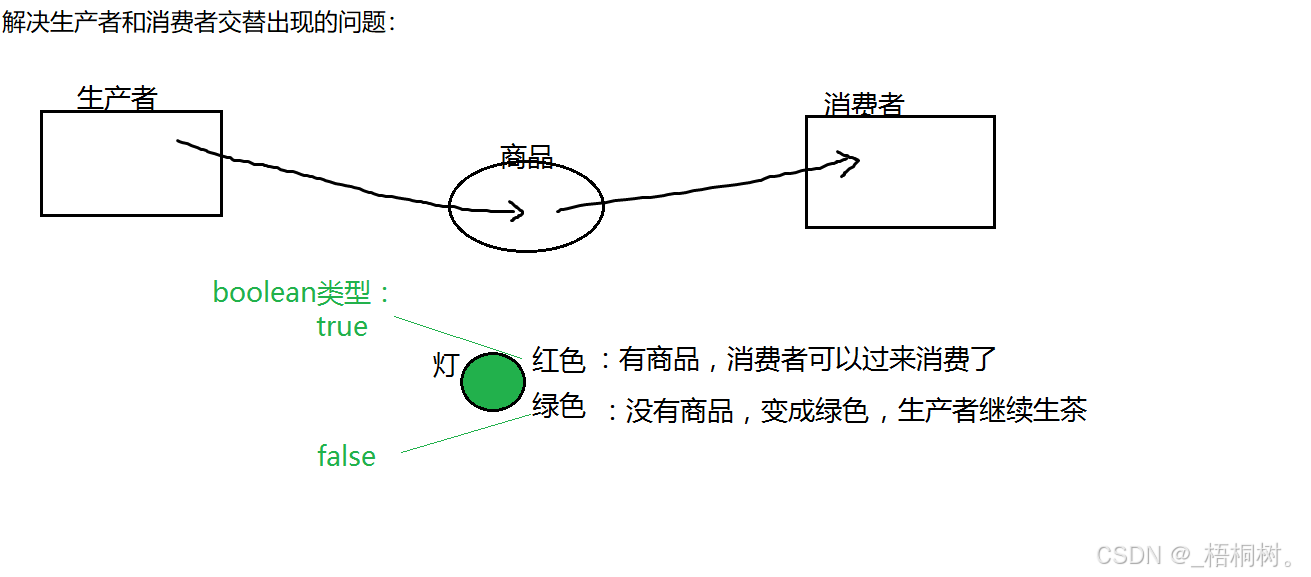
package com.bjsxt.test15.test13;
public class Product {//商品
    //属性:
    //品牌
    private String brand;
    //名字
    private String name;
    //加入一个“灯”:
    boolean flag=false;//最开始这个灯应该是绿色的:false--》没有商品
    //提供setget方法:
    public String getBrand() {
        return brand;
    }
    public void setBrand(String brand) {
        this.brand = brand;
    }
    public String getName() {
        return name;
    }
    public void setName(String name) {
        this.name = name;
    }
    //生产产品:
    public synchronized void setProduct(String brand,String name){
        if(flag==true){//灯是红色:生产者不生产的,等着
            try {
                wait();//Object的方法
            } catch (InterruptedException e) {
                e.printStackTrace();
            }
        }
        //如果灯是绿色的呢?开始生产商品:
        this.setBrand(brand);
        try {
            Thread.sleep(100);
        } catch (InterruptedException e) {
            e.printStackTrace();
        }
        this.setName(name);
        //将信息打印:
        System.out.println("生产者生产了:"+this.getBrand()+"----"+this.getName());
        //截止到上面,商品已经生产完了:
        //将灯变成:红色
        flag=true;
        //告诉消费者赶紧来消费:
        notify();//Object类方法
    }
    //消费商品
    public synchronized void getProduct(){
        if(!flag){//flag==false--->如果灯是绿色的:
            try {
                wait();
            } catch (InterruptedException e) {
                e.printStackTrace();
            }
        }
        //如果灯是红色的:开始消费:
        try {
            Thread.sleep(100);
        } catch (InterruptedException e) {
            e.printStackTrace();
        }
        System.out.println("消费者消费,消费了:"+this.getBrand()+"----"+this.getName());
        //截止到这里,消费结束
        //灯变成:绿色:
        flag=false;
        //通知生产者赶紧生产:
        notify();
    }
}
package com.bjsxt.test15.test13;
public class ProducerThread extends Thread {//生产者线程
    //共享商品:
    private Product p;
    public ProducerThread(Product p){
        this.p=p;
    }
    //重写run方法:
    @Override
    public void run() {
        for(int i=1;i<=10;i++){
            if(i%2==0){
                //费列罗巧克力:
                p.setProduct("费列罗","巧克力");
            }else{
                p.setProduct("哈尔滨","啤酒");
            }
        }
    }
}
package com.bjsxt.test15.test13;
public class CustomerThread extends Thread {//消费者线程
    private Product p;
    public CustomerThread(Product p){
        this.p=p;
    }
    //重写run方法:
    @Override
    public void run() {
        for (int i=1;i<=10;i++){
            p.getProduct();
        }
    }
}
package com.bjsxt.test15.test13;
public class Test {
    public static void main(String[] args) {
        //创建一个共享商品:
        Product p=new Product();
        //创建生产者和消费者线程:
        CustomerThread ct=new CustomerThread(p);
        ProducerThread pt=new ProducerThread(p);
        pt.start();
        ct.start();
    }
}

线程池
队列
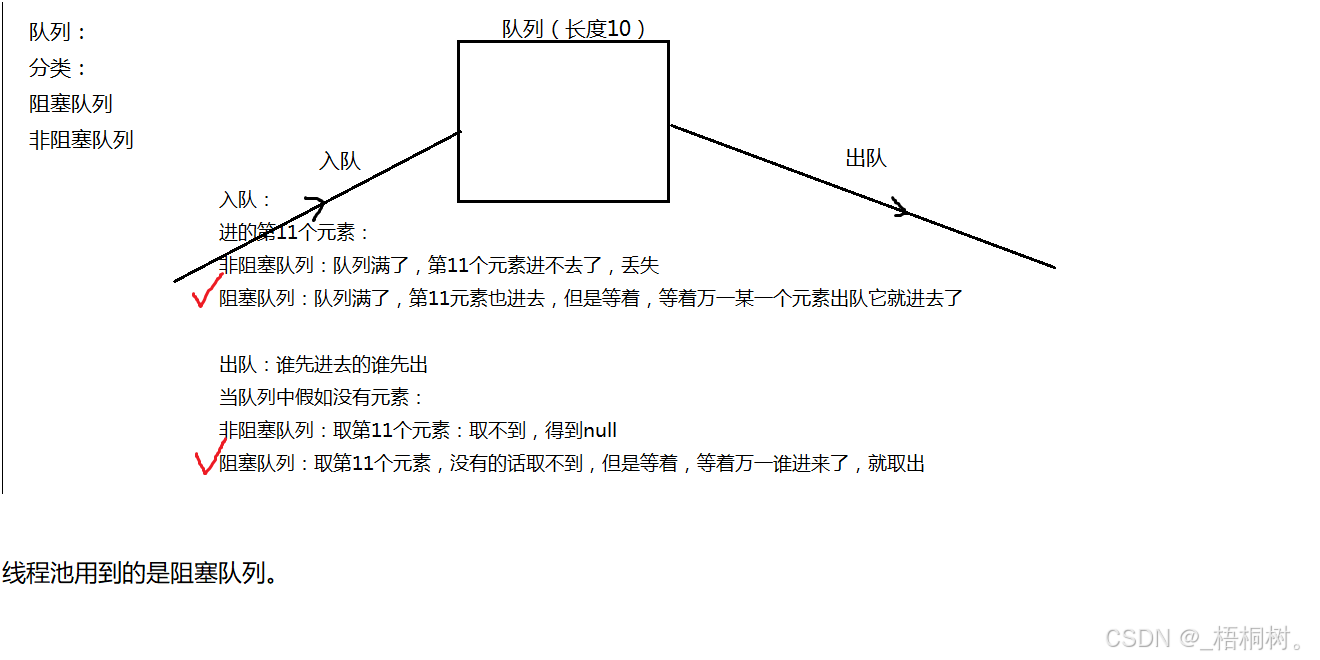
线程池
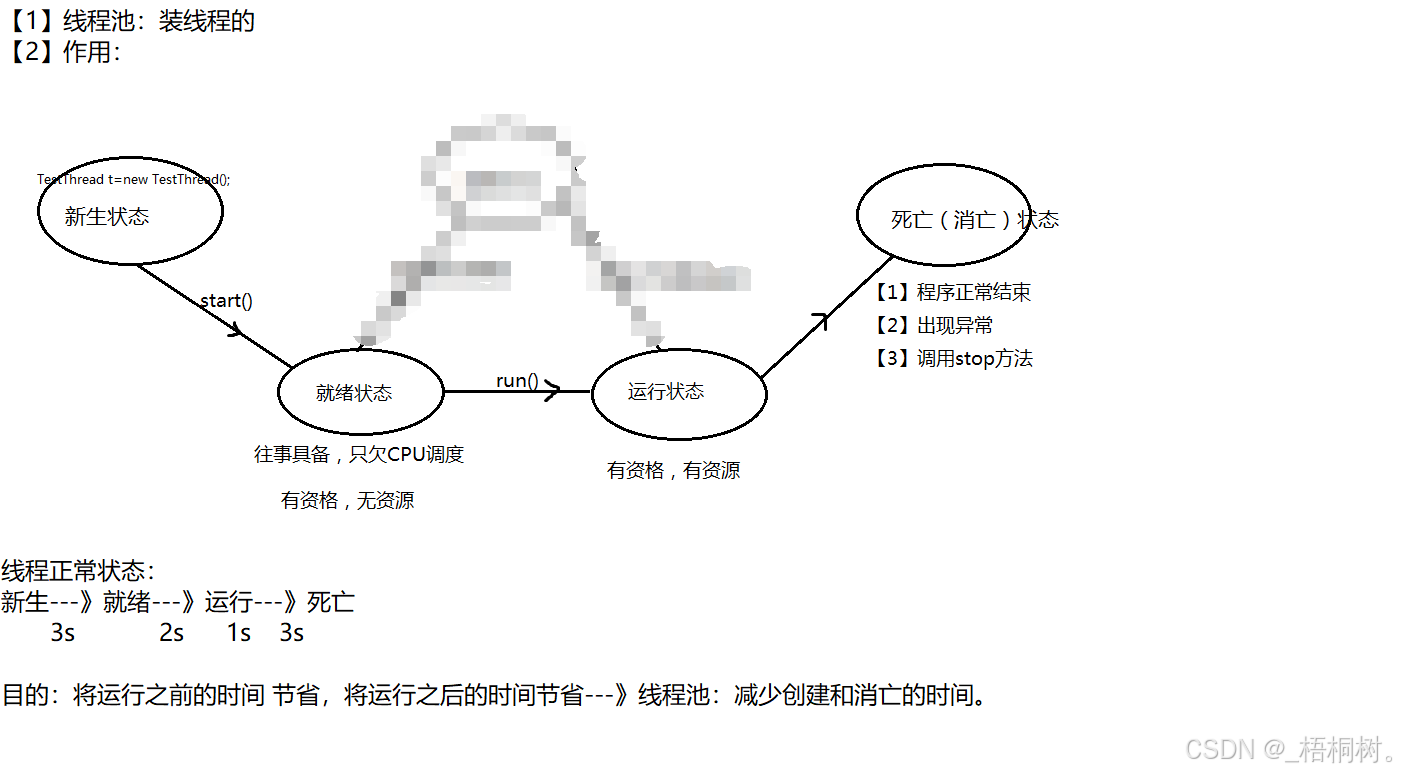
内置线程池
JDK1.5之后提供了内置线程池:
【1】可缓存线程池:
public class Test {
    public static void main(String[] args) {
        //可缓存线程:
        ExecutorService es = Executors.newCachedThreadPool();
        //执行任务:
        for(int i=1;i<=100;i++){
            es.execute(new TestThread());
        }
        //关闭:
        es.shutdown();
    }
}
最开始没有核心线程,来一个任务,新建一个线程来执行这个任务,当这个任务执行完以后,这个线程继续执行其他的任务,所以在结果中我们发现,线程可以是重复的:
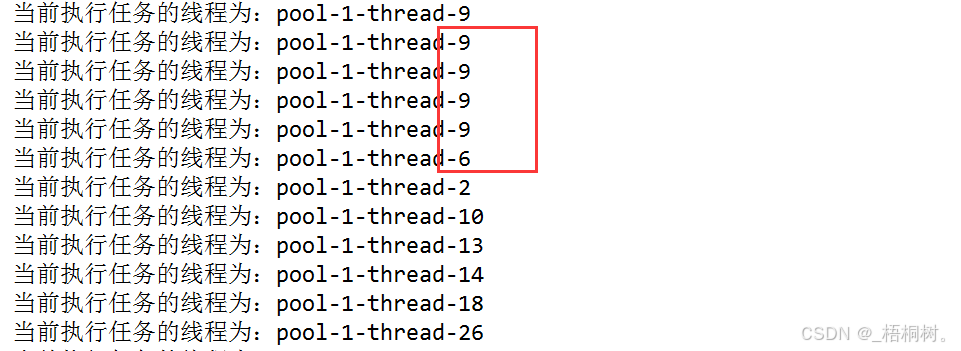
【2】定长线程池:
public class Test {
    public static void main(String[] args) {
        //定长线程:
        ExecutorService es = Executors.newFixedThreadPool(3);
        //执行任务:
        for(int i=1;i<=100;i++){
            es.execute(new TestThread());
        }
        //关闭:
        es.shutdown();
    }
}

【3】定时线程池:
public class Test {
    public static void main(String[] args) {
        //定时线程:
        ScheduledExecutorService ses=Executors.newScheduledThreadPool(3);
        //执行任务:
        for(int i=1;i<=100;i++){
            ses.schedule(new TestThread(),3, TimeUnit.SECONDS);
        }
        //关闭:
        ses.shutdown();
    }
}
进行延时:延时3秒执行线程
【4】单例线程池:
public class Test {
    public static void main(String[] args) {
        //单例线程:
        ExecutorService es= Executors.newSingleThreadExecutor();
        //执行任务:
        for(int i=1;i<=100;i++){
           es.execute(new TestThread());
        }
        //关闭:
        es.shutdown();
    }
}
就是由一个线程来执行任务
public class Test {
    public static void main(String[] args) {
        //单例线程:
        ExecutorService es= Executors.newSingleThreadExecutor();
        //执行任务:
        for(int i=1;i<=100;i++){
            //利用匿名内部类的对象传入execute方法也是可以的:
           es.execute(new Runnable() {
               @Override
               public void run() {
                   System.out.println("当前线程为:"+Thread.currentThread().getName());
               }
           });
        }
        //关闭:
        es.shutdown();
    }
}


