目录
- 一、搭建一个主界面框架
- 二、实现步骤
- 1.主界面区域划分
- 2.主界面区域实现
一、搭建一个主界面框架
主要实现主界面的框架样式和基础功能。这里特别说明一下,由于MvvmLight 已经过时不在维护,本项目决定将MvvmLight框架变更为 CommunityToolkit.Mvvm 框架,使用方法和 MvvmLight 一样,具体配置大家可以参考像 MvvmLight 一样使用 CommunityToolkit.Mvvm 工具包 这篇文章。本节实现效果如下所示:

二、实现步骤
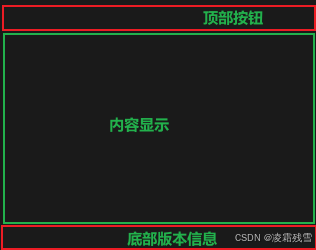
1.主界面区域划分
这里我们分析一下,主界面一共分成上中下三个区域,最上面的为系统功能按钮,中间区域显示内容信息,底部显示系统版本版权信息等。分割效果图如下:
2.主界面区域实现
MainWindow.xaml 文件完整代码如下:
<Window x:Class="CommonProject_DeskTop.MainWindow"
xmlns="http://schemas.microsoft.com/winfx/2006/xaml/presentation"
xmlns:x="http://schemas.microsoft.com/winfx/2006/xaml"
xmlns:d="http://schemas.microsoft.com/expression/blend/2008"
xmlns:mc="http://schemas.openxmlformats.org/markup-compatibility/2006"
xmlns:local="clr-namespace:CommonProject_DeskTop"
xmlns:behavior="http://schemas.microsoft.com/xaml/behaviors"
xmlns:viewmodel="clr-namespace:CommonProject_DeskTop.ViewModel"
mc:Ignorable="d" Title="通用基础案例"
DataContext="{Binding Source={StaticResource Locator},Path=Main}" MinWidth="1200" MinHeight="700"
ResizeMode="CanResize" Background="#1F1F1F" AllowsTransparency="True" WindowStyle="None" WindowStartupLocation="CenterScreen">
<Window.Resources>
<ResourceDictionary>
<ResourceDictionary.MergedDictionaries>
<ResourceDictionary Source="/Assets/Styles/SystemButton.xaml"/>
</ResourceDictionary.MergedDictionaries>
</ResourceDictionary>
</Window.Resources>
<Grid x:Name="MainContent" ClipToBounds="True" Background="Transparent">
<Grid.RowDefinitions>
<RowDefinition Height="40"/>
<RowDefinition Height="*"/>
<RowDefinition Height="30"/>
</Grid.RowDefinitions>
<!--顶部系统菜单按钮-->
<Grid Background="#1F2336" MouseDown="DragMoveWindow">
<!--绘制多边形形状作为标题背景底色-->
<Polygon Points="0 0,280,0,220 40 20 40 0 40" StrokeThickness="0" Stroke="White" HorizontalAlignment="Left">
<Polygon.Fill>
<SolidColorBrush Color="Gray"/>
</Polygon.Fill>
</Polygon>
<TextBlock Text="仓储管理系统" TextAlignment="Left" VerticalAlignment="Center" FontSize="20" Foreground="Gold" Margin="35 0 0 0"/>
<!--系统按钮-->
<StackPanel HorizontalAlignment="Right" Orientation="Horizontal" Margin="0 0 10 0" VerticalAlignment="Center" >
<Button Content="" ToolTip="登录" Style="{StaticResource SystemButtonStyle}" Command="{Binding ButtonClickCmd}" CommandParameter="{Binding RelativeSource={RelativeSource Mode=Self},Path=ToolTip}"/>
<Button Content="" ToolTip="最小化" Style="{StaticResource SystemButtonStyle}" Command="{Binding ButtonClickCmd}" CommandParameter="{Binding RelativeSource={RelativeSource Mode=Self},Path=ToolTip}"/>
<Button Content="" ToolTip="最大化" Style="{StaticResource SystemButtonStyle}" Command="{Binding ButtonClickCmd}" CommandParameter="{Binding RelativeSource={RelativeSource Mode=Self},Path=ToolTip}"/>
<Button Content="" ToolTip="关闭" Style="{StaticResource SystemButtonStyle}" Command="{Binding ButtonClickCmd}" CommandParameter="{Binding RelativeSource={RelativeSource Mode=Self},Path=ToolTip}"/>
</StackPanel>
</Grid>
<Grid Grid.Row="1">
<Grid>
<Grid.ColumnDefinitions>
<ColumnDefinition Width="130"/>
<ColumnDefinition Width="*"/>
</Grid.ColumnDefinitions>
<Rectangle Fill="#111111"/>
<ListBox Margin="0 5 0 0" Background="Transparent" Foreground="White" BorderThickness="0" FontSize="16" Name="listMenu">
<behavior:Interaction.Triggers>
<behavior:EventTrigger EventName="SelectionChanged">
<behavior:InvokeCommandAction Command="{Binding RelativeSource={RelativeSource AncestorType=ListBox}, Path=DataContext.MenuClickCmd}" CommandParameter="{Binding ElementName=listMenu,Path=SelectedItem}"/>
</behavior:EventTrigger>
</behavior:Interaction.Triggers>
<ListBox.ItemContainerStyle>
<Style TargetType="ListBoxItem">
<Setter Property="Template">
<Setter.Value>
<ControlTemplate TargetType="ListBoxItem">
<StackPanel Height="35" Orientation="Horizontal" Background="Transparent" Name="container" Cursor="Hand">
<Rectangle Fill="DarkRed" VerticalAlignment="Stretch" Width="5" Visibility="Hidden" Name="leftSlideRectangle"/>
<ContentPresenter VerticalAlignment="Center" Margin="15 0 0 0"/>
</StackPanel>
<ControlTemplate.Triggers>
<Trigger Property="IsSelected" Value="True">
<Setter Property="Visibility" Value="Visible" TargetName="leftSlideRectangle"/>
<Setter Property="Background" Value="#3a3a3a" TargetName="container"/>
</Trigger>
<Trigger Property="IsMouseOver" Value="True">
<Setter Property="Visibility" Value="Visible" TargetName="leftSlideRectangle"/>
<Setter Property="Opacity" Value="0.5" TargetName="leftSlideRectangle"/>
<Setter Property="Background" Value="#1a1a1a" TargetName="container"/>
</Trigger>
</ControlTemplate.Triggers>
</ControlTemplate>
</Setter.Value>
</Setter>
</Style>
</ListBox.ItemContainerStyle>
<ListBoxItem Content="首页"/>
<ListBoxItem Content="物资管理"/>
<ListBoxItem Content="仓库设置"/>
<ListBoxItem Content="库位管理"/>
<ListBoxItem Content="客户管理"/>
<ListBoxItem Content="供应商管理"/>
<ListBoxItem Content="物资入库"/>
<ListBoxItem Content="物资出库"/>
<ListBoxItem Content="入库管理"/>
<ListBoxItem Content="出库管理"/>
</ListBox>
</Grid>
</Grid>
<!--底部版本信息-->
<Grid Grid.Row="2" Background="#424242">
<Grid.ColumnDefinitions>
<ColumnDefinition/>
<ColumnDefinition/>
<ColumnDefinition/>
<ColumnDefinition Width="*"/>
</Grid.ColumnDefinitions>
<StatusBarItem Grid.Column="0" FontSize="10" Foreground="#F5F5F5" HorizontalAlignment="Center" Content="版权@2024"/>
<StatusBarItem Grid.Column="1" FontSize="10" Foreground="#F5F5F5" HorizontalAlignment="Center" Content="XXXXXXXXX有限公司"/>
<StatusBarItem Grid.Column="3" HorizontalAlignment="Center" >
<TextBlock Text="{Binding DateTimeStr}" FontSize="10" Foreground="#EBEBEB"/>
</StatusBarItem>
</Grid>
</Grid>
</Window>
2、MainWindow.xaml.cs 后端代码如下:
using CommonProject_DeskTop.ViewModel;
using CommunityToolkit.Mvvm.Messaging;
using Microsoft.Extensions.DependencyInjection;
using System;
using System.Collections.Generic;
using System.Diagnostics;
using System.Linq;
using System.Text;
using System.Threading.Tasks;
using System.Windows;
using System.Windows.Controls;
using System.Windows.Data;
using System.Windows.Documents;
using System.Windows.Input;
using System.Windows.Media;
using System.Windows.Media.Imaging;
using System.Windows.Navigation;
using System.Windows.Shapes;

namespace CommonProject_DeskTop
{
    /// <summary>
    /// MainWindow.xaml 的交互逻辑
    /// </summary>
    public partial class MainWindow : Window
    {
        public MainWindow()
        {
            InitializeComponent();
            //消息注册
            RegisterMessage();
        }

        private void RegisterMessage()
        {
            注册一个系统菜单功能消息
            WeakReferenceMessenger.Default.Register<string>(this, HandleMessage);
        }

        private void HandleMessage(object recipient, string message)
        {
            switch (message)
            {
                case "MainWindowClose":
                    AppClose();
                    break;
                case "MainWindowMax":
                    MainWindowMax();
                    break;
                case "MainWindowMin":
                    MainWindowMin();
                    break;
            }
        }


        /// <summary>
        /// 窗体最小化
        /// </summary>
        private void MainWindowMin()
        {
            this.WindowState = WindowState.Minimized;
        }
        /// <summary>
        /// 窗体最大化
        /// </summary>
        private void MainWindowMax()
        {
            if (this.WindowState == WindowState.Maximized)
            {
                this.WindowState = WindowState.Normal;
            }
            else
            {
                this.WindowState = WindowState.Maximized;
            }
        }
        /// <summary>
        /// 退出系统
        /// </summary>
        private void AppClose()
        {
            //DataCenter.Instance.Dispose();
            string appName = AppDomain.CurrentDomain.SetupInformation.ApplicationName.Replace(".exe", "");
            foreach (var item in Process.GetProcessesByName(appName))
            {
                item.Kill();
            }
        }


        /// <summary>
        /// 窗体拖拽方法
        /// </summary>
        /// <param name="sender"></param>
        /// <param name="e"></param>
        private void DragMoveWindow(object sender, MouseButtonEventArgs e)
        {
            this.WindowState = WindowState.Normal;
            if (e.LeftButton == MouseButtonState.Pressed && this.WindowState != WindowState.Maximized)
            {
                this.DragMove();
            }
        }
    }
}
3、MainViewModel.cs 文件代码如下:
using CommunityToolkit.Mvvm.ComponentModel;
using CommunityToolkit.Mvvm.Input;
using CommunityToolkit.Mvvm.Messaging;
using System;
using System.Collections.Generic;
using System.Linq;
using System.Text;
using System.Threading.Tasks;
using System.Windows;
using System.Windows.Controls;
using System.Windows.Threading;

namespace CommonProject_DeskTop.ViewModel
{
    public class MainViewModel : ObservableObject
    {
        #region 属性
        [ObservableProperty]
        private string dateTimeStr;
        public string DateTimeStr
        {
            get { return dateTimeStr; }
            set { SetProperty(ref dateTimeStr, value); }
        }
        #endregion

        #region 命令
        public RelayCommand<string> ButtonClickCmd { get; set; }
        public RelayCommand<object>MenuClickCmd { get; set; }

        #endregion

        #region 方法


        #region 系统按钮方法
        private void FunMenu(string p)
        {
            switch (p)
            {
                case "最小化":
                    WindowMin();
                    break;
                case "最大化":
                    WindowMax();
                    break;
                case "关闭":
                    AppClose();
                    break;
            }
        }
        private void AppClose()
        {
            WeakReferenceMessenger.Default.Send("MainWindowClose");
        }

        private void WindowMax()
        {
            WeakReferenceMessenger.Default.Send("MainWindowMax");
        }

        private void WindowMin()
        {
            WeakReferenceMessenger.Default.Send("MainWindowMin");
        }
        #endregion

        #region 菜单按钮方法
        private void MenuChange(object obj)
        {
            var menu =obj as ListBoxItem;
            switch (menu.Content.ToString())
            {
                case "首页":
                    MessageBox.Show(menu.Content.ToString(), "");
                    break;
                case "物资管理":
                    MessageBox.Show(menu.Content.ToString(), "");
                    break;
                case "仓库设置":
                    MessageBox.Show(menu.Content.ToString(),"");
                    break;
                case "库位管理":
                    MessageBox.Show(menu.Content.ToString(), "");
                    break;
                case "客户管理":
                    MessageBox.Show(menu.Content.ToString(), "");
                    break;
                case "供应商管理":
                    MessageBox.Show(menu.Content.ToString(), "");
                    break;
                case "物资入库":
                    MessageBox.Show(menu.Content.ToString(), "");
                    break;
                case "物资出库":
                    MessageBox.Show(menu.Content.ToString(), "");
                    break;
                case "入库管理":
                    MessageBox.Show(menu.Content.ToString(), "");
                    break;
                case "出库管理":
                    MessageBox.Show(menu.Content.ToString(), "");
                    break;
            }
        }
        #endregion

        private void CreateTimer()
        {
            #region 系统时间定时器获取时间数据
            DispatcherTimer cpuTimer = new DispatcherTimer
            {
                Interval = new TimeSpan(0, 0, 0, 1, 0)
            };
            cpuTimer.Tick += DispatcherTimer_Tick;
            cpuTimer.Start();
            #endregion
        }

        private void DispatcherTimer_Tick(object sender, EventArgs e)
        {
            DateTimeStr = DateTime.Now.ToString("yyyy年MM月dd日 HH:mm:ss");
        }


        #endregion

        public MainViewModel()
        {
            ButtonClickCmd = new RelayCommand<string>(FunMenu);
            MenuClickCmd = new RelayCommand<object>(MenuChange);
            //创建定时器
            CreateTimer();
        }
    }
}
4、SystemButton.xaml 样式文件代码如下:
<ResourceDictionary xmlns="http://schemas.microsoft.com/winfx/2006/xaml/presentation"
                    xmlns:x="http://schemas.microsoft.com/winfx/2006/xaml">
    <Style TargetType="Button" x:Key="SystemButtonStyle">
        <Setter Property="FontSize" Value="14"/>
        <Setter Property="Height" Value="36"/>
        <Setter Property="Width" Value="50"/>
        <Setter Property="Margin" Value="3 0 3 0"/>
        <Setter Property="Foreground" Value="Gainsboro"/>
        <Setter Property="Tag" Value="#3F3F41"/>
        <Setter Property="Template">
            <Setter.Value>
                <ControlTemplate TargetType="Button">
                    <Grid Background="Transparent" Height="{TemplateBinding Height}" Width="{TemplateBinding Width}" Name="back">
                        <Border Name="hover" Background="{TemplateBinding Background}" Visibility="Collapsed"/>
                        <TextBlock Text="{TemplateBinding Content}" FontFamily="{DynamicResource iconfont}"
                                VerticalAlignment="Center" HorizontalAlignment="Center" Name="txt"/>
                    </Grid>
                    <ControlTemplate.Triggers>
                        <Trigger Property="IsMouseOver" Value="True">
                            <Setter Property="Visibility" Value="Visible" TargetName="hover"/>
                        </Trigger>
                    </ControlTemplate.Triggers>
                </ControlTemplate>
            </Setter.Value>
        </Setter>
        <Style.Triggers>
            <Trigger Property="IsMouseOver" Value="True">
                <Setter Property="Background" Value="{Binding Tag,RelativeSource={RelativeSource Mode=Self}}"/>
            </Trigger>
        </Style.Triggers>
    </Style>
</ResourceDictionary>