文章目录
- 自定义指令
- 1.指令介绍
- 2.自定义指令
- 3.自定义指令语法
- 4.指令中的配置项
- 自定义指令-指令的值
- 1.使用效果
- 2.语法
- 插槽-默认插槽
- 1.作用
- 2.用处
- 4.插槽的基本语法
- 插槽-具名插槽
- 1.作用
- 2.具名插槽语法
- 3.v-slot的简写
- 插槽总结
- 1.插槽分类
- 2.作用
- 3.场景
- 4.使用步骤
自定义指令
1.指令介绍
- 内置指令:v-html、v-if、v-bind、v-on… 这都是Vue内置的一些指令,可以直接使用
- 自定义指令:同时Vue也支持让开发者,自己注册一些指令。这些指令被称为自定义指令
每个指令都有自己各自独立的功能
2.自定义指令
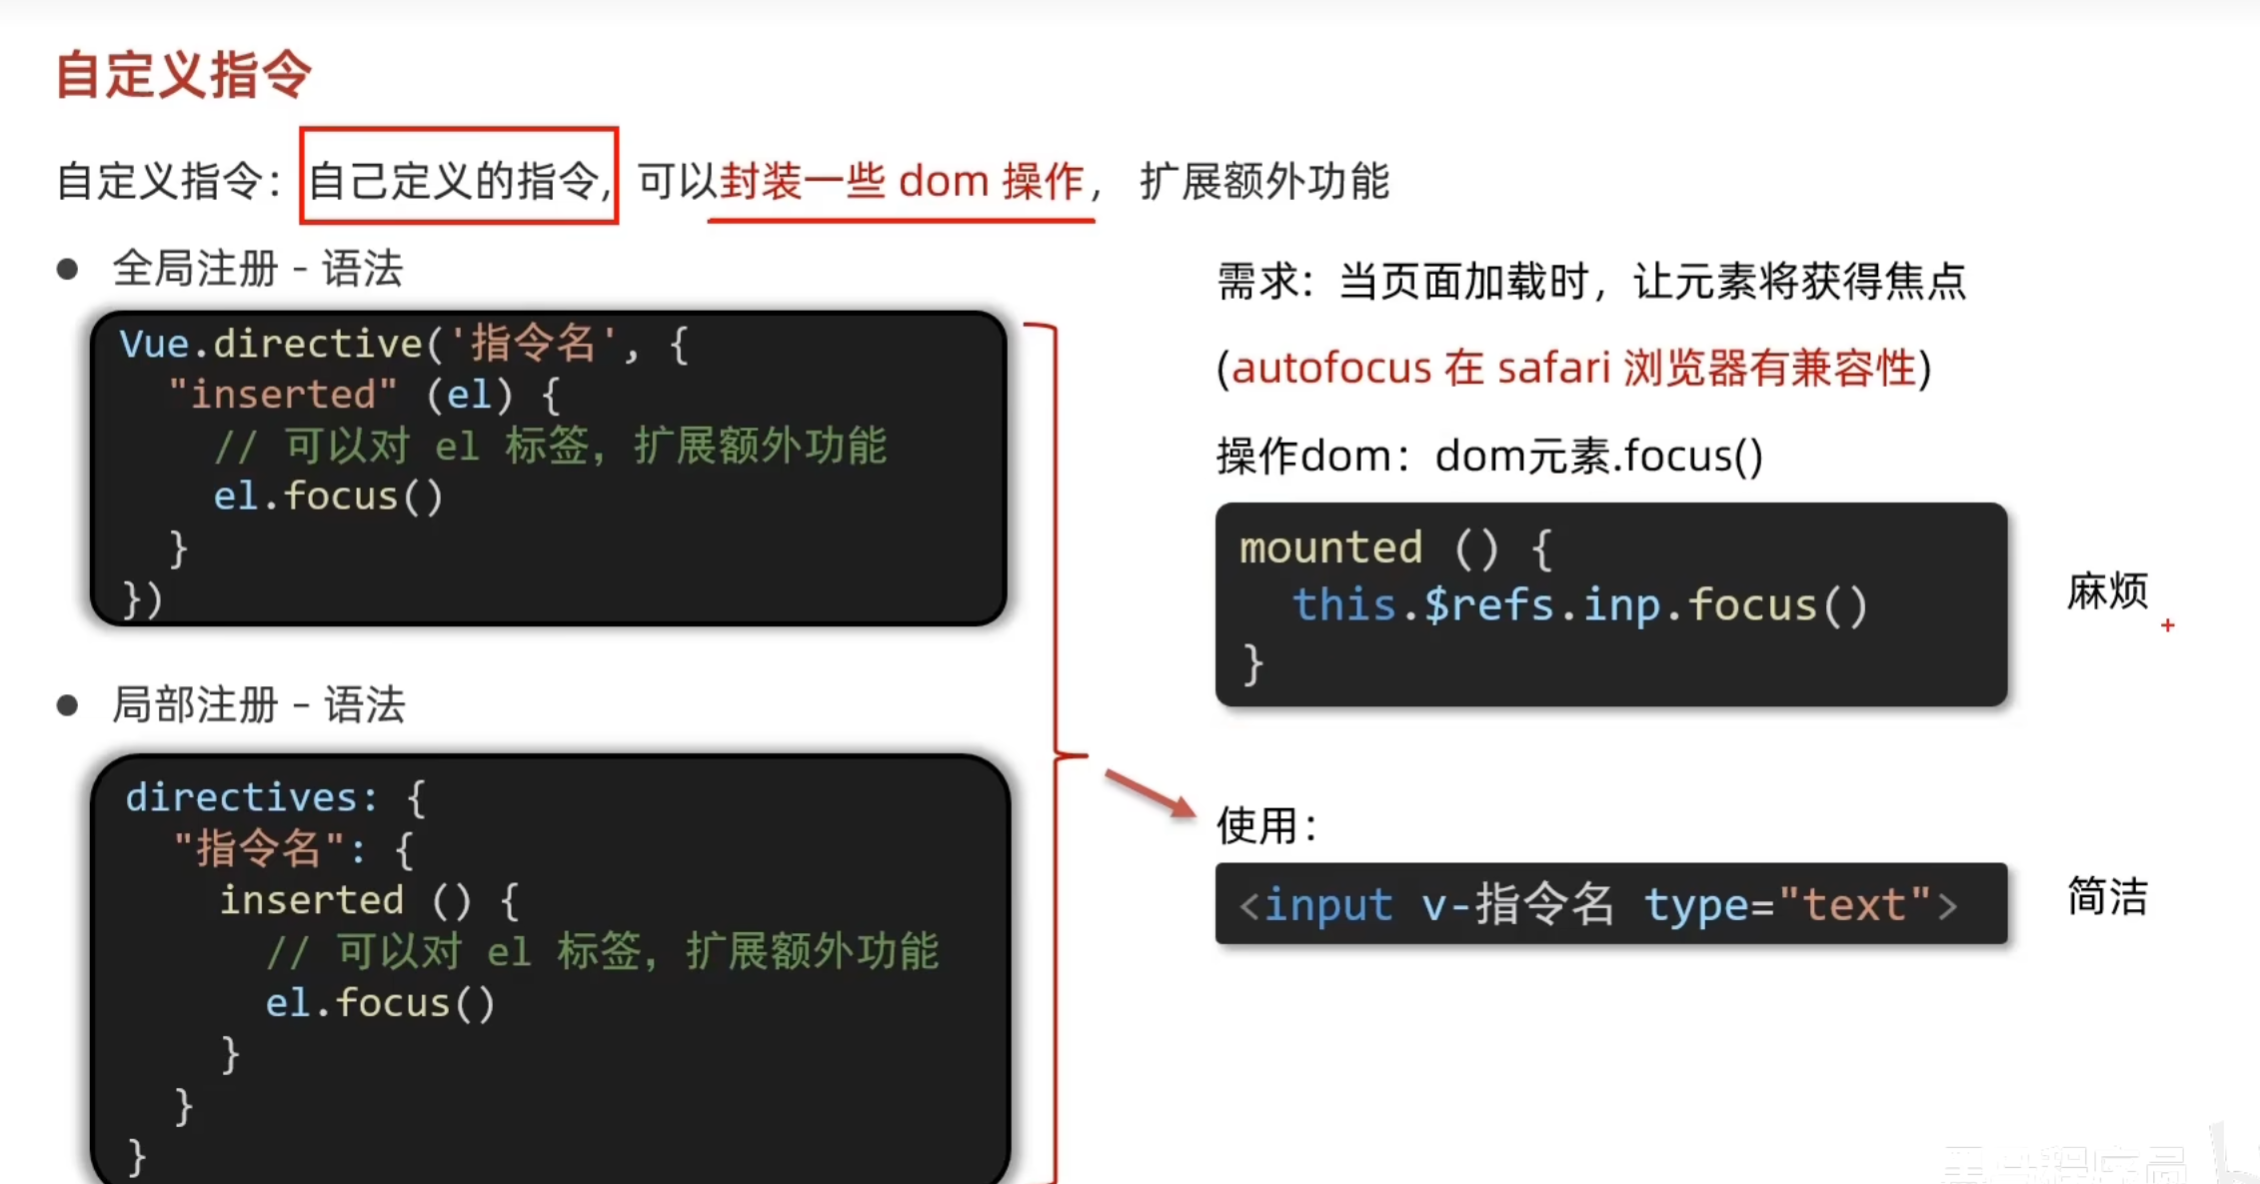
概念:自己定义的指令,可以封装一些DOM操作,扩展额外的功能
3.自定义指令语法

- 全局注册
//在main.js中
Vue.directive('指令名', {
  "inserted" (el) {
    // 可以对 el 标签,扩展额外功能
    el.focus()
  }
})
- 局部注册
//在Vue组件的配置项中
directives: {
  "指令名": {
    inserted () {
      // 可以对 el 标签,扩展额外功能
      el.focus()
    }
  }
}
- 使用指令
注意:在使用指令的时候,一定要先注册,再使用,否则会报错使用指令语法: v-指令名。如:
注册指令时不用加v-前缀,但使用时一定要加v-前缀
4.指令中的配置项
inserted:被绑定元素插入父节点时调用的钩子函数
el:使用指令的那个DOM元素
自定义指令-指令的值
1.使用效果
实现一个 color 指令 - 传入不同的颜色, 给标签设置文字颜色
2.语法
1.在绑定指令时,可以通过“等号”的形式为指令 绑定 具体的参数值
<div v-color="color">我是内容</div>
2.通过 binding.value 可以拿到指令值,指令值修改会 触发 update 函数
示例:
<template>
  <div>
    <h1 v-color="color1">指令的值1测试</h1>
    <h1 v-color="color2">指令的值2测试</h1>
  </div>
</template>

<script>
export default {
  data () {
    return {
      color1:'red',
      color2:'blue'
    }
  },
  directives: {
    color:{
      //inserted提供的是元素被添加到页面时的逻辑
      inserted(el,binding){
        el.style.color=binding.value
      },
      //update提供的是元素被更新时的逻辑
      update(el,binding){
        el.style.color=binding.value
      }

    }
  }
}
</script>

<style>

</style>
插槽-默认插槽
1.作用
让组件内部的一些 结构 支持 **自定义,**将需要多次显示的对话框,封装成一个组件
2.用处
组件的内容部分,不写死,使用的时候可以自定义。传什么就显示什么
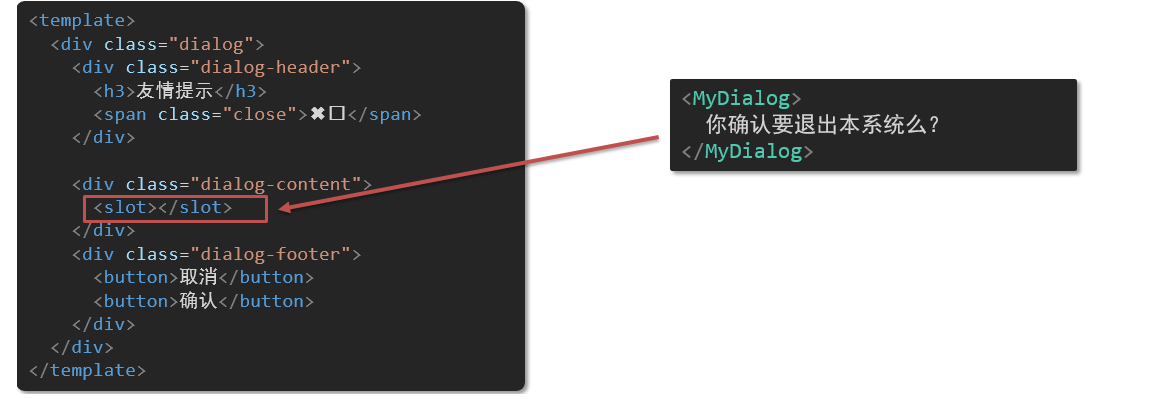
4.插槽的基本语法
- 组件内需要定制的结构部分,改用****占位,solt里可以填写默认内容(不传入内容时就显示)
- 使用组件时, ****标签内部, 传入结构替换slot
- 给插槽传入内容时,可以传入纯文本、html标签、组件

插槽-具名插槽
1.作用
一个组件内有多处结构,需要外部传入标签,进行定制多处结构
2.具名插槽语法
- 多个slot使用name属性区分名字
- template配合v-slot:名字来分发对应标签
3.v-slot的简写
v-slot写起来太长,vue给我们提供一个简单写法 v-slot —> #
<template>
  <div>
    <MyDialog>
      <template v-slot:head>
        <div>
          我是大标题
        </div>
      </template>
      <template v-slot:count>
        <div>
          我是内容
        </div>
      </template>
      <template v-slot:button>
        <div>
          <button>按钮</button>
        </div>
      </template>
    </MyDialog>
  </div>
</template>

<script>
import MyDialog from './components/MyDialog.vue'
export default {
  data () {
    return {

    }
  },
  components: {
    MyDialog
  }
}
</script>

<style>
body {
  background-color: #b3b3b3;
}
</style>
<template>
  <div class="dialog">
    <div class="dialog-header">
      <slot name="head"></slot>
    </div>
    <div class="dialog-content">
      <slot name="count"></slot>
    </div>
    <div class="dialog-footer" >
      <slot name="button"></slot>
    </div>
  </div>
</template>

<script>
export default {
  data() {
    return {}
  },
}
</script>

<style scoped>
* {
  margin: 0;
  padding: 0;
}
.dialog {
  width: 470px;
  height: 230px;
  padding: 0 25px;
  background-color: #ffffff;
  margin: 40px auto;
  border-radius: 5px;
}
.dialog-header {
  height: 70px;
  line-height: 70px;
  font-size: 20px;
  border-bottom: 1px solid #ccc;
  position: relative;
}
.dialog-header .close {
  position: absolute;
  right: 0px;
  top: 0px;
  cursor: pointer;
}
.dialog-content {
  height: 80px;
  font-size: 18px;
  padding: 15px 0;
}
.dialog-footer {
  display: flex;
  justify-content: flex-end;
}
.dialog-footer button {
  width: 65px;
  height: 35px;
  background-color: #ffffff;
  border: 1px solid #e1e3e9;
  cursor: pointer;
  outline: none;
  margin-left: 10px;
  border-radius: 3px;
}
.dialog-footer button:last-child {
  background-color: #007acc;
  color: #fff;
}
</style>
插槽总结
1.插槽分类
- 默认插槽
- 具名插槽
插槽只有两种,作用域插槽不属于插槽的一种分类
2.作用
定义slot 插槽的同时, 是可以传值的。给 插槽 上可以 绑定数据,将来 使用组件时可以用
3.场景
封装表格组件
4.使用步骤
给 slot 标签, 以 添加属性的方式传值
所有添加的属性, 都会被收集到一个对象中
- { id: 3, msg: ‘测试文本’ }
- 在template中, 通过
#插槽名= "obj"接收,默认插槽名为 default
<MyTable :list="list">
  <template #default="obj">
    <button @click="del(obj.id)">删除</button>
  </template>
</MyTable>


