文章目录
- 一、关于 pdf2docx
- 主要功能
- 限制
- 二、安装
- 1、 PyPI
- 2、从remote安装
- 3、从源码安装
- 4、卸载
- 三、转化 PDF
- 例 1: convert all pages
- 例 2: 转换指定页面
- 例 3: multi-Processing
- 例 4: 转换加密的pdf
- 四、提取表格
- 五、命令行交互
- 1、按页面范围
- 2、按页码
- 3、Multi-Processing
- 六、图形界面
- 七、Technical Documentation
一、关于 pdf2docx
- github :https://github.com/ArtifexSoftware/pdf2docx/blob/master/README_CN.md
- 基于
PyMuPDF提取文本、图片、矢量等原始数据 - 基于规则解析章节、段落、表格、图片、文本等布局及样式
- 基于
python-docx创建Word文档
主要功能
- 解析和创建页面布局
- 页边距
- 章节和分栏 (目前最多支持两栏布局)
- 页眉和页脚 [TODO]
- 解析和创建段落
- OCR 文本 [TODO]
- 水平(从左到右)或竖直(自底向上)方向文本
- 字体样式例如字体、字号、粗/斜体、颜色
- 文本样式例如高亮、下划线和删除线
- 列表样式 [TODO]
- 外部超链接
- 段落水平对齐方式 (左/右/居中/分散对齐)及前后间距
- 解析和创建图片
- 内联图片
- 灰度/RGB/CMYK等颜色空间图片
- 带有透明通道图片
- 浮动图片(衬于文字下方)
- 解析和创建表格
- 边框样式例如宽度和颜色
- 单元格背景色
- 合并单元格
- 单元格垂直文本
- 隐藏部分边框线的表格
- 嵌套表格
- 支持多进程转换
pdf2docx 同时解析出了表格内容和样式,因此也可以作为一个表格内容提取工具。
限制
- 目前暂不支持扫描PDF文字识别
- 仅支持从左向右书写的语言(因此不支持阿拉伯语)
- 不支持旋转的文字
- 基于规则的解析无法保证 100%还原PDF样式
二、安装
1、 PyPI
$ pip install pdf2docx
更新
$ pip install --upgrade pdf2docx
2、从remote安装
Install pdf2docx directly from the master branch:
$ pip install git+git://github.com/dothinking/pdf2docx.git@master --upgrade
注:这种方式 pdf2docx 的版本可能比 PYPI 高,没有发布
3、从源码安装
Clone or download pdf2docx, navigate to the root directory and run:
$ python setup.py install
或者,使用开发模式
$ python setup.py develop
4、卸载
$ pip uninstall pdf2docx
三、转化 PDF
我们可以使用 Converter 类, 或者包装的 parse() 方法,来转化所有/指定的 pdf 页面到 docx。
如果pdf文件包含大量页面,支持多线程处理。
例 1: convert all pages
from pdf2docx import Converter

pdf_file = '/path/to/sample.pdf'
docx_file = 'path/to/sample.docx'

# convert pdf to docx
cv = Converter(pdf_file)
cv.convert(docx_file)      # all pages by default
cv.close()
或使用 parse 方法:
from pdf2docx import parse

pdf_file = '/path/to/sample.pdf'
docx_file = 'path/to/sample.docx'

# convert pdf to docx
parse(pdf_file, docx_file)
例 2: 转换指定页面
-
通过
start(如果省略,则从第一页开始)和end(如果忽略,则到最后一页)指定页面范围:# convert from the second page to the end (by default) cv.convert(docx_file, start=1) # convert from the first page (by default) to the third (end=3, excluded) cv.convert(docx_file, end=3) # convert from the second page and the third cv.convert(docx_file, start=1, end=3)
-
或者,通过
pages参数设置单独的页面:# convert the first, third and 5th pages cv.convert(docx_file, pages=[0,2,4])
注:关于输入参数的详细描述 请参阅convert()。
例 3: multi-Processing
使用默认CPU计数启用多处理:
cv.convert(docx_file, multi_processing=True)
指定CPU个数:
cv.convert(docx_file, multi_processing=True, cpu_count=4)
注:多线程 仅适用于由 start 和 end 指定的连续页面。
例 4: 转换加密的pdf
提供 password 参数,打开和转换加密 pdf
cv = Converter(pdf_file, password)
cv.convert(docx_file)
cv.close()
四、提取表格
from pdf2docx import Converter

pdf_file = '/path/to/sample.pdf'

cv = Converter(pdf_file)
tables = cv.extract_tables(start=0, end=1)
cv.close()

for table in tables:
    print(table)
The output may look like:
...
[['Input ', None, None, None, None, None],
['Description A ', 'mm ', '30.34 ', '35.30 ', '19.30 ', '80.21 '],
['Description B ', '1.00 ', '5.95 ', '6.16 ', '16.48 ', '48.81 '],
['Description C ', '1.00 ', '0.98 ', '0.94 ', '1.03 ', '0.32 '],
['Description D ', 'kg ', '0.84 ', '0.53 ', '0.52 ', '0.33 '],
['Description E ', '1.00 ', '0.15 ', None, None, None],
['Description F ', '1.00 ', '0.86 ', '0.37 ', '0.78 ', '0.01 ']]
五、命令行交互
$ pdf2docx --help

NAME
    pdf2docx - Command line interface for pdf2docx.

SYNOPSIS
    pdf2docx COMMAND | -

DESCRIPTION
    Command line interface for pdf2docx.

COMMANDS
    COMMAND is one of the following:

    convert
      Convert pdf file to docx file.

    debug
      Convert one PDF page and plot layout information for debugging.

    table
      Extract table content from pdf pages.
1、按页面范围
按--start(如果省略,则从第一页开始)和--end(如果省略,则从最后一页)指定页面范围。
默认情况下,页面索引是基于零的,但可以通过--zero_based_index=False将其关闭,即第一个页面索引从1开始。
转换所有页面:
$ pdf2docx convert test.pdf test.docx
将页面从第二个转换到结尾:
$ pdf2docx convert test.pdf test.docx --start=1
将页面从第一个转换为第三个(index=2):
$ pdf2docx convert test.pdf test.docx --end=3
转换第二页和第三页:
$ pdf2docx convert test.pdf test.docx --start=1 --end=3
使用零基索引转换第一页和第二页,关闭:
$ pdf2docx convert test.pdf test.docx --start=1 --end=3 --zero_based_index=False
2、按页码
转换第一页、第三页和第五页:
$ pdf2docx convert test.pdf test.docx --pages=0,2,4
3、Multi-Processing
使用默认的CPU计数打开多处理:
$ pdf2docx convert test.pdf test.docx --multi_processing=True
指定CPU的计数:
$ pdf2docx convert test.pdf test.docx --multi_processing=True --cpu_count=4
六、图形界面
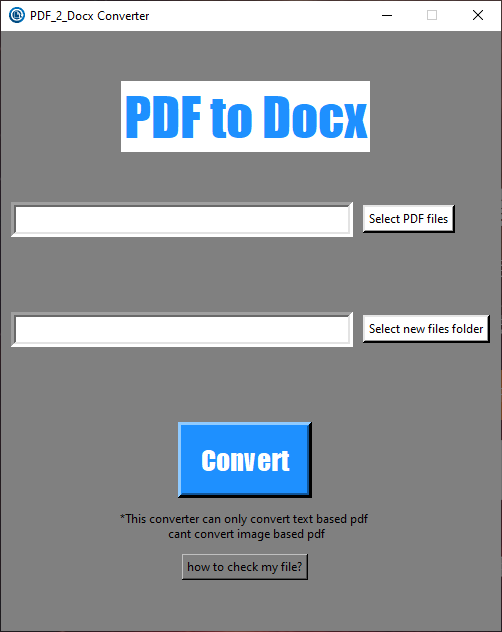
Thanks @JoHnTsIm providing a tkinter based user interface.
To launch the GUI:
$ pdf2docx gui

七、Technical Documentation
PDF文件遵循一定的格式规范,PyMuPDF 提供了便利的解析函数, 用于获取页面元素例如文本和形状及其位置。然后,基于元素间的相对位置关系解析内容,例如将“横纵线条 围绕着文本”解析为“表格”,将“文本下方的一条横线”解析为“文本下划线”。最后,借助 python-docx 将解析结果重建为docx格式的Word文档。
以下分篇介绍提取PDF页面数据、解析和重建docx过程中的具体细节:
- 提取文本图片和形状
- 解析页面布局
- 解析表格
- 解析段落
2024-07-19


