在前两篇文章,介绍了springboot的自动配置原理,而nacos的服务注册就依赖自动配置原理。
Nacos

Nacos核心功能点
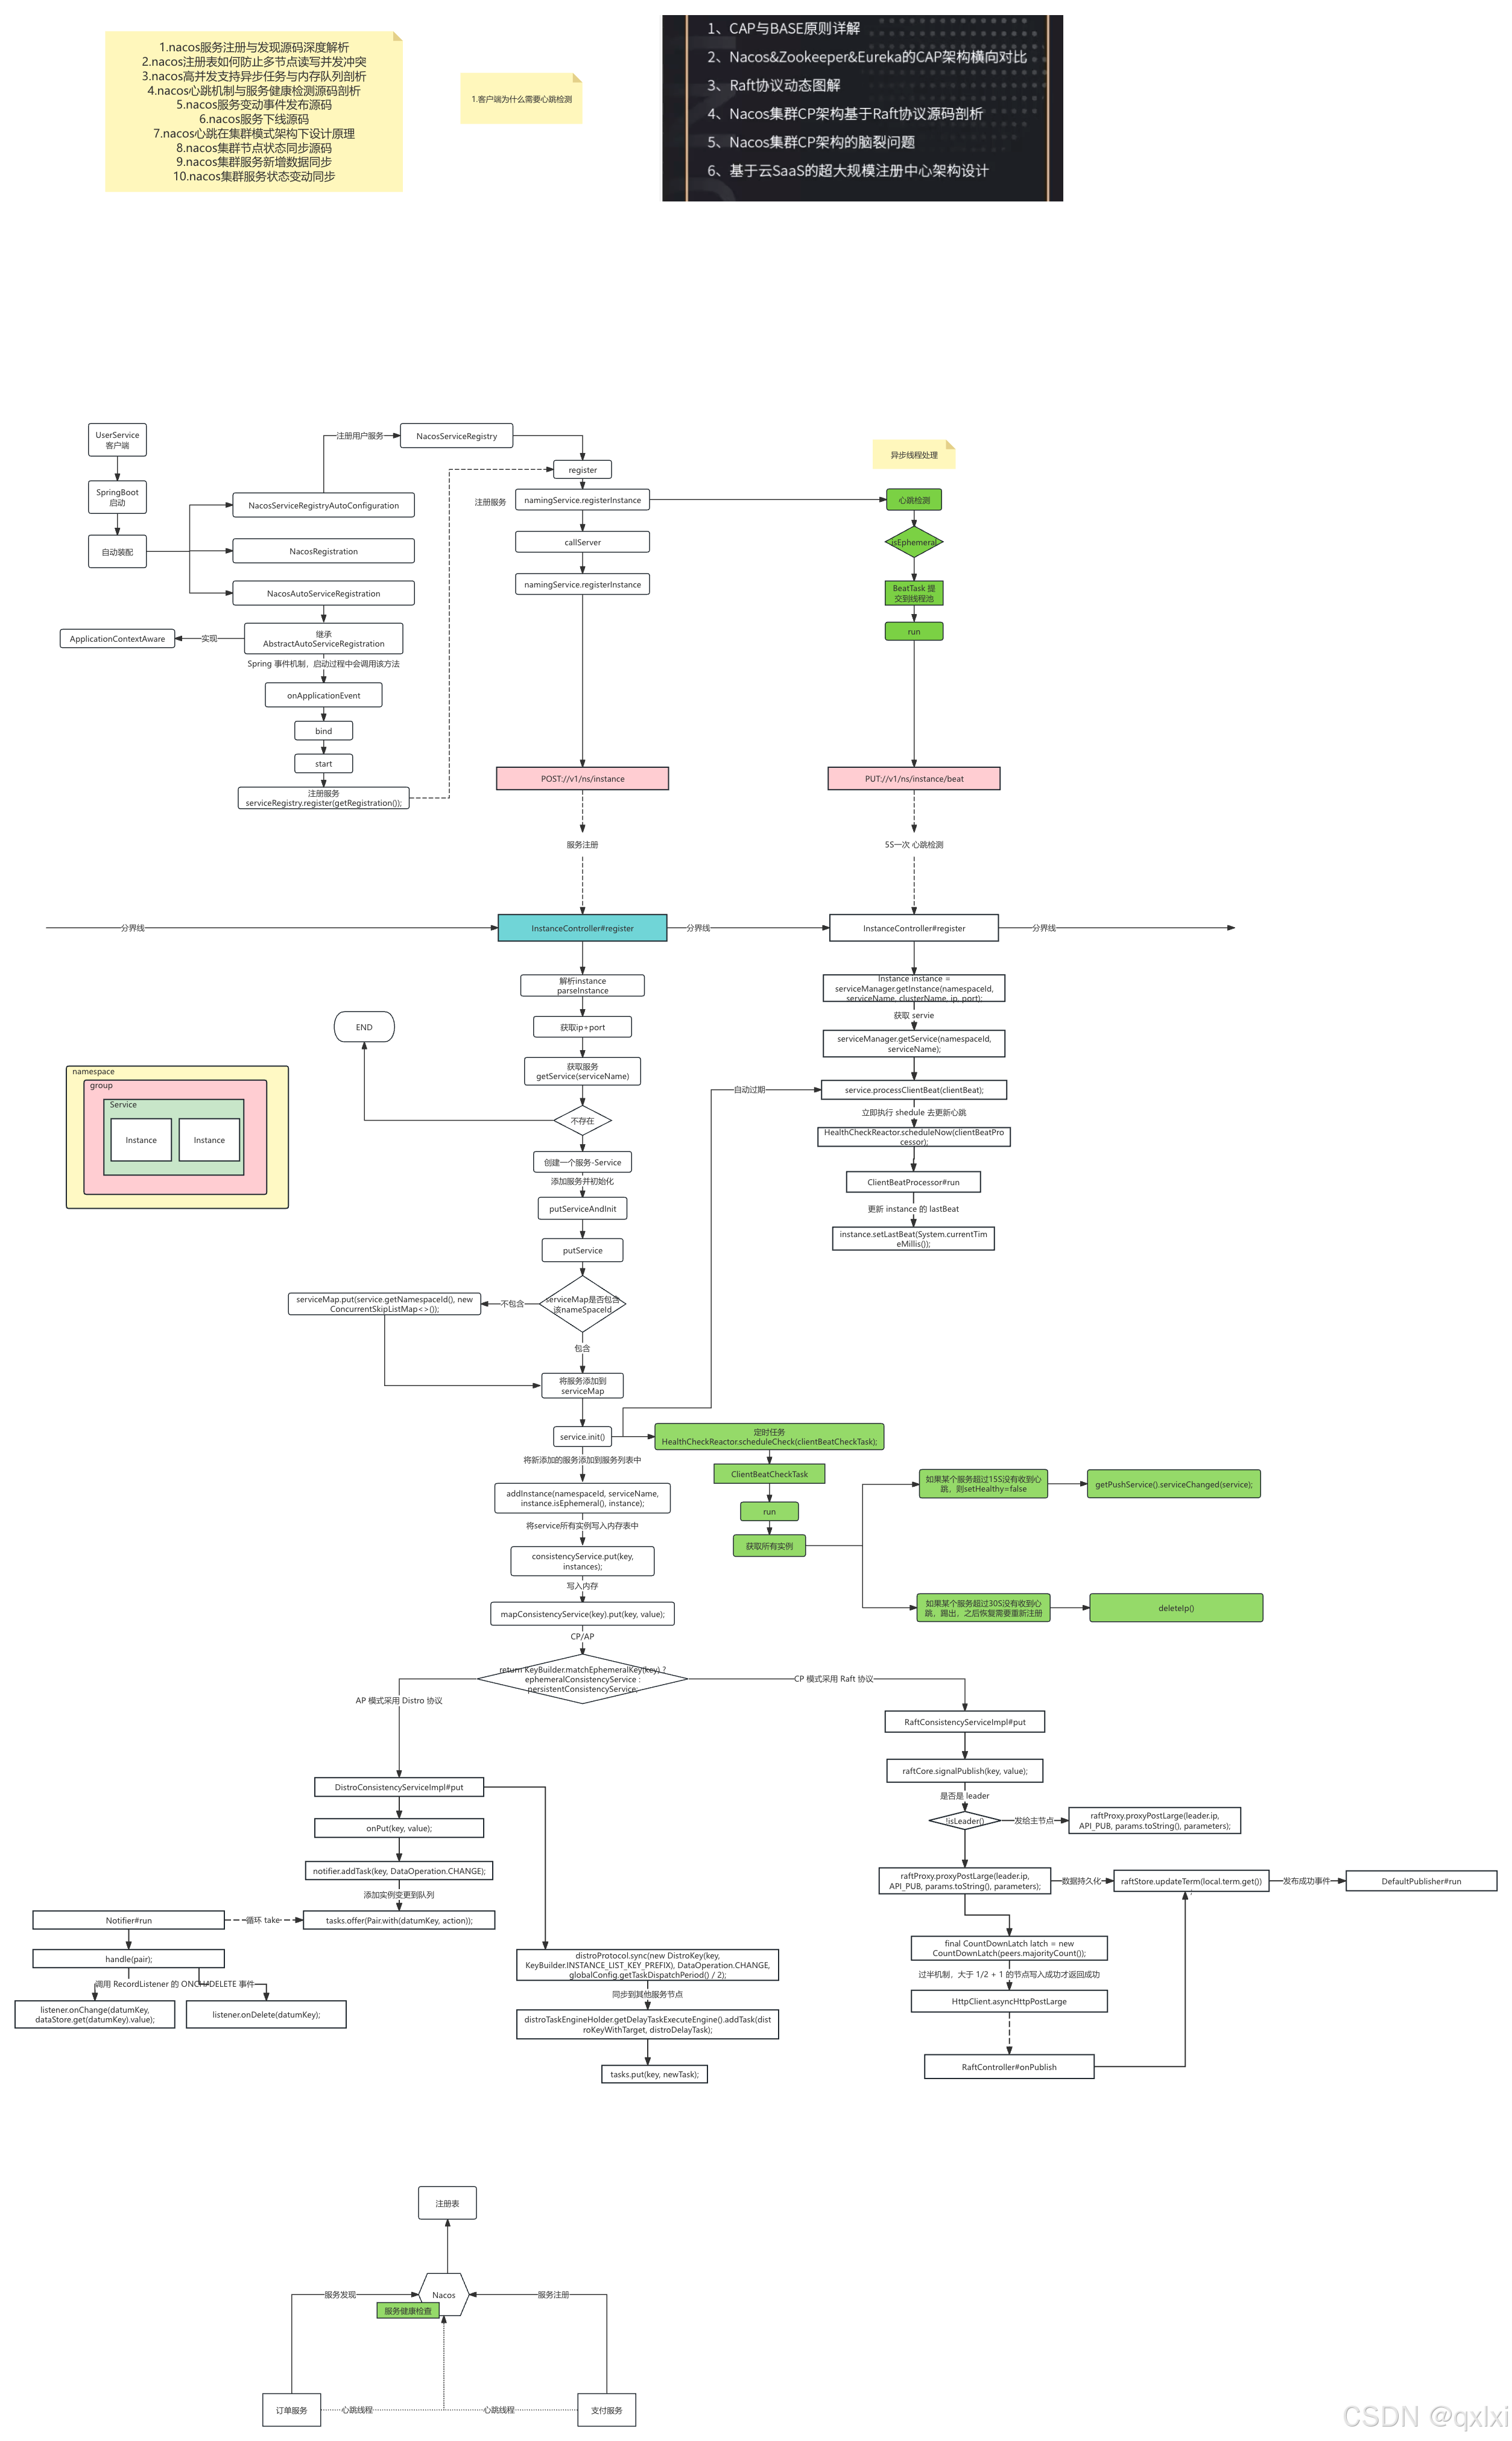
服务注册 :Nacos Client会通过发送REST请求的方式向Nacos Server注册自己的服务,提供自身的元数据,比如ip地址、端口等信息。Nacos Server接收到注册请求后,就会把这些元数据信息存储在一个双层的内存Map中。
服务心跳: 在服务注册后,Nacos Client会维护一个定时心跳来持续通知Nacos Server,说明服务一直处于可用状态,防止被剔除。默认5s发送一次心跳。
服务健康检查: Nacos Server会开启一个定时任务用来检查注册服务实例的健康情况,对于超过15s没有收到客户端心跳的实例会将它 的healthy属性置为false(客户端服务发现时不会发现),如果某个实例超过30秒没有收到心跳,直接剔除该实例(被剔除的实例如果恢复 发送心跳则会重新注册)
服务发现: 服务消费者(Nacos Client)在调用服务提供者的服务时,会发送一个REST请求给Nacos Server,获取上面注册的服务清 单,并且缓存在Nacos Client本地,同时会在Nacos Client本地开启一个定时任务定时拉取服务端最新的注册表信息更新到本地缓存
服务同步: Nacos Server集群之间会互相同步服务实例,用来保证服务信息的一致性。
客户端 服务注册&心跳发送
在客户端中,也就是开发的应用,包含引入有 nacos-discovery 而路径下包含有一个spring.factories 在自动配置的时候,会加载
如下配置类。
org.springframework.boot.autoconfigure.EnableAutoConfiguration=\
  com.alibaba.cloud.nacos.discovery.NacosDiscoveryAutoConfiguration,\
  com.alibaba.cloud.nacos.ribbon.RibbonNacosAutoConfiguration,\
  com.alibaba.cloud.nacos.endpoint.NacosDiscoveryEndpointAutoConfiguration,\
  com.alibaba.cloud.nacos.registry.NacosServiceRegistryAutoConfiguration,\
其中 NacosServiceRegistryAutoConfiguration 中引入了三个类 NacosServiceRegistry、NacosRegistration、NacosAutoServiceRegistration 其中 NacosAutoServiceRegistration 继承了 AbstractAutoServiceRegistration
	public void onApplicationEvent(WebServerInitializedEvent event) {
		bind(event);
	}
	// 启动
	this.start();
	//注册服务
	register();
组装实例信息,ip 端口 服务权重 集群名字 源信息 以及是否
	private Instance getNacosInstanceFromRegistration(Registration registration) {
		Instance instance = new Instance();
		instance.setIp(registration.getHost());
		instance.setPort(registration.getPort());
		instance.setWeight(nacosDiscoveryProperties.getWeight());
		instance.setClusterName(nacosDiscoveryProperties.getClusterName());
		instance.setEnabled(nacosDiscoveryProperties.isInstanceEnabled());
		instance.setMetadata(registration.getMetadata());
		instance.setEphemeral(nacosDiscoveryProperties.isEphemeral());
		return instance;
	}
	// 注册实例
	namingService.registerInstance(serviceId, group, instance);

	// 服务名 组名 实例
   public void registerInstance(String serviceName, String groupName, Instance instance) throws NacosException {
       // 实例非法校验
       NamingUtils.checkInstanceIsLegal(instance);
       // 获取组服务名
       String groupedServiceName = NamingUtils.getGroupedName(serviceName, groupName);

       if (instance.isEphemeral()) {
       		// 构建心跳信息
           BeatInfo beatInfo = beatReactor.buildBeatInfo(groupedServiceName, instance);
           // 启动一个心跳发送线程
           beatReactor.addBeatInfo(groupedServiceName, beatInfo);
       }
       // 实际就是调用 instance
       serverProxy.registerService(groupedServiceName, groupName, instance);
   }

	// 心跳发送线程
	executorService.schedule(new BeatTask(beatInfo), beatInfo.getPeriod(), TimeUnit.MILLISECONDS);
发送心跳线程
所谓的客户端心跳,其实就是启动一个线程,然后定时给一个接口发送调用。
	class BeatTask implements Runnable {

        BeatInfo beatInfo;

        public BeatTask(BeatInfo beatInfo) {
            this.beatInfo = beatInfo;
        }

        @Override
        public void run() {
        	// 如果停止 直接返回
            if (beatInfo.isStopped()) {
                return;
            }
            // 获取下次时间
            long nextTime = beatInfo.getPeriod();
            // 实际就是调用服务端的一个心跳接口  /instance/beat
            JsonNode result = serverProxy.sendBeat(beatInfo, BeatReactor.this.lightBeatEnabled);
            // 如果结束,启动另外一个 开始下次的心跳线程发送
            executorService.schedule(new BeatTask(beatInfo), nextTime, TimeUnit.MILLISECONDS);
        }
    }

nacos 服务注册
对于服务端来说,就是一个API接口
	public String register(HttpServletRequest request) throws Exception {
        // 准备服务实例
        final Instance instance = parseInstance(request);

        serviceManager.registerInstance(namespaceId, serviceName, instance);
        return "ok";
    }
注册实例其实就是三步、创建服务、获取服务、添加实例
    public void registerInstance(String namespaceId, String serviceName, Instance instance) throws NacosException {
        createEmptyService(namespaceId, serviceName, instance.isEphemeral());
        Service service = getService(namespaceId, serviceName);
        addInstance(namespaceId, serviceName, instance.isEphemeral(), instance);
    }
创建服务
    public void createServiceIfAbsent(String namespaceId, String serviceName, boolean local, Cluster cluster)
            throws NacosException {
        // 命名空间 服务名称
        Service service = getService(namespaceId, serviceName);
        if (service == null) {
            service = new Service();
            service.setName(serviceName);
            service.setNamespaceId(namespaceId);
            service.setGroupName(NamingUtils.getGroupName(serviceName));
            // now validate the service. if failed, exception will be thrown
            service.setLastModifiedMillis(System.currentTimeMillis());
            service.recalculateChecksum();
            if (cluster != null) {
                cluster.setService(service);
                service.getClusterMap().put(cluster.getName(), cluster);
            }
            service.validate();
			// 这里是重点
            putServiceAndInit(service);
            if (!local) {
                addOrReplaceService(service);
            }
        }
    }

    private void putServiceAndInit(Service service) throws NacosException {
     	// 添加服务
        putService(service);
        // 下面说心跳检测机制
        service.init();
    }

这里其实就是底层的注册表的数据结构了,这里使用双检查锁。分别是nameSpace、group、service、实例。
这里简单思考下,为什么要设计这么复杂。一个服务可能对应多个实例。没有问题。一个分组group 可能是在同一个公司有不同的组,比如订单、支付,每个组都有自己的服务。namespace则可以分为dev\test\prod 三个不同的组。
	// 注册表  如何提升
    private final Map<String, Map<String, Service>> serviceMap = new ConcurrentHashMap<>();

	// 这里的机制其实就是 判断当前是否存在该nameSpaceId , 如果不存在的话,则创建一个CSLM
    public void putService(Service service) {
        if (!serviceMap.containsKey(service.getNamespaceId())) {
            // 添加锁 lock
            synchronized (putServiceLock) {
                if (!serviceMap.containsKey(service.getNamespaceId())) {
                    serviceMap.put(service.getNamespaceId(), new ConcurrentSkipListMap<>());
                }
            }
        }
        // 将添加服务添加到nameSpaceId 添加服务
        serviceMap.get(service.getNamespaceId()).put(service.getName(), service);
    }
    // 添加实例
    public void addInstance(String namespaceId, String serviceName, boolean ephemeral, Instance... ips)
            throws NacosException {

        // 构建一个key
        String key = KeyBuilder.buildInstanceListKey(namespaceId, serviceName, ephemeral);

        Service service = getService(namespaceId, serviceName);

        synchronized (service) {
            List<Instance> instanceList = addIpAddresses(service, ephemeral, ips);

            Instances instances = new Instances();
            instances.setInstanceList(instanceList);

            // 持久化服务
            consistencyService.put(key, instances);
        }
    }
	// 这里根据判断是否ephemeral 走保存内存还是磁盘持久化
    private ConsistencyService mapConsistencyService(String key) {
        // AP CP
        return KeyBuilder.matchEphemeralKey(key) ? ephemeralConsistencyService : persistentConsistencyService;
    }
这里其实选择的是 DistroConsistencyServiceImpl 另一个就是 RaftConsistencyServiceImpl 使用raft实现的数据持久化,这里先不介绍。
DistroConsistencyServiceImpl
    public void put(String key, Record value) throws NacosException {
        onPut(key, value);
        distroProtocol.sync(new DistroKey(key, KeyBuilder.INSTANCE_LIST_KEY_PREFIX), DataOperation.CHANGE,
                globalConfig.getTaskDispatchPeriod() / 2);
    }

    // 这里调用put
	public void onPut(String key, Record value) {
        if (KeyBuilder.matchEphemeralInstanceListKey(key)) {
            Datum<Instances> datum = new Datum<>();
            datum.value = (Instances) value;
            datum.key = key;
            datum.timestamp.incrementAndGet();
            //将数据保存到内存中
            dataStore.put(key, datum);
        }
        if (!listeners.containsKey(key)) {
            return;
        }
        // 但是这里调用了一个任务
        notifier.addTask(key, DataOperation.CHANGE);
    }
	// 其实就是一个map
    private Map<String, Datum> dataMap = new ConcurrentHashMap<>(1024);

    public void put(String key, Datum value) {
        dataMap.put(key, value);
    }

    @PostConstruct
    public void init() {
        // 初始化 构造方法执行的时候 进行处理
        GlobalExecutor.submitDistroNotifyTask(notifier);
    }
从源码中可以看到,在类初始化的时候,创建一个任务异步进行执行。 其实就是将当前服务进行异步任务注册,可以提升性能。添加和获取任务。
源码精髓:很多开源框架为了提升操作性能会大量使用这种异步任务及内存队列操作,这些操作本省不需要写入立即返回成功,用这种方式可以提升操作性能很大帮助
   public class Notifier implements Runnable {
		// 保存服务
        private ConcurrentHashMap<String, String> services = new ConcurrentHashMap<>(10 * 1024);
		// 阻塞队列
        private BlockingQueue<Pair<String, DataOperation>> tasks = new ArrayBlockingQueue<>(1024 * 1024);
		// 初始化的时候 添加一个任务到阻塞队列中
        public void addTask(String datumKey, DataOperation action) {
            if (services.containsKey(datumKey) && action == DataOperation.CHANGE) {
                return;
            }
            if (action == DataOperation.CHANGE) {
                services.put(datumKey, StringUtils.EMPTY);
            }
            tasks.offer(Pair.with(datumKey, action));
        }

        @Override
        public void run() {
            // 为什么异步设计 : 提升性能
            // 阻塞队列 ,会线程等待 wait
            // 并发、反射、网络、IO
            for (; ; ) {
              	// 异步处理
               Pair<String, DataOperation> pair = tasks.take();
               handle(pair);
            }
        }
    }

心跳检测机制
其实就是服务注册的时候 启动一个线程,然后检查所有实例的心跳检测,对于超过15s没有收到客户端心跳的实例会将它 的healthy属性置为false(客户端服务发现时不会发现),如果某个实例超过30秒没有收到心跳,直接剔除该实例(被剔除的实例如果恢复 发送心跳则会重新注册)
    /**
     * Init service.
     */
    public void init() {
        // 心跳检查线程
        HealthCheckReactor.scheduleCheck(clientBeatCheckTask);
        for (Map.Entry<String, Cluster> entry : clusterMap.entrySet()) {
            entry.getValue().setService(this);
            entry.getValue().init();
        }
    }

	// 初始化5S后执行,每5S执行一次
    public static void scheduleCheck(ClientBeatCheckTask task) {
        futureMap.putIfAbsent(task.taskKey(), GlobalExecutor.scheduleNamingHealth(task, 5000, 5000, TimeUnit.MILLISECONDS));
    }

    //
	public void run() {
        List<Instance> instances = service.allIPs(true);

            for (Instance instance : instances) {
                // 当前时间 减去 心跳超时时间
                if (System.currentTimeMillis() - instance.getLastBeat() > instance.getInstanceHeartBeatTimeOut()) {
                        if (instance.isHealthy()) {
                            // 健康状态
                            instance.setHealthy(false);
                            getPushService().serviceChanged(service);
                            ApplicationUtils.publishEvent(new InstanceHeartbeatTimeoutEvent(this, instance));
                        }
                    }
                }
            }

            // then remove obsolete instances:
            for (Instance instance : instances) {
                if (System.currentTimeMillis() - instance.getLastBeat() > instance.getIpDeleteTimeout()) {
                    // delete instance
                    Loggers.SRV_LOG.info("[AUTO-DELETE-IP] service: {}, ip: {}", service.getName(),
                            JacksonUtils.toJson(instance));
                    deleteIp(instance);
                }
            }
        }
    }
至此,我们就基本上过了一遍,服务的注册 以及心跳检测机制,本篇主要是针对nacos1.4.1 的源码学习,关于后续的服务发现,以及2.X版本的源码 讲解,后续在继续。


