类鸟群:仿真鸟群
仔细观察一群鸟或一群鱼,你会发现,虽然群体由个体生物组成,但该群体作为一个整体似乎有它自己的生命。鸟群中的鸟在移动、飞越和绕过障碍物时,彼此之间相互定位。受到打扰或惊吓时会破坏编队,但随后重新集结,仿佛被某种更大的力量控制。
1986年,Craig Reynolds创造鸟类群体行为的一种逼真模拟,称为“类鸟群(Boids)”模型。关于类鸟群模型,值得注意的是,只有 3 个简单的规则控制着群体中个体间的相互作用,但该模型产生的行为类似于真正的鸟群。类鸟群模型被广泛研究,甚至被用来制作群体的计算机动画,如电影“蝙蝠侠归来(1992)”中的行军企鹅。
本项目将利用 Reynolds 的 3 个规则,创建一个类鸟群,模拟 N 只鸟的群体行为,并画出随着时间的推移,它们的位置和运动方向。我们还会提供一个方法,向鸟群中添加一只鸟,以及一种驱散效果,可以用于研究群体的局部干扰效果。类鸟群被称为“N 体模拟”,因为它模拟了 N 个粒子的动态系统,彼此之间施加作用力。
工作原理
模拟类鸟群的三大核心规则如下:
分离:保持类鸟个体之间的最小距离;
列队:让每个类鸟个体指向其局部同伴的平均移动方向;
内聚:让每个类鸟个体朝其局部同伴的质量中心移动。
类鸟群模拟也可以添加其他规则,如避开障碍物,或受到打扰时驱散鸟群,在随后的小节中我们将会探讨这些。这个版本的类鸟群在模拟的每一步中,实现了这些核心规则。
对于群体中的所有类鸟个体,做以下几件事:
- 应用三大核心规则;
- 应用所有附加规则;
- 应用所有边界条件。
- 更新类鸟个体的位置和速度。
- 绘制新的位置和速度。
如你所见,这些简单的规则创造了一个鸟群,它具有演变的复杂行为。
所需模块
下面是该模拟要用到的 Python 工具:
- numpy 数组,用于保存类鸟群的位置和速度;
- matplotlib 库,用于生成类鸟群动画;
- argparse,用于处理命令行选项;
- scipy.spatial.distance 模块,包含一些非常简洁的方法,计算点之间的距离。
代码
首先,要计算类鸟群的位置和速度。接下来,要为模拟设置边界条件,看看如何绘制类鸟群,并实现前面讨论的类鸟群模拟规则。最后,我们会为模拟添加一些有趣的事件,即添加一些类鸟个体和驱散类鸟群。
计算类鸟群的位置和速度
类鸟群仿真需要从 numpy 数组取得信息,计算每一步中类鸟群个体的位置和速度。模拟开始时,将所有类鸟群个体大致放在屏幕中央,速度设置为随机的方向。
import math
import numpy as np

width, height = 640, 480

pos = [width/2.0, height/2.0] + 10*np.random.rand(2*N).reshape(N, 2)
angles = 2*math.pi*np.random.rand(N)
vel = np.array(list(zip(np.sin(angles), np.cos(angles))))
开始在第一行导入 math 模块,用于接下来的计算。在第二行,将 numpy 库导入为 np(少一些录入)。然后,设置屏幕上模拟窗口的宽度和高度。在第四行,创建一个 numpy 数组 pos,对窗口中心加上 10 个单位以内的随机偏移。代码np.random.rand(2 * N)创建了一个一维数组,包含范围在[0,1]的 2N 个随机数。然后 reshape()调用将它转换成二维数组的形状(N,2),它将用于保存类鸟群个体的位置。也要注意,numpy 的广播规则在这里生效:1×2 的数组加到 N×2 的数组的每个元素上。
接下来,用以下方法,创建随机单位速度矢量数组(这些都是模为 1.0 的矢量,指向随机的方向):给定一个角度 t,数字对(cos(t), sin(t))位于半径为 1.0 的圆上,中心在原点(0, 0)。如果从原点到圆上的一点画一条线,就得到一个单位矢量,它取决于角度 A。如果随机选择角度 A,就得到一个随机速度矢量。下图展示了这个方案。

在第五行,生成一个数组,包含 N 个随机角度,范围在[0, 2pi],在第六行,用前面讨论的随机向量方法生成一个数组,并用内置的 zip()方法将坐标分组。
设置边界条件
鸟儿飞翔在无际的天空,但类鸟群必须在有限的空间中运动。要创建这个空间,就要创建边界条件,在这个例子中,我们采用“平铺小块边界条件”。
将类鸟群模拟想象成发生在一个平铺的空间:如果类鸟群个体离开一个小块,它将从相反的方向进入到相同的小块。环形边界条件和小块边界条件之间的主要区别是,类鸟群模拟不会发生在离散的网格上,而是在一个连续区域移动。下图展示了这些小块边界条件的样子。请看下图中间的小块。飞出右侧的鸟儿正进入右边的小块,但该边界条件确保它们实际上通过平铺在左边的小块,又回到了中心的小块。在顶部和底部的小块,可以看到同样的事情发生。
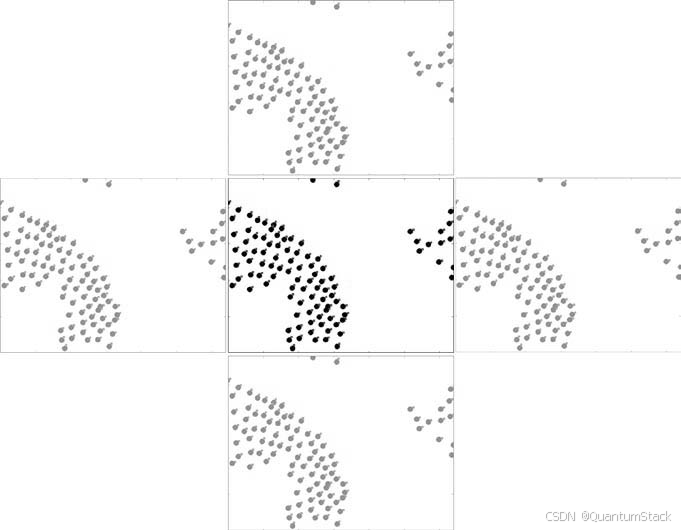
下面是如何为类鸟群模拟实现平铺小块边界条件:
def applyBC(self):
	"""apply boundary conditions"""
	deltaR = 2.0
	for coord in self.pos:
		if coord[0] > width + deltaR:
			coord[0] = - deltaR
		if coord[0] < - deltaR:
			coord[0] = width + deltaR
		if coord[1] > height + deltaR:
			coord[1] = - deltaR
		if coord[1] < - deltaR:
			coord[1] = height + deltaR
在第五行,如果 x 坐标比小块的宽度大,则将它设置回小块的左侧边缘。该行中的 deltaR 提供了一个微小的缓冲区,它允许类鸟群个体开始从相反方向回来之前,稍稍移出小块之外一点,从而产生更好的视觉效果。在小块的左侧、顶部和底部边缘执行类似的检查。
绘制类鸟群
要生成动画,需要知道类鸟群个体的位置和速度,并有办法在每个时间步骤中表示位置和运动方向。
绘制类鸟群个体的身体和头部
为了生成类鸟群动画,我们用 matplotlib 和一点小技巧来绘制位置和速度。将每个类鸟群个体画成两个圆,如下图所示。较大的圆代表身体,较小的圆表示头部。点 P 是身体的中心,H 是头部的中心。根据公式 H = P + k × V 来计算 H 的位置,其中 V 是类鸟群个体的速度,k 是常数。在任何给定时间,类鸟群个体的头指向运动的方向。这指明了类鸟群个体的移动方向,比只画身体更好。
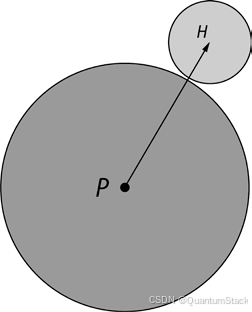
在下面的代码片段中,利用 matplotlib,用圆形标记画出类鸟群个体的身体。
fig = plt.figure()
ax = plt.axes(xlim=(0, width), ylim=(0, height))

pts, = ax.plot([], [], markersize=10, c='k', marker='o', ls='None')
beak, = ax.plot([], [], markersize=4, c='r', marker='o', ls='None')
anim = animation.FuncAnimation(fig, tick, fargs=(pts, beak, boids),interval=50)
在第三和第四行分别为类鸟群个体的身体(pts)和头部(beak)标记设置大小和形状。在第五行为动画窗口添加鼠标按钮事件。既然知道了如何绘制身体和喙,让我们看看如何更新它们的位置。
更新类鸟群个体的位置
动画开始后,需要更新身体和头的位置,它指明了类鸟群个体移动的方向。用以下代码来实现:
vec = self.pos + 10*self.vel/self.maxVel
beak.set_sdata(vec.rehape(2*self.N)[::2], vec.reshape(2*self.N)[1::2])
在第一行,计算头部的位置,即在速度(vel)的方向上增加 10 个单位的位移。该位移确定了喙和身体之间的距离。在第二行,用头部位置的新值来更新(reshape)matplotlib 的轴(set_data)。[::2]从速度列表中选出偶数元素(x 轴的值),[1::2]选出奇数元素(Y 轴的值)。
应用类鸟群规则
现在,要在 Python 中实现类鸟群的 3 个规则。我们用“numpy 的方式”来完成这件事,避免循环并利用高度优化的 numpy 方法。
import numpy as np
from scipy.spatial.distance import squareform, pdist, cdist

	def test2(pos, radius):
		# get distance matrix
		distMatrix = squareform(pdist(pos))
		# apply threshold
		D = distMatrix < radius
		# compute velocity
		vel = pos*D.sum(axis=1).reshape(N, 1) - D.dot(pos)
		return vel
在第五行,用 squareform()和 pdist()方法(在 scipy 库中定义),来计算一组点之间两两的距离(从数组中任意取两点,计算距离,然后针对所有可能的两点对这么做)。
squareform()方法给出一个 3×3 矩阵,其中项 Mij 给出了点 Pi和 Pj 之间的距离。接下来,在第七行,基于距离筛选这个矩阵。
在第九行的方法有点复杂。D.sum()方法按列对矩阵中的 True 值求和。reshape 是必需的,因为和是 N 个值的一维数组(形如(N,)),而你希望它形如(N,1),这样它就能够与位置数组相乘。D.dot()就是矩阵和位置矢量的点积(乘法)。
下面的方法利用前面讨论的 numpy 技术,应用类鸟群的 3 个规则:
	def applyRules(self):
		# apply rule #1: Separation
		D = distMatrix < 25.0
		vel = self.pos*D.sum(axis=1).reshape(self.N, 1) - D.dot(self.pos)#应用分离规则时,每个个体都被“推离”相邻个体一定距离
		#计算出的速度被限制在某个最大值以内
		self.limit(vel, self.maxRuleVel)

		# distance threshold for alignment (different from separation)
		D = distMatrix < 50.0

		# apply rule #2: Alignment
		vel2 = D.dot(self.vel)#应用列队规则时,50 个单位的半径内,所有相邻个体的速度之和限制为一个最大值
		self.limit(vel2, self.maxRuleVel)
		vel += vel2;

		# apply rule #3: Cohesion
		vel3 = D.dot(self.pos) - self.pos#为每个个体增加一个速度矢量,它指向一定半径内相邻个体的重心或几何中心
		self.limit(vel3, self.maxRuleVel)
		vel += vel3

		return vel
添加个体
类鸟群模拟的核心规则会导致类鸟群展示出群聚行为。但是,让我们在模拟过程中添加一个个体,看看表现如何,让事情变得更有趣。
下面的代码创建一个鼠标事件,让你点击鼠标左键添加一个个体。个体将出现在光标的位置,具有随机指定的速度
# 用 mpl_connect()方法向 matplotlib 画布添加一个按钮按下事件
cid = fig.canvas.mpl_connect('button_press_event', buttonPress)
现在,为了处理鼠标事件,实际创建类鸟群个体,添加以下代码:
def buttonPress(self, event):
	"""event handler for matplotlib button presses"""
	#确保鼠标事件是左键点击
	if event.button is 1:
		#将(event.xdata,event.ydata)给出的鼠标位置添加到类鸟群的位置数组
		self.pos = np.concatenate((self.pos, np.array([[event.xdata, event.ydata]])), axis=0)

		# 将一个随机速度矢量添加到类鸟群的速度数组,并将类鸟群的计数增加 1
		angles = 2*math.pi*np.random.rand(1)
		v = np.array(list(zip(np.sin(angles), np.cos(angles))))
		self.vel = np.concatenate((self.vel, v), axis=0)
		self.N += 1
驱散类鸟群
3 个模拟规则保持类鸟群在移动时成为一个群体。但是,群体受到惊扰时,会发生什么?为了模拟这种情况,可以引入一种“驱散”效果:如果在用户界面(UI)窗口中单击右键,群体就会分散。你可以认为这是群体面对突然出现的捕食者的反应,或突然出现一声巨响惊吓了鸟群。下面是实现该效果的一种方式,它作为buttonPress()方法的延续:
# 检查鼠标按键是否是右键单击事件
	elif event.button is 3:
		# 改变每个个体的速度,在干扰出现的点(即点击鼠标的位置)的相反的方向上增加一个分量
		self.vel += 0.1*(self.pos - np.array([[event.xdata, event.ydata]]))
最初,类鸟群将飞离该点,但你会看到,3 个规则胜出,类鸟群将作为群体再次会聚。
命令行参数
下面是类鸟群程序如何处理命令行参数:
parser = argparse.ArgumentParser(description="Implementing CraigReynolds's Boids...")

# add arguments
parser.add_argument('--num-boids', dest='N', required=False)
args = parser.parse_args()

# set the initial number of boids
N = 100
if args.N:
	N = int(args.N)

# create boids
boids = Boids(N)
Boids 类
接下来看看 Boids 类,它代表了模拟。
class Boids:
	"""class that represents Boids simulation"""
	def __init__(self, N):
		"""initialize the Boid simulation"""
		# 初始化位置和速度数组
		self.pos = [width/2.0, height/2.0] + 10*np.random.rand(2*N).reshape(N, 2)
		# normalized random velocities
		angles = 2*math.pi*np.random.rand(N)
		self.vel = np.array(list(zip(np.sin(angles), np.cos(angles))))
		self.N = N
		# minimum distance of approach
		self.minDist = 25.0
		# maximum magnitude of velocities calculated by "rules"
		self.maxRuleVel = 0.03
		# maximum magnitude of the final velocity
		self.maxVel = 2.0
Boid 类处理初始化,更新动画,并应用规则。
boids.tick()在每个时间步骤被调用,以便更新动画,如下所示:
def tick(frameNum, pts, beak, boids):
	#print frameNum
	"""update function for animation"""
	boids.tick(frameNum, pts, beak)
	return pts, beak
我们还需要一种方法来限制某些矢量的值。否则,速度将在每个时间步骤无限制地增加,模拟将崩溃。
def limitVec(self, vec, maxVal):
	"""limit the magnitude of the 2D vector"""
	mag = norm(vec)
	if mag > maxVal:
		vec[0], vec[1] = vec[0]*maxVal/mag, vec[1]*maxVal/mag

	#限制了数组中的值,采用模拟规则计算出的值
	def limit(self, X, maxVal):
		"""limit the magnitude of 2D vectors in array X to maxValue"""
		for vec in X:
			self.limitVec(vec, maxVal)
完整代码
下面是类鸟群模拟的完整程序:
import sys, argparse
import math
import numpy as np
import matplotlib.pyplot as plt
import matplotlib.animation as animation
from scipy.spatial.distance import squareform, pdist, cdist
from numpy.linalg import norm

width, height = 640, 480

class Boids:
	"""class that represents Boids simulation"""
	def __init__(self, N):
		"""initialize the Boid simulation"""
		# 初始化位置和速度数组
		self.pos = [width/2.0, height/2.0] + 10*np.random.rand(2*N).reshape(N, 2)
		# normalized random velocities
		angles = 2*math.pi*np.random.rand(N)
		self.vel = np.array(list(zip(np.sin(angles), np.cos(angles))))
		self.N = N
		# minimum distance of approach
		self.minDist = 25.0
		# maximum magnitude of velocities calculated by "rules"
		self.maxRuleVel = 0.03
		# maximum magnitude of the final velocity
		self.maxVel = 2.0

	def tick(self, frameNum, pts, beak):
		#print frameNum
		"""update function for animation"""
		self.distMatrix = squareform(pdist(self.pos))
		self.vel += self.applyRules()
		self.limit(self.vel, self.maxVel)
		self.pos += self.vel
		self.applyBC()

		pts.set_data(self.pos.reshape(2*self.N)[::2],
					  self.pos.reshape(2*self.N)[1::2])
		vec = self.pos + 10*self.vel/self.maxVel
		beak.set_data(vec.reshape(2*self.N)[::2],
					  vec.reshape(2*self.N)[1::2])


	def limitVec(self, vec, maxVal):
		"""limit the magnitude of the 2D vector"""
		mag = norm(vec)
		if mag > maxVal:
			vec[0], vec[1] = vec[0]*maxVal/mag, vec[1]*maxVal/mag

		#限制了数组中的值,采用模拟规则计算出的值
	def limit(self, X, maxVal):
		"""limit the magnitude of 2D vectors in array X to maxValue"""
		for vec in X:
			self.limitVec(vec, maxVal)

	def applyBC(self):
		"""apply boundary conditions"""
		deltaR = 2.0
		for coord in self.pos:
			if coord[0] > width + deltaR:
				coord[0] = - deltaR
			if coord[0] < - deltaR:
				coord[0] = width + deltaR
			if coord[1] > height + deltaR:
				coord[1] = - deltaR
			if coord[1] < - deltaR:
				coord[1] = height + deltaR

	def applyRules(self):
		# apply rule #1: Separation
		D = self.distMatrix < 25.0
		vel = self.pos*D.sum(axis=1).reshape(self.N, 1) - D.dot(self.pos)
		self.limit(vel, self.maxRuleVel)

		# distance threshold for alignment (different from separation)
		D = self.distMatrix < 50.0

		# apply rule #2: Alignment
		vel2 = D.dot(self.vel)
		self.limit(vel2, self.maxRuleVel)
		vel += vel2;

		# apply rule #3: Cohesion
		vel3 = D.dot(self.pos) - self.pos
		self.limit(vel3, self.maxRuleVel)
		vel += vel3

		return vel

	def buttonPress(self, event):
		"""event handler for matplotlib button presses"""
		# left-click to add a boid
		if event.button is 1:
			self.pos = np.concatenate((self.pos, np.array([[event.xdata, event.ydata]])), axis=0)

			# generate a random velocity
			angles = 2*math.pi*np.random.rand(1)
			v = np.array(list(zip(np.sin(angles), np.cos(angles))))
			self.vel = np.concatenate((self.vel, v), axis=0)
			self.N += 1
		# right-click to scatter boids
		elif event.button is 3:
			# add scattering velocity
			self.vel += 0.1*(self.pos - np.array([[event.xdata, event.ydata]]))

def tick(frameNum, pts, beak, boids):
	boids.tick(frameNum, pts, beak)
	return pts, beak

def main():
	print('starting boids...')
	parser = argparse.ArgumentParser(description="Implementing CraigReynolds's Boids...")
	# add arguments
	parser.add_argument('--num-boids', dest='N', required=False)
	args = parser.parse_args()
	# set the initial number of boids
	N = 100
	if args.N:
		N = int(args.N)

	# create boids
	boids = Boids(N)

	fig = plt.figure()
	ax = plt.axes(xlim=(0, width), ylim=(0, height))

	pts, = ax.plot([], [], markersize=10, c='k', marker='o', ls='None')
	beak, = ax.plot([], [], markersize=4, c='r', marker='o', ls='None')
	anim = animation.FuncAnimation(fig, tick, fargs=(pts, beak, boids),interval=50)

	# 用 mpl_connect()方法向 matplotlib 画布添加一个按钮按下事件
	cid = fig.canvas.mpl_connect('button_press_event', boids.buttonPress)
	plt.show()


if __name__ == '__main__':
	main()




![[安洵杯 2019]easy_web1](https://i-blog.csdnimg.cn/direct/d6da7d3e617d4d4189fa10d7b578f34f.png)


