1、react脚手架
脚手架简介
用来帮助程序员快速创建一个基于xxx库的模板项目
1、包含了所有需要的配置(语法检查、jsx编译、devServer…);
2、下载好了所有相关的依赖;
3、可以直接运行一个简单效果;
create-react-app
1、react提供了一个用于创建react项目的脚手架库: create-react-app;
2、项目的整体技术架构为:react + webpack + es6 + eslint;
3、使用脚手架开发的项目的特点:模块化、组件化、工程化;
创建项目并启动
第一步,全局安装:npm i -g create-react-app;
第二步,切换到想创项目的目录,使用命令:create-react-app hello-react;
第三步,进入项目文件夹:cd hello-react;
第四步,启动项目:npm start;
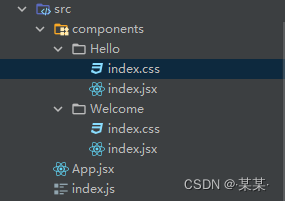
react脚手架项目结构

2、React样式隔离
2.1、样式问题叙述
在components下创建两个文件Hello和Welcone分别在两个文件夹内创建index.js和index.css文件;
App.js注册引入Hello和Welcone组件
//App.js
import './App.css';
import Hello from './components/Hello'  //引入Hello组件
import Welcome from './components/Welcome' //引入Welcome组件
function App() {
  return (
    <div className="App">
      <Hello/>    //注册Hello组件  这里hello是先注册的
      <Welcome/>     //注册Welcome组件    welcome是后注册的 记住这是要考的哦
    </div>
  );
}

export default App;
Hello组件
//Hello/index.js文件
import React, {Component} from "react";
import "./index.css"
export default class Hello extends Component {
    render() {
        return <h2 className="title"> Hello React</h2>
    }
}

//Hello/index.css文件
.title{
    background-color: red;
}
Welcome组件同理,除了h2标签中文字不同 及 title的背景色为蓝色
启动项目
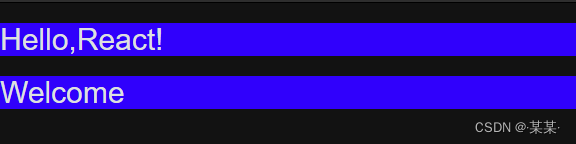
预期结果:上面为红色,下面为蓝色;
实际结果:都是蓝色,产生样式污染;
因为react组件在页面渲染的前,会将组件的样式“集合”到一起,因为引用组件时,<Welcome/>组件在<Home/>下面,因此<Welcome/>组件的蓝色会覆盖<Home/>组件的红色。
2.2、样式问题处理
1、Css Modules
Css Modules 并不是React专用解决方法,适用于所有使用 webpack 等打包工具的开发环境。
使用如下:
// 1、更改index.css文件名为index.module.css
//index.module.css文件
.bg {
	padding: 20px;
    background-color: red;
}

// 驼峰命名
.headName {
    background-color: green;
}

// 下划线
.head_age {
	background-color: skyblue;
}

// 连接符
.head-gender {
	background-color: orange;
}

.size {
    font-size: 20px;
}

// ':global' 表示该类为全局作用域下的
:global .text-left {
	color: pink;
    float: left;
}


// 2、修改Hello/index.js文件引入方式
import React, {Component} from "react";
//不可以import "./index.module.css" 这样引入
import hello from "./index.module.css"  //改变引入方法
export default class Hello extends Component {
    render() {
        return (
	        <div className={hello.bg}>
				<h2 className={hello.headName}>我叫张三</h2>
				<h2 className={hello.head_age}>年龄19</h2>

				// 类名使用 - 连接符写法如下:
				<h2 className={hello.headGender}>性别男</h2>
				// 或
				<h2 className={hello['head-gender']}>性别男</h2>

				// 多类名用法
				<div className={`${hello['head-gender']} ${hello.size}`}></div>

				// className="text-left" 这种形式则表示全局下的选择器
		        <p className="text-left">全局样式---全局样式</p>
			</div>
		)
    }
}
css-modules方案,每个className都需要写一个styles.实在是麻烦
2、scss的嵌套语法和CSS 属性选择器
安装sass:npm install node-sass --save-dev
Person组件
// 1、Person/index.js文件
import React, {Component} from "react";
import './index.scss'

export default class Person extends React.Component{
  render() {
    return (
      <div data-component='person'>
        <p className="name">person组件</p>
        <p className="text">隔离css</p>
      </div>
    )
  }
}

// 2、Person/index.scss文件
[data-component=person] {
  padding: 20px;
  background-color: #761c19;
  .name{
    font-size: 18px;
    color: #1b6d85;
  }
  .text {
    color: #3c763d;
  }
}
data-component可以限制为每个组件的名字,因为className可能会出现重复,但是组件名字在同一个项目中基本不会重复。
这样就解决了css class全局污染的问题。简单易用,不用引入新的概念和扩展。
3、React代理配置
前端本地端口3000, 后端服务本地端口5000,配置代理
3.1、方法一
在package.json中追加如下配置
"proxy": "http://localhost:5000"
优点:配置简单,前端请求资源时可以不加任何前缀。
缺点:不能配置多个代理。
工作方式:上述方式配置代理,当请求了3000不存在的资源时,那么该请求会转发给5000 (优先匹配前端资源)
import React, { Component } from 'react'
import axios from 'axios'

export default class App extends Component {

	getStudentData = ()=>{
		axios.get('http://localhost:3000/students').then(
			response => {console.log('成功了',response.data);},
			error => {console.log('失败了',error);}
		)
	}

	getCarData = ()=>{
		axios.get('http://localhost:3000/cars').then(
			response => {console.log('成功了',response.data);},
			error => {console.log('失败了',error);}
		)
	}

	render() {
		return (
			<div>
				<button onClick={this.getStudentData}>点我获取学生数据</button>
				<button onClick={this.getCarData}>点我获取汽车数据</button>
			</div>
		)
	}
}
3.2、方法二
第一步:在src下创建配置文件:src/setupProxy.js
编写setupProxy.js配置具体代理规则:
const proxy = require('http-proxy-middleware')

module.exports = function(app) {
  app.use(
    proxy('/api1', {  //api1是需要转发的请求(所有带有/api1前缀的请求都会转发给5000)
      target: 'http://localhost:5000', //配置转发目标地址(能返回数据的服务器地址)
      changeOrigin: true, //控制服务器接收到的请求头中host字段的值
      /*
      	changeOrigin设置为true时,服务器收到的请求头中的host为:localhost:5000
      	changeOrigin设置为false时,服务器收到的请求头中的host为:localhost:3000
      	changeOrigin默认值为false,但我们一般将changeOrigin值设为true
      */
      pathRewrite: {'^/api1': ''} //去除请求前缀,保证交给后台服务器的是正常请求地址(必须配置)
    }),
    proxy('/api2', {
      target: 'http://localhost:5001',
      changeOrigin: true,
      pathRewrite: {'^/api2': ''}
    })
  )
}
优点:可以配置多个代理,可以灵活的控制请求是否走代理。
缺点:配置繁琐,前端请求资源时必须加前缀。
import React, { Component } from 'react'
import axios from 'axios'

export default class App extends Component {

	getStudentData = ()=>{
		axios.get('http://localhost:3000/api1/students').then(
			response => {console.log('成功了',response.data);},
			error => {console.log('失败了',error);}
		)
	}

	getCarData = ()=>{
		axios.get('http://localhost:3000/api2/cars').then(
			response => {console.log('成功了',response.data);},
			error => {console.log('失败了',error);}
		)
	}

	render() {
		return (
			<div>
				<button onClick={this.getStudentData}>点我获取学生数据</button>
				<button onClick={this.getCarData}>点我获取汽车数据</button>
			</div>
		)
	}
}
4、消息订阅-发布机制
工具库:PubSubJS
下载:npm install pubsub-js --save
使用:
1、import PubSub from 'pubsub-js' 引入依赖
2、PubSub.publish('delete', data) 发布消息
3、PubSub.subscribe('delete', function(data){}) 订阅消息
Search组件与List组件为同级组件,当Search组件中点击获取数据时发布消息,在List组件中接收消息中数据,渲染界面;
Search组件
import React, { Component } from 'react'
import PubSub from 'pubsub-js'
import axios from 'axios'
export default class Search extends Component {
search = ()=>{
//获取用户的输入(连续解构赋值+重命名)
const {keyWordElement:{value:keyWord}} = this
//发送请求前通知List更新状态
PubSub.publish('atguigu',{isFirst:false,isLoading:true})
//发送网络请求
axios.get(`/api1/search/users?q=${keyWord}`).then(
response => {
//请求成功后通知List更新状态
PubSub.publish('atguigu',{isLoading:false,users:response.data.items})
},
error => {
//请求失败后通知App更新状态
PubSub.publish('atguigu',{isLoading:false,err:error.message})
}
)
}
render() {
return (
<section className="jumbotron">
<h3 className="jumbotron-heading">搜索github用户</h3>
<div>
<input ref={c => this.keyWordElement = c} type="text" placeholder="输入关键词点击搜索"/>
<button onClick={this.search}>搜索</button>
</div>
</section>
)
}
}
List组件
import React, { Component } from 'react'
import PubSub from 'pubsub-js'
import './index.css'

export default class List extends Component {

	state = { //初始化状态
		users:[], //users初始值为数组
		isFirst:true, //是否为第一次打开页面
		isLoading:false,//标识是否处于加载中
		err:'',//存储请求相关的错误信息
	}

	componentDidMount(){
		this.token = PubSub.subscribe('atguigu',(_,stateObj)=>{
			this.setState(stateObj)
		})
	}

	componentWillUnmount(){
		PubSub.unsubscribe(this.token)
	}

	render() {
		const {users,isFirst,isLoading,err} = this.state
		return (
			<div className="row">
				{
					isFirst ? <h2>欢迎使用,输入关键字,随后点击搜索</h2> :
					isLoading ? <h2>Loading......</h2> :
					err ? <h2 style={{color:'red'}}>{err}</h2> :
					users.map((userObj)=>{
						return (
							<div key={userObj.id} className="card">
								<a rel="noreferrer" href={userObj.html_url} target="_blank">
									<img alt="head_portrait" src={userObj.avatar_url} style={{width:'100px'}}/>
								</a>
								<p className="card-text">{userObj.login}</p>
							</div>
						)
					})
				}
			</div>
		)
	}
}
5、React路由
5.1、相关理解
SPA的理解
1、单页Web应用(single page web application,SPA);
2、整个应用只有一个完整的页面;
3、点击页面中的链接不会刷新页面,只会做页面的局部更新;
4、数据都需要通过ajax请求获取,并在前端异步展现;
后端路由
1、理解: value是function,用来处理客户端提交的请求;
2、注册路由: router.get(path, function(req, res));
3、工作过程:当node接收到一个请求时,根据请求路径找到匹配的路由,调用路由中的函数来处理请求,返回响应数据;
前端路由
1、浏览器端路由,value是component,用于展示页面内容;
2、注册路由:<Route path="/test" component={Test}>
3、工作过程:当浏览器的path变为/test时, 当前路由组件就会变为Test组件
5.2、react-router-dom
react的一个插件库,专门用来实现一个SPA应用,基于react的项目基本都会用到此库。
使用:
下载react-router-dom:npm install --save react-router-dom
引入bootstrap.css:<link rel="stylesheet" href="/css/bootstrap.css">
5.3、路由基本使用
1、导航区的a标签改为Link标签<Link to="/xxxxx">Demo</Link>
2、展示区写Route标签进行路径的匹配<Route path='/xxxx' component={Demo}/>
3、<App>的最外侧包裹了一个<BrowserRouter>或<HashRouter>
App组件
import React, { Component } from 'react'
import {Link,Route} from 'react-router-dom'
import Home from './components/Home'
import About from './components/About'

export default class App extends Component {
	render() {
		return (
			<div>
				<div className="row">
					<div className="col-xs-2 col-xs-offset-2">
						<div className="list-group">

							{/* 原生html中,靠<a>跳转不同的页面 */}
							{/* <a className="list-group-item" href="./about.html">About</a>
							<a className="list-group-item active" href="./home.html">Home</a> */}

							{/* 在React中靠路由链接实现切换组件--编写路由链接 */}
							<Link className="list-group-item" to="/about">About</Link>
							<Link className="list-group-item" to="/home">Home</Link>
						</div>
					</div>
					<div className="col-xs-6">
						<div className="panel">
							<div className="panel-body">
								{/* 注册路由 */}
								<Route path="/about" component={About}/>
								<Route path="/home" component={Home}/>
							</div>
						</div>
					</div>
				</div>
			</div>
		)
	}
}
src/index.js
//引入react核心库
import React from 'react'
//引入ReactDOM
import ReactDOM from 'react-dom'
import {BrowserRouter} from 'react-router-dom'
//引入App
import App from './App'

ReactDOM.render(
	<BrowserRouter>
		<App/>
	</BrowserRouter>,
	document.getElementById('root')
)
5.4、NavLink与封装NavLink
NavLink可以实现当前路由标签高亮效果,Link标签无法实现高亮效果
1、通过activeClassName指定高亮效果样式名;
2、标签体内容是一个特殊的标签属性;
3、通过this.props.children可以获取标签体内容;
MyNavLink组件
import React, { Component } from 'react'
import {NavLink} from 'react-router-dom'

export default class MyNavLink extends Component {
	render() {
		// console.log(this.props);

		// this.props.children可以获取标签体内容
		// {to: "/about", children: "About"}
		return (
			<NavLink activeClassName="aaabbb" className="list-group-item" {...this.props}/>
		)
	}
}
App组件
import React, { Component } from 'react'
import {Route} from 'react-router-dom'
import Home from './pages/Home' //Home是路由组件
import About from './pages/About' //About是路由组件
import Header from './components/Header' //Header是一般组件
import MyNavLink from './components/MyNavLink'

export default class App extends Component {
	render() {
		return (
			<div>
				<div className="row">
					<div className="col-xs-2 col-xs-offset-2">
						<div className="list-group">
							{/* 在React中靠路由链接实现切换组件--编写路由链接 */}
							<MyNavLink to="/about">About</MyNavLink>
							<MyNavLink to="/home">Home</MyNavLink>
						</div>
					</div>
					<div className="col-xs-6">
						<div className="panel">
							<div className="panel-body">
								{/* 注册路由 */}
								<Route path="/about" component={About}/>
								<Route path="/home" component={Home}/>
							</div>
						</div>
					</div>
				</div>
			</div>
		)
	}
}
5.5、Switch的使用
1、通常情况下,path和component是一一对应的关系;
2、Switch可以提高路由匹配效率(单一匹配);
import React, { Component } from 'react'
import {Route,Switch} from 'react-router-dom'
import Home from './pages/Home' //Home是路由组件
import About from './pages/About' //About是路由组件
import Header from './components/Header' //Header是一般组件
import MyNavLink from './components/MyNavLink'
import Test from './pages/Test'

export default class App extends Component {
	render() {
		return (
			<div>
				<div className="row">
					<div className="col-xs-2 col-xs-offset-2">
						<div className="list-group">
							{/* 在React中靠路由链接实现切换组件--编写路由链接 */}
							<MyNavLink to="/about">About</MyNavLink>
							<MyNavLink to="/home">Home</MyNavLink>
						</div>
					</div>
					<div className="col-xs-6">
						<div className="panel">
							<div className="panel-body">
								{/* Switch包裹时,路由匹配到路径时直接加载对应的组件;
								    Switch未包裹时,路由会一直向下匹配。如有相同的路径,不同的组件,加载最下面的组件*/}
								{/* 注册路由 */}
								<Switch>
									<Route path="/about" component={About}/>
									<Route path="/home" component={Home}/>
									<Route path="/home" component={Test}/>
								</Switch>
							</div>
						</div>
					</div>
				</div>
			</div>
		)
	}
}
5.6、多级路径刷新页面样式丢失问题
路由多级路径切换跳转后,点击浏览器刷新出现样式丢失问题。
...
// 路由多级路径/atguigu/about
<MyNavLink to="/atguigu/about">About</MyNavLink>
<MyNavLink to="/atguigu/home">Home</MyNavLink>

...

<Switch>
	<Route path="/atguigu/about" component={About}/>
	<Route path="/atguigu/home" component={Home}/>
</Switch>

...
原因:在public/index.html中加载样式路径出现问题
<!DOCTYPE html>
<html>
	<head>
		<meta charset="UTF-8" />
		<title>react脚手架</title>
		<link rel="icon" href="%PUBLIC_URL%/favicon.ico" />
		<!--
		<link rel="stylesheet" href="./css/bootstrap.css">

		前端本地服务http://localhost:3000默认加载的是public下的内容;
		正常请求样式路径:http://localhost:3000/css/bootstrap.css
		多级路由刷新路径:http://localhost:3000/atguigu/css/bootstrap.css
		当请求发送不存在的路径时,返回public下的index.html中的内容
		-->
		<link rel="stylesheet" href="./css/bootstrap.css">
		<style>
			.atguigu{
				background-color: rgb(209, 137, 4) !important;
				color: white !important;
			}
		</style>
	</head>
	<body>
		<div id="root"></div>
	</body>
</html>
解决方案:
1、public/index.html中引入样式时不写./写 / (常用);
2、public/index.html中引入样式时不写./写 %PUBLIC_URL% (常用);
3、public/index.html中引入样式时写./,但是使用HashRouter代替BrowserRouter包裹App组件;
5.7、路由的严格匹配与模糊匹配
默认使用的是模糊匹配(简单记:【输入的路径】必须包含要【匹配的路径】,且顺序要一致)
开启严格匹配:<Route exact={true} path="/about" component={About}/>
注意:严格匹配不要随便开启,需要再开。有些时候开启会导致无法继续匹配二级路由
<MyNavLink to="/about">About</MyNavLink>
<MyNavLink to="/home/a/b">Home</MyNavLink>

......

<Switch>
	// 开启严格模式
	<Route exact path="/about" component={About}/>
	<Route exact path="/home" component={Home}/>
</Switch>
5.8、Redirect的使用
一般写在所有路由注册的最下方,当所有路由都无法匹配时,跳转到Redirect指定的路由
import {Route,Switch,Redirect} from 'react-router-dom'
......
<Switch>
	<Route path="/about" component={About}/>
	<Route path="/home" component={Home}/>
	<Redirect to="/about"/>
</Switch>
5.9、嵌套路由
注册子路由时要写上父路由的path值,路由的匹配是按照注册路由的顺序进行的
Home组件下的News与Message组件
import React, { Component } from 'react'
import MyNavLink from '../../components/MyNavLink'
import {Route,Switch,Redirect} from 'react-router-dom'
import News from './News'
import Message from './Message'

export default class Home extends Component {
	render() {
		return (
				<div>
					<h3>我是Home的内容</h3>
					<div>
						<ul className="nav nav-tabs">
							<li>
								<MyNavLink to="/home/news">News</MyNavLink>
							</li>
							<li>
								<MyNavLink to="/home/message">Message</MyNavLink>
							</li>
						</ul>
						{/* 注册路由 */}
						<Switch>
							<Route path="/home/news" component={News}/>
							<Route path="/home/message" component={Message}/>
							<Redirect to="/home/news"/>
						</Switch>
					</div>
				</div>
			)
	}
}
5.10、向路由组件传递参数
params传参
使用方式:
1、路由链接(携带参数):<Link to='/demo/test/tom/18'}>详情</Link>
2、注册路由(声明接收):<Route path="/demo/test/:name/:age" component={Test}/>
3、接收参数:this.props.match.params
search传参(query传参)
使用方式:
1、路由链接(携带参数):<Link to='/demo/test?name=tom&age=18'}>详情</Link>
2、注册路由(无需声明,正常注册即可):<Route path="/demo/test" component={Test}/>
3、接收参数:this.props.location.search
备注:获取到的search是urlencoded编码字符串,需要借助querystring解析
state传参
使用方式:
1、路由链接(携带参数):<Link to={{pathname:'/demo/test',state:{name:'tom',age:18}}}>详情</Link>
2、注册路由(无需声明,正常注册即可):<Route path="/demo/test" component={Test}/>
3、接收参数:this.props.location.state
备注:刷新也可以保留住参数
import React, { Component } from 'react'
import {Link,Route} from 'react-router-dom'
import Detail from './Detail'

export default class Message extends Component {
	state = {
		messageArr:[
			{id:'01',title:'消息1'},
			{id:'02',title:'消息2'},
			{id:'03',title:'消息3'},
		]
	}
	render() {
		const {messageArr} = this.state
		return (
			<div>
				<ul>
					{
						messageArr.map((msgObj)=>{
							return (
								<li key={msgObj.id}>
									{/* 第一步:传递参数 */}

									{/* 向路由组件传递params参数 */}
									{/* <Link to={`/home/message/detail/${msgObj.id}/${msgObj.title}`}>{msgObj.title}</Link> */}

									{/* 向路由组件传递search参数 */}
									{/* <Link to={`/home/message/detail/?id=${msgObj.id}&title=${msgObj.title}`}>{msgObj.title}</Link> */}

									{/* 向路由组件传递state参数 */}
									<Link to={{pathname:'/home/message/detail',state:{id:msgObj.id,title:msgObj.title}}}>{msgObj.title}</Link>

								</li>
							)
						})
					}
				</ul>
				<hr/>
				{/* 第二步:路由组件接受参数 */}

				{/* 声明接收params参数 */}
				{/* <Route path="/home/message/detail/:id/:title" component={Detail}/> */}

				{/* search参数无需声明接收,正常注册路由即可 */}
				{/* <Route path="/home/message/detail" component={Detail}/> */}

				{/* state参数无需声明接收,正常注册路由即可 */}
				<Route path="/home/message/detail" component={Detail}/>

			</div>
		)
	}
}
import React, { Component } from 'react'
// import qs from 'querystring'

const DetailData = [
	{id:'01',content:'你好,中国'},
	{id:'02',content:'你好,尚硅谷'},
	{id:'03',content:'你好,未来的自己'}
]
export default class Detail extends Component {
	render() {
		console.log(this.props);
		{/* 第三步:props中读取参数 */}

		// 接收params参数
		// match: {..., params: {id: "01", title: "消息1"}}
		// const {id,title} = this.props.match.params

		// 接收search参数
		// location: {..., search: "?id=01&title=消息1"}
		// const {search} = this.props.location
		// const {id,title} = qs.parse(search.slice(1))

		// 接收state参数
		// location: {..., state: {id: "01", title: "消息1"}}
		const {id,title} = this.props.location.state || {}

		const findResult = DetailData.find((detailObj)=>{
			return detailObj.id === id
		}) || {}
		return (
			<ul>
				<li>ID:{id}</li>
				<li>TITLE:{title}</li>
				<li>CONTENT:{findResult.content}</li>
			</ul>
		)
	}
}
5.11、路由组件与一般组件
1、写法不同:
一般组件:<Demo/>
路由组件:<Route path="/demo" component={Demo}/>
2、存放位置不同:
一般组件:components文件夹
路由组件:pages文件夹
3、接收到的props不同:
一般组件:写组件标签时传递了什么,就能收到什么
路由组件:接收到三个固定的属性
history:    go: ƒ go(n)
			goBack: ƒ goBack()
			goForward: ƒ goForward()
			push: ƒ push(path, state)
			replace: ƒ replace(path, state)

location:  pathname: "/about"
			search: ""
			state: undefined

match:     params: {}
			path: "/about"
			url: "/about"
4、编程式路由导航
借助this.prosp.history对象上的API对操作路由跳转、前进、后退
- this.prosp.history.push()
- this.prosp.history.replace()
- this.prosp.history.goBack()
- this.prosp.history.goForward()
- this.prosp.history.go()
5.12、withRouter使用
import React, { Component } from 'react'
import {withRouter} from 'react-router-dom'
class Header extends Component {
back = ()=>{
this.props.history.goBack()
}
forward = ()=>{
this.props.history.goForward()
}
go = ()=>{
this.props.history.go(-2)
}
render() {
console.log('Header组件收到的props是',this.props);
return (
<div className="page-header">
<h2>React Router Demo</h2>
<button onClick={this.back}>回退</button>
<button onClick={this.forward}>前进</button>
<button onClick={this.go}>go</button>
</div>
)
}
}
export default withRouter(Header)
//withRouter可以加工一般组件,让一般组件具备路由组件所特有的API
//withRouter的返回值是一个新组件
5.13、BrowserRouter与HashRouter的区别
1、底层原理不一样:
BrowserRouter使用的是H5的history API,不兼容IE9及以下版本;
HashRouter使用的是URL的哈希值;
2、path表现形式不一样
BrowserRouter的路径中没有#,例如:localhost:3000/demo/test;
HashRouter的路径包含#,例如:localhost:3000/#/demo/test;
3、刷新后对路由state参数的影响
BrowserRouter没有任何影响,因为state保存在history对象中;
HashRouter刷新后会导致路由state参数的丢失;
4、HashRouter可以用于解决一些路径错误相关的问题;
6、第三方组件库
6.1、React UI组件库
material-ui(国外)
官网:http://www.material-ui.com/#/
github:https://github.com/callemall/material-ui
ant-design(国内蚂蚁金服)
官网:https://ant.design/index-cn
Github:https://github.com/ant-design/ant-design/
6.2、antd的按需引入+自定主题
1、安装依赖:yarn add react-app-rewired customize-cra babel-plugin-import less less-loader
2、修改package.json
"scripts": {
	"start": "react-app-rewired start",
	"build": "react-app-rewired build",
	"test": "react-app-rewired test",
	"eject": "react-scripts eject"
},
3、根目录下创建config-overrides.js
// 配置具体的修改规则
const { override, fixBabelImports,addLessLoader} = require('customize-cra');
module.exports = override(
	fixBabelImports('import', {
		libraryName: 'antd',
		libraryDirectory: 'es',
		style: true,
	}),
	addLessLoader({
		lessOptions:{
			javascriptEnabled: true,
			modifyVars: { '@primary-color': 'green' },
		}
	}),
);
4、不用在组件里亲自引入样式了,即:import 'antd/dist/antd.css’应该删掉