一. LightWeight概述
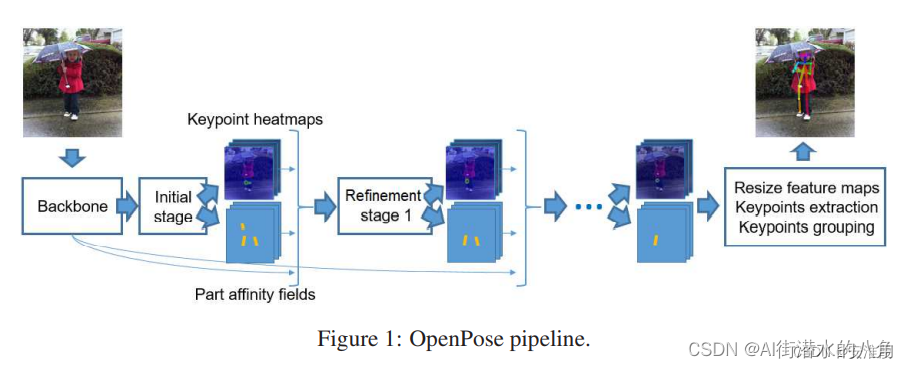
light weight openpose是openpose的简化版本,使用了openpose的大体流程。
Light weight openpose和openpose的区别是:
a 前者使用的是Mobilenet V1(到conv5_5),后者使用的是Vgg19(前10层)。
b 前者部分层使用了空洞卷积(dilated convolution)来提升感受视野,后者使用一般的卷积。
c 前者卷积核大小为3*3,后者为7*7。
d 前者只有一个refine stage,后者有5个stage。
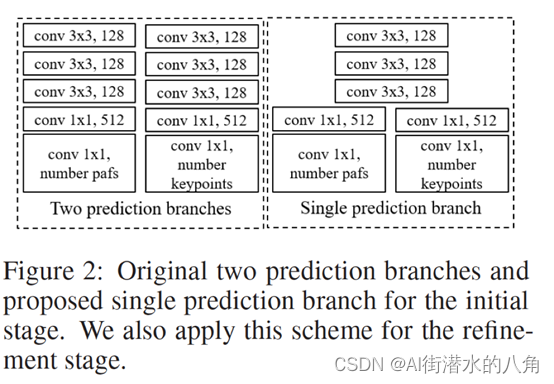
e 前者的initial stage和refine stage里面的两个分支(hotmaps和pafs)使用权值共享,后者则是并行的两个分支
二. LightWeight的网络结构
openpose的每个stage使用下图中左侧的两个并行的分支,分别预测hotmaps和pafs,为了进一步降低计算量,light weight openpose中将前几层进行权值共享,如下图右侧所示。
其网络流程:
三. LightWeight的网络结构代码
import torch
from torch import nn

from modules.conv import conv, conv_dw, conv_dw_no_bn


class Cpm(nn.Module):
    def __init__(self, in_channels, out_channels):
        super().__init__()
        self.align = conv(in_channels, out_channels, kernel_size=1, padding=0, bn=False)
        self.trunk = nn.Sequential(
            conv_dw_no_bn(out_channels, out_channels),
            conv_dw_no_bn(out_channels, out_channels),
            conv_dw_no_bn(out_channels, out_channels)
        )
        self.conv = conv(out_channels, out_channels, bn=False)

    def forward(self, x):
        x = self.align(x)
        x = self.conv(x + self.trunk(x))
        return x


class InitialStage(nn.Module):
    def __init__(self, num_channels, num_heatmaps, num_pafs):
        super().__init__()
        self.trunk = nn.Sequential(
            conv(num_channels, num_channels, bn=False),
            conv(num_channels, num_channels, bn=False),
            conv(num_channels, num_channels, bn=False)
        )
        self.heatmaps = nn.Sequential(
            conv(num_channels, 512, kernel_size=1, padding=0, bn=False),
            conv(512, num_heatmaps, kernel_size=1, padding=0, bn=False, relu=False)
        )
        self.pafs = nn.Sequential(
            conv(num_channels, 512, kernel_size=1, padding=0, bn=False),
            conv(512, num_pafs, kernel_size=1, padding=0, bn=False, relu=False)
        )

    def forward(self, x):
        trunk_features = self.trunk(x)
        heatmaps = self.heatmaps(trunk_features)
        pafs = self.pafs(trunk_features)
        return [heatmaps, pafs]


class RefinementStageBlock(nn.Module):
    def __init__(self, in_channels, out_channels):
        super().__init__()
        self.initial = conv(in_channels, out_channels, kernel_size=1, padding=0, bn=False)
        self.trunk = nn.Sequential(
            conv(out_channels, out_channels),
            conv(out_channels, out_channels, dilation=2, padding=2)
        )

    def forward(self, x):
        initial_features = self.initial(x)
        trunk_features = self.trunk(initial_features)
        return initial_features + trunk_features


class RefinementStage(nn.Module):
    def __init__(self, in_channels, out_channels, num_heatmaps, num_pafs):
        super().__init__()
        self.trunk = nn.Sequential(
            RefinementStageBlock(in_channels, out_channels),
            RefinementStageBlock(out_channels, out_channels),
            RefinementStageBlock(out_channels, out_channels),
            RefinementStageBlock(out_channels, out_channels),
            RefinementStageBlock(out_channels, out_channels)
        )
        self.heatmaps = nn.Sequential(
            conv(out_channels, out_channels, kernel_size=1, padding=0, bn=False),
            conv(out_channels, num_heatmaps, kernel_size=1, padding=0, bn=False, relu=False)
        )
        self.pafs = nn.Sequential(
            conv(out_channels, out_channels, kernel_size=1, padding=0, bn=False),
            conv(out_channels, num_pafs, kernel_size=1, padding=0, bn=False, relu=False)
        )

    def forward(self, x):
        trunk_features = self.trunk(x)
        heatmaps = self.heatmaps(trunk_features)
        pafs = self.pafs(trunk_features)
        return [heatmaps, pafs]


class PoseEstimationWithMobileNet(nn.Module):
    def __init__(self, num_refinement_stages=1, num_channels=128, num_heatmaps=19, num_pafs=38):
        super().__init__()
        self.model = nn.Sequential(
            conv(     3,  32, stride=2, bias=False),
            conv_dw( 32,  64),
            conv_dw( 64, 128, stride=2),
            conv_dw(128, 128),
            conv_dw(128, 256, stride=2),
            conv_dw(256, 256),
            conv_dw(256, 512),  # conv4_2
            conv_dw(512, 512, dilation=2, padding=2),
            conv_dw(512, 512),
            conv_dw(512, 512),
            conv_dw(512, 512),
            conv_dw(512, 512)   # conv5_5
        )
        self.cpm = Cpm(512, num_channels)

        self.initial_stage = InitialStage(num_channels, num_heatmaps, num_pafs)
        self.refinement_stages = nn.ModuleList()
        for idx in range(num_refinement_stages):
            self.refinement_stages.append(RefinementStage(num_channels + num_heatmaps + num_pafs, num_channels,
                                                          num_heatmaps, num_pafs))

    def forward(self, x):
        backbone_features = self.model(x)
        backbone_features = self.cpm(backbone_features)

        stages_output = self.initial_stage(backbone_features)
        for refinement_stage in self.refinement_stages:
            stages_output.extend(
                refinement_stage(torch.cat([backbone_features, stages_output[-2], stages_output[-1]], dim=1)))

        return stages_output
四. LightWeight是怎么去识别行为呢
LightWeight可以检测到人体的关键点,所以可以通过两种方式来判断行为,第一种方法是通过计算角度,第二种方式,是通过判断整体的关键点(把抠出的关键点图送入到分类网络),本文的做法是第一种方式
#   计算姿态
def get_pos(keypoints):
    str_pose = ""
    # 计算左臂与水平方向的夹角
    keypoints = np.array(keypoints)
    v1 = keypoints[1] - keypoints[0]
    v2 = keypoints[2] - keypoints[0]
    angle_left_arm = get_angle(v1, v2)
    #计算右臂与水平方向的夹角
    v1 = keypoints[0] - keypoints[1]
    v2 = keypoints[3] - keypoints[1]
    angle_right_arm = get_angle(v1, v2)

    if angle_left_arm>0 and angle_right_arm>0:
        str_pose = "LEFT_UP"
    elif angle_left_arm<0 and angle_right_arm<0:
        str_pose = "RIGHT_UP"
    elif angle_left_arm>0 and angle_right_arm<0:
        str_pose = "ALL_HANDS_UP"
    elif angle_left_arm>0 and angle_right_arm<0:
        str_pose = "NORMAL"
    return str_pose
五. LightWeight的演示效果


六. 整个工程的内容
提供源代码,模型,提供GUI界面代码

代码的下载路径(新窗口打开链接):基于深度学习LightWeight的人体姿态之行为识别系统源码

有问题可以私信或者留言,有问必答


![[数据结构] 归并排序快速排序 及非递归实现](https://i-blog.csdnimg.cn/direct/853675eb6100455e815a9e70a3d1a30e.png)