一、功能介绍
在当今的移动应用领域,随着技术的飞速发展和智能设备的普及,将先进的计算机视觉技术集成到移动平台,特别是Android系统中,已成为提升用户体验、拓展应用功能的关键。其中,目标检测与人脸识别作为计算机视觉领域的两大基石,广泛应用于安全监控、智能门禁、图像分类、增强现实等多个场景,对促进物联网、智慧城市等前沿科技的发展起着至关重要的作用。
YOLOv3,作为YOLO系列的最新版本,以其快速、准确的目标检测能力著称,能够在单个神经网络中同时进行对象分类和定位,特别适合实时应用需求。该模型通过优化的网络结构设计,实现了速度与精度的较好平衡,是目前广泛应用的目标检测模型之一。
卷积神经网络(CNN,Convolutional Neural Networks)作为深度学习领域的重要组成部分,尤其在图像识别和处理方面展现出了卓越的能力。在人脸识别任务中,CNN能够学习并提取人脸特征,实现高精度的人脸检测与识别。结合特定的人脸识别模型,如FaceNet等,可以在移动平台上实现快速且准确的人脸验证或识别功能,这对于安全认证、个性化服务等领域有着直接的应用价值。
本项目通过Qt框架整合OpenCV与YOLOv3及CNN模型,不仅展示了如何在Android平台上高效实现复杂计算机视觉算法的集成,还为开发者提供了一个实践案例,探索了移动设备上高性能目标检测与人脸识别技术的可行性。这不仅促进了人工智能技术在移动应用中的普及与深化,也为未来的智能安防、健康管理、娱乐互动等应用场景提供了坚实的技术基础。项目的跨平台特性也为软件的广泛部署与应用提供了便利,进一步推动了AI技术与移动互联网的融合创新。
Qt是一个由Qt Company(前身为Trolltech,后被诺基亚收购,再后由Digia接手,并最终成立Qt公司)开发的跨平台C++图形用户界面应用程序开发框架。它自1991年起由Haavard Nord和Eirik Chambe-Eng创建,支持多个主流平台的应用程序开发,包括Android、Windows、iOS和Linux等。Qt框架提供了丰富的功能和工具,涵盖图形用户界面设计、数据库操作、网络编程、文件处理等多个方面,并通过其广泛的类库加速应用程序的开发过程。Qt具有良好的文档和社区支持,广泛用于桌面应用、移动应用、嵌入式系统等多种类型的应用程序开发。不仅可用于开发图形用户界面程序,还可用于非GUI程序,如控制台工具和服务器。Qt的发展历程展现了其不断适应市场需求和技术进步的能力,为开发者提供了强大的工具和平台。
本篇文章用到的全部软件工具、库的模型,以及APP都可以在这里下载(网盘):https://pan.quark.cn/s/145a9b3f7f53
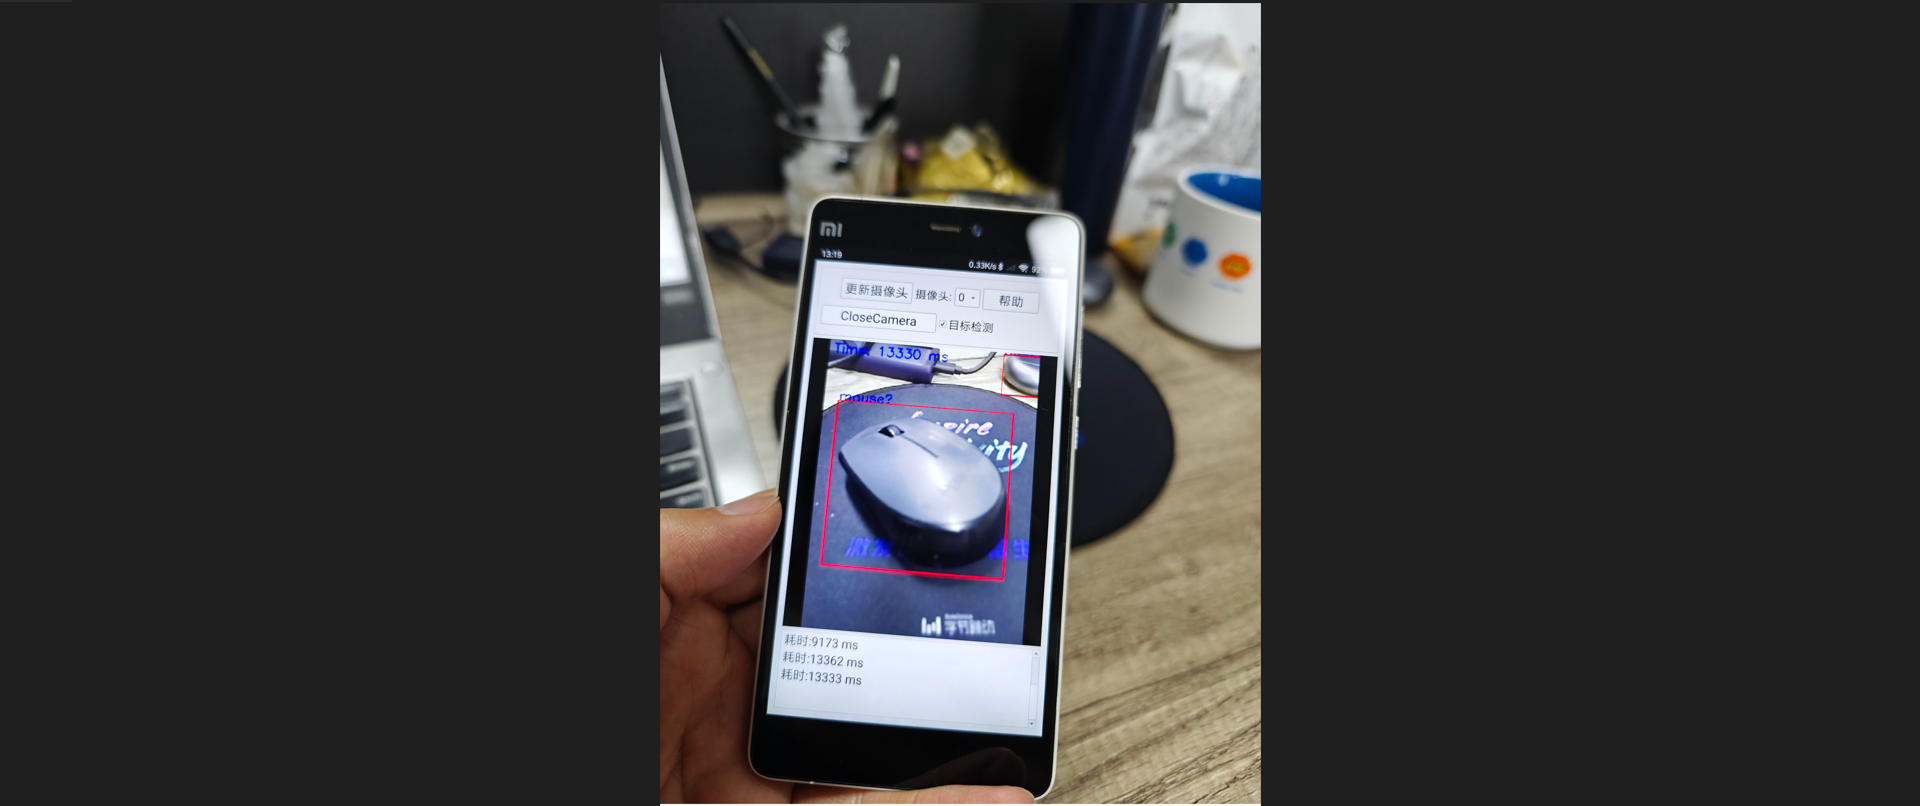
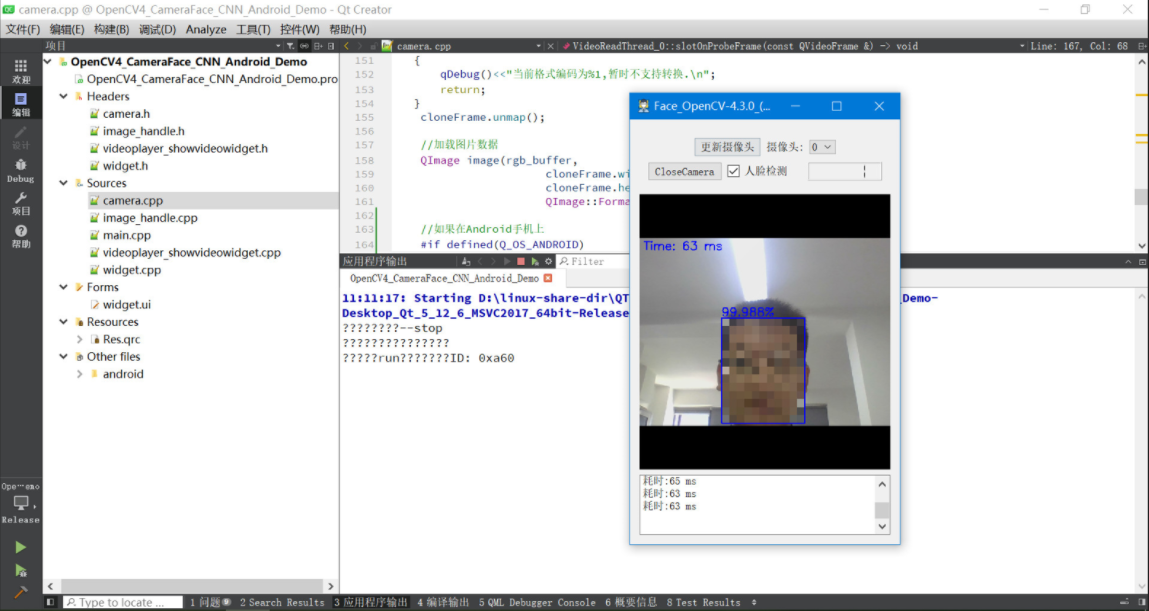
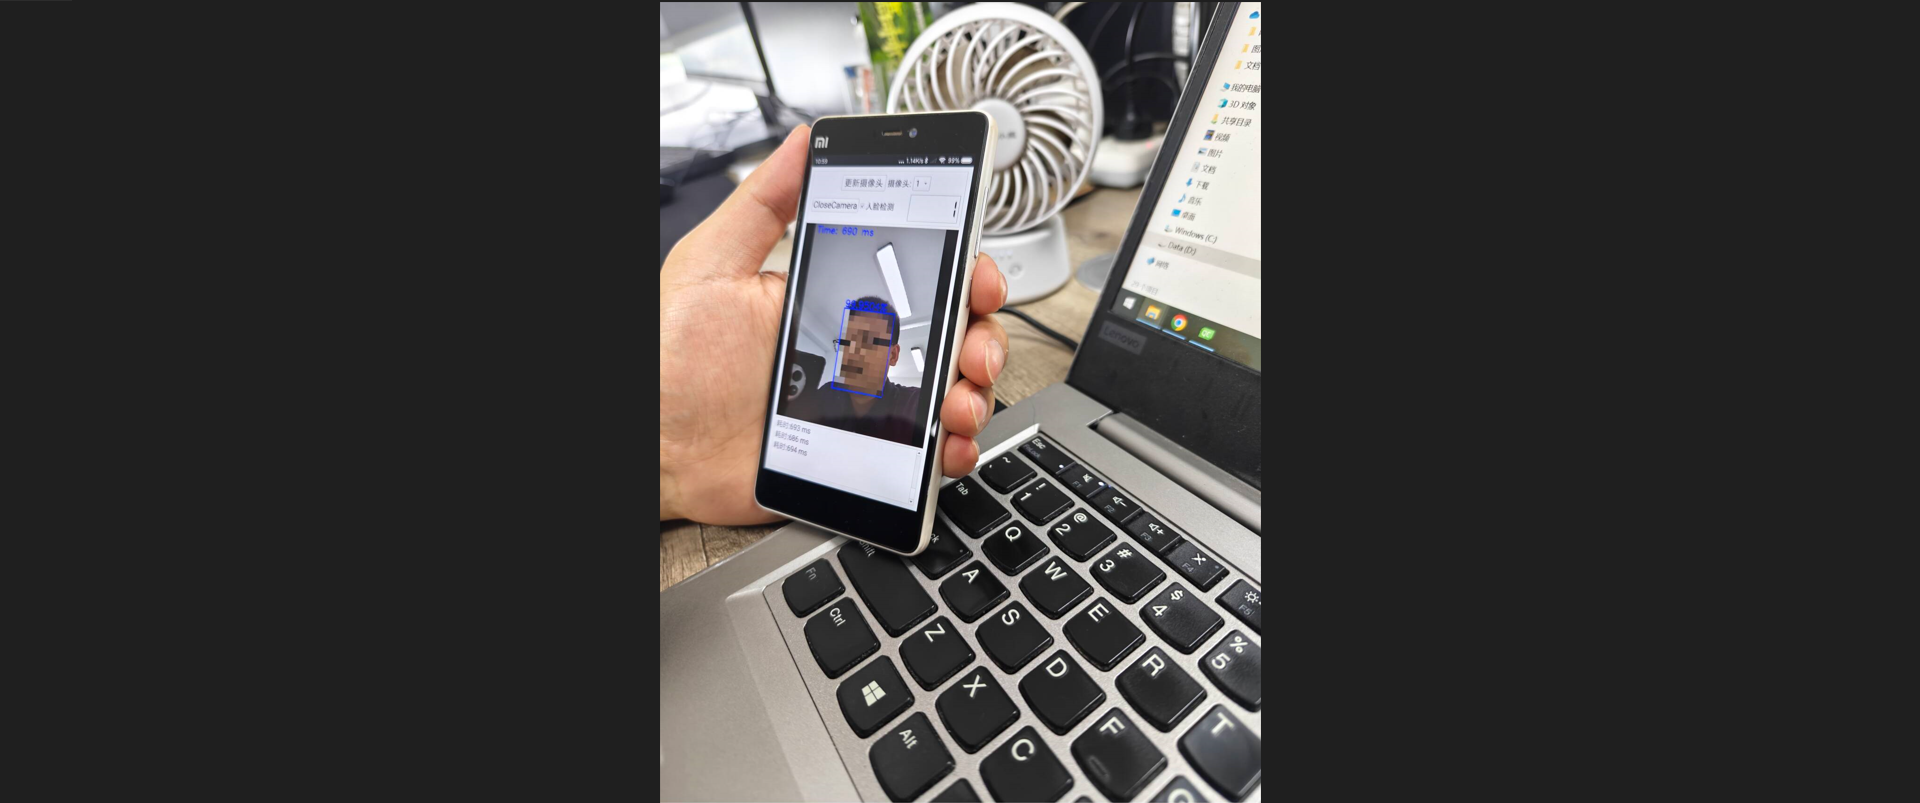
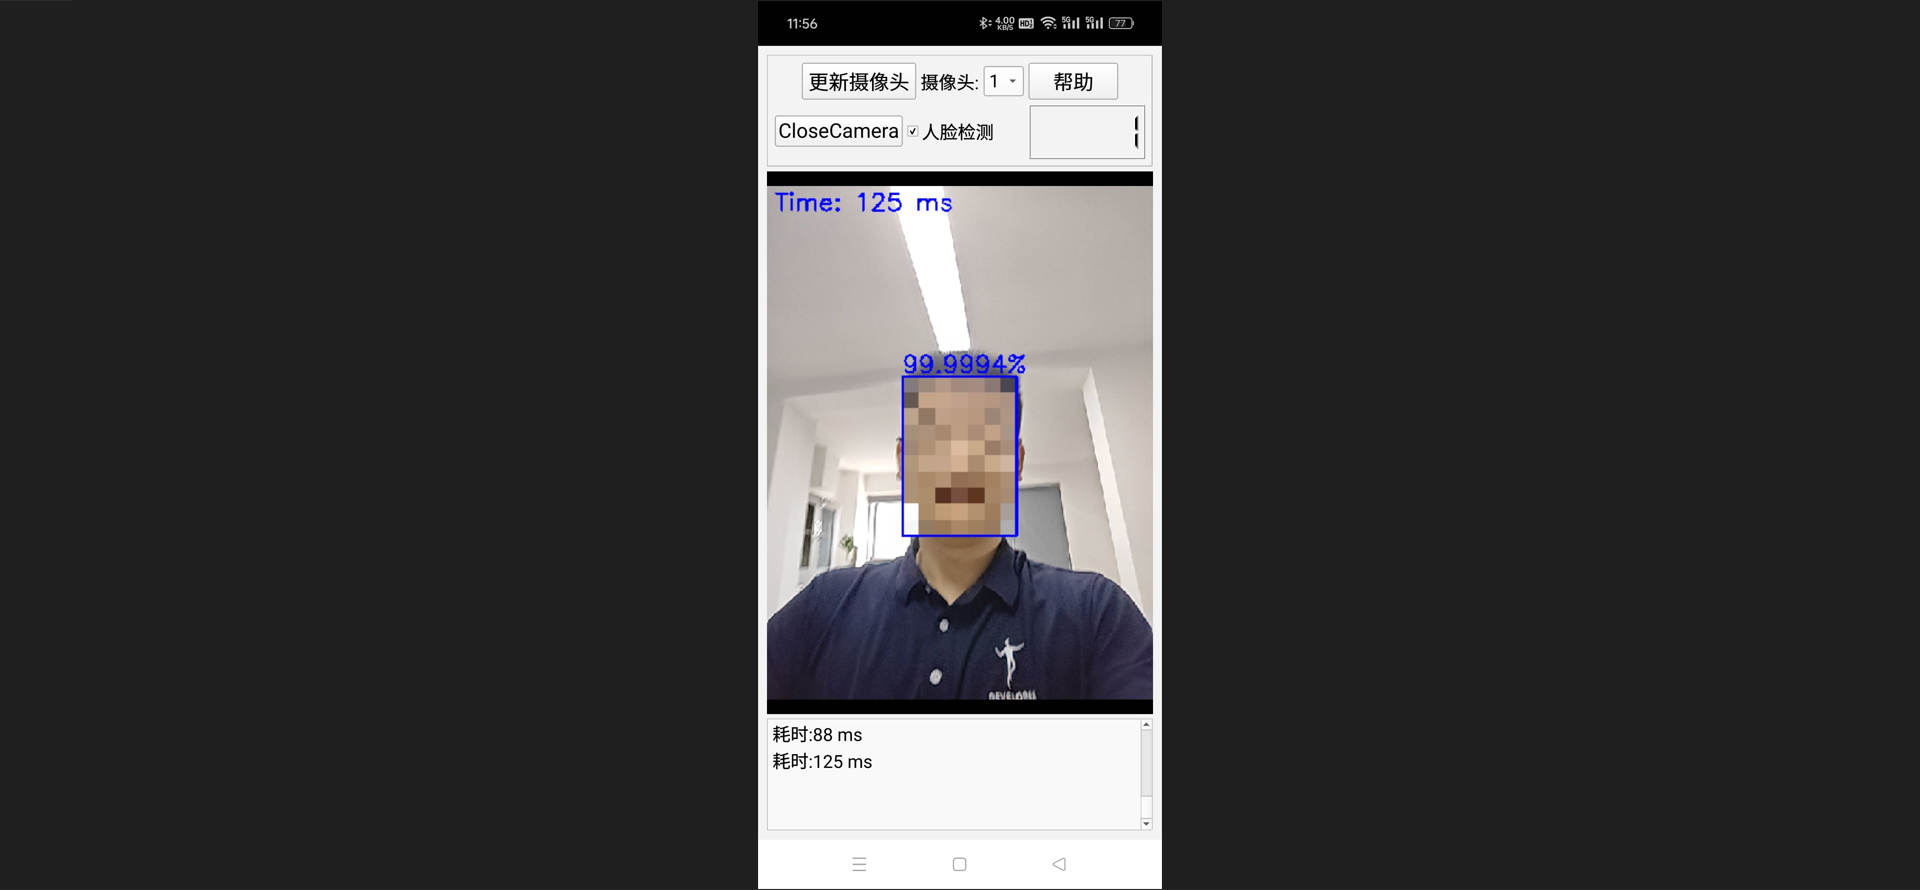
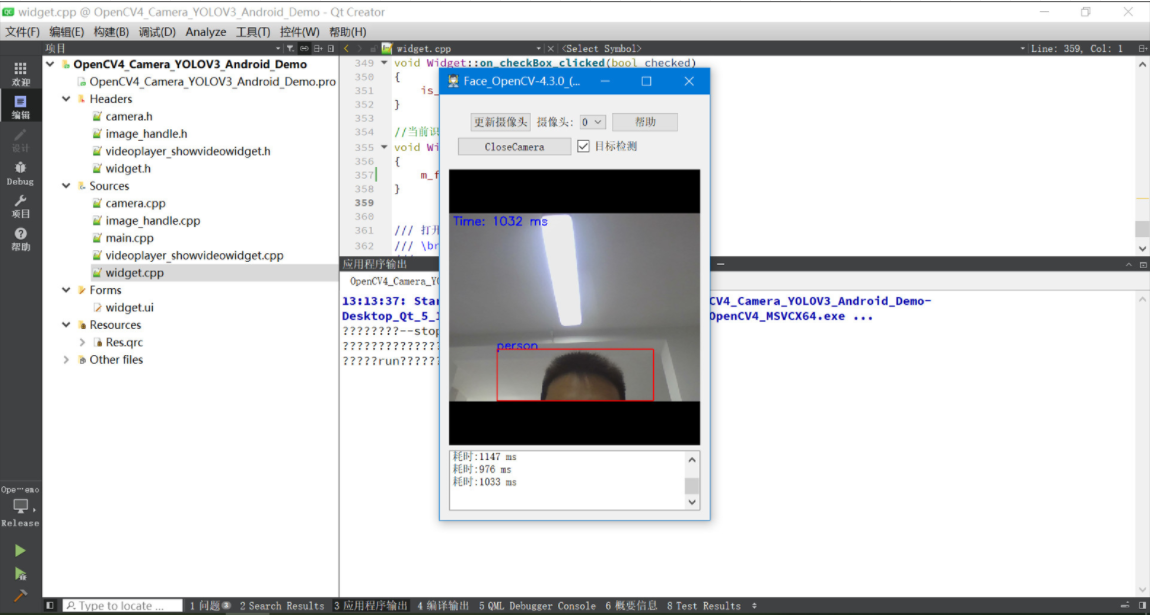
实现效果:
二、OpenCV下载
OpenCV是开源的计算机视觉、机器学习软件库,其图片处理的功能非常强大,并且速度很快。 作为目标检测功能,OpenCV里本身就自带了很多的模型,比如: 人眼检测、鼻子检测、嘴巴检测、人脸检测、人体检测、猫脸检测等等,下载完OpenCV,就能直接进行图像识别测试体验,并且OpenCV也可以直接调用YOLO的模型,精确识别各种物体,yolo v3 里自带的模型文件可以精确识别常见的很多物体: 比如: 狗、汽车、自行车、人体、书本、手机等等。
OpenCV下载地址:https://opencv.org/releases/page/3/
可以直接下载不同平台的SDK包,非常的方便。
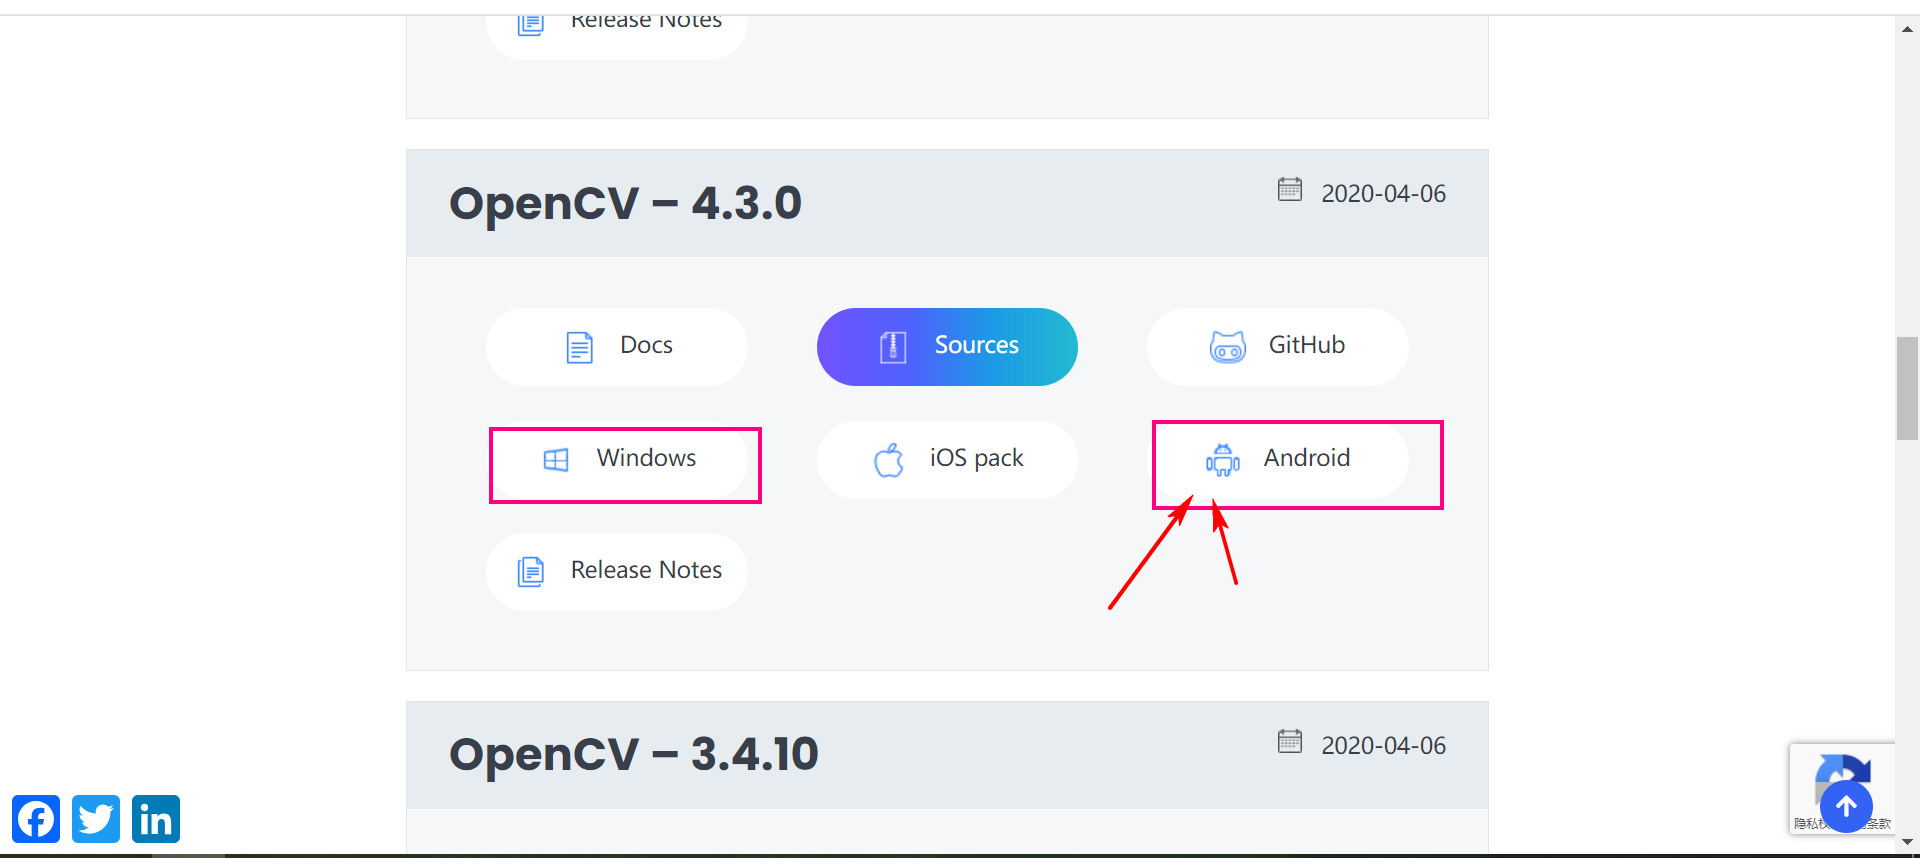
下载下来之后。

主要需要使用的文件就在这里面。

三、YOLO目标检测算法
3.1 YOLO算法介绍
YOLO算法官网介绍:https://pjreddie.com/darknet/yolo/

You only look once (YOLO) is a state-of-the-art, real-time object detection system. On a Pascal Titan X it processes images at 30 FPS and has a mAP of 57.9% on COCO test-dev.
You Only Look Once (YOLO) 是最先进的实时目标检测系统。在 Pascal Titan X 上,它以 30 FPS 处理图像,并且在 COCO 测试开发上的 mAP 为 57.9%。
Comparison to Other Detectors
YOLOv3 is extremely fast and accurate. In mAP measured at .5 IOU YOLOv3 is on par with Focal Loss but about 4x faster. Moreover, you can easily tradeoff between speed and accuracy simply by changing the size of the model, no retraining required!
与其他探测器的比较
YOLOv3 非常快速且准确。在 mAP 中,测量结果为 0.5 IOU YOLOv3 与 Focal Loss 相当,但速度快约 4 倍。此外,只需更改模型的大小即可轻松在速度和准确性之间进行权衡,无需重新训练!
3.2 Linux快速体验
在Linux下快速体验YOLO算法的目标检测(采用官方的模型)。
(1)安装darknet
git clone https://github.com/pjreddie/darknet
cd darknet
make
(2)下载权重文件
wget https://pjreddie.com/media/files/yolov3.weights
yolov3.weights 是 YOLOv3 网络训练得到的权重文件,存储了神经网络中每个层次的权重和偏置信息。
在cfg/目录下已经包含了yolov3对应的配置文件。
(3)运行detector
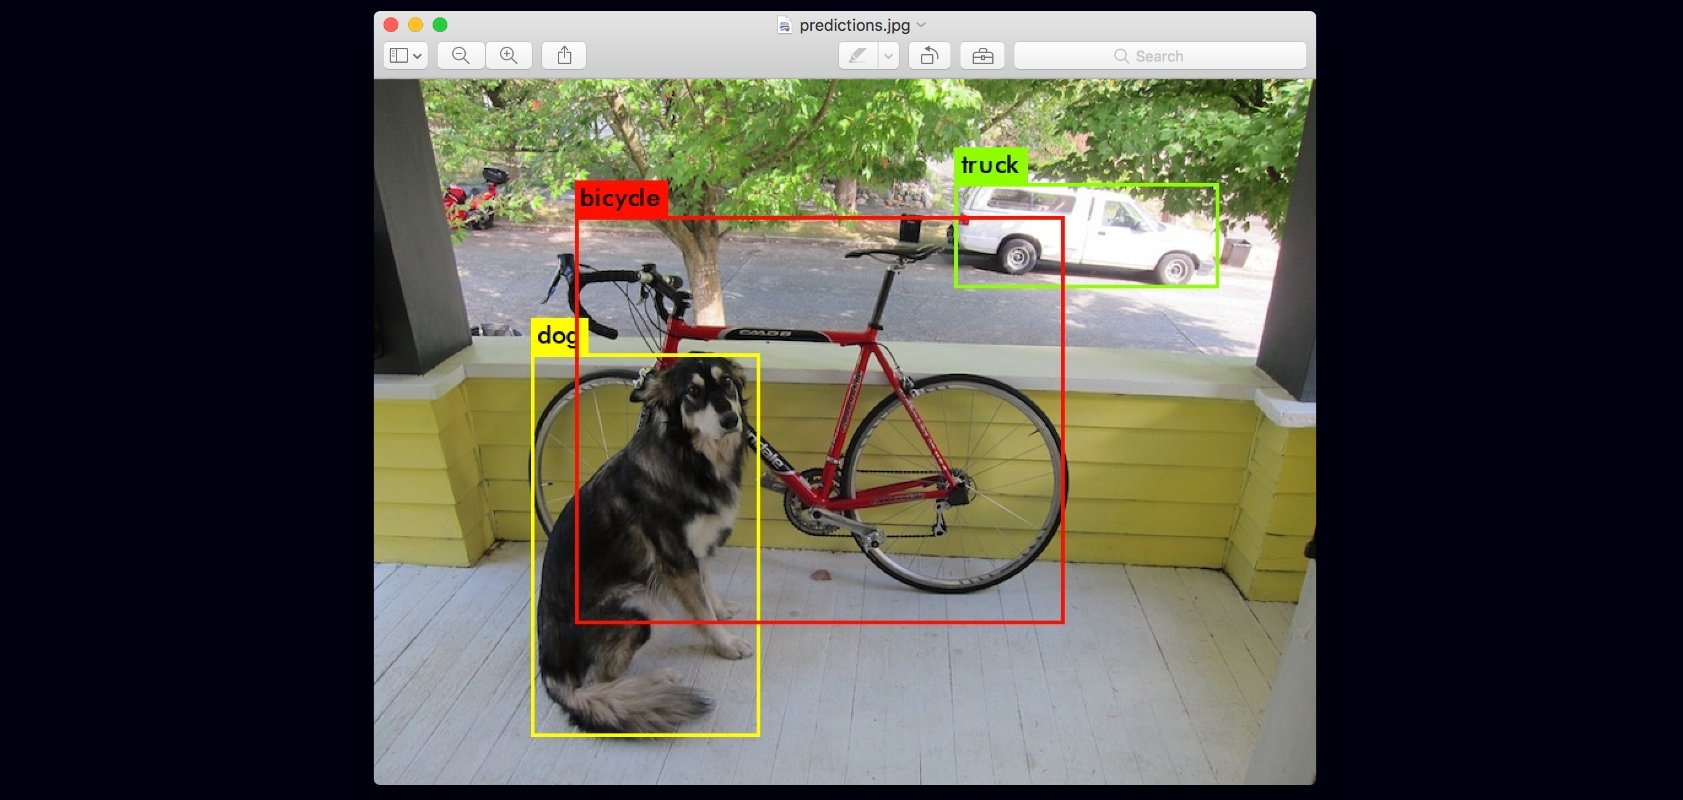
./darknet detect cfg/yolov3.cfg yolov3.weights data/dog.jpg
运行输出的信息:
layer     filters    size              input                output
    0 conv     32  3 x 3 / 1   416 x 416 x   3   ->   416 x 416 x  32  0.299 BFLOPs
    1 conv     64  3 x 3 / 2   416 x 416 x  32   ->   208 x 208 x  64  1.595 BFLOPs
    .......
  105 conv    255  1 x 1 / 1    52 x  52 x 256   ->    52 x  52 x 255  0.353 BFLOPs
  106 detection
truth_thresh: Using default '1.000000'
Loading weights from yolov3.weights...Done!
data/dog.jpg: Predicted in 0.029329 seconds.
dog: 99%
truck: 93%
bicycle: 99%
3.3 官方模型支持识别的目标类型
person
bicycle
car
motorbike
aeroplane
bus
train
truck
boat
traffic light
fire hydrant
stop sign
parking meter
bench
bird
cat
dog
horse
sheep
cow
elephant
bear
zebra
giraffe
backpack
umbrella
handbag
tie
suitcase
frisbee
skis
snowboard
sports ball
kite
baseball bat
baseball glove
skateboard
surfboard
tennis racket
bottle
wine glass
cup
fork
knife
spoon
bowl
banana
apple
sandwich
orange
broccoli
carrot
hot dog
pizza
donut
cake
chair
sofa
pottedplant
bed
diningtable
toilet
tvmonitor
laptop
mouse
remote
keyboard
cell phone
microwave
oven
toaster
sink
refrigerator
book
clock
vase
scissors
teddy bear
hair drier
toothbrush
四、Qt Android工程配置
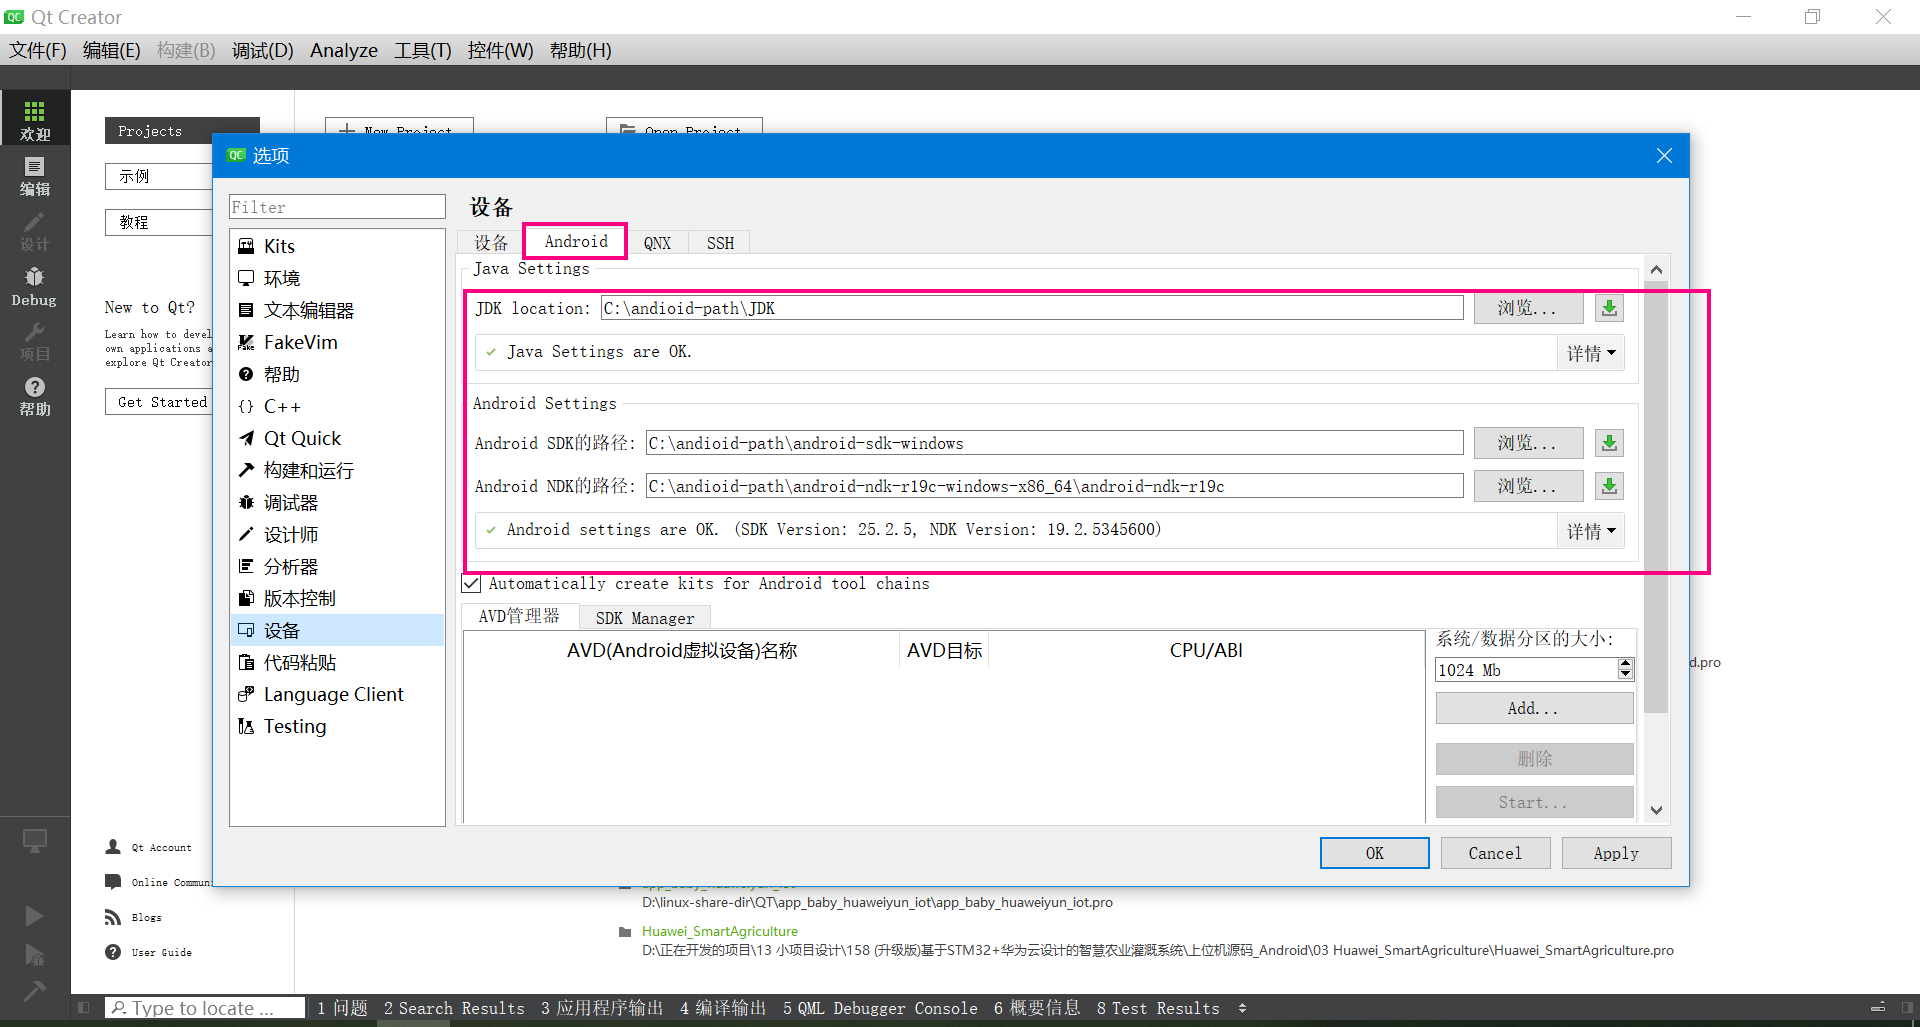
4.1 搭建Qt Android的开发环境
我用的开发环境是:QT5.12.6 ,下面是Android开发环境的配置。
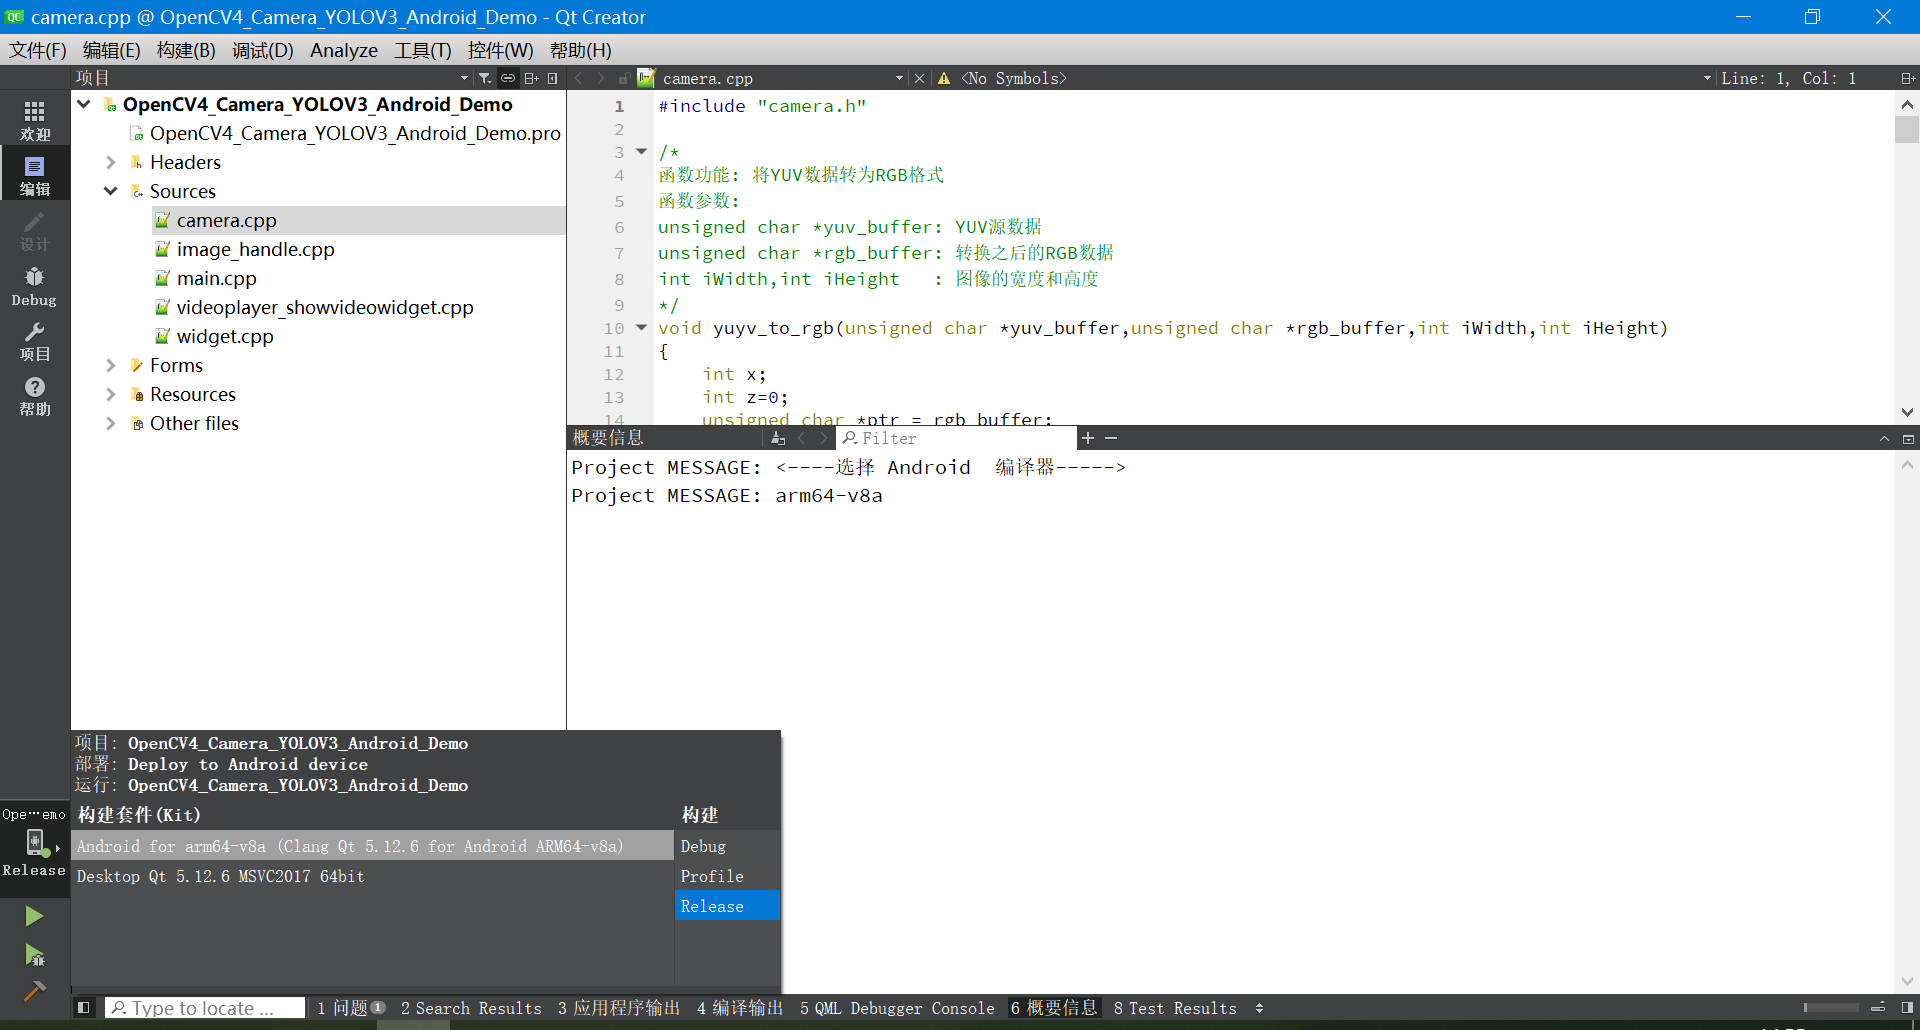
4.2 编译选择的编译器
4.3 pro工程文件配置(很重要)
下面是介绍OpenCV的库引用如何配置。 分别贴出来了Windows、Android的32位和64位的库引用配置办法。
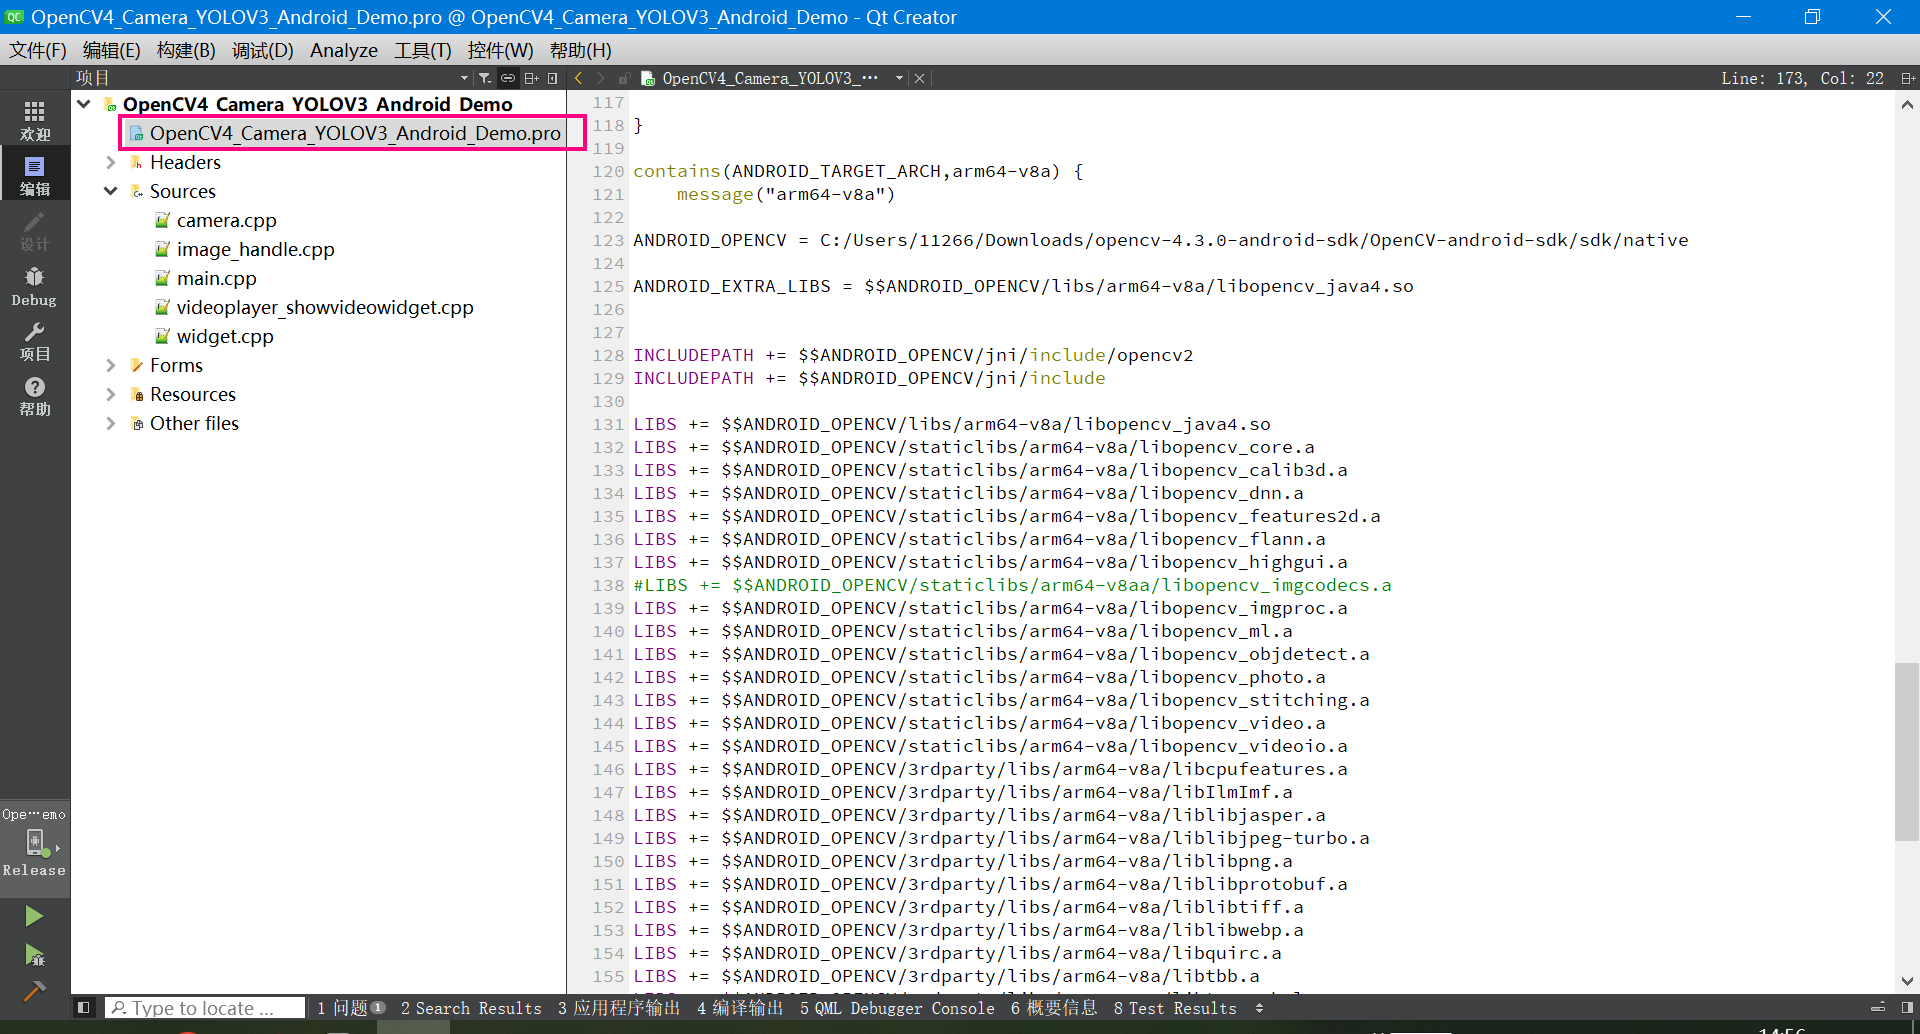
下面是Windows、Android的32位和64位的库引用配置代码。
# 根据操作系统选择编译器
win32 {
    # Windows下的编译器选择
    # 32位
    equals(QT_ARCH, x86) {
        # 32位编译器设置
        message("<----选择 windows电脑 32 编译器----->")
    }
    # 64位
    equals(QT_ARCH, x86_64) {
        # 64位编译器设置
        message("<----选择 windows电脑 64 编译器----->")

#添加opencv头文件的路径,需要根据自己的头文件路径进行修改
INCLUDEPATH += C:/opencv_4.x/opencv/build/include
INCLUDEPATH += C:/opencv_4.x/opencv/build/include/opencv
INCLUDEPATH += C:/opencv_4.x/opencv/build/include/opencv2

LIBS += -LC:/opencv_4.x/opencv/build/x64/vc15/lib\
          -lopencv_world430

    }
}


#Android环境配置
android {
message("<----选择 Android  编译器----->")
contains(ANDROID_TARGET_ARCH,armeabi-v7a) {
    message("armeabi-v7a")

ANDROID_OPENCV = C:/Users/11266/Downloads/opencv-4.3.0-android-sdk/OpenCV-android-sdk/sdk/native

ANDROID_EXTRA_LIBS = $$ANDROID_OPENCV/libs/armeabi-v7a/libopencv_java4.so

INCLUDEPATH += $$ANDROID_OPENCV/jni/include/opencv2
INCLUDEPATH += $$ANDROID_OPENCV/jni/include

LIBS += $$ANDROID_OPENCV/libs/armeabi-v7a/libopencv_java4.so
LIBS += $$ANDROID_OPENCV/staticlibs/armeabi-v7a/libopencv_core.a
LIBS += $$ANDROID_OPENCV/staticlibs/armeabi-v7a/libopencv_calib3d.a
LIBS += $$ANDROID_OPENCV/staticlibs/armeabi-v7a/libopencv_dnn.a
LIBS += $$ANDROID_OPENCV/staticlibs/armeabi-v7a/libopencv_features2d.a
LIBS += $$ANDROID_OPENCV/staticlibs/armeabi-v7a/libopencv_flann.a
LIBS += $$ANDROID_OPENCV/staticlibs/armeabi-v7a/libopencv_highgui.a
LIBS += $$ANDROID_OPENCV/staticlibs/armeabi-v7a/libopencv_imgcodecs.a
LIBS += $$ANDROID_OPENCV/staticlibs/armeabi-v7a/libopencv_imgproc.a
LIBS += $$ANDROID_OPENCV/staticlibs/armeabi-v7a/libopencv_ml.a
LIBS += $$ANDROID_OPENCV/staticlibs/armeabi-v7a/libopencv_objdetect.a
LIBS += $$ANDROID_OPENCV/staticlibs/armeabi-v7a/libopencv_photo.a
LIBS += $$ANDROID_OPENCV/staticlibs/armeabi-v7a/libopencv_stitching.a
LIBS += $$ANDROID_OPENCV/staticlibs/armeabi-v7a/libopencv_video.a
LIBS += $$ANDROID_OPENCV/staticlibs/armeabi-v7a/libopencv_videoio.a
LIBS += $$ANDROID_OPENCV/3rdparty/libs/armeabi-v7a/libcpufeatures.a
LIBS += $$ANDROID_OPENCV/3rdparty/libs/armeabi-v7a/libIlmImf.a
LIBS += $$ANDROID_OPENCV/3rdparty/libs/armeabi-v7a/liblibjasper.a
LIBS += $$ANDROID_OPENCV/3rdparty/libs/armeabi-v7a/liblibjpeg-turbo.a
LIBS += $$ANDROID_OPENCV/3rdparty/libs/armeabi-v7a/liblibpng.a
LIBS += $$ANDROID_OPENCV/3rdparty/libs/armeabi-v7a/liblibprotobuf.a
LIBS += $$ANDROID_OPENCV/3rdparty/libs/armeabi-v7a/liblibtiff.a
LIBS += $$ANDROID_OPENCV/3rdparty/libs/armeabi-v7a/liblibwebp.a
LIBS += $$ANDROID_OPENCV/3rdparty/libs/armeabi-v7a/libquirc.a
LIBS += $$ANDROID_OPENCV/3rdparty/libs/armeabi-v7a/libtbb.a
LIBS += $$ANDROID_OPENCV/3rdparty/libs/armeabi-v7a/libtegra_hal.a

}

contains(ANDROID_TARGET_ARCH,arm64-v8a) {
    message("arm64-v8a")

ANDROID_OPENCV = C:/Users/11266/Downloads/opencv-4.3.0-android-sdk/OpenCV-android-sdk/sdk/native

ANDROID_EXTRA_LIBS = $$ANDROID_OPENCV/libs/arm64-v8a/libopencv_java4.so


INCLUDEPATH += $$ANDROID_OPENCV/jni/include/opencv2
INCLUDEPATH += $$ANDROID_OPENCV/jni/include

LIBS += $$ANDROID_OPENCV/libs/arm64-v8a/libopencv_java4.so
LIBS += $$ANDROID_OPENCV/staticlibs/arm64-v8a/libopencv_core.a
LIBS += $$ANDROID_OPENCV/staticlibs/arm64-v8a/libopencv_calib3d.a
LIBS += $$ANDROID_OPENCV/staticlibs/arm64-v8a/libopencv_dnn.a
LIBS += $$ANDROID_OPENCV/staticlibs/arm64-v8a/libopencv_features2d.a
LIBS += $$ANDROID_OPENCV/staticlibs/arm64-v8a/libopencv_flann.a
LIBS += $$ANDROID_OPENCV/staticlibs/arm64-v8a/libopencv_highgui.a
#LIBS += $$ANDROID_OPENCV/staticlibs/arm64-v8aa/libopencv_imgcodecs.a
LIBS += $$ANDROID_OPENCV/staticlibs/arm64-v8a/libopencv_imgproc.a
LIBS += $$ANDROID_OPENCV/staticlibs/arm64-v8a/libopencv_ml.a
LIBS += $$ANDROID_OPENCV/staticlibs/arm64-v8a/libopencv_objdetect.a
LIBS += $$ANDROID_OPENCV/staticlibs/arm64-v8a/libopencv_photo.a
LIBS += $$ANDROID_OPENCV/staticlibs/arm64-v8a/libopencv_stitching.a
LIBS += $$ANDROID_OPENCV/staticlibs/arm64-v8a/libopencv_video.a
LIBS += $$ANDROID_OPENCV/staticlibs/arm64-v8a/libopencv_videoio.a
LIBS += $$ANDROID_OPENCV/3rdparty/libs/arm64-v8a/libcpufeatures.a
LIBS += $$ANDROID_OPENCV/3rdparty/libs/arm64-v8a/libIlmImf.a
LIBS += $$ANDROID_OPENCV/3rdparty/libs/arm64-v8a/liblibjasper.a
LIBS += $$ANDROID_OPENCV/3rdparty/libs/arm64-v8a/liblibjpeg-turbo.a
LIBS += $$ANDROID_OPENCV/3rdparty/libs/arm64-v8a/liblibpng.a
LIBS += $$ANDROID_OPENCV/3rdparty/libs/arm64-v8a/liblibprotobuf.a
LIBS += $$ANDROID_OPENCV/3rdparty/libs/arm64-v8a/liblibtiff.a
LIBS += $$ANDROID_OPENCV/3rdparty/libs/arm64-v8a/liblibwebp.a
LIBS += $$ANDROID_OPENCV/3rdparty/libs/arm64-v8a/libquirc.a
LIBS += $$ANDROID_OPENCV/3rdparty/libs/arm64-v8a/libtbb.a
LIBS += $$ANDROID_OPENCV/3rdparty/libs/arm64-v8a/libtegra_hal.a
}

}
五、代码实现
5.1 C++实现(人脸检测)
#include <opencv2/opencv.hpp>

int main() {
    std::string prototxt_path = "D:/deploy.prototxt.txt";
    std::string model_path = "D:/res10_300x300_ssd_iter_140000_fp16.caffemodel";
    cv::dnn::Net model = cv::dnn::readNetFromCaffe(prototxt_path, model_path);

    cv::VideoCapture capture(0);  // 打开默认摄像头(设备号为0)
    if (!capture.isOpened()) {
        std::cout << "Failed to open the camera." << std::endl;
        return -1;
    }

    while (true) {
        cv::Mat frame;
        capture >> frame;  // 读取视频帧
        if (frame.empty()) {
            break;
        }

        int h = frame.rows;
        int w = frame.cols;
        cv::Mat blob = cv::dnn::blobFromImage(frame, 1.0, cv::Size(300, 300), cv::Scalar(104.0, 177.0, 123.0));
        model.setInput(blob);
        cv::Mat output = model.forward();
        cv::Mat detectionMat(output.size[2], output.size[3], CV_32F, output.ptr<float>());

        float font_scale = 1.0;
        for (int i = 0; i < detectionMat.rows; ++i) {
            float confidence = detectionMat.at<float>(i, 2);
            if (confidence > 0.5) {
                int start_x = static_cast<int>(detectionMat.at<float>(i, 3) * w);
                int start_y = static_cast<int>(detectionMat.at<float>(i, 4) * h);
                int end_x = static_cast<int>(detectionMat.at<float>(i, 5) * w);
                int end_y = static_cast<int>(detectionMat.at<float>(i, 6) * h);
                cv::rectangle(frame, cv::Point(start_x, start_y), cv::Point(end_x, end_y), cv::Scalar(255, 0, 0), 2);
                std::ostringstream ss;
                ss << confidence * 100 << "%";
                cv::putText(frame, ss.str(), cv::Point(start_x, start_y - 5), cv::FONT_HERSHEY_SIMPLEX, font_scale, cv::Scalar(255, 0, 0), 2);
            }
        }

        cv::imshow("Face Detection", frame);

        char c = cv::waitKey(1);
        if (c == 27) {  // 按下Esc键退出循环
            break;
        }
    }

    capture.release();
    cv::destroyAllWindows();

    return 0;
}
运行效果如下:
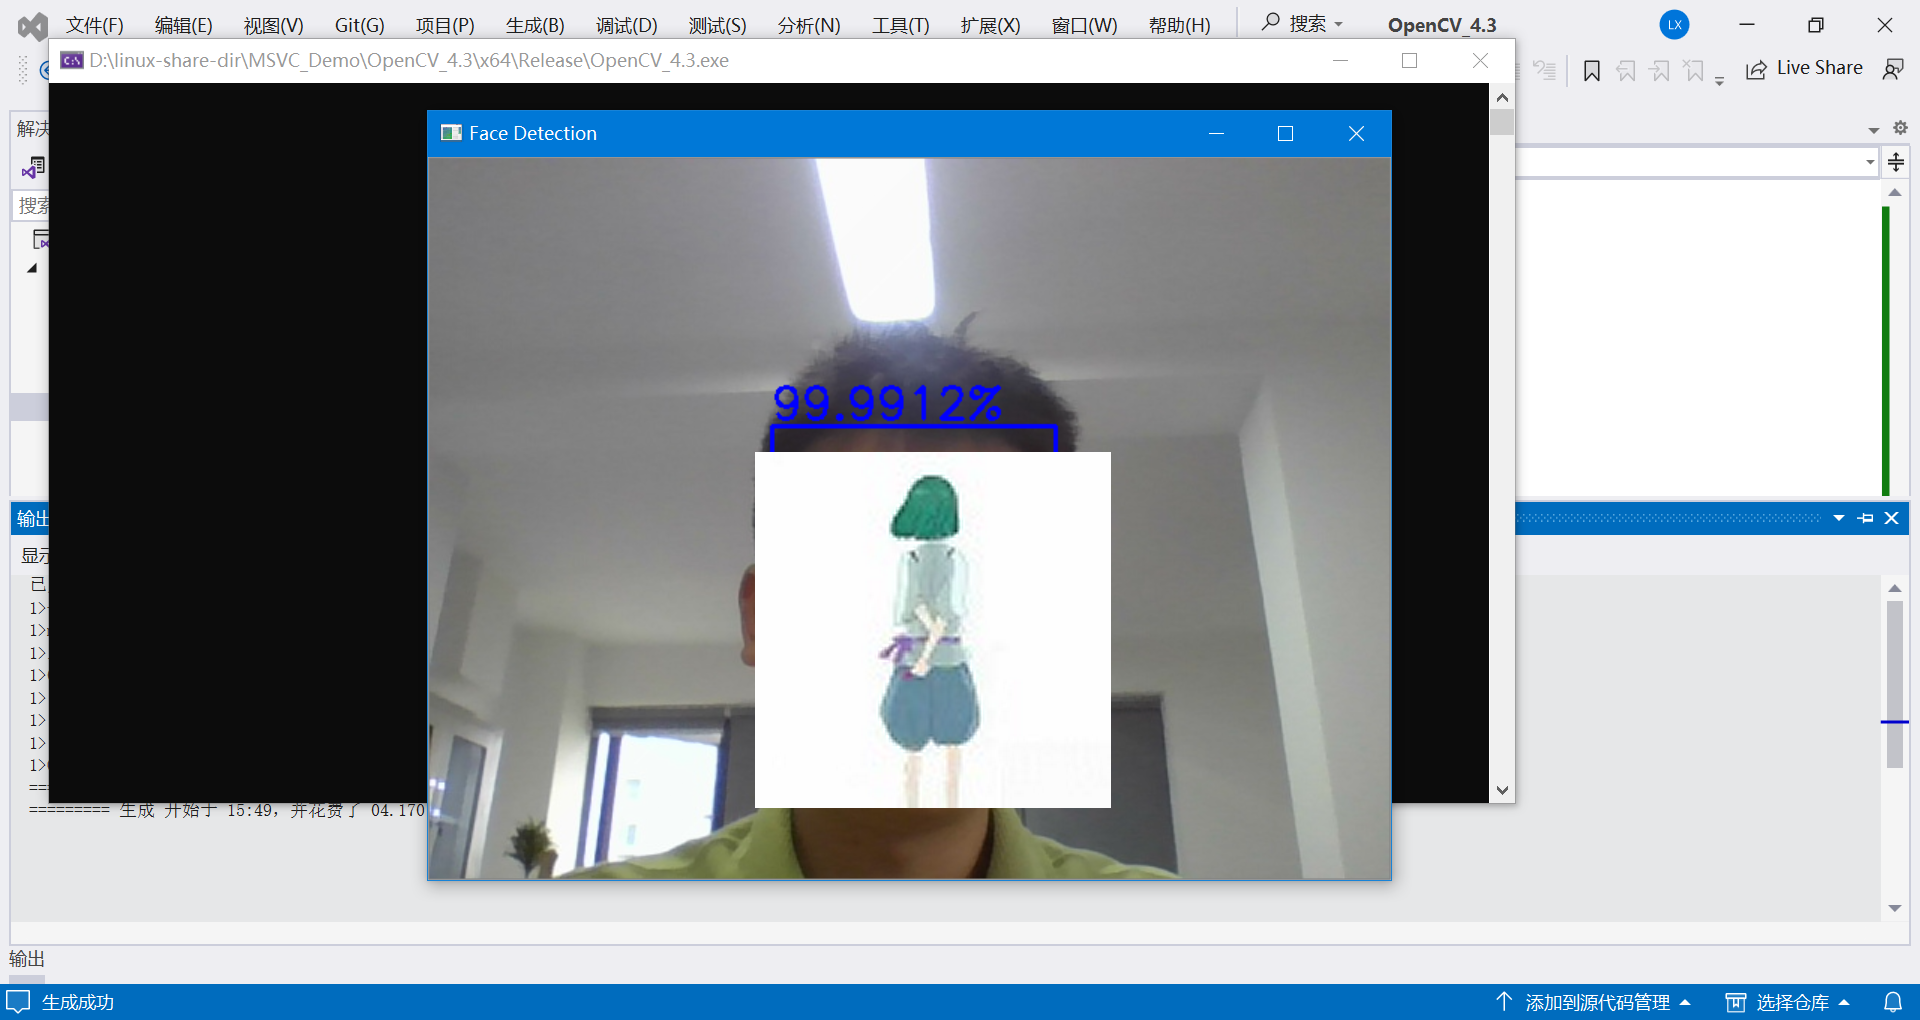
代码运行解释:
当运行这段代码时,执行操作的步骤:
(1)导入必要的OpenCV库:
#include <opencv2/opencv.hpp>
(2)指定人脸检测模型的路径和配置文件的路径:
std::string prototxt_path = "./deploy.prototxt.txt";
std::string model_path = "./res10_300x300_ssd_iter_140000_fp16.caffemodel";
(3)使用cv::dnn::readNetFromCaffe函数读取人脸检测模型:
cv::dnn::Net model = cv::dnn::readNetFromCaffe(prototxt_path, model_path);
(4)创建一个cv::VideoCapture对象来打开默认摄像头(设备号为0):
cv::VideoCapture capture(0);
(5)检查摄像头是否成功打开,如果没有成功打开则结束程序:
if (!capture.isOpened()) {
    std::cout << "Failed to open the camera." << std::endl;
    return -1;
}
(6)开始一个无限循环,用于处理实时视频流中的每一帧:
while (true) {
    // 读取视频帧
    cv::Mat frame;
    capture >> frame;
    if (frame.empty()) {
        break;
    }

    // 在帧上进行人脸检测
    // ...

    // 显示带有人脸检测结果的帧
    cv::imshow("Face Detection", frame);

    // 等待按键输入并检查是否按下了Esc键
    char c = cv::waitKey(1);
    if (c == 27) {
        break;
    }
}
在循环中,从摄像头读取一帧视频,并将其存储在名为frame的cv::Mat对象中。如果读取的帧为空,则退出循环。 使用cv::dnn::blobFromImage函数将frame图像转换为神经网络可以处理的格式。然后,将输入转换后的图像数据到人脸检测模型,并进行前向传播计算。之后,在每一帧上遍历检测到的人脸,并对于置信度高于0.5的人脸,在图像上绘制矩形框和置信度百分比。最后,使用cv::imshow函数显示带有人脸检测结果的帧。
通过cv::waitKey等待用户按键输入,并在用户按下Esc键时退出循环。对于其他按键,将继续循环处理下一帧。
当循环结束后,释放摄像头资源并关闭所有窗口:
capture.release();
cv::destroyAllWindows();
这样,代码就完成了从本地摄像头获取实时视频流并进行人脸检测的功能。
5.2 python实现(人脸检测)
下面的python代码与上面的C++代码一样,使用了OpenCV的深度学习模块(dnn)来进行人脸检测。
import cv2
import numpy as np

prototxt_path = r"./deploy.prototxt.txt"
model_path =r"./res10_300x300_ssd_iter_140000_fp16.caffemodel"
model = cv2.dnn.readNetFromCaffe(prototxt_path, model_path)
image = cv2.imread("2.jpg")
h, w = image.shape[:2]
blob = cv2.dnn.blobFromImage(image, 1.0, (300, 300),(104.0, 177.0, 123.0))
model.setInput(blob)
output = np.squeeze(model.forward())
font_scale = 1.0
for i in range(0, output.shape[0]):
    confidence = output[i, 2]
    if confidence > 0.5:
        box = output[i, 3:7] * np.array([w, h, w, h])
        start_x, start_y, end_x, end_y = box.astype(np.int)
        cv2.rectangle(image, (start_x, start_y), (end_x, end_y), color=(255, 0, 0), thickness=2)
        cv2.putText(image, f"{confidence*100:.2f}%", (start_x, start_y-5), cv2.FONT_HERSHEY_SIMPLEX, font_scale, (255, 0, 0), 2)
cv2.imshow("image", image)
cv2.waitKey(0)
cv2.imwrite("beauty_detected.jpg", image)
代码功能流程解释:
(1)导入必要的库和模型:
- 导入cv2和numpy库,用于图像处理和数组操作。
- 设置人脸检测模型的路径。
(2)读取和预处理图像:
- 使用cv2.imread函数读取图像文件。
- 获取图像的高度和宽度(h, w)。
- 使用cv2.dnn.blobFromImage函数将图像转换为一个4维blob,这是深度学习模型输入的格式。
(3)加载模型并进行前向推理:
- 使用cv2.dnn.readNetFromCaffe函数加载人脸检测模型。
- 将预处理后的图像数据作为模型的输入。
- 使用模型的forward方法进行前向推理,得到输出结果。
(4)处理模型输出:
- 将输出结果转换为numpy数组,并使用np.squeeze函数去除维度为1的维度。
- 遍历输出结果的每个检测框。
- 对于置信度大于0.5的检测框:
- 计算检测框在原始图像中的坐标。
- 使用cv2.rectangle函数绘制人脸框。
- 使用cv2.putText函数在人脸框上方显示置信度百分比。
(5)显示和保存结果:
- 使用cv2.imshow函数显示处理后的图像。
- 使用cv2.waitKey函数等待键盘输入。
- 如果按下任意键,则使用cv2.imwrite函数保存结果图像。
5.3 目标检测示例代码(摄像头实时画面检测)
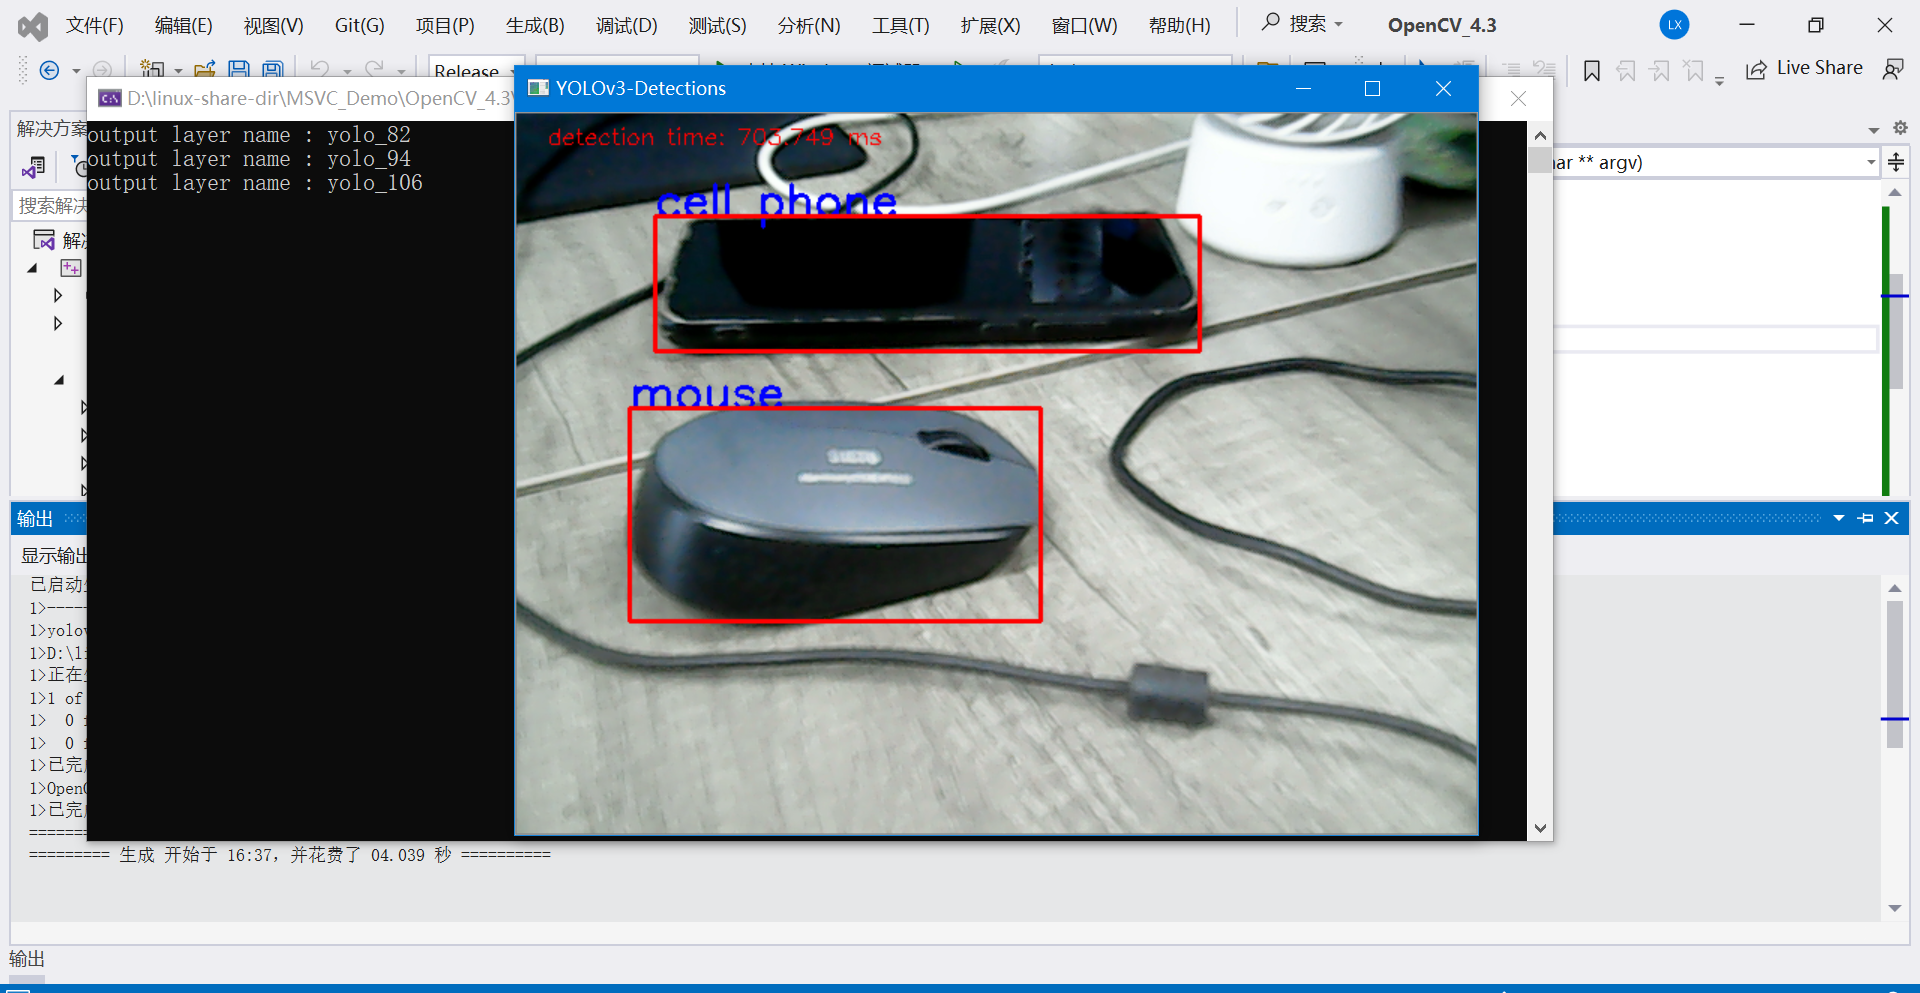
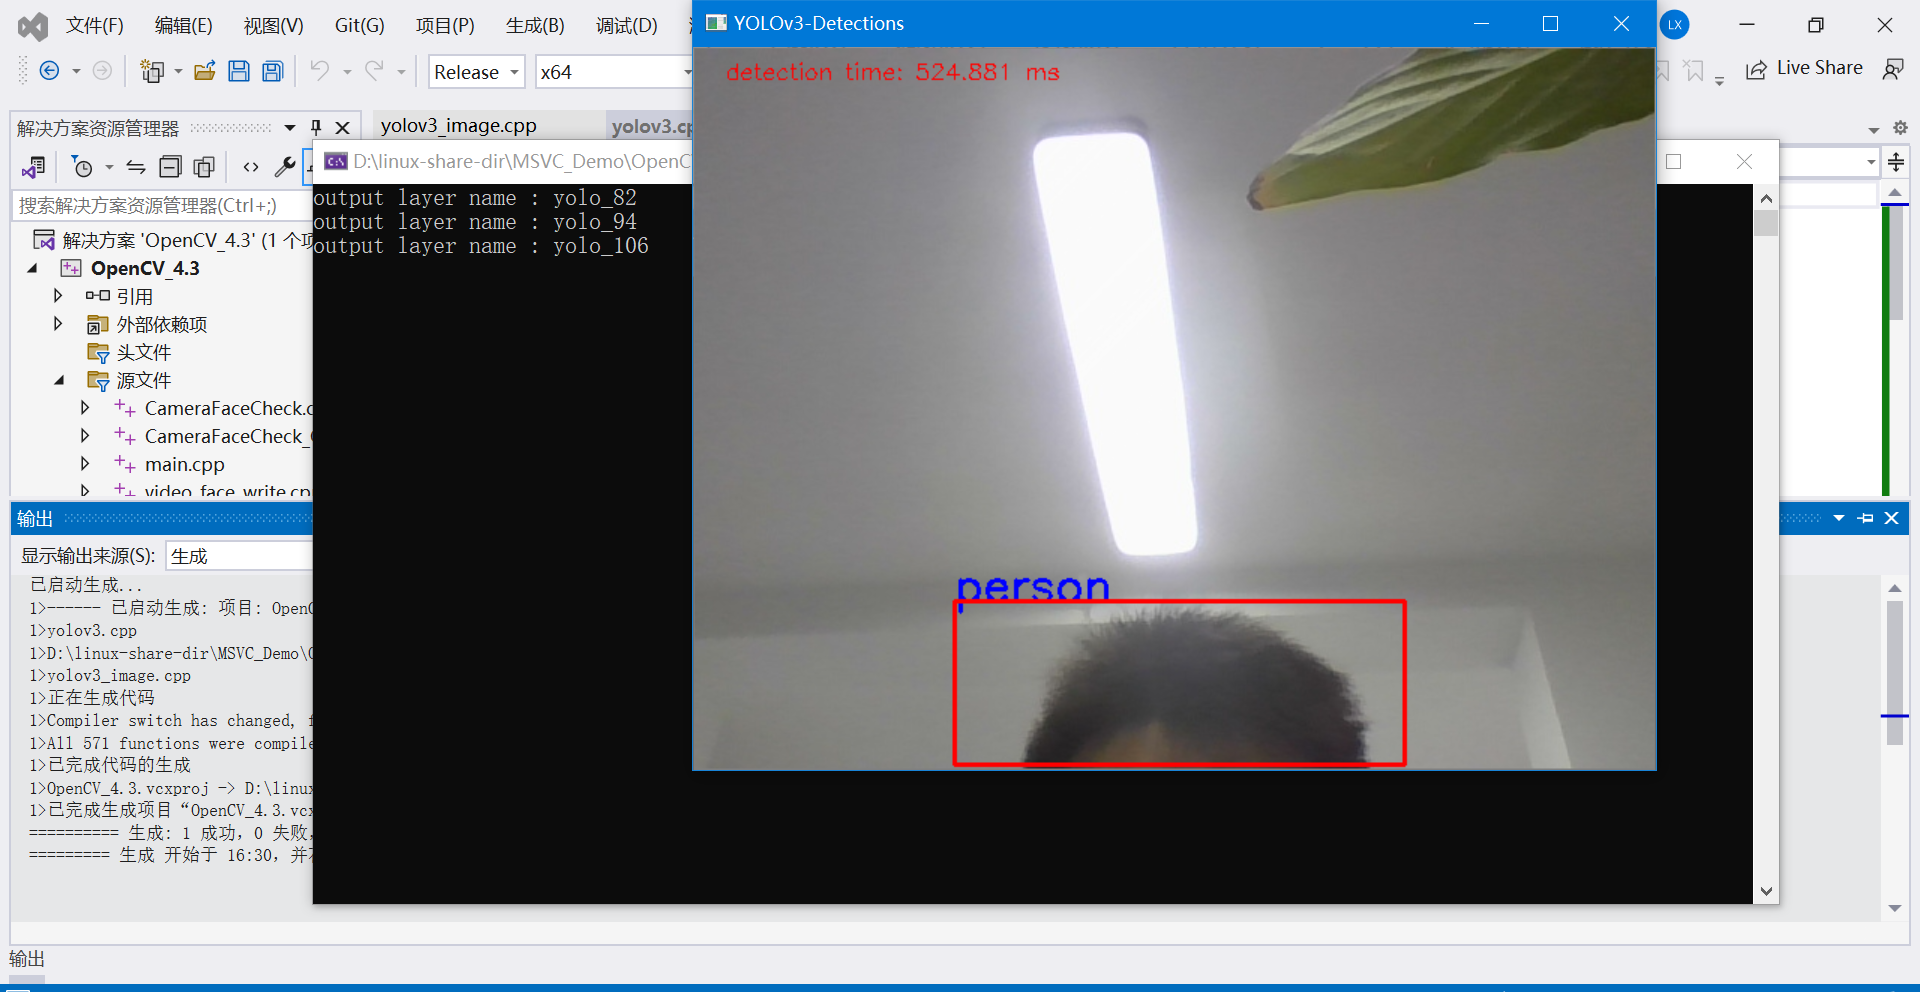
下面这份代码采用OpenCV打开摄像头,实时读取摄像头画面,调用YOLOV3模型,完成目标检测。
模型采用的是官方训练的模型,可以检测80种目标物体。
完整的代码如下:
#include <opencv2/opencv.hpp>
#include <opencv2/dnn.hpp>

#include <fstream>
#include <iostream>
#include <algorithm>
#include <cstdlib>

using namespace std;
using namespace cv;
using namespace cv::dnn;

String yolo_cfg = "D:/linux-share-dir/yolov3/yolov3.cfg";
String yolo_model = "D:/linux-share-dir/yolov3/yolov3.weights";

void image_detection(VideoCapture& cap);

int main(int argc, char** argv)
{
	VideoCapture cap(0); // 打开默认摄像头
	if (!cap.isOpened())
	{
		cout << "无法打开摄像头" << endl;
		return -1;
	}

	image_detection(cap);

	return 0;
}


void image_detection(VideoCapture& cap) {
	// 加载网络模型
	Net net = readNetFromDarknet(yolo_cfg, yolo_model);
	net.setPreferableTarget(DNN_TARGET_CPU);

	std::vector<String> outNames = net.getUnconnectedOutLayersNames();
	for (int i = 0; i < outNames.size(); i++) {
		printf("output layer name : %s\n", outNames[i].c_str());
	}

	vector<string> classNamesVec;
	ifstream classNamesFile("D:/linux-share-dir/yolov3/coco.names");
	if (classNamesFile.is_open())
	{
		string className = "";
		while (std::getline(classNamesFile, className))
			classNamesVec.push_back(className);
	}

	while (true)
	{
		Mat frame;
		cap >> frame; // 读取摄像头数据

		Mat inputBlob = blobFromImage(frame, 1 / 255.F, Size(416, 416), Scalar(), true, false);
		net.setInput(inputBlob);

		// 进行检测
		std::vector<Mat> outs;
		net.forward(outs, outNames);
		vector<double> layersTimings;
		double freq = getTickFrequency() / 1000;
		double time = net.getPerfProfile(layersTimings) / freq;
		ostringstream ss;
		ss << "detection time: " << time << " ms";
		putText(frame, ss.str(), Point(20, 20), 0, 0.5, Scalar(0, 0, 255));
		vector<Rect> boxes;
		vector<int> classIds;
		vector<float> confidences;
		for (size_t i = 0; i < outs.size(); ++i)
		{
			// Network produces output blob with a shape NxC where N is a number of
			// detected objects and C is a number of classes + 4 where the first 4
			// numbers are [center_x, center_y, width, height]
			float* data = (float*)outs[i].data;
			for (int j = 0; j < outs[i].rows; ++j, data += outs[i].cols)
			{
				Mat scores = outs[i].row(j).colRange(5, outs[i].cols);
				Point classIdPoint;
				double confidence;
				minMaxLoc(scores, 0, &confidence, 0, &classIdPoint);
				if (confidence > 0.5)
				{
					int centerX = (int)(data[0] * frame.cols);
					int centerY = (int)(data[1] * frame.rows);
					int width = (int)(data[2] * frame.cols);
					int height = (int)(data[3] * frame.rows);
					int left = centerX - width / 2;
					int top = centerY - height / 2;

					classIds.push_back(classIdPoint.x);
					confidences.push_back((float)confidence);
					boxes.push_back(Rect(left, top, width, height));
				}
			}
		}

		vector<int> indices;
		NMSBoxes(boxes, confidences, 0.5, 0.2, indices);
		for (size_t i = 0; i < indices.size(); ++i)
		{
			int idx = indices[i];
			Rect box = boxes[idx];
			String className = classNamesVec[classIds[idx]];
			putText(frame, className.c_str(), box.tl(), FONT_HERSHEY_SIMPLEX, 1.0, Scalar(255, 0, 0), 2, 8);
			rectangle(frame, box, Scalar(0, 0, 255), 2, 8, 0);
		}

		imshow("YOLOv3-Detections", frame);

		char c = waitKey(1);
		if (c == 27) // 按下Esc键退出程序
			break;
	}

	return;
}
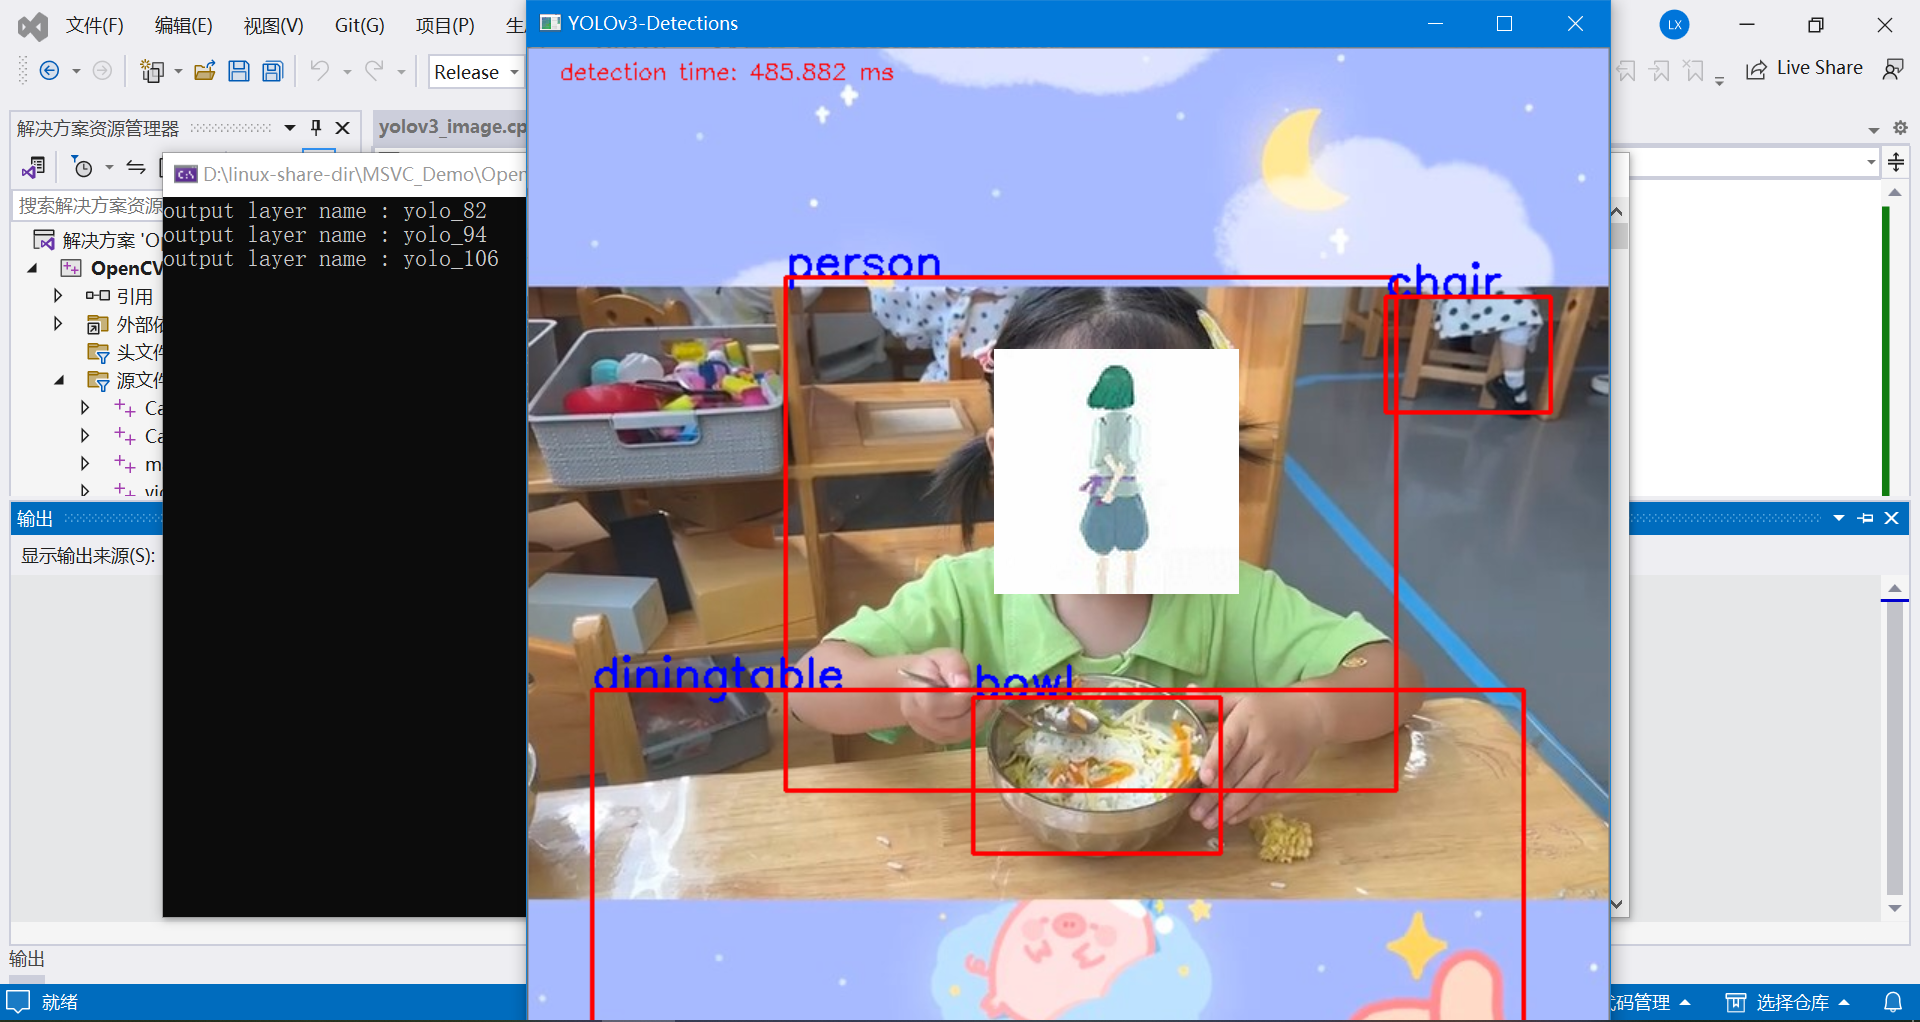
示例1:
5.4 目标检测示例代码(加载图片检测)
下面这份代码采用OpenCV加载本地磁盘的一张图片,调用YOLOV3模型,完成目标检测。
模型采用的是官方训练的模型,可以检测80种目标物体。
完整的代码如下:
#include <opencv2/opencv.hpp>
#include <opencv2/dnn.hpp>

#include <fstream>
#include <iostream>
#include <algorithm>
#include <cstdlib>

using namespace std;
using namespace cv;
using namespace cv::dnn;
void image_detection();


String yolo_cfg = "D:/linux-share-dir/yolov3/yolov3.cfg";
String yolo_model = "D:/linux-share-dir/yolov3/yolov3.weights";

int main(int argc, char** argv)
{
	image_detection();
}

void image_detection() {
	//加载网络模型
	Net net = readNetFromDarknet(yolo_cfg, yolo_model);

	//net.setPreferableBackend(DNN_BACKEND_INFERENCE_ENGINE);
	net.setPreferableTarget(DNN_TARGET_CPU);
	std::vector<String> outNames = net.getUnconnectedOutLayersNames();
	for (int i = 0; i < outNames.size(); i++) {
		printf("output layer name : %s\n", outNames[i].c_str());
	}

	vector<string> classNamesVec;
	ifstream classNamesFile("D:/linux-share-dir/yolov3/coco.names");
	if (classNamesFile.is_open())
	{
		string className = "";
		while (std::getline(classNamesFile, className))
			classNamesVec.push_back(className);
	}

	// 加载图像
	Mat frame = imread("D:/1.png");
	Mat inputBlob = blobFromImage(frame, 1 / 255.F, Size(416, 416), Scalar(), true, false);
	net.setInput(inputBlob);

	// 检测
	std::vector<Mat> outs;
	net.forward(outs, outNames);
	vector<double> layersTimings;
	double freq = getTickFrequency() / 1000;
	double time = net.getPerfProfile(layersTimings) / freq;
	ostringstream ss;
	ss << "detection time: " << time << " ms";
	putText(frame, ss.str(), Point(20, 20), 0, 0.5, Scalar(0, 0, 255));
	vector<Rect> boxes;
	vector<int> classIds;
	vector<float> confidences;
	for (size_t i = 0; i < outs.size(); ++i)
	{
		// Network produces output blob with a shape NxC where N is a number of
		// detected objects and C is a number of classes + 4 where the first 4
		// numbers are [center_x, center_y, width, height]
		float* data = (float*)outs[i].data;
		for (int j = 0; j < outs[i].rows; ++j, data += outs[i].cols)
		{
			Mat scores = outs[i].row(j).colRange(5, outs[i].cols);
			Point classIdPoint;
			double confidence;
			minMaxLoc(scores, 0, &confidence, 0, &classIdPoint);
			if (confidence > 0.5)
			{
				int centerX = (int)(data[0] * frame.cols);
				int centerY = (int)(data[1] * frame.rows);
				int width = (int)(data[2] * frame.cols);
				int height = (int)(data[3] * frame.rows);
				int left = centerX - width / 2;
				int top = centerY - height / 2;

				classIds.push_back(classIdPoint.x);
				confidences.push_back((float)confidence);
				boxes.push_back(Rect(left, top, width, height));
			}
		}
	}

	vector<int> indices;
	NMSBoxes(boxes, confidences, 0.5, 0.2, indices);
	for (size_t i = 0; i < indices.size(); ++i)
	{
		int idx = indices[i];
		Rect box = boxes[idx];
		String className = classNamesVec[classIds[idx]];
		putText(frame, className.c_str(), box.tl(), FONT_HERSHEY_SIMPLEX, 1.0, Scalar(255, 0, 0), 2, 8);
		rectangle(frame, box, Scalar(0, 0, 255), 2, 8, 0);
	}

	imshow("YOLOv3-Detections", frame);
	waitKey(0);
	return;
}
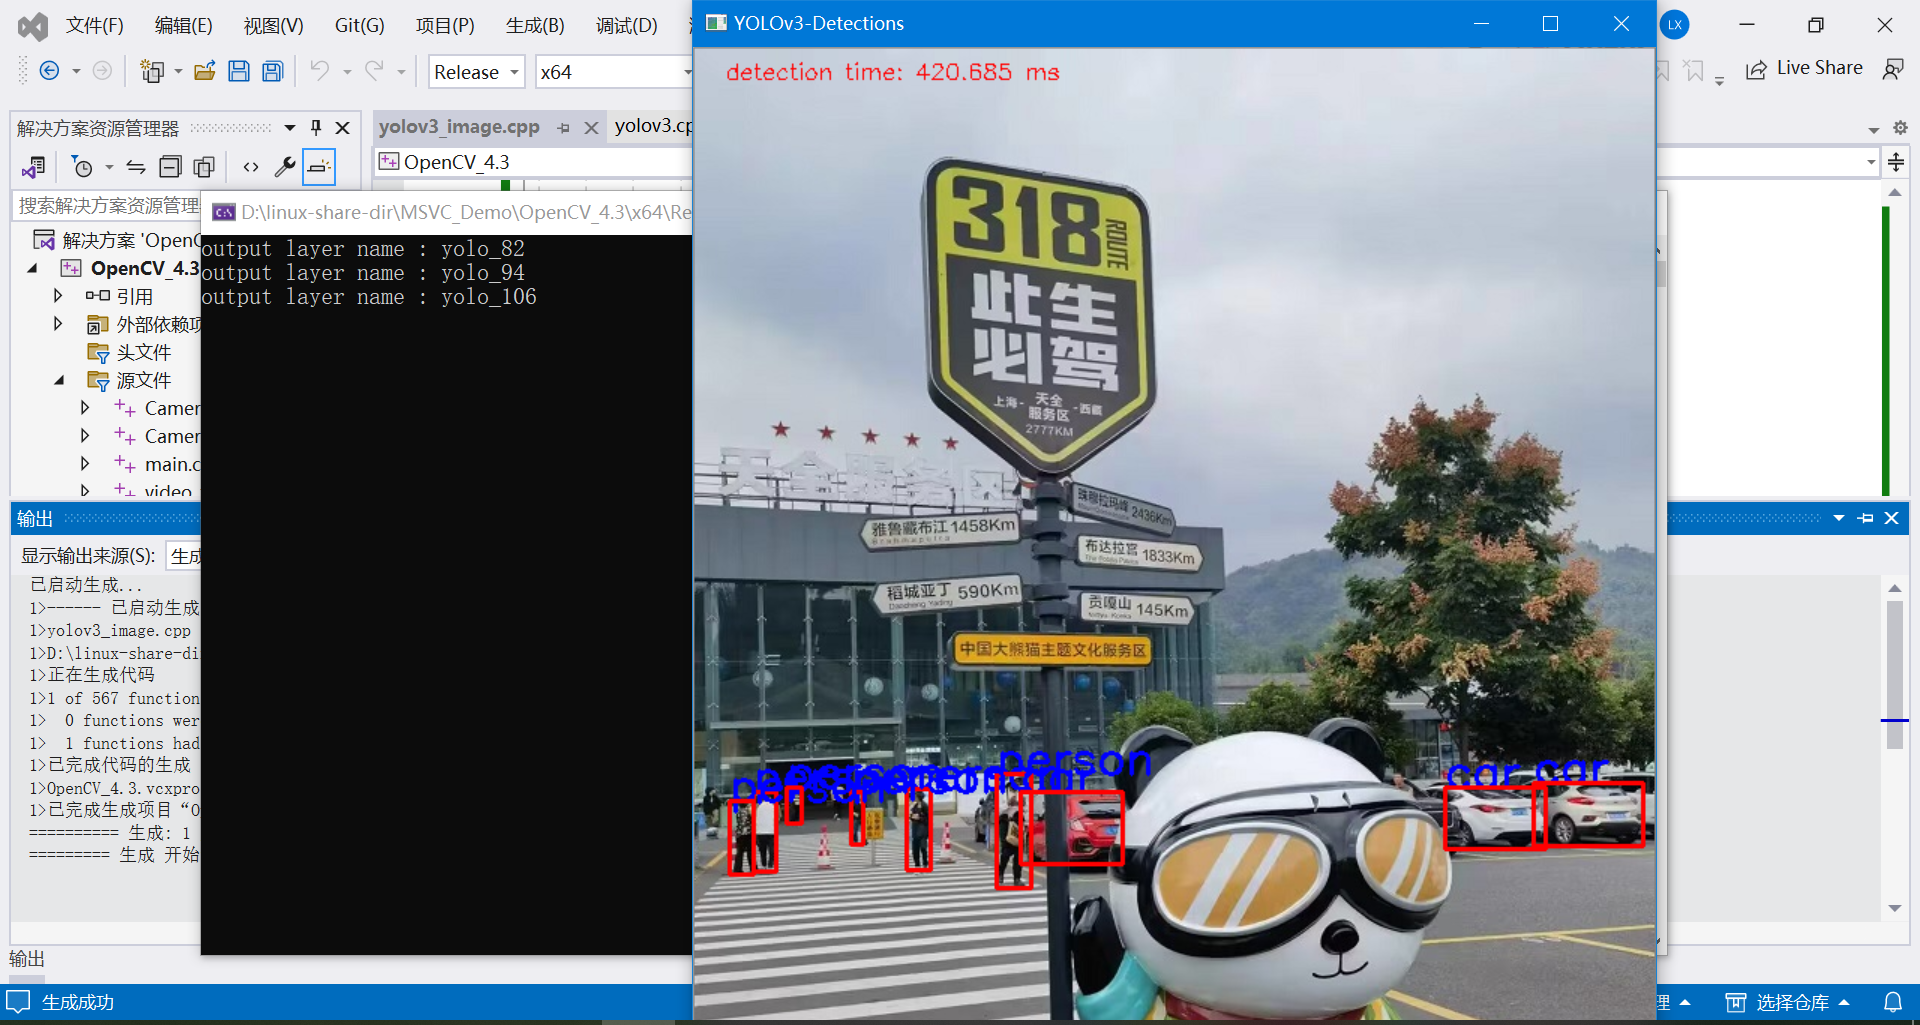
测试图片1:
测试图片2:
