之前我介绍了如何使用OpenAI最新的LLM GPT-4o,通过函数调用将实时数据引入到LLM。在这篇后续文章中我将介绍使用Hermes 2 Pro -Llama- 3 8B进行函数调用,这是一种由Nous Research开发的功能强大的LLM,基于Meta的Llama 3架构,有80亿个参数。它是开放模型,我们将在Hugging Face的文本生成推理上运行它。
我们将把Fightaware.com的API 与该LLM集成起来,以便实时跟踪航班状态。
FlightAware的AeroAPI是开发人员获取全面航班信息的一种完美工具。它支持实时航班跟踪、历史和未来航班数据以及按各种标准进行航班搜索。该API以用户友好的JSON格式呈现数据,因而高度可用、易于集成。我们将调用REST API,根据用户发送给LLM的提示获取航班的实时状态。
Hermes 2 Pro简介
Hermes 2 Pro -Llama- 3 8B擅长自然语言处理任务、创意写作和编程协助等。它的一项突出功能是出色的函数调用功能,便于执行外部函数,并检索与股票价格、公司基本面、财务报表等相关的信息。
该模型利用特殊的系统提示和多轮函数调用结构以及新的ChatML角色,使得函数调用可靠且易于解析。据基准测试显示,Hermes 2 Pro-Llama-3在与Fireworks AI合作构建的函数调用评估中获得了出色的90%。
本地部署Hermes 2 Pro
就这个环境而言,我使用一台基于英伟达GeForce RTX 4090 GPU的Linux服务器,搭载24GB的VRAM。它运行Docker和英伟达容器工具包,使容器能够访问GPU。
我们将使用来自Hugging Face的文本生成推理服务器来运行Hermes 2 Pro。
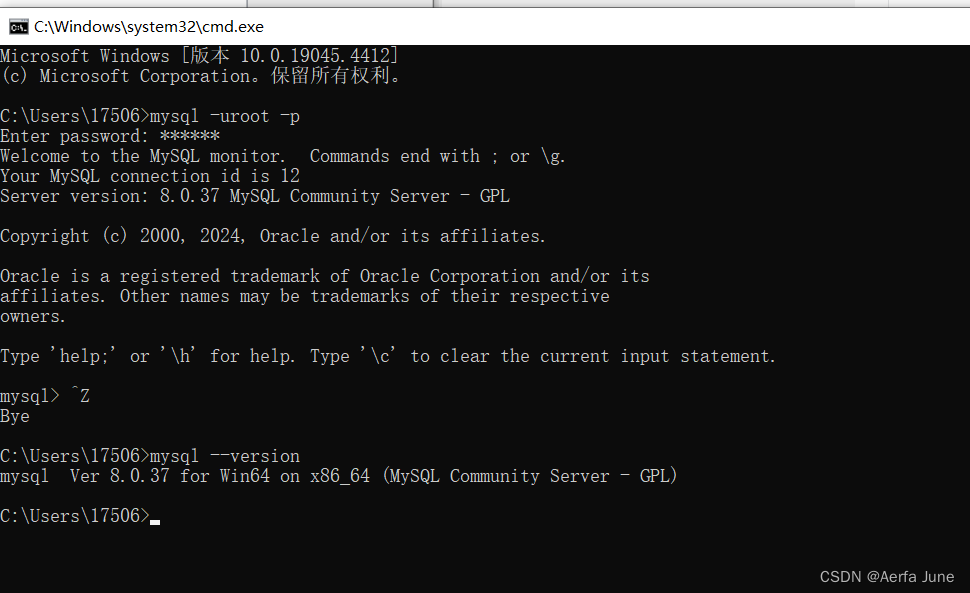
下面的命令在端口8080上启动推理引擎,通过REST端点为LLM提供服务。
export token="YOUR_HF_TOKEN"

export model="NousResearch/Hermes-2-Pro-Llama-3-8B"

export volume="/home/ubuntu/data"

docker run --name hermes -d --gpus all -e HUGGING_FACE_HUB_TOKEN=$token --shm-size 1g -p 8080:80 -v $volume:/data ghcr.io/huggingface/text-generation-inference:2.0.3 --model-id $model --max-total-tokens 8096


To test the endpoint, run the following command:

	curl 127.0.0.1:8081  \
  -X POST \
   -H 'Content-Type: application/json' \
 -d '{"inputs":"What is Deep Learning?"}'
如果一切正常,您应该看到Hermes 2 Pro的响应。
跟踪航班状态的函数
在继续下一步之前,注册FlightAware并获取API密钥,使用REST API需要API密钥。免费的个人版本足以完成本教程。
获得API密钥后,用Python创建以下函数,以检索任何航班的状态。
	import ast
	import json
import random
	from datetime import datetime, timedelta
	import requests
	import pytz


	def get_flight_status(flight):
	    """Returns Flight Information"""


	    AEROAPI_BASE_URL = "https://aeroapi.flightaware.com/aeroapi"
	    AEROAPI_KEY="YOUR FLIGHTAWARE API KEY"

	    def get_api_session():
	        session = requests.Session()
	        session.headers.update({"x-apikey": AEROAPI_KEY})
	        return session


def fetch_flight_data(flight_id, session):
	        if "flight_id=" in flight_id:
	            flight_id = flight_id.split("flight_id=")[1]


 start_date = datetime.now().date().strftime('%Y-%m-%d')
	        end_date = (datetime.now().date() + timedelta(days=1)).strftime('%Y-%m-%d')
	        api_resource = f"/flights/{flight_id}?start={start_date}&end={end_date}"
	        response = session.get(f"{AEROAPI_BASE_URL}{api_resource}")
	        response.raise_for_status()
	        return response.json()['flights'][0]

	    def utc_to_local(utc_date_str, local_timezone_str):
	        utc_datetime = datetime.strptime(utc_date_str, '%Y-%m-%dT%H:%M:%SZ').replace(tzinfo=pytz.utc)
	        local_timezone = pytz.timezone(local_timezone_str)
	        local_datetime = utc_datetime.astimezone(local_timezone)
	        return local_datetime.strftime('%Y-%m-%d %H:%M:%S')

	    session = get_api_session()
	    flight_data = fetch_flight_data(flight, session)

	    dep_key = 'estimated_out' if 'estimated_out' in flight_data and flight_data['estimated_out'] else \
	          'actual_out' if 'actual_out' in flight_data and flight_data['actual_out'] else \
	          'scheduled_out'

	    arr_key = 'estimated_in' if 'estimated_in' in flight_data and flight_data['estimated_in'] else \
	          'actual_in' if 'actual_in' in flight_data and flight_data['actual_in'] else \
	          'scheduled_in'

	    flight_details = {
	        'flight':flight,
	        'source': flight_data['origin']['city'],
	        'destination': flight_data['destination']['city'],
	        'depart_time': utc_to_local(flight_data[dep_key], flight_data['origin']['timezone']),
	        'arrival_time': utc_to_local(flight_data[arr_key], flight_data['destination']['timezone']),
	        'status': flight_data['status']
	    }
	return json.dumps(flight_details)


	flight_info = get_flight_status("EK524")
	print(flight_info)
	#'{"flight": "EK524", "source": "Dubai", "destination": "Hyderabad", "depart_time": "2024-05-23 22:00:00", "arrival_time": "2024-05-24 03:05:00", "status": "Scheduled"}'
虽然代码简单直观,还是让我解释关键步骤。
get_flight_status函数接受航班参数(假设是航班标识符),并以JSON格式返回格式化的航班详细信息。它查询AeroAPI以根据特定的航班标识符获取航班数据,并格式化关键细节,比如源地、目的地、驶离时间、到达时间和状态。
不妨看看脚本的组件:
API凭据:
AEROAPI_BASE_URL是FlightAware AeroAPI的基础URL。
AEROAPI_KEY是用于身份验证的API密钥。
会话管理:
get_api_session:这个嵌套函数初始化请求。这将使用API密钥设置所需的报头,并返回会话对象。该会话将处理所有API请求。
数据获取:
fetch_flight_data:这个函数接受flight_id和session作为参数。它用适当的日期过滤器构造端点URL,用于获取一天的数据,并发送GET请求以检索航班数据。该函数处理API响应,并提取相关的航班信息。
时间转换:
utc_to_local:根据提供的时区字符串将UTC时间(来自API响应)转换为本地时间。该函数帮助我们获得基于城市的到达和驶离时间。
数据处理:
脚本根据可用的估计时间或实际时间确定驶离和到达时间的键,并返回到计划时间。然后,它构造一个含有格式化航班详细信息的字典。
![]()
上述截图显示了我们从FlightAware API收到的从迪拜飞往海得拉巴的阿联酋航空EK524的响应。请注意,到达和驶离时间基于城市的当地时间。
我们旨在将该函数与Gemini 1.0 Pro集成,使其能够实时访问航班跟踪信息。
将函数与Hermes 2 Pro集成
先使用以下命令安装最新版本的Hugging Face Python SDK:
pip install --upgrade huggingface_hub导入模块,并通过将客户端指向TGI端点来初始化客户端。
from huggingface_hub import InferenceClient

client = InferenceClient("http://127.0.0.1:8080")
接下来,定义函数模式,采用的格式与OpenAPI函数调用的格式一样。
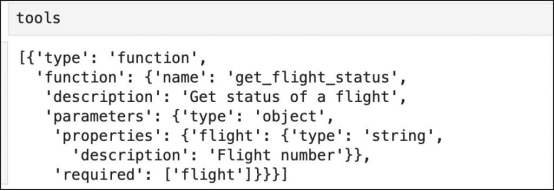
tools = [
    {
        "type": "function",
        "function": {
            "name": "get_flight_status",
            "description": "Get status of a flight",
            "parameters": {
                "type": "object",
                "properties": {
                    "flight": {
                        "type": "string",
                        "description": "Flight number"
                    }
                },
                "required": ["flight"]
            }
        }
    }
]
这将使用LLM用作工具的一个或多个函数填充列表。
现在,我们将创建接受提示并确定是否需要调用函数的聊天机器人。如果需要调用,则LLM先返回函数名和需要调用的参数。函数的输出作为第二次调用的一部分发送给LLM。最终的响应将根据函数的输出得到与事实相符的正确答案。
def chatbot(prompt):
messages = [
{
"role": "system",
"content": "You're a helpful assistant! Answer the users question best you can based on the tools provided. Be concise in your responses.",
},
{
"role": "user",
"content": prompt
},
]
response = client.chat_completion(messages=messages, tools=tools)
tool_calls = response.choices[0].message.tool_calls
if tool_calls:
available_functions = {
"get_flight_status": get_flight_status,
}
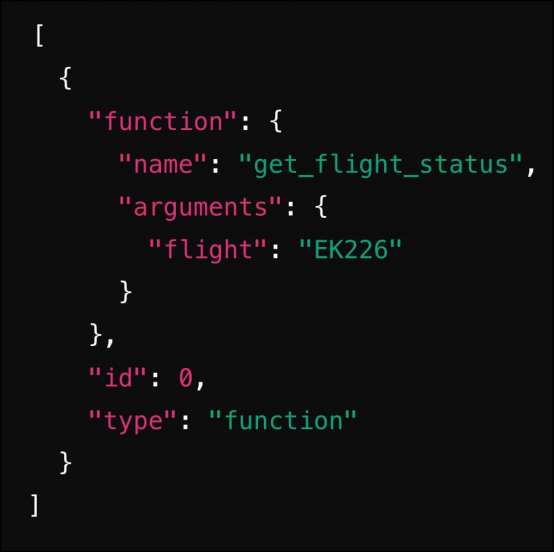
for tool_call in tool_calls:
function_name = tool_call.function.name
function_to_call = available_functions[function_name]
function_args = tool_call.function.arguments
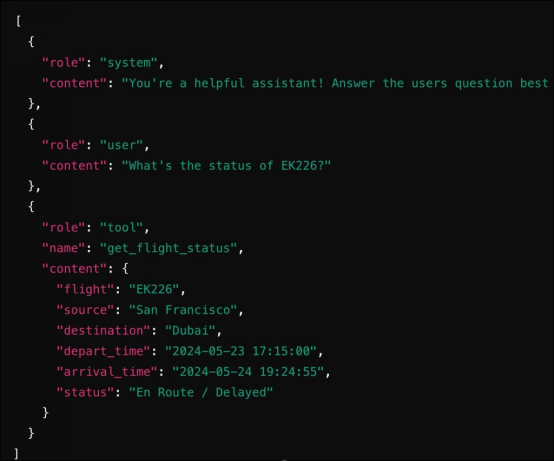
function_response = function_to_call(flight=function_args.get("flight"))
messages.append(
{
"role": "tool",
"name": function_name,
"content": function_response
}
)
final_response = client.chat_completion(messages=messages)
return final_response
return response目标LLM期望的提示的自动格式化是使用Hugging Face Python库的一个好处。比如说,使用函数时,Hermes 2 Pro的提示需要按照特定的格式进行结构化:
<|im_start|>system
You are a function calling AI model. You are provided with function signatures within XML tags. You may call one or more functions to assist with the user query. Don't make assumptions about what values to plug into functions. Here are the available tools: [{'type': 'function', 'function': {'name': 'get_stock_fundamentals', 'description': 'Get fundamental data for a given stock symbol using yfinance API.', 'parameters': {'type': 'object', 'properties': {'symbol': {'type': 'string'}}, 'required': ['symbol']}}}] Use the following pydantic model json schema for each tool call you will make: {'title': 'FunctionCall', 'type': 'object', 'properties': {'arguments': {'title': 'Arguments', 'type': 'object'}, 'name': {'title': 'Name', 'type': 'string'}}, 'required':

['arguments', 'name']} For each function call return a json object with function name and arguments within XML tags as follows:

{'arguments': , 'name': }
<|im_end|>
同样,函数的输出可以以以下格式发送到LLM:
<|im_start|>tool

{"name": "get_stock_fundamentals", "content": {'symbol': 'TSLA', 'company_name': 'Tesla, Inc.', 'sector': 'Consumer Cyclical', 'industry': 'Auto Manufacturers', 'market_cap': 611384164352, 'pe_ratio': 49.604652, 'pb_ratio': 9.762013, 'dividend_yield': None, 'eps': 4.3, 'beta': 2.427, '52_week_high': 299.29, '52_week_low': 152.37}}

<|im_end|>
确保提示遵循该模板需要仔细格式化。InferenceClient类可高效地处理这种转换,使开发人员能够在提示中使用系统、用户、工具和助手角色的熟悉的OpenAI格式。
在首次调用聊天完成API时,LLM给出以下答案作为响应:
随后,在调用函数之后,我们将结果嵌入到消息中并将其发回给LLM。
正如您所见,集成函数调用的工作流程与OpenAI非常相似。
现在是时候调用聊天机器人并通过提示来测试它了。
res=chatbot("What's the status of EK226?")
print(res.choices[0].message.content)
聊天机器人的完整代码如下所示。
from huggingface_hub import InferenceClient

client = InferenceClient("http://127.0.0.1:8080")


tools = [
    {
        "type": "function",
        "function": {
            "name": "get_flight_status",
            "description": "Get status of a flight",
            "parameters": {
                "type": "object",
                "properties": {
                    "flight": {
                        "type": "string",
                        "description": "Flight number"
                    }
                },
                "required": ["flight"]
            }
        }
    }
]


def chatbot(prompt):
    messages = [
        {
            "role": "system",
            "content": "You're a helpful assistant! Answer the users question best you can based on the tools provided. Be concise in your responses.",
        },
        {
            "role": "user",
            "content": prompt
        },
]


    response = client.chat_completion(messages=messages, tools=tools)
    tool_calls = response.choices[0].message.tool_calls

    if tool_calls:
        available_functions = {
            "get_flight_status": get_flight_status,
        }

        for tool_call in tool_calls:
            function_name = tool_call.function.name
            function_to_call = available_functions[function_name]
            function_args = tool_call.function.arguments

            function_response = function_to_call(flight=function_args.get("flight"))

            messages.append(
                {
                    "role": "tool",
                    "name": function_name,
                    "content": function_response
                }
            )

        final_response = client.chat_completion(messages=messages)
        return final_response

    return response


res=chatbot("What's the status of EK226?")

print(res.choices[0].message.content)