目录
盒子 模型(box-model)
盒子 模型-内容区
代码
运行
盒子 模型-内边距
代码
运行
盒子 模型-边框
代码
运行
盒子 模型-外边距
代码
运行
清除浏览器的默认样式
代码
运行
盒子模型练习
代码
运行
编辑
文档流
浮动
代码
运行
清除浮动
代码
运行
CSS 定位(Position)
相对定位(relative)
特点:
代码
运行
绝对定位(absolute)
特点 :
代码
运行
盒子 模型(box-model)
● CSS处理网页时,它认为每个标签都包含在一 个不可见的盒子里。
● 如果把所有的标签都想象成盒子,那么我们对网页的布局就相 当于是摆 放盒子。
● 我们只需要将相应的盒子摆放到网页中相应的 位置即可完成网页的布局。
内容区:放置标签内容的区域
width和height它只是设置标签内容区的大小
内边距:内容区到边框以内发区域
边框:标签的最外边
标签大小=内容区大小+内边距大小+边框大小
盒子 模型-内容区
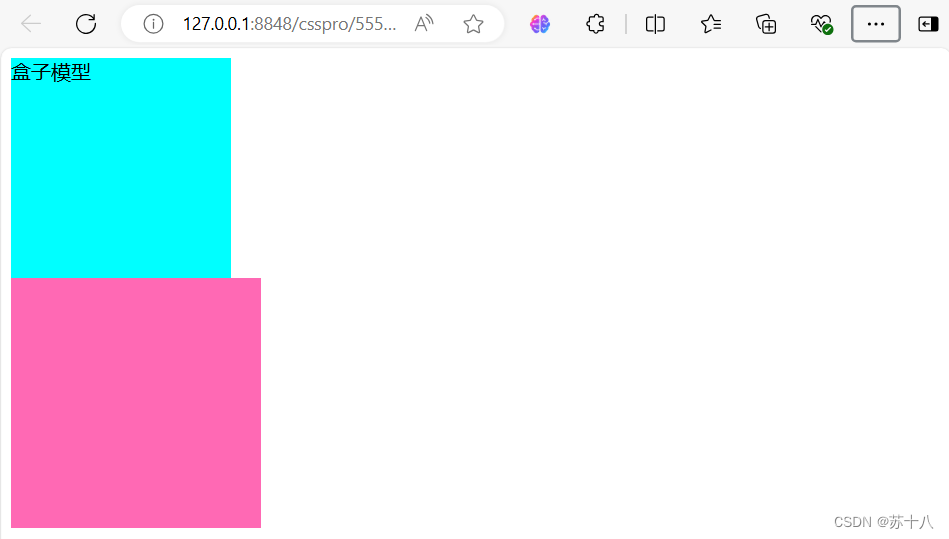
● 内容区指的是盒子中放置内容的区域,也就是标签中的文本内容,子标 签都是存在于内容区中的。
● 通过width和height两个属性可以设置内容区的大小而不是整个盒子的大 小。
● 如果没有为标签设置内边距和边框,则内容区大小 默认和盒子大小是一 致的。
● width和height属性适用于块标签。
代码
<!DOCTYPE html>
<html>
	<head>
		<meta charset="utf-8">
		<title></title>
		<style>
			.box1{
				background-color: aqua;
				width: 176px;
				height: 176px;
			}

			.box2{
				width: 200px;
				height: 200px;
				background-color: hotpink;
		</style>
	</head>
	<body>

		<div class="box1">
			盒子模型
		</div>

		<div class="box2"></div>
	</body>
</html>
运行
盒子 模型-内边距
● 内边距指的就是标签内容区与边框以内的空间。
● 内边距会影响整个盒子的大小。 使用padding属性来设置标签的内边距。
padding:10px 20px 30px 40p
上、右、下、左四个方向的内边距
代码
<!DOCTYPE html>
<html>
	<head>
		<meta charset="utf-8">
		<title></title>
		<style>
			.box1{
				background-color: aqua;
				width: 176px;
				height: 176px;

				padding: 10px;/* 四个方向内边距相同 */
				/* padding-top: 10px;
				padding-left: 15px; */

				/* padding: 5px 10px 15px 20px;上 右 下 左 顺时针 */
				/* padding: 10px 20px;上下 左右 */
			}
		</style>
	</head>
	<body>

		<div class="box1">
			盒子模型
		</div>
	</body>
</html>
运行
padding: 10px;

padding-top: 10px;
padding-left: 15px;

padding: 5px 10px 15px 20px;

padding: 10px 20px;

盒子 模型-边框
● 可以在标签周围创建边框,边框是标签可见框的最外部
可以使用border属性来设置盒子的边框:
可以使用border-top/left/right/bottom分别指定上右下左 四个方向的 边框。
● 边框可以设置样式:
dotted (点线)
dashed (虚线)
solid (实线)
double (双线)
groove (槽线)
border-radius设置四个角为圆角边框
border-top-left-radius设置左上为圆角边框
代码
<!DOCTYPE html>
<html>
	<head>
		<meta charset="utf-8">
		<title></title>
		<style>
			.box1{
				background-color: aqua;
				width: 176px;
				height: 176px;

				border-top-width: 1px;
				border-top-color: rebeccapurple;
                border-top-style: solid;

                /* border-top: 2px rebeccapurple solid;*/
				/* border: 2px rosybrown solid; */
				/* border-radius: 10px;	 */

				border-top-left-radius: 10px;
				border-top-right-radius: 10px;
			}
		</style>
	</head>
	<body>

		<div class="box1">
			盒子模型
		</div>
	</body>
</html>
运行
border-top-width: 1px;
border-top-color: rebeccapurple;
border-top-style: solid;
border-top-left-radius: 10px;
border-top-right-radius: 10px;

border-top: 2px rebeccapurple solid;
border-radius: 10px;

border: 2px rosybrown solid;

盒子 模型-外边距
● 外边距是标签边框与周围标签相距的空间。 使用margin属性可以设置 外边距。用法和padding类似,同样也提供了四个方向的 。
margin-top/right/bottom/left。
margin的值可以为负值。
margin的值还可以auto,设置外边距为最大值,当将左右外边距设置为 auto时,浏览器会将左右外边距设置为相等.
垂直设置为auto时值为0,所以水平居中也可以简写为margin:0 auto。
● 外边距不会影响盒子的整体大小,但是会影响盒子的位置,会影响盒子 的实际控制范围。
● 外边距不影响标签的大小.只是影响标签的位置 ,外边距是一个标签到另一个标签的距离
代码
<!DOCTYPE html>
<html>
	<head>
		<meta charset="utf-8">
		<title></title>
		<style>
			.box2{
				width: 200px;
				height: 200px;
				background-color: hotpink;
				margin-top: 10px;
				margin-bottom: 10px;
				/* margin-left: 100px; */
				/* margin-left: auto;
				margin-right: auto; */

				margin:10px auto;
			}
		</style>
	</head>
	<body>
		<div class="box2"></div>
	</body>
</html>
运行
margin-top: 10px;
margin-bottom: 10px;
margin:10px auto;

margin-left: 100px;

margin-left: auto;
margin-right: auto;

清除浏览器的默认样式
浏览器为了在页面中没有样式时,也可以有一个比较好的显示效果,所 以为很多的标签都设置了一些默认的margin和padding,而它的这些默 认样式,正常情况下我们是不需要使用的。
我们往往在编写样式之前需要将浏览器中的默认的margin和padding统统 的去掉。
*{ margin: 0;
padding: 0;
}
代码
<!DOCTYPE html>
<html>
	<head>
		<meta charset="utf-8">
		<title></title>
		<style>
			*{
				margin: 0px;
				padding: 0px;
				outline: none;
			}
			.box1{
				background-color: aqua;
				width: 176px;
				height: 176px;

				padding: 10px;/* 四个方向内边距相同 */

				border: 2px rosybrown solid;
				border-top-left-radius: 10px;
				border-top-right-radius: 10px;
			}

			.box2{
				width: 200px;
				height: 200px;
				background-color: hotpink;
				margin-top: 10px;
				margin-bottom: 10px;

				margin:10px auto;
		</style>
	</head>
	<body>

		<div class="box1">
			盒子模型
		</div>

		<div class="box2"></div>

		<p>wwww</p>
		<p>sss</p>
		<h1>wwww</h1>
	    <h1>222</h1>
	</body>
</html>
运行

盒子模型练习
代码
<!DOCTYPE html>
<html>
	<head>
		<meta charset="utf-8">
		<title></title>
		<style>
			.box1{
				background-color: chartreuse;
				width: 80px;

				padding: 10px 60px;
			}

			.txt1{
				width: 476px;
				height: 32px;
				padding: 2px 10px;
				border: 2px green solid;
				border-radius: 5px;
				outline: none;
			}
			.txt1:hover{
				border:2px magenta solid;
			}
			.txt1:focus{
				border: 2px black solid;
			}
		</style>
	</head>
	<body>

		<div class="box1">
			公司介绍
		</div>
		<br/>
		<input class="txt1"/>
	</body>
</html>
运行


文档流
网页默认是一个二维平面,在网页中一行行摆放标签
块标签会占一行,行标签只占自身的大小
这种情况下实现网页布局就比较麻烦了,需要通过一些方法改变默认的摆放顺序---网页布局
浮动
浮动指的是使标签脱离原来的文档流,在父标签中浮动起来
使用float属性
none :不浮动
left :向左浮动
right :向右浮动
● 当一个标签浮动以后,其下方的标签会上移。
● 浮动会使标签完全脱离文档流,也就是不再在文档中在占用位置标签浮 动以后即完全脱离文档流,这时不会再影响父标签的高度,也就是浮动标签 不会撑开父标签。
代码
<!DOCTYPE html>
<html>
	<head>
		<meta charset="utf-8">
		<title></title>
		<style>
			div{
				background-color: darkturquoise;
				float: right;/* 可以让标签脱离原来的文档流(二维平面),浮动后的标签默认是呢内容的大小,可以为其设置宽和高*/
				width: 100px;
			}
		</style>
	</head>
	<body>
		<div>div1</div>
		<div>div2</div>
		<div>div3</div>
		<h1 style="background-color: cornflowerblue;">十里桃花</h1>
	</body>
</html>
运行

清除浮动
clear属性可以用于清除标签周围的浮动对标签的影响,其他标签的位置不 发生变化。
left : 忽略左侧浮动
right :忽略右侧浮动
both :忽略全部浮动
浮动的标签不占用原来的文档流空间
下面的标签就会向上移动,会影响后面的网页布局
解决浮动问题:
1、为父级标签设置一个高度,把父级标签撑开
2、在浮动的标签后使用清除浮动属性
代码
<!DOCTYPE html>
<html>
	<head>
		<meta charset="utf-8">
		<title></title>
		<style>
			 .nav{
				background-color:thistle;
				float: left;
				padding: 10px 54px;

			 }
			 .nav:hover{
				 background-color: lightcoral;
			 }
			 .nav_box{
				background-color: darkorange;
				width: 688px;
				margin: 0px auto;
			 }
			 .middle_box{
				 width: 688px;
				 margin: 10px auto;
			 }
			 .middle_box_left,.middle_box_center,.middle_box_right{
				 float: left;
				 height: 200px;
			 }
			 .middle_box_left{
				 width: 100px;
				 background-color: darkcyan;
				 padding-left: 10px;
			 }
			 .middle_box_center{
			 	 width: 458px;
				 background-color: darkgoldenrod;
			 }
			 .middle_box_right{
				 width: 120px;
				 background-color: darkblue;
			 }
			 .middle_box_bottom{
				 background-color: aquamarine;
				 height: 50px;
			 }
		</style>
	</head>
	<body>
		  <div class="nav_box">
			  <div class="nav">网站首页</div>
			  <div class="nav">产品案例</div>
			  <div class="nav">公司介绍</div>
			  <div class="nav">联系我们</div>
			  <div style="clear: left;"></div> <!-- 清除浮动的影响,自动撑开父级标签-->
		  </div>

		  <div class="middle_box">
		      <div class="middle_box_left">
			    <div>家电</div>
			    <div>家电</div>
			    <div>家电</div>
			    <div>家电</div>
			  </div>
		      <div class="middle_box_center">center</div>
		      <div class="middle_box_right">right</div>
			  <div style="clear: left;"></div>
		      <div class="middle_box_bottom">bottom</div>
		  </div>
	</body>
</html>
运行

CSS 定位(Position)
相对定位(relative)
首先要开启标签的定位功能,指定定位的类型
以自己原来的位置进行定位的
相对定位不会让标签脱离文档流
相对定位是一个非常容易掌握的概念. 相对于它 的起点进行移动,移动后原来的位置还被占用。
可以通过position:relative; 开启相对定位, left right top bottom四个属性来设置标签的偏移量
特点:
1.当开启了标签的相对定位以后,而不设置偏移量时,标签不会发生任何变化
2.相对定位是相对于标签在文档流中原来的位置进行定位
3.相对定位的标签不会脱离文档流
代码
<!DOCTYPE html>
<html>
	<head>
		<meta charset="utf-8">
		<title></title>
		<style>
			.box1{
				width: 100px;
				height: 100px;
				background-color: aqua;

				position: relative;
				left: 100px;
				top: 100px;
			}
			.box2{
				width: 100px;
				height: 100px;
				background-color: darkcyan;
			}
		</style>
	</head>
	<body>
		<div class="box1">div1</div>
		<div class="box2">div2</div>
	</body>
</html>
运行

绝对定位(absolute)
开启绝对定位,标签立即脱离文档流
参照物:
离他最近的开启定位的父级标签
如果所有的父级标签都没有开启定位,那么以浏览器窗口为参照物
开启标签的绝对定位都会开启父级标签的相对定位
绝对定位是不占空间的,运用了 绝对定位的标签会脱离原来的文档 流,浮动起来,因此视觉上会其他的标签重叠。
可以通过position: absolute; 开启 绝对定位, left right top bottom四个属性来 设置标签的偏移量
特点 :
1.开启绝对定位,会使标签脱离文档流
2.开启绝对定位以后,如果不设置偏移量,则标签的位置不会发生变化
3.绝对定位是相对于离他最近的开启了定位的祖先标签进行定位(一般情况,开启了子标签 的绝对定位都会同时开启父标签的相对定位)
如果所有的祖先标签都没有开启定位,则会相对于浏览器窗口进行定位
代码
<!DOCTYPE html>
<html>
	<head>
		<meta charset="utf-8">
		<title></title>
		<style>
			.box1{
				width: 100px;
				height: 100px;
				background-color: aqua;

				position: absolute;
				left: 100px;
				top: 100px;
			}
			.box2{
				width: 100px;
				height: 100px;
				background-color: darkcyan;
			}
			.box3{
				width: 200px;
				height: 200px;
				background-color: olivedrab;
				position: relative;
			}
		</style>
	</head>
	<body>
		<p>wwwww</p>
		<p>wwwww</p>
		<p>wwwww</p>
		<p>wwwww</p>
		<div class="box3">div3<div class="box1">div1</div></div>
		<div class="box2">div2</div>
	</body>
</html>
运行


