这是一个好玩的组件
主要作用划线,像水果忍者中的刀光,还有一些涂鸦的小游戏,包括让鼠标划线然后让对象进行跟踪导航也可通过此插件完成
附注:unity版本建议使用稳定一些的版本,有些api可能已经发生变化,请参考unity官方文档
此组件:线渲染器用于在 3D 空间中绘制自由浮动线。如果您要使用此组件请在3d场景文件中使用
unity官方文档:Unity - Scripting API: LineRenderer (unity3d.com)![]() https://docs.unity3d.com/ScriptReference/LineRenderer.html
https://docs.unity3d.com/ScriptReference/LineRenderer.html
Public Methods(公有方法)
| BakeMesh | Creates a snapshot of LineRenderer and stores it in mesh. (创建linerender的快照并将其存储在mesh中) |
| GetPosition | Get the position of a vertex in the line. (获取顶点在直线上的位置) |
| GetPositions | Get the positions of all vertices in the line. (获取行中所有顶点的位置) |
| SetPosition | Set the position of a vertex in the line. (设置顶点在直线中的位置) |
| SetPositions | Set the positions of all vertices in the line. (设置行中所有顶点的位置) |
| Simplify | Generates a simplified version of the original line by removing points that fall within the specified tolerance. (通过删除落在指定公差范围内的点来生成原始行的简化版本) |
这里主要使用的是:SetPositions
代码如下:
using System.Collections;
using System.Collections.Generic;
using UnityEngine;
using UnityEngine.UI;


    public GameObject airPlane;//想要移动的模型、对象
    public LineRenderer line;//绘制线的组件
    public float speed = 1;//速度
    private Queue<Vector3> que = new Queue<Vector3>();//存储数据的栈(利用栈先进先出的特点)
    private Vector3 pos;//坐标点
    private Vector3 prevPos;//坐标点

    private float time;//时间
    private float starttime;//起始时间


    void Start()
    {
        //先归正,让画出来线的第一个点的位置与模型位置一致
        pos = airPlane.transform.position;
        this.transform.position = pos;
        //存储初始点位
        que.Enqueue(airPlane.transform.position);
    }


    void Update()
    {
        if (Input.GetMouseButton(0))
        {
            //射线点击生成一大堆坐标点,(由点成线)
            Ray ray=Camera.main.ScreenPointToRay(Input.mousePosition);
            RaycastHit hit;
            //存储射线对象内的投射命中点的信息到RaycastHit
            if (Physics.Raycast(ray, out hit))
            {
                prevPos = hit.point;

            }


            //这里是给2d的注释掉部分
            //    Vector3 pp = Camera.main.WorldToScreenPoint(airPlane.transform.position);
            //Vector3 ppp = new Vector3(Input.mousePosition.x,Input.mousePosition.y,pp.z);
            //Vector3 p = Camera.main.ScreenToViewportPoint(ppp);


            //存储生成的线
            que.Enqueue(prevPos);
            //初始获取共有多少个点    组件上线段数量=栈中的坐标
            line.positionCount = que.Count;
            //给组件设置参数
            line.SetPositions(que.ToArray());
        }
        else if (Input.GetMouseButtonUp(0))
        {
            //进行计算运行效果
            PlaneMove();
        }

        if (pos!=airPlane.transform.position)
        {
            //判断是否一致第一个点
            //进行缓慢的沿着线段移动
            airPlane.transform.position=Vector3.Lerp(airPlane.transform.position,pos,(Time.time-starttime)/time);
            //初始获取共有多少个点    组件上线段数量=栈中的坐标
            line.positionCount = que.Count;
            //给组件设置参数
            line.SetPositions(que.ToArray());
        }
        else if (que.Count > 0)
        {
            PlaneMove();
        }
    }

    public void PlaneMove()
    {
        //出栈,赋值刷新数据
        pos = que.Dequeue();
        //获取当前时间
        starttime = Time.time;
        //计算距离,进行移动
        time = Vector3.Distance(airPlane.transform.position, pos)/speed;
        //让物体朝着线段方向进行移动
        airPlane.transform.up = pos - airPlane.transform.position;
    }
当然上面的代码是简单的书写了原理,做了一个画线导航的功能
此插件还可做闪电效果:
Unity LineRenderer 实现闪电效果
(54条消息) Unity LineRenderer 实现闪电效果_unity闪电_路妖姬.山良有木的博客-CSDN博客
--------------------------------
然后在这里有个动态虚线的效果
1、首先导入一张图片
(图片要求,两端透明中间白色,可以使用ps一类的插件进行制作)
2、对导入的图片进行参数调整如下图(注意第二个我这张图没有打钩,请记得打上)

read/write Enable 允许读写(允许程序以其他的方式进行修改)
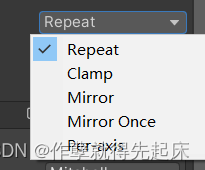
Wrap Mode 包装方式/纹理坐标环绕模式(倒不如说是渲染方式,在这里选择的是重复 渲染 填充)
这里面默认是:固定 clamp (就是一张死图)
还有:(请根据需要进行使用)
3、创建一个材质球,然后将图片添加进去
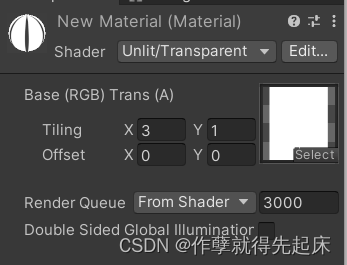
4、添加材质并设置
(下图这里是LineRenderer组件的截图,在材质球中Tiling修改参数会改变图片渲染的间距)

接着使用代码就可以了
-----------------------
在像素游戏中一些场景背景的动态制作也会应用到,画图等,总之这是一个相当有意思的组件
行军蚁效果指路:(2d,本文代码适用于3d方面,部分内容为补充内容)
(54条消息) 【游戏开发解答】教你在Unity中使用LineRenderer制作行军蚂蚁线(行军 | 虚线 | 路径 | 线段)_林新发的博客-CSDN博客_linerenderer 虚线


