1、链表的概念及结构
概念:链表是一种物理结构上非连续、非顺序的存储结构,数据结构的逻辑顺序是通过链表中的指针链接次序实现的。

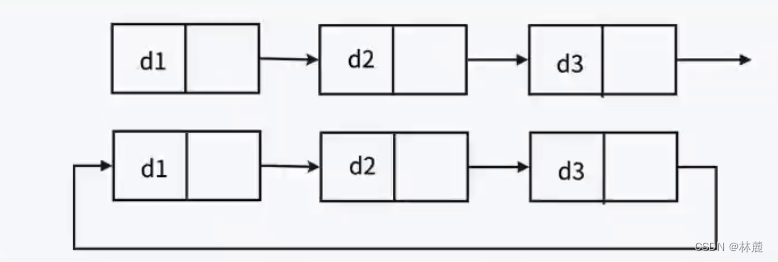
就像图中的小火车,每节车厢都是一个节点,每个节点都存储着一个数据。它们本身并不是顺序存储的,而是由詹式车钩相互连起来的。而在链表中这个詹式车钩就是指针链接。
火车在淡季时会减去几个车厢,而在旺季时会加上几个车厢。火车是可以灵活改变的。链表也是同理。
每个节点是在不同的空间存放,可能乱七八糟,但是有了指针链接将他们连接起来,从而在逻辑结构上好像是连续的。
在链表里,每节 "车厢" 是什么样子的呢?

与顺序表不同的是,每节 "车厢" 都是独立申请下来的,我们称之为 "节点/结点"。
节点的组成主要有两部分:当前节点要保存的数据和保存的下一个节点的地址(指针变量)。
图中指针变量plist保存的是第一个节点的地址,我们称plist此时 "指向" 第一个节点。如果我们想让plist指向第二个节点就让plist保存第二个节点的地址:0x0012FFA0。
为什么还需要指针变量来保存下一个节点的地址?
链表的每一个节点都是独立申请的(即需要插入一个数据时才去申请一块节点的空间),我们需要通过指针变量来保存下一个节点的位置才能从当前节点找到下一个节点。
2、单向链表的实现
结合前面学到的结构体知识,我们可以通过结构体来创建每个节点对应的结构体代码:
typedef int SLTypeData;
//创建每个节点类型
typedef struct SList
{
	SLTypeData data;  //存储数据
	struct SList* next;  //下一个节点的地址
}*pList;
这就是链表每个节点的类型创建,关于单向链表的接口都有以下这些。
void SLPushBack(pList* phead, SLTypeData val);//链表节点尾部插入
pList SLBuyNode(int val);//申请节点空间
void SLPrint(pList* phead);//打印链表每个节点的数据
void SLPushFront(pList* phead, SLTypeData val);//链表节点头部插入
void SLPopBack(pList* phead);//链表节点尾部删除
void SLPopFront(pList* phead);//链表节点头部删除
void SLInsert(pList* phead, pList pos, SLTypeData val);//指定位置之前插入
pList SLfind(pList* phead, SLTypeData val);//查找该存储数据的节点并返回
void SLInsertAfter(pList pos, SLTypeData val);//指定位置之后插入
void SLEarse(pList* phead, pList pos);//指定位置节点删除
void SLDesTroy(pList* phead);//链表销毁
完整代码:分别在三个文件,test.c文件调用函数、pList.c实现函数、pList.h函数声明。
pList.h 声明:
#pragma once
#include <stdio.h>
#include <assert.h>
#include <stdlib.h>
typedef int SLTypeData;

//创建每个节点类型
typedef struct SList
{
	SLTypeData data;  //存储数据
	struct SList* next;  //下一个节点的地址
}*pList;

void SLPushBack(pList* phead, SLTypeData val);//链表节点尾部插入
pList SLBuyNode(int val);//申请节点空间
void SLPrint(pList* phead);//打印链表每个节点的数据
void SLPushFront(pList* phead, SLTypeData val);//链表节点头部插入
void SLPopBack(pList* phead);//链表节点尾部删除
void SLPopFront(pList* phead);//链表节点头部删除
void SLInsert(pList* phead, pList pos, SLTypeData val);//指定位置之前插入
pList SLfind(pList* phead, SLTypeData val);//查找该存储数据的节点并返回
void SLInsertAfter(pList pos, SLTypeData val);//指定位置之后插入
void SLEarse(pList* phead, pList pos);//指定位置节点删除
void SLDesTroy(pList* phead);//链表销毁
pList.c 函数实现:
#include "pList.h"

pList SLBuyNode(SLTypeData val)
{
	pList ret = (pList)malloc(sizeof(struct SList));
	if (ret == NULL)
	{
		perror("malloc");
		return NULL;
	}
	ret->data = val;
	ret->next = NULL;
	return ret;
}

void SLPushBack(pList* phead, SLTypeData val)
{
	assert(phead != NULL);
	pList node = SLBuyNode(val);
	if (node == NULL)
	{
		perror("SLBuyNode");
		return;
	}
	if (*phead == NULL)
	{
		*phead = node;
		return;
	}
	pList pcur = *phead;
	//找到尾节点
	while (pcur->next)
	{
		pcur = pcur->next;
	}
	//给尾结点下一个节点的地址
	pcur->next = node;
}

void SLPrint(pList* phead)
{
	assert(phead);
	assert(*phead);
	pList pcur = *phead;
	while (pcur)
	{
		printf("%d -> ", pcur->data);
		pcur = pcur->next;
	}
	printf("NULL\n");
}

void SLPushFront(pList* phead, SLTypeData val)
{
	assert(phead != NULL);
	pList node = SLBuyNode(val);
	if (node == NULL)
	{
		perror("SLBuyNode");
		return;
	}
	//头部插入操作
	node->next = *phead;
	*phead = node;
}

void SLPopBack(pList* phead)
{
	assert(*phead != NULL);
	//首先判断一下链表是否只有一个节点的情况,如果是则直接释放头结点
	if ((*phead)->next == NULL)
	{
		free(*phead);
		*phead = NULL;
		return;
	}
	pList pcur = *phead;
	while (pcur->next->next)
	{
		pcur = pcur->next;
	}
	//完成尾部删除
	free(pcur->next);
	pcur->next = NULL;
}

void SLPopFront(pList* phead)
{
	assert(phead != NULL);
	pList pcur = *phead;
	*phead = (*phead)->next;
	free(pcur);
	pcur = NULL;
}

void SLInsert(pList* phead, pList pos, SLTypeData val)
{
	assert(phead);
	assert(*phead);
	assert(pos);
	pList node = SLBuyNode(val);
	//判断指定位置是否等于头结点
	if (pos == *phead)
	{
		node->next = *phead;
		*phead = node;
		return;
	}
	pList prve = *phead;
	//找到链表中pos位置之前的节点
	while (prve->next != pos)
	{
		prve = prve->next;
	}
	//插入操作
	prve->next = node;
	node->next = pos;
}

pList SLfind(pList* phead, SLTypeData val)
{
	assert(phead);
	pList pcur = *phead;
	while (pcur)
	{
		if (pcur->data == val)
		{
			return pcur;
		}
		pcur = pcur->next;
	}
	return NULL;//如果遍历了一遍链表未找到存储该数据的节点则返回NULL
}

void SLInsertAfter(pList pos, SLTypeData val)
{
	assert(pos);
	pList node = SLBuyNode(val);
	node->next = pos->next;
	pos->next = node;
}

void SLEarse(pList* phead, pList pos)
{
	assert(phead);
	assert(*phead);
	assert(pos);
	if (pos == *phead)
	{
		*phead = (*phead)->next;
		free(pos);
		return;
	}
	pList prev = *phead;
	while (prev->next != pos)
	{
		prev = prev->next;
	}
	prev->next = pos->next;
	free(pos);
	pos = NULL;
}

void SLDesTroy(pList* phead)
{
	assert(phead);
	assert(*phead);
	pList pcur = *phead;
	while (pcur)
	{
		pList next = pcur->next;
		free(pcur);
		pcur = next;
	}
	*phead = NULL;
	printf("销毁成功\n");
}
test.c 函数调用:
#include "pList.h"

void SLttext()
{
	pList plist = NULL;
	SLPushBack(&plist, 1);
	SLPushBack(&plist, 2);
	SLPushBack(&plist, 3);
	SLPushBack(&plist, 4);
	SLPrint(&plist); //打印:1 -> 2 -> 3 -> 4 -> NULL

	SLPushFront(&plist, 5);
	SLPushFront(&plist, 6);
	SLPushFront(&plist, 7);
	SLPrint(&plist);//打印:7 -> 6 -> 5 -> 1 -> 2 -> 3 -> 4 -> NULL

	SLPopBack(&plist);
	SLPrint(&plist);//打印:7 -> 6 -> 5 -> 1 -> 2 -> 3 -> NULL

	SLPopFront(&plist);
	SLPrint(&plist);//打印:6 -> 5 -> 1 -> 2 -> 3 -> NULL

	pList find = SLfind(&plist, 3);
	SLInsert(&plist, find, 11);
	SLPrint(&plist);//打印:6 -> 5 -> 1 -> 2 -> 11 -> 3 -> NULL

    find = SLfind(&plist, 1);
	SLInsertAfter(find, 12);
	SLPrint(&plist);//打印:6 -> 5 -> 1 -> 12 -> 2 -> 11 -> 3 -> NULL

	find = SLfind(&plist, 5);
	SLEarse(&plist, find);
	SLPrint(&plist);//打印:6 -> 1 -> 12 -> 2 -> 11 -> 3 -> NULL

	SLDesTroy(&plist);
}
int main()
{
	SLttext();
	return 0;
}3、链表的分类
链表的结构非常多样,以下结构组合起来就有8种(2 x 2 x 2)链表结构。
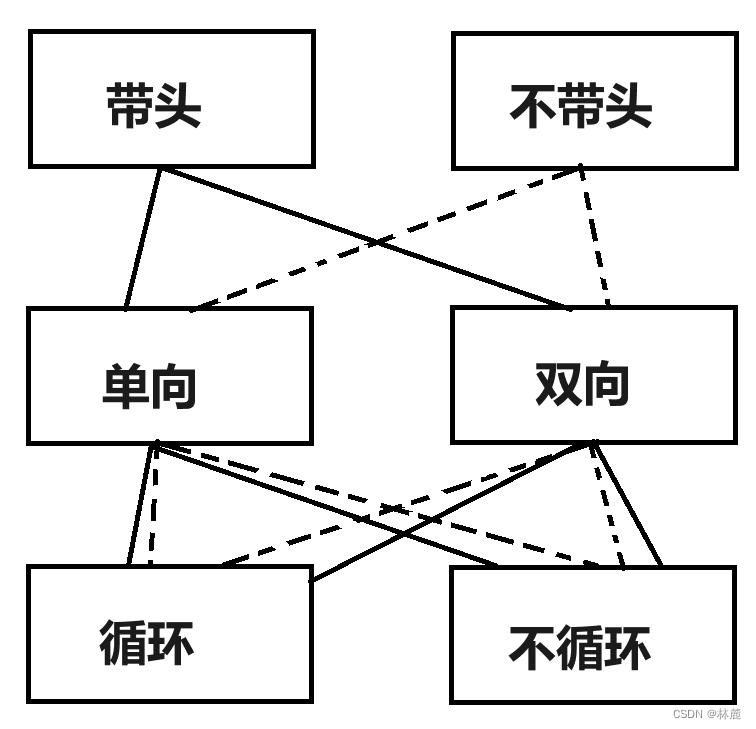
链表结构:
1. 单向或双向
2. 带头或不带头
3. 循环或不循环
虽然有这么多链表的结构,但是我们实际中最常用的还是两种结构:单链表和双向带头循环链表
1. 不带头单向非循环链表:结构简单,一般不会单独用来存数据。实际中更多是作为其他数据结构的子结构,如哈希桶、图的邻接表等等。另外这种结构在笔试面试中出现很多。
2. 带头双向循环链表:结构最复杂,一般用在单独存储数据。实际中使用链表数据结构,都是带头双向循环链表。另外这个结构虽然复杂,但是使用代码实现以后会发现结构会带来很多优势,实现反而简单了,后面我们代码实现就知道了。
完


