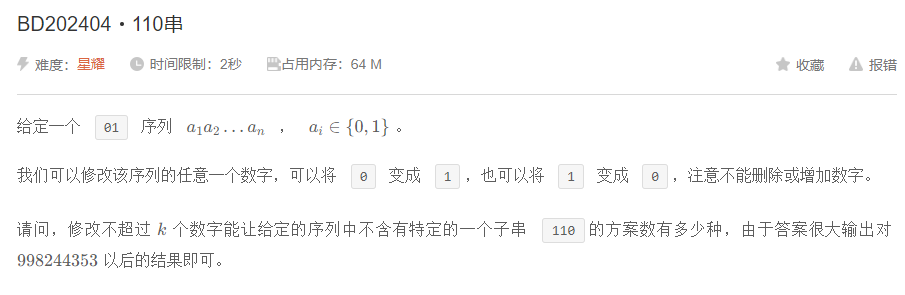
目录
- 前言
- 一、加密解密图像
- 1.常用的算法
- 1.1 空间域加密技术:
- 1.2 基于频域的水印技术:
- 1.3 Arnold变换:
- 1.4 DES与AES算法:
- 2.实验
- 代码
- 结果
- 二、数字汉字识别
- 代码
- 结果:
- 三 物体识别
- 代码
- 结果
- 四,物块追踪
- 代码
- 结果
前言
小试牛刀
一、加密解密图像
1.常用的算法
1.1 空间域加密技术:
空间域加密技术直接在图像的像素级进行操作。例如,最低有效位(LSB)替换是一种简单的方法,它将秘密信息嵌入到图像的像素的最低有效位中,因为人眼对这些微小的变化不敏感。
1.2 基于频域的水印技术:
频域技术首先将图像从空间域转换到频域(例如,使用DFT、DCT等)。在频域中,可以对图像的频率成分进行操作,如添加水印或修改频率成分,然后再将图像转换回空间域。
基于小波变换的图像加密算法:
小波变换能够将图像分解为不同的频率层次,基于小波变换的加密算法通常涉及对这些小波系数进行修改,例如通过混沌序列来扰乱小波系数,实现加密。
1.3 Arnold变换:
Arnold变换是一种经典的图像置乱技术,它通过周期性地应用一个线性变换(通常是一个旋转矩阵),来改变图像像素的位置,从而实现加密。
1.4 DES与AES算法:
DES(数据加密标准)和AES(高级加密标准)都是对称密钥加密算法。它们使用相同的密钥进行加密和解密。这些算法通过一系列复杂的替换和置换操作来改变数据的表示,从而实现加密。
2.实验
我们利用了混沌理论的不可预测性和Arnold变换的置乱效果来实现图像的加密解密
Arnold变换,又称Arnold cat map,是一种在图像加密领域中常用的线性变换技术,用于实现图像的置乱。这种变换得名于数学家Vladimir Arnold,它在数学上具有混沌理论的特性,能够产生高度随机化和不可预测的变换结果。以下是Arnold变换的详细介绍:
定义与数学表达式
Arnold变换通常定义在二维空间上,其数学表达式如下:
给定一个二维点 ( (i, j) ),经过Arnold变换后的新位置 ( (i’, j’) ) 由以下公式确定:
[ i’ = (i + j) \mod N ]
[ j’ = (i + 2j) \mod N ]
其中,( N ) 是变换的模数,通常是图像的宽度或高度。
特点
- 线性:Arnold变换是一个线性变换,它不改变图像的像素值,只改变像素的位置。
- 混沌性:由于其混沌特性,Arnold变换能够快速地将图像中的像素分散到不同的位置,使得图像的原始结构难以辨认。
- 周期性:Arnold变换在一定次数的迭代后会回到初始状态,这个特性被称为周期性。
逆变换
Arnold变换的逆变换可以通过逆Arnold变换公式实现,其数学表达式如下:
[ i = (2j - i) \mod N ]
[ j = (-i + j) \mod N ]
代码
import numpy as np
import cv2

def logistic_map(x, r=3.99):
    return r * x * (1 - x)

def generate_chaos_sequence(size, seed=0.5, r=3.99):
    sequence = [seed]
    for _ in range(1, size):
        sequence.append(logistic_map(sequence[-1], r))
    return np.array(sequence)

def chaotic_key_image(img_shape, r=3.99):
    size = np.prod(img_shape)
    print(img_shape)
    chaos_sequence = generate_chaos_sequence(size, seed=np.random.random(), r=r)
    key_image = (chaos_sequence.reshape(img_shape) * 255).astype(np.uint8)
    return key_image

def pad_image_to_square(image):
    h, w, c = image.shape
    if h == w:
        return image, (h, w)
    size = max(h, w)
    padded_image = np.zeros((size, size, c), dtype=image.dtype)
    padded_image[:h, :w, :] = image
    return padded_image, (h, w)

def arnold_cat_map(image, iterations=1):
    N = image.shape[0]
    result = image.copy()
    for _ in range(iterations):
        new_result = np.zeros_like(result)
        for i in range(N):
            for j in range(N):
                new_i = (i + j) % N
                new_j = (i + 2 * j) % N
                new_result[new_i, new_j] = result[i, j]
        result = new_result
    return result

def inverse_arnold_cat_map(image, iterations=1):
    N = image.shape[0]
    result = image.copy()
    for _ in range(iterations):
        new_result = np.zeros_like(result)
        for i in range(N):
            for j in range(N):
                new_i = (2 * i - j) % N
                new_j = (-i + j) % N
                new_result[new_i, new_j] = result[i, j]
        result = new_result
    return result

def encrypt_image(image_path, key_path, encrypted_path, r=3.99, iterations=1):
    img = cv2.imread(image_path, cv2.IMREAD_COLOR)

    # 将图像填充为正方形
    padded_img, original_shape = pad_image_to_square(img)
    h, w, c = padded_img.shape

    # 生成混沌密钥图像
    key_img = chaotic_key_image((h, w, c), r=r)

    # 使用 Arnold Cat Map 加密
    encrypted_img = arnold_cat_map(cv2.bitwise_xor(padded_img, key_img), iterations=iterations)

    cv2.imwrite(key_path, key_img)
    cv2.imwrite(encrypted_path, encrypted_img)
    print("加密完成")

def decrypt_image(encrypted_path, key_path, decrypted_path, original_shape, iterations=1):
    encrypted_img = cv2.imread(encrypted_path, cv2.IMREAD_COLOR)
    key_img = cv2.imread(key_path, cv2.IMREAD_UNCHANGED)

    # 反向 Arnold Cat Map 解密
    decrypted_img = cv2.bitwise_xor(inverse_arnold_cat_map(encrypted_img, iterations=iterations), key_img)

    # 裁剪回原始形状
    h, w = original_shape
    decrypted_img = decrypted_img[:h, :w, :]

    cv2.imwrite(decrypted_path, decrypted_img)
    print("解密完成")

if __name__ == '__main__':
    input_path = '0.png'
    encrypt_image(input_path, 'key.png', 'encrypted.png', iterations=10)
    original_shape = cv2.imread(input_path, cv2.IMREAD_COLOR).shape[:2]
    decrypt_image('encrypted.png', 'key.png', 'decrypted.png', original_shape, iterations=10)
结果


二、数字汉字识别
HSV、RGB和BGR是用于在数字图像中表示颜色的三种不同的颜色空间模型。以下是它们之间的主要区别:
-
HSV(Hue, Saturation, Value)颜色空间:
- HSV模型根据颜色的三个基本属性来表示颜色:色调(Hue)、饱和度(Saturation)、亮度(Value)。
- 色调(H)是一个角度值,通常在0°至360°之间,表示颜色的类型(如红色、绿色、蓝色等)。
- 饱和度(S)表示颜色的纯度,即颜色中灰色成分的多少。饱和度越高,颜色越纯。
- 亮度(V)表示颜色的明暗程度,亮度越高,颜色越亮。
- HSV颜色空间更符合人类对颜色的直观感知,因此在图像编辑和颜色分析中非常有用。
-
RGB(Red, Green, Blue)颜色空间:
- RGB颜色空间是最常用的颜色模型,它基于三种原色光的加色混合原理。
- 红色(R)、绿色(G)和蓝色(B)的组合可以产生几乎所有其他颜色。
- 在数字图像中,每个颜色通道可以有0到255的强度值。
- RGB颜色空间适用于显示设备,因为它直接对应于显示设备的工作原理。
-
BGR(Blue, Green, Red)颜色空间:
- BGR颜色空间实际上是RGB颜色空间的一个变体,只是颜色通道的顺序颠倒了。
- 在BGR模型中,首先是蓝色分量,然后是绿色和红色。
- OpenCV库默认使用BGR颜色空间来读取和显示图像,这与其他一些图像处理库使用RGB作为默认颜色空间不同。
代码
import cv2
import numpy as np
import matplotlib.pyplot as plt
import base64
from aip import AipOcr
import time
from PIL import Image, ImageDraw, ImageFont
APP_ID = ' '
API_KEY = 'PZ0GKXJBMwZYuOHWpJ8PVQbt'
SECRET_KEY = '1UOcWxmRTjFCsAycKtSInIz3UayYD4ul'

client = AipOcr(APP_ID, API_KEY, SECRET_KEY)


# 在OpenCV图像上绘制中文文本
def draw_chinese_text(cv2_img, text, position, font_path, font_size=24):
    # 将OpenCV图像转换为PIL图像
    cv2_img_rgb = cv2.cvtColor(cv2_img, cv2.COLOR_BGR2RGB)
    pil_img = Image.fromarray(cv2_img_rgb)

    # 创建一个可以在PIL图像上绘制文本的对象
    draw = ImageDraw.Draw(pil_img)
    # 字体的格式
    font = ImageFont.truetype(font_path, font_size)

    # 绘制文本
    draw.text(position, text, fill=(0, 0, 0), font=font)

    # 将PIL图像转换回OpenCV图像
    cv2_img_result = cv2.cvtColor(np.array(pil_img), cv2.COLOR_RGB2BGR)
    return cv2_img_result


def recognize_content(image_path):
    # 读取图片
    image = cv2.imread(image_path)
    output_image = image.copy()

    # 1. 识别指定区域内的数字内容
    specified_area = image[200:300, 200:500]
    # 使用OCR函数recognize_text进行文字识别
    specified_area_text = recognize_text(specified_area)

    # 2.定义颜色范围及其对应的绘制颜色
    color_bounds = {
        'red': (((17, 17, 245), (37, 37, 265)), (0, 0, 255)),  # 红色范围及绘制颜色
        'green': (((17, 245, 17), (37, 265, 37)), (0, 255, 0)),  # 绿色范围及绘制颜色
        'blue': (((245, 17, 17), (265, 37, 37)), (255, 0, 0)),  # 蓝色范围及绘制颜色
        'gold': (((17, 130, 191), (37, 150, 211)), (0, 0, 255)),  # 金色范围及绘制颜色
        'yellow': (((25, 240, 240), (30, 255, 255)), (0, 255, 255)),  # 黄色范围及绘制颜色
        'pink': (((205, 180, 240), (215, 200, 255)), (255, 0, 255)),  # 粉色范围及绘制颜色
        'purple': (((230, 200, 205), (245, 215, 225)), (128, 0, 128)),  # 紫色范围及绘制颜色
        'brown': (((105, 140, 180), (120, 160, 200)), (42, 42, 165)),  # 棕色范围及绘制颜色
    }
    color_texts = {}
    boxes = []

    for color, ((lower, upper), draw_color) in color_bounds.items():
        mask = cv2.inRange(image, lower, upper)
        contours, _ = cv2.findContours(mask, cv2.RETR_EXTERNAL, cv2.CHAIN_APPROX_SIMPLE)
        if not contours:
            continue
        #找到指定区域
        x_min = min([cv2.boundingRect(contour)[0] for contour in contours])-10
        y_min = min([cv2.boundingRect(contour)[1] for contour in contours])-10
        x_max = max([cv2.boundingRect(contour)[0] + cv2.boundingRect(contour)[2] for contour in contours])+10
        y_max = max([cv2.boundingRect(contour)[1] + cv2.boundingRect(contour)[3] for contour in contours])+10

        boxes.append(((x_min, y_min), (x_max, y_max), draw_color))
        # 使用OCR函数recognize_text进行文字识别
        color_texts[color] = recognize_text(image[y_min:y_max, x_min:x_max])

    for (start_point, end_point, color) in boxes:
        cv2.rectangle(output_image, start_point, end_point, color, 2)
    # 3.构造要打印的文本
    text_to_print = f"(1)内容:{specified_area_text};\n"
    text_to_print += f"(2)红色:{color_texts.get('red', '')},绿色:{color_texts.get('green', '')},蓝色:{color_texts.get('blue', '')}\n"
    text_to_print += f"(3)粉色:{color_texts.get('pink', '')}"

    # 指定字体路径,确保路径正确且字体支持中文
    font_path = "msyh.ttc"
    # 调用函数在图片上绘制中文文本
    output_image = draw_chinese_text(output_image, text_to_print, (10, 700), font_path, 24)
    # 显示结果
    cv2.imshow("Result", output_image)
    cv2.waitKey(0)
    cv2.destroyAllWindows()
    # 保存图像
    cv2.imwrite("problem2_result_image.jpg", output_image)


def recognize_text(roi):
    # 将ROI转换为JPEG格式的字节流
    _, buffer = cv2.imencode('.jpg', roi)

    # 使用百度OCR进行文字识别,直接传递字节串
    text = client.basicAccurate(buffer)
    print(text)
    time.sleep(0.5)
    if text['words_result']==[]:
        return ''
    else:
        return text['words_result'][0]['words']

if __name__ == '__main__':
    input_path = '2.png'
    recognize_content(input_path)
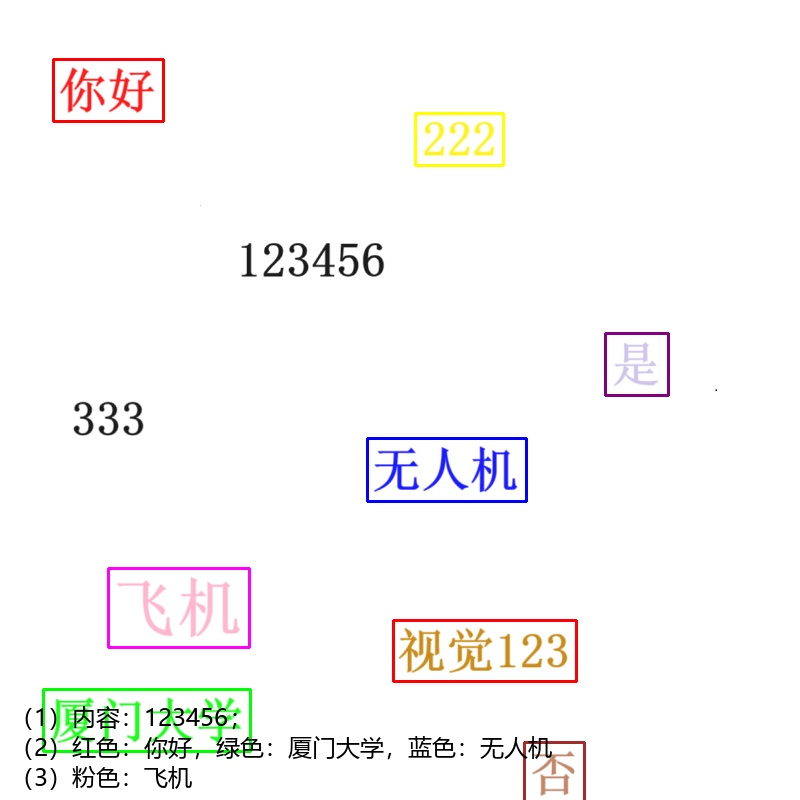
结果:
要识别的图像:

识别结果:
三 物体识别
代码
import cv2
import numpy as np

def read_and_preprocess_image(image_path):
    image = cv2.imread(image_path)
    if image is None:
        raise ValueError("Error: Image not found!")
    gray = cv2.cvtColor(image, cv2.COLOR_BGR2GRAY)
    blurred = cv2.GaussianBlur(gray, (5, 5), 0)
    return image, blurred

def detect_edges(blurred_image):
    edges = cv2.Canny(blurred_image, 50, 150)
    return edges

def find_contours(edges):
    contours, _ = cv2.findContours(edges.copy(), cv2.RETR_EXTERNAL, cv2.CHAIN_APPROX_SIMPLE)
    return contours

def classify_contours(contours):
    nuts = []
    washers = []
    gears = []
    for contour in contours:
        area = cv2.contourArea(contour)
        if area < 50:  # 过滤小噪点
            continue
        epsilon = 0.01 * cv2.arcLength(contour, True)
        approx = cv2.approxPolyDP(contour, epsilon, True)

        # 计算轮廓的质心
        M = cv2.moments(contour)
        if M["m00"] != 0:
            cX = int(M["m10"] / M["m00"])
            cY = int(M["m01"] / M["m00"])
            position = (cX, cY)
            x, y, w, h = cv2.boundingRect(contour)
        else:
            continue

        # 根据顶点数和形状特征分类
        if len(approx) < 10:  # 六角螺母的顶点数小于10
            nuts.append((contour, area, position,(x, y, w, h)))
        elif 10 <= len(approx) <= 17:  # 垫片
            washers.append((contour, area, position,(x, y, w, h)))
        else:
            gears.append((contour, area, position,(x, y, w, h)))  # 齿轮最多
    return nuts, washers, gears

def sort_and_select(nuts, washers, gears):
    nuts.sort(key=lambda x: x[1], reverse=True)
    washers.sort(key=lambda x: x[1])
    gears.sort(key=lambda x: x[1])


    smallest_gear = gears[0] if len(gears) > 0 else None
    third_largest_nut = nuts[2] if len(nuts) >= 3 else None
    smallest_washer = washers[0] if len(washers) > 0 else None

    return smallest_gear, third_largest_nut, smallest_washer

def calculate_gear_module(contour):
    # 假设每个齿的距离相等,使用轮廓的近似顶点数来估算齿数
    epsilon = 0.03 * cv2.arcLength(contour, True)
    approx = cv2.approxPolyDP(contour, epsilon, True)
    num_teeth = len(approx)
    print("齿轮齿数:", num_teeth)
    # 计算轮廓的外接圆直径
    (x, y), radius = cv2.minEnclosingCircle(contour)
    diameter = 2 * radius
    # 估算模数,模数 = 直径 / 齿数
    module = diameter / num_teeth
    return module, num_teeth

def find_inner_circle(image, sm):
    x, y, w, h = sm[3]
    x, y, w, h = max(x, 0), max(y, 0), min(w, image.shape[1] - x), min(h, image.shape[0] - y)
    mask = image[y:y+h, x:x+w]
    # 转换为灰度图像
    if len(mask.shape) == 3:
        mask = cv2.cvtColor(mask, cv2.COLOR_BGR2GRAY)
    blurred = cv2.GaussianBlur(mask, (5, 5), 0)

    edges = cv2.Canny(blurred, 100, 200)
    contours, _ = cv2.findContours(edges.copy(), cv2.RETR_EXTERNAL, cv2.CHAIN_APPROX_SIMPLE)
    # 选取最小的轮廓
    areas = []
    for contour in contours:
        area = cv2.contourArea(contour)
        if area < 50:
            continue
        areas.append((area, contour))
    areas.sort(key=lambda x: x[0])

    # 计算最小的轮廓内接圆半径
    if len(areas) > 0:
        (x, y), radius = cv2.minEnclosingCircle(areas[0][1])
        return int(radius)


def draw_and_label(image, smallest_gear, third_largest_nut, smallest_washer):
    # 齿轮
    if smallest_gear:
        module, num_teeth = calculate_gear_module(smallest_gear[0])
        radius_d = module * num_teeth / 2  # 分度圆半径
        (x, y), _ = cv2.minEnclosingCircle(smallest_gear[0])
        center = (int(x), int(y))
        cv2.drawContours(image, [smallest_gear[0]], -1, (255, 0, 0), 2)  # 蓝色轮廓
        cv2.putText(image, f"Rd = {radius_d:.2f}", center, cv2.FONT_HERSHEY_SIMPLEX, 0.5, (255, 0, 0), 2)
    # 六角螺母
    if third_largest_nut:
        inner_circle = find_inner_circle(image,third_largest_nut)
        if inner_circle is not None:
            cx, cy = third_largest_nut[2]
            #cv2.circle(image, (cx, cy), inner_circle, (0, 255, 0), 2)  # 绿色圆
            cv2.putText(image, f"R = {inner_circle}", (cx, cy), cv2.FONT_HERSHEY_SIMPLEX, 0.5, (0, 255, 0), 2)
        (x, y), radius = cv2.minEnclosingCircle(third_largest_nut[0])
        center = (int(x), int(y))
        distances = [cv2.pointPolygonTest(third_largest_nut[0], center, True) for point in third_largest_nut[0]]
        radius = min(distances)
        cv2.circle(image, center, int(radius), (0, 255, 0), 2)  # 绿色圆
        cv2.putText(image, f"R = {radius}", center, cv2.FONT_HERSHEY_SIMPLEX, 0.5, (0, 255, 0), 2)
    # 垫片
    if smallest_washer:
        cv2.drawContours(image, [smallest_washer[0]], -1, (0, 0, 255), 2)  # 红色轮廓
        (x, y), outer_radius = cv2.minEnclosingCircle(smallest_washer[0])
        outer_center = (int(x), int(y))
        inner_radius = find_inner_circle(image,smallest_washer)

        if inner_radius is not None:
            cx, cy = smallest_washer[2]

            # 绘制大圆(圆环的外圈)
            cv2.circle(image, outer_center, int(outer_radius), (0, 0, 255), -1)  # 使用红色填充

            # 绘制小圆(圆环的内圈),使用白色填充以形成圆环效果
            cv2.circle(image, outer_center, int(inner_radius), (255, 255, 255), -1)  # 背景色为白色


def main(image_path):
    image, blurred = read_and_preprocess_image(image_path)
    edges = detect_edges(blurred)
    contours = find_contours(edges)
    nuts, washers, gears = classify_contours(contours)
    smallest_gear, third_largest_nut, smallest_washer = sort_and_select(nuts, washers, gears)
    draw_and_label(image, smallest_gear, third_largest_nut, smallest_washer)

    # 显示和保存结果
    cv2.imshow('Result', image)
    cv2.waitKey(0)
    cv2.destroyAllWindows()
    cv2.imwrite('problem3_result_image.png', image)

if __name__ == "__main__":
    main('3.png')
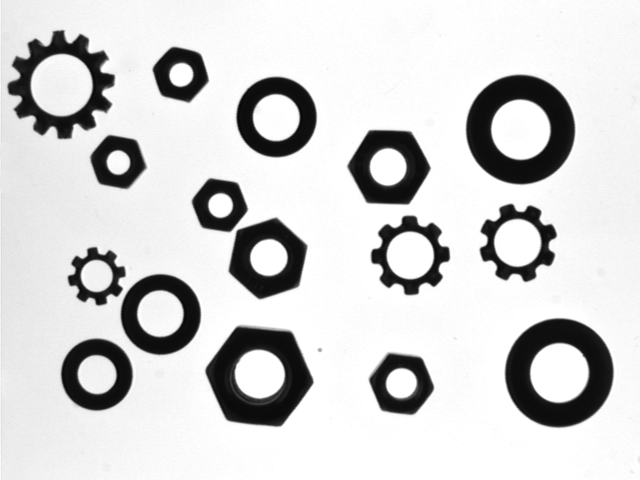
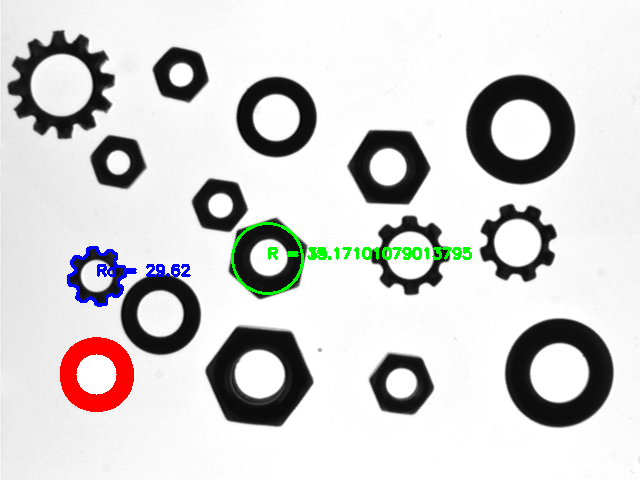
结果
四,物块追踪
代码
import cv2
import numpy as np
import matplotlib.pyplot as plt
from scipy.interpolate import interp1d
import imageio
# 定义颜色范围(在HSV空间中)
color_ranges = {
    'red': ((0, 100, 100), (10, 255, 255)),
    'green': ((36, 50, 50), (86, 255, 255)),
    'blue': ((94, 50, 50), (126, 255, 255))
}

def get_color_range(color):
    return color_ranges[color]

def process_video(input_path, color,picture_name):
    cap = cv2.VideoCapture(input_path)
    if not cap.isOpened():
        print("Error: Could not open video.")
        return

    color_range = get_color_range(color)
    points = []
    frames = []

    while True:
        ret, frame = cap.read()
        if not ret:
            break

        # 转换为HSV颜色空间
        hsv = cv2.cvtColor(frame, cv2.COLOR_BGR2HSV)

        # 创建掩膜
        mask = cv2.inRange(hsv, color_range[0], color_range[1])

        # 对掩膜进行一些形态学操作以去噪
        mask = cv2.erode(mask, None, iterations=2)
        mask = cv2.dilate(mask, None, iterations=2)

        # 寻找轮廓
        contours, _ = cv2.findContours(mask.copy(), cv2.RETR_EXTERNAL, cv2.CHAIN_APPROX_SIMPLE)

        best_circle = None
        best_circle_radius = 0

        for contour in contours:
            # 拟合一个最小包围圆
            (x, y), radius = cv2.minEnclosingCircle(contour)
            center = (int(x), int(y))
            radius = int(radius)

            # 计算轮廓的面积和圆的面积比较
            contour_area = cv2.contourArea(contour)
            circle_area = np.pi * (radius ** 2)

            # 判断轮廓是否接近圆形
            if contour_area / circle_area > 0.8:
                if radius > best_circle_radius:
                    best_circle = (center, radius)
                    best_circle_radius = radius

        if best_circle is not None:
            center, radius = best_circle
            x, y = center

            # 绘制外接正方形
            x1, y1 = int(x - radius), int(y - radius)
            x2, y2 = int(x + radius), int(y + radius)
            cv2.rectangle(frame, (x1, y1), (x2, y2), (0, 0, 0), 2)

            # 记录圆心坐标
            points.append((x, y))
        else:
            # 如果没有检测到圆形,记录None
            points.append(None)

        frames.append(frame)
        # 显示视频帧
        cv2.imshow('Frame', frame)

        if cv2.waitKey(1) & 0xFF == ord('q'):
            break

    cap.release()
    cv2.destroyAllWindows()
    # 保存为GIF
    imageio.mimsave('output.gif', frames, 'GIF', fps=120)

    # 处理缺失的点,使用线性插值
    x_coords = [p[0] if p is not None else None for p in points]
    y_coords = [p[1] if p is not None else None for p in points]

    # 使用线性插值填补缺失的点
    n = len(points)
    valid_points = [i for i in range(n) if points[i] is not None]

    if valid_points:
        x_interp = interp1d(valid_points, [x_coords[i] for i in valid_points], kind='linear', fill_value='extrapolate')
        y_interp = interp1d(valid_points, [y_coords[i] for i in valid_points], kind='linear', fill_value='extrapolate')

        x_coords = x_interp(range(n))
        y_coords = y_interp(range(n))

        # 生成运动轨迹图
        plt.figure()
        plt.plot(x_coords, y_coords, 'bo-', markersize=5)
        plt.gca().invert_yaxis()
        plt.xlabel('X Coordinate')
        plt.ylabel('Y Coordinate')
        plt.title(selected_color+' Motion Path')
        plt.savefig(picture_name)
        plt.show()

if __name__ == '__main__':
    # 输入视频路径
    input_video_path = '4.mp4'
    # 选择的颜色
    selected_color = 'blue'
    # 图片名
    picture_name = 'motion_path_'+selected_color+'.png'
    process_video(input_video_path, selected_color,picture_name)
结果