Arduino - Keypad
Arduino - Keypad
The keypad is widely used in many devices such as door lock, ATM, calculator…
键盘广泛应用于门锁、ATM、计算器等多种设备中。
In this tutorial, we will learn:
在本教程中,我们将学习:
- How to use keypad 3x4 and keypad 4x4 with Arduino.
如何将键盘 3x4 和键盘 4x4 与 Arduino 一起使用。 - How to read value from keypad 3x4 and keypad 4x4 with Arduino.
如何使用 Arduino 从键盘 3x4 和键盘 4x4 读取值。 - How to verify the password inputted from keypad
如何验证从键盘输入的密码
About Keypad 关于键盘
The keypad is a set of buttons arranged in rows and columns (called matrix). Each button is called key
键盘是一组按行和列排列的按钮(称为矩阵)。每个按钮都称为键
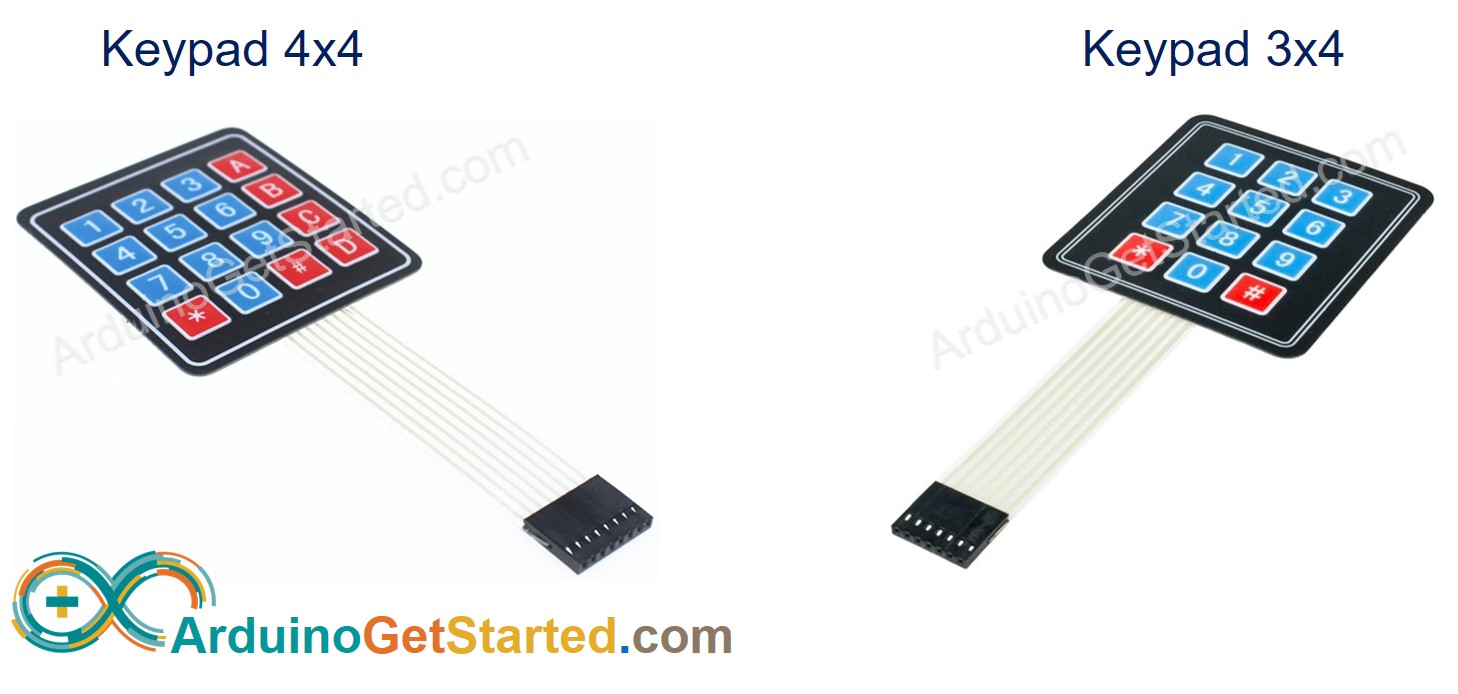
Keypad has various types. Two popular types for DIY projects are keypad 3x4 (12 keys) and keypad 4x4 (16 keys).
键盘有多种类型。DIY 项目的两种流行类型是键盘 3x4(12 键)和键盘 4x4(16 键)。
Pinout 引脚排列
Keypad pins are divided into two groups: row and column.
键盘引脚分为两组:行和列。
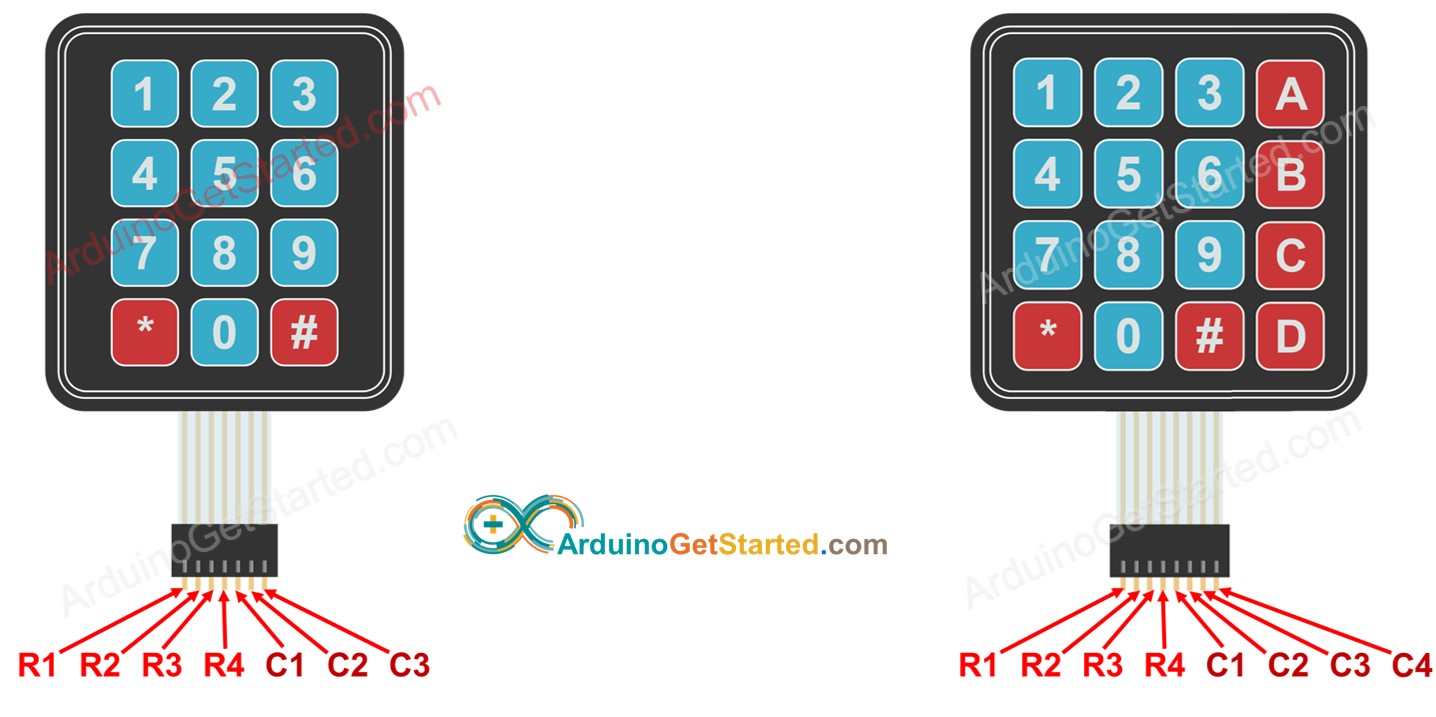
Keypad 3x4 has 7 pins: 4 row-pins (R1, R2, R3, R4) and 3 column-pin (C1, C2, C3).
键盘 3x4 有 7 个引脚:4 个排引脚(R1、R2、R3、R4)和 3 列引脚(C1、C2、C3)。
Keypad 4x4 has 8 pins: 4 row-pins (R1, R2, R3, R4) and 4 column-pin (C1, C2, C3, C4).
键盘 4x4 有 8 个引脚:4 个排引脚(R1、R2、R3、R4)和 4 列引脚(C1、C2、C3、C4)。
How It Works 它是如何工作的
This section is the in-depth knowledge. DON’T worry if you don’t understand. Ignore this section if it overloads you, and come back in another day. Keep reading the next sections.
本节是深入的知识。如果您不明白,请不要担心。如果它使您超负荷,请忽略此部分,并在另一天再回来。继续阅读下一节。
The process of detecting the key pressing is called scanning keypad.
检测按键的过程称为扫描键盘。
It is called “scanning” because it checks one key by one key.
它被称为“扫描”,因为它逐个键检查一个键。
Row-pins are connected to Arduino’s output pins
Row-pin连接到Arduino的输出引脚
Column pins are connected to Arduino’s input pins (INPUT_PULLUP, in this state, the value of the input pin is HIGH if the key is not pressed).
列引脚连接到Arduino的输入引脚(INPUT_PULLUP,在此状态下,如果未按下该键,则输入引脚的值为HIGH)。
For each row: 对于每一行:
- Sets all row-pins is HIGH.
将所有行引脚设置为高电平。 - Sets only the current row-pin to LOW.
仅将当前行引脚设置为低电平。 - Reads the state of each column.
读取每列的状态。- If a column-pin is HIGH ⇒ key at (row, column) is NOT pressed.
如果列引脚为高电平,则不按下 (行、列) 处⇒键。 - If a column-pin is LOW ⇒ key at (row, column) is pressed.
如果列引脚为低电平,则按下 (行、列) 处⇒键。
- If a column-pin is HIGH ⇒ key at (row, column) is NOT pressed.
- Repeats the above process for the next row-pins.
对下一个行引脚重复上述过程。
※ NOTE THAT: ※ 注意事项:
The above is one of the methods to scan keypad. We can invert all HIGH to LOW and all LOW to HIGH to scan keypad.
以上是扫描键盘的方法之一。我们可以将所有高电平反转为低电平,将所有低电平反转为高电平以扫描键盘。
Why does keypad is arranged and connected as a matrix? This makes the scanning process complicated. Why do not use each key as an independent button, then the state of the key is simply determined by reading the state of a button?
为什么键盘是以矩阵的形式排列和连接的?这使得扫描过程变得复杂。为什么不把每个键都当成一个独立的按钮,那么键的状态就是通过读取一个按钮的状态来确定的呢?
⇒ As we know, an independent button requires one Arduino’s pin and GND. Let’s take keypad 4x4 as an example. If we each key as an independent button, it requires 16 Arduino pin for 16 keys plus GND pin. If we arranged a connected key in matrix form, we just need to use 8 Arduino’s pin, so we can save Arduino’s pin. In short, the answer is: to save the Arduino pins.
⇒ 众所周知,一个独立的按钮需要一个Arduino的引脚和GND。让我们以键盘 4x4 为例。如果我们每个按键作为一个独立的按钮,它需要 16 个 Arduino 引脚用于 16 个按键加上 GND 引脚。如果我们以矩阵形式排列一个连接的密钥,我们只需要使用 8 个 Arduino 的引脚,这样我们就可以保存 Arduino 的引脚。简而言之,答案是:保存Arduino引脚。
Wiring Diagram 接线图
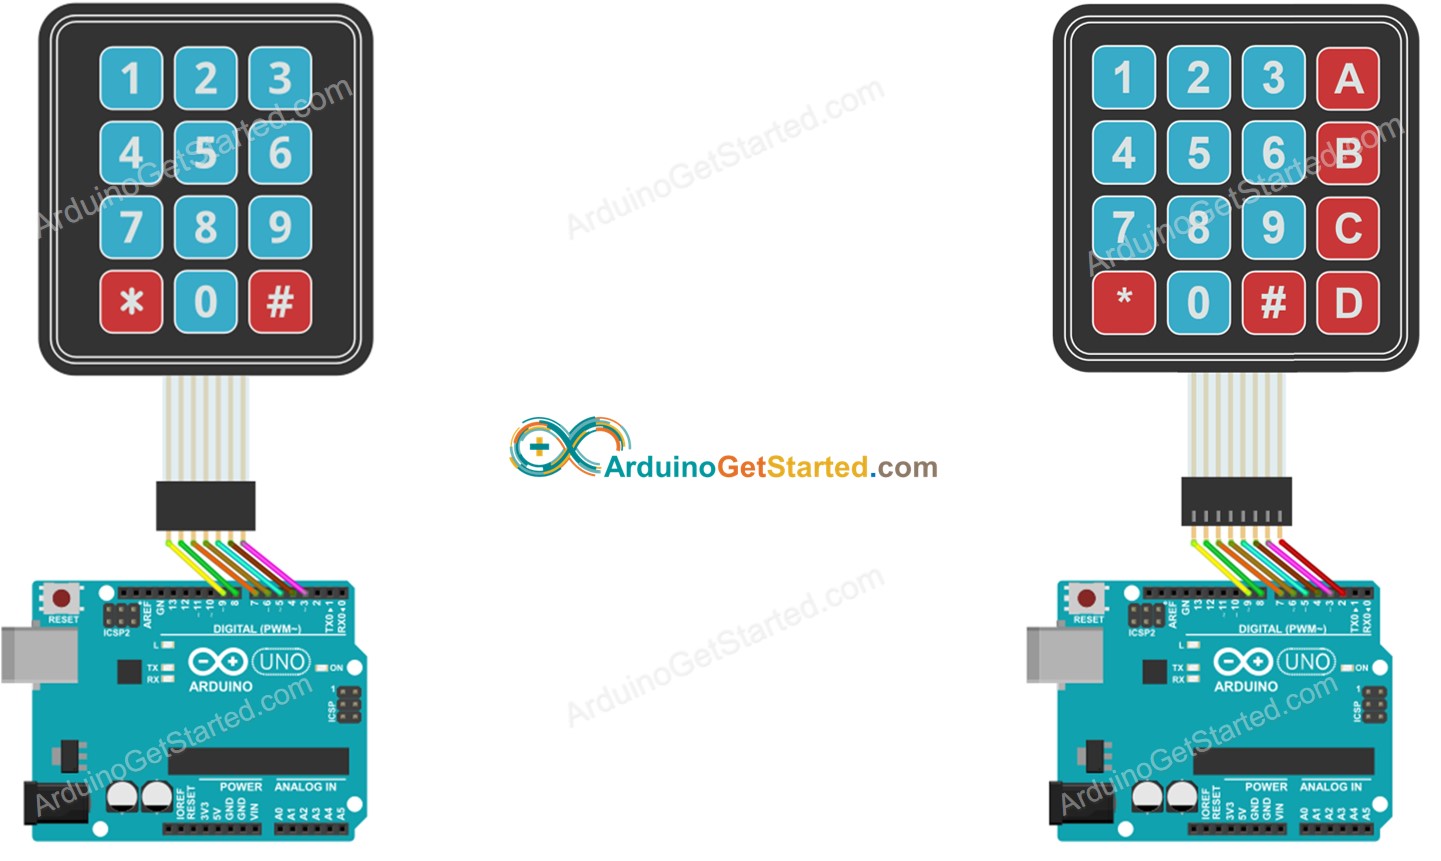
This image is created using Fritzing. Click to enlarge image
此图像是使用 Fritzing 创建的。点击放大图片
How To Program For Keypad 如何为键盘编程
Thanks to Keypad library, using keypad with Arduino is a piece of cake, no matter whether you understand how the keypad works or not.
多亏了键盘库,无论您是否了解键盘的工作原理,使用带有 Arduino 的键盘都是小菜一碟。
Arduino Code Arduino代码
Keypad 3x4 键盘 3x4
#include <Keypad.h>

const int ROW_NUM = 4; //four rows
const int COLUMN_NUM = 3; //three columns

char keys[ROW_NUM][COLUMN_NUM] = {
  {'1','2','3'},
  {'4','5','6'},
  {'7','8','9'},
  {'*','0','#'}
};

byte pin_rows[ROW_NUM] = {9, 8, 7, 6}; //connect to the row pinouts of the keypad
byte pin_column[COLUMN_NUM] = {5, 4, 3}; //connect to the column pinouts of the keypad

Keypad keypad = Keypad( makeKeymap(keys), pin_rows, pin_column, ROW_NUM, COLUMN_NUM );

void setup(){
  Serial.begin(9600);
}

void loop(){
  char key = keypad.getKey();

  if (key){
    Serial.println(key);
  }
}
Keypad 4x4 键盘 4x4
#include <Keypad.h>

const int ROW_NUM = 4; //four rows
const int COLUMN_NUM = 4; //four columns

char keys[ROW_NUM][COLUMN_NUM] = {
  {'1','2','3', 'A'},
  {'4','5','6', 'B'},
  {'7','8','9', 'C'},
  {'*','0','#', 'D'}
};

byte pin_rows[ROW_NUM] = {9, 8, 7, 6}; //connect to the row pinouts of the keypad
byte pin_column[COLUMN_NUM] = {5, 4, 3, 2}; //connect to the column pinouts of the keypad

Keypad keypad = Keypad( makeKeymap(keys), pin_rows, pin_column, ROW_NUM, COLUMN_NUM );

void setup(){
  Serial.begin(9600);
}

void loop(){
  char key = keypad.getKey();

  if (key){
    Serial.println(key);
  }
}
Quick Steps 快速步骤
- Navigate to the Libraries icon on the left bar of the Arduino IDE.
导航到 Arduino IDE 左侧栏上的 Libraries 图标。 - Search “keypad”, then find the keypad library by Mark Stanley, Alexander Brevig
搜索“键盘”,然后找到 Mark Stanley、Alexander Brevig 的键盘库 - Click Install button to install keypad library.
单击“安装”按钮安装键盘库。

- Copy the above code and open with Arduino IDE
复制上面的代码并使用Arduino IDE打开 - Click Upload button on Arduino IDE to upload code to Arduino
单击Arduino IDE上的“上传”按钮,将代码上传到Arduino - Open Serial Monitor 开放式串行监视器
- Press some keys on keypad
按键盘上的一些键 - See the result in Serial Monitor
在串行监视器中查看结果
Keypad and Password 键盘和密码
A popular application of keypad is the password input. In this application, we specify two special keys:
键盘的一个流行应用是密码输入。在此应用程序中,我们指定了两个特殊键:
- A key to start/re-start the password input. For example, key ""
用于启动/重新启动密码输入的密钥。例如,键“” - A key to terminate the password input. For example, key “#”
用于终止密码输入的键。例如,键“#”
The password will be a string that contains the remaining keys, except for two selected special keys.
密码将是一个字符串,其中包含其余密钥,但两个选定的特殊密钥除外。
When a key is pressed.
按下某个键时。
- If the key is NOT neither "" nor “#”, append the key to the user’s input password string.
如果密钥既不是“”也不是“#”,则将密钥追加到用户的输入密码字符串中。 - If the key is “#”, compare the user’s input password string with the password to determine the input password is correct or not, and then clear the user’s input password string
如果密钥为“#”,则将用户的输入密码字符串与密码进行比较,以确定输入密码是否正确,然后清除用户的输入密码字符串 - If the key is "", clear the user’s input password string
如果密钥为“”,请清除用户的输入密码字符串
Keypad - Password Code 键盘 - 密码代码
/*

 * Created by ArduinoGetStarted.com
   *
 * This example code is in the public domain
   *
 * Tutorial page: https://arduinogetstarted.com/tutorials/arduino-keypad
   */

#include <Keypad.h>

const int ROW_NUM = 4; //four rows
const int COLUMN_NUM = 3; //three columns

char keys[ROW_NUM][COLUMN_NUM] = {
  {'1','2','3'},
  {'4','5','6'},
  {'7','8','9'},
  {'*','0','#'}
};

byte pin_rows[ROW_NUM] = {9, 8, 7, 6}; //connect to the row pinouts of the keypad
byte pin_column[COLUMN_NUM] = {5, 4, 3}; //connect to the column pinouts of the keypad

Keypad keypad = Keypad( makeKeymap(keys), pin_rows, pin_column, ROW_NUM, COLUMN_NUM );

const String password = "1234"; // change your password here
String input_password;

void setup(){
  Serial.begin(9600);
  input_password.reserve(32); // maximum input characters is 33, change if needed
}

void loop(){
  char key = keypad.getKey();

  if (key){
    Serial.println(key);

    if(key == '*') {
      input_password = ""; // clear input password
    } else if(key == '#') {
      if(password == input_password) {
        Serial.println("password is correct");
        // DO YOUR WORK HERE

      } else {
        Serial.println("password is incorrect, try again");
      }

      input_password = ""; // clear input password
    } else {
      input_password += key; // append new character to input password string
    }
  }
}
- Run above code 运行上述代码
- Open Serial Monitor 开放式串行监视器
- Press “123456” keys and press “#”
按“123456”键,按“#” - Press “1234” keys and press “#”
按“1234”键,按“#” - See the result on Serial Monitor
在串行监视器上查看结果
Video Tutorial 视频教程
We are considering to make the video tutorials. If you think the video tutorials are essential, please subscribe to our YouTube channel to give us motivation for making the videos.
我们正在考虑制作视频教程。如果您认为视频教程是必不可少的,请订阅我们的 YouTube 频道,为我们制作视频提供动力。
Additional Knowledge 其他知识
- How to use the multiple passwords for keypad
如何使用键盘的多个密码 - How to input a multiple digits number using the keypad
如何使用键盘输入多位数字
Challenge Yourself 挑战自我
- Display the pressed key of the keypad on LCD. Hint: Refer to Arduino - LCD
在 LCD 上显示键盘的按键。提示:请参阅Arduino - LCD - Make a door lock with password protection using the keypad.
使用键盘制作带有密码保护的门锁。