Kivy tutorial 004: Making the GUI do stuff, binding to events – Kivy Blog
Central themes: Events and Kivy properties
中心主题:事件和kivy属性
We left the last tutorial with a calculator app GUI with some nice automatic behaviour, but which doesn’t actually do anything. Let’s change that; it’s time to learn about binding events.
上次导师课我们留下了一个有着一些不错的自动行为的计算机GUI,但是这真是啥也不干。让我们改变它,是时候了解绑定事件了。
To refresh, the basic calculator GUI code was as follows. If you modified it to experiment, feel free to continue with your modified code, and try to change the instructions to fit your modifications:
为了重新刷新,基本的计算机GUI代码像下面一样。如果你修改它来体验,随意继续修改你的代码,并且试着改变结构来达到你的修改。
from kivy.app import App
from kivy.uix.button import Button
from kivy.uix.boxlayout import BoxLayout
from kivy.uix.gridlayout import GridLayout
from kivy.uix.label import Label


class YourApp(App):
    def build(self):
        root_widget = BoxLayout(orientation='vertical')

        output_label = Label(size_hint_y=1)

        button_symbols = ('1', '2', '3', '+',
                          '4', '5', '6', '-',
                          '7', '8', '9', '.',
                          '0', '*', '/', '=')

        button_grid = GridLayout(cols=4, size_hint_y=2)
        for symbol in button_symbols:
            button_grid.add_widget(Button(text=symbol))

        clear_button = Button(text='clear', size_hint_y=None,
                              height=100)

        root_widget.add_widget(output_label)
        root_widget.add_widget(button_grid)
        root_widget.add_widget(clear_button)

        return root_widget


YourApp().run()
Note
This tutorial introduces some major new Kivy concepts. I recommend working through it even if you don’t entirely follow what’s going on, then going back to modify components and see how things change.
这节导师课介绍一些主要的kivy概念。 我建议克服它尽管你没有整个的跟随事态的进行,然后返回修改部件并且看看事如何改变的。
The plan now is that every one of these buttons should add their symbol to the Label at the top, except ‘=’ which should evaluate the code and display the result. This is obviously an extremely basic calculator, but the point here is to showcase some Kivy basics - if you’d like to improve the interface, go ahead with trying to do so along the way.
现在的计划是每个按钮应该增加他们的符号到标签的上面, 除了=号应该求值并且展示结果。这是一个极其明显的基础的计算机,但是这的关键点是展示一些kivy的基本要素-如果你想来提升界面,继续沿着这种方式继续尝试。
To make the buttons do something, we must bind to their events. This is a generic Kivy concept; whenever you want one thing to trigger another, you look for an event to bind to. Some widgets such as Button have events indicating they have been clicked on, and every Kivy property (such as all those used to customise Widgets so far) has an associated event when it changes.
为了让按钮做点事,我们必须bind绑定给它们的事件。这是一个通用kivy概念,当你像一个事引发另一个事的时候,你寻找一个事件来帮i的那个。一些组件例如Button按钮有些事件表明它们已经被点击了,并且每个kivy属性(例如所有的这些都是被用来自定义组件)有一个关联事件当它改变时。
Let’s start with a simple binding example: 让我们开始一个简单地bind绑定案例:
def print_button_text(self, instance):
    print(instance.text)
for button in button_grid.children[1:]:  # note use of the
                                         # `children` property
    button.bind(on_press=print_button_text)

# we could also have used `button.bind(on_press=lambda instance: print(instance.text))`
If you run the code now, and click on any of the buttons, you should see its text printed in the console (but not in the Kivy GUI).
如果你现在运行代码,并且点击任何按钮,你应该看见它的text信息在console控制台中打印出来(不是在KIVY的GUI中)
The key concept here is the bind method, which you can use with any Widget, as well as several other Kivy objects (discussed in later tutorials). This takes any number of keyword arguments, each specifying an event name and a function to call; in this case the event name is on_press, and the function to be called is our new print_button_text`. The ``bind` method makes sure that whenever on_press occurs, the function is called. It automatically receives a single argument, the binded widget instance.
这儿的主要概念是绑定方法, 你可以同任何组件使用绑定方法,和好几个个其他的kivy对象(之后的导师课会有涉及)。这携带任何关键字的元素,每个关键字元素特别说明一个event事件名字和一个功能来召唤;在情况下,event事件名字是 on_press, 并且 被使唤的功能是 我们的print_button_text。 bind 方法确保当 on_press出现时,功能被使唤。 它自动地接收一个单一的变量,这变量时被绑定的组件实例。
Also note that we’ve iterated over button_grid.children[1:]`. The ``children` property is available on any Widget, and holds a list of all the widgets added to it, in reverse order. In this case, we use [1:] to skip the first element, ‘=’, as we want to use this to evaluate the result.
也请注意我们已经和button_grid.children[1:]互动了。 子类属性在任何组件中都适用,并且包含了一个所有组件添加其中的list列表,这列表是反序的。在这种情况下,我们使用[1:] 来跳过第一个元素, '='向我们想的一样使用这玩意来求结果的值。
Note
Button also has an on_release event that is called when the user releases a click or touch. You can find more information in the Button documentation.
按钮也有一个on_release事件,当一个用户松开一个点击或者触摸 这on_release事件被使唤。你可以发现更多的信息在 Button文档中。
This binding idea is very normal in Kivy, and you’ll quickly get used to seeing it used in different ways, including some introduced later in these tutorials. The kv markup language, also introduced later, has special syntax designed to make it even simpler and clearer.
在kivy 绑定想法非常常见,并且你可以快速地习惯来看它在不同的方式中使用。在之后的导师课中会有介绍。 kv 标记语言, 也在之后被介绍, 有特殊地语法被设计来让代码更简单和更清晰。
Anyway, all this does so far is print some text when the event occurs, but we want to update the GUI. Let’s change the bound function to achieve that:
无论如何,所有干的这些当目前为止是,当事件出现时打印了一些文本,但是我们想要更新GUI。 让我们改变被捆绑的功能来实现它:
def print_button_text(instance):
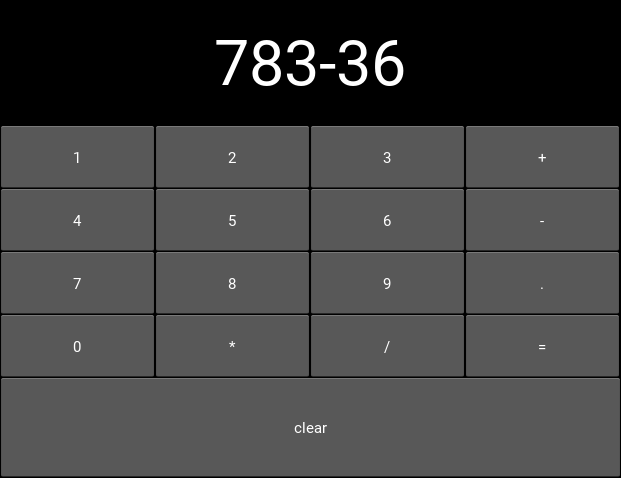
output_label.text += instance.textRun the code again. Now when you press the buttons, you should see the text appear at the top of the screen, as in the screenshot below:
再次运行代码。现在当你按按钮,你应该看到文本出现在屏幕地商法,像下面截图一样:
At this point, a new problem presents itself; the font size of the label is kind of small. We can use another event to have it update automatically in response to the label’s height:
在这时,一个新的问题它自己出现了;标签地大小有点小了。我们可以使用另一个事件来让它自动地更新来响应标签的高度:
def resize_label_text(label, new_height):
    label.font_size = 0.5*label.height
output_label.bind(height=resize_label_text)
Note that the event here is named height. This works because the Label has a Kivy property named height (as do all Widgets, see the documentation, and all Kivy properties can be bound to as an event of the same name, called when the property changes. In this case, you can now resize the window, which causes the layouts in the Widget tree to automatically resize their children, which in turn causes resize_label_text to automatically be called.
注意现在这地事件被命名为高度。 这行, 因为Label标签有一个kivy属性被叫做height高度(所有的组件都这么干,看文档, 所有的kivy属性可以被绑定作为一个这相同名字的事件,当属性改变时被叫唤。在这种情况下,你现在可以重新定义窗口的大小,这也导致了布局里的组件树自动地定义它的子类大小,这也相继地导致 resize_label_text 自动地被使唤。
We’ll use one final binding to make the calculator interface actually work; when the ‘=’ button is pressed, we can evaluate the entire label text as python code, and display the result.
我们将使用一个最终的绑定来使计算机界面真实起效;当= 号按钮被按下时,我们可以求出整个label标签里的值作为python代码,并且展示结果。
Note
Using eval as a calculator like this is in general a terrible idea, used here only to avoid dwelling on the details rather than the Kivy principles.
像这样使用eval求值 作为计算器通常是一个糟糕的想法,这里使用它只是为了避免纠缠于细节而不是Kivy原则。
def evaluate_result(instance):
    try:
        output_label.text = str(eval(output_label.text))
    except SyntaxError:
        output_label.text = 'Python syntax error!'
button_grid.children[0].bind(on_press=evaluate_result)
# Remember, button_grid.children[0] is the '=' button
Further, we can make the ‘clear’ button clear the label, so that you can start a new calculation:
另一方面我们使 clear按钮清空label 标签,因此可以开始一个新的计算:
def clear_label(instance):
output_label.text = ''
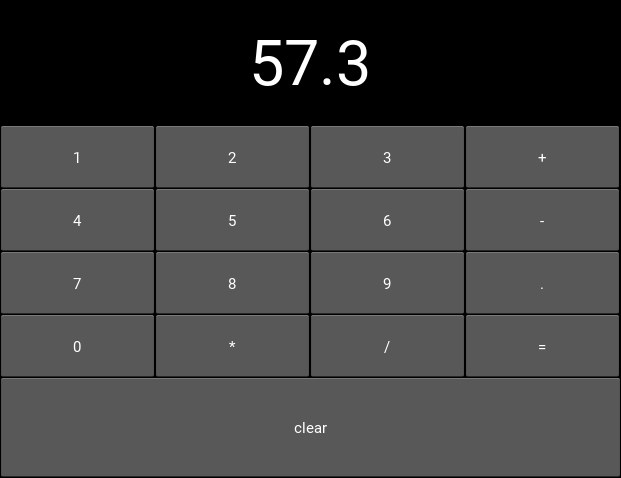
clear_button.bind(on_press=clear_label)With this all in place, run the app again and…the calculator works! Every button now does something, either adding its symbol to the output label, evaluating the label’s text as python code, or clearing the result. You should be seeing something like the image below:
这些就绪以后,再次运行app... 计算机运行了! 现在每个按钮干了些事,要么添加他的符号给输出标签, 求作为python代码的标签文本值, 或者清空结果。 你应该看像下面图片一样的事儿:
These core event binding concepts are central to working with Kivy widgets, and come up in many different ways. Don’t worry if you don’t remember all the details straight away, such as the way all properties have events you can bind to, or the specific syntax; you can look all this up in the documentation as linked throughout and indexed on the Kivy website. Later tutorials also follow on to help cement this knowledge.
这些代码绑定概念是kivy组件的核心,并且以不同的方式出现。 如果你不能立即记得所有的细节,例如所有的属性都可以由你绑定的事件, 或者特殊的语法; 你可以在文档中查询这所有的全部,就像在文中超链接所示。等会导师课跟随着帮助加强知识。
Full code
your_filename.py:
from kivy.app import App
from kivy.uix.button import Button
from kivy.uix.boxlayout import BoxLayout
from kivy.uix.gridlayout import GridLayout
from kivy.uix.label import Label


class YourApp(App):
    def build(self):
        root_widget = BoxLayout(orientation='vertical')

        output_label = Label(size_hint_y=1)

        button_symbols = ('1', '2', '3', '+',
                          '4', '5', '6', '-',
                          '7', '8', '9', '.',
                          '0', '*', '/', '=')

        button_grid = GridLayout(cols=4, size_hint_y=2)
        for symbol in button_symbols:
            button_grid.add_widget(Button(text=symbol))

        clear_button = Button(text='clear', size_hint_y=None,
                              height=100)

        def print_button_text(instance):
            output_label.text += instance.text
        for button in button_grid.children[1:]:  # note use of the
                                             # `children` property
            button.bind(on_press=print_button_text)

        def resize_label_text(label, new_height):
            label.font_size = 0.5*label.height
        output_label.bind(height=resize_label_text)

        def evaluate_result(instance):
            try:
                output_label.text = str(eval(output_label.text))
            except SyntaxError:
                output_label.text = 'Python syntax error!'
        button_grid.children[0].bind(on_press=evaluate_result)

        def clear_label(instance):
            output_label.text = ''
        clear_button.bind(on_press=clear_label)

        root_widget.add_widget(output_label)
        root_widget.add_widget(button_grid)
        root_widget.add_widget(clear_button)

        return root_widget


YourApp().run()
eval
Python eval() 函数 | 菜鸟教程
困惑: button_grid.children[0].bind(on_press=evaluate_result),为啥用这布局中的第一个元素绑定str后的eval后的值呢?为啥不是第二个值呢?
我溜达了半天,人家文中说的很明白,children这玩意与生俱来,并且是in reverse order!反序!
也就是说,根据咱添加按钮的顺序,button_grid.children[0]是什么呢?
我1开始在代码中添加了
print(button_grid.children)结果是
[<kivy.uix.button.Button object at 0x00000163EA850510>, <kivy.uix.button.Button object at 0x00000163EA850200>, <kivy.uix.button.Button object at 0x00000163EA810EB0>, <kivy.uix.button.Button object at 0x00000163EA810BA0>, <kivy.uix.button.Button object at 0x00000163EA810890>, <kivy.uix.button.Button object at 0x00000163EA810580>, <kivy.uix.button.Button object at 0x00000163EA810270>, <kivy.uix.button.Button object at 0x00000163EA7D4F20>, <kivy.uix.button.Button object at 0x00000163EA7D4C10>, <kivy.uix.button.Button object at 0x00000163EA7D4900>, <kivy.uix.button.Button object at 0x00000163EA7D45F0>, <kivy.uix.button.Button object at 0x00000163EA7D42E0>, <kivy.uix.button.Button object at 0x00000163E01DBF90>, <kivy.uix.button.Button object at 0x00000163E01DBC80>, <kivy.uix.button.Button object at 0x00000163E01DB970>, <kivy.uix.button.Button object at 0x00000163E01DB5F0>]
这谁能看懂,也不知道咋处理,那反序的话不就是咱最后添加的按钮, =号嘛
人家把算好的结果绑定给 等于号=怎么了? 不就是绑定给=等于号吗? XDD