之前已经写了一篇mmdeploy环境部署流程,在使用中却发现了很多问题,特此记录。
注意一:
echo "export LD_LIBRARY_PATH=/root/TensorRT-8.6.1.6/lib:/root/cudnn/lib:$LD_LIBRARY_PATH" >> ~/.bashrc && \
source ~/.bashrc
这两个环境变量一定要写入到.bashrc中,否则会出现net backend not found: tensorrt错误。
注意二:
from mmdeploy.apis import inference_model

deploy_cfg = "mmdeploy/configs/mmdet/detection/detection_tensorrt-fp16_dynamic-320x320-1344x1344.py"
model_cfg = "mmdetection/configs/faster_rcnn/faster-rcnn_r50_fpn_1x_coco.py"
backend_files = ["mmdeploy_model/faster-rcnn-fp16/end2end.engine"]
img = "mmdetection/demo/demo.jpg"
device = "cuda"
result = inference_model(model_cfg, deploy_cfg, backend_files, img, device)

print(result)
以上代码可以用于推理,但速度较慢,
如果要集成到自己的应用,可以创建Detector
from mmdeploy_runtime import Detector
import cv2
import datetime

# 读取图片
img = cv2.imread("../mmdetection3/demo/demo.jpg")
# 创建检测器
detector = Detector(
    model_path="faster-rcnn-onnx",
    device_name="cuda",
    device_id=0,
)
startTime = datetime.datetime.now()
# 执行推理
bboxes, labels, _ = detector(img)
print(1)
# 使用阈值过滤推理结果,并绘制到原图中
indices = [i for i in range(len(bboxes))]
for index, bbox, label_id in zip(indices, bboxes, labels):
    [left, top, right, bottom], score = bbox[0:4].astype(int), bbox[4]
    if score < 0.3:
        continue
    cv2.rectangle(img, (left, top), (right, bottom), (0, 255, 0))
endTime = datetime.datetime.now()
durTime = '推理-----时间:%dms' % ((endTime - startTime).seconds * 1000 + (endTime - startTime).microseconds / 1000)
print(durTime)
cv2.imwrite("output_detection2.png", img)
注意三:
转onnx的时候如果提示
RuntimeError: Error when binding input: There's no data transfer registered for copying tensors from Device:[DeviceType:1 MemoryType:0 DeviceId:0] to Device:[DeviceType:0 MemoryType:0 DeviceId:0]
说明你安装了onnxruntime和onnxruntime-gpu,卸载掉其中一个即可,因为我希望用gpu跑onnx,所以留下onnxruntime-gpu,卸载onnxruntime
pip uninstall onnxruntime-gpu注意四:
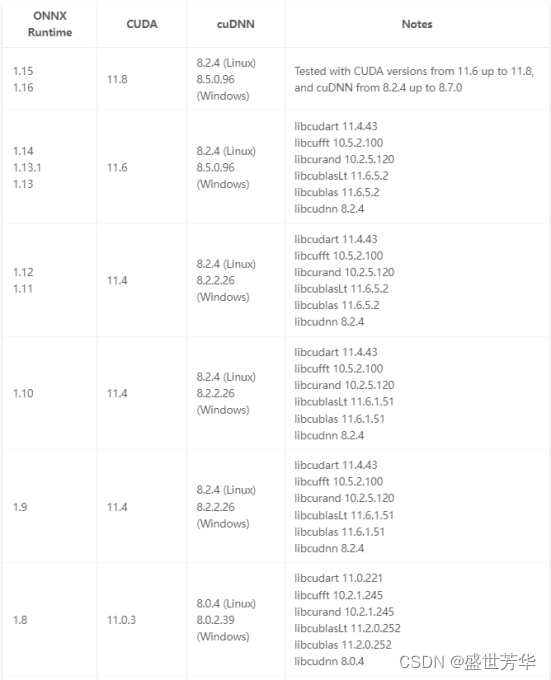
转onnx的时候如果提示一个IOB啥的错误,说明onnxruntime-gpu版本有问题。

我测试用1.15.0版本没问题,所以要pip install onnxruntime-gpu==1.15.0以及使用Release ONNX Runtime v1.8.1 · microsoft/onnxruntime · GitHub 版本的运行时环境。
注意五:
如果创建Detector需要用GPU预测,那一定要安装mmdeploy-runtime-gpu版本
pip install mmdeploy-runtime-gpu因为mmdeploy-runtime 支持 onnxruntime 推理,mmdeploy-runtime-gpu 支持 onnxruntime-gpu tensorrt 推理
注意六:
如果执行
detector = Detector(
model_path="faster-rcnn",
device_name="cuda",
device_id=0,
)
提示 [mmdeploy] [error] [common.cpp:67] Device "cuda" not found那就pip把mmdeploy-runtime卸载了,然后用gpu版本pip install mmdeploy-runtime-gpu
注意七:
执行
detector = Detector(
model_path="faster-rcnn",
device_name="cuda",
device_id=0,
)
如果提示
Net backend not found: tensorrt, available backends: [("onnxruntime", 0)]
是因为没设置tensorrt环境变量
cd TensorRT-8.6.1.6
export TENSORRT_DIR=$(pwd)
export LD_LIBRARY_PATH=$TENSORRT_DIR/lib:$LD_LIBRARY_PATH
注意八:
运行
detector = Detector(
model_path="faster-rcnn",
device_name="cuda",
device_id=0,
)
如果提示libonnxruntime_providers_cuda.so with error: libcudnn.so.8: cannot open shared object file: No such file or directory
那是cudnn环境变量没设置导致的
cd cudnn
export CUDNN_DIR=$(pwd)
export LD_LIBRARY_PATH=$CUDNN_DIR/lib:$LD_LIBRARY_PATH
注意九:
运行
detector = Detector(
model_path="faster-rcnn-onnx",
device_name="cuda",
device_id=0,
)
如果提示Segmentation fault (core dumped)
那说明ONNXRuntime-gpu版本和cuda不匹配
我的cuda11.7,那就要用ONNXRuntime-gpu的版本是1.15.0,ONNXRuntime-gpu和运行时一定要对得上,注意:用1.18.0有问题。
注意十:
运行
detector = Detector(
model_path="faster-rcnn-onnx",
device_name="cuda",
device_id=0,
)
如果提示 [mmdeploy] [error] [tensor.cpp:137] mismatched data type FLOAT vs HALF
那说明转onnx应该用了configs/mmdet/detection/detection_onnxruntime-fp16_dynamic.py这个配置,换成configs/mmdet/detection/detection_onnxruntime_dynamic.py重新转onnx即可。
注意十一:
如果要同时使用trt和onnx,编译mmdeploy时
cmake -DCMAKE_CXX_COMPILER=g++-9 -DMMDEPLOY_TARGET_BACKENDS="trt;ort" -DTENSORRT_DIR=/root/TensorRT-8.6.1.6/ -DCUDNN_DIR=/root/cudnn -DONNXRUNTIME_DIR=/root/onnxruntime-linux-x64-gpu-1.15.0 .
make -j$(nproc) && make install
编译sdk的时候
cmake . \
    -DCMAKE_CXX_COMPILER=g++-9 \
    -DMMDEPLOY_BUILD_SDK=ON \
    -DMMDEPLOY_BUILD_EXAMPLES=ON \
    -DMMDEPLOY_BUILD_SDK_PYTHON_API=ON \
    -DMMDEPLOY_TARGET_DEVICES="cuda;cpu" \
    -DMMDEPLOY_TARGET_BACKENDS="trt;ort" \
    -Dpplcv_DIR=/root/ppl.cv/cuda-build/install/lib/cmake/ppl/ \
    -DTENSORRT_DIR=/root/TensorRT-8.6.1.6/ \
    -DCUDNN_DIR=/root/cudnn/ \
    -DONNXRUNTIME_DIR=/root/onnxruntime-linux-x64-gpu-1.15.0
make -j$(nproc) && make install
测试发现,创建Detector如果用trt的gpu识别一张图11ms,而onnx的gpu识图需要3s,大概率环境问题吧,谁爱整谁整去吧,我心累了!!!!!!!!!
参考:
使用SDK推理时报错,645738 Segmentation fault (core dumped) · Issue #2645 · open-mmlab/mmdeploy (github.com)
paddle使用fp16模式推理时报错ONNXRuntimeError无法加载libcublasLt.so.11类似错误 – 行星带 (beltxman.com) mmdeploy/docs/en/01-how-to-build/linux-x86_64.md at v1.3.1 · open-mmlab/mmdeploy (github.com)
CUDA lazy loading is not enabled_cuda lazy loading is not enabled. enabling it can -CSDN博客
TensorRT ubuntu18.04 安装过程记录_importerror: libnvinfer.so.8: cannot open shared o-CSDN博客 安装使用MMDeploy(Python版)_pycharm怎么用mmdeploy-CSDN博客
MMDeploy安装、python API测试及C++推理_mmdeploy c++-CSDN博客
Windows系统下MMDeploy预编译包的使用_mmdeploy masrkrcnn-CSDN博客
mmdeploy环境部署流程_mmdeploy 实现dcnv4模型部署-CSDN博客

