Arduino - Serial Plotter Arduino - 串行绘图仪
In this tutorial, we will learn how to use the Serial Plotter on Arduino IDE, how to plot the multiple graphs.
在本教程中,我们将学习如何在Arduino IDE上使用串行绘图仪,如何绘制多个图形。
About Serial Plotter 关于串行绘图仪
Serial Plotter is one of the tools in Arduino IDE. Arduino can read the temperature, humidity or any kind of sensor data, and send it to Serial Plotter. Serial Plotter receives data from Arduino and visualizes data as waveforms. Serial Plotter can visualize not only single but also multiple sensor data in the same graph.
串行绘图仪是Arduino IDE中的工具之一。Arduino可以读取温度,湿度或任何类型的传感器数据,并将其发送到串行绘图仪。串行绘图仪从Arduino接收数据,并将数据可视化为波形。串行绘图仪不仅可以在同一图形中显示单个传感器数据,还可以显示多个传感器数据。
Data is exchanged between Serial Plotter and Arduino via USB cable, which is also used to upload the code to Arduino. Therefore, To use Serial Plotter, we MUST connect Arduino and PC via this cable.
数据通过USB线在串行绘图仪和Arduino之间交换,USB线也用于将代码上传到Arduino。因此,要使用串行绘图仪,我们必须通过此电缆连接Arduino和PC。
Serial Plotter includes a selection box to select the serial baud rate and a graph:
串行绘图仪包括一个选择框,用于选择串行波特率和一个图表:
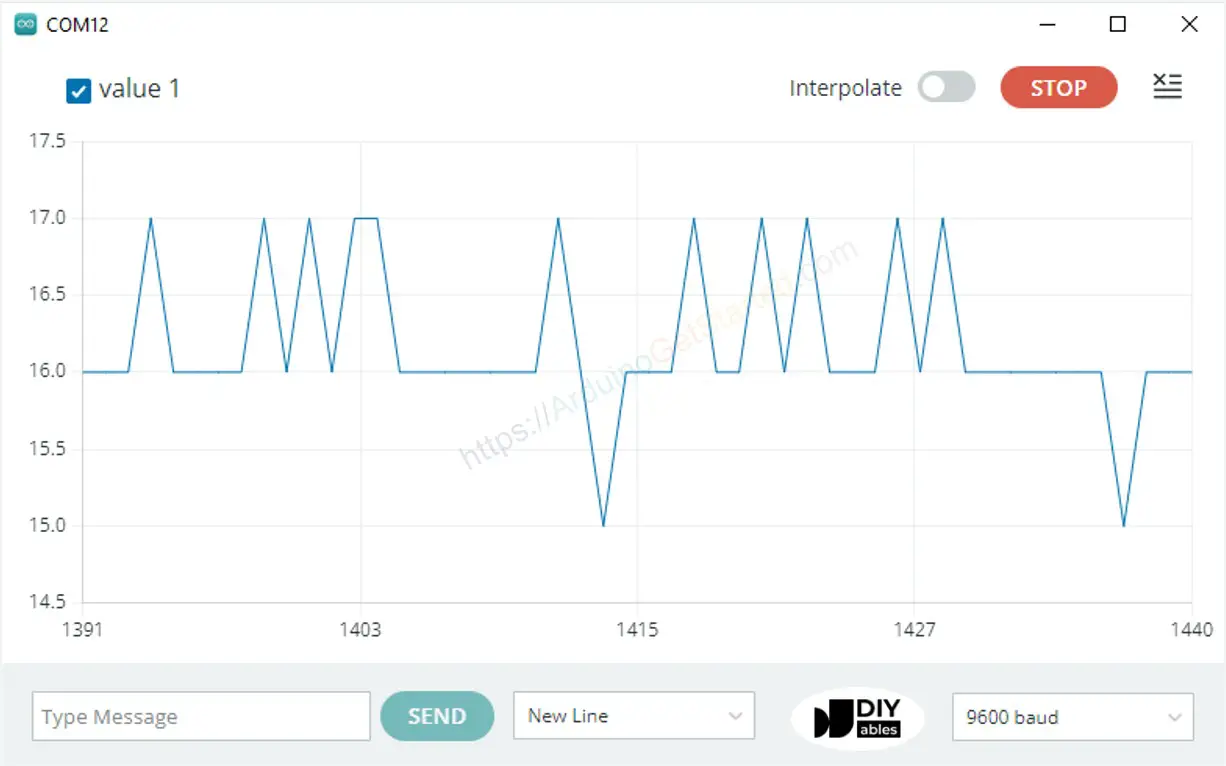
- X-axis: represent the time. It has 500 points. The time between each point is the time between two consecutive Serial.println() function calls. This time is usually equal to the time of loop() function.
X轴:表示时间。它有 500 点。每个点之间的时间是两个连续的Serial.println()函数调用之间的时间。这个时间通常等于loop()函数的时间。 - Y-axis: represents the values received from Arduino. The Y-axis automatically adjusts itself as the value increases or decreases.
Y轴:表示从Arduino接收的值。Y 轴会随着值的增加或减少而自动调整。
If you want to use the Serial Plotter on your smartphone, you can use the Web Serial Plotter instead.
如果您想在智能手机上使用串行绘图仪,您可以改用网络串行绘图仪。
How To Open Serial Plotter 如何打开串行绘图仪
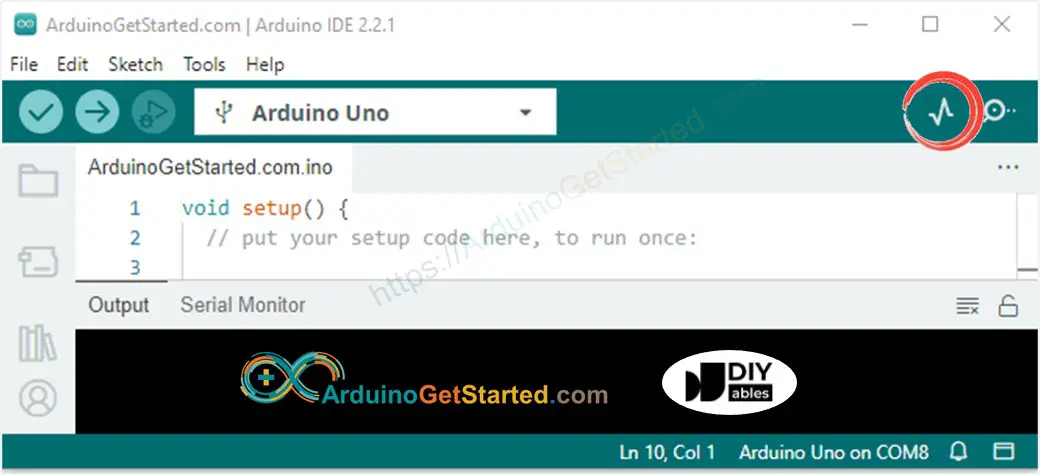
On Arduino IDE, Click Serial Plotter icon
在 Arduino IDE 上,单击 Serial Plotter 图标
Plotting of Single Line in Graph 图中单线的绘制
To print a single graph, we just need to send the data and terminate it by “\r\n” character.
要打印单个图形,我们只需要发送数据并用“\r\n”字符终止它。
In detail, we just need to useSerial.println() function
详细来说,我们只需要使用 Serial.println() 函数
Serial.println(variable);
※ NOTE THAT: ※ 注意事项:
Serial.println() automatically appends “\r\n” characters after data.
Serial.println() 自动在数据后附加“\r\n”字符。
Example Code 示例代码
This example reads the value from an analog input pin and plots them on Serial Plotter
本例从模拟输入引脚读取值,并将其绘制在串行绘图仪上
/*

 * Created by ArduinoGetStarted.com
   *
 * This example code is in the public domain
   *
 * Tutorial page: https://arduinogetstarted.com/tutorials/arduino-serial-plotter
   */

void setup() {
  Serial.begin(9600); //好像115200不行
}

void loop() {
  int y1 = analogRead(A0);

  Serial.println(y1);

  delay(100);
}
Quick Steps 快速步骤
- Copy the above code and open with Arduino IDE
复制上面的代码并使用Arduino IDE打开 - Click Upload button on Arduino IDE to upload code to Arduino
单击Arduino IDE上的“上传”按钮,将代码上传到Arduino - Open Serial Plotter 开放式串行绘图仪
- Select baurate 9600 选择金黄色 9600
- See graph on Serial Plotter
参见串行绘图仪上的图表
Plotting of Multiple Lines in Graph 在图形中绘制多条线
When we want to plot multiple variables, we need to separate variables from each other by “\t” or " " character. The last value MUST be terminated by “\r\n” characters.
当我们想绘制多个变量时,我们需要用"\t"或" "字符将变量彼此分开。最后一个值必须以“\r\n”字符结尾。
In detail: 详细地:
- The first variable 第一个变量
Serial.print(variable_first);
- The middle variables 中间变量
Serial.print("\t"); // or Serial.print(" ")
Serial.print(variable_nth);
- The last variable 最后一个变量
Serial.print("\t"); // or Serial.print(" ")
Serial.println(variable_last);
Example Code 示例代码
This example reads the value from 4 analog input pins and plots them on Serial Plotter
本例从4个模拟输入引脚读取值,并在串行绘图仪上绘制
/*

 * Created by ArduinoGetStarted.com
   *
 * This example code is in the public domain
   *
 * Tutorial page: https://arduinogetstarted.com/tutorials/arduino-serial-plotter
   */

void setup() {
  Serial.begin(9600);
}

void loop() {
  int y1 = analogRead(A0);
  int y2 = analogRead(A1);
  int y3 = analogRead(A2);
  int y4 = analogRead(A3);

  Serial.print(y1);
  Serial.print(" "); // a space ' ' or  tab '\t' character is printed between the two values.
  Serial.print(y2);
  Serial.print(" "); // a space ' ' or  tab '\t' character is printed between the two values.
  Serial.print(y3);
  Serial.print(" "); // a space ' ' or  tab '\t' character is printed between the two values.
  Serial.println(y4); // the last value is followed by a carriage return and a newline characters.

  delay(100);
}
Multiple Graph: 多图:

Example of 3 Sine Waveforms 3 正弦波形示例
/*
* Created by ArduinoGetStarted.com
*
* This example code is in the public domain
*
* Tutorial page: https://arduinogetstarted.com/tutorials/arduino-serial-plotter
*/
void setup() {
Serial.begin(9600);
}
void loop() {
for(int i = 0; i < 360; i += 5) {
float y1 = 1 * sin(i * M_PI / 180);
float y2 = 2 * sin((i + 90)* M_PI / 180);
float y3 = 5 * sin((i + 180)* M_PI / 180);
Serial.print(y1);
Serial.print("\t"); // a space ' ' or tab '\t' character is printed between the two values.
Serial.print(y2);
Serial.print("\t"); // a space ' ' or tab '\t' character is printed between the two values.
Serial.println(y3); // the last value is followed by a carriage return and a newline characters.
delay(100);
}
}
Multiple Sine Waveform Graph:
多正弦波形图:

Video Tutorial 视频教程
We are considering to make the video tutorials. If you think the video tutorials are essential, please subscribe to our YouTube channel to give us motivation for making the videos.
我们正在考虑制作视频教程。如果您认为视频教程是必不可少的,请订阅我们的 YouTube 频道,为我们制作视频提供动力。
Function References 函数参考
- Serial.available()
- Serial.begin()
- Serial.print()
- Serial.println()
- Serial.read()
- Serial.readBytes()
- Serial.readBytesUntil()
- Serial.readString()
- Serial.readStringUntil()
- Serial.write()









![ServBay[中文] 下一代Web开发环境](https://img-blog.csdnimg.cn/direct/aa72cea2081044cfa852c859f1b5dbd1.png)
