【目的】
校验视频中出现马赛克的频率,抽象成将视频切割成图片,对每张代测图片进行自动化验证。
【实现】
图像边缘检测算法识别
算法步骤:
- 使用高斯滤波器,以平滑图像,滤除噪声。
- 计算图像中每个像素点的梯度强度和方向。
- 应用非极大值(Non-Maximum Suppression)抑制,以消除边缘检测带来的杂散响应。
- 应用双阈值(Double-Threshold)检测来确定真实的和潜在的边缘。
- 通过抑制孤立的弱边缘最终完成边缘检测。
八点法计算方案
说明:像素点处理方法,缺点是一张图片的处理速度过慢,平均在5,6s/张图
算法步骤:
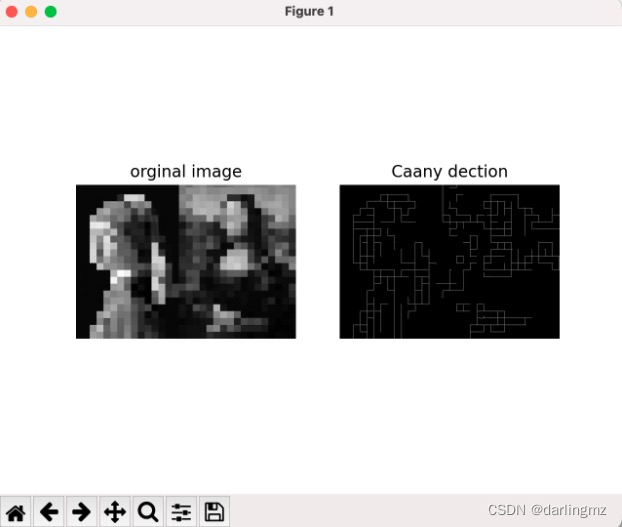
- 对图片进行Canny边缘检测,阈值分别取40和200,得到图像的检测结果;
-
其中马赛克区域经过边缘检测后,出现了一堆方块状或类方块状的区域;

-
方块和类方块大体分为以上5种,分别为完备的正方形、分别缺一边的不完备正方形。为了统计上述边缘检测结果图中含有的这5类正方形,可以采取下述方式进行统计:
-
边长从3开始,逐次加1,到33截止(这里有待考究)。判断每个像素以这个边长能否组成正方形(5种情况,以下简称正方形)。如果能,这个边长的正方形数加1,如果不能继续遍历。
- 整体判断法:以此边长遍历整个正方形区域,如果无缺失的像素/整个正方形的像素大于70%,认为这个正方形存在。这种方法的优点是判断准确,综合利用正方形所有的像素,但缺点同样明显,运算速度极低;
- 八点判断法:选取正方形中的八个点来进行判断,如果选择的八个点都满足构成正方形条件,那么,认为此正方形存在。这种方法的优点是运算速度有所提升,但是准确率上存在不足;****
- 四点判断法:选取正方形上的四个点位置进行判断,如果选择的四个点都满足构成正方的条件,认为此正方形存在。这种方法运算速度最快,伴随着的是不太理想的准确率。
图像轮廓计算正方形面积
识别正方形
area = cv2.contourArea(obj) #计算轮廓内区域的面积
机器学习-图片分类
https://github.com/search?q=detect+mosaic&type=
机器学习-马赛克识别
https://github.com/search?q=detect+mosaic&type=
【代码1】
import cv2
from PIL import Image
import numpy as np
import math
import warnings
import os
from numpy import sort
import time

make_file_cmd = "touch test_mosaic_tmp.txt"
os.popen(make_file_cmd).read()
file = open('./test_mosaic_tmp.txt', 'w', encoding='utf-8')

# 算法来源,博客https://www.cnblogs.com/techyan1990/p/7291771.html和https://blog.csdn.net/zhancf/article/details/49736823
"""
8点法确认正方形
"""

def test_mosaic(url):
    highhold = 100  # 高阈值
    lowhold = 60  # 低阈值

    warnings.filterwarnings("ignore")
    demo = Image.open(url)
    im = np.array(demo.convert('L'))  # 灰度化矩阵
    # im = cv2.imread(url, 0)
    # image = cv2.Canny(im, 100, 200, 5)
    # file.write(str(im.shape) + "\n")

    height = im.shape[0]  # 尺寸
    width = im.shape[1]
    gm = [[0 for i in range(width)] for j in range(height)]  # 梯度强度
    gx = [[0 for i in range(width)] for j in range(height)]  # 梯度x
    gy = [[0 for i in range(width)] for j in range(height)]  # 梯度y

    theta = 0  # 梯度方向角度360度
    dirr = [[0 for i in range(width)] for j in range(height)]  # 0,1,2,3方位判定值
    highorlow = [[0 for i in range(width)] for j in range(height)]  # 强边缘、弱边缘、忽略判定值2,1,0
    rm = np.array([[0 for i in range(width)] for j in range(height)])  # 输出矩阵
    # 高斯滤波平滑,3x3
    for i in range(1, height - 1, 1):
        for j in range(1, width - 1, 1):
            rm[i][j] = im[i - 1][j - 1] * 0.0924 + im[i - 1][j] * 0.1192 + im[i - 1][j + 1] * 0.0924 + im[i][
                j - 1] * 0.1192 + im[i][j] * 0.1538 + im[i][j + 1] * 0.1192 + im[i + 1][j - 1] * 0.0924 + im[i + 1][
                           j] * 0.1192 + im[i + 1][j + 1] * 0.0924
    for i in range(1, height - 1, 1):  # 梯度强度和方向
        for j in range(1, width - 1, 1):
            gx[i][j] = -rm[i - 1][j - 1] + rm[i - 1][j + 1] - 2 * rm[i][j - 1] + 2 * rm[i][j + 1] - rm[i + 1][j - 1] + \
                       rm[i + 1][j + 1]
            gy[i][j] = rm[i - 1][j - 1] + 2 * rm[i - 1][j] + rm[i - 1][j + 1] - rm[i + 1][j - 1] - 2 * rm[i + 1][j] - \
                       rm[i + 1][j + 1]
            gm[i][j] = pow(gx[i][j] * gx[i][j] + gy[i][j] * gy[i][j], 0.5)
            theta = math.atan(gy[i][j] / gx[i][j]) * 180 / 3.1415926
            if theta >= 0 and theta < 45:
                dirr[i][j] = 2
            elif theta >= 45 and theta < 90:
                dirr[i][j] = 3
            elif theta >= 90 and theta < 135:
                dirr[i][j] = 0
            else:
                dirr[i][j] = 1
    for i in range(1, height - 1, 1):  # 非极大值抑制,双阈值监测
        for j in range(1, width - 1, 1):
            NW = gm[i - 1][j - 1]
            N = gm[i - 1][j]
            NE = gm[i - 1][j + 1]
            W = gm[i][j - 1]
            E = gm[i][j + 1]
            SW = gm[i + 1][j - 1]
            S = gm[i + 1][j]
            SE = gm[i + 1][j + 1]
            if dirr[i][j] == 0:
                d = abs(gy[i][j] / gx[i][j])
                gp1 = (1 - d) * E + d * NE
                gp2 = (1 - d) * W + d * SW
            elif dirr[i][j] == 1:
                d = abs(gx[i][j] / gy[i][j])
                gp1 = (1 - d) * N + d * NE
                gp2 = (1 - d) * S + d * SW
            elif dirr[i][j] == 2:
                d = abs(gx[i][j] / gy[i][j])
                gp1 = (1 - d) * N + d * NW
                gp2 = (1 - d) * S + d * SE
            elif dirr[i][j] == 3:
                d = abs(gy[i][j] / gx[i][j])
                gp1 = (1 - d) * W + d * NW
                gp2 = (1 - d) * E + d * SE
            if gm[i][j] >= gp1 and gm[i][j] >= gp2:
                if gm[i][j] >= highhold:
                    highorlow[i][j] = 2
                    rm[i][j] = 1
                elif gm[i][j] >= lowhold:
                    highorlow[i][j] = 1
                else:
                    highorlow[i][j] = 0
                    rm[i][j] = 0
            else:
                highorlow[i][j] = 0
                rm[i][j] = 0
    for i in range(1, height - 1, 1):  # 抑制孤立低阈值点
        for j in range(1, width - 1, 1):
            if highorlow[i][j] == 1 and (
                    highorlow[i - 1][j - 1] == 2 or highorlow[i - 1][j] == 2 or highorlow[i - 1][j + 1] == 2 or
                    highorlow[i][j - 1] == 2 or highorlow[i][j + 1] == 2 or highorlow[i + 1][j - 1] == 2 or
                    highorlow[i + 1][j] == 2 or highorlow[i + 1][j + 1] == 2):
                # highorlow[i][j]=2
                rm[i][j] = 1
    # img=Image.fromarray(rm)#矩阵化为图片
    # img.show()
    # new = np.concatenate((im, image), axis=1)
    # cv2.imwrite('combined.jpg', new)

    # 正方形法判定是否有马赛克
    value = 20
    lowvalue = 16
    imgnumber = [0 for i in range(value)]
    for i in range(1, height - 1, 1):  # 性价比高的8点判定法
        for j in range(1, width - 1, 1):
            for k in range(lowvalue, value):
                count = 0
                if i + k - 1 >= height or j + k - 1 >= width:
                    continue
                if rm[i][j] != 0:
                    count += 1  # 4个顶点
                if rm[i + k - 1][j] != 0:
                    count += 1
                if rm[i][j + k - 1] != 0:
                    count += 1
                if rm[i + k - 1][j + k - 1] != 0:
                    count += 1
                e = (k - 1) // 2
                if rm[i + e][j] != 0:
                    count += 1
                if rm[i][j + e] != 0:
                    count += 1
                if rm[i + e][j + k - 1] != 0:
                    count += 1
                if rm[i + k - 1][j + e] != 0:
                    count += 1
                if count >= 6:
                    imgnumber[k] += 1
    for i in range(lowvalue, value):
        file.write("length:{}  number:{}".format(i, imgnumber[i]) + "\n")


def get_all_mosaic(dir_url):
    start_time = time.time()
    num_lists = []
    list = os.listdir(dir_url)
    for i in list:
        num = int(i.split(".")[0])
        num_lists.append(num)
    num_lists = sort(num_lists)
    for j in num_lists:
        print(j)
        url = dir_url + str(j) + ".jpg"
        test_mosaic(url)
    end_time = time.time()
    print(f"get_all_mosaic time consumption: {str(end_time - start_time)} seconds")


if __name__ == '__main__':
    url = "Desktop/ceshi/"
    get_all_mosaic(url)
    # smaller_cmd = '/opt/homebrew/bin/ffmpeg -i ' + str(url) + ' -vf scale=320:-1 tmp.png'
    # # smaller_cmd = '/opt/homebrew/bin/ffmpeg -i ' + str(url) + ' -vf "scale=iw/6:ih/6" tmp.png'
    # os.popen(smaller_cmd).read()
    # test("tmp.png")
【代码2】自定义逻辑
import cv2
import os
import numpy as np

# 学习link:本文链接:https://blog.csdn.net/LPYchengxuyuan/article/details/122003702
#定义形状检测函数
def ShapeDetection(img):
    msk_num = 0
    img_area = []
    Square_area = []
    triangle_area = []
    Rectangle_area = []
    Circle_area = []
    Square_x_y = []
    Square_w_h = []
    imgGray = cv2.cvtColor(img, cv2.COLOR_RGB2GRAY)  # 转灰度图
    imgBlur = cv2.GaussianBlur(imgGray, (5, 5), 1)  # 高斯模糊
    imgCanny = cv2.Canny(imgBlur, 60, 60)  # Canny算子边缘检测
    cv2.imwrite("shape_Detection.png", imgContour)
    triangle_num = 0
    Square_num = 0
    Rectangle_num = 0
    Circle_num = 0
    not_Square_num = 0

    area_5 = []
    area_6 = []
    area_7 = []
    area_8 = []
    area_9 = []
    area_10 = []
    area_11 = []
    area_12 = []
    area_13 = []

    contours,hierarchy = cv2.findContours(imgCanny,cv2.RETR_EXTERNAL,cv2.CHAIN_APPROX_NONE)  #寻找轮廓点
    for obj in contours:
        area = cv2.contourArea(obj)  #计算轮廓内区域的面积
        cv2.drawContours(imgContour, obj, -1, (255, 0, 0), 4)  #绘制轮廓线
        perimeter = cv2.arcLength(obj,True)  #计算轮廓周长
        approx = cv2.approxPolyDP(obj,0.02*perimeter,True)  #获取轮廓角点坐标
        CornerNum = len(approx)   #轮廓角点的数量
        x, y, w, h = cv2.boundingRect(approx)  #获取坐标值和宽度、高度
        # 添加正方形的判断
        if CornerNum == 3:
            objType = "triangle"
            not_Square_num += 1
            triangle_area.append(area)
        elif CornerNum == 4:
            if w == h:
                objType = "Square"
                Square_num += 1
                Square_area.append(area)
                Square_x_y.append([x,y])
                Square_w_h.append(w)
                cv2.rectangle(imgContour, (x, y), (x + w, y + h), (0, 0, 255), 2)  # 绘制边界框
                cv2.putText(imgContour, objType, (x + (w // 2), y + (h // 2)), cv2.FONT_HERSHEY_COMPLEX, 0.6, (0, 0, 0),1)  # 绘制文字
            else:
                objType = "Rectangle"
                not_Square_num += 1
                # img_area.append(area)
                Rectangle_area.append(area)
        elif CornerNum == 5:
            area_5.append(area)
        elif CornerNum == 6:
            area_6.append(area)
        elif CornerNum == 7:
            area_7.append(area)
        elif CornerNum == 8:
            area_8.append(area)
        elif CornerNum == 9:
            area_9.append(area)
        elif CornerNum == 10:
            area_10.append(area)
        elif CornerNum == 11:
            area_11.append(area)
        elif CornerNum == 12:
            area_12.append(area)
        elif CornerNum == 13:
            area_13.append(area)
        else:
            objType = "N"
            not_Square_num += 1
            img_area.append(area)

    print(triangle_num,Square_num,Rectangle_num,Circle_num,not_Square_num)
    print(sum(triangle_area),sum(Square_area),sum(Rectangle_area),sum(area_5),sum(area_6),sum(area_7),sum(area_8),sum(area_9),sum(area_10),sum(area_11),sum(area_12),sum(area_13),sum(img_area))

    # print(Square_x_y)
    # print(Square_w_h)
    rm_cmd = "rm -rf ./tmp/*.png ./tmp/*.ts"
    os.popen(rm_cmd).read()
    # cv2.imwrite("./tmp/Original_img.png", img)
    # cv2.imwrite("./tmp/imgGray.png", imgGray)
    # cv2.imwrite("./tmp/imgBlur.png", imgBlur)
    cv2.imwrite("./tmp/imgCanny.png", imgCanny)
    cv2.imwrite("./tmp/shape_Detection.png", imgContour)

    if test_msk_1(Square_num,not_Square_num) is True and test_msk_2(Square_num,Square_w_h) and True or test_msk_3(Square_area) is True:
        msk_num += 1
        print("这张图片马赛克")
    else:
        print("这张图片正常")
    print("马赛克张数:" + str(msk_num))

# 添加马赛克的判断
"""
1、正方形的个数占所有形状的2/3
2、统计相同长度的正方形个数,前三名正方形占所有正方形个数的1/3
3、统计相同长度的正方形个数,前三名正方形面积占所有正方形面积的1/3
"""

def test_msk_1(Square_num,not_Square_num):
    msk_num = 0
    if not_Square_num == 0:
        return
    if Square_num / not_Square_num >= 2/3:
        print("1正方形的个数/所有形状:" + Square_num / not_Square_num)
        msk_num += 1
    if msk_num > 0:
        return True
    else:
        return False


def test_msk_2(Square_num,Square_w_h):
    msk_num = 0
    # 求正方形不同长度的个数字典
    Square_num_info = {}
    for i in Square_w_h:
        if i not in Square_num_info:
            Square_num_info[i] = 1
        else:
            Square_num_info[i] += 1
    Square_num_info_value = list(Square_num_info.values())
    # 求个数前三的长度
    if Square_num_info_value == None or len(Square_num_info_value) == 0:
        print("参数不合法!")
        return True
    elif len(Square_num_info_value) == 1:
        print("正方形" + str(Square_num_info_value[0]))
        return True
    elif len(Square_num_info_value) == 2:
        print("正方形" + str(Square_num_info_value[0]) + str(Square_num_info_value[1]))
        return True
    r1 = r2 = r3 = -2 ** 31
    i = 0
    while i < len(Square_num_info_value):
        if Square_num_info_value[i] > r1:
            r3 = r2
            r2 = r1
            r1 = Square_num_info_value[i]
        # elif C[i] > r2 and C[i] != r1:
        elif Square_num_info_value[i] > r2:
            r3 = r2
            r2 = Square_num_info_value[i]
        # elif C[i] > r3 and C[i] != r2:
        elif Square_num_info_value[i] > r3:
            r3 = Square_num_info_value[i]
        i += 1
    top3_Square_num = r1 + r2 + r3
    if top3_Square_num / Square_num >= 1/3:
        print(top3_Square_num,Square_num)
        print("2前三正方形个数/总正方形个数的:" + str(top3_Square_num / Square_num))
        msk_num += 1
    if msk_num > 0:
        return True
    else:
        return False


def test_msk_3(Square_area):
    msk_num = 0
    all_area = sum(Square_area)
    # 求正方形不同长度的面积字典
    Square_num_info = {}
    for i in Square_area:
        if i not in Square_num_info:
            Square_num_info[i] = 1
        else:
            Square_num_info[i] += 1
    Square_num_info_value = list(Square_num_info.values())
    print(Square_num_info)
    print(Square_num_info_value)
    # 求个数前三的面积
    if Square_num_info_value == None or len(Square_num_info_value) == 0:
        print("参数不合法!")
        return True
    elif len(Square_num_info_value) == 1:
        top3_Square_num = Square_num_info_value[0]
        print("Square_num_info_value:" + str(top3_Square_num))
        return True
    elif len(Square_num_info_value) == 2:
        top3_Square_num = Square_num_info_value[0] + Square_num_info_value[1]
        print("Square_num_info_value:" + str(top3_Square_num))
        return True
    r1 = r2 = r3 = -2 ** 31
    i = 0
    while i < len(Square_num_info_value):
        if Square_num_info_value[i] > r1:
            r3 = r2
            r2 = r1
            r1 = Square_num_info_value[i]
        elif Square_num_info_value[i] > r2:
            r3 = r2
            r2 = Square_num_info_value[i]
        elif Square_num_info_value[i] > r3:
            r3 = Square_num_info_value[i]
        i += 1
    top3_Square_num = []
    top3_Square_num.append(r1)
    top3_Square_num.append(r2)
    top3_Square_num.append(r3)
    top1 = [k for k, v in Square_num_info.items() if v == r1]
    top2 = [k for k, v in Square_num_info.items() if v == r2]
    top3 = [k for k, v in Square_num_info.items() if v == r3]
    top3_Square_length = top1 + top2 + top3
    top3_Square_length = list(dict.fromkeys(top3_Square_length))
    top3_Square_area = 0
    for i in range(0,3):
        print(top3_Square_length[i],top3_Square_num[i])
        top3_Square_area += top3_Square_length[i] * top3_Square_num[i]
    print(top3_Square_area,all_area)
    if top3_Square_area / all_area >= 2/3:
        print("3前三正方形面积/总正方形:" + str(top3_Square_area / all_area))
        msk_num += 1
    if msk_num > 0:
        return True
    else:
        return False


if __name__ == '__main__':
    path = 'Desktop/huaping/1.png'
    img = cv2.imread(path)
    imgContour = img.copy()
    ShapeDetection(img)
    # for i in range(1,11):
    #     path = 'Desktop/ceshi/' + str(i) + '.jpg'
    #     img = cv2.imread(path)
    #     imgContour = img.copy()
    #     ShapeDetection(img)

    # for i in range(50):
    #     path = 'Desktop/ceshi2/' + str(i) + '.jpg'
    #     img = cv2.imread(path)
    #     imgContour = img.copy()
    #     ShapeDetection(img)
    #     i += 1
    # print(i)
![buuctf-web-[BJDCTF2020]Easy MD51](https://img-blog.csdnimg.cn/img_convert/e32defdf90ab4d649b5c46bd8b64b008.png)

