RadioML 2016.10a 调制方式识别 MLP、CNN、ResNet
X = []
lbl = []
for mod in mods:
    for snr in snrs:
        X.append(Xd[(mod,snr)])
        for i in range(Xd[(mod,snr)].shape[0]):
            lbl.append((mod,snr))
X = np.vstack(X)
file.close()
上述论文的分类任务是识别和区分不同类型的无线电调制方式。
项目地址:https://github.com/daetz-coder/RadioML2016.10a_CNN

数据链接:https://pan.baidu.com/s/1sxyWf4M0ouAloslcXSJe9w?pwd=2016
提取码:2016
下面介绍具体的处理方式,首先为了方便数据加载,根据SNR的不同划分为多个csv子文件
import pickle
import pandas as pd

# 指定pickle文件路径
pickle_file_path = './data/RML2016.10a_dict.pkl'

# 加载数据
with open(pickle_file_path, 'rb') as file:
    data_dict = pickle.load(file, encoding='latin1')

# 创建一个字典,用于按SNR组织数据
data_by_snr = {}

# 遍历数据字典,将数据按SNR分组
for key, value in data_dict.items():
    mod_type, snr = key
    if snr not in data_by_snr:
        data_by_snr[snr] = {}
    if mod_type not in data_by_snr[snr]:
        data_by_snr[snr][mod_type] = []
    # 只保留1000条数据
    data_by_snr[snr][mod_type].extend(value[:1000])

# 创建并保存每个SNR对应的CSV文件
for snr, mod_data in data_by_snr.items():
    combined_df = pd.DataFrame()
    for mod_type, samples in mod_data.items():
        for sample in samples:
            flat_sample = sample.flatten()
            temp_df = pd.DataFrame([flat_sample], columns=[f'Sample_{i}' for i in range(flat_sample.size)])
            temp_df['Mod_Type'] = mod_type
            temp_df['SNR'] = snr
            combined_df = pd.concat([combined_df, temp_df], ignore_index=True)

    # 保存到CSV文件
    csv_file_path = f'output_data_snr_{snr}.csv'
    combined_df.to_csv(csv_file_path, index=False)
    print(f"CSV file saved for SNR {snr}: {csv_file_path}")

print("Data processing complete. All CSV files saved.")
一、模型划分
0、Baseline
import torch
import torch.nn as nn
import torch.optim as optim
from torch.utils.data import DataLoader, TensorDataset, random_split
import pandas as pd
import numpy as np
import matplotlib.pyplot as plt
from sklearn.metrics import confusion_matrix, ConfusionMatrixDisplay

# 加载数据
csv_file_path = 'snr_data/output_data_snr_6.csv'
data_frame = pd.read_csv(csv_file_path)

# 提取前256列数据并转换为张量
vectors = torch.tensor(data_frame.iloc[:, :256].values, dtype=torch.float32)

# 划分训练集和测试集索引
train_size = int(0.8 * len(vectors))
test_size = len(vectors) - train_size
train_indices, test_indices = random_split(range(len(vectors)), [train_size, test_size])

# 使用训练集的统计量进行归一化
train_vectors = vectors[train_indices]
train_mean = train_vectors.mean(dim=0, keepdim=True)
train_std = train_vectors.std(dim=0, keepdim=True)

vectors = (vectors - train_mean) / train_std

# 转置和重塑为16x16 若MLP 无需重构
vectors = vectors.view(-1, 16, 16).unsqueeze(1).permute(0, 1, 3, 2)  # 添加通道维度并进行转置


# 提取Mod_Type列并转换为数值标签
mod_types = data_frame['Mod_Type'].astype('category').cat.codes.values
labels = torch.tensor(mod_types, dtype=torch.long)

# 创建TensorDataset
dataset = TensorDataset(vectors, labels)

# 创建训练集和测试集
train_dataset = TensorDataset(vectors[train_indices], labels[train_indices])
test_dataset = TensorDataset(vectors[test_indices], labels[test_indices])

# 创建DataLoader
train_loader = DataLoader(train_dataset, batch_size=32, shuffle=True)
test_loader = DataLoader(test_dataset, batch_size=32, shuffle=False)
这里需要加载具体模型
criterion = nn.CrossEntropyLoss()
optimizer = optim.Adam(model.parameters(), lr=0.001)
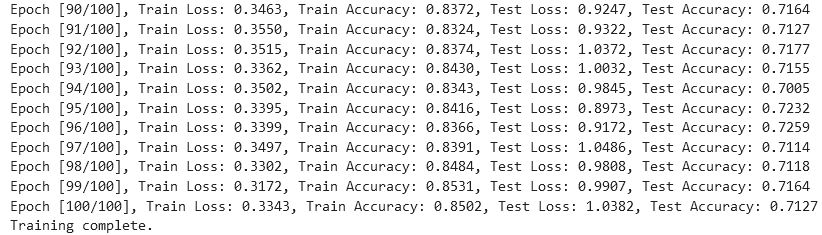
num_epochs = 100
train_losses = []
test_losses = []
train_accuracies = []
test_accuracies = []
def calculate_accuracy(outputs, labels):
_, predicted = torch.max(outputs, 1)
total = labels.size(0)
correct = (predicted == labels).sum().item()
return correct / total
for epoch in range(num_epochs):
# 训练阶段
model.train()
running_loss = 0.0
correct = 0
total = 0
for inputs, labels in train_loader:
optimizer.zero_grad()
outputs = model(inputs)
loss = criterion(outputs, labels)
loss.backward()
optimizer.step()
running_loss += loss.item()
correct += (outputs.argmax(1) == labels).sum().item()
total += labels.size(0)
train_loss = running_loss / len(train_loader)
train_accuracy = correct / total
train_losses.append(train_loss)
train_accuracies.append(train_accuracy)
# 测试阶段
model.eval()
running_loss = 0.0
correct = 0
total = 0
with torch.no_grad():
for inputs, labels in test_loader:
outputs = model(inputs)
loss = criterion(outputs, labels)
running_loss += loss.item()
correct += (outputs.argmax(1) == labels).sum().item()
total += labels.size(0)
test_loss = running_loss / len(test_loader)
test_accuracy = correct / total
test_losses.append(test_loss)
test_accuracies.append(test_accuracy)
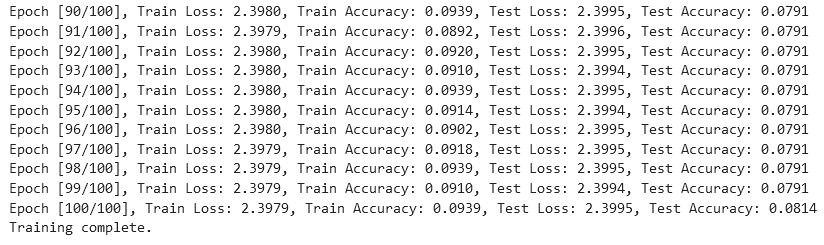
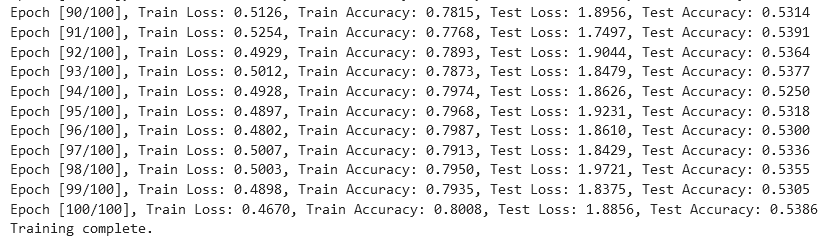
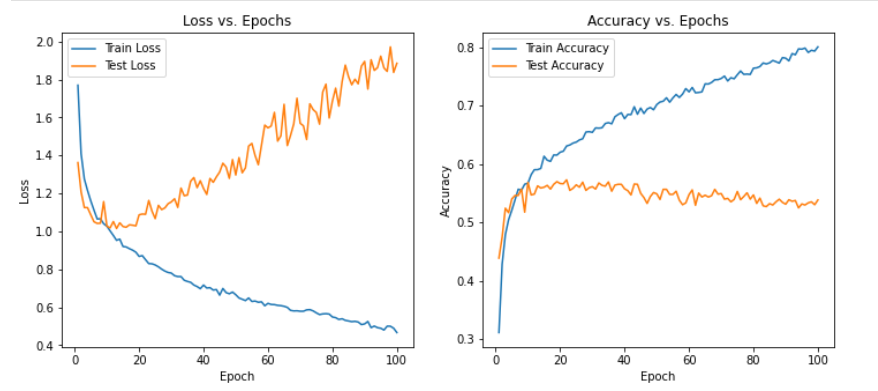
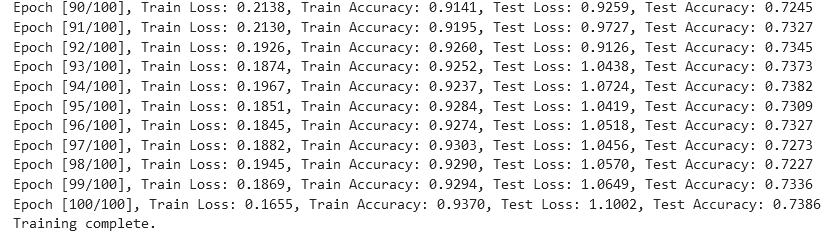
print(f"Epoch [{epoch+1}/{num_epochs}], Train Loss: {train_loss:.4f}, Train Accuracy: {train_accuracy:.4f}, Test Loss: {test_loss:.4f}, Test Accuracy: {test_accuracy:.4f}")
print("Training complete.")
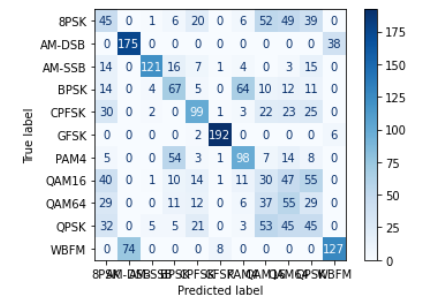
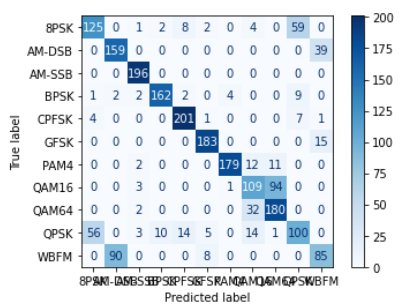
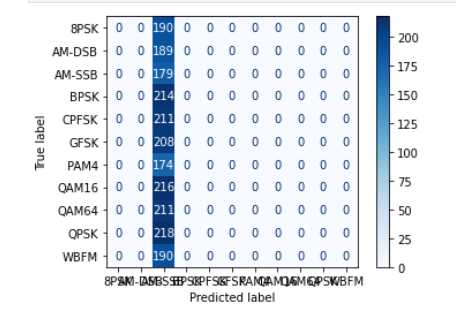
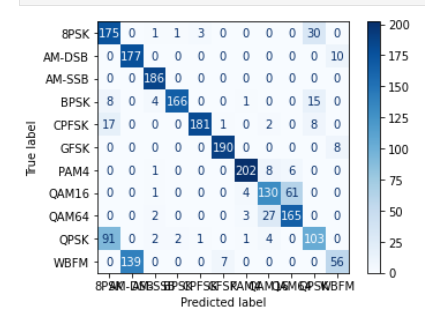
# 计算混淆矩阵
all_labels = []
all_predictions = []
model.eval()
with torch.no_grad():
for inputs, labels in test_loader:
outputs = model(inputs)
_, predicted = torch.max(outputs, 1)
all_labels.extend(labels.numpy())
all_predictions.extend(predicted.numpy())
# 绘制混淆矩阵
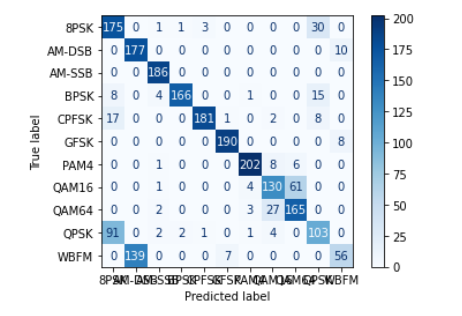
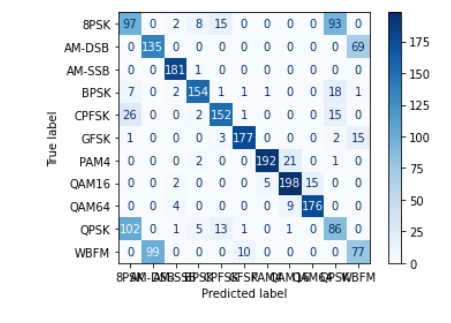
cm = confusion_matrix(all_labels, all_predictions)
disp = ConfusionMatrixDisplay(confusion_matrix=cm, display_labels=data_frame['Mod_Type'].astype('category').cat.categories)
disp.plot(cmap=plt.cm.Blues)
plt.show()
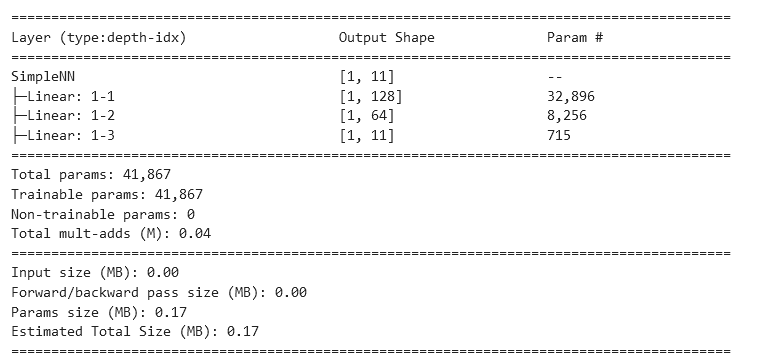
1、MLP
from torchinfo import summary
class SimpleNN(nn.Module):
    def __init__(self):
        super(SimpleNN, self).__init__()
        self.fc1 = nn.Linear(256, 128)
        self.fc2 = nn.Linear(128, 64)
        self.fc3 = nn.Linear(64, 11)  # 有11种调制类型

    def forward(self, x):
        x = torch.relu(self.fc1(x))
        x = torch.relu(self.fc2(x))
        x = self.fc3(x)
        return x

model = SimpleNN()
# 打印模型结构和参数
summary(model, input_size=(1, 256))
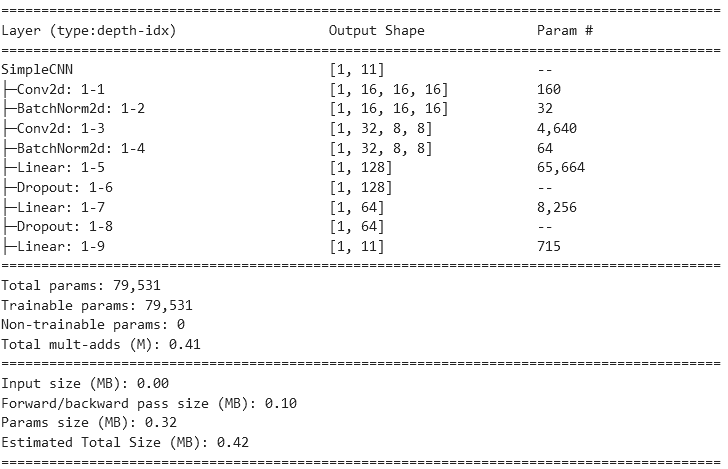
2、CNN
# 定义模型
from torchinfo import summary
class SimpleCNN(nn.Module):
    def __init__(self):
        super(SimpleCNN, self).__init__()
        self.conv1 = nn.Conv2d(1, 16, kernel_size=3, padding=1)
        self.bn1 = nn.BatchNorm2d(16)
        self.conv2 = nn.Conv2d(16, 32, kernel_size=3, padding=1)
        self.bn2 = nn.BatchNorm2d(32)
        self.dropout = nn.Dropout(0.3)
        self.fc1 = nn.Linear(32*4*4, 128)
        self.fc2 = nn.Linear(128, 64)
        self.fc3 = nn.Linear(64, 11)  # 11种调制类型

    def forward(self, x):
        x = torch.relu(self.bn1(self.conv1(x)))
        x = torch.max_pool2d(x, 2)
        x = torch.relu(self.bn2(self.conv2(x)))
        x = torch.max_pool2d(x, 2)
        x = x.view(x.size(0), -1)
        x = torch.relu(self.fc1(x))
        x = self.dropout(x)
        x = torch.relu(self.fc2(x))
        x = self.dropout(x)
        x = self.fc3(x)
        return x

model = SimpleCNN()
summary(model, input_size=(1, 1,16,16))
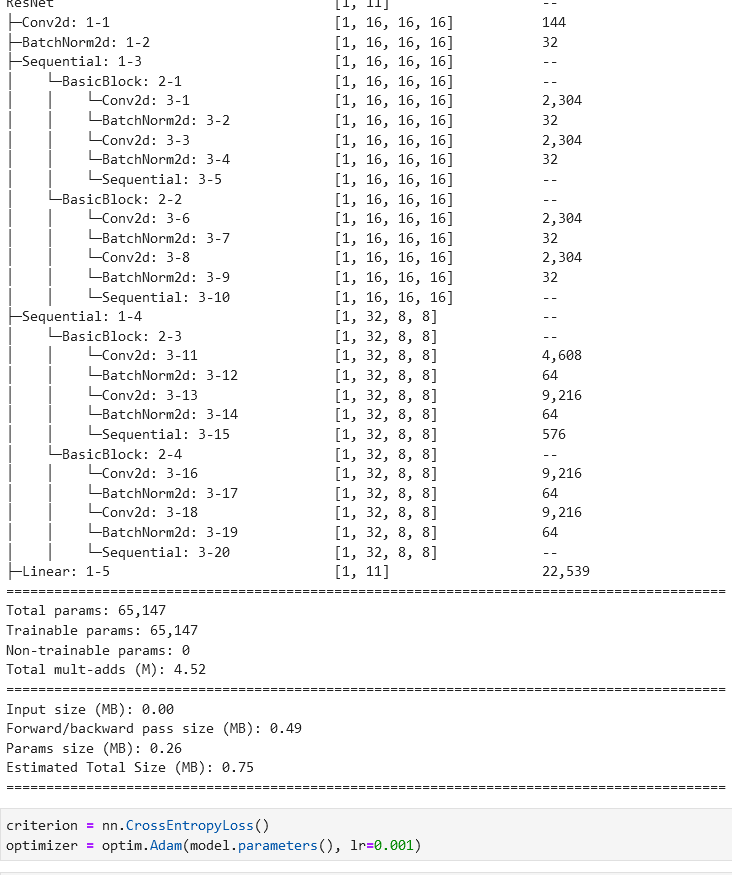
3、ResNet
# 定义ResNet基本块
from torchinfo import summary
class BasicBlock(nn.Module):
    expansion = 1

    def __init__(self, in_planes, planes, stride=1):
        super(BasicBlock, self).__init__()
        self.conv1 = nn.Conv2d(in_planes, planes, kernel_size=3, stride=stride, padding=1, bias=False)
        self.bn1 = nn.BatchNorm2d(planes)
        self.conv2 = nn.Conv2d(planes, planes, kernel_size=3, stride=1, padding=1, bias=False)
        self.bn2 = nn.BatchNorm2d(planes)
        self.shortcut = nn.Sequential()
        if stride != 1 or in_planes != self.expansion * planes:
            self.shortcut = nn.Sequential(
                nn.Conv2d(in_planes, self.expansion * planes, kernel_size=1, stride=stride, bias=False),
                nn.BatchNorm2d(self.expansion * planes)
            )

    def forward(self, x):
        out = torch.relu(self.bn1(self.conv1(x)))
        out = self.bn2(self.conv2(out))
        out += self.shortcut(x)
        out = torch.relu(out)
        return out

# 定义ResNet
class ResNet(nn.Module):
    def __init__(self, block, num_blocks, num_classes=11):
        super(ResNet, self).__init__()
        self.in_planes = 16

        self.conv1 = nn.Conv2d(1, 16, kernel_size=3, stride=1, padding=1, bias=False)
        self.bn1 = nn.BatchNorm2d(16)
        self.layer1 = self._make_layer(block, 16, num_blocks[0], stride=1)
        self.layer2 = self._make_layer(block, 32, num_blocks[1], stride=2)
        self.linear = nn.Linear(32*4*4*4, num_classes)

    def _make_layer(self, block, planes, num_blocks, stride):
        strides = [stride] + [1]*(num_blocks-1)
        layers = []
        for stride in strides:
            layers.append(block(self.in_planes, planes, stride))
            self.in_planes = planes * block.expansion
        return nn.Sequential(*layers)

    def forward(self, x):
        out = torch.relu(self.bn1(self.conv1(x)))
        out = self.layer1(out)
        out = self.layer2(out)
        out = torch.flatten(out, 1)
        out = self.linear(out)
        return out

def ResNet18():
    return ResNet(BasicBlock, [2, 2])

model = ResNet18()
summary(model, input_size=(1, 1,16,16))
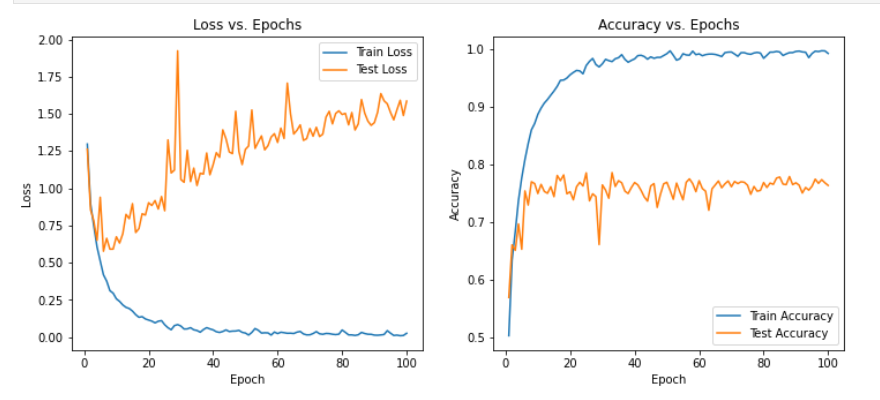
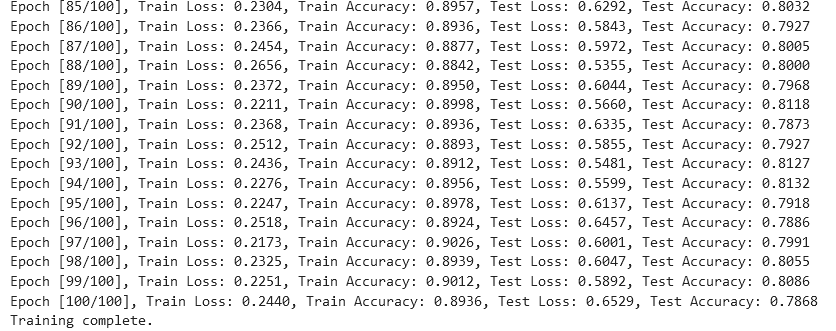
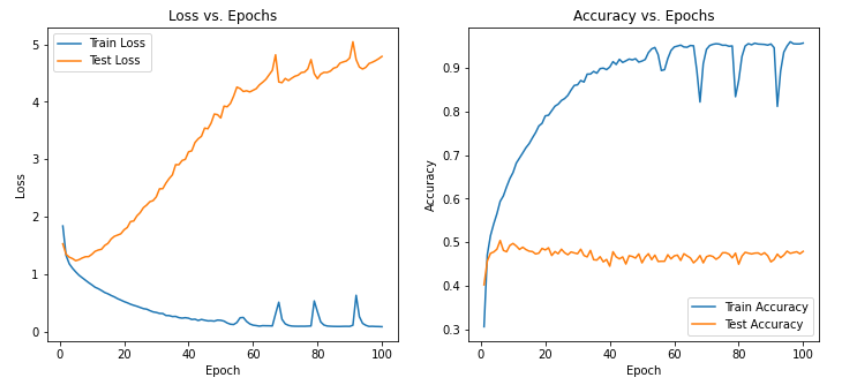
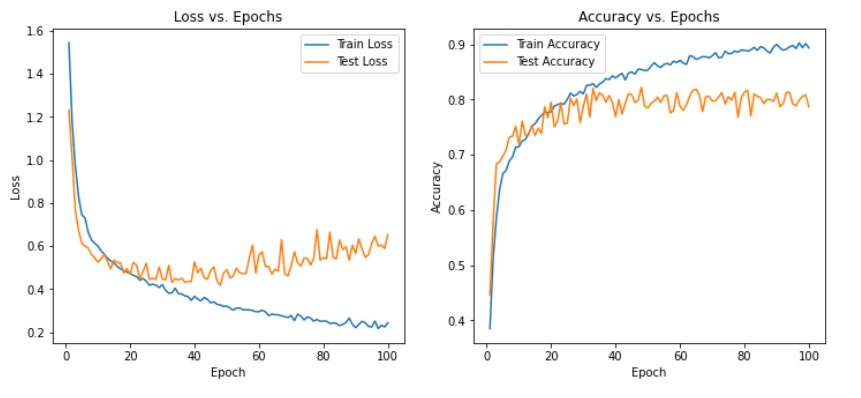
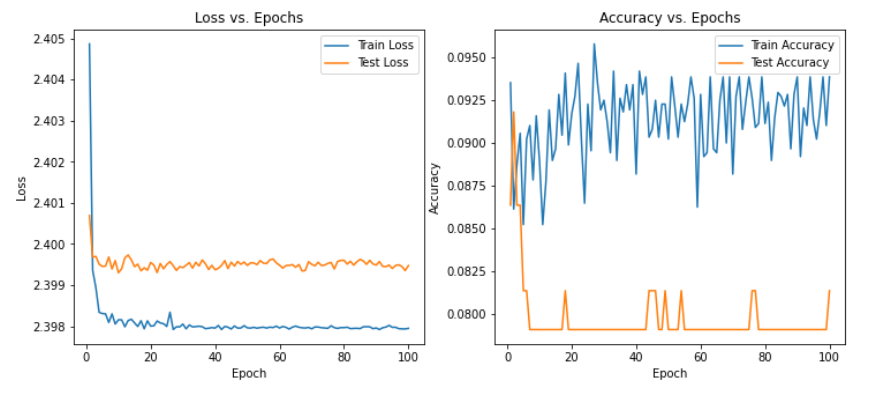
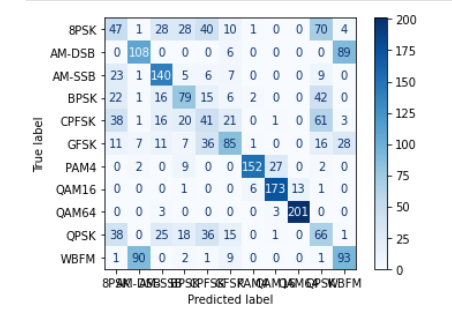
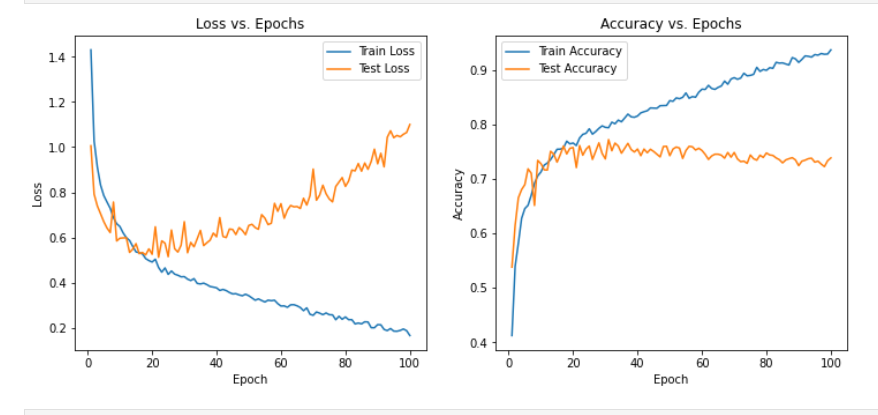
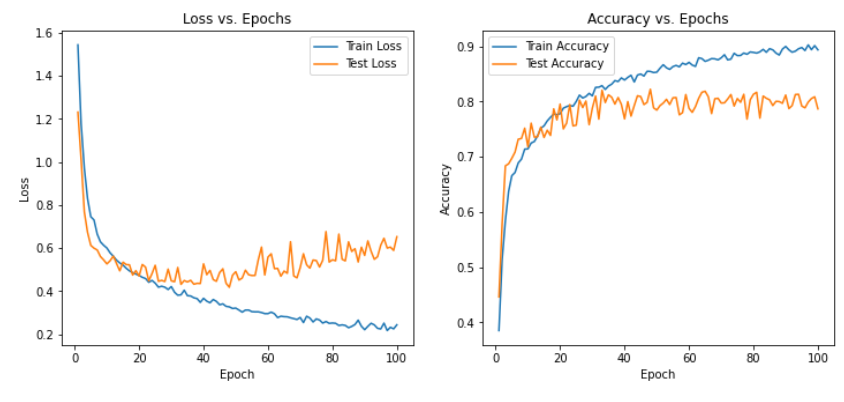
可以发现在三种模型下非常容易过拟合,为了探究是否是SNR的造成的影响,故修改SNR数值,进行下述实验
二、SNR划分
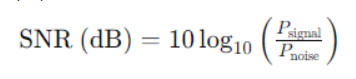
根据SNR的计算公式来看,-20db表示噪声的功率是信号的100倍,其余以此类推
1、SNR(-20) min
2、SNR(-6)
3、SNR(0)
4、SNR(6)

5、SNR(18) max
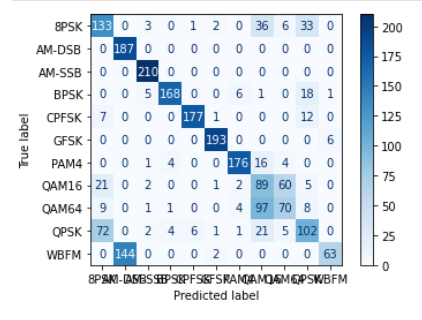
从实验结果来看,趋势还是比较符合预期,总体上SNR越大检测的性能越好,尤其是当SNR=-20db时无法区分任何一种类型


![[图解]企业应用架构模式2024新译本讲解14-服务层2](https://img-blog.csdnimg.cn/direct/962f1eadba7c479482c31ac4dd4877d1.png)


