I built a custom AI agent that thinks and then acts. I didn't invent it though, these agents are known as ReAct Agents and I'll show you how to build one yourself using LlamaIndex in this tutorial.
我构建了一个自定义的AI智能体,它能够思考然后行动。不过,这并不是我的发明,这类智能体被称为ReAct智能体。在本教程中,我将向你展示如何使用LlamaIndex来自己构建一个这样的智能体。
Hi folks! Today, I'm super excited to show you how you can build a Python app that takes the contents of a web page and generates an optimization report based on the latest Google guidelines—all in under 10 seconds! This is perfect for bloggers and content creators who want to ensure their content meets Google's standards.
嗨,大家好!今天,我非常激动地要告诉大家如何构建一个Python应用,这个应用能够在10秒内抓取一个网页的内容,并根据最新的Google指南生成一个优化报告!这非常适合博主和内容创作者,他们想要确保自己的内容符合Google的标准。
We'll use a LlamaIndex ReActAgent and three tools that will enable the AI agent to:
我们将使用LlamaIndex ReActAgent和三个工具,这些工具将使AI智能体能够:
- Read the content of a blog post from a given URL. 从给定的URL读取博客文章的内容。
- Process Google's content guidelines. 处理Google的内容指南。
- Generate a PDF report based on the content and guidelines. 基于内容和指南生成PDF报告。
This is especially useful given the recent Google updates that have affected organic traffic for many bloggers. You may want to tweak this to suit your needs but in general, this should be a great starting point if you want to explore AI Agents.
鉴于最近Google的更新对许多博主的自然流量产生了影响,这一点特别有用。你可能想要根据自己的需求进行调整,但总的来说,如果你想要探索AI智能体,这将是一个很好的起点。
Ok, let's dive in and build this! 好的,让我们深入其中并开始构建吧!
Overview and scope 概述和范围
Here's what we'll cover: 以下是我们将要涵盖的内容:
- Architecture overview 架构概述
- Setting up the environment 设置环境
- Creating the tools 创建工具
- Writing the main application 编写主应用程序
- Running the application 运行应用程序
1. Architecture Overview 架构概述
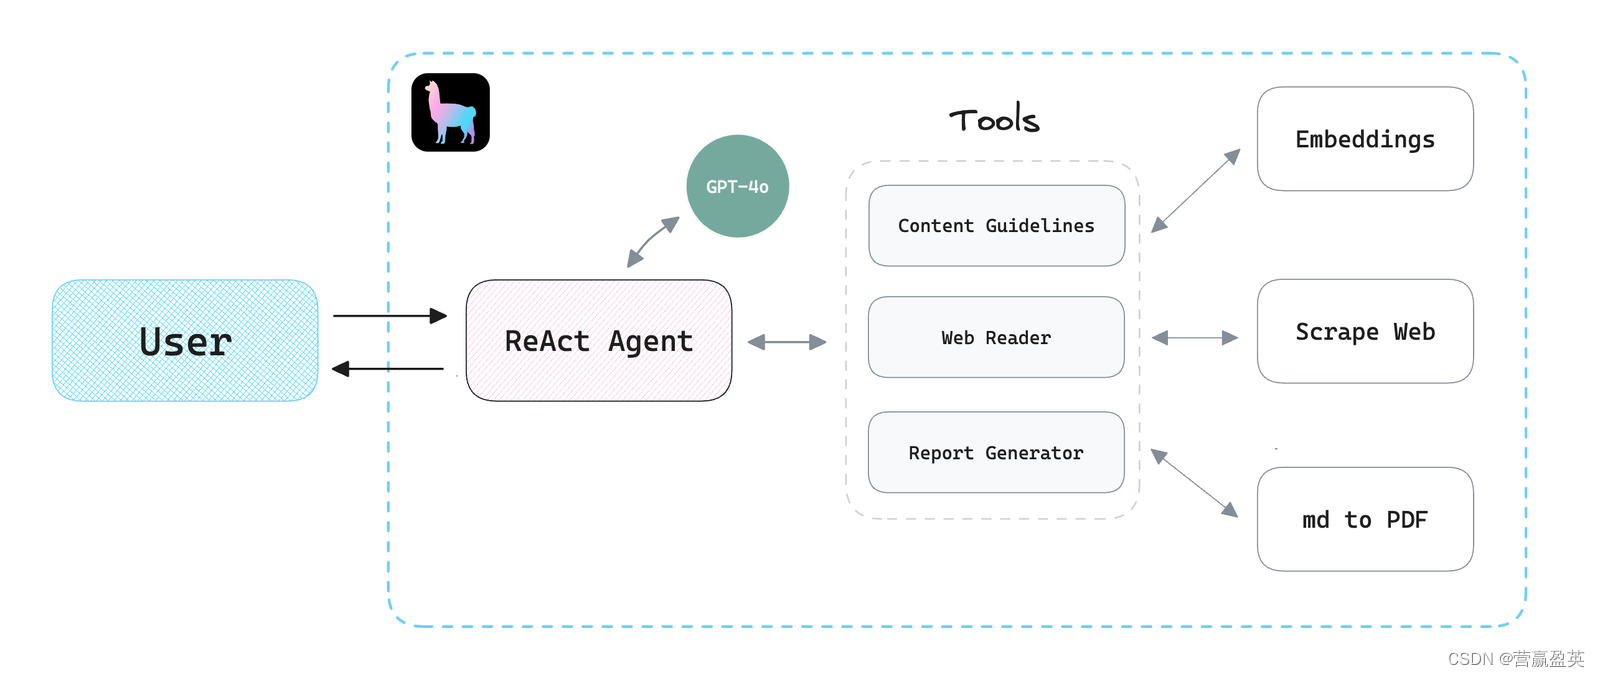
"ReAct" refers to Reason and Action. A ReAct agent understands and generates language, performs reasoning, and executes actions based on that understanding and since LlamaIndex provides a nice and easy-to-use interface to create ReAct agents and tools, we'll use it and OpenAI's latest model GPT-4o to build our app.
“ReAct”指的是原因(Reason)和行动(Action)。一个ReAct代理理解并生成语言,基于这种理解进行推理,并执行相应的行动。由于LlamaIndex提供了一个友好且易于使用的界面来创建ReAct代理和工具,我们将使用它以及OpenAI的最新模型GPT-4o来构建我们的应用程序。
We'll create three simple tools: 我们将创建三个简单的工具:
- The
guidelinestool: Converts Google's guidelines to embeddings for reference.
指南工具:将谷歌的指南转换为嵌入式表示以供参考。
- The
web_readertool: Reads the contents of a given web page.
web_reader工具:读取给定网页的内容。
- The
report_generatortool: Converts the model's response from markdown to a PDF report.
report_generator工具:将模型的响应从Markdown转换为PDF报告。
2. Setting up the environment 设置环境
Let's start by creating a new project directory. Inside of it, we'll set up a new environment:
首先,我们创建一个新的项目目录。在其中,我们将设置一个新的环境:
mkdir llamaindex-react-agent-demo
cd llamaindex-react-agent-demo
python3 -m venv venv
source venv/bin/activate
Next, install the necessary packages: 接下来,安装必要的包:
pip install llama-index llama-index-llms-openai
pip install llama-index-readers-web llama-index-readers-file
pip install python-dotenv pypandoc
To convert the contents to a PDF we'll use a third-party tool called pandoc. You can follow the steps as outlined here to set it up on your machine.
为了将内容转换为PDF,我们将使用一个名为pandoc的第三方工具。你可以按照这里概述的步骤在你的机器上设置它。
Finally, we'll create a .env file in the root directory and add our OpenAI API Key as follows:
最后,我们将在根目录中创建一个.env文件,并添加我们的OpenAI API密钥,如下所示:
OPENAI_API_KEY="PASTE_KEY_HERE"
3. Creating the Tools 创建工具
谷歌内容嵌入指南(Google Content Guidelines for Embeddings)
Navigate to any page in your browser. In this tutorial, I'm using this page. Once you're there, convert it to a PDF. In general, you can do this by clicking on "File -> Export as PDF..." or something similar depending on your browser.
在浏览器中导航到任何页面。在本教程中,我使用这个页面。到达后,将其转换为PDF。通常,你可以通过点击“文件 -> 导出为PDF...”或类似选项(取决于你的浏览器)来完成此操作。
Save Google's content guidelines as a PDF and place it in a data folder. Then, create a tools folder and add a guidelines.py file:
将谷歌的内容指南保存为PDF并放入一个数据文件夹中。然后,创建一个tools文件夹并在其中添加一个guidelines.py文件
import os

from llama_index.core import StorageContext, VectorStoreIndex, load_index_from_storage
from llama_index.core.tools import QueryEngineTool, ToolMetadata
from llama_index.readers.file import PDFReader

...
After adding the required packages, we'll convert our PDF to embeddings and then create a VectorStoreIndex:
在添加必要的包之后,我们将把PDF转换为嵌入,然后创建一个VectorStoreIndex:
...

data = PDFReader().load_data(file=file_path)
index = VectorStoreIndex.from_documents(data, show_progress=False)

...
Then, we return a QueryEngineTool which can be used by the agent:
然后,我们返回一个QueryEngineTool,该工具可以被代理使用:
...

query_engine = index.as_query_engine()

guidelines_engine = QueryEngineTool(
    query_engine=query_engine,
    metadata=ToolMetadata(
        name="guidelines_engine",
        description="This tool can retrieve content from the guidelines"
    )
)
Web Page Reader 网页阅读器
Next, we'll write some code to give the agent the ability to read the contents of a webpage. Create a web_reader.py file in the tools folder:
接下来,我们将编写一些代码,以使代理能够读取网页的内容。在tools文件夹中创建一个web_reader.py文件:
# web_reader.py

from llama_index.core import SummaryIndex
from llama_index.core.tools import QueryEngineTool, ToolMetadata
from llama_index.readers.web import SimpleWebPageReader

...

url = "https://www.gettingstarted.ai/crewai-beginner-tutorial"

documents = SimpleWebPageReader(html_to_text=True).load_data([url])
index = SummaryIndex.from_documents(documents)
I'm using a SummaryIndex to process the documents, there are multiple other index types that you could decide to choose based on your data.
我使用了一个SummaryIndex来处理文档,你也可以根据你的数据选择多种其他索引类型。
I'm also using SimpleWebPageReader to pull the contents of URL. Alternatively, you could implement your own function, but we'll just use this data loader to keep things simple.
我也在使用SimpleWebPageReader来拉取URL的内容。另外,你也可以实现自己的函数,但为了保持简单,我们将只使用这个数据加载器。
Next, we'll build the QueryEngineTool object which will be provided to the agent just like we've done before:
接下来,我们将构建QueryEngineTool对象,并将其提供给代理,就像我们之前所做的那样:
query_engine = index.as_query_engine()

web_reader_engine = QueryEngineTool(
    query_engine=query_engine,
    metadata=ToolMetadata(
        name="web_reader_engine",
        description="This tool can retrieve content from a web page"
    )
)
Ok, cool. Now let's wrap up the tool and create our PDF report generator.
好的,很棒。现在让我们整合这个工具并创建我们的PDF报告生成器。
PDF Report Generator PDF报告生成器
For this one, we'll use a FunctionTool instead of a QueryEngineTool since the agent won't be querying an index but rather executing a Python function to generate the report.
对于这一项,我们将使用FunctionTool而不是QueryEngineTool,因为代理不会查询索引,而是执行一个Python函数来生成报告。
Start by creating a report_generator.py file in the tools folder:
首先,在tools文件夹中创建一个report_generator.py文件:
# report_generator.py

...

import tempfile
import pypandoc

from llama_index.core.tools import FunctionTool

def generate_report(md_text, output_file):

    with tempfile.NamedTemporaryFile(delete=False, suffix=".md") as temp_md:
        temp_md.write(md_text.encode("utf-8"))
        temp_md_path = temp_md.name

    try:
        output = pypandoc.convert_file(temp_md_path, "pdf", outputfile=output_file)
        return "Success"

    finally:
        os.remove(temp_md_path)

report_generator = FunctionTool.from_defaults(
    fn=generate_report,
    name="report_generator",
    description="This tool can generate a PDF report from markdown text"
)
4. Writing the Main Application 编写主应用程序
Awesome! All good. Now we'll put everything together in a main.py file:
太棒了!一切都很好。现在我们将把所有内容整合到一个main.py文件中:
# main.py

...

# llama_index
from llama_index.llms.openai import OpenAI
from llama_index.core.agent import ReActAgent

# tools
from tools.guidelines import guidelines_engine
from tools.web_reader import web_reader_engine
from tools.report_generator import report_generator

llm = OpenAI(model="gpt-4o")

agent = ReActAgent.from_tools(
    tools=[
        guidelines_engine, # <---
        web_reader_engine, # <---
        report_generator # <---
        ],
    llm=llm,
    verbose=True
)

...
As you can see, we start by importing the required packages and our tools, then we'll use the ReActAgent class to create our agent.
如你所见,我们首先导入所需的包和我们的工具,然后我们将使用ReActAgent类来创建我们的代理。
To create a simple chat loop, we'll write the following code and then run the app:
为了创建一个简单的聊天循环,我们将编写以下代码,然后运行应用程序:
...

while True:
    user_input = input("You: ")
    if user_input.lower() == "quit":
        break
    response = agent.chat(user_input)
    print("Agent: ", response)
5. Running the Application 运行应用程序
It's showtime! Let's run the application from the terminal:
是时候展示了!让我们从终端运行应用程序:
python main.py
Feel free to use the following prompt, or customize it as you see fit:
请随意使用以下提示,或根据需要进行自定义:
"Based on the given web page, develop actionable tips including how to rewrite some of the content to optimize it in a way that is more aligned with the content guidelines. You must explain in a table why each suggestion improves content based on the guidelines, then create a report."
“基于给定的网页,开发可操作的建议,包括如何重写部分内容以优化内容,使其更符合内容指南。你必须在表格中解释为什么每个建议都能根据指南改进内容,然后创建一份报告。”
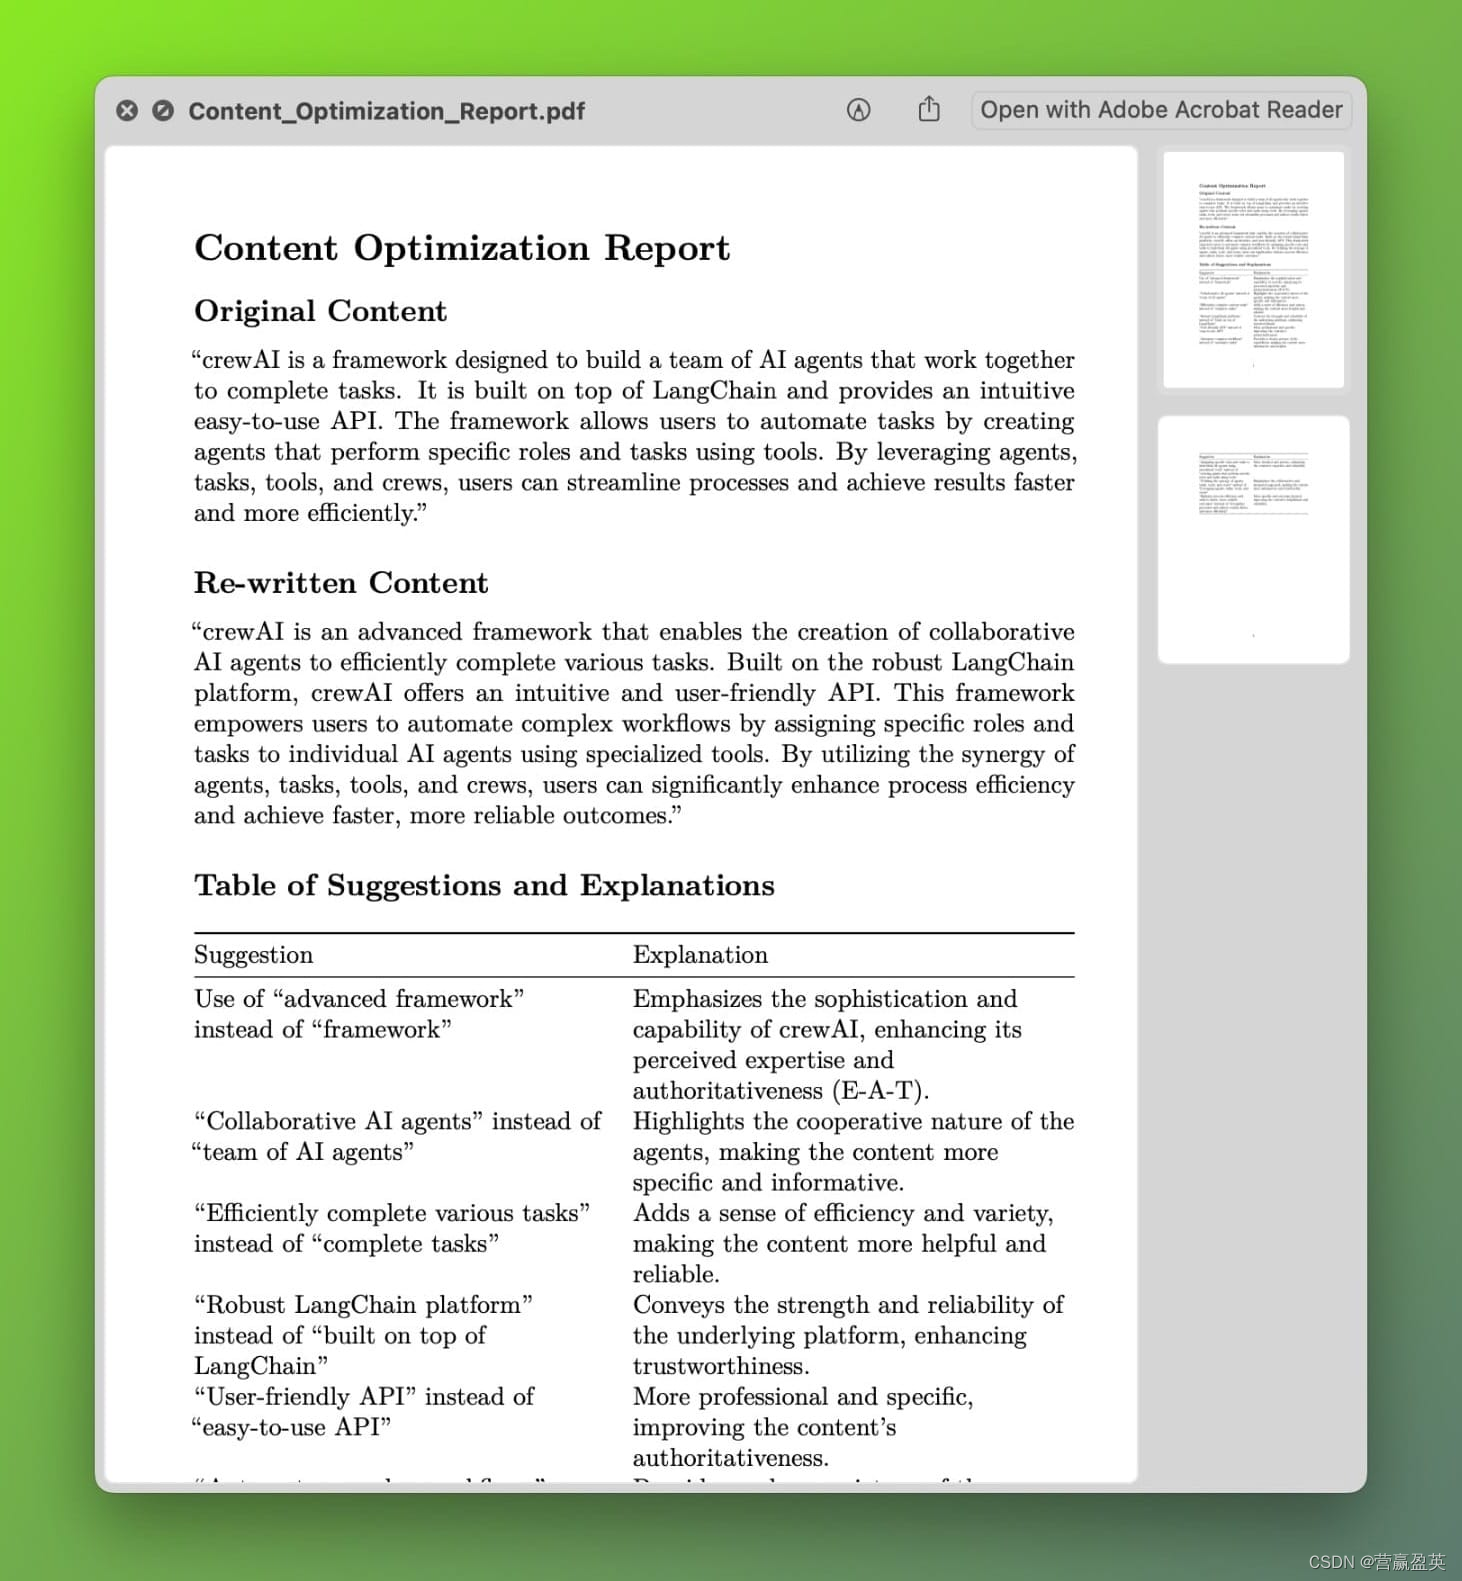
The agent will process the request, and call upon the tools as needed to generate a PDF report with actionable tips and explanations.
代理将处理请求,并在需要时调用这些工具来生成包含可操作建议和解释的PDF报告。
The whole process will look something like this: 整个过程将如下所示:
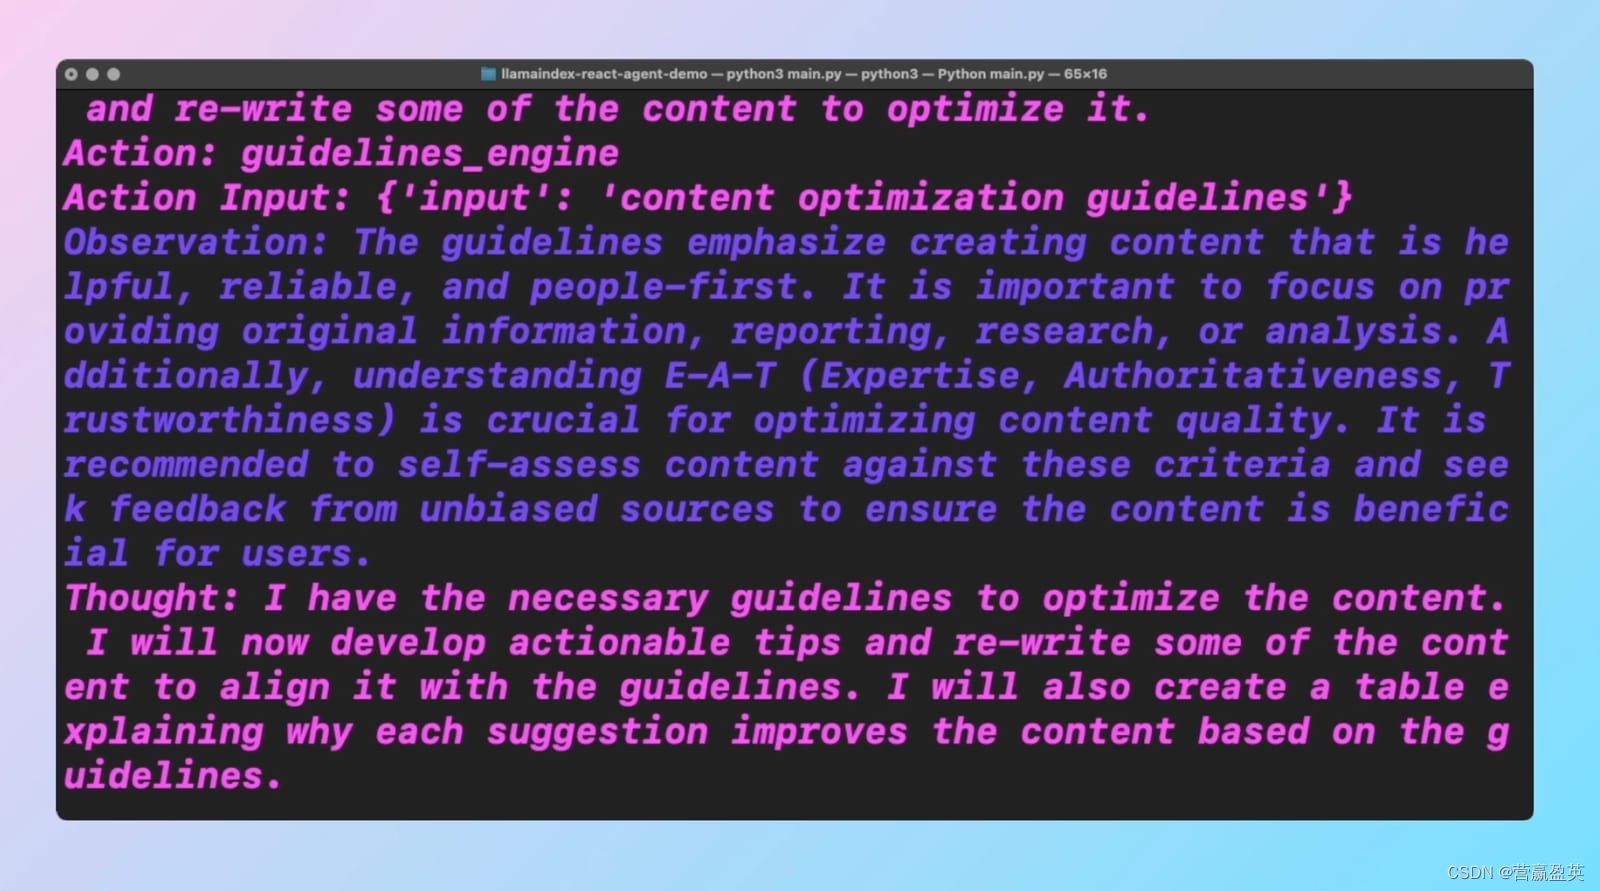
You can clearly see how the agent is reasoning and thinking about the task at hand and then devising a plan on how to execute it. With the assistance of the tools that we've created, we can give it extra capabilities, like generating a PDF report.
你可以清楚地看到代理是如何对当前任务进行推理和思考的,然后制定一个执行计划。借助我们创建的工具,我们可以赋予它额外的功能,比如生成PDF报告。
Here's the final PDF report: 这是最终的PDF报告:
Conclusion 总结
And that's it! You've built a smart AI agent that can optimize your blog content based on Google's guidelines. This tool can save you a lot of time and ensure your content is always up to standard.
就这样!你已经构建了一个智能的AI代理,可以根据Google的指南优化你的博客内容。这个工具可以为你节省大量时间,并确保你的内容始终符合标准。
附录:相关程序代码
main.py
# main.py

import os
from dotenv import load_dotenv

load_dotenv()

# llama_index
from llama_index.llms.openai import OpenAI
from llama_index.core.agent import ReActAgent

# tools
from tools.guidelines import guidelines_engine
from tools.web_reader import web_reader_engine
from tools.report_generator import report_generator
from tools.web_loader import web_loader

llm = OpenAI(model="gpt-4o")

agent = ReActAgent.from_tools(
    tools=[
        guidelines_engine,
        web_reader_engine,
        report_generator
        ],
    llm=llm,
    verbose=True
)

while True:
    user_input = input("You: ")
    if user_input.lower() == "quit":
        break
    response = agent.chat(user_input)
    print("Agent: ", response)
tools/guidelines.py
# guidelines.py

import os
from llama_index.core import StorageContext, VectorStoreIndex, load_index_from_storage
from llama_index.core.tools import QueryEngineTool, ToolMetadata
from llama_index.readers.file import PDFReader

def load_index(file_path, index_name):
    data = PDFReader().load_data(file=file_path)

    if os.path.exists('embeddings/' + index_name):
        index = load_index_from_storage(
            StorageContext.from_defaults(persist_dir='embeddings/' + index_name)
        )
    else:
        index = VectorStoreIndex.from_documents(data, show_progress=False)
        index.storage_context.persist(persist_dir='embeddings/' + index_name)

    return index

def asQueryEngineTool(index):
    query_engine = index.as_query_engine()

    return QueryEngineTool(
        query_engine=query_engine,
        metadata=ToolMetadata(
            name="guidelines_engine",
            description="This tool can retrieve content from the guidelines"
        )
    )

file_path = os.path.join("data", "content-guidelines.pdf")
guidelines_index = load_index(file_path, index_name="guidelines")

guidelines_engine = asQueryEngineTool(guidelines_index)
tools/web_reader.py
from llama_index.core import SummaryIndex
from llama_index.core.tools import QueryEngineTool, ToolMetadata
from llama_index.readers.web import SimpleWebPageReader

def load_index(url: str):
    documents = SimpleWebPageReader(html_to_text=True).load_data([url])
    index = SummaryIndex.from_documents(documents)

    return index

def asQueryEngineTool(index):

    query_engine = index.as_query_engine()

    return QueryEngineTool(
        query_engine=query_engine,
        metadata=ToolMetadata(
            name="web_reader_engine",
            description="This tool can retrieve content from a web page"
        )
    )

index = load_index(
    url="https://www.gettingstarted.ai/crewai-beginner-tutorial"
)

web_reader_engine = asQueryEngineTool(index)

web_reader_engine = QueryEngineTool(
    query_engine=query_engine,
    metadata=ToolMetadata(
        name="web_reader_engine",
        description="This tool can retrieve content from a web page"
    )
)
tools/report_generator.py
import os
import tempfile
import pypandoc

from llama_index.core.tools import FunctionTool

def generate_report(md_text, output_file):

    with tempfile.NamedTemporaryFile(delete=False, suffix=".md") as temp_md:
        temp_md.write(md_text.encode("utf-8"))
        temp_md_path = temp_md.name

    try:
        output = pypandoc.convert_file(temp_md_path, "pdf", outputfile=output_file)
        return "Success"

    finally:
        os.remove(temp_md_path)

report_generator = FunctionTool.from_defaults(
    fn=generate_report,
    name="report_generator",
    description="This tool can generate a PDF report from markdown text"
)