1、系统实现功能
- 添加用户
- 查看用户
- 修改用户
- 删除用户
完整代码下载地址在最后,若显示链接不存在,可能是资源还没有审核,可私聊我发完整代码。
2、功能实现
2.1 添加用户
构建添加用户的Flask接口
add_user()
@app.route("/add/user", methods=["GET", "POST"])
def add_user():
    username = request.form.get("username")
    password = request.form.get("password")
    mobile = request.form.get("mobile")

    # 1、连接数据库
    conn = Connection(
        host="localhost",
        port=3306,
        user="root",
        password="3535",
    )
    cursor = conn.cursor()
    conn.select_db("mysql_learning")
    # 2、执行SQL
    sql = "INSERT INTO admins (username, password, mobile) VALUES (%s, %s, %s)"
    cursor.execute(sql, [username, password, mobile])
    conn.commit()
    # 3、关闭连接
    cursor.close()
    conn.close()
    data_list = get_users()
    return render_template("show_user.html", data_list=data_list)
编写添加用户的页面
采用弹出框的方式进行用户的添加。其中action="/add/user"就是上述构建的添加用户的接口地址
<!--添加用户弹出框-->
    <div id="add-user" class="modify-dialog" data-options="closed:true" style="padding-left: 10px;">
        <form id="ff1" method="post" action="/add/user">
            <div style="margin-top: 5px;">
                <label>姓名:</label>
                <input id="username1" class="easyui-validatebox" type="text" name="username">
            </div>
            <br>
            <div>
                <label>密码:</label>
                <input id="password1" class="easyui-validatebox" type="text" name="password">
            </div>
            <br>
            <div>
                <label>电话:</label>
                <input id="mobile1" class="easyui-validatebox" type="text" name="mobile">
            </div>
            <br>
            <div>
                <input id="confirm" class="easyui-validatebox" type="submit" name="mobile">
            </div>
        </form>
    </div>
实现效果

2.2 显示用户
新建查询用户方法
get_user
def get_users():
    # 1、连接数据库
    conn = Connection(
        host="localhost",
        port=3306,
        user="root",
        password="3535",
    )
    cursor = conn.cursor()
    conn.select_db("mysql_learning")
    # 2、执行SQL
    sql = "SELECT * FROM admins"
    cursor.execute(sql)
    data_list = cursor.fetchall()
    # 3、关闭连接
    cursor.close()
    conn.close()
    return data_list
新建Flask接口,调用该方法
@app.route("/show/user", methods=["GET"])
def show_user():
    data_list = get_users()
    return render_template("show_user.html", data_list=data_list)
/show/user接口,查询到用户的信息data_list之后,并携带信息,跳转到show_user.html页面
新建
show_user.html页面
<div class="container" style="margin-top: 10px;">
    <h1>用户列表</h1>
    <a style="float: right;margin-bottom: 10px;" id="btn-add" href="#" class="easyui-linkbutton" data-options="iconCls:'icon-add'" onclick="addUser()">添加用户</a>
    <table class="table table-striped table-bordered">
        <thead>
        <tr>
            <th>ID</th>
            <th>姓名</th>
            <th>密码</th>
            <th>手机号</th>
        </tr>
        </thead>
        <tbody>
        {% for item in data_list %}
        <tr>
            <td style="width: 50px">{{ item[0] }}</td>
            <td style="width: 100px">{{ item[1] }}</td>
            <td style="width: 150px">{{ item[2] }}</td>
            <td style="width: 100px">{{ item[3] }}</td>
            <td style="width: 100px">
                <a id="btn-delete" href="#" class="easyui-linkbutton" data-options="iconCls:'icon-remove'" onclick="deleteUser(this)">删除</a>
                <a id="btn-modify" href="#" class="easyui-linkbutton" data-options="iconCls:'icon-edit'" onclick="modifyUser(this)">修改</a>
            </td>
        </tr>
        {% endfor %}
        </tbody>
    </table>
</div>
采用以下这种方式遍历用户数据
{% for item in data_list %}

{% endfor %}
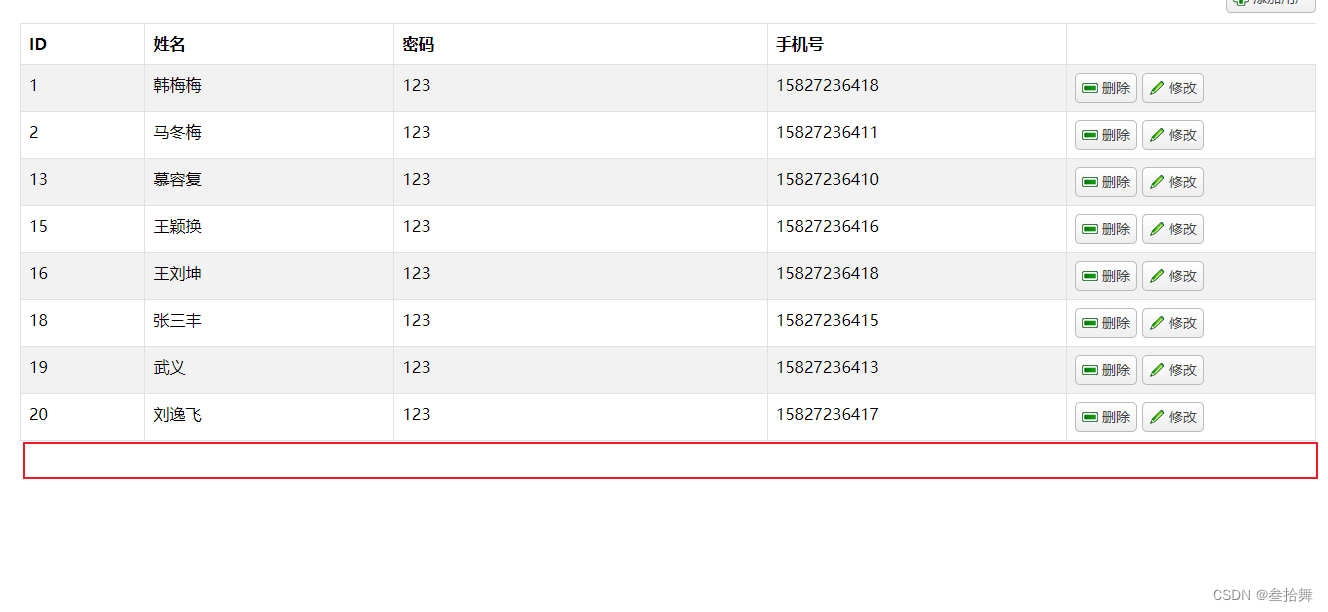
实现效果

2.3 修改用户
创建修改用户的Flask接口
modify_user()
@app.route("/modify/user", methods=["POST"])
def modify_user():
    new_data = json.loads(request.form.get("data"))
    user_id = new_data.get('id')
    username = new_data.get('name')
    password = new_data.get('password')
    mobile = new_data.get('mobile')
    # 1、连接数据库
    conn = Connection(
        host="localhost",
        port=3306,
        user="root",
        password="3535",
    )
    cursor = conn.cursor()
    conn.select_db("mysql_learning")
    # 2、执行SQL
    print("=====" + str(user_id))
    sql = "UPDATE admins SET username = %s, password = %s, mobile = %s WHERE id = %s"
    cursor.execute(sql, [username, password, mobile, user_id])
    conn.commit()
    cursor.close()
    conn.close()
    data_list = get_users()
    return render_template("show_user.html", data_list=data_list)
创建前端修改用户页面
依然采用弹出框的形式,进行修改用户
<div id="dd" class="modify-dialog" data-options="closed:true" style="padding-left: 10px;">
        <form id="ff" method="post">
            <div style="margin-top: 5px;">
                <label>姓名:</label>
                <input id="username" class="easyui-validatebox" type="text" name="username">
            </div>
            <br>
            <div>
                <label>密码:</label>
                <input id="password" class="easyui-validatebox" type="text" name="password">
            </div>
            <br>
            <div>
                <label>电话:</label>
                <input id="mobile" class="easyui-validatebox" type="text" name="mobile">
            </div>
            <br>
            <a id="btn-confirm" href="#" class="easyui-linkbutton" data-options="iconCls:'icon-remove'" onclick="confirmModifyUser(this)">确定</a>
            <a id="btn-cancel" href="#" class="easyui-linkbutton" data-options="iconCls:'icon-remove'" onclick="deleteUser(this)">取消</a>
        </form>
    </div>
首先,用户点击修改之后,弹出修改狂,修改狂要显示当前的用户信息,实现的jquery代码如下:
function modifyUser(button) {
        $('#dd').dialog({
            title: '修改用户',
            width: 400,
            height: 300,
            closed: false,
            cache: false,
            modal: true
        });
        // 获取按钮所在的行
        const row = button.closest('tr');
        const id_cell = row.getElementsByTagName('td')[0];
        modifyUserId = id_cell.textContent || id_cell.innerText;
        // 获取第一列的单元格
        const name_cell = row.getElementsByTagName('td')[1];
        // 获取单元格的文本内容
        const name = name_cell.textContent || name_cell.innerText;

        // 获取第一列的单元格
        const password_cell = row.getElementsByTagName('td')[2];
        // 获取单元格的文本内容
        const password = password_cell.textContent || password_cell.innerText;

        // 获取第一列的单元格
        const mobile_cell = row.getElementsByTagName('td')[3];
        // 获取单元格的文本内容
        const mobile = mobile_cell.textContent || mobile_cell.innerText;

        $('#username').val(name);
        $('#password').val(password);
        $('#mobile').val(mobile);
    }
上面代码中的modifyUserId ,是为了接收要修改的用户的id,因为id不在弹出框显示,要定义一个全局的变量modifyUserId 进行接收。实现效果如下:

接着用户,修改信息,点击确定进行用户信息的修改,点击确定之后触发以下函数:
function confirmModifyUser(){
        const name = $('#username').val();
        const password = $('#password').val();
        const mobile = $('#mobile').val();
        console.log(modifyUserId);
        let newData = {
            id: modifyUserId,
            name: name,
            password: password,
            mobile: mobile
        };
        let newDataJson = JSON.stringify(newData);
        $.post("/modify/user", {data: newDataJson}, function (){
            $.messager.alert("系统提示", "修改成功", "info");
                    setTimeout(function () {
                        history.go(0);
                    }, 1000);
        })
    }
创建一个newData进行用户新的信息的接收,并且把newData转化为json格式的数据,方便flask后端进行接收。这里要注意,后端接收代码的编写:
new_data = json.loads(request.form.get("data"))
user_id = new_data.get('id')
username = new_data.get('name')
password = new_data.get('password')
mobile = new_data.get('mobile')
最终实现的效果如下:

2.4 删除用户
构建删除用户的接口
del_user()
@app.route("/delete/user/<user_id>", methods=["POST"])
def del_user(user_id):
    # 1、连接数据库
    conn = Connection(
        host="localhost",
        port=3306,
        user="root",
        password="3535",
    )
    cursor = conn.cursor()
    conn.select_db("mysql_learning")
    # 2、执行SQL
    print("=====" + str(user_id))
    sql = "DELETE FROM admins WHERE id = %s"
    cursor.execute(sql, user_id)
    conn.commit()
    cursor.close()
    conn.close()
    data_list = get_users()
    return render_template("show_user.html", data_list=data_list)
编写删除页面
给用户列表页面的删除按钮绑定删除事件deleteUser,并传递参数this,这里的this可以获取当前行的数据,下面的参数button就是行的参数,通过先获取按钮所在行,接着获取第一列的单元格,最后获取单元格的内容即是唯一标识符id
function deleteUser(button) {
        $.messager.confirm('确认', '您确认想要删除记录吗?', function (r) {
            if (r) {
                // 获取按钮所在的行
                const row = button.closest('tr');
                // 获取第一列的单元格
                const cell = row.getElementsByTagName('td')[0];
                // 获取单元格的文本内容
                const id = cell.textContent || cell.innerText;

                $.post("/delete/user/" + id, function () {
                    $.messager.alert("系统提示", "删除成功", "info");
                    setTimeout(function () {
                        history.go(0);
                    }, 1000);
                })
            }
        });
    }
当用户点击删除之后,首先弹出确认删除的提示框,再次确认才会删除信息。
现实效果如下

点击OK即可确认删除。
3、完整代码下载地址
https://download.csdn.net/download/WwLK123/89434139


![[Qt的学习日常]--常用控件3](https://img-blog.csdnimg.cn/direct/ea9bc34104da484dbfc5cc28f22be9db.png)