Android 敏捷开发助手
- Lottie动画 轻松使用
- PNG、JPG等普通图片高保真转SVG图
- Android 完美的蒙层方案
- Android MMKV框架引入使用
- 强大无匹的自定义下拉列表
- Google Protobuf 实践使用开发
Protobuf 实践使用
- 前言
- Protobuf基本介绍
- Protobuf 使用配置
- protobuf 基本语法
- 1. 基本使用
- 2. 赋值与清空
- 3. 数据集合
- 4. 文件操作
- 5. 数据覆盖
- 6. 枚举
- protobuf结构分析
- Protobuf JNI开发
- protobuf版本差异化
- 1. 差异化配置
- 2. 多版本完整配置文件
- 3. 多版本输出差异对比
- protobuf异常处理
- 1. proto文件中的import失效:cannot resolve import **.proto
- protobuf优缺点
- 总结
博客创建时间:2023.01.28
博客更新时间:2023.01.28
以Android studio build=7.0.0,SDKVersion 31来分析讲解。如图文和网上其他资料不一致,可能是别的资料版本较低而已。
前言
protobuf是google提供的一个开源序列化框架,类似于XML,JSON这样的数据表示语言,其最大的特点是基于二进制,因此比传统的XML表示高效短小得多。
protobuf在google中是一个比较核心的基础库,作为分布式运算涉及到大量的不同业务消息的传递,如何高效简洁的表示、操作这些业务消息在google这样的大规模应用中是至关重要的。而protobuf这样的库正好是在效率、数据大小、易用性之间取得了很好的平衡。
官方文档: http://code.google.com/p/protobuf/
protobuf语言指南:https://developers.google.com/protocol-buffers/docs/proto?csw=1&hl=zh-cn
protobuf编码文档:https://developers.google.com/protocol-buffers/docs/encoding?csw=1&hl=zh-cn
protobufAPI文档:https://developers.google.com/protocol-buffers/docs/reference/overview?csw=1&hl=zh-cn
Protobuf基本介绍
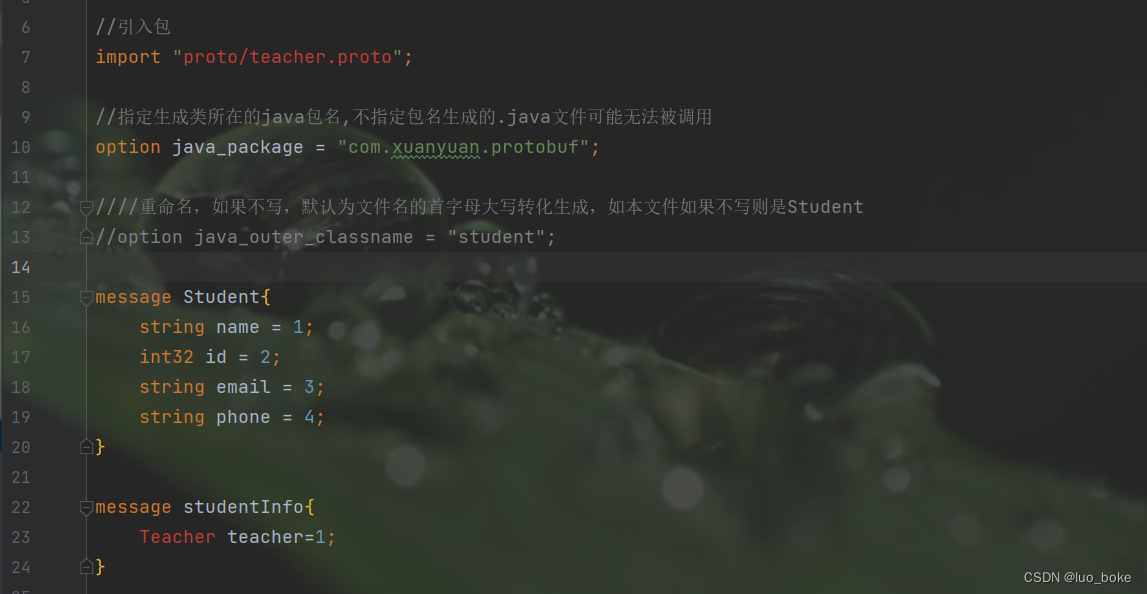
每个ProtocolBuffer mesage是一小段逻辑记录,包含一系列的键值对。这里有个非常简单的 .proto 文件定义了个人信息,它的定义方式和C++类很相似
message Person {
    required string name=1;
    required int32 id=2;
    optional string email=3;

    enum PhoneType {
        MOBILE=0;
        HOME=1;
        WORK=2;
    }

    message PhoneNumber {
        required string number=1;
        optional PhoneType type=2 [default=HOME];
    }

    repeated PhoneNumber phone=4;
}
每个消息类型拥有一个或多个特定的数字字段,每个字段拥有一个名字和一个值类型。
值类型可以是数字(整数或浮点)、布尔型、字符串、原始字节或者其他ProtocolBuffer类型,还允许数据结构的分级。你可以指定可选字段,必选字段和重复字段。
限定修饰符
Required: 表示是一个必须字段,必须相对于发送方,在发送消息之前必须设置该字段的值,对于接收方,必须能够识别该字段的意思。发送之前没有设置required字段或者无法识别required字段都会引发编解码异常,导致消息被丢弃。
Optional: 表示是一个可选字段,可选对于发送方,在发送消息时,可以有选择性的设置或者不设置该字段的值。对于接收方,如果能够识别可选字段就进行相应的处理,如果无法识别,则忽略该字段,消息中的其它字段正常处理。
—因为optional字段的特性,很多接口在升级版本中都把后来添加的字段都统一的设置为optional字段,这样老的版本无需升级程序也可以正常的与新的软件进行通信,只不过新的字段无法识别而已,因为并不是每个节点都需要新的功能,因此可以做到按需升级和平滑过渡。
Repeated: 表示该字段可以包含0~N个元素。其特性和optional一样,但是每一次可以包含多个值。可以看作是在传递一个数组的值。
Protobuf 使用配置
以protobuf v3.6.1举例
1. 插件版本配置
在project的build.gradle文件中配置插件版本
buildscript {
    dependencies {
        classpath 'com.google.protobuf:protobuf-gradle-plugin:0.8.14'
    }
}
2. 依赖包配置
在module的build.gradle中配置protobuf依赖
dependencies {
    implementation 'com.googlecode.protobuf-java-format:protobuf-java-format:1.4'
    // proto依赖库
//    implementation 'com.google.protobuf:protobuf-lite:3.0.0'
    implementation 'com.google.protobuf:protobuf-java:3.6.1'
//    implementation 'com.google.protobuf:protobuf-javalite:3.18.1'
}
3. java 或cpp 文件生成
protobuf {
    protoc {
        //编译器版本
//        artifact = 'com.google.protobuf:protoc:3.0.0'
        artifact = 'com.google.protobuf:protoc:3.6.1'
//        artifact = 'com.google.protobuf:protoc:3.18.1'
    }

//    plugins {
//        javalite {
//            // 指定当前工程使用的protobuf版本为javalite版,以生成javalite版的java类
            artifact = 'com.google.protobuf:protoc-gen-javalite:3.8.0'
            artifact = 'com.google.protobuf:protoc-gen-javalite:3.0.0'
            artifact = 'com.google.protobuf:protoc-gen-javalite:3.6.1'
//
//        }
//    }


    //这里配置生成目录,编译后会在build的目录下生成对应的java文件
    generateProtoTasks {
        all().each { task ->
            task.builtins {
//                java {
//                    option "lite"
//                }
                // 生成CPP文件
//                cpp {   }
                remove java
            }

            task.plugins {
                //
//                javalite { }
                java {}
                cpp { }
            }
        }
    }
}

// builtins protoc编译配置,如果配置生成java、cpp、python等语言
.0
//plugins protoc编译插件配置,如配置grpc插件等。 此处配置的插件必须在 protobuf.plugins 中预先定义
注意: 根据远程依赖包的配置方式,proto生成代码的方式也不一样
配置完上面的3步就可以使用protobuf文件拉
protobuf 基本语法
1. 基本使用
1**. 创建对象**
// 创建对象
val student= Student.newBuilder().setPhone("17712345678").build()
val student2= Student.newBuilder().setPhone("17712345678").build()
Log.i("11111111111111111", "student= $student")
Log.i( "11111111111111111", "student.toString()= $student")
Log.i( "11111111111111111", "student2.toString()= $student2")

输出:
student= # com.xuanyuan.protobuf.StudentOuterClass$Student@63764208
phone: "17712345678"
student.toString()= # com.xuanyuan.protobuf.StudentOuterClass$Student@63764208
phone: "17712345678"
student2.toString()= # com.xuanyuan.protobuf.StudentOuterClass$Student@63764208
phone: "17712345678"
2. 把对象序列化成字节数组
val bt: ByteArray = student.toByteArray()
Log.i("11111111111111111","student.toByteArray()= "+ bt.contentToString())
*****************************************************
输出:
student.toByteArray()= [34, 11, 49, 55, 55, 49, 50, 51, 52, 53, 54, 55, 56]
3. 把对象转换成字节String
val bys = student.toByteString()
Log.i("11111111111111111","student.toByteString()= "+bys.toStringUtf8())
*****************************************************
输出:
student.toByteString()= "17712345678
4. 从字节数组中解析成对象
val student20 = Student.parseFrom(bt)
Log.i("11111111111111111", "20 Student.parseFrom= $student20")
val student21 = Student.parseFrom(bys)
Log.i("11111111111111111", "21 Student.parseFrom= $student21")
*****************************************************
输出:
20 Student.parseFrom= # com.xuanyuan.protobuf.StudentOuterClass$Student@63764208
phone: "17712345678"
21 Student.parseFrom= # com.xuanyuan.protobuf.StudentOuterClass$Student@63764208
phone: "17712345678"
2. 赋值与清空
1. 属性赋值
prot对象不能直接通过对象赋值,只能 toBuilder 创建一个新对象。
student=student.toBuilder().setPhone("17711112222").setEmail("17711112222@163.com").build()
Log.i("11111111111111111", "设置属性  student= $student")
*****************************************************
输出:
设置属性  student= # com.xuanyuan.protobuf.StudentOuterClass$Student@76e1af76
email: "17711112222@163.com"
phone: "17711112222"
2. 清空指定字段值
student=student.toBuilder().clearPhone().build()
Log.i("11111111111111111", "清空号码  student= $student")
*****************************************************
输出:
清空号码  student= # com.xuanyuan.protobuf.StudentOuterClass$Student@c50b3b71
email: "17711112222@163.com"
3. 清空所有字段
student=student.toBuilder().clear().build()
Log.i("11111111111111111", "清空属性值  student= $student")
*****************************************************
输出:
清空属性值  student= # com.xuanyuan.protobuf.StudentOuterClass$Student@7ba6f
注意:赋值不改变原有对象的值,而是改动了新对象的值,看打印信息发现对象的地址每次都是不一样的。
3. 数据集合
1. 获取集合长度
var student= Student.newBuilder().setName("ken").build()
val size = student.teachersCount
Log.i("11111111111111111", "student.teachersCount= $size")
*****************************************************
输出:
student.teachersCount= 0
2. 获取指定index的t对象l
// 不存在则返回nul
val t1 = student.teachersList.getOrNull(1)
Log.i("11111111111111111", " student.teachersList.getOrNull(1) $t1")
*****************************************************
输出:
student.teachersList.getOrNull(1) null

//不存在则返回某个默认值
val teacher=Teacher.newBuilder().build()
val t2 = student.teachersList.getOrElse(1) { teacher }
Log.i("11111111111111111", " student.teachersList.getOrNull(1) $t2")
*****************************************************
输出:
student.teachersList.getOrElse # com.xuanyuan.protobuf.TeacherOuterClass$Teacher@7baa4
3. 获取指定对象的index
val index = student.teachersList.indexOf(teacher)
Log.i("11111111111111111", " 指定索引对象index $t2")
*****************************************************
输出:
指定索引对象index -1
4. 获取集合最后一个元素index
val lastIndex = student.teachersList.lastIndex
Log.i("11111111111111111", " lastIndex 对象index $t2")
*****************************************************
输出:
lastIndex对象index -1
5. 获取指定index的对象
val teachersList = student.teachersList
val list = ArrayList(teachersList)
list.add(teacher)
student = student.toBuilder().addAllTeachers(list).build()
val t3 = student.teachersList[0]
Log.i("11111111111111111", " student.teachersList[1]= $t3")
*****************************************************
输出:
student.teachersList[1]= # com.xuanyuan.protobuf.TeacherOuterClass$Teacher@7baa4
注意:
- 和List一样,消息数组越界异常,可能会崩溃。
- 如上代码直接teachersList不可以直接进行ad操作,否则会报异常,需要再转一次。
4. 文件操作
val student = Student.newBuilder().setName("ken").build()
//将二进制数据写入文件
val filePath = externalCacheDir?.absolutePath + File.separator + "cache.cache"
FileOutputStream(filePath).use { student.writeTo(it) }

//从文件中读取二进制,并且转换成对象
FileInputStream(filePath).use { val p2 = Student.parseFrom(it) }
5. 数据覆盖
val p1 = Student.newBuilder().setName("ken").setId(100).setPhone("177").build()
val p2 = Student.newBuilder().setName("luo").setId(50).build()
//p2数据覆盖p1数据,没有覆盖的字段,保留p1数据
val p3 = p1.toBuilder().mergeFrom(p2).build()
Log.i("11111111111111111", " mergeFrom= $p3")
*****************************************************
输出:
mergeFrom= # com.xuanyuan.protobuf.StudentOuterClass$Student@cb25185d
id: 50
name: "luo"
phone: "177"
6. 枚举
enum Month {
    //允许对枚举常量设置别名
    option allow_alias = true;
    // The unspecified month.
    MONTH_UNSPECIFIED = 0;
    // The month of January.
    JANUARY = 1;
    // The month of February.
    FEBRUARY = 2;
    // The month of March.
    MARCH = 3;
    // The month of April.
    APRIL = 4;
    // The month of May.
    MAY = 5;
}

Student.newBuilder().setMonth(StudentOuterClass.Month.FEBRUARY).build()
注意:
- 枚举类型第一个字段的值为必须 0,否则编译会报错。
- 枚举常量值必须在 32 位整型值的范围内。因为enum 值是使用可变编码方式的,对负数不够高效,因此不推荐在enum 中使用负数。
protobuf结构分析
存储方式
protobuf是基于128bits的数值存储方式(Base 128 Varints)。数据表示方式:每块数据由接连的若干个字节表示(小的数据用1个字节就可以表示),每个字节最高位标识本块数据是否结束(1:未结束,0:结束),低7位表示数据内容。(可以看出数据封包后体积至少增大14.2%)
Protobuf 是基于128bits的小端字节序,即每个字节由 1位(最高位结束标识)+7位(数据位)表示,每个字节最高表示127。如果数据超过128则需要2个及以上字节表示。下面用一个示例说明:
数字1的表示方法为:0000 0001,这个容易理解
数字300的表示方法为:1010 1100 0000 0010,为什么会这样?
1.首先300超过128 需要两个字节表示,用正常数据表示应该为1 0010 1100
2.因为protobuf是128bits数值存储方式,每7位表示有效数据,所以其数据为10 0101100
3.protobuf是小端字节序,所以数据形式0101100 10
4.添加1位结束标识位,不足8位补齐,则1010 1100 0000 0010

所以1010 1100 0000 0010就是数据300在protobuf中传输的数据形式
组成分解
protobuf中的对象数据是怎样传输的呢?其数据组成由:
数据头(tag号(从1开始)+数据类型)+数据组成
msg1_head + msg1 + msg2_head + msg2 + …
message Student{
  string name = 1;
  int32 id = 2;
  int32 age = 3;
  string email = 4;
  string phone = 5;
  repeated Teacher teachers = 6;
  Month month = 7;
  bool sex = 8;
}
执行代码
val tt00 = Student.newBuilder().setName("ken").build()
Log.i("11111111111111111", "tt00.id= " + tt00.toByteArray().contentToString())

val tt = Student.newBuilder().setId(5).build()
Log.i("11111111111111111", "tt.id= " + tt.toByteArray().contentToString())

val tt11 = Student.newBuilder().setAge(69).build()
Log.i("11111111111111111", "tt11.id= " + tt11.toByteArray().contentToString())

val tt22 = Student.newBuilder().setEmail("1211").build()
Log.i("11111111111111111", "tt22.id= " + tt22.toByteArray().contentToString())

val tt33 = Student.newBuilder().setSex(true).build()
Log.i("11111111111111111", "tt33.id= " + tt33.toByteArray().contentToString())
输出数据
10:28:23.263  I  tt00.id= [10, 3, 107, 101, 110]
10 =00001010 分解为00001:标识第一个字段,010为数据类型为2(数据类型为String)
3 数据长度
107,101,110 拼接为“ken”

10:28:23.263  I  tt.id= [16, 5]
16=00010000 分解为00010,第二个字段为id,000数据类型为0(数据类型为整型,无需长度)
5 为id值

10:28:23.263  I  tt11.id= [24, 69]
24 =分解为00011第3个字段,000数据类型整型

10:28:23.263  I  tt22.id= [34, 4, 49, 50, 49, 49]
34 =00100 010,4:第4个字段,2:字符串类型数据
4 数据4个长度
49, 50, 49, 49 标识1211

10:28:23.263  I  tt33.id= [64, 1]
10:28:23.264  I  tt44.id= [10, 3, 107, 101, 110, 16, 5, 24, 69, 34, 4, 49, 50, 49, 49, 64, 1]
数据类型
| 类型 | 含义 | 数据类型 |
|---|---|---|
| 0 | Varint | int32, int64, uint32, uint64, sint32, sint64, bool, enum |
| 1 | 64-bit | fixed64, sfixed64, double |
| 2 | Length-delimited | string, bytes, embedded messages, packed repeated fields |
| 3 | Start group | groups (deprecated) |
| 4 | End group | groups (deprecated) |
| 5 | 32-bit | fixed32, sfixed32, float |
Protobuf JNI开发
1. 生成protobuf cpp文件
protobuf的原始文件格式是这样的,文件是以.proto格式结尾。
当我们前面的步骤配置好运行代码,则编译器会自动生成proto的java文件和cpp文件,该文件生成位置在build文件中

java文件会根据proto文件名生成对应的 名称+OuterClass.java 文件
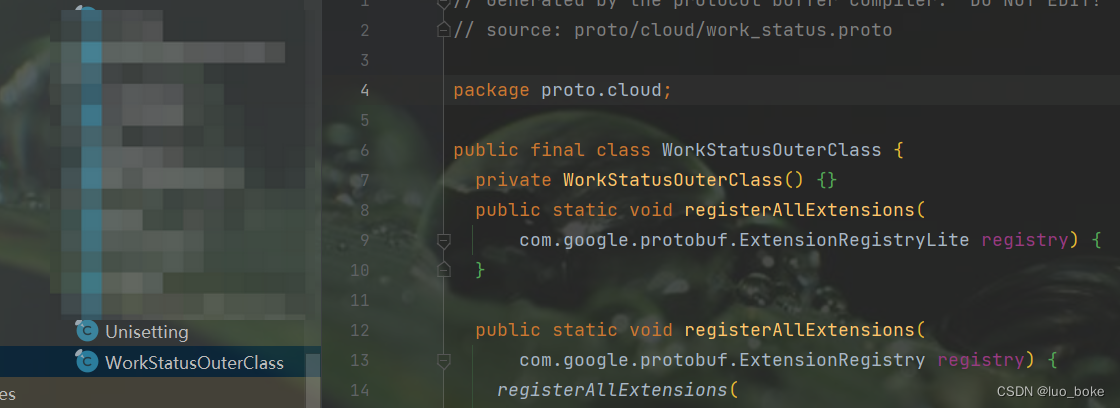
cpp文件会生成对应名称的.pb.cc和.pb.h文件

2. proto JNI开发配置
- 在build>>generated 文件中的proto cpp文件是一种缓存文件,在cpp的其他.h或者.cpp文件文件中是无法使用的,需要将proto cpp文件复制到main目录中。

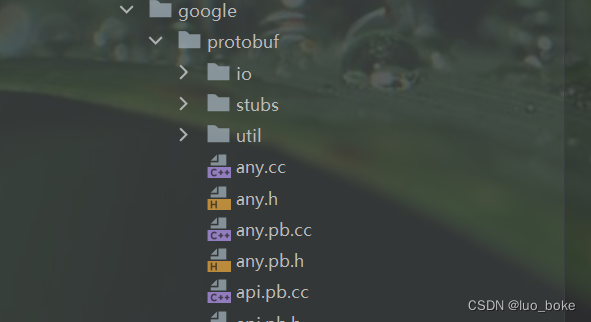
- 将.pb.cc与.pb.h文件放入main的 cpp文件夹后任然不可使用,因为生成的proto文件是依赖于google protobuf文件的,这些文件也需要将其导入到main 中的JNI目录下。

- 需要下载google 官网中的proto支持文件置于JNI目录下。如图中main>>cpp>>google文件夹中
下载地址https://github.com/protocolbuffers/protobuf/tree/main/src
protobuf版本差异化
protobuf版本有很多,不同版本可能互相不兼容,当你使用proto用于输出传输时,如固件端、云端与APP端需要确认两端使用的protobuf版本一致。
1. 差异化配置
1. proto编译器配置
protobuf的编译器版本配置格式是一样的,只用切换不同版本就行了
    protoc {
        //编译器版本
//        artifact = 'com.google.protobuf:protoc:3.0.0'
        artifact = 'com.google.protobuf:protoc:3.6.1'
//        artifact = 'com.google.protobuf:protoc:3.18.1'
    }
2. plugins.javalite 配置
当你的远程依赖包使用的protobuf-lite、protobuf-javalite时,会使用的上plugins#javalite ,当远程仓库使用方式为protobuf-java时,可以屏蔽javalite 插件配置
//    plugins {
//        javalite {
//            // 指定当前工程使用的protobuf版本为javalite版,以生成javalite版的java类
            artifact = 'com.google.protobuf:protoc-gen-javalite:3.8.0'
            artifact = 'com.google.protobuf:protoc-gen-javalite:3.0.0'
            artifact = 'com.google.protobuf:protoc-gen-javalite:3.6.1'
//
//        }
//    }
3. generateProtoTasks 配置
generateProtoTasks是生成proto java或cpp文件的关键配置
    generateProtoTasks {
        all().each { task ->
            task.builtins {
//                java {
//                    option "lite"
//                }
                // 生成CPP文件
//                cpp {   }
                remove java
            }

            task.plugins {
                // 远程依赖使用protobuf-lite、protobuf-javalite 则使用javalite { }
                // javalite { }
                // 远程依赖使用protobuf-java方式则使用java {}
                java {}
                cpp { }
            }
        }
    }
2. 多版本完整配置文件
不同版本project的build.gradle文件是一致的,但是不通的protobuf版本在module中的配置是不一样的,生成的java 和cpp也有差异
buildscript {
    dependencies {
        classpath 'com.google.protobuf:protobuf-gradle-plugin:0.8.14'
    }
}
1.v3.0.0
// 生成proto JNI开发.pb.h 和.pb.cc 格式文档
plugins {
    id 'com.android.application'
    // 需要添加插件支持
    id 'com.google.protobuf'
}

protobuf {
    protoc {
        //编译器版本
        artifact = 'com.google.protobuf:protoc:3.0.0'
//        artifact = 'com.google.protobuf:protoc:3.6.1'
//        artifact = 'com.google.protobuf:protoc:3.18.1'
    }

    plugins {
        javalite {
            // 指定当前工程使用的protobuf版本为javalite版,以生成javalite版的java类
//            artifact = 'com.google.protobuf:protoc-gen-javalite:3.8.0'
            artifact = 'com.google.protobuf:protoc-gen-javalite:3.0.0'
//            artifact = 'com.google.protobuf:protoc-gen-javalite:3.6.1'

        }
    }

    //这里配置生成目录,编译后会在build的目录下生成对应的java文件
    //当你的远程依赖包使用的protobuf-lite、protobuf-javalite时,会使用的上plugins#javalite,
    // 当远程仓库使用方式为protobuf-java时,可以屏蔽javalite 插件配置
    generateProtoTasks {
        all().each { task ->
            task.builtins {
//                java {
//                    option "lite"
//                }
                // 生成CPP文件
//                cpp {   }
                remove java
            }

            task.plugins {
                // 远程依赖使用protobuf-lite、protobuf-javalite 则使用javalite { }
                 javalite { }
                // 远程依赖使用protobuf-java方式则使用java {}
                // java {}
                cpp { }
            }
        }
    }
}

android {
    compileSdk 32

    defaultConfig {
        applicationId "com.xuanyuan.testndk"
        minSdk 21
        targetSdk 32
        versionCode 1
        versionName "1.0"

        testInstrumentationRunner "androidx.test.runner.AndroidJUnitRunner"
        externalNativeBuild {
            cmake {
                cppFlags ''
            }
        }
    }

    buildTypes {
        release {
            minifyEnabled false
            proguardFiles getDefaultProguardFile('proguard-android-optimize.txt'), 'proguard-rules.pro'
        }
    }
    compileOptions {
        sourceCompatibility JavaVersion.VERSION_1_8
        targetCompatibility JavaVersion.VERSION_1_8
    }

    sourceSets {
        main {
            // 也可以自定义 proto文件的读取位置
//            proto {
//                // In addition to the default 'src/main/proto'
//                srcDir 'src/main/protobuf'
//                srcDir 'src/main/protocolbuffers'
//                // In addition to the default '**/*.proto' (use with caution).
//                // Using an extension other than 'proto' is NOT recommended,
//                // because when proto files are published along with class files, we can
//                // only tell the type of a file from its extension.
//                include '**/*.protodevel'
//            }
            java {

            }
        }
        test {
            proto {
                // In addition to the default 'src/test/proto'
                srcDir 'src/test/protocolbuffers'
            }
        }
    }

    ndkVersion "22.1.7171670"
    externalNativeBuild {
        cmake {
            path file('src/main/cpp/CMakeLists.txt')
            version '3.18.1'
        }
    }
    buildFeatures {
        viewBinding true
    }
}

dependencies {
    implementation 'androidx.appcompat:appcompat:1.5.1'
    implementation 'com.google.android.material:material:1.6.1'
    implementation 'androidx.constraintlayout:constraintlayout:2.1.4'
    testImplementation 'junit:junit:4.13.2'
    androidTestImplementation 'androidx.test.ext:junit:1.1.3'
    androidTestImplementation 'androidx.test.espresso:espresso-core:3.4.0'


    implementation 'com.googlecode.protobuf-java-format:protobuf-java-format:1.4'

    // proto依赖库
    implementation 'com.google.protobuf:protobuf-lite:3.0.0'
//    implementation 'com.google.protobuf:protobuf-java:3.6.1'
//    implementation 'com.google.protobuf:protobuf-javalite:3.18.1'
}
2 v3.6.1
// 生成proto JNI开发.pb.h 和.pb.cc 格式文档
plugins {
    id 'com.android.application'
    // 需要添加插件支持
    id 'com.google.protobuf'
}

protobuf {
    protoc {
        //编译器版本
//        artifact = 'com.google.protobuf:protoc:3.0.0'
        artifact = 'com.google.protobuf:protoc:3.6.1'
//        artifact = 'com.google.protobuf:protoc:3.18.1'
    }

//    plugins {
//        javalite {
//            // 指定当前工程使用的protobuf版本为javalite版,以生成javalite版的java类
            artifact = 'com.google.protobuf:protoc-gen-javalite:3.8.0'
            artifact = 'com.google.protobuf:protoc-gen-javalite:3.0.0'
            artifact = 'com.google.protobuf:protoc-gen-javalite:3.6.1'
//
//        }
//    }

    //这里配置生成目录,编译后会在build的目录下生成对应的java文件
    generateProtoTasks {
        all().each { task ->
            task.builtins {
//                java {
//                    option "lite"
//                }
                // 生成CPP文件
//                cpp {   }
                remove java
            }

            task.plugins {
                //
//                javalite { }
                java {}
                cpp { }
            }
        }
    }
}

android {
    compileSdk 32

    defaultConfig {
        applicationId "com.xuanyuan.testndk"
        minSdk 21
        targetSdk 32
        versionCode 1
        versionName "1.0"

        testInstrumentationRunner "androidx.test.runner.AndroidJUnitRunner"
        externalNativeBuild {
            cmake {
                cppFlags ''
            }
        }
    }

    buildTypes {
        release {
            minifyEnabled false
            proguardFiles getDefaultProguardFile('proguard-android-optimize.txt'), 'proguard-rules.pro'
        }
    }
    compileOptions {
        sourceCompatibility JavaVersion.VERSION_1_8
        targetCompatibility JavaVersion.VERSION_1_8
    }

    sourceSets {
        main {
            // 也可以自定义 proto文件的读取位置
//            proto {
//                // In addition to the default 'src/main/proto'
//                srcDir 'src/main/protobuf'
//                srcDir 'src/main/protocolbuffers'
//                // In addition to the default '**/*.proto' (use with caution).
//                // Using an extension other than 'proto' is NOT recommended,
//                // because when proto files are published along with class files, we can
//                // only tell the type of a file from its extension.
//                include '**/*.protodevel'
//            }
            java {

            }
        }
        test {
            proto {
                // In addition to the default 'src/test/proto'
                srcDir 'src/test/protocolbuffers'
            }
        }
    }

    ndkVersion "22.1.7171670"
    externalNativeBuild {
        cmake {
            path file('src/main/cpp/CMakeLists.txt')
            version '3.18.1'
        }
    }
    buildFeatures {
        viewBinding true
    }
}

dependencies {
    implementation 'androidx.appcompat:appcompat:1.5.1'
    implementation 'com.google.android.material:material:1.6.1'
    implementation 'androidx.constraintlayout:constraintlayout:2.1.4'
    testImplementation 'junit:junit:4.13.2'
    androidTestImplementation 'androidx.test.ext:junit:1.1.3'
    androidTestImplementation 'androidx.test.espresso:espresso-core:3.4.0'


    implementation 'com.googlecode.protobuf-java-format:protobuf-java-format:1.4'

    // proto依赖库
//    implementation 'com.google.protobuf:protobuf-lite:3.0.0'
    implementation 'com.google.protobuf:protobuf-java:3.6.1'
//    implementation 'com.google.protobuf:protobuf-javalite:3.18.1'
}
3. v3.18.1
// 生成proto JNI开发.pb.h 和.pb.cc 格式文档
plugins {
    id 'com.android.application'
    // 需要添加插件支持
    id 'com.google.protobuf'
}

protobuf {
    protoc {
        //编译器版本
//        artifact = 'com.google.protobuf:protoc:3.0.0'
//        artifact = 'com.google.protobuf:protoc:3.6.1'
        artifact = 'com.google.protobuf:protoc:3.18.1'
    }

//    plugins {
//        javalite {
//            // 指定当前工程使用的protobuf版本为javalite版,以生成javalite版的java类
//            artifact = 'com.google.protobuf:protoc-gen-javalite:3.18.1'
            artifact = 'com.google.protobuf:protoc-gen-javalite:3.0.0'
            artifact = 'com.google.protobuf:protoc-gen-javalite:3.6.1'
//
//        }
//    }

    //这里配置生成目录,编译后会在build的目录下生成对应的java文件
    //当你的远程依赖包使用的protobuf-lite、protobuf-javalite时,会使用的上plugins#javalite,
    // 当远程仓库使用方式为protobuf-java时,可以屏蔽javalite 插件配置
    generateProtoTasks {
        all().each { task ->
            task.builtins {
                java {
                    option "lite"
                }
                // 生成CPP文件
                cpp {   }
                remove java
            }

            task.plugins {
                // 远程依赖使用protobuf-lite、protobuf-javalite 则使用javalite { }
//                 javalite { }
//                // 远程依赖使用protobuf-java方式则使用java {}
//                // java {}
//                cpp { }
            }
        }
    }
}

android {
    compileSdk 32

    defaultConfig {
        applicationId "com.xuanyuan.testndk"
        minSdk 21
        targetSdk 32
        versionCode 1
        versionName "1.0"

        testInstrumentationRunner "androidx.test.runner.AndroidJUnitRunner"
        externalNativeBuild {
            cmake {
                cppFlags ''
            }
        }
    }

    buildTypes {
        release {
            minifyEnabled false
            proguardFiles getDefaultProguardFile('proguard-android-optimize.txt'), 'proguard-rules.pro'
        }
    }
    compileOptions {
        sourceCompatibility JavaVersion.VERSION_1_8
        targetCompatibility JavaVersion.VERSION_1_8
    }

    sourceSets {
        main {
            // 也可以自定义 proto文件的读取位置
//            proto {
//                // In addition to the default 'src/main/proto'
//                srcDir 'src/main/protobuf'
//                srcDir 'src/main/protocolbuffers'
//                // In addition to the default '**/*.proto' (use with caution).
//                // Using an extension other than 'proto' is NOT recommended,
//                // because when proto files are published along with class files, we can
//                // only tell the type of a file from its extension.
//                include '**/*.protodevel'
//            }
            java {

            }
        }
        test {
            proto {
                // In addition to the default 'src/test/proto'
                srcDir 'src/test/protocolbuffers'
            }
        }
    }

    ndkVersion "22.1.7171670"
    externalNativeBuild {
        cmake {
            path file('src/main/cpp/CMakeLists.txt')
            version '3.18.1'
        }
    }
    buildFeatures {
        viewBinding true
    }
}

dependencies {
    implementation 'androidx.appcompat:appcompat:1.5.1'
    implementation 'com.google.android.material:material:1.6.1'
    implementation 'androidx.constraintlayout:constraintlayout:2.1.4'
    testImplementation 'junit:junit:4.13.2'
    androidTestImplementation 'androidx.test.ext:junit:1.1.3'
    androidTestImplementation 'androidx.test.espresso:espresso-core:3.4.0'


    implementation 'com.googlecode.protobuf-java-format:protobuf-java-format:1.4'

    // proto依赖库
//    implementation 'com.google.protobuf:protobuf-lite:3.0.0'
//    implementation 'com.google.protobuf:protobuf-java:3.6.1'
    implementation 'com.google.protobuf:protobuf-javalite:3.18.1'
}
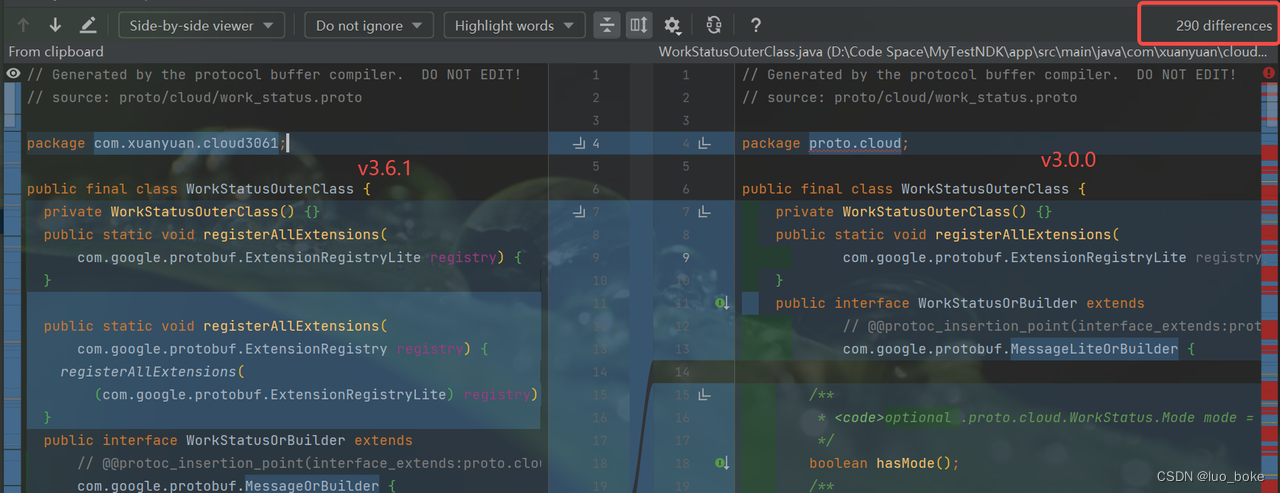
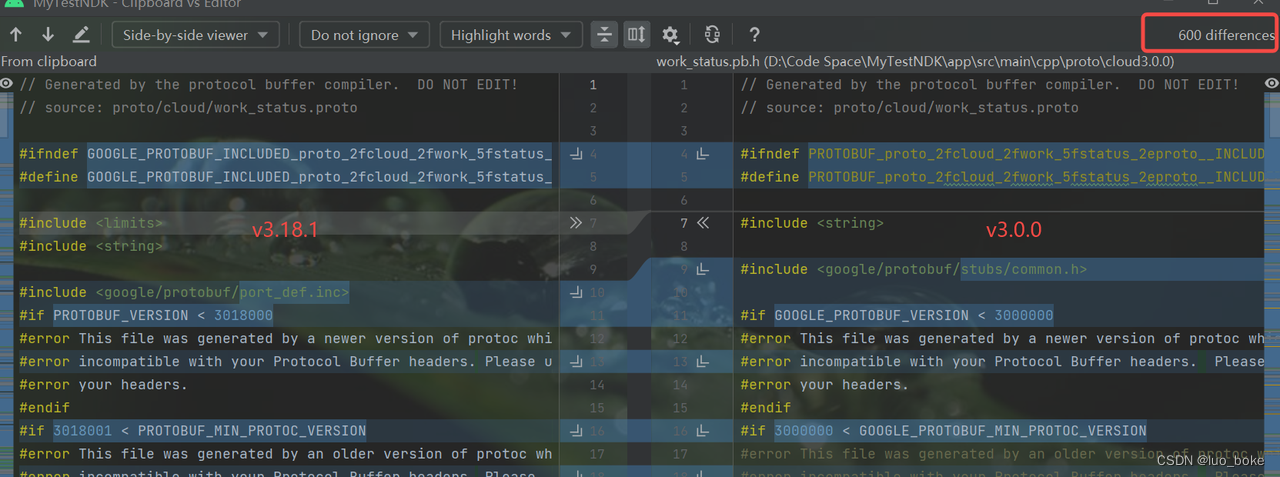
3. 多版本输出差异对比
以proto v3.0.0、v3.6.1、v3.18.1三个版本生成的.java和.pb.h文件进行对比
java

cpp

protobuf异常处理
1. proto文件中的import失效:cannot resolve import **.proto
现象
当我们在一个A.proto文件中import另一文件B.proto时,会出现B.proto无法被引入的问题。
其实编译也能成功,不影响使用。但是看着不爽,不能自动引入文件中的message对象。
原因
其实是Idea的问题,不能识别proto目录下的XXX.proto文件
解决方案
- 进入ASsetting > Languages & Frameworks> Protocol Buffers然后取消选中Configure automatically
- 然后Add proto的目录路径即可
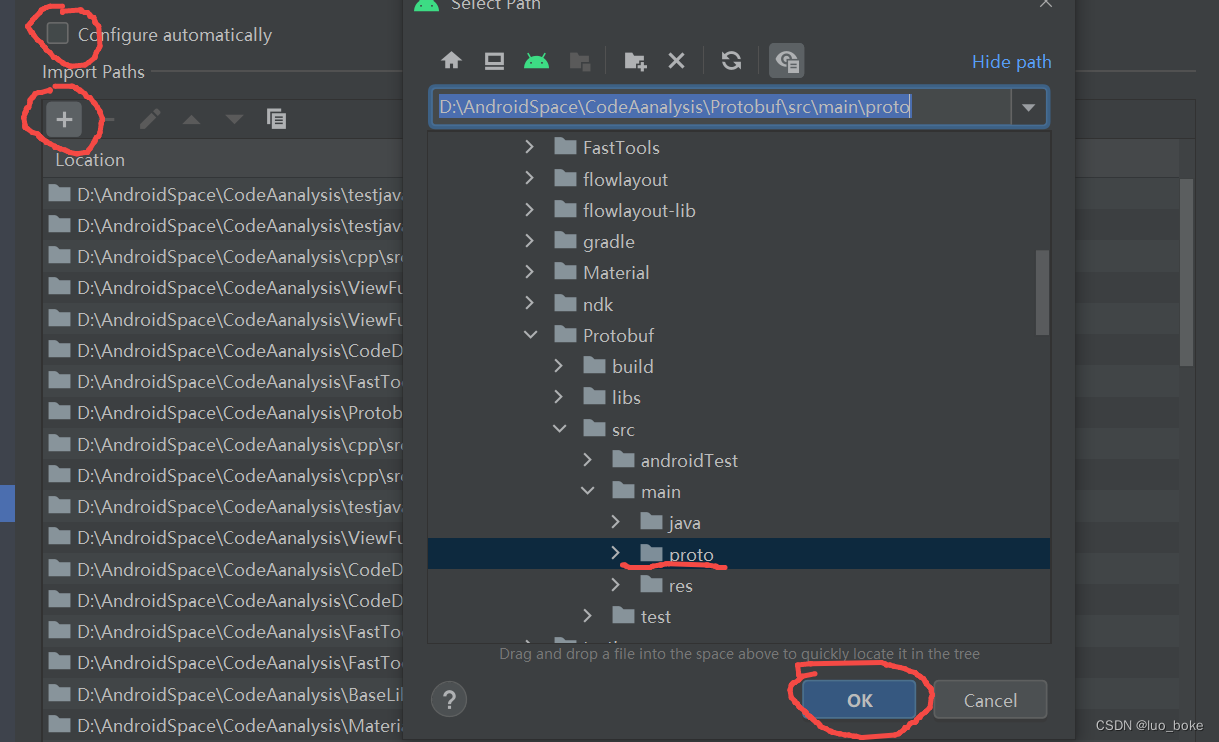
- 然后会发现文件import 正常可以使用了

protobuf优缺点
protobuf的优点
优点前面也提到了,主要有两个:
- 序列化和反序列化效率比 xml 和 json 都高(这个protobuf 自己做了测试,链接要翻墙);
- 字段可以乱序,欠缺,因此可以用来兼容旧的协议,或者是减少协议数据。
protobuf的缺点
但是字段允许乱序欠缺,反过来也是缺点。所以这里总结 protobuf 两个缺点,一个跟这有关:
- 如果字段过多,或者嵌套过深,都会影响反序列化效率,解析每一块数据都要根据序号找到对应的位置然后再插入到已解析好的数据中。
- 数据基于128bits的存储方式,单块数据比较大时效率很受影响。解析数据需要取到所有字节的低7位,然后再拼成一整块数据。以上两个缺点,特别是对于erlang这类没有指针的语言来说,代价就相当昂贵。
- 协议序号也要占空间,序号越大占空间越大,当序号小于16时无需额外增加字节就可以表示。
总结
一般都是后台定义好 Protobuf ,然后给到我们客户端,客户端再根据 Protobuf 生成对应平台的代码进行使用即可。
千万注意在使用protobuf时,一定要多方对齐protobuf的版本,因为protobuf源文件一样时,通过不同版本的protobuf编译器生成的proto java文件或者cpp文件其内容是不一样的。如果多端的版本不一致,使用中可能会引起异常。
使用注意
-
一个.proto文件中可以有多个message
-
这个tag是ProtoBuf编码使用来标识属性的,因此在定义了一个message的属性之后,最好不要再去修改属性的tag值以免造成旧数据解析错误。如代码中1,2,3,4就是tag。
string name = 1; int32 id = 2; string email = 3; string phone = 4; -
1-15 的字段编号只占一个字节进行编码,16-2047 的字段编号占两个字节,包括字段编号和字段类型,因此建议更多的使用 1-15 的字段编号。
相关链接:
- Lottie动画 轻松使用
- PNG、JPG等普通图片高保真转SVG图
- Android 完美的蒙层方案
- Android MMKV框架引入使用
- 强大无匹的自定义下拉列表
- Google Protobuf 实践使用开发
扩展链接:
- Android CameraX 使用入门
- Android 今日头条屏幕适配详细使用攻略
- Android 史上最新最全的ADB及命令百科,没有之一
博客书写不易,您的点赞收藏是我前进的动力,千万别忘记点赞、 收藏 ^ _ ^ !


![[HITCON 2017]SSRFme(perl脚本中get命令执行漏洞)](https://img-blog.csdnimg.cn/9aee12f075f042659cfc4a18bf4cd98f.png)