一、背景

0、Hybrid Transformer 论文解读
1、代码复现|Demucs Music Source Separation_demucs架构原理-CSDN博客
2、Hybrid Transformer 各个模块对应的代码具体在工程的哪个地方
3、Hybrid Transformer 各个模块的底层到底是个啥(初步感受)?
4、Hybrid Transformer 各个模块处理后,数据的维度大小是咋变换的?
5、Hybrid Transformer 拆解STFT模块
从模块上划分,Hybrid Transformer Demucs 共包含 (STFT模块、时域编码模块、频域编码模块、Cross-Domain Transformer Encoder模块、时域解码模块、频域解码模块、ISTFT模块)7个模块。
本篇目标:拆解频域编码模块的底层。
时域编码和频域编码原理类似(后续不再拆解时域编码模块)。
二、频域编码模块
class HEncLayer(nn.Module):
    def __init__(self, chin, chout, kernel_size=8, stride=4, norm_groups=1, empty=False,
                 freq=True, dconv=True, norm=True, context=0, dconv_kw={}, pad=True,
                 rewrite=True):
        """Encoder layer. This used both by the time and the frequency branch.

        Args:
            chin: number of input channels.
            chout: number of output channels.
            norm_groups: number of groups for group norm.
            empty: used to make a layer with just the first conv. this is used
                before merging the time and freq. branches.
            freq: this is acting on frequencies.
            dconv: insert DConv residual branches.
            norm: use GroupNorm.
            context: context size for the 1x1 conv.
            dconv_kw: list of kwargs for the DConv class.
            pad: pad the input. Padding is done so that the output size is
                always the input size / stride.
            rewrite: add 1x1 conv at the end of the layer.
        """
        super().__init__()
        norm_fn = lambda d: nn.Identity()  # noqa
        if norm:
            norm_fn = lambda d: nn.GroupNorm(norm_groups, d)  # noqa
        if pad:
            pad = kernel_size // 4
        else:
            pad = 0
        klass = nn.Conv1d
        self.freq = freq
        self.kernel_size = kernel_size
        self.stride = stride
        self.empty = empty
        self.norm = norm
        self.pad = pad
        if freq:
            kernel_size = [kernel_size, 1]
            stride = [stride, 1]
            pad = [pad, 0]
            klass = nn.Conv2d
        self.conv = klass(chin, chout, kernel_size, stride, pad)
        if self.empty:
            return
        self.norm1 = norm_fn(chout)
        self.rewrite = None
        if rewrite:
            self.rewrite = klass(chout, 2 * chout, 1 + 2 * context, 1, context)
            self.norm2 = norm_fn(2 * chout)

        self.dconv = None
        if dconv:
            self.dconv = DConv(chout, **dconv_kw)

    def forward(self, x, inject=None):
        """
        `inject` is used to inject the result from the time branch into the frequency branch,
        when both have the same stride.
        """
        if not self.freq and x.dim() == 4:
            B, C, Fr, T = x.shape
            x = x.view(B, -1, T)

        if not self.freq:
            le = x.shape[-1]
            if not le % self.stride == 0:
                x = F.pad(x, (0, self.stride - (le % self.stride)))
        y = self.conv(x)
        if self.empty:
            return y
        if inject is not None:
            assert inject.shape[-1] == y.shape[-1], (inject.shape, y.shape)
            if inject.dim() == 3 and y.dim() == 4:
                inject = inject[:, :, None]
            y = y + inject
        y = F.gelu(self.norm1(y))
        if self.dconv:
            if self.freq:
                B, C, Fr, T = y.shape
                y = y.permute(0, 2, 1, 3).reshape(-1, C, T)
            y = self.dconv(y)
            if self.freq:
                y = y.view(B, Fr, C, T).permute(0, 2, 1, 3)
        if self.rewrite:
            z = self.norm2(self.rewrite(y))
            z = F.glu(z, dim=1)
        else:
            z = y
        return z
核心代码如上所示。
使用print函数打印出各个关键节点的信息,可以得到频域编解码模块的全景图。
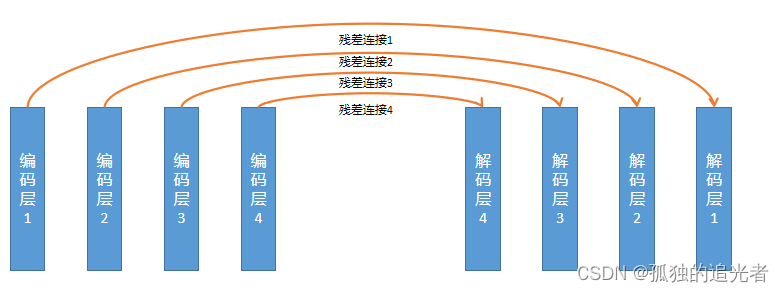
编码层:Conv2d+Norm1+GELU, Norm1:Identity()
残差连接:(Conv1d+GroupNorm+GELU +Conv1d+GroupNorm+GLU+LayerScale())
+(Conv2d+Norm2+GLU),Norm2:Identity() ,备注:Identity可以理解成直通
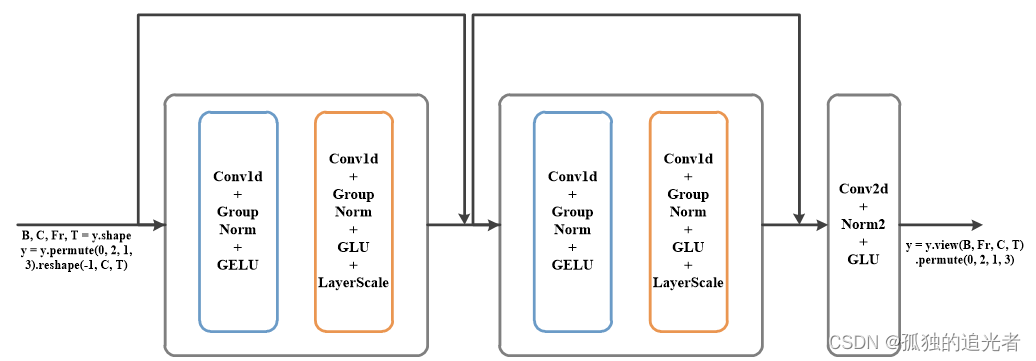
#上图均是自己读完代码绘制的。相信自己也可以。
#具体的,编码层1-4的Conv2d分别是:
Conv2d(4, 48, kernel_size=(8, 1), stride=(4, 1), padding=(2, 0))
Conv2d(48, 96, kernel_size=(8, 1), stride=(4, 1), padding=(2, 0))
Conv2d(96, 192, kernel_size=(8, 1), stride=(4, 1), padding=(2, 0))
Conv2d(192, 384, kernel_size=(8, 1), stride=(4, 1), padding=(2, 0))
#残差连接1
DConv(
(layers): ModuleList(
(0): Sequential(
(0): Conv1d(48, 6, kernel_size=(3,), stride=(1,), padding=(1,))
(1): GroupNorm(1, 6, eps=1e-05, affine=True)
(2): GELU(approximate=none)
(3): Conv1d(6, 96, kernel_size=(1,), stride=(1,))
(4): GroupNorm(1, 96, eps=1e-05, affine=True)
(5): GLU(dim=1)
(6): LayerScale()
)
(1): Sequential(
(0): Conv1d(48, 6, kernel_size=(3,), stride=(1,), padding=(2,), dilation=(2,))
(1): GroupNorm(1, 6, eps=1e-05, affine=True)
(2): GELU(approximate=none)
(3): Conv1d(6, 96, kernel_size=(1,), stride=(1,))
(4): GroupNorm(1, 96, eps=1e-05, affine=True)
(5): GLU(dim=1)
(6): LayerScale()
)
)
)
Conv2d(48, 96, kernel_size=(1, 1), stride=(1, 1))
#残差连接2
DConv(
(layers): ModuleList(
(0): Sequential(
(0): Conv1d(96, 12, kernel_size=(3,), stride=(1,), padding=(1,))
(1): GroupNorm(1, 12, eps=1e-05, affine=True)
(2): GELU(approximate=none)
(3): Conv1d(12, 192, kernel_size=(1,), stride=(1,))
(4): GroupNorm(1, 192, eps=1e-05, affine=True)
(5): GLU(dim=1)
(6): LayerScale()
)
(1): Sequential(
(0): Conv1d(96, 12, kernel_size=(3,), stride=(1,), padding=(2,), dilation=(2,))
(1): GroupNorm(1, 12, eps=1e-05, affine=True)
(2): GELU(approximate=none)
(3): Conv1d(12, 192, kernel_size=(1,), stride=(1,))
(4): GroupNorm(1, 192, eps=1e-05, affine=True)
(5): GLU(dim=1)
(6): LayerScale()
)
)
)
Conv2d(96, 192, kernel_size=(1, 1), stride=(1, 1))
#残差连接3
DConv(
(layers): ModuleList(
(0): Sequential(
(0): Conv1d(192, 24, kernel_size=(3,), stride=(1,), padding=(1,))
(1): GroupNorm(1, 24, eps=1e-05, affine=True)
(2): GELU(approximate=none)
(3): Conv1d(24, 384, kernel_size=(1,), stride=(1,))
(4): GroupNorm(1, 384, eps=1e-05, affine=True)
(5): GLU(dim=1)
(6): LayerScale()
)
(1): Sequential(
(0): Conv1d(192, 24, kernel_size=(3,), stride=(1,), padding=(2,), dilation=(2,))
(1): GroupNorm(1, 24, eps=1e-05, affine=True)
(2): GELU(approximate=none)
(3): Conv1d(24, 384, kernel_size=(1,), stride=(1,))
(4): GroupNorm(1, 384, eps=1e-05, affine=True)
(5): GLU(dim=1)
(6): LayerScale()
)
)
)
Conv2d(192, 384, kernel_size=(1, 1), stride=(1, 1))
#残差连接4
DConv(
(layers): ModuleList(
(0): Sequential(
(0): Conv1d(384, 48, kernel_size=(3,), stride=(1,), padding=(1,))
(1): GroupNorm(1, 48, eps=1e-05, affine=True)
(2): GELU(approximate=none)
(3): Conv1d(48, 768, kernel_size=(1,), stride=(1,))
(4): GroupNorm(1, 768, eps=1e-05, affine=True)
(5): GLU(dim=1)
(6): LayerScale()
)
(1): Sequential(
(0): Conv1d(384, 48, kernel_size=(3,), stride=(1,), padding=(2,), dilation=(2,))
(1): GroupNorm(1, 48, eps=1e-05, affine=True)
(2): GELU(approximate=none)
(3): Conv1d(48, 768, kernel_size=(1,), stride=(1,))
(4): GroupNorm(1, 768, eps=1e-05, affine=True)
(5): GLU(dim=1)
(6): LayerScale()
)
)
)
Conv2d(384, 768, kernel_size=(1, 1), stride=(1, 1))
关于,各个卷积模块输出数据的shape计算,可以读这篇文章。
没有所谓天生的大佬,如果有那么我愿称他/她为圣人。我相信,能读到这儿的都会成为大佬~。Believe yourself,one day,you will be somebody.
感谢阅读,最近开始写公众号(分享好用的AI工具),欢迎大家一起见证我的成长(桂圆学AI)

![python的a[:2]、a[:] 和a [::] 的区别](https://img-blog.csdnimg.cn/20201207152315960.png)




![基于LangChain-Chatchat实现的RAG-本地知识库的问答应用[1]-最新版快速实践并部署(检索增强生成RAG大模型)](https://img-blog.csdnimg.cn/img_convert/6a7ae6d4174fcd3d55fee11dc029437c.png)
