文章目录
- Web APIs - 第2天
- 事件
- 事件监听
- 案例一 :京东点击关闭顶部广告
- 案例二:随机点名案例
- 拓展知识-事件监听版本
- 双击事件
- 事件类型
- 鼠标事件
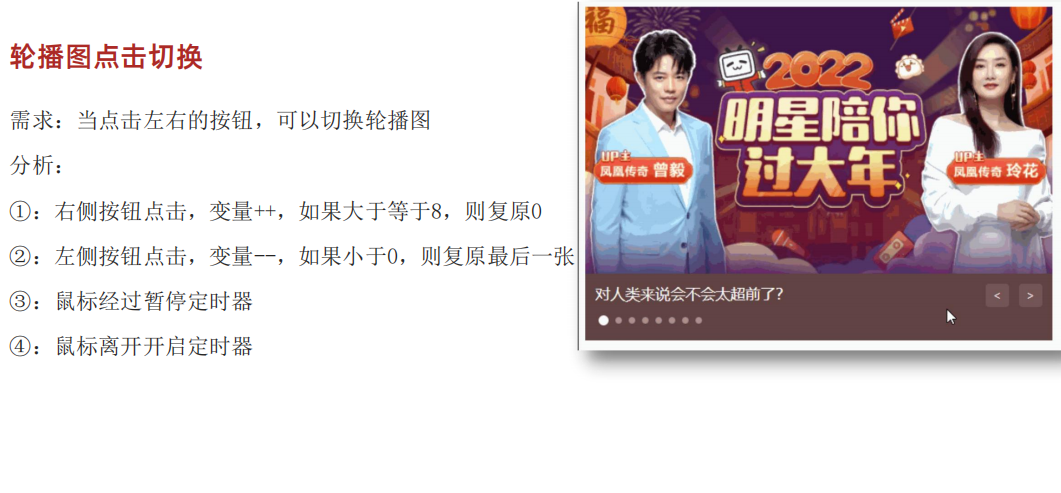
- 综合案例-轮播图完整版
- 焦点事件
- 综合案例-小米搜索框案例
- 键盘事件
- 文本事件
- 事件对象
- 综合案例-按下回车发布评论
- 环境对象
- 回调函数
- 综合案例-Tab栏切换
Web APIs - 第2天
学会通过为DOM注册事件来实现可交互的网页特效。
- 能够判断函数运行的环境并确字 this 所指代的对象
- 理解事件的作用,知道应用事件的 3 个步骤
学习会为 DOM 注册事件,实现简单可交互的网页特交。
事件
事件是在编程时系统内发生的动作或者发生的事情
比如用户在网页上单击一个按钮
事件监听
-
什么是时间监听?
就是让程序检测是否有事件产生,一旦有事件触发,就立即调用一个函数做出响应,也称为 绑定事件或者注册事件
比如鼠标经过显示下拉菜单,比如点击可以播放轮播图等等
<!DOCTYPE html>
<html lang="en">
<head>
  <meta charset="UTF-8">
  <meta name="viewport" content="width=device-width, initial-scale=1.0">
  <title>事件监听</title>
</head>
<body>
  <h3>事件监听</h3>
  <p id="text">为 DOM 元素添加事件监听,等待事件发生,便立即执行一个函数。</p>
  <button id="btn">点击改变文字颜色</button>
  <script>
    // 1. 获取 button 对应的 DOM 对象
    const btn = document.querySelector('#btn')

    // 2. 添加事件监听
    btn.addEventListener('click', function () {
      console.log('等待事件被触发...')
      // 改变 p 标签的文字颜色
      let text = document.getElementById('text')
      text.style.color = 'red'
    })

    // 3. 只要用户点击了按钮,事件便触发了!!!
  </script>
</body>
</html>
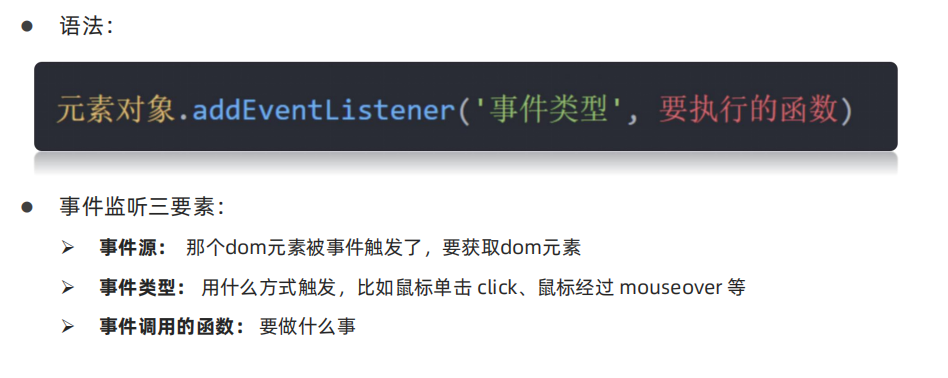
完成事件监听分成3个步骤:
- 获取 DOM 元素
- 通过
addEventListener方法为 DOM 节点添加事件监听 - 等待事件触发,如用户点击了某个按钮时便会触发
click事件类型 - 事件触发后,相对应的回调函数会被执行
大白话描述:所谓的事件无非就是找个机会(事件触发)调用一个函数(回调函数)。
注意:
事件类型要加引号
函数是点击之后再去执行,每次点击都会执行一次
案例一 :京东点击关闭顶部广告
需求:点击关闭之后,顶部关闭
分析:
①:点击的是关闭按钮
②:关闭的是父盒子
核心:利用样式的显示和隐藏完成, display:none 隐藏元素 display:block 显示元素
<html lang="en">

<head>
  <meta charset="UTF-8">
  <meta http-equiv="X-UA-Compatible" content="IE=edge">
  <meta name="viewport" content="width=device-width, initial-scale=1.0">
  <title>Document</title>
  <style>
    .box {
      position: relative;
      width: 1000px;
      height: 200px;
      background-color: pink;
      margin: 100px auto;
      text-align: center;
      font-size: 50px;
      line-height: 200px;
      font-weight: 700;
    }

    .box1 {
      position: absolute;
      right: 20px;
      top: 10px;
      width: 20px;
      height: 20px;
      background-color: skyblue;
      text-align: center;
      line-height: 20px;
      font-size: 16px;
      cursor: pointer;
    }
  </style>
</head>

<body>
  <div class="box">
    我是广告
    <div class="box1">X</div>
  </div>
  <script>
    // 1. 获取事件源
    const box1 = document.querySelector('.box1')
    //  关闭的是大盒子
    const box = document.querySelector('.box')
    // 2. 事件侦听
    box1.addEventListener('click', function () {
      box.style.display = 'none'
    })
  </script>
</body>

</html>
案例二:随机点名案例
业务分析:
① 点击开始按钮随机抽取数组的一个数据,放到页面中
② 点击结束按钮删除数组当前抽取的一个数据
③ 当抽取到最后一个数据的时候,两个按钮同时禁用(写点开始里面,只剩最后一个数据不用抽了
)
核心:利用定时器快速展示,停止定时器结束展示
<!DOCTYPE html>
<html lang="en">

<head>
    <meta charset="UTF-8">
    <meta name="viewport" content="width=device-width, initial-scale=1.0">
    <title>Document</title>
    <style>
        * {
            margin: 0;
            padding: 0;
        }

        h2 {
            text-align: center;
        }

        .box {
            width: 600px;
            margin: 50px auto;
            display: flex;
            font-size: 25px;
            line-height: 40px;
        }

        .qs {

            width: 450px;
            height: 40px;
            color: red;

        }

        .btns {
            text-align: center;
        }

        .btns button {
            width: 120px;
            height: 35px;
            margin: 0 50px;
        }
    </style>
</head>

<body>
    <h2>随机点名</h2>
    <div class="box">
        <span>名字是:</span>
        <div class="qs">这里显示姓名</div>
    </div>
    <div class="btns">
        <button class="start">开始</button>
        <button class="end">结束</button>
    </div>

    <script>
        // 数据数组
        const arr = ['马超', '黄忠', '赵云', '关羽', '张飞']
        // 定时器的全局变量
        let timerId = 0
        // 随机号要全局变量
        let random = 0
        // 业务1.开始按钮模块
        const qs = document.querySelector('.qs')
        // 1.1 获取开始按钮对象
        const start = document.querySelector('.start')
        // 1.2 添加点击事件
        start.addEventListener('click', function () {
            timerId = setInterval(function () {
                // 随机数
                random = parseInt(Math.random() * arr.length)
                // console.log(arr[random])
                qs.innerHTML = arr[random]
            }, 35)
            // 如果数组里面只有一个值了,还需要抽取吗?  不需要  让两个按钮禁用就可以
            if (arr.length === 1) {
                // start.disabled = true
                // end.disabled = true
                start.disabled = end.disabled = true
            }
        })

        // 2. 关闭按钮模块
        const end = document.querySelector('.end')
        end.addEventListener('click', function () {
            clearInterval(timerId)
            // 结束了,可以删除掉当前抽取的那个数组元素
            arr.splice(random, 1)
            console.log(arr)
        })
    </script>
</body>

</html>
拓展知识-事件监听版本
-
DOM L0
事件源.on事件 = function() { }
-
DOM L2
事件源.addEventListener(事件, 事件处理函数)
-
区别:
on方式会被覆盖,addEventListener方式可绑定多次,拥有事件更多特性,推荐使用
双击事件
click 译成中文是【点击】的意思,它的含义是监听(等着)用户鼠标的单击操作,除了【单击】还有【双击】dblclick
<script>
  // 双击事件类型
  btn.addEventListener('dblclick', function () {
    console.log('等待事件被触发...');
    // 改变 p 标签的文字颜色
    const text = document.querySelector('.text')
    text.style.color = 'red'
  })

  // 只要用户双击击了按钮,事件便触发了!!!
</script>
结论:【事件类型】决定了事件被触发的方式,如 click 代表鼠标单击,dblclick 代表鼠标双击。
事件类型
将众多的事件类型分类可分为:鼠标事件、键盘事件、表单事件、焦点事件等,我们逐一展开学习。
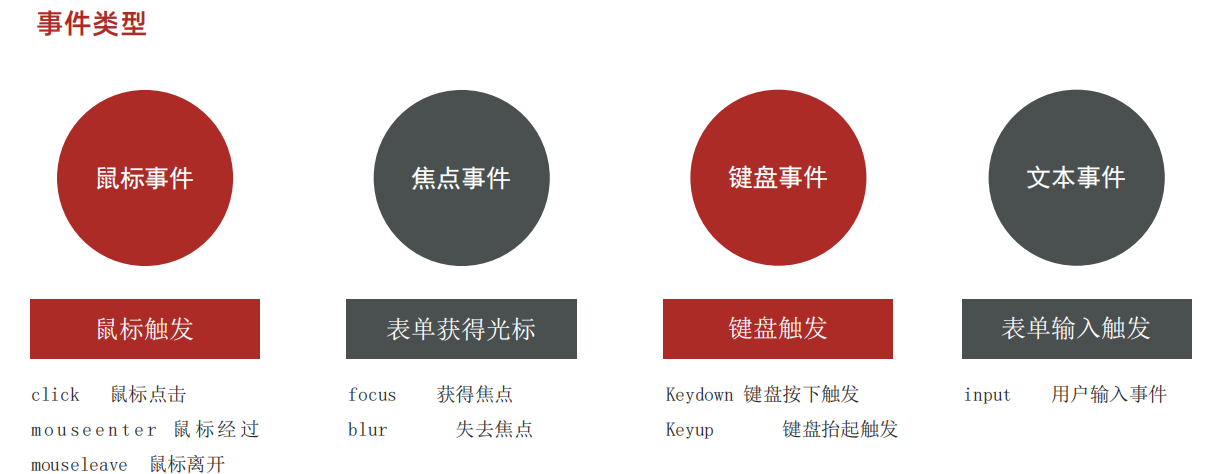
鼠标事件
鼠标事件是指跟鼠标操作相关的事件
<html lang="en">

<head>
  <meta charset="UTF-8">
  <meta http-equiv="X-UA-Compatible" content="IE=edge">
  <meta name="viewport" content="width=device-width, initial-scale=1.0">
  <title>Document</title>
  <style>
    div {
      width: 200px;
      height: 200px;
      background-color: pink;
    }
  </style>
</head>

<body>
  <div></div>
  <script>
    const div = document.querySelector('div')
    // 鼠标经过
    div.addEventListener('mouseenter', function () {
      console.log(`轻轻的我来了`)
    })
    // 鼠标离开
    div.addEventListener('mouseleave', function () {
      console.log(`轻轻的我走了`)
    })

  </script>
</body>

</html>
综合案例-轮播图完整版
<!DOCTYPE html>
<html lang="en">
<head>
<meta charset="UTF-8" />
<meta http-equiv="X-UA-Compatible" content="IE=edge" />
<meta name="viewport" content="width=device-width, initial-scale=1.0" />
<title>轮播图点击切换</title>
<style>
* {
box-sizing: border-box;
}
.slider {
width: 560px;
height: 400px;
overflow: hidden;
}
.slider-wrapper {
width: 100%;
height: 320px;
}
.slider-wrapper img {
width: 100%;
height: 100%;
display: block;
}
.slider-footer {
height: 80px;
background-color: rgb(100, 67, 68);
padding: 12px 12px 0 12px;
position: relative;
}
.slider-footer .toggle {
position: absolute;
right: 0;
top: 12px;
display: flex;
}
.slider-footer .toggle button {
margin-right: 12px;
width: 28px;
height: 28px;
appearance: none;
border: none;
background: rgba(255, 255, 255, 0.1);
color: #fff;
border-radius: 4px;
cursor: pointer;
}
.slider-footer .toggle button:hover {
background: rgba(255, 255, 255, 0.2);
}
.slider-footer p {
margin: 0;
color: #fff;
font-size: 18px;
margin-bottom: 10px;
}
.slider-indicator {
margin: 0;
padding: 0;
list-style: none;
display: flex;
align-items: center;
}
.slider-indicator li {
width: 8px;
height: 8px;
margin: 4px;
border-radius: 50%;
background: #fff;
opacity: 0.4;
cursor: pointer;
}
.slider-indicator li.active {
width: 12px;
height: 12px;
opacity: 1;
}
</style>
</head>
<body>
<div class="slider">
<div class="slider-wrapper">
<img src="./images/slider01.jpg" alt="" />
</div>
<div class="slider-footer">
<p>对人类来说会不会太超前了?</p>
<ul class="slider-indicator">
<li class="active"></li>
<li></li>
<li></li>
<li></li>
<li></li>
<li></li>
<li></li>
<li></li>
</ul>
<div class="toggle">
<button class="prev"><</button>
<button class="next">></button>
</div>
</div>
</div>
<script>
// 1. 初始数据
const data = [
{ url: './images/slider01.jpg', title: '对人类来说会不会太超前了?', color: 'rgb(100, 67, 68)' },
{ url: './images/slider02.jpg', title: '开启剑与雪的黑暗传说!', color: 'rgb(43, 35, 26)' },
{ url: './images/slider03.jpg', title: '真正的jo厨出现了!', color: 'rgb(36, 31, 33)' },
{ url: './images/slider04.jpg', title: '李玉刚:让世界通过B站看到东方大国文化', color: 'rgb(139, 98, 66)' },
{ url: './images/slider05.jpg', title: '快来分享你的寒假日常吧~', color: 'rgb(67, 90, 92)' },
{ url: './images/slider06.jpg', title: '哔哩哔哩小年YEAH', color: 'rgb(166, 131, 143)' },
{ url: './images/slider07.jpg', title: '一站式解决你的电脑配置问题!!!', color: 'rgb(53, 29, 25)' },
{ url: './images/slider08.jpg', title: '谁不想和小猫咪贴贴呢!', color: 'rgb(99, 72, 114)' },
]
// 获取元素
const img = document.querySelector('.slider-wrapper img')
const p = document.querySelector('.slider-footer p')
const footer = document.querySelector('.slider-footer')
// 1. 右按钮业务
// 1.1 获取右侧按钮
const next = document.querySelector('.next')
let i = 0 // 信号量 控制播放图片张数
// 1.2 注册点击事件
next.addEventListener('click', function () {
// console.log(11)
i++
// 1.6判断条件 如果大于8 就复原为 0
// if (i >= 8) {
// i = 0
// }
i = i >= data.length ? 0 : i
// 1.3 得到对应的对象
// console.log(data[i])
// 调用函数
toggle()
})
// 2. 左侧按钮业务
// 2.1 获取左侧按钮
const prev = document.querySelector('.prev')
// 1.2 注册点击事件
prev.addEventListener('click', function () {
i--
// 判断条件 如果小于0 则爬到最后一张图片索引号是 7
// if (i < 0) {
// i = 7
// }
i = i < 0 ? data.length - 1 : i
// 1.3 得到对应的对象
// console.log(data[i])
// 调用函数
toggle()
})
// 声明一个渲染的函数作为复用
function toggle() {
// 1.4 渲染对应的数据
img.src = data[i].url
p.innerHTML = data[i].title
footer.style.backgroundColor = data[i].color
// 1.5 更换小圆点 先移除原来的类名, 当前li再添加 这个 类名
document.querySelector('.slider-indicator .active').classList.remove('active')
document.querySelector(`.slider-indicator li:nth-child(${i + 1})`).classList.add('active')
}
// 3. 自动播放模块
let timerId = setInterval(function () {
// 利用js自动调用点击事件 click() 一定加小括号调用函数
next.click()
}, 1000)
// 4. 鼠标经过大盒子,停止定时器
const slider = document.querySelector('.slider')
// 注册事件
slider.addEventListener('mouseenter', function () {
// 停止定时器
clearInterval(timerId)
})
// 5. 鼠标离开大盒子,开启定时器
// 注册事件
slider.addEventListener('mouseleave', function () {
// 停止定时器
if (timerId) clearInterval(timerId)
// 开启定时器
timerId = setInterval(function () {
// 利用js自动调用点击事件 click() 一定加小括号调用函数
next.click()
}, 1000)
})
</script>
</body>
</html>
焦点事件
focus 获得焦点
blur 失去焦点
<body>
  <input type="text">
  <script>
    const input = document.querySelector('input')
    input.addEventListener('focus', function () {
      console.log('有焦点触发')
    })
    input.addEventListener('blur', function () {
      console.log('失去焦点触发')
    })
  </script>
</body>
综合案例-小米搜索框案例

<!DOCTYPE html>
<html lang="en">

<head>
    <meta charset="UTF-8">
    <meta http-equiv="X-UA-Compatible" content="IE=edge">
    <meta name="viewport" content="width=device-width, initial-scale=1.0">
    <title>Document</title>
    <style>
        * {
            margin: 0;
            padding: 0;
            box-sizing: border-box;
        }

        ul {

            list-style: none;
        }

        .mi {
            position: relative;
            width: 223px;
            margin: 100px auto;
        }

        .mi input {
            width: 223px;
            height: 48px;
            padding: 0 10px;
            font-size: 14px;
            line-height: 48px;
            border: 1px solid #e0e0e0;
            outline: none;
        }

        .mi .search {
            border: 1px solid #ff6700;
        }

        .result-list {
            display: none;
            position: absolute;
            left: 0;
            top: 48px;
            width: 223px;
            border: 1px solid #ff6700;
            border-top: 0;
            background: #fff;
        }

        .result-list a {
            display: block;
            padding: 6px 15px;
            font-size: 12px;
            color: #424242;
            text-decoration: none;
        }

        .result-list a:hover {
            background-color: #eee;
        }
    </style>

</head>

<body>
    <div class="mi">
        <input type="search" placeholder="小米笔记本">
        <ul class="result-list">
            <li><a href="#">全部商品</a></li>
            <li><a href="#">小米11</a></li>
            <li><a href="#">小米10S</a></li>
            <li><a href="#">小米笔记本</a></li>
            <li><a href="#">小米手机</a></li>
            <li><a href="#">黑鲨4</a></li>
            <li><a href="#">空调</a></li>
        </ul>
    </div>
    <script>
        // 1. 获取元素
        const input = document.querySelector('[type=search]')
        const ul = document.querySelector('.result-list')
        // console.log(input)
        // 2. 监听事件 获得焦点
        input.addEventListener('focus', function () {
            // ul显示
            ul.style.display = 'block'
            // 添加一个带有颜色边框的类名
            input.classList.add('search')
        })
        // 3. 监听事件 失去焦点
        input.addEventListener('blur', function () {
            ul.style.display = 'none'
            input.classList.remove('search')
        })
    </script>
</body>

</html>
键盘事件
keydown 键盘按下触发
keyup 键盘抬起触发
文本事件
input 表单输入触发
<body>
  <input type="text">
  <script>
    const input = document.querySelector('input')
    // 1. 键盘事件
    // input.addEventListener('keydown', function () {
    //   console.log('键盘按下了')
    // })
    // input.addEventListener('keyup', function () {
    //   console.log('键盘弹起了')
    // })
    // 2. 用户输入文本事件  input
    input.addEventListener('input', function () {
      console.log(input.value)
    })
  </script>
</body>
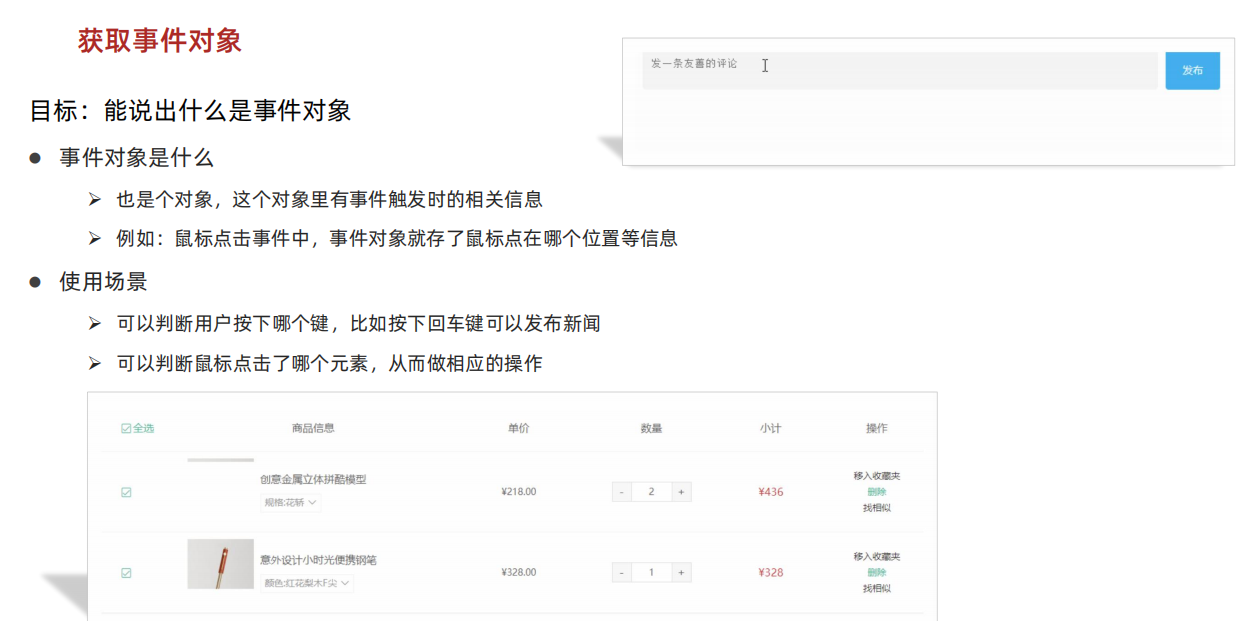
事件对象
任意事件类型被触发时与事件相关的信息会被以对象的形式记录下来,我们称这个对象为事件对象。
<body>
  <!-- <button>点击</button> -->
  <input type="text">
  <script>
    // const btn = document.querySelector('button')
    // btn.addEventListener('click', function (e) {
    //   console.log(e)
    // })

    const input = document.querySelector('input')
    input.addEventListener('keyup', function (e) {
      // console.log(window.event);
      // console.log(11)
      // console.log(e.key)
      if (e.key === 'Enter') {
        console.log('我按下了回车键')
      }
    })
  </script>
</body>
事件回调函数的【第1个参数】即所谓的事件对象,通常习惯性的将这个对数命名为 event、ev 、ev 。
接下来简单看一下事件对象中包含了哪些有用的信息:
ev.type当前事件的类型ev.clientX/Y光标相对浏览器窗口的位置ev.offsetX/Y光标相于当前 DOM 元素的位置ev.key用户按下的键盘键的值 现在不提倡使用keyCode
注:在事件回调函数内部通过 window.event 同样可以获取事件对象。
综合案例-按下回车发布评论

<!DOCTYPE html>
<html lang="en">

<head>
  <meta charset="UTF-8">
  <meta http-equiv="X-UA-Compatible" content="IE=edge">
  <meta name="viewport" content="width=device-width, initial-scale=1.0">
  <title>评论回车发布</title>
  <style>
    .wrapper {
      min-width: 400px;
      max-width: 800px;
      display: flex;
      justify-content: flex-end;
    }

    .avatar {
      width: 48px;
      height: 48px;
      border-radius: 50%;
      overflow: hidden;
      background: url(./images/avatar.jpg) no-repeat center / cover;
      margin-right: 20px;
    }

    .wrapper textarea {
      outline: none;
      border-color: transparent;
      resize: none;
      background: #f5f5f5;
      border-radius: 4px;
      flex: 1;
      padding: 10px;
      transition: all 0.5s;
      height: 30px;
    }

    .wrapper textarea:focus {
      border-color: #e4e4e4;
      background: #fff;
      height: 50px;
    }

    .wrapper button {
      background: #00aeec;
      color: #fff;
      border: none;
      border-radius: 4px;
      margin-left: 10px;
      width: 70px;
      cursor: pointer;
    }

    .wrapper .total {
      margin-right: 80px;
      color: #999;
      margin-top: 5px;
      opacity: 0;
      transition: all 0.5s;
    }

    .list {
      min-width: 400px;
      max-width: 800px;
      display: flex;
    }

    .list .item {
      width: 100%;
      display: flex;
    }

    .list .item .info {
      flex: 1;
      border-bottom: 1px dashed #e4e4e4;
      padding-bottom: 10px;
    }

    .list .item p {
      margin: 0;
    }

    .list .item .name {
      color: #FB7299;
      font-size: 14px;
      font-weight: bold;
    }

    .list .item .text {
      color: #333;
      padding: 10px 0;
    }

    .list .item .time {
      color: #999;
      font-size: 12px;
    }
  </style>
</head>

<body>
  <div class="wrapper">
    <i class="avatar"></i>
    <textarea id="tx" placeholder="发一条友善的评论" rows="2" maxlength="200"></textarea>
    <button>发布</button>
  </div>
  <div class="wrapper">
    <span class="total">0/200字</span>
  </div>
  <div class="list">
    <div class="item" style="display: none;">
      <i class="avatar"></i>
      <div class="info">
        <p class="name">清风徐来</p>
        <p class="text">大家都辛苦啦,感谢各位大大的努力,能圆满完成真是太好了[笑哭][支持]</p>
        <p class="time">2022-10-10 20:29:21</p>
      </div>
    </div>
  </div>
  <script>
    const tx = document.querySelector('#tx')
    const total = document.querySelector('.total')
    const item = document.querySelector('.item')
    const text = document.querySelector('.text')
    // 1. 当我们文本域获得了焦点,就让 total 显示出来
    tx.addEventListener('focus', function () {
      total.style.opacity = 1
    })
    // 2. 当我们文本域失去了焦点,就让 total 隐藏出来
    tx.addEventListener('blur', function () {
      total.style.opacity = 0
    })
    // 3. 检测用户输入
    tx.addEventListener('input', function () {
      // console.log(tx.value.length)  得到输入的长度
      total.innerHTML = `${tx.value.length}/200字`
    })

    // 4. 按下回车发布评论
    tx.addEventListener('keyup', function (e) {
      // 只有按下的是回车键,才会触发
      // console.log(e.key)
      if (e.key === 'Enter') {
        // 如果用户输入的不为空就显示和打印
        if (tx.value.trim()) {
          // console.log(11)
          item.style.display = 'block'
          // console.log(tx.value)  // 用户输入的内容
          text.innerHTML = tx.value

        }
        // 等我们按下回车,结束,清空文本域
        tx.value = ''
        // 按下回车之后,就要把 字符统计 复原
        total.innerHTML = '0/200字'
      }

    })
  </script>
</body>

</html>
环境对象
能够分析判断函数运行在不同环境中 this 所指代的对象。
环境对象指的是函数内部特殊的变量 this ,它代表着当前函数运行时所处的环境。
作用:弄清楚this的指向,可以让我们代码更简洁
<body>
  <button>点击</button>
  <script>
    // 每个函数里面都有this 环境对象  普通函数里面this指向的是window
    // function fn() {
    //   console.log(this)
    // }
    // window.fn()
    const btn = document.querySelector('button')
    btn.addEventListener('click', function () {
      // console.log(this)  // btn 对象
      // btn.style.color = 'red'
      this.style.color = 'red'
    })
  </script>
</body>
结论:
- 函数的调用方式不同
this变量的值也不同 - 【谁调用
this就是谁】是判断this值的粗略规则 - 直接调用函数,其实相当于是 window.函数,所以 this 指代 window
回调函数

回顾一下间歇函数 setInterval
<script>
	function fn() {
    console.log('我是回调函数...');
  }
  // 调用定时器
  setInterval(fn, 1000);
</script>
fn 函数做为参数传给了 setInterval ,这便是回调函数的实际应用了,结合刚刚学习的函数表达式上述代码还有另一种更常见写法。
<script>
  // 调用定时器,匿名函数做为参数
  setInterval(function () {
    console.log('我是回调函数...');
  }, 1000);
</script>
结论:
- 回调函数本质还是函数,只不过把它当成参数使用
- 使用匿名函数做为回调函数比较常见
综合案例-Tab栏切换

<!DOCTYPE html>
<html lang="en">

<head>
  <meta charset="UTF-8" />
  <meta http-equiv="X-UA-Compatible" content="IE=edge" />
  <meta name="viewport" content="width=device-width, initial-scale=1.0" />
  <title>tab栏切换</title>
  <style>
    * {
      margin: 0;
      padding: 0;
    }

    .tab {
      width: 590px;
      height: 340px;
      margin: 20px;
      border: 1px solid #e4e4e4;
    }

    .tab-nav {
      width: 100%;
      height: 60px;
      line-height: 60px;
      display: flex;
      justify-content: space-between;
    }

    .tab-nav h3 {
      font-size: 24px;
      font-weight: normal;
      margin-left: 20px;
    }

    .tab-nav ul {
      list-style: none;
      display: flex;
      justify-content: flex-end;
    }

    .tab-nav ul li {
      margin: 0 20px;
      font-size: 14px;
    }

    .tab-nav ul li a {
      text-decoration: none;
      border-bottom: 2px solid transparent;
      color: #333;
    }

    .tab-nav ul li a.active {
      border-color: #e1251b;
      color: #e1251b;
    }

    .tab-content {
      padding: 0 16px;
    }

    .tab-content .item {
      display: none;
    }

    .tab-content .item.active {
      display: block;
    }
  </style>
</head>

<body>
  <div class="tab">
    <div class="tab-nav">
      <h3>每日特价</h3>
      <ul>
        <li><a class="active" href="javascript:;">精选</a></li>
        <li><a href="javascript:;">美食</a></li>
        <li><a href="javascript:;">百货</a></li>
        <li><a href="javascript:;">个护</a></li>
        <li><a href="javascript:;">预告</a></li>
      </ul>
    </div>
    <div class="tab-content">
      <div class="item active"><img src="./images/tab00.png" alt="" /></div>
      <div class="item"><img src="./images/tab01.png" alt="" /></div>
      <div class="item"><img src="./images/tab02.png" alt="" /></div>
      <div class="item"><img src="./images/tab03.png" alt="" /></div>
      <div class="item"><img src="./images/tab04.png" alt="" /></div>
    </div>
  </div>
  <script>
    // 1. a 模块制作 要给 5个链接绑定鼠标经过事件
    // 1.1 获取 a 元素
    const as = document.querySelectorAll('.tab-nav a')
    // console.log(as)
    for (let i = 0; i < as.length; i++) {
      // console.log(as[i])
      // 要给 5个链接绑定鼠标经过事件
      as[i].addEventListener('mouseenter', function () {
        // console.log('鼠标经过')
        // 排他思想
        // 干掉别人 移除类active
        document.querySelector('.tab-nav .active').classList.remove('active')
        // 我登基 我添加类 active  this 当前的那个 a
        this.classList.add('active')

        // 下面5个大盒子 一一对应  .item
        // 干掉别人
        document.querySelector('.tab-content .active').classList.remove('active')
        // 对应序号的那个 item 显示 添加 active 类
        document.querySelector(`.tab-content .item:nth-child(${i + 1})`).classList.add('active')

      })
    }
  </script>
</body>

</html>


![小红书评论爬取使用教程[八猪采集器]](https://img-blog.csdnimg.cn/img_convert/8926593b2057d4b101fda5c042b94811.png)