RPM(红帽软件包管理器)
RPM建立统一的数据库文件,记录软件信息并分析依赖关系。目前RPM的优势已经被公众所认可,使用范围也已不局限在红帽系统中了。常见RPM命令如下:
安装软件 rpm -ivh filename.rpm
升级软件 rpm -Uvh filename.rpm
卸载软件 rpm -e filename.rpm
查询软件描述信息 rpm -qpi filename.rpm
列出软件文件信息 rpm -qpl filename.rpm
查询文件属于哪个RPM rpm -qf filename
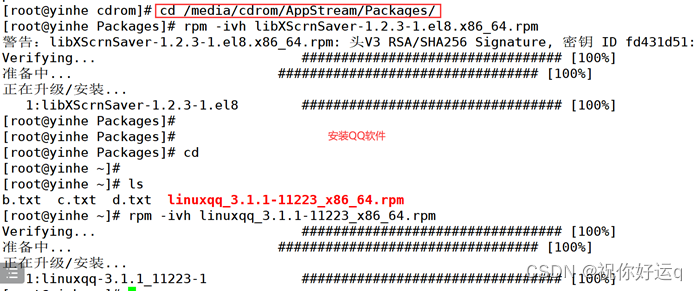
例、安装linux版QQ。下载链接:https://im.qq.com/linuxqq/download.html,下载安装包后复制到虚拟机linux桌面上,打开终端,切换目录后输入rpm-ivh XXX安装软件。
wget https://dldir1.qq.com/qqfile/qq/QQNT/2355235c/linuxqq_3.1.1-11223_x86_64.rpm
Yum软件仓库
Yum软件仓库便是为了进一步降低软件安装难度和复杂度而设计的技术。Yum软件仓库可 以根据用户的要求分析出所需软件包及其相关的依赖关系,然后自动下载软件包并安装到系统。
配置本地yum软件仓库
Yum软件仓库的作用是为了进一步简化RPM管理软件的难度以及自动分析所需软件包及其依赖关系的技术。要使用Yum软件仓库,就要先把它搭建起来然后正确配置。
1、CD/DVD驱动器加载镜像

2、创建挂载目录,编辑/etc/fstab配置文件,挂载。
![]()

![]()
也可以临时挂载
[root@yegg ~]# mount /dev/sr0 /media/cdrom/
3、查看是否挂上
[root@yegg ~]# df -h
/dev/sr0 7.9G 7.9G 0 100% /media/cdrom
4、创建Yum仓库的配置文件。
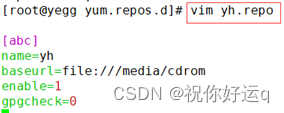
使用vim编辑器在/etc/yum.repos.d/目录中创建配置文件,文件名称可自定,但后缀必须为.repo,逐项写入以下内容。
[root@mylinux ~]# cd /etc/yum.repos.d/
[root@mylinux yum.repos.d]# vim rhel.repo
[rhel] #Yum软件仓库唯一标识名,避免和其他仓库冲突
name=rhel #Yum软件仓库的名称
baseurl=file:///media/cdrom #提供的方式包括FTP(ftp://..)、HTTP(http://..)、本地(file:///..)
enable=1 #是否启用;1为启用,0为禁用
gpgcheck=0 #是否校验文件;1为校验,0为不校验。本地源一般不校验。
Rehad7 以及centos7 的写法:
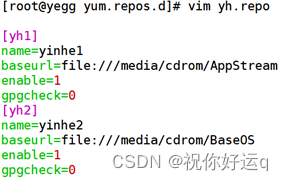
Redhat8 以及centos8 写法:(sr0挂载在/media/cdrom目录下)
1:安装 #yum install 2,检测升级 # yum update
3,升级 #yum update 4,软件包查询 #yum repolist / yum list all
5,软件包信息 #yun info 6,卸载软件 #Yum remove

安装LINUX版本的QQ及其 依赖包。
远程控制
sshd服务
SSH(Secure Shell)是一种提供远程登录的协议,是目前远程管理Linux系统的第一选择,可以基于口令和密钥进行验证。sshd服务的配置信息保存在/etc/ssh/sshd_config文件中,配置文件中有些配置项是以井号(#)开头,若想要这些配置生效,需要去掉井号(#)。重要的参数如下:
| 参数 | 作用 |
| Port 22 | 默认的sshd服务端口 |
| ListenAddress 0.0.0.0 | 设定sshd服务器监听的IP地址 |
| Protocol 2 | SSH协议的版本号 |
| HostKey /etc/ssh/ssh_host_key | SSH协议版本为1时,DES私钥存放的位置 |
| HostKey /etc/ssh/ssh_host_rsa_key | SSH协议版本为2时,RSA私钥存放的位置 |
| HostKey /etc/ssh/ssh_host_dsa_key | SSH协议版本为2时,DSA私钥存放的位置 |
| PermitRootLogin yes | 是否允许root管理员直接登录 |
| StrictModes yes | 当远程用户的私钥改变时拒绝连接 |
| MaxAuthTries 6 | 最大密码尝试次数 |
| MaxSessions 10 | 最大终端数 |
| PasswordAuthentication yes | 是否允许密码验证 |
| PermitEmptyPasswords no | 是否允许空密码登录 |
RHEL7系统已经默认启用了sshd服务,现在再开启一台虚拟机,现在有两台服务器,主机名和IP分别为mylinux_01、192.168.20.7,mylinu_02、192.168.20.10。现在我们在mylinux_02上使用ssh远程连接到mylinux_01,使用root身份。
[root@mylinu_02 ~]# ssh 192.168.20.7
The authenticity of host '192.168.20.7 (192.168.20.7)' can't be established.
ECDSA key fingerprint is SHA256:uiViG3xHDWCMFRMQdfLvuJpYTpLCvM3+VK4WdxXSBH8.
ECDSA key fingerprint is MD5:7a:6c:97:24:f4:6c:c0:90:39:b5:4a:65:4c:80:2b:8d.
Are you sure you want to continue connecting (yes/no)? yes # 第一次远程登录需输入yes确认
Warning: Permanently added '192.168.20.7' (ECDSA) to the list of known hosts.
root@192.168.20.7's password: #此处输入远程主机的root密码
Last login: Tue Nov 5 14:49:37 2019
[root@mylinux_01 ~]#
可以使用-l参数指定登录用户名,此处我们使用-l参数指定以普通用户mylinux远程登录到mylinux_01主机。
例:
[root@mylinu_02 ~]# ssh -l mylinux 192.168.20.7
mylinux@192.168.20.7's password: #此处输入远程主机的root密码
Last login: Fri Nov 22 14:25:56 2019 from 192.168.20.10
[mylinux@mylinux_01 ~]$
如果想要禁止以root管理员身份进行远程登录,可在配置文件中将PermitRootLogin后边的yes改为no即可,大家自行实验。
安全密钥验证
1、使用ssh-keygen命令在客户端主机中生成“密钥对”。
[root@mylinu_02 ~]# ssh-keygen -t rsa
Generating public/private rsa key pair.
Enter file in which to save the key (/root/.ssh/id_rsa): #确认密钥储存位置
/root/.ssh/id_rsa already exists.
Overwrite (y/n)? y
Enter passphrase (empty for no passphrase): #回车确认或自行设置密钥的密码
Enter same passphrase again: #再次回车确认或自行设置密钥的密码
Your identification has been saved in /root/.ssh/id_rsa.
Your public key has been saved in /root/.ssh/id_rsa.pub.
The key fingerprint is:
SHA256:6/7sYxLu/bX2YWQzErtDyju5N97o/D9XQTWE3vvHE/k root@mylinu_02
The key's randomart image is:
+---[RSA 2048]----+
| ooo|
| . ..|
| ..o |
| .oo |
| S + =+|
| ... o =++|
| ... o.o.+=|
| .ooooo+*+E|
| o+===B*++O|
+----[SHA256]-----+
2、使用ssh-copy-id命令 + 远程主机的IP把客户端主机中生成的公钥文件传送至远程主机。
[root@mylinu_02 ~]# ssh-copy-id 192.168.20.7
/usr/bin/ssh-copy-id: INFO: Source of key(s) to be installed: "/root/.ssh/id_rsa.pub"
/usr/bin/ssh-copy-id: INFO: attempting to log in with the new key(s), to filter out any that are already installed
/usr/bin/ssh-copy-id: INFO: 1 key(s) remain to be installed -- if you are prompted now it is to install the new keys
root@192.168.20.7's password: #此处输入远程主机的root密码
Number of key(s) added: 1
Now try logging into the machine, with: "ssh '192.168.20.7'"
and check to make sure that only the key(s) you wanted were added.
3、在客户端尝试登录到服务器,验证是否无须输入密码也可成功登录。
此处默认为root管理员,若想普通用户也可以使用密钥登录,如mylinux_01主机的mylinux用户也能在客户机上使用密钥验证,执行如下命令即可:ssh-copy-id mylinux@192.168.20.7。进入秘钥保存目录/root/.ssh,删掉相关文件后再次进行远程登录测试,就需要使用密码进行验证。
Windows 免密钥登陆
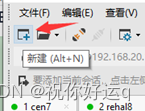
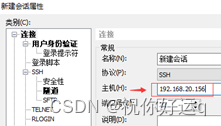
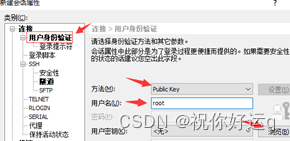
1,xshell生成密钥对

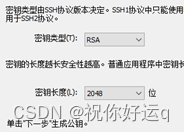

2.将密钥上传到 liunx服务器的 /root/.ssh 目录中
[root@yegg] mkdir .ssh [root@yegg] cd .ssh
[root@yegg .ssh]# ls
id_rsa id_rsa_2048.pub(上传来的公钥) id_rsa.pub known_hosts
[root@yegg .ssh]# mv id_rsa_2048.pub authorized_keys 修改密钥名称为authorized_keys
3,查看ssh 的密钥登陆是否打开
[root@linux-node ~]# grep '^[A,P]' /etc/ssh/sshd_config
PubkeyAuthentication yes #启用PublicKey认证
AuthorizedKeysFile .ssh/authorized_keys #PublicKey文件路径
P asswordAuthentication no #不适用密码认证登录
4, 密钥登陆


scp远程传输命令
scp可以基于SSH协议在网络之间进行加密安全传输,而咱们前边学过的cp命令只能在本地硬盘中进行文件复制。scp常用参数如下:
| 参数 | 作用 |
| -v | 显示详细的连接进度 |
| -P | 指定远程主机的sshd端口号 |
| -r | 用于传送文件夹 |
例1、在mylinux_02主机的/tmp目录下创建一个test.txt文件,内容为yinhejiaoyu,在使用scp命令将此文件远程传输至mylinux_01主机的/tmp目录。
[root@mylinu_02 ~]# echo hello > /tmp/test.txt
[root@mylinu_02 tmp]# scp /tmp/test.txt root@192.168.20.7:/tmp/
root@192.168.20.7's password: #此处输入远程主机的root密码
test.txt 100% 12 13.5KB/s 00:00
[root@mylinux_01 ~]# cat /tmp/test.txt
hello
例1、在mylinux_01的/tmp目录中创建test01.txt,内容为yinhejiaoyu__001,然后再到mulinux__02主机上直接下载到本地/tmp目录。
[root@mylinux_01 ~]# echo hello_001 > /tmp/test01.txt
[root@mylinu_02 ~]# scp root@192.168.20.7:/tmp/test01.txt /tmp/
root@192.168.20.7's password:
test01.txt 100% 16 17.5KB/s 00:00
[root@mylinu_02 ~]# cat /tmp/test01.txt
hello_001







![[大模型]LLaMA3-8B-Instruct langchain 接入](https://img-blog.csdnimg.cn/direct/ab2289e479c24db7b3613655e9adb73d.png#pic_center)
