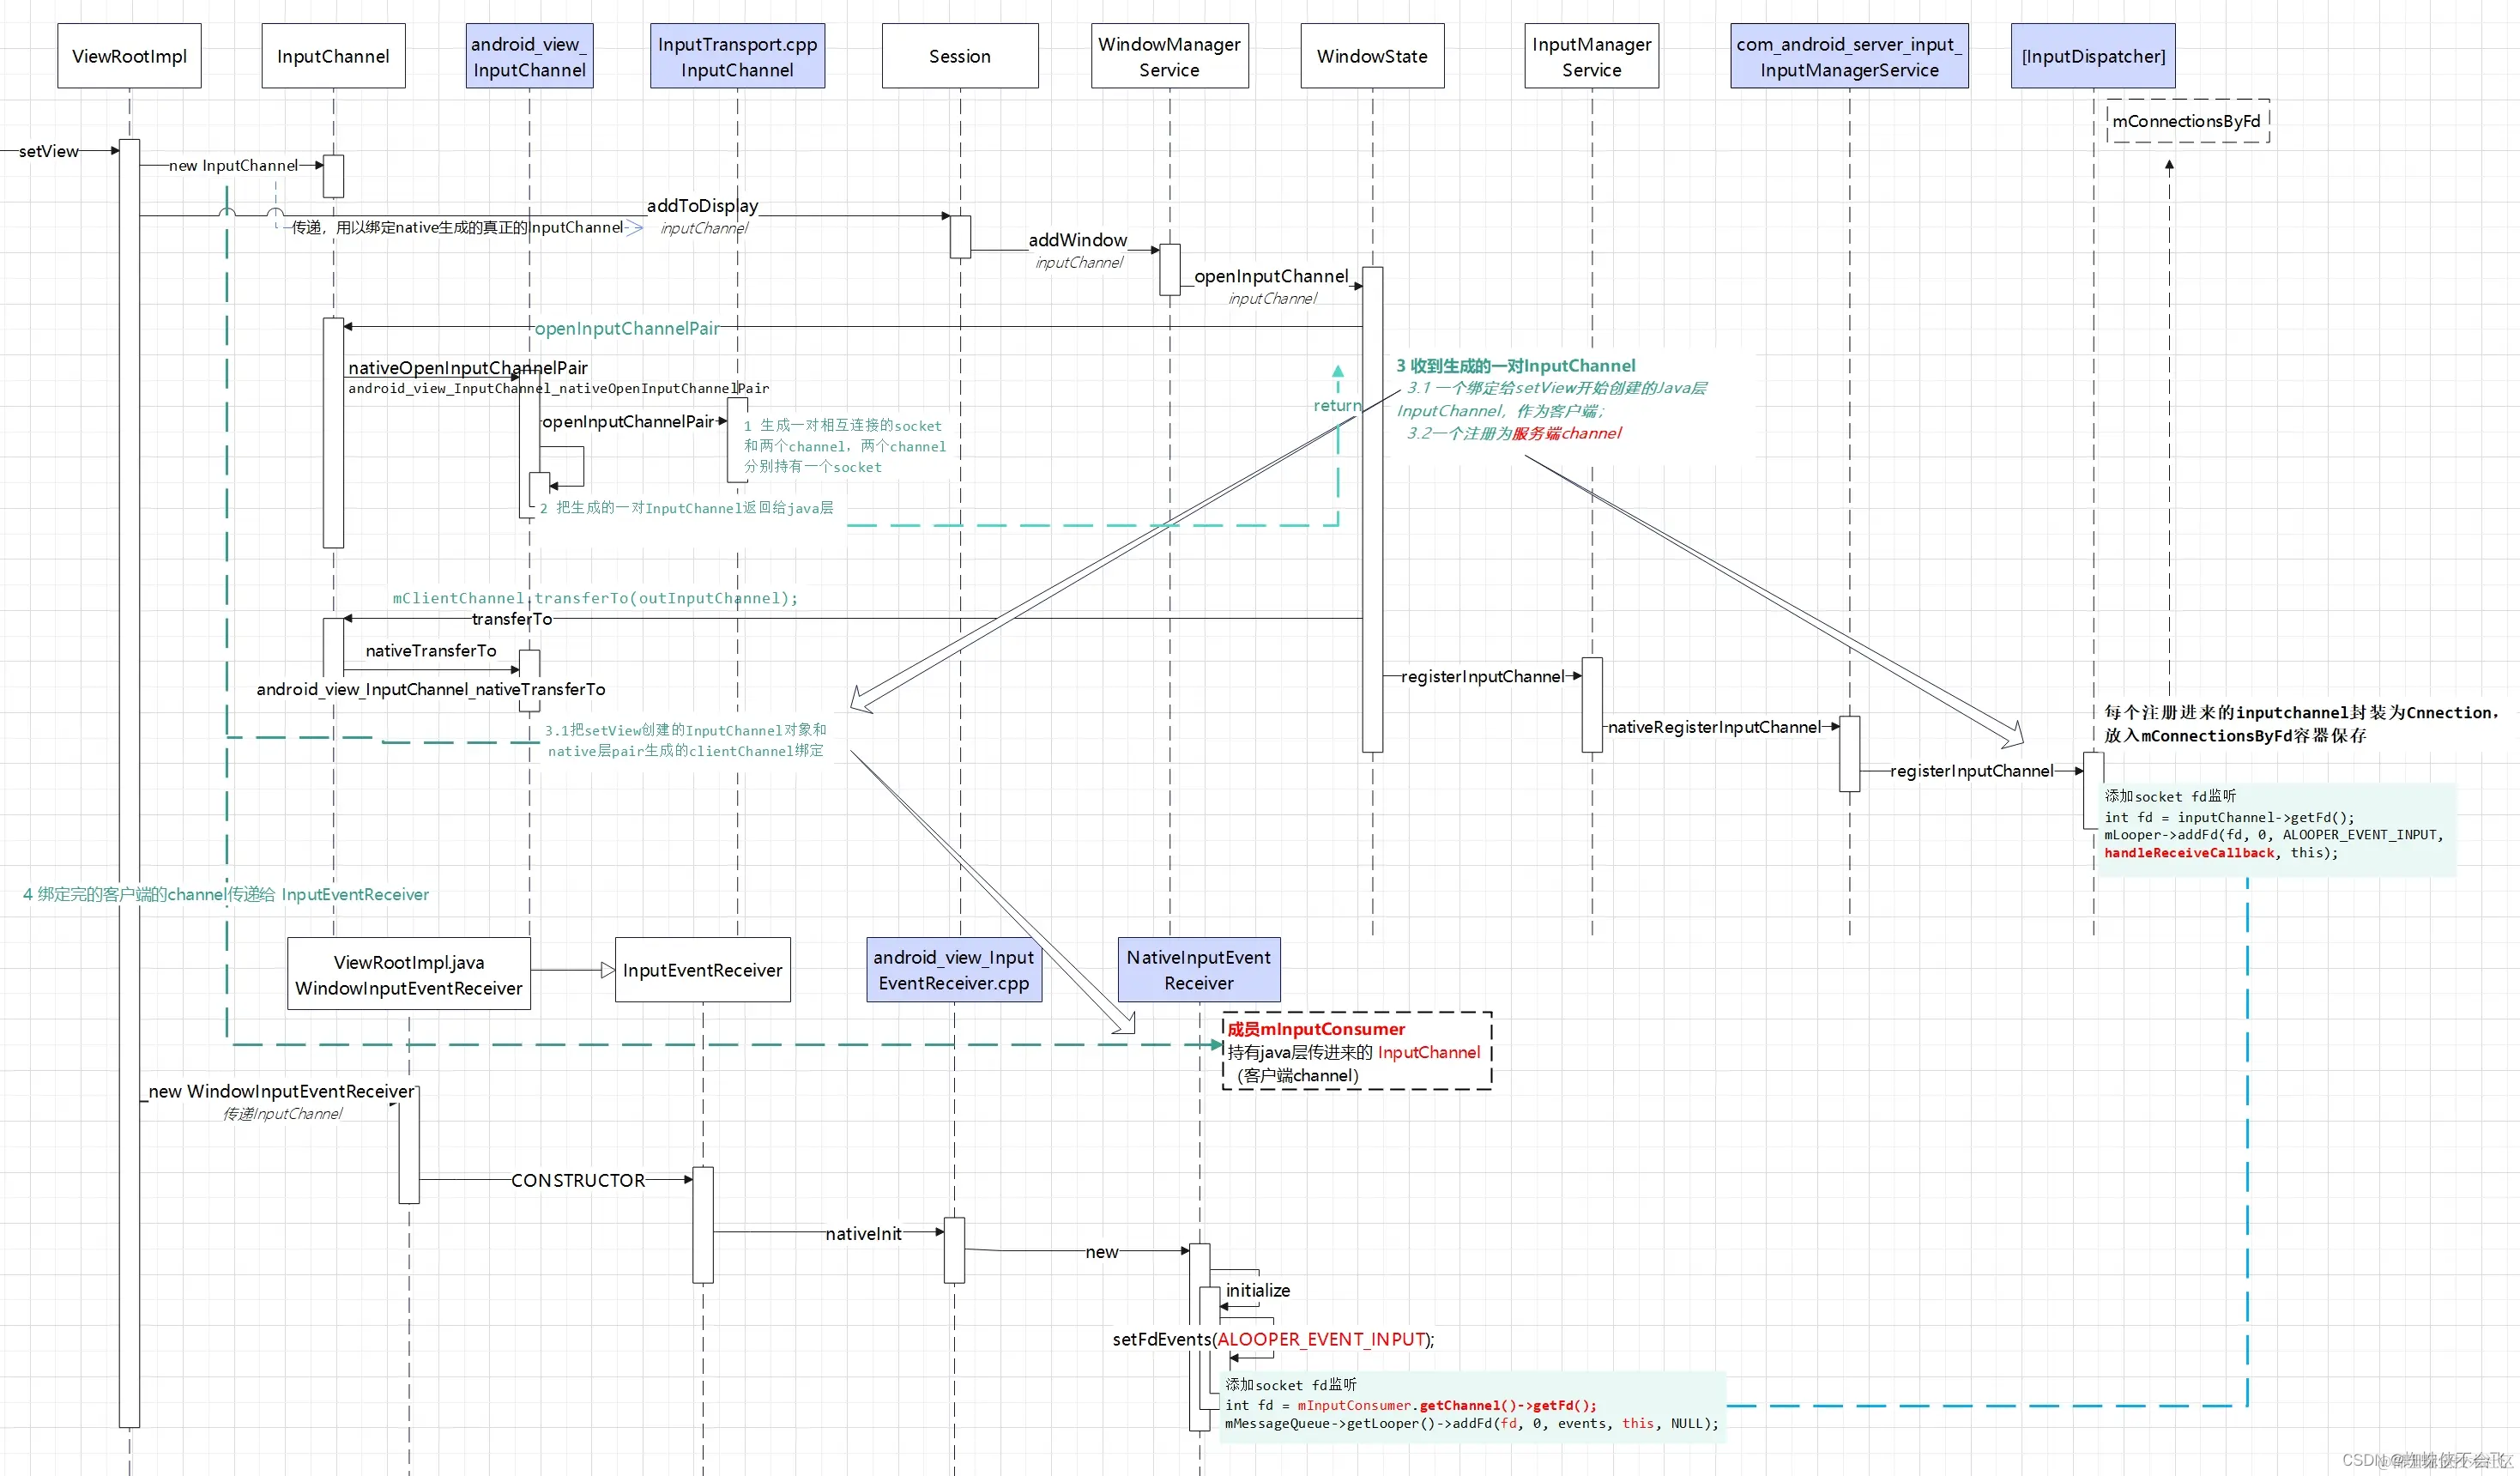
点击手机屏幕,可以分发input 事件到对应的view,由上一节知道input 是运行在system 进程的,那应用进程与系统进程是如何通讯的呢,相信本文可以给到一点小小的答案。
先给个结论:应用在resume 的时候才去建立与input 服务的联系。其中还创建了Token 对象和WindowState 对象等
/frameworks/base/core/java/android/app/ActivityThread.java
应用执行resume 代码流程
4826      @Override
4827      public void handleResumeActivity(ActivityClientRecord r, boolean finalStateRequest,
4828              boolean isForward, String reason) {
4829          // If we are getting ready to gc after going to the background, well
4830          // we are back active so skip it.
4831          unscheduleGcIdler();
4832          mSomeActivitiesChanged = true;
4833
4834          // TODO Push resumeArgs into the activity for consideration
4835          // skip below steps for double-resume and r.mFinish = true case.

// 这里去回调应用的onsesume 方法
4836          if (!performResumeActivity(r, finalStateRequest, reason)) {
4837              return;
4838          }
4839          if (mActivitiesToBeDestroyed.containsKey(r.token)) {
4840              // Although the activity is resumed, it is going to be destroyed. So the following
4841              // UI operations are unnecessary and also prevents exception because its token may
4842              // be gone that window manager cannot recognize it. All necessary cleanup actions
4843              // performed below will be done while handling destruction.
4844              return;
4845          }
4846
4847          final Activity a = r.activity;
4848
4849          if (localLOGV) {
4850              Slog.v(TAG, "Resume " + r + " started activity: " + a.mStartedActivity
4851                      + ", hideForNow: " + r.hideForNow + ", finished: " + a.mFinished);
4852          }
4853
4854          final int forwardBit = isForward
4855                  ? WindowManager.LayoutParams.SOFT_INPUT_IS_FORWARD_NAVIGATION : 0;
4856
4857          // If the window hasn't yet been added to the window manager,
4858          // and this guy didn't finish itself or start another activity,
4859          // then go ahead and add the window.
4860          boolean willBeVisible = !a.mStartedActivity;
4861          if (!willBeVisible) {
4862              willBeVisible = ActivityClient.getInstance().willActivityBeVisible(
4863                      a.getActivityToken());
4864          }
4865          if (r.window == null && !a.mFinished && willBeVisible) {
4866              r.window = r.activity.getWindow();
4867              View decor = r.window.getDecorView();
4868              decor.setVisibility(View.INVISIBLE);
4869              ViewManager wm = a.getWindowManager();
4870              WindowManager.LayoutParams l = r.window.getAttributes();
4871              a.mDecor = decor;
4872              l.type = WindowManager.LayoutParams.TYPE_BASE_APPLICATION;
4873              l.softInputMode |= forwardBit;
4874              if (r.mPreserveWindow) {
4875                  a.mWindowAdded = true;
4876                  r.mPreserveWindow = false;
4877                  // Normally the ViewRoot sets up callbacks with the Activity
4878                  // in addView->ViewRootImpl#setView. If we are instead reusing
4879                  // the decor view we have to notify the view root that the
4880                  // callbacks may have changed.
4881                  ViewRootImpl impl = decor.getViewRootImpl();
4882                  if (impl != null) {
4883                      impl.notifyChildRebuilt();
4884                  }
4885              }
4886              if (a.mVisibleFromClient) {
4887                  if (!a.mWindowAdded) {
4888                      a.mWindowAdded = true;

// 这里去增加view,并设置了 mWindowAdded 为true 的。保证只增加一次
4889                      wm.addView(decor, l);
/frameworks/base/core/java/android/view/WindowManagerImpl.java
// addview 方法
 145      @Override
146      public void addView(@NonNull View view, @NonNull ViewGroup.LayoutParams params) {
147          applyTokens(params);
148          mGlobal.addView(view, params, mContext.getDisplayNoVerify(), mParentWindow,
149                  mContext.getUserId());
150      }
/frameworks/base/core/java/android/view/WindowManagerGlobal.java
// addview 方法
 145      @Override
146      public void addView(@NonNull View view, @NonNull ViewGroup.LayoutParams params) {
147          applyTokens(params);
148          mGlobal.addView(view, params, mContext.getDisplayNoVerify(), mParentWindow,
149                  mContext.getUserId());
150      }
/frameworks/base/core/java/android/view/WindowManagerGlobal.java
304      public void addView(View view, ViewGroup.LayoutParams params,
305              Display display, Window parentWindow, int userId) {
306          if (view == null) {
307              throw new IllegalArgumentException("view must not be null");
308          }
。。。。
372              IWindowSession windowlessSession = null;
373              // If there is a parent set, but we can't find it, it may be coming

385              if (windowlessSession == null) {
    // 创建ViewRootImpl 对象,windowlessSession与分屏有关
386                  root = new ViewRootImpl(view.getContext(), display);
387              } else {
388                  root = new ViewRootImpl(view.getContext(), display,
389                          windowlessSession);
390              }
// 给 ViewRootImpl 去设置params 参数
392              view.setLayoutParams(wparams);
393
394              mViews.add(view);
395              mRoots.add(root);
396              mParams.add(wparams);
397
398              // do this last because it fires off messages to start doing things
399              try {
    // 去设置view
400                  root.setView(view, wparams, panelParentView, userId);
401              } catch (RuntimeException e) {
/frameworks/base/core/java/android/view/ViewRootImpl.java
1099      public void setView(View view, WindowManager.LayoutParams attrs, View panelParentView,
1100              int userId) {
1101          synchronized (this) {
1102              if (mView == null) {
1103                  mView = view;
。。。。
// 向surfaceflinger 申请vsync ,准备绘制
1195                  requestLayout();
1196                  InputChannel inputChannel = null;
1197                  if ((mWindowAttributes.inputFeatures
1198                          & WindowManager.LayoutParams.INPUT_FEATURE_NO_INPUT_CHANNEL) == 0) {
    // 没有该属性,创建 InputChannel对象
1199                      inputChannel = new InputChannel();
1200                  }
。。。。
1212                  try {
1213                      mOrigWindowType = mWindowAttributes.type;
1214                      mAttachInfo.mRecomputeGlobalAttributes = true;
1215                      collectViewAttributes();
1216                      adjustLayoutParamsForCompatibility(mWindowAttributes);
1217                      controlInsetsForCompatibility(mWindowAttributes);
// 一、这里传入了空的 inputChannel,去与input 创建socket 通信。这里还去创建了 windowtoken、windowstate 等对象
1218                      res = mWindowSession.addToDisplayAsUser(mWindow, mWindowAttributes,
1219                              getHostVisibility(), mDisplay.getDisplayId(), userId,
1220                              mInsetsController.getRequestedVisibilities(), inputChannel, mTempInsets,
1221                              mTempControls);

// 二、创建service 服务端到客户端的回调

1325                  if (inputChannel != null) {
1326                      if (mInputQueueCallback != null) {
1327                          mInputQueue = new InputQueue();
1328                          mInputQueueCallback.onInputQueueCreated(mInputQueue);
1329                      }
// 创建 WindowInputEventReceiver对象,looper 是主线程
1330                      mInputEventReceiver = new WindowInputEventReceiver(inputChannel,
1331                              Looper.myLooper());
1332
1333                      if (ENABLE_INPUT_LATENCY_TRACKING && mAttachInfo.mThreadedRenderer != null) {
1334                          InputMetricsListener listener = new InputMetricsListener();
1335                          mHardwareRendererObserver = new HardwareRendererObserver(
1336                                  listener, listener.data, mHandler, true /*waitForPresentTime*/);
1337                          mAttachInfo.mThreadedRenderer.addObserver(mHardwareRendererObserver);
1338                      }
1339                  }
1340
1341                  view.assignParent(this);
1342                  mAddedTouchMode = (res & WindowManagerGlobal.ADD_FLAG_IN_TOUCH_MODE) != 0;
1343                  mAppVisible = (res & WindowManagerGlobal.ADD_FLAG_APP_VISIBLE) != 0;
1344
1345                  if (mAccessibilityManager.isEnabled()) {
1346                      mAccessibilityInteractionConnectionManager.ensureConnection();
1347                  }
1348
1349                  if (view.getImportantForAccessibility() == View.IMPORTANT_FOR_ACCESSIBILITY_AUTO) {
1350                      view.setImportantForAccessibility(View.IMPORTANT_FOR_ACCESSIBILITY_YES);
1351                  }
1352

// 设置input 事件接收后的回调链
1353                  // Set up the input pipeline.
1354                  CharSequence counterSuffix = attrs.getTitle();
1355                  mSyntheticInputStage = new SyntheticInputStage();
1356                  InputStage viewPostImeStage = new ViewPostImeInputStage(mSyntheticInputStage);
1357                  InputStage nativePostImeStage = new NativePostImeInputStage(viewPostImeStage,
1358                          "aq:native-post-ime:" + counterSuffix);
1359                  InputStage earlyPostImeStage = new EarlyPostImeInputStage(nativePostImeStage);
1360                  InputStage imeStage = new ImeInputStage(earlyPostImeStage,
1361                          "aq:ime:" + counterSuffix);
1362                  InputStage viewPreImeStage = new ViewPreImeInputStage(imeStage);
1363                  InputStage nativePreImeStage = new NativePreImeInputStage(viewPreImeStage,
1364                          "aq:native-pre-ime:" + counterSuffix);
1365
1366                  mFirstInputStage = nativePreImeStage;
1367                  mFirstPostImeInputStage = earlyPostImeStage;
1368                  mPendingInputEventQueueLengthCounterName = "aq:pending:" + counterSuffix;
1369
1370                  AnimationHandler.requestAnimatorsEnabled(mAppVisible, this);
1371              }
1372          }
一、传入空的 inputChannel,去与input 创建socket 通信。
调用mWindowSession.addToDisplay携带着InputChannel,addToDisplay最终调用到WMS的addwindow。
/frameworks/base/services/core/java/com/android/server/wm/Session.java
205      public int addToDisplayAsUser(IWindow window, WindowManager.LayoutParams attrs,
206              int viewVisibility, int displayId, int userId, InsetsVisibilities requestedVisibilities,
207              InputChannel outInputChannel, InsetsState outInsetsState,
208              InsetsSourceControl[] outActiveControls) {
209          return mService.addWindow(this, window, attrs, viewVisibility, displayId, userId,
210                  requestedVisibilities, outInputChannel, outInsetsState, outActiveControls);
211      }
/frameworks/base/services/core/java/com/android/server/wm/WindowManagerService.java
449      public int addWindow(Session session, IWindow client, LayoutParams attrs, int viewVisibility,
1450              int displayId, int requestUserId, InsetsVisibilities requestedVisibilities,
1451              InputChannel outInputChannel, InsetsState outInsetsState,
1452              InsetsSourceControl[] outActiveControls) {
1453          Arrays.fill(outActiveControls, null);
1454          int[] appOp = new int[1];
1455          final boolean isRoundedCornerOverlay = (attrs.privateFlags
1456                  & PRIVATE_FLAG_IS_ROUNDED_CORNERS_OVERLAY) != 0;
1457          int res = mPolicy.checkAddPermission(attrs.type, isRoundedCornerOverlay, attrs.packageName,
1458                  appOp);
1459          if (res != ADD_OKAY) {
1460              return res;
1461          }
。。。。。。。。
1682              final boolean openInputChannels = (outInputChannel != null
1683                      && (attrs.inputFeatures & INPUT_FEATURE_NO_INPUT_CHANNEL) == 0);
1684              if  (openInputChannels) {
    // 通过windowstate 去打开channel,给outInputChannel 赋值
1685                  win.openInputChannel(outInputChannel);
1686              }
1687
/frameworks/base/services/core/java/com/android/server/wm/WindowState.java
2766      void openInputChannel(InputChannel outInputChannel) {
2767          if (mInputChannel != null) {
2768              throw new IllegalStateException("Window already has an input channel.");
2769          }
2770          String name = getName();

// 通过wms 的ims 去创建inputchannel
2771          mInputChannel = mWmService.mInputManager.createInputChannel(name);
2772          mInputChannelToken = mInputChannel.getToken();
2773          mInputWindowHandle.setToken(mInputChannelToken);
2774          mWmService.mInputToWindowMap.put(mInputChannelToken, this);
2775          if (outInputChannel != null) {
2776              mInputChannel.copyTo(outInputChannel);
2777          } else {
2778              // If the window died visible, we setup a fake input channel, so that taps
2779              // can still detected by input monitor channel, and we can relaunch the app.
2780              // Create fake event receiver that simply reports all events as handled.
2781              mDeadWindowEventReceiver = new DeadWindowEventReceiver(mInputChannel);
2782          }
2783      }
/frameworks/base/services/core/java/com/android/server/input/InputManagerService.java
784      public InputChannel createInputChannel(String name) {
785          return mNative.createInputChannel(name);
786      }

// mNative 对象是 NativeImpl
406          NativeInputManagerService getNativeService(InputManagerService service) {
407              return new NativeInputManagerService.NativeImpl(service, mContext, mLooper.getQueue());
408          }
/frameworks/base/services/core/java/com/android/server/input/NativeInputManagerService.java
194      class NativeImpl implements NativeInputManagerService {
195          /** Pointer to native input manager service object, used by native code. */
196          @SuppressWarnings({"unused", "FieldCanBeLocal"})
197          private final long mPtr;
198
199          NativeImpl(InputManagerService service, Context context, MessageQueue messageQueue) {
    // 调用native 层初始化方法
200              mPtr = init(service, context, messageQueue);
201          }

// 调用native 层createInputChannel 方法
229          public native InputChannel createInputChannel(String name);
/frameworks/base/services/core/jni/com_android_server_input_InputManagerService.cpp
2322          {"createInputChannel", "(Ljava/lang/String;)Landroid/view/InputChannel;",
2323           (void*)nativeCreateInputChannel},

1592
1593  static jobject nativeCreateInputChannel(JNIEnv* env, jobject nativeImplObj, jstring nameObj) {
1594      NativeInputManager* im = getNativeInputManager(env, nativeImplObj);
1595
1596      ScopedUtfChars nameChars(env, nameObj);
1597      std::string name = nameChars.c_str();
1598

// NativeInputManager 的 createInputChannel 方法
1599      base::Result<std::unique_ptr<InputChannel>> inputChannel = im->createInputChannel(name);
1600
1601      if (!inputChannel.ok()) {
1602          std::string message = inputChannel.error().message();
1603          message += StringPrintf(" Status=%d", static_cast<int>(inputChannel.error().code()));
1604          jniThrowRuntimeException(env, message.c_str());
1605          return nullptr;
1606      }
1607

// 回调java 层的方法
1608      jobject inputChannelObj =
1609              android_view_InputChannel_createJavaObject(env, std::move(*inputChannel));
1610      if (!inputChannelObj) {
1611          return nullptr;
1612      }
1613
1614      android_view_InputChannel_setDisposeCallback(env, inputChannelObj,
1615              handleInputChannelDisposed, im);
1616      return inputChannelObj;
1617  }

512  base::Result<std::unique_ptr<InputChannel>> NativeInputManager::createInputChannel(
513          const std::string& name) {
514      ATRACE_CALL();
// 调用InputDispatcher 的方法 createInputChannel
515      return mInputManager->getDispatcher().createInputChannel(name);
516  }
/frameworks/native/services/inputflinger/dispatcher/InputDispatcher.cpp
5450  Result<std::unique_ptr<InputChannel>> InputDispatcher::createInputChannel(const std::string& name) {
5451      if (DEBUG_CHANNEL_CREATION) {
5452          ALOGD("channel '%s' ~ createInputChannel", name.c_str());
5453      }
5454
5455      std::unique_ptr<InputChannel> serverChannel;
5456      std::unique_ptr<InputChannel> clientChannel;

// InputChannel 去创建socket 通信
5457      status_t result = InputChannel::openInputChannelPair(name, serverChannel, clientChannel);
5458
5459      if (result) {
5460          return base::Error(result) << "Failed to open input channel pair with name " << name;
5461      }
5462
5463      { // acquire lock
5464          std::scoped_lock _l(mLock);
5465          const sp<IBinder>& token = serverChannel->getConnectionToken();
5466          int fd = serverChannel->getFd();
// 创建服务器端的 Connection,serverChannel作为参数
5467          sp<Connection> connection =
5468                  new Connection(std::move(serverChannel), false /*monitor*/, mIdGenerator);
5469
5470          if (mConnectionsByToken.find(token) != mConnectionsByToken.end()) {
5471              ALOGE("Created a new connection, but the token %p is already known", token.get());
5472          }

// 将token作为客户端的标志值保存到 mConnectionsByToken,在事件分发的时候可以使用
5473          mConnectionsByToken.emplace(token, connection);
5474
5475          std::function<int(int events)> callback = std::bind(&InputDispatcher::handleReceiveCallback,
5476                                                              this, std::placeholders::_1, token);
5477

// 将 handleReceiveCallback 函数增加到fd 的监听中,应用客户端与input 服务端通信的时候,会回调 handleReceiveCallback
5478          mLooper->addFd(fd, 0, ALOOPER_EVENT_INPUT, new LooperEventCallback(callback), nullptr);
5479      } // release lock
5480
5481      // Wake the looper because some connections have changed.
5482      mLooper->wake();
// 这里返回客户端inputchannel 给应用
5483      return clientChannel;
5484  }
调用socketpair函数创建一对相互连接的socket,然后创建了一对InputChannel,分别持有一个socket,一个作为客户端一个作为服务端,这样分别持有这两个InputChannel的两端就可以通过socket通信了。
// =========InputChannel 去创建socket 通信========
334  status_t InputChannel::openInputChannelPair(const std::string& name,
335                                              std::unique_ptr<InputChannel>& outServerChannel,
336                                              std::unique_ptr<InputChannel>& outClientChannel) {
337      int sockets[2];
// 创建socket
338      if (socketpair(AF_UNIX, SOCK_SEQPACKET, 0, sockets)) {
339          status_t result = -errno;
340          ALOGE("channel '%s' ~ Could not create socket pair.  errno=%s(%d)", name.c_str(),
341                strerror(errno), errno);
342          outServerChannel.reset();
343          outClientChannel.reset();
344          return result;
345      }
346
347      int bufferSize = SOCKET_BUFFER_SIZE;
// 设置双向通信
348      setsockopt(sockets[0], SOL_SOCKET, SO_SNDBUF, &bufferSize, sizeof(bufferSize));
349      setsockopt(sockets[0], SOL_SOCKET, SO_RCVBUF, &bufferSize, sizeof(bufferSize));
350      setsockopt(sockets[1], SOL_SOCKET, SO_SNDBUF, &bufferSize, sizeof(bufferSize));
351      setsockopt(sockets[1], SOL_SOCKET, SO_RCVBUF, &bufferSize, sizeof(bufferSize));
352
// 服务器端和客户端都是使用相同的token
353      sp<IBinder> token = new BBinder();
354
355      std::string serverChannelName = name + " (server)";
356      android::base::unique_fd serverFd(sockets[0]);
// 创建服务器端的 InputChannel 对象
357      outServerChannel = InputChannel::create(serverChannelName, std::move(serverFd), token);
358
359      std::string clientChannelName = name + " (client)";
360      android::base::unique_fd clientFd(sockets[1]);
// 创建客户器端的 InputChannel 对象
361      outClientChannel = InputChannel::create(clientChannelName, std::move(clientFd), token);
362      return OK;
363  }

309  std::unique_ptr<InputChannel> InputChannel::create(const std::string& name,
310                                                     android::base::unique_fd fd, sp<IBinder> token) {
311      const int result = fcntl(fd, F_SETFL, O_NONBLOCK);
312      if (result != 0) {
313          LOG_ALWAYS_FATAL("channel '%s' ~ Could not make socket non-blocking: %s", name.c_str(),
314                           strerror(errno));
315          return nullptr;
316      }
317      // using 'new' to access a non-public constructor
318      return std::unique_ptr<InputChannel>(new InputChannel(name, std::move(fd), token));
319  }
/frameworks/base/services/core/java/com/android/server/wm/WindowState.java
2766      void openInputChannel(InputChannel outInputChannel) {
2767          if (mInputChannel != null) {
2768              throw new IllegalStateException("Window already has an input channel.");
2769          }
2770          String name = getName();

// 最终获取到创建的 nputchannel
2771          mInputChannel = mWmService.mInputManager.createInputChannel(name);
// 获取到token,该token 的值与 服务器端ims 的值是一致的。可以一一对应socket 通信
2772          mInputChannelToken = mInputChannel.getToken();
// 将其设置给 InputWindowHandle
2773          mInputWindowHandle.setToken(mInputChannelToken);
2774          mWmService.mInputToWindowMap.put(mInputChannelToken, this);
2775          if (outInputChannel != null) {
    // 最后将其拷贝给 mInputChannel
2776              mInputChannel.copyTo(outInputChannel);
2777          } else {
2778              // If the window died visible, we setup a fake input channel, so that taps
2779              // can still detected by input monitor channel, and we can relaunch the app.
2780              // Create fake event receiver that simply reports all events as handled.
2781              mDeadWindowEventReceiver = new DeadWindowEventReceiver(mInputChannel);
2782          }
2783      }
二、创建service 服务端到客户端的回调
/frameworks/base/core/java/android/view/ViewRootImpl.java
// 创建 WindowInputEventReceiver对象,looper 是主线程
1330                      mInputEventReceiver = new WindowInputEventReceiver(inputChannel,
1331                              Looper.myLooper());

// 创建 WindowInputEventReceiver对象,继承了 InputEventReceiver对象
8953      final class WindowInputEventReceiver extends InputEventReceiver {
8954          public WindowInputEventReceiver(InputChannel inputChannel, Looper looper) {
8955              super(inputChannel, looper);
8956          }
8957

// 会回调下列的方法,然后走调用链 enqueueInputEvent
8958          @Override
8959          public void onInputEvent(InputEvent event) {
8960              Trace.traceBegin(Trace.TRACE_TAG_VIEW, "processInputEventForCompatibility");
8961              List<InputEvent> processedEvents;
8962              try {
8963                  processedEvents =
8964                      mInputCompatProcessor.processInputEventForCompatibility(event);
8965              } finally {
8966                  Trace.traceEnd(Trace.TRACE_TAG_VIEW);
8967              }
8968              if (processedEvents != null) {
8969                  if (processedEvents.isEmpty()) {
8970                      // InputEvent consumed by mInputCompatProcessor
8971                      finishInputEvent(event, true);
8972                  } else {
8973                      for (int i = 0; i < processedEvents.size(); i++) {
8974                          enqueueInputEvent(
8975                                  processedEvents.get(i), this,
8976                                  QueuedInputEvent.FLAG_MODIFIED_FOR_COMPATIBILITY, true);
8977                      }
8978                  }
8979              } else {
8980                  enqueueInputEvent(event, this, 0, true);
8981              }
8982          }
// InputEventReceiver对象的构造方法
/frameworks/base/core/java/android/view/InputEventReceiver.java
69      public InputEventReceiver(InputChannel inputChannel, Looper looper) {
70          if (inputChannel == null) {
71              throw new IllegalArgumentException("inputChannel must not be null");
72          }
73          if (looper == null) {
74              throw new IllegalArgumentException("looper must not be null");
75          }
76
77          mInputChannel = inputChannel;
78          mMessageQueue = looper.getQueue();

// 调用native 层的初始化方法
79          mReceiverPtr = nativeInit(new WeakReference<InputEventReceiver>(this),
80                  inputChannel, mMessageQueue);
81
82          mCloseGuard.open("InputEventReceiver.dispose");
83      }
/frameworks/base/core/jni/android_view_InputEventReceiver.cpp
493  static jlong nativeInit(JNIEnv* env, jclass clazz, jobject receiverWeak,
494          jobject inputChannelObj, jobject messageQueueObj) {
495      std::shared_ptr<InputChannel> inputChannel =
496              android_view_InputChannel_getInputChannel(env, inputChannelObj);
497      if (inputChannel == nullptr) {
498          jniThrowRuntimeException(env, "InputChannel is not initialized.");
499          return 0;
500      }
501
502      sp<MessageQueue> messageQueue = android_os_MessageQueue_getMessageQueue(env, messageQueueObj);
503      if (messageQueue == nullptr) {
504          jniThrowRuntimeException(env, "MessageQueue is not initialized.");
505          return 0;
506      }
507

// 创建 NativeInputEventReceiver 对象
508      sp<NativeInputEventReceiver> receiver = new NativeInputEventReceiver(env,
509              receiverWeak, inputChannel, messageQueue);
// 初始化
510      status_t status = receiver->initialize();
511      if (status) {
512          std::string message = android::base::
513                  StringPrintf("Failed to initialize input event receiver.  status=%s(%d)",
514                               statusToString(status).c_str(), status);
515          jniThrowRuntimeException(env, message.c_str());
516          return 0;
517      }
518
519      receiver->incStrong(gInputEventReceiverClassInfo.clazz); // retain a reference for the object
520      return reinterpret_cast<jlong>(receiver.get());
521  }


124  NativeInputEventReceiver::NativeInputEventReceiver(
125          JNIEnv* env, jobject receiverWeak, const std::shared_ptr<InputChannel>& inputChannel,
126          const sp<MessageQueue>& messageQueue)
127        : mReceiverWeakGlobal(env->NewGlobalRef(receiverWeak)),
128          mInputConsumer(inputChannel),
129          mMessageQueue(messageQueue),
130          mBatchedInputEventPending(false),
131          mFdEvents(0) {
132      if (kDebugDispatchCycle) {
133          ALOGD("channel '%s' ~ Initializing input event receiver.", getInputChannelName().c_str());
134      }
135  }

// 初始化的方法
142  status_t NativeInputEventReceiver::initialize() {
143      setFdEvents(ALOOPER_EVENT_INPUT);
144      return OK;
145  }

184  void NativeInputEventReceiver::setFdEvents(int events) {
185      if (mFdEvents != events) {
186          mFdEvents = events;
// events 是 ALOOPER_EVENT_INPUT
187          int fd = mInputConsumer.getChannel()->getFd();
188          if (events) {
    // 在Looper 代码中,如果有socket 通信,会回调 handleEvent
189              mMessageQueue->getLooper()->addFd(fd, 0, events, this, nullptr);
190          } else {
191              mMessageQueue->getLooper()->removeFd(fd);
192          }
193      }
194  }

263  int NativeInputEventReceiver::handleEvent(int receiveFd, int events, void* data) {
264      // Allowed return values of this function as documented in LooperCallback::handleEvent
265      constexpr int REMOVE_CALLBACK = 0;
266      constexpr int KEEP_CALLBACK = 1;
267
268      if (events & (ALOOPER_EVENT_ERROR | ALOOPER_EVENT_HANGUP)) {
269          // This error typically occurs when the publisher has closed the input channel
270          // as part of removing a window or finishing an IME session, in which case
271          // the consumer will soon be disposed as well.
272          if (kDebugDispatchCycle) {
273              ALOGD("channel '%s' ~ Publisher closed input channel or an error occurred. events=0x%x",
274                    getInputChannelName().c_str(), events);
275          }
276          return REMOVE_CALLBACK;
277      }
278

// 是下列的event,去消费input事件
279      if (events & ALOOPER_EVENT_INPUT) {
280          JNIEnv* env = AndroidRuntime::getJNIEnv();
281          status_t status = consumeEvents(env, false /*consumeBatches*/, -1, nullptr);
282          mMessageQueue->raiseAndClearException(env, "handleReceiveCallback");
283          return status == OK || status == NO_MEMORY ? KEEP_CALLBACK : REMOVE_CALLBACK;
284      }
总结:
- 创建了一对相互连接的Socket,用来通信
- 创建了一对InputChannel,分别持有一个socket,使InputChannel成为实现两端通信的信使。
- 两个InputChannel分别作为客户端channel和服务端channel,服务端channel给InputDispatcher持有,客户端channel给InputEventReceiver持有。
- 两个socket的fd分别注册到对应端的Looper,有数据传输会唤醒对端处理。
