左侧导航菜单制作
1. 修改路由,方便查看页面
index.ts
import { RouteRecordRaw, createRouter, createWebHistory } from "vue-router";
import Layout from '@/layout/Index.vue'

const routes: Array<RouteRecordRaw> = [
    {
        path: '/',
        name: 'home',
        component: Layout
    }
]

const router = createRouter({
    history: createWebHistory(),
    routes
})

export default router
2. 官网
https://element-plus.org/zh-CN/component/menu.html
3. 在Layout中新建Menu.vue
3.1代码如下
<template>
  <el-radio-group v-model="isCollapse" style="margin-bottom: 20px">
    <el-radio-button :value="false">expand</el-radio-button>
    <el-radio-button :value="true">collapse</el-radio-button>
  </el-radio-group>
  <el-menu
    default-active="2"
    class="el-menu-vertical-demo"
    :collapse="isCollapse"
    @open="handleOpen"
    @close="handleClose"
  >
    <el-sub-menu index="1">
      <template #title>
        <el-icon><location /></el-icon>
        <span>Navigator One</span>
      </template>
      <el-menu-item-group>
        <template #title><span>Group One</span></template>
        <el-menu-item index="1-1">item one</el-menu-item>
        <el-menu-item index="1-2">item two</el-menu-item>
      </el-menu-item-group>
      <el-menu-item-group title="Group Two">
        <el-menu-item index="1-3">item three</el-menu-item>
      </el-menu-item-group>
      <el-sub-menu index="1-4">
        <template #title><span>item four</span></template>
        <el-menu-item index="1-4-1">item one</el-menu-item>
      </el-sub-menu>
    </el-sub-menu>
    <el-menu-item index="2">
      <el-icon><icon-menu /></el-icon>
      <template #title>Navigator Two</template>
    </el-menu-item>
    <el-menu-item index="3" disabled>
      <el-icon><document /></el-icon>
      <template #title>Navigator Three</template>
    </el-menu-item>
    <el-menu-item index="4">
      <el-icon><setting /></el-icon>
      <template #title>Navigator Four</template>
    </el-menu-item>
  </el-menu>
</template>

<script lang="ts" setup>
import { ref } from 'vue'
import {
  Document,
  Menu as IconMenu,
  Location,
  Setting,
} from '@element-plus/icons-vue'

const isCollapse = ref(true)
const handleOpen = (key: string, keyPath: string[]) => {
  console.log(key, keyPath)
}
const handleClose = (key: string, keyPath: string[]) => {
  console.log(key, keyPath)
}
</script>

<style scoped lang="scss">
.el-menu-vertical-demo:not(.el-menu--collapse) {
  width: 200px;
  min-height: 400px;
}
</style>
3.2 效果图
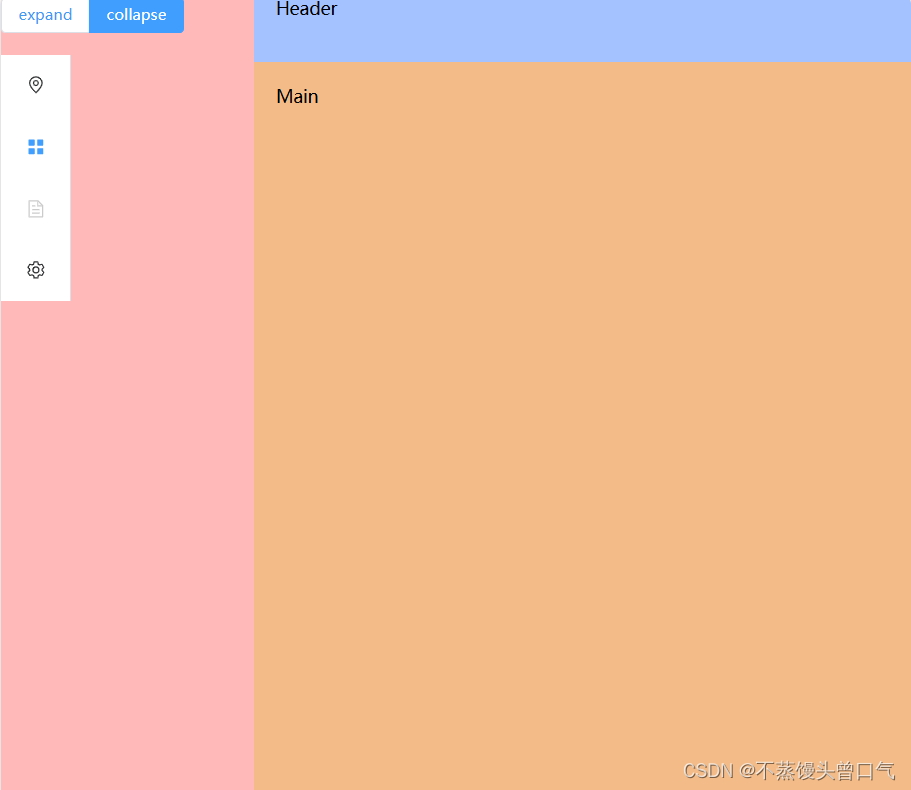
3.3 修改样式
<template>
  <el-menu
    default-active="2"
    class="el-menu-vertical-demo"
    :collapse="isCollapse"
    @open="handleOpen"
    @close="handleClose"
    background-color="#0a2542"
  >

    <!-- 隐藏展开按钮 -->
    <el-radio-group v-model="isCollapse" style="margin-bottom: 20px;margin-left: 9px;">
      <el-radio-button :value="false" v-show="isCollapse" >|||</el-radio-button>
      <el-radio-button :value="true" v-show="!isCollapse">|||</el-radio-button>
    </el-radio-group>
    <el-sub-menu index="1">
      <template #title>
        <el-icon><location /></el-icon>
        <span>Navigator One</span>
      </template>
      <el-menu-item-group>
        <template #title><span>Group One</span></template>
        <el-menu-item index="1-1">item one</el-menu-item>
        <el-menu-item index="1-2">item two</el-menu-item>
      </el-menu-item-group>
      <el-menu-item-group title="Group Two">
        <el-menu-item index="1-3">item three</el-menu-item>
      </el-menu-item-group>
      <el-sub-menu index="1-4">
        <template #title><span>item four</span></template>
        <el-menu-item index="1-4-1">item one</el-menu-item>
      </el-sub-menu>
    </el-sub-menu>
    <el-menu-item index="2">
      <el-icon><icon-menu /></el-icon>
      <template #title>Navigator Two</template>
    </el-menu-item>
    <el-menu-item index="3" disabled>
      <el-icon><document /></el-icon>
      <template #title>Navigator Three</template>
    </el-menu-item>
    <el-menu-item index="4">
      <el-icon><setting /></el-icon>
      <template #title>Navigator Four</template>
    </el-menu-item>
  </el-menu>
</template>

<script lang="ts" setup>
import { ref } from 'vue'
import {
  Document,
  Menu as IconMenu,
  Location,
  Setting,
} from '@element-plus/icons-vue'

//只允许展开一个子菜单
// const uniqueOpened = ref(true)
const isCollapse = ref(true)
const handleOpen = (key: string, keyPath: string[]) => {
  console.log(key, keyPath)
}
const handleClose = (key: string, keyPath: string[]) => {
  console.log(key, keyPath)
}
</script>

<style scoped lang="scss">
.el-menu-vertical-demo:not(.el-menu--collapse) {
  width: 200px;
  min-height: 400px;
}
.el-menu-vertical-demo:not(.el-menu--collapse) {
  width: 230px;
  min-height: 400px;
}
.el-menu {
  border-right: none;
}

//主菜单颜色
:deep(.el-sub-menu .el-sub-menu__title){
	 color: #f5f4f4 !important;
}

/*子菜单文字颜色*/
:deep(.el-menu .el-menu-item){
	color: #e1e5ea;
}
/* 菜单点中文字的颜色 */

:deep(.el-menu-item.is-active){
	color: #f07810 !important;
}
/* 当前打开菜单的所有子菜单颜色 */

:deep(.is-opened .el-menu-item){
	background-color: #082343 !important;
}
/* 鼠标移动菜单的颜色 */

:deep(.el-menu-item:hover){
	background-color: #001528 !important;
}


</style>
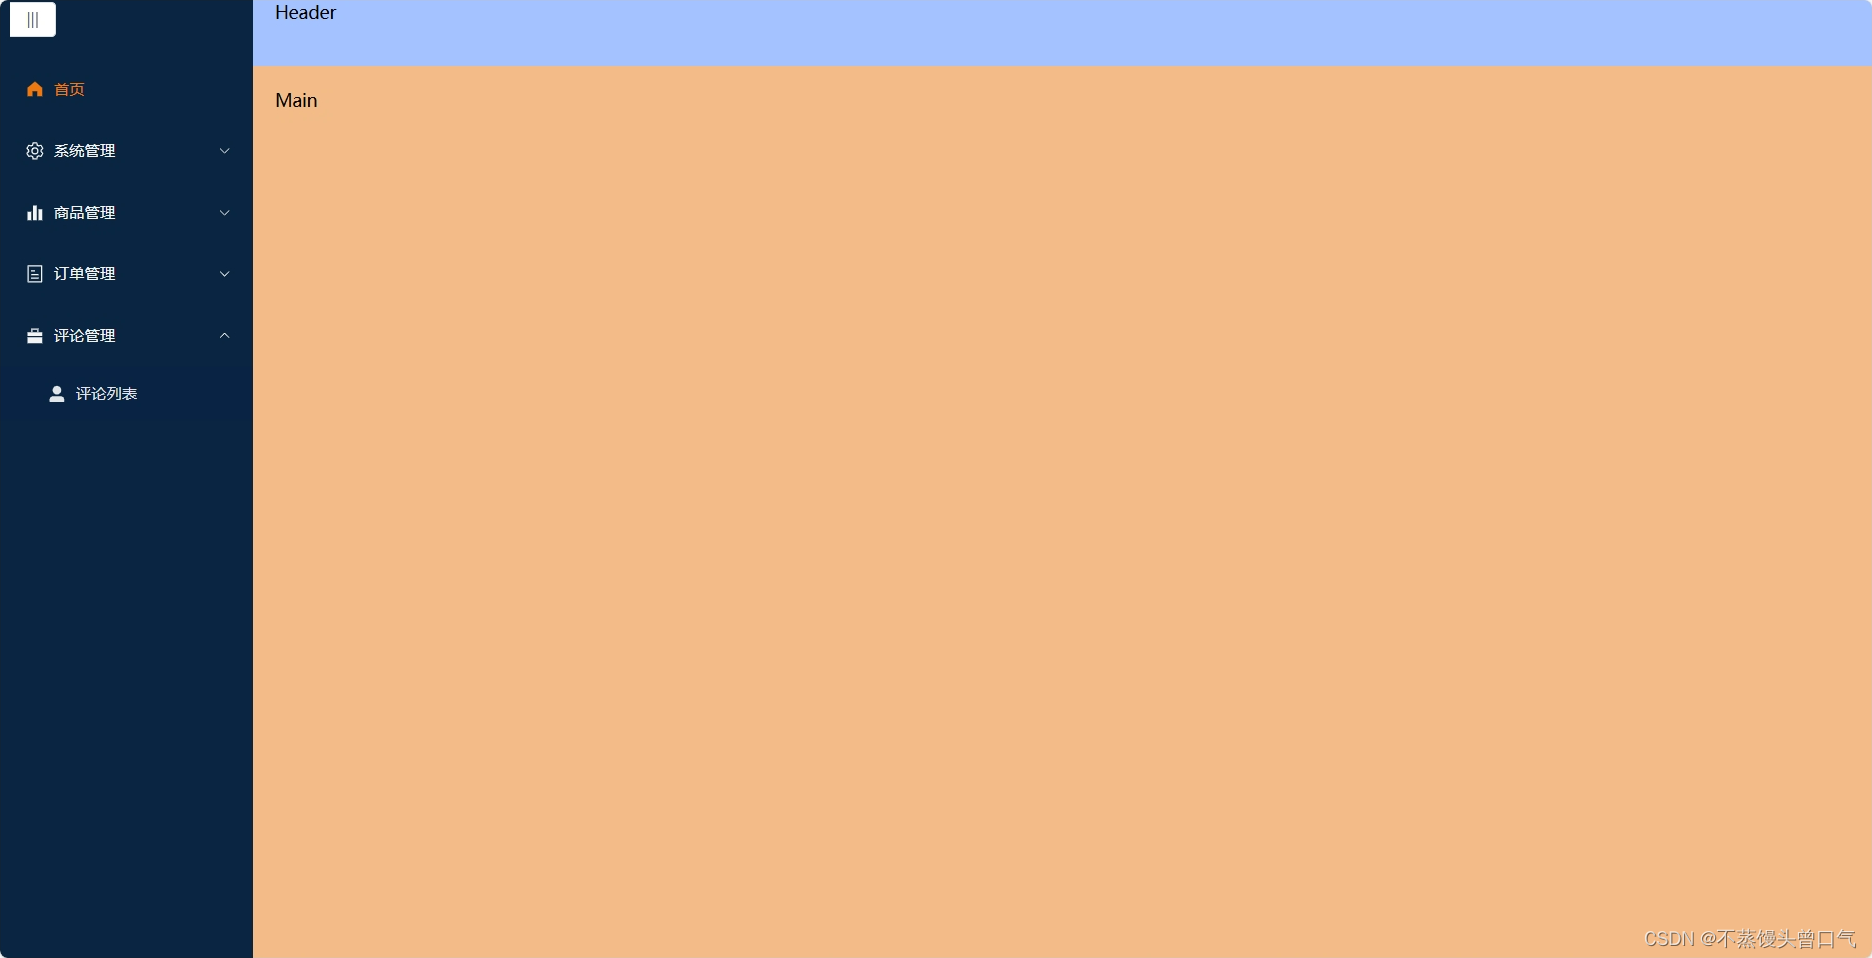
3.4 效果图
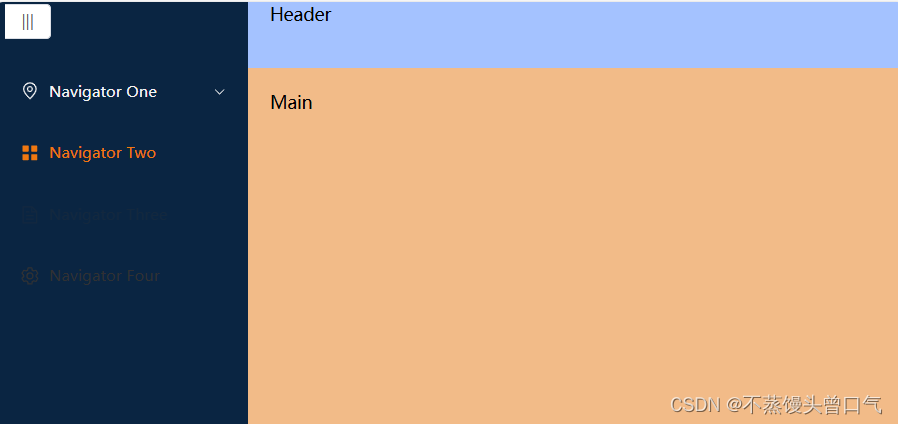

4. 在Layout中新建MenuItem.vue
4.1 代码如下
<template>
    <template v-for="menu in menuList" :key="menu.path">
        <!-- 判断是否有子菜单 -->
        <el-sub-menu v-if="menu.children && menu.children.length > 0" :index="menu.path">
            <template #title>
                <el-icon>
                    <!-- 动态组件 图标传入 -->
                    <component :is="menu.meta.icon"></component>
                </el-icon>
                <span>{{ menu.meta.title }}</span>
            </template>
            <!-- 递归渲染子菜单 -->
            <menu-item :menuList="menu.children"></menu-item>
        </el-sub-menu>
        <el-menu-item v-else :index="menu.path">
            <el-icon>
                <component :is="menu.meta.icon"></component>
            </el-icon>
            <template #title>
                {{ menu.meta.title }}
            </template>
        </el-menu-item>
    </template>
</template>

<script setup lang="ts">
// 接收父组件传递的menuList数据
defineProps(['menuList'])
</script>

<style scoped lang="less">

</style>
知识点补充
component是vue内置组件,主要作用为动态渲染组件,基本用法如下:官网:动态组件 & 异步组件 | Vue.js (vueframework.com)
<!-- 动态组件由 vm 实例的 `componentName` property 控制 -->
<component :is="componentName"></component>
4.2 Menu.vue修改
<template>
  <!-- router是否启用 vue-router 模式。
    启用该模式会在激活导航时以 index 作为 path
    进行路由跳转 使用 default-active 来设置加载时的激活项。 -->
  <el-menu
    default-active="/dashboard"
    class="el-menu-vertical-demo"
    :collapse="isCollapse"
    router
    unique-opened
    @open="handleOpen"
    @close="handleClose"
    background-color="#0a2542"
  >

    <!-- 隐藏展开按钮 -->
    <el-radio-group v-model="isCollapse" style="margin-bottom: 20px;margin-left: 9px;">
      <el-radio-button :value="false" v-show="isCollapse" >|||</el-radio-button>
      <el-radio-button :value="true" v-show="!isCollapse">|||</el-radio-button>
    </el-radio-group>
    <!-- 父组件传递数据 -->
    <MenuItem :menuList="menuList"></MenuItem>
  </el-menu>
</template>

<script lang="ts" setup>
import { ref,reactive } from 'vue'
import MenuItem from './MenuItem.vue';


//菜单数据
let menuList = reactive([
  {
    path: "/dashboard",
    component: "Layout",
    name: "dashboard",
    meta: {
      title: "首页",
      icon: "HomeFilled",
      roles: ["sys:dashboard"],
    },
  },
  {
    path: "/system",
    component: "Layout",
    name: "system",
    meta: {
      title: "系统管理",
      icon: "Setting",
      roles: ["sys:manage"],
    },
    children: [
      {
        path: "/adminUser",
        component: "/system/AdminUser",
        name: "adminUser",
        meta: {
          title: "管理员管理",
          icon: "UserFilled",
          roles: ["sys:adminUser"],
        },
      },
      {
        path: "/userList",
        component: "/system/UserList",
        name: "userList",
        meta: {
          title: "用户管理",
          icon: "Wallet",
          roles: ["sys:userList"],
        },
      },
      {
        path: "/menuList",
        component: "/system/MenuList",
        name: "menuList",
        meta: {
          title: "菜单管理",
          icon: "Menu",
          roles: ["sys:menu"],
        },
      },
    ],
  },
  {
    path: "/goodsRoot",
    component: "Layout",
    name: "goodsRoot",
    meta: {
      title: "商品管理",
      icon: "Histogram",
      roles: ["sys:goodsRoot"],
    },
    children: [
      {
        path: "/goodsType",
        component: "/goods/GoodsType",
        name: "goodsType",
        meta: {
          title: "商品分类",
          icon: "UserFilled",
          roles: ["sys:goodsType"],
        },
      },
      {
        path: "/unusedList",
        component: "/goods/UnusedList",
        name: "unusedList",
        meta: {
          title: "闲置商品",
          icon: "Wallet",
          roles: ["sys:unusedList"],
        },
      },
      {
        path: "/buyList",
        component: "/goods/BuyList",
        name: "buyList",
        meta: {
          title: "求购商品",
          icon: "Wallet",
          roles: ["sys:buyList"],
        },
      },
    ],
  },
  {
    path: "/order",
    component: "Layout",
    name: "order",
    meta: {
      title: "订单管理",
      icon: "Tickets",
      roles: ["sys:order"],
    },
    children: [
      {
        path: "/unusedOrder",
        component: "/order/UnusedOrder",
        name: "unusedOrder",
        meta: {
          title: "闲置订单",
          icon: "UserFilled",
          roles: ["sys:unusedOrder"],
        },
      },
      {
        path: "/buyOrder",
        component: "/order/BuyOrder",
        name: "buyOrder",
        meta: {
          title: "求购订单",
          icon: "Wallet",
          roles: ["sys:buyOrder"],
        },
      },
    ],
  },
  {
    path: "/comment",
    component: "Layout",
    name: "comment",
    meta: {
      title: "评论管理",
      icon: "Briefcase",
      roles: ["sys:comment"],
    },
    children: [
      {
        path: "/commentList",
        component: "/comment/CommentList",
        name: "commentList",
        meta: {
          title: "评论列表",
          icon: "UserFilled",
          roles: ["sys:commentList"],
        },
      },
    ],
  },
]);

//只允许展开一个子菜单
// const uniqueOpened = ref(true)
const isCollapse = ref(true)
const handleOpen = (key: string, keyPath: string[]) => {
  console.log(key, keyPath)
}
const handleClose = (key: string, keyPath: string[]) => {
  console.log(key, keyPath)
}
</script>

<style scoped lang="scss">
.el-menu-vertical-demo:not(.el-menu--collapse) {
  width: 200px;
  min-height: 400px;
}
.el-menu-vertical-demo:not(.el-menu--collapse) {
  width: 230px;
  min-height: 400px;
}
.el-menu {
  border-right: none;
}


//主菜单颜色
:deep(.el-sub-menu .el-sub-menu__title){
	 color: #f5f4f4 !important;
}

/*子菜单文字颜色*/
:deep(.el-menu .el-menu-item){
	color: #e1e5ea;
}
/* 菜单点中文字的颜色 */

:deep(.el-menu-item.is-active){
	color: #f07810 !important;
}
/* 当前打开菜单的所有子菜单颜色 */

:deep(.is-opened .el-menu-item){
	background-color: #082343 !important;
}
/* 鼠标移动菜单的颜色 */

:deep(.el-menu-item:hover){
	background-color: #001528 !important;
}


</style>
4.3 在index.vue中引入
<template>
    <el-container class="mycontainer">
        <el-aside width="230px" class="asside">
            <Menu></Menu>
        </el-aside>
        <el-container>
            <el-header class="header">Header</el-header>
            <el-main class="mymain">Main</el-main>
        </el-container>
    </el-container>
</template>

<script setup lang="ts">
import Menu from "./Menu.vue"
</script>

<style scoped lang="scss">
.mycontainer{
    height: 100%;
    .asside{
        background-color: #0a2542;
        // 使宽度自适应
        width: auto;
    }
    .header{
        background-color: rgb(164, 194, 255);
    }
    .mymain{
        background-color: rgb(242, 187, 136);
    }
}
</style>
5. 最终效果
