💛前情提要💛
本文是传知代码平台中的相关前沿知识与技术的分享~
接下来我们即将进入一个全新的空间,对技术有一个全新的视角~
本文所涉及所有资源均在传知代码平台可获取
以下的内容一定会让你对AI 赋能时代有一个颠覆性的认识哦!!!
以下内容干货满满,跟上步伐吧~
📌导航小助手📌
- 💡本章重点
- 🍞一. 概述
- 🍞二. 算法介绍
- 🍞三. 演示效果
- 🍞四. 核心逻辑
- 🫓总结
💡本章重点
- 【CLIP】文本也能和图像配对
🍞一. 概述
模态: 数据的一种形式,如图像、文本、声音、点云等。
多模态学习,就是利用模型同时处理多个模态数据,有助于提高模型的准确性和泛化能力。在自动驾驶场景中,为了准确感知周围交通环境,在车载系统中,通常装载多种传感器,包括相机和激光雷达。
相机影像能够提供丰富的纹理信息,但其中包含的景物深度信息可能会有所损失;利用激光雷达生成的点云,能够为周边环境提供精确的3D信息,但是点云本身具有较大的稀疏性。
同时使用上述两种模态作为输入,能够使模型更好的感知周边环境。
🍞二. 算法介绍
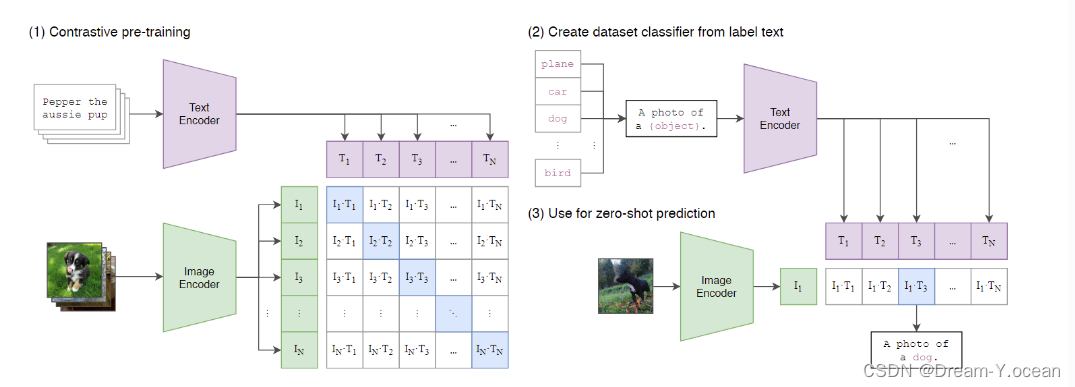
CLIP的基本原理是通过 对比学习 让模型区分正样本和负样本。
为了实现这一目标,CLIP使用了一个多模态编码器,它由两个子编码器组成:图像编码器可以是基于卷积神经网络(CNN)或者视觉变换器(ViT)的模型;
文本编码器则是一个基于Transformer的模型。
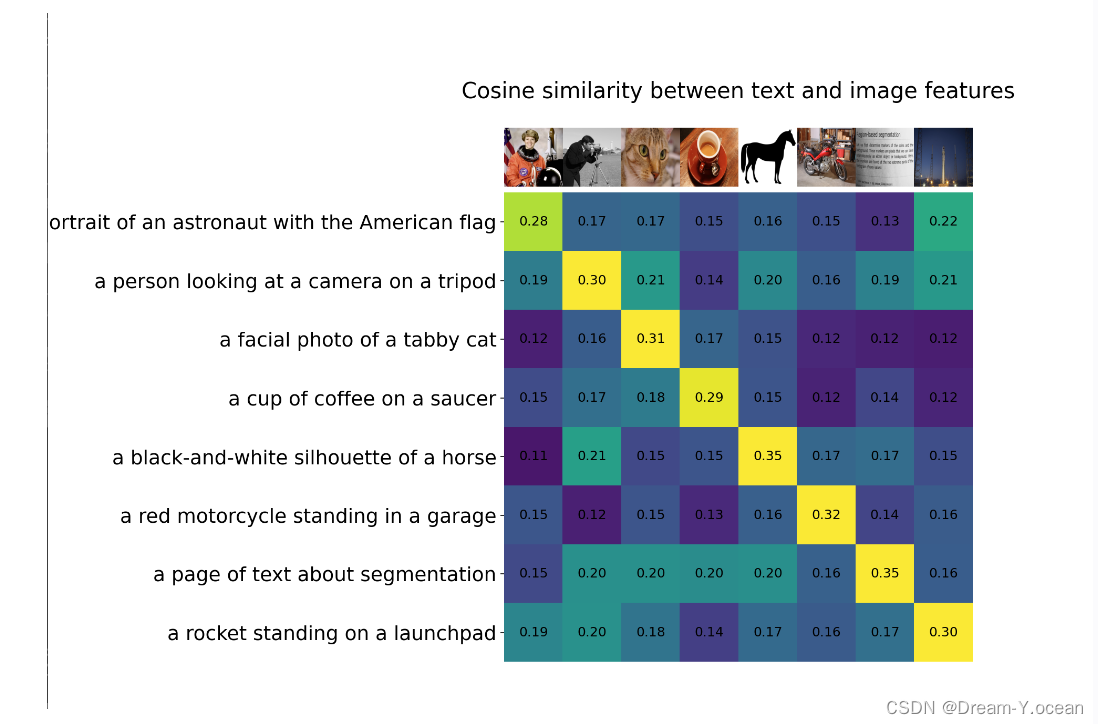
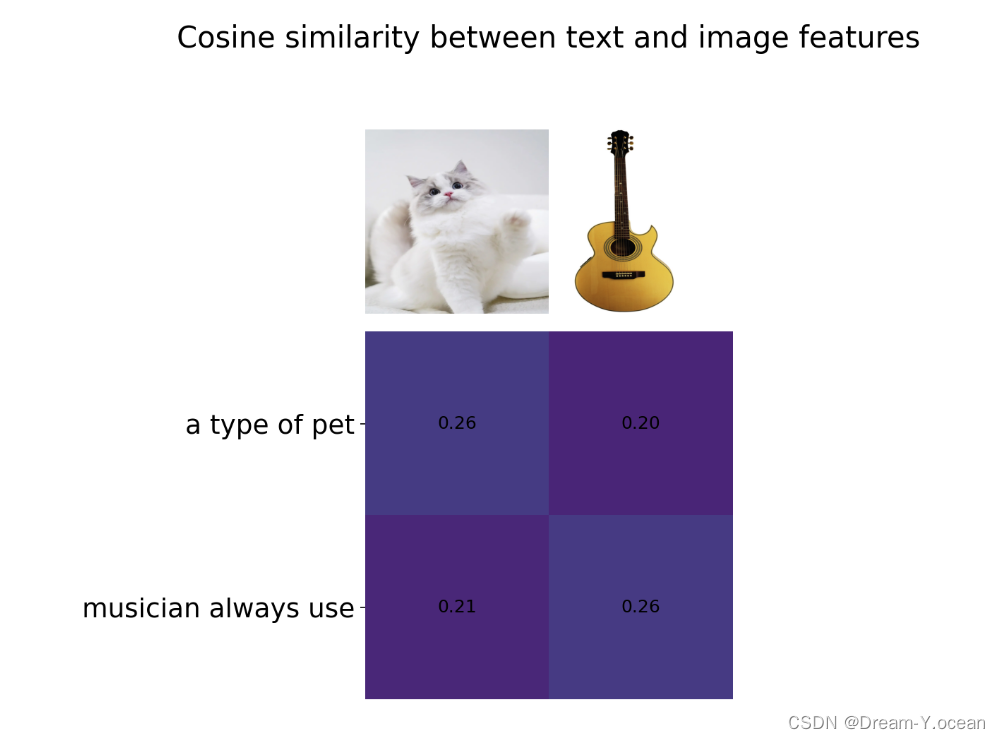
CLIP通过一个 线性投影 将每个编码器的表示映射到 多模态嵌入空间,通过联合训练图像编码器和文本编码器来最大化批次中N个真实对的图像和文本嵌入的余弦相似度,通过计算余弦相似度来衡量图像和文本之间的匹配程度。
🍞三. 演示效果
🍞四. 核心逻辑
-
将图片和文本分别通过图像编码器和文本编码器得到特征I_f与T_f;
-
之后通过线性投影,将特征转换到多模态嵌入空间的向量I_E与T_e;
-
最后计算图像文本对之间的相似度,以及交叉熵损失;
# image_encoder - ResNet or Vision Transformer
# text_encoder - CBOW or Text Transformer
# I[n, h, w, c] - minibatch of aligned images
# T[n, l] - minibatch of aligned texts
# W_i[d_i, d_e] - learned proj of image to embed
# W_t[d_t, d_e] - learned proj of text to embed
# t - learned temperature parameter
# extract feature representations of each modality

I_f = image_encoder(I)   #[n, d_i]
T_f = text_encoder(T)  #[n, d_t]

# joint multimodal embedding [n, d_e]
I_e = l2_normalize(np.dot(I_f, W_i), axis=1)
T_e = l2_normalize(np.dot(T_f, W_t), axis=1)

# scaled pairwise cosine similarities [n, n]
logits = np.dot(I_e, T_e.T) * np.exp(t)

# symmetric loss function
labels = np.arange(n)
loss_i = cross_entropy_loss(logits, labels, axis=0)
loss_t = cross_entropy_loss(logits, labels, axis=1)
loss = (loss_i + loss_t)/2
使用方式
- 修改文字和图像,获得两者之间的相似度
import clip
import os
import torch
from PIL import Image
import numpy as np
import matplotlib.pyplot as plt

os.environ["KMP_DUPLICATE_LIB_OK"]="TRUE"

device = "cuda" if torch.cuda.is_available() else "cpu"

model,preprocess = clip.load("ViT-B/32",device=device)
descriptions = {
    "cat":"a type of pet",
    "guitar":"musician always use"
    }

original_images=[]
images=[]
texts=[]

for filename in [filename for filename in os.listdir('./images')if filename.endswith('png') or filename.endswith('.jpg')]:
    name = filename.split('.')[0]
    image = Image.open(os.path.join('./images',filename)).convert("RGB")
    original_images.append(image)
    images.append(preprocess(image))
    texts.append(descriptions[name])
image_input = torch.tensor(np.stack(images))
text_tokens = clip.tokenize(["This is "+ desc for desc in texts])
with torch.no_grad():
    image_features = model.encode_image(image_input).float()
    text_features = model.encode_text(text_tokens).float()
image_features /= image_features.norm(dim=-1, keepdim=True)
text_features /= text_features.norm(dim=-1, keepdim=True)
similarity = text_features.cpu().numpy() @ image_features.cpu().numpy().T
count = len(descriptions)

plt.figure(figsize=(20, 14))
plt.imshow(similarity, vmin=0.1, vmax=1.0)
# plt.colorbar()
plt.yticks(range(count), texts, fontsize=18)
plt.xticks([])
for i, image in enumerate(original_images):
    plt.imshow(image, extent=(i - 0.5, i + 0.5, -1.6, -0.6), origin="lower")
for x in range(similarity.shape[1]):
    for y in range(similarity.shape[0]):
        plt.text(x, y, f"{similarity[y, x]:.2f}", ha="center", va="center", size=12)

for side in ["left", "top", "right", "bottom"]:
  plt.gca().spines[side].set_visible(False)

plt.xlim([-0.5, count - 0.5])
plt.ylim([count + 0.5, -2])

plt.title("Cosine similarity between text and image features", size=20)
plt.show()
部署方式
# 利用如下代码创建环境
conda install --yes -c pytorch pytorch=1.7.1 torchvision cudatoolkit=11.0
pip install ftfy regex tqdm
pip install git+https://github.com/openai/CLIP.git
🫓总结
综上,我们基本了解了“一项全新的技术啦” 🍭 ~~
恭喜你的内功又双叒叕得到了提高!!!
感谢你们的阅读😆
后续还会继续更新💓,欢迎持续关注📌哟~
💫如果有错误❌,欢迎指正呀💫
✨如果觉得收获满满,可以点点赞👍支持一下哟~✨
【传知科技 – 了解更多新知识】
