聊天列表动态加载
如果要动态加载聊天列表内容,我们可以在列表的滚动区域捕获鼠标滑轮事件,并且在滚动到底部的时候我们发送一个加载聊天用户的信号
bool ChatUserList::eventFilter(QObject *watched, QEvent *event)
{
    // 检查事件是否是鼠标悬浮进入或离开
    if (watched == this->viewport()) {
        if (event->type() == QEvent::Enter) {
            // 鼠标悬浮,显示滚动条
            this->setVerticalScrollBarPolicy(Qt::ScrollBarAsNeeded);
        } else if (event->type() == QEvent::Leave) {
            // 鼠标离开,隐藏滚动条
            this->setVerticalScrollBarPolicy(Qt::ScrollBarAlwaysOff);
        }
    }

    // 检查事件是否是鼠标滚轮事件
    if (watched == this->viewport() && event->type() == QEvent::Wheel) {
        QWheelEvent *wheelEvent = static_cast<QWheelEvent*>(event);
        int numDegrees = wheelEvent->angleDelta().y() / 8;
        int numSteps = numDegrees / 15; // 计算滚动步数

        // 设置滚动幅度
        this->verticalScrollBar()->setValue(this->verticalScrollBar()->value() - numSteps);

        // 检查是否滚动到底部
        QScrollBar *scrollBar = this->verticalScrollBar();
        int maxScrollValue = scrollBar->maximum();
        int currentValue = scrollBar->value();
        //int pageSize = 10; // 每页加载的联系人数量

        if (maxScrollValue - currentValue <= 0) {
            // 滚动到底部,加载新的联系人
            qDebug()<<"load more chat user";
            //发送信号通知聊天界面加载更多聊天内容
            emit sig_loading_chat_user();
         }

        return true; // 停止事件传递
    }

    return QListWidget::eventFilter(watched, event);
}
回到ChatDialog类里添加槽函数
void ChatDialog::slot_loading_chat_user()
{
    if(_b_loading){
        return;
    }

    _b_loading = true;
    LoadingDlg *loadingDialog = new LoadingDlg(this);
    loadingDialog->setModal(true);
    loadingDialog->show();
    qDebug() << "add new data to list.....";
    addChatUserList();
    // 加载完成后关闭对话框
    loadingDialog->deleteLater();

    _b_loading = false;
}
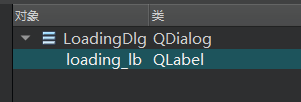
槽函数中我们添加了LoadingDlg类,这个类也是个QT 设计师界面类,ui如下
添加stackwidget管理界面
ChatDialog界面里添加stackedWidget,然后添加两个页面

回头我们将这两个界面升级为我们自定义的界面
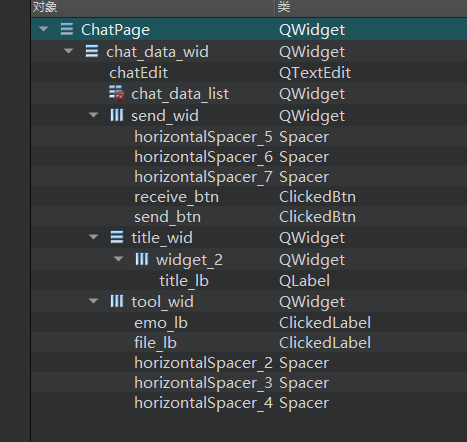
我们先添加一个自定义的QT设计师界面类ChatPage,然后将原来放在ChatDialog.ui中的chat_data_wid这个widget移动到ChatPage中ui布局如下

布局属性如下

然后我们将ChatDialog.ui中的chat_page 升级为ChatPage。
接着我们将ChatPage中的一些控件比如emo_lb, file_lb升级为ClickedLabel, receive_btn, send_btn升级为ClickedBtn
如下图:
然后我们在ChatPage的构造函数中添加按钮样式的编写
ChatPage::ChatPage(QWidget *parent) :
    QWidget(parent),
    ui(new Ui::ChatPage)
{
    ui->setupUi(this);
    //设置按钮样式
    ui->receive_btn->SetState("normal","hover","press");
    ui->send_btn->SetState("normal","hover","press");

    //设置图标样式
    ui->emo_lb->SetState("normal","hover","press","normal","hover","press");
    ui->file_lb->SetState("normal","hover","press","normal","hover","press");
}
因为我们继承了QWidget,我们想实现样式更新,需要重写paintEvent
void ChatPage::paintEvent(QPaintEvent *event)
{
    QStyleOption opt;
    opt.init(this);
    QPainter p(this);
    style()->drawPrimitive(QStyle::PE_Widget, &opt, &p, this);
}
类似的,我们的ListItemBase
void ListItemBase::paintEvent(QPaintEvent *event)
{
    QStyleOption opt;
    opt.init(this);
    QPainter p(this);
    style()->drawPrimitive(QStyle::PE_Widget, &opt, &p, this);
}
ClickedLabel完善
我们希望ClickedLabel在按下的时候显示按下状态的资源,在抬起的时候显示抬起的资源,所以修改按下事件和抬起事件
void ClickedLabel::mousePressEvent(QMouseEvent *event)
{
    if (event->button() == Qt::LeftButton) {
        if(_curstate == ClickLbState::Normal){
              qDebug()<<"clicked , change to selected hover: "<< _selected_hover;
            _curstate = ClickLbState::Selected;
            setProperty("state",_selected_press);
            repolish(this);
            update();

        }else{
               qDebug()<<"clicked , change to normal hover: "<< _normal_hover;
            _curstate = ClickLbState::Normal;
            setProperty("state",_normal_press);
            repolish(this);
            update();
        }
        return;
    }
    // 调用基类的mousePressEvent以保证正常的事件处理
    QLabel::mousePressEvent(event);
}
抬起事件
void ClickedLabel::mouseReleaseEvent(QMouseEvent *event)
{
    if (event->button() == Qt::LeftButton) {
        if(_curstate == ClickLbState::Normal){
             // qDebug()<<"ReleaseEvent , change to normal hover: "<< _normal_hover;
            setProperty("state",_normal_hover);
            repolish(this);
            update();

        }else{
             //  qDebug()<<"ReleaseEvent , change to select hover: "<< _selected_hover;
            setProperty("state",_selected_hover);
            repolish(this);
            update();
        }
        emit clicked();
        return;
    }
    // 调用基类的mousePressEvent以保证正常的事件处理
    QLabel::mousePressEvent(event);
}
qss美化
我们添加qss美化一下
LoadingDlg{
    background: #f2eada;
}

#title_lb{
    font-family: "Microsoft YaHei";
    font-size: 18px;
    font-weight: normal;
}

#chatEdit{
    background: #ffffff;
    border: none; /* 隐藏边框 */
    font-family: "Microsoft YaHei"; /* 设置字体 */
    font-size: 18px; /* 设置字体大小 */
    padding: 5px; /* 设置内边距 */
}

#send_wid{
    background: #ffffff;
    border: none; /* 隐藏边框 */
}

#add_btn[state='normal']{
    border-image: url(:/res/add_friend_normal.png);
}

#add_btn[state='hover']{
    border-image: url(:/res/add_friend_hover.png);

}

#add_btn[state='press']{
    border-image: url(:/res/add_friend_hover.png);
}

#receive_btn[state='normal']{
   background: #f0f0f0;
   color: #2cb46e;
   font-size: 16px; /* 设置字体大小 */
   font-family: "Microsoft YaHei"; /* 设置字体 */
   border-radius: 20px; /* 设置圆角 */
}

#receive_btn[state='hover']{
   background: #d2d2d2;
   color: #2cb46e;
   font-size: 16px; /* 设置字体大小 */
   font-family: "Microsoft YaHei"; /* 设置字体 */
   border-radius: 20px; /* 设置圆角 */
}

#receive_btn[state='press']{
   background: #c6c6c6;
   color: #2cb46e;
   font-size: 16px; /* 设置字体大小 */
   font-family: "Microsoft YaHei"; /* 设置字体 */
   border-radius: 20px; /* 设置圆角 */
}

#send_btn[state='normal']{
    background: #f0f0f0;
    color: #2cb46e;
    font-size: 16px; /* 设置字体大小 */
    font-family: "Microsoft YaHei"; /* 设置字体 */
    border-radius: 20px; /* 设置圆角 */
}

#send_btn[state='hover']{
   background: #d2d2d2;
   color: #2cb46e;
   font-size: 16px; /* 设置字体大小 */
   font-family: "Microsoft YaHei"; /* 设置字体 */
   border-radius: 20px; /* 设置圆角 */
}

#send_btn[state='press']{
   background: #c6c6c6;
   color: #2cb46e;
   font-size: 16px; /* 设置字体大小 */
   font-family: "Microsoft YaHei"; /* 设置字体 */
   border-radius: 20px; /* 设置圆角 */
}

#tool_wid{
    background: #ffffff;
    border-bottom: 0.5px solid #ececec; /* 设置下边框颜色和宽度 */
}

#emo_lb[state='normal']{
    border-image: url(:/res/smile.png);
}

#emo_lb[state='hover']{
    border-image: url(:/res/smile_hover.png);
}

#emo_lb[state='press']{
    border-image: url(:/res/smile_press.png);
}

#file_lb[state='normal']{
    border-image: url(:/res/filedir.png);
}

#file_lb[state='hover']{
    border-image: url(:/res/filedir_hover.png);
}

#file_lb[state='press']{
    border-image: url(:/res/filedir_press.png);
}
效果
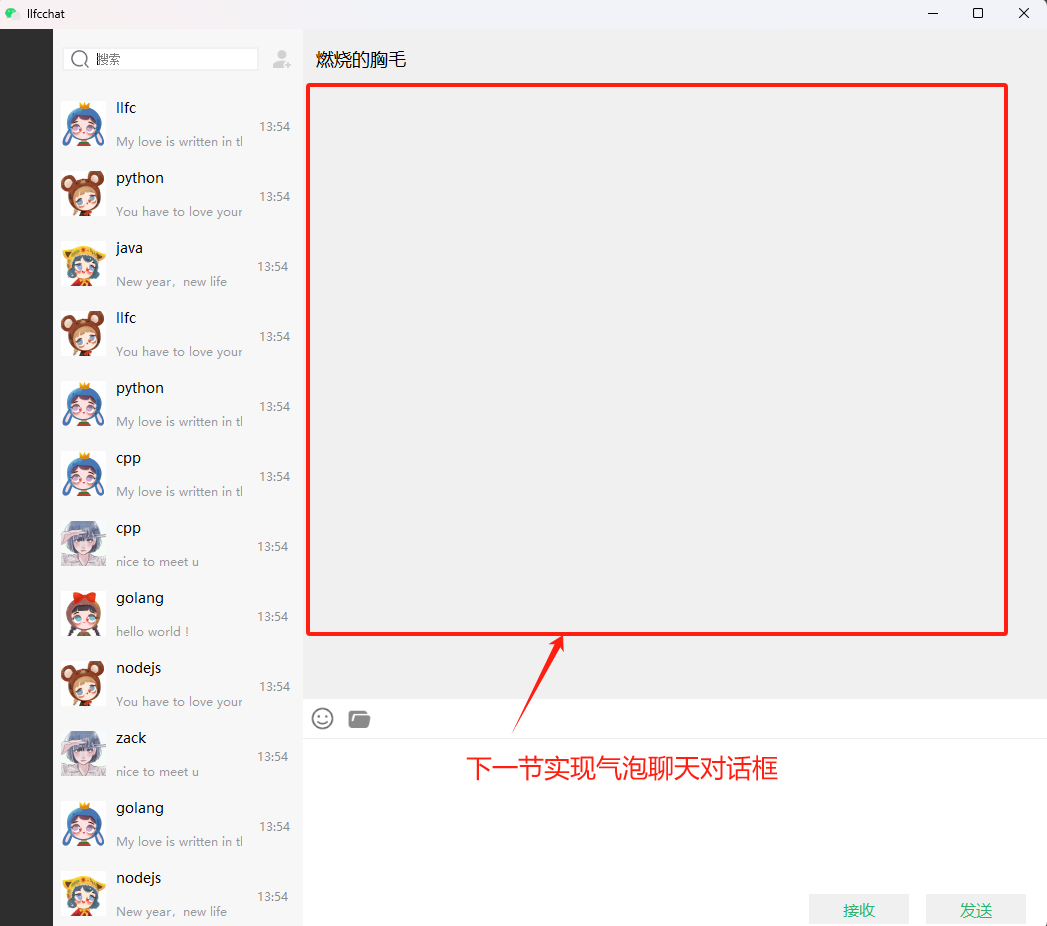
最后整体运行一下看看效果, 下一节我们实现红框内的内容
视频链接
https://www.bilibili.com/video/BV13Z421W7WA/?spm_id_from=333.788&vd_source=8be9e83424c2ed2c9b2a3ed1d01385e9
源码链接
https://gitee.com/secondtonone1/llfcchat

![[imx6ull]Linux下的SocketCAN通信](https://img-blog.csdnimg.cn/1f1a74e6d5da4193800eee6c97c2b0d1.png)

