This section explains how to populate a ComboBoxEdit control with DevExpress skin items.
本节介绍如何使用DevExpress皮肤项填充ComboBoxEdit控件。
- To populate a combo box editor, iterate through the SkinManager.Skins collection, which returns all currently available DevExpress skins, and create a new combo box item for each applicable skin – as illustrated in the code below.
要填充组合框编辑器,请遍历SkinManager.Skins集合,返回所有当前可用的DevExpress皮肤,并为每个适用的皮肤创建一个新的组合框项目,如下面的代码所示。
//Uncomment the following line to add bonus and theme skins
//DevExpress.UserSkins.BonusSkins.Register();
foreach (SkinContainer cnt in SkinManager.Default.Skins) {
    comboBoxEdit1.Properties.Items.Add(cnt.SkinName);
}
- You can implement more complex logic to skip or rename specific skins. For instance, the following code sample excludes the “Caramel” skin and any “Office 2007…” skin, and renames “DevExpress Style” and “DevExpress Dark Style” skins to ”Default Skin” and ”Default Dark Skin”, respectively.
您可以实现更复杂的逻辑来跳过或重命名特定的皮肤。例如,以下代码示例排除了“焦糖”皮肤和任何“Office 2007…”皮肤,并将“DevExpress Style”和“DevExpress Dark Style”皮肤分别重命名为“Default skin”和“Default Dark skin”。
DevExpress.UserSkins.BonusSkins.Register();
foreach (SkinContainer cnt in SkinManager.Default.Skins) {
    if (cnt.SkinName.Contains("Office 2007") || cnt.SkinName == "Caramel")
        continue;
    if(!cnt.SkinName.Contains("DevExpress"))
        comboBoxEdit1.Properties.Items.Add(cnt.SkinName);
    else switch(cnt.SkinName) {
            case "DevExpress Style":
                comboBoxEdit1.Properties.Items.Add("Default Skin");
                break;
            case "DevExpress Dark Style":
                comboBoxEdit1.Properties.Items.Add("Default Dark Skin");
                break;
        }
}
- Handle the ComboBoxEdit.SelectedIndexChanged event to apply a corresponding skin when a user selects a combo box item.
处理ComboBoxEdit。SelectedIndexChanged事件,以在用户选择组合框项目时应用相应的皮肤。
private void ComboBoxEdit1_SelectedIndexChanged(object sender, EventArgs e) {
    ComboBoxEdit comboBox = sender as ComboBoxEdit;
    string skinName = comboBox.Text;
    switch (skinName) {
        case "Default Skin":
            DevExpress.LookAndFeel.UserLookAndFeel.Default.SkinName = "DevExpress Style";
            break;
        case "Default Dark Skin":
            DevExpress.LookAndFeel.UserLookAndFeel.Default.SkinName = "DevExpress Dark Style";
            break;
        default:
            DevExpress.LookAndFeel.UserLookAndFeel.Default.SkinName = skinName;
            break;
    }
}
- Run the application to see the result.
运行应用程序以查看结果。

SkinHelper Methods
DevExpress。XtraBars。帮手SkinHelper类提供多个Init。。。方法,允许您使用外观/调色板项填充自定义控件。
在下图中,两个功能区按钮是自定义皮肤和调色板选择器。BarButtonItem。两个按钮的ButtonStyle属性都等于DropDown。每个按钮都有一个关联的PopupControlContainer分配给BarButtonItem。DropDownControl属性。弹出控件容器承载停靠属性设置为“填充”的库控件。
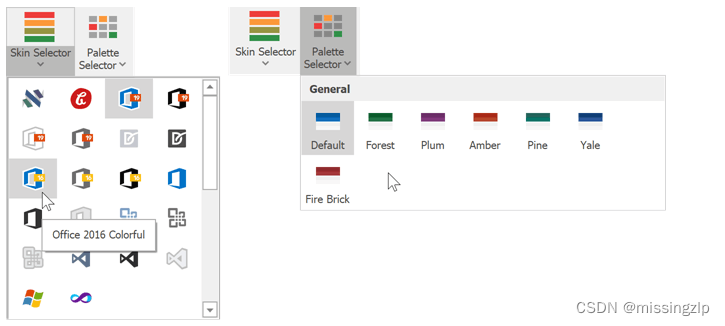
The code below demonstrates how to populate these selectors with the InitSkinGallery and InitSkinPaletteGallerymethods.
下面的代码演示了如何使用InitSkinGallery和InitSkinPartiteGallery方法填充这些选择器。
//Container and gallery settings
popupControlContainer1.AutoSize =
    popupControlContainer2.AutoSize = true;
popupControlContainer1.AutoSizeMode =
    popupControlContainer2.AutoSizeMode = AutoSizeMode.GrowAndShrink;
galleryControl1.Gallery.AutoSize =
    galleryControl2.Gallery.AutoSize = GallerySizeMode.Both;

//Populate the skin gallery
galleryControl2.Gallery.RowCount = 6;
SkinHelper.InitSkinGallery(galleryControl2);

#region Optional Settings
//Uncomment these lines to modify the gallery
//---Enlarge item images
/*foreach (GalleryItem item in galleryControl2.Gallery.GetAllItems())
    item.ImageOptions.Image = item.ImageOptions.HoverImage;
galleryControl2.Gallery.ImageSize = new Size(48, 48);
galleryControl2.Gallery.AllowHoverImages = false;*/
//---Hide item and group captions
/*galleryControl2.Gallery.ShowItemText = false;
galleryControl2.Gallery.ShowGroupCaption = false;*/
//---Hide group selector
/*galleryControl2.Gallery.AllowFilter = false;*/
//---Remove "Custom Skins" and "Theme Skins" groups
/*galleryControl2.Gallery.Groups.RemoveAt(3);
galleryControl2.Gallery.Groups.RemoveAt(2);*/
#endregion

//Populate the palette gallery
galleryControl1.Gallery.ColumnCount = 6;
SkinHelper.InitSkinPaletteGallery(galleryControl1);

