一、导入黑马商城项目
资料文档:Docs
1. 安装MySQL
①删除root目录下的mysql
rm -rf mysql/②把课前资料里的mysql目录上传到root目录下
③创建一个通用网络
docker network create hm-net④使用下面的命令安装MySQL
docker run -d \
  --name mysql \
  -p 3306:3306 \
  -e TZ=Asia/Shanghai \
  -e MYSQL_ROOT_PASSWORD=123456 \
  -v /root/mysql/data:/var/lib/mysql \
  -v /root/mysql/conf:/etc/mysql/conf.d \
  -v /root/mysql/init:/docker-entrypoint-initdb.d \
  --network hm-net\
  mysql
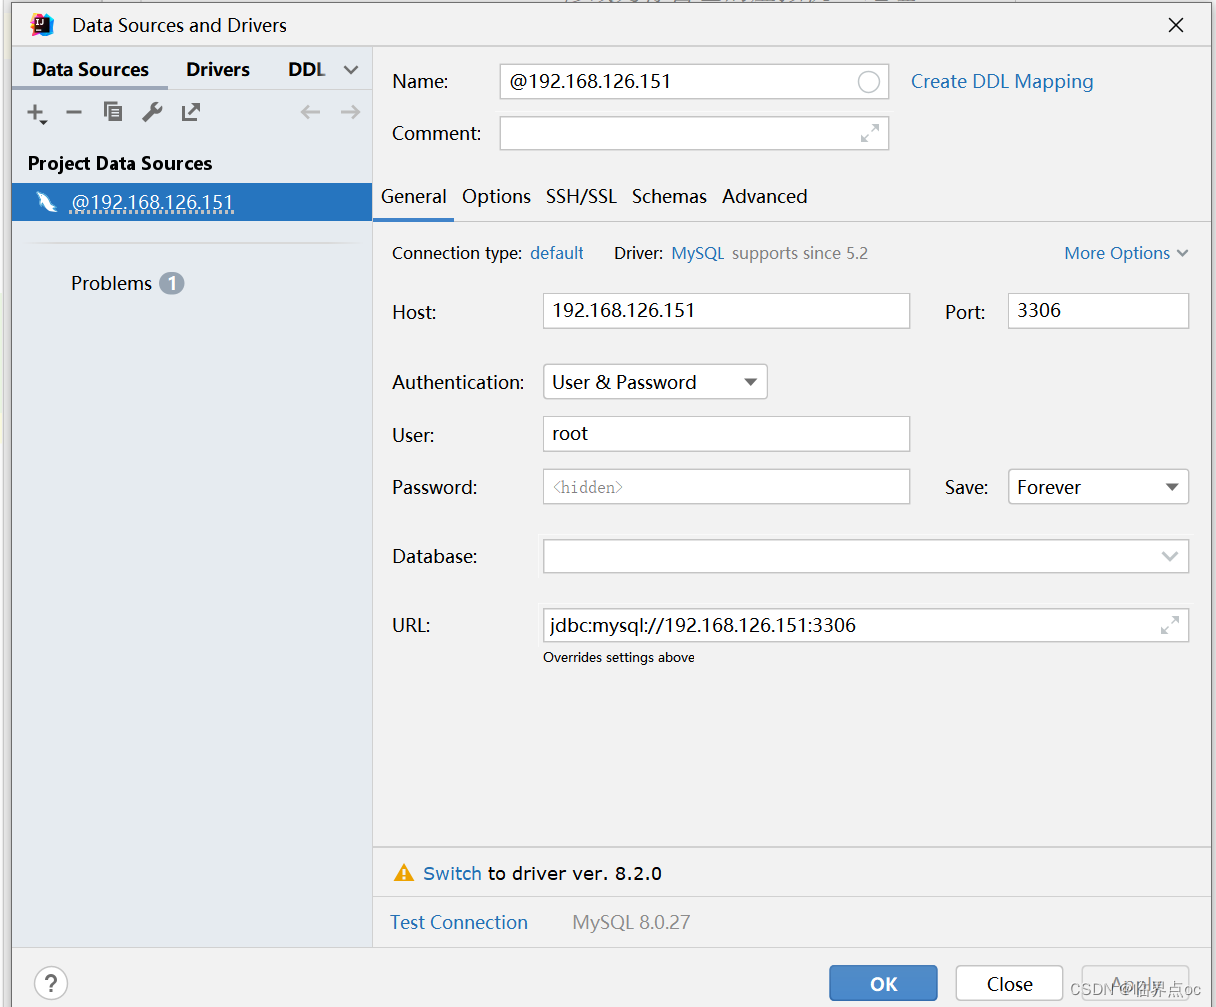
⑤客户端连接测试
2. 后端
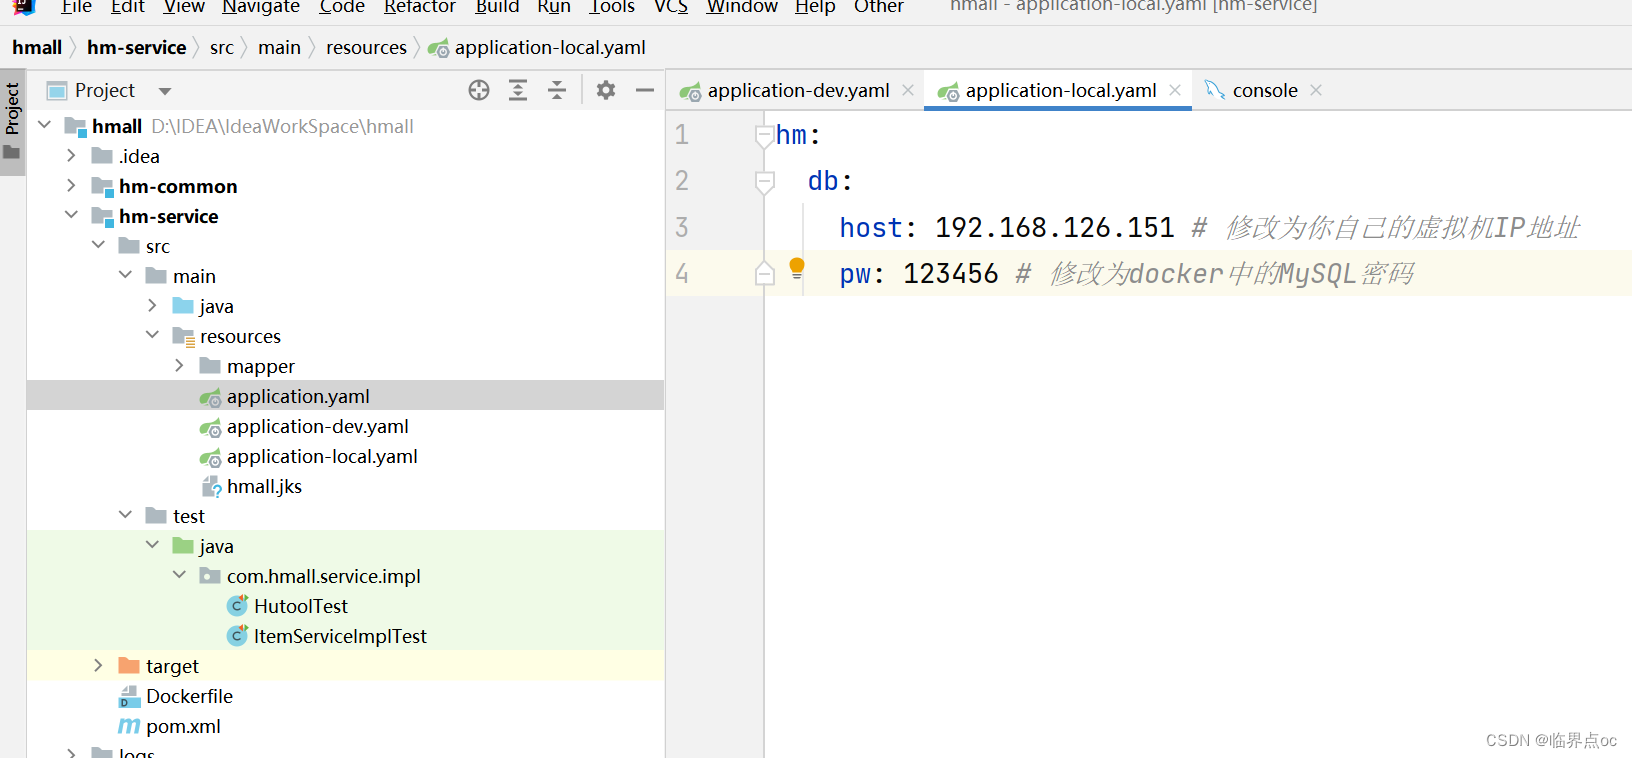
①把hmall项目复制到IDEA工作空间,打开。修改配置文件里的信息(在Day02中导入过的不用删除)
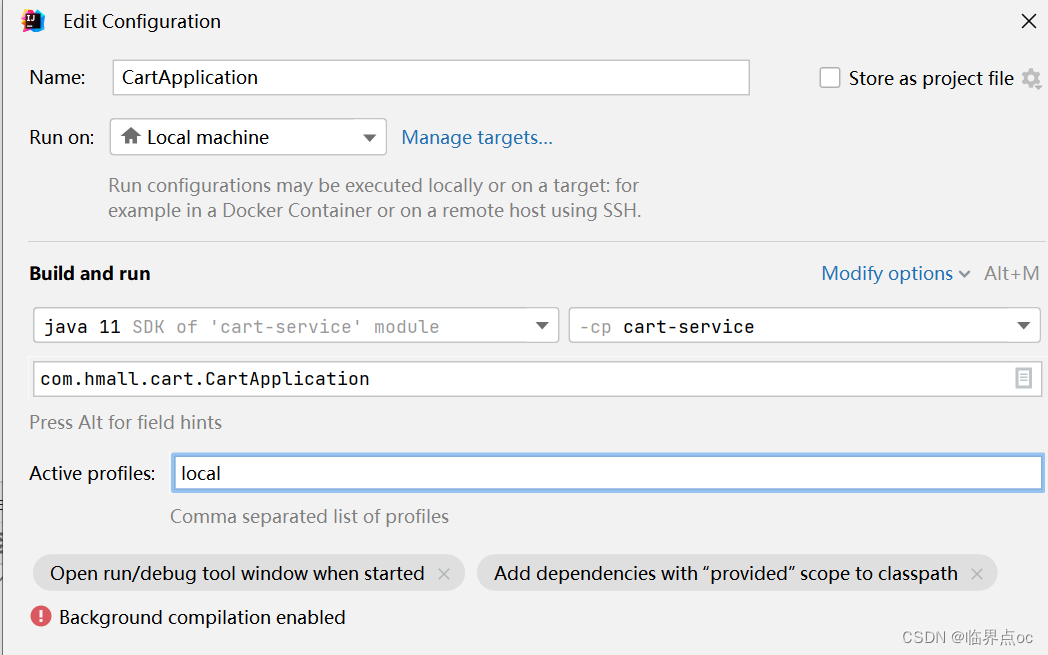
②ALT + 8键打开services窗口,新增一个启动项
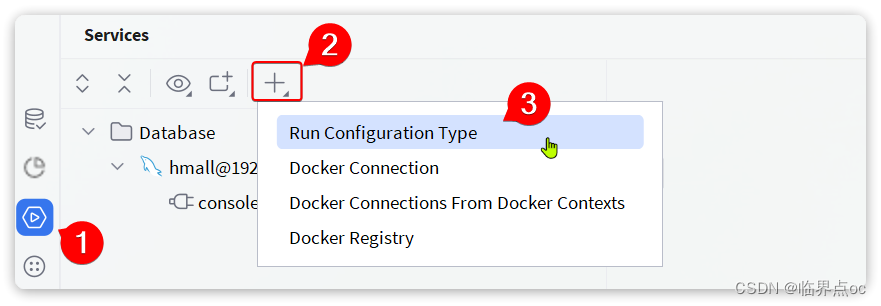
在弹出的窗口中找到Spring Boot

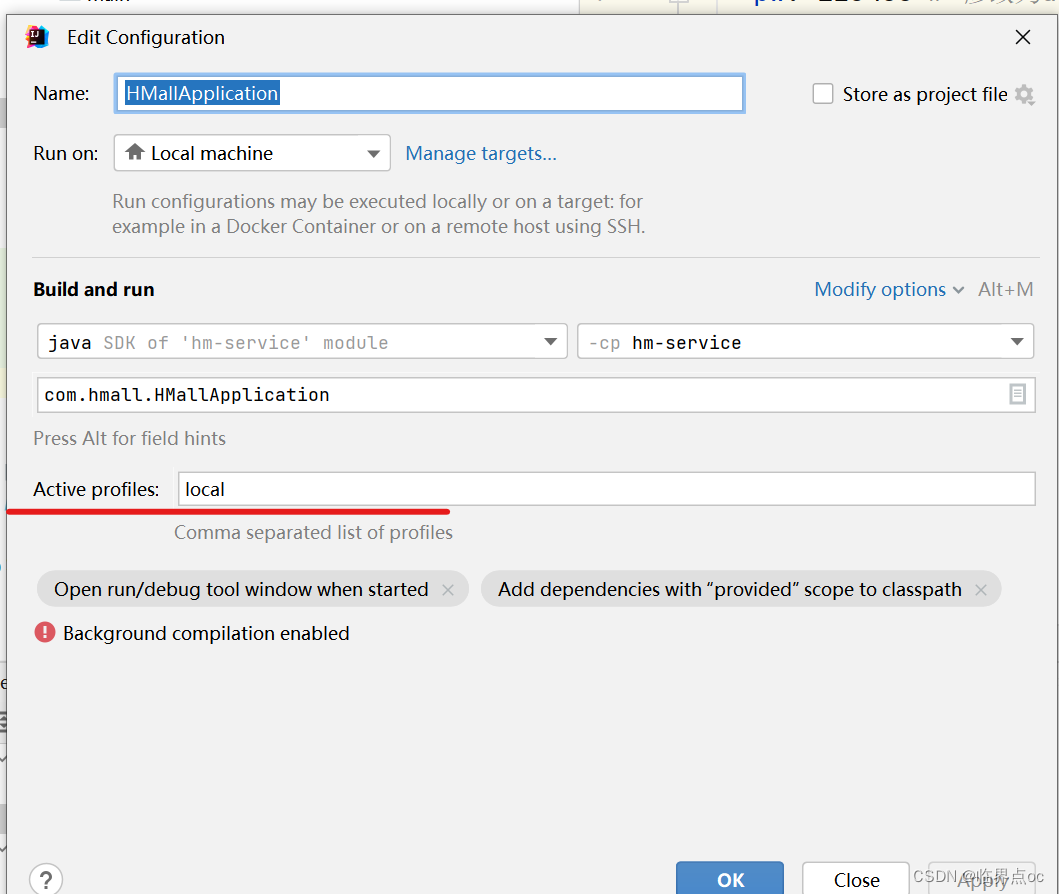
在弹出窗口中配置SpringBoot的启动环境为local:
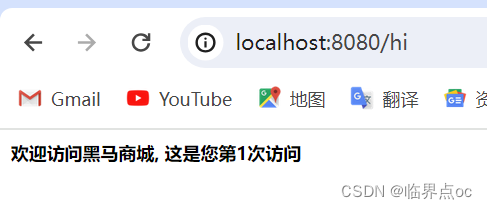
③接着运行项目,访问 http://localhost:8080/hi
3. 前端
①把Day03课前资料中的hmall-nginx目录拷贝到一个不带中文的路径下,
②运行nginx.exe

如果启动失败,查看错误日志如下,把nginx.conf中的端口号改成其他的,或者停止占用80端口号的程序。
2024/06/07 10:50:15 [emerg] 42452#46764: bind() to 0.0.0.0:80 failed (10013: An attempt was made to access a socket in a way forbidden by its access permissions)


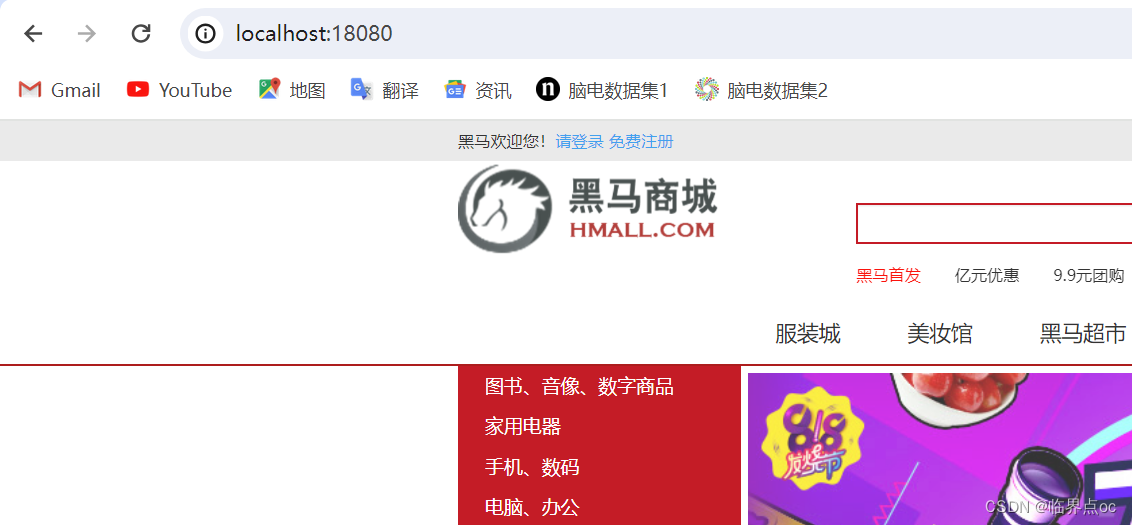
③访问 http://localhost:18080,查看是否成功
二、认识微服务
1. 单体架构
单体架构:将业务的所有功能集中在一个项目中开发,打成一个包部署
优点:架构简单,部署成本低。
缺点:团队协作成本高,系统发布效率低,系统可用性差
总结:单价架构适合开发功能相对简单,规模较小的项目。

JMeter官网:Apache JMeter - Download Apache JMeter
安装教程:JMeter软件的安装(超详细教程)_jmeter安装-CSDN博客
①把课前资料中的“黑马商城测试.jmx”拖拽入JMeter中测试。

2. 微服务
微服务架构,是服务化思想指导下的一套最佳实践架构方案。服务化,就是把单体架构中的功能模块拆分为多个独立项目。
- 粒度小
- 团队自治
- 服务自治

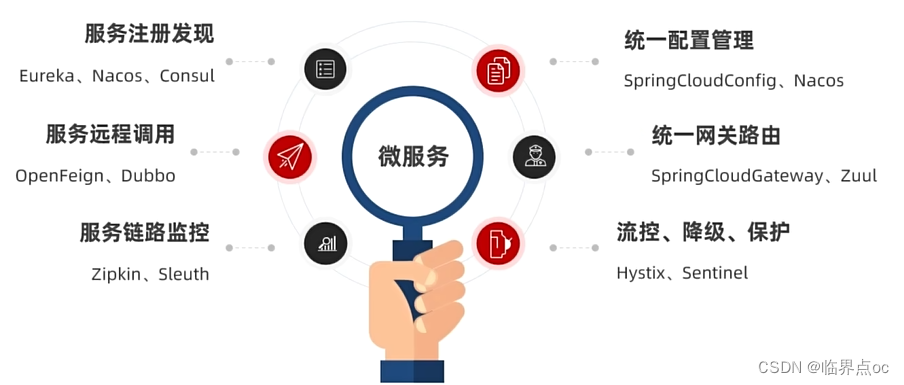
3. SpringCloud
SpringCloud是目前国内使用最广泛的微服务架构。SpringCloud集成了各种微服务功能组件,并基于SpringBoot实现了这些组件的自动装配,从而提供了良好的开箱即用体验。
官网地址:Spring Cloud
| SpringCloud版本 | SpringBoot版本 |
| 2023.0.x aka Leyton | 3.2.x |
| 2022.0.x aka Kilburn | 3.0.x, 3.1.x(Starting with 2022.0.3) |
| 2021.0.x aka Jubilee | 2.6.x, 2.7.x (Starting with 2021.0.3) |
| 2020.0.x aka Ilford | 2.4.x, 2.5.x (Starting with 2020.0.3) |
| Hoxton | 2.2.x, 2.3.x (Starting with SR5) |
| Greenwich | 2.1.x |
| Finchley | 2.0.x |
| Edgware | 1.5.x |
| Dalston | 1.5.x |
三、微服务拆分
1. 熟悉黑马商城

在登录时如果报错如下,在pom.xml里把MyBatis Plus的版本改成3.4.2或其他版本
org.mybatis.spring.MyBatisSystemException: nested exception is org.apache.ibatis.builder.BuilderException: Error evaluating expression 'ew.sqlSegment != null and ew.sqlSegment != '' and ew.nonEmptyOfWhere'. Cause: org.apache.ibatis.ognl.OgnlException: sqlSegment [java.lang.ExceptionInInitializerError]
at org.mybatis.spring.MyBatisExceptionTranslator.translateExceptionIfPossible(MyBatisExceptionTranslator.java:96) ~[mybatis-spring-2.0.6.jar:2.0.6]
at org.mybatis.spring.SqlSessionTemplate$SqlSessionInterceptor.invoke(SqlSessionTemplate.java:441)

2. 服务拆分原则
1. 什么时候拆分
- 创业型项目:先采用单体架构,快速开发,快速试错。随着规模扩大,逐渐拆分
- 确定的大型项目:资金充足,目标明确,可以直接选择微服务架构,避免后续拆分的麻烦。
2. 怎么拆分
从拆分目标来说,要做到:
- 高内聚:每个微服务的职责要尽量单一,包含的业务相关关联度高、完整度高
- 低耦合:每个微服务的功能要相对独立,尽量减少对其他微服务的依赖。
从拆分方式来说,一般包含两种方式:
- 纵向拆分:按照业务模块来拆分
- 横向拆分:抽取公共服务,提高复用性
3. 拆分购物车、商品服务

工程结构有两种:
- 独立Project
- Maven聚合
案例1:拆分服务
需求:
- 将hm-service中与商品管理相关功能代码拆分到一个微服务module中,命名为item-service
- 将hm-service中与购物车有关的功能拆分成一个微服务moudle中,命名为cart-service
(1)拆分商品管理模块 item-service
步骤:
①创建item-servicemodule
如果创建新module时,出现Error adding module to project: null的错误(JDK版本过高),可以下载一个JDK11。
安装教程:超详细JDK下载与安装步骤_jdk下载与安装教程-CSDN博客
JDK 安装与环境变量配置(Win10详细版)_jdk环境变量配置-CSDN博客
②修改pom.xml文件
<?xml version="1.0" encoding="UTF-8"?>
<project xmlns="http://maven.apache.org/POM/4.0.0"
         xmlns:xsi="http://www.w3.org/2001/XMLSchema-instance"
         xsi:schemaLocation="http://maven.apache.org/POM/4.0.0 http://maven.apache.org/xsd/maven-4.0.0.xsd">
    <parent>
        <artifactId>hmall</artifactId>
        <groupId>com.heima</groupId>
        <version>1.0.0</version>
    </parent>
    <modelVersion>4.0.0</modelVersion>

    <artifactId>item-service</artifactId>

    <properties>
        <maven.compiler.source>11</maven.compiler.source>
        <maven.compiler.target>11</maven.compiler.target>
        <project.build.sourceEncoding>UTF-8</project.build.sourceEncoding>
    </properties>

    <dependencies>
        <!--common-->
        <dependency>
            <groupId>com.heima</groupId>
            <artifactId>hm-common</artifactId>
            <version>1.0.0</version>
        </dependency>
        <!--web-->
        <dependency>
            <groupId>org.springframework.boot</groupId>
            <artifactId>spring-boot-starter-web</artifactId>
        </dependency>
        <!--数据库-->
        <dependency>
            <groupId>mysql</groupId>
            <artifactId>mysql-connector-java</artifactId>
        </dependency>
        <!--mybatis-->
        <dependency>
            <groupId>com.baomidou</groupId>
            <artifactId>mybatis-plus-boot-starter</artifactId>
        </dependency>
    </dependencies>
    <build>
        <finalName>${project.artifactId}</finalName>
        <plugins>
            <plugin>
                <groupId>org.springframework.boot</groupId>
                <artifactId>spring-boot-maven-plugin</artifactId>
            </plugin>
        </plugins>
    </build>

</project>
③添加启动类ItemApplication
package com.hmall.item;

import org.mybatis.spring.annotation.MapperScan;
import org.springframework.boot.SpringApplication;
import org.springframework.boot.autoconfigure.SpringBootApplication;

@MapperScan("com.hmall.item.mapper")
@SpringBootApplication
public class ItemApplication {
    public static void main(String[] args) {
        SpringApplication.run(ItemApplication.class, args);
    }
}
④执行SQL脚本,更改配置文件

application.yaml
server:
  port: 8081
spring:
  application:
    name: item-service  # 微服务名称
  profiles:
    active: dev
  datasource:
    url: jdbc:mysql://${hm.db.host}:3306/hm-item?useUnicode=true&characterEncoding=UTF-8&autoReconnect=true&serverTimezone=Asia/Shanghai
    driver-class-name: com.mysql.cj.jdbc.Driver
    username: root
    password: ${hm.db.pw}
mybatis-plus:
  configuration:
    default-enum-type-handler: com.baomidou.mybatisplus.core.handlers.MybatisEnumTypeHandler
  global-config:
    db-config:
      update-strategy: not_null
      id-type: auto
logging:
  level:
    com.hmall: debug
  pattern:
    dateformat: HH:mm:ss:SSS
  file:
    path: "logs/${spring.application.name}"
knife4j:
  enable: true
  openapi:
    title: 黑马商城商品管理接口文档
    description: "黑马商城商品管理接口文档"
    email: zhanghuyi@itcast.cn
    concat: 虎哥
    url: https://www.itcast.cn
    version: v1.0.0
    group:
      default:
        group-name: default
        api-rule: package
        api-rule-resources:
          - com.hmall.item.controller
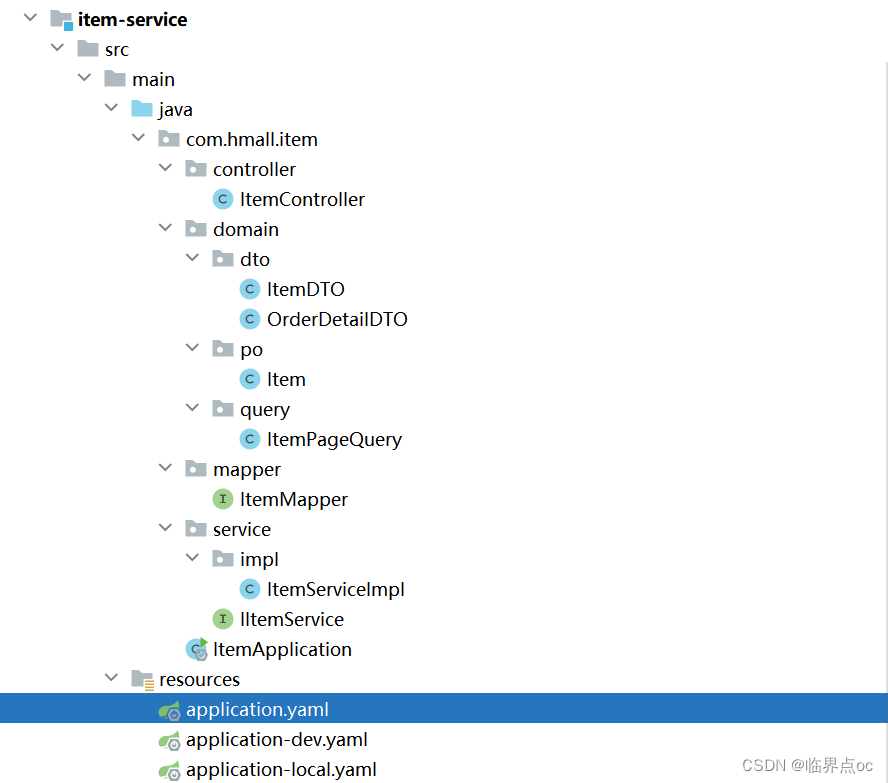
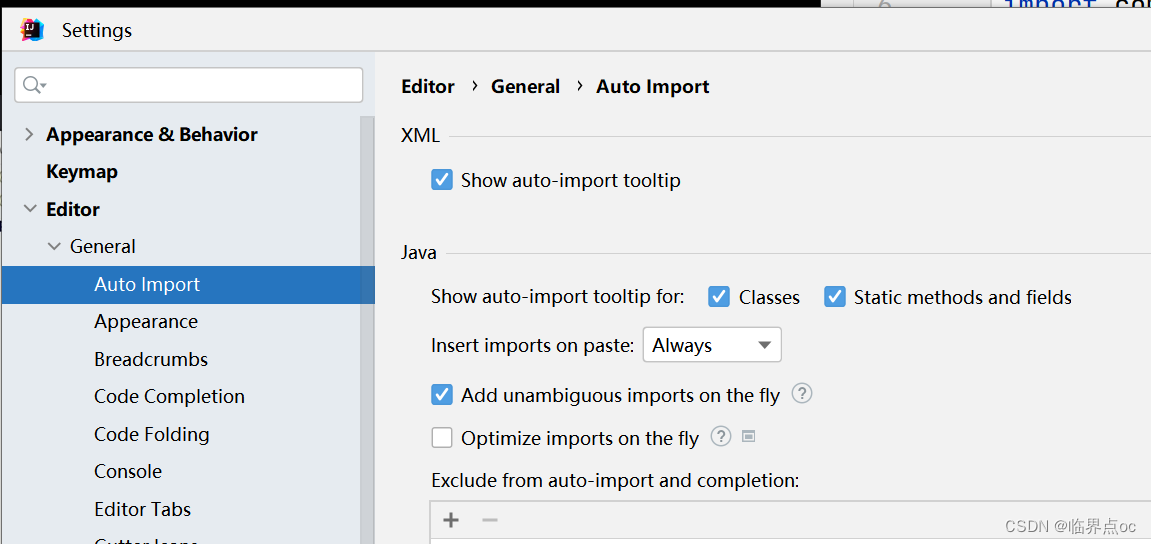
⑤从hm-service拷贝下图所示文件到item-service当中,报错的把import删掉,设置自动导入
自动导入设置
⑥修改ItemServiceImpl.java中sqlStatement字符串

⑦启动类使用的配置文件设置为local

⑧启动项目进行测试
http://localhost:8081/doc.html#/home

小Tips:IDEA同时打开多个Database
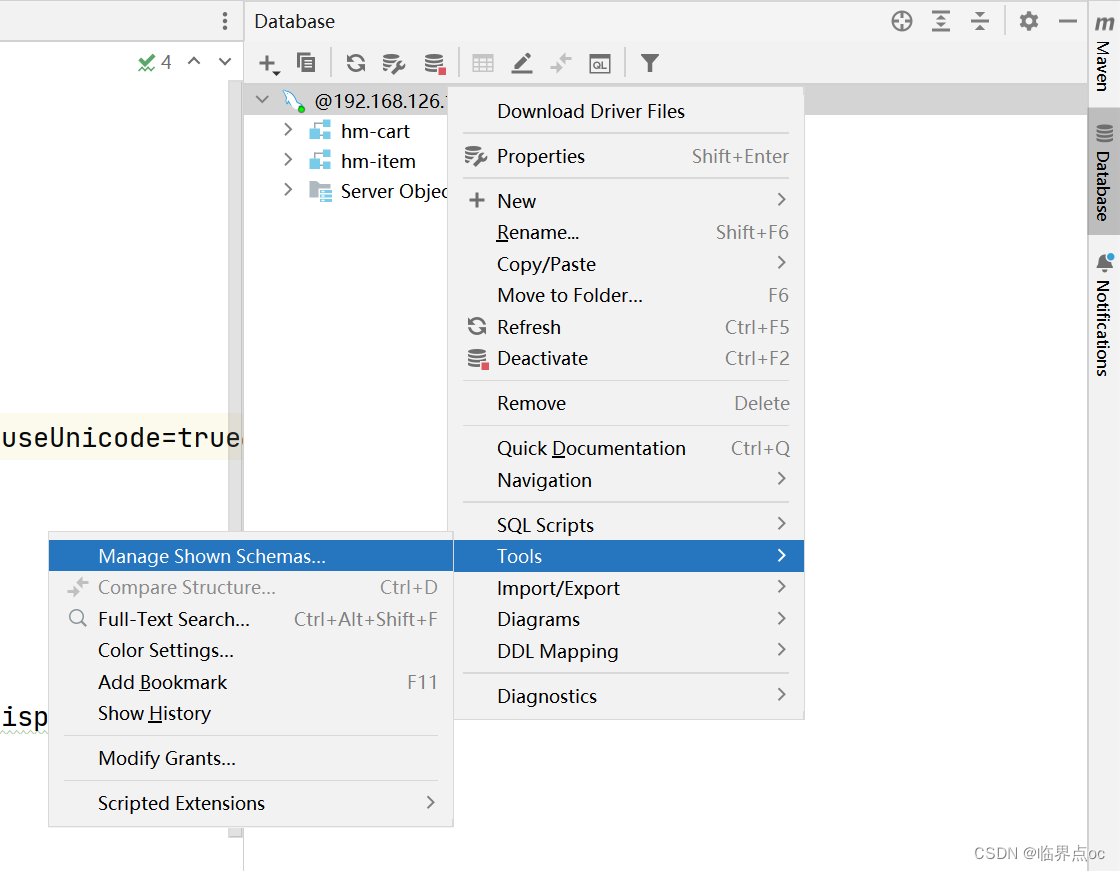
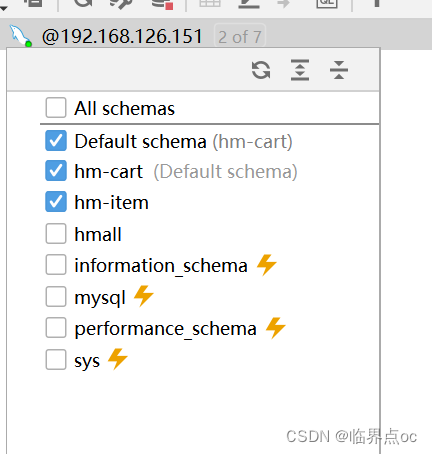
(2)拆分购物车模块 cart-service
①创建cart-service模块

②添加启动类CartApplication
package com.hmall.cart;

import org.mybatis.spring.annotation.MapperScan;
import org.springframework.boot.SpringApplication;
import org.springframework.boot.autoconfigure.SpringBootApplication;

@MapperScan("com.hmall.cart.mapper")
@SpringBootApplication
public class CartApplication {
    public static void main(String[] args) {
        SpringApplication.run(CartApplication.class, args);
    }
}
③从item-service拷贝并修改配置文件application.yaml
server:
  port: 8082
spring:
  application:
    name: cart-service  # 微服务名称
  profiles:
    active: dev
  datasource:
    url: jdbc:mysql://${hm.db.host}:3306/hm-cart?useUnicode=true&characterEncoding=UTF-8&autoReconnect=true&serverTimezone=Asia/Shanghai
    driver-class-name: com.mysql.cj.jdbc.Driver
    username: root
    password: ${hm.db.pw}
mybatis-plus:
  configuration:
    default-enum-type-handler: com.baomidou.mybatisplus.core.handlers.MybatisEnumTypeHandler
  global-config:
    db-config:
      update-strategy: not_null
      id-type: auto
logging:
  level:
    com.hmall: debug
  pattern:
    dateformat: HH:mm:ss:SSS
  file:
    path: "logs/${spring.application.name}"
knife4j:
  enable: true
  openapi:
    title: 黑马商城购物车接口文档
    description: "黑马商城购物车接口文档"
    email: zhanghuyi@itcast.cn
    concat: 虎哥
    url: https://www.itcast.cn
    version: v1.0.0
    group:
      default:
        group-name: default
        api-rule: package
        api-rule-resources:
          - com.hmall.cart.controller
④执行脚本hm-cart.sql

⑤从hm-service中拷贝如下文件到cart-service中

⑥将CartServiceImpl.java中目前报错的代码先注释掉
package com.hmall.cart.service.impl;

import cn.hutool.core.util.StrUtil;
import com.baomidou.mybatisplus.core.conditions.query.QueryWrapper;
import com.baomidou.mybatisplus.extension.service.impl.ServiceImpl;
import com.hmall.cart.domain.dto.CartFormDTO;
import com.hmall.cart.domain.po.Cart;
import com.hmall.cart.domain.vo.CartVO;
import com.hmall.cart.mapper.CartMapper;
import com.hmall.cart.service.ICartService;
import com.hmall.common.exception.BizIllegalException;
import com.hmall.common.utils.BeanUtils;
import com.hmall.common.utils.CollUtils;
import com.hmall.common.utils.UserContext;
import lombok.RequiredArgsConstructor;
import org.springframework.stereotype.Service;

import java.util.Collection;
import java.util.List;
import java.util.Map;
import java.util.Set;
import java.util.function.Function;
import java.util.stream.Collectors;

/**
 * <p>
 * 订单详情表 服务实现类
 * </p>
 *
 * @author 虎哥
 * @since 2023-05-05
 */
@Service
@RequiredArgsConstructor
public class CartServiceImpl extends ServiceImpl<CartMapper, Cart> implements ICartService {

    // private final IItemService itemService;

    @Override
    public void addItem2Cart(CartFormDTO cartFormDTO) {
        // 1.获取登录用户
        Long userId = UserContext.getUser();

        // 2.判断是否已经存在
        if(checkItemExists(cartFormDTO.getItemId(), userId)){
            // 2.1.存在,则更新数量
            baseMapper.updateNum(cartFormDTO.getItemId(), userId);
            return;
        }
        // 2.2.不存在,判断是否超过购物车数量
        checkCartsFull(userId);

        // 3.新增购物车条目
        // 3.1.转换PO
        Cart cart = BeanUtils.copyBean(cartFormDTO, Cart.class);
        // 3.2.保存当前用户
        cart.setUserId(userId);
        // 3.3.保存到数据库
        save(cart);
    }

    @Override
    public List<CartVO> queryMyCarts() {
        // 1.查询我的购物车列表
        List<Cart> carts = lambdaQuery().eq(Cart::getUserId,  1L/* TODO UserContext.getUser()*/).list();
        if (CollUtils.isEmpty(carts)) {
            return CollUtils.emptyList();
        }

        // 2.转换VO
        List<CartVO> vos = BeanUtils.copyList(carts, CartVO.class);

        // 3.处理VO中的商品信息
        handleCartItems(vos);

        // 4.返回
        return vos;
    }

    private void handleCartItems(List<CartVO> vos) {
        // TODO 1.获取商品id
//        Set<Long> itemIds = vos.stream().map(CartVO::getItemId).collect(Collectors.toSet());
//        // 2.查询商品
//        List<ItemDTO> items = itemService.queryItemByIds(itemIds);
//        if (CollUtils.isEmpty(items)) {
//            return;
//        }
//        // 3.转为 id 到 item的map
//        Map<Long, ItemDTO> itemMap = items.stream().collect(Collectors.toMap(ItemDTO::getId, Function.identity()));
//        // 4.写入vo
//        for (CartVO v : vos) {
//            ItemDTO item = itemMap.get(v.getItemId());
//            if (item == null) {
//                continue;
//            }
//            v.setNewPrice(item.getPrice());
//            v.setStatus(item.getStatus());
//            v.setStock(item.getStock());
//        }
    }

    @Override
    public void removeByItemIds(Collection<Long> itemIds) {
        // 1.构建删除条件,userId和itemId
        QueryWrapper<Cart> queryWrapper = new QueryWrapper<Cart>();
        queryWrapper.lambda()
                .eq(Cart::getUserId, UserContext.getUser())
                .in(Cart::getItemId, itemIds);
        // 2.删除
        remove(queryWrapper);
    }

    private void checkCartsFull(Long userId) {
        int count = lambdaQuery().eq(Cart::getUserId, userId).count();
        if (count >= 10) {
            throw new BizIllegalException(StrUtil.format("用户购物车课程不能超过{}", 10));
        }
    }

    private boolean checkItemExists(Long itemId, Long userId) {
        int count = lambdaQuery()
                .eq(Cart::getUserId, userId)
                .eq(Cart::getItemId, itemId)
                .count();
        return count > 0;
    }
}
⑦拷贝相关依赖到pom.xml
<?xml version="1.0" encoding="UTF-8"?>
<project xmlns="http://maven.apache.org/POM/4.0.0"
         xmlns:xsi="http://www.w3.org/2001/XMLSchema-instance"
         xsi:schemaLocation="http://maven.apache.org/POM/4.0.0 http://maven.apache.org/xsd/maven-4.0.0.xsd">
    <parent>
        <artifactId>hmall</artifactId>
        <groupId>com.heima</groupId>
        <version>1.0.0</version>
    </parent>
    <modelVersion>4.0.0</modelVersion>

    <artifactId>cart-service</artifactId>

    <properties>
        <maven.compiler.source>11</maven.compiler.source>
        <maven.compiler.target>11</maven.compiler.target>
        <project.build.sourceEncoding>UTF-8</project.build.sourceEncoding>
    </properties>

    <dependencies>
        <!--common-->
        <dependency>
            <groupId>com.heima</groupId>
            <artifactId>hm-common</artifactId>
            <version>1.0.0</version>
        </dependency>
        <!--web-->
        <dependency>
            <groupId>org.springframework.boot</groupId>
            <artifactId>spring-boot-starter-web</artifactId>
        </dependency>
        <!--数据库-->
        <dependency>
            <groupId>mysql</groupId>
            <artifactId>mysql-connector-java</artifactId>
        </dependency>
        <!--mybatis-->
        <dependency>
            <groupId>com.baomidou</groupId>
            <artifactId>mybatis-plus-boot-starter</artifactId>
        </dependency>
    </dependencies>
    <build>
        <finalName>${project.artifactId}</finalName>
        <plugins>
            <plugin>
                <groupId>org.springframework.boot</groupId>
                <artifactId>spring-boot-maven-plugin</artifactId>
            </plugin>
        </plugins>
    </build>

</project>
⑧在Maven面板刷新一下,ALT + 8键打开services面板,加载启动类CartApplication
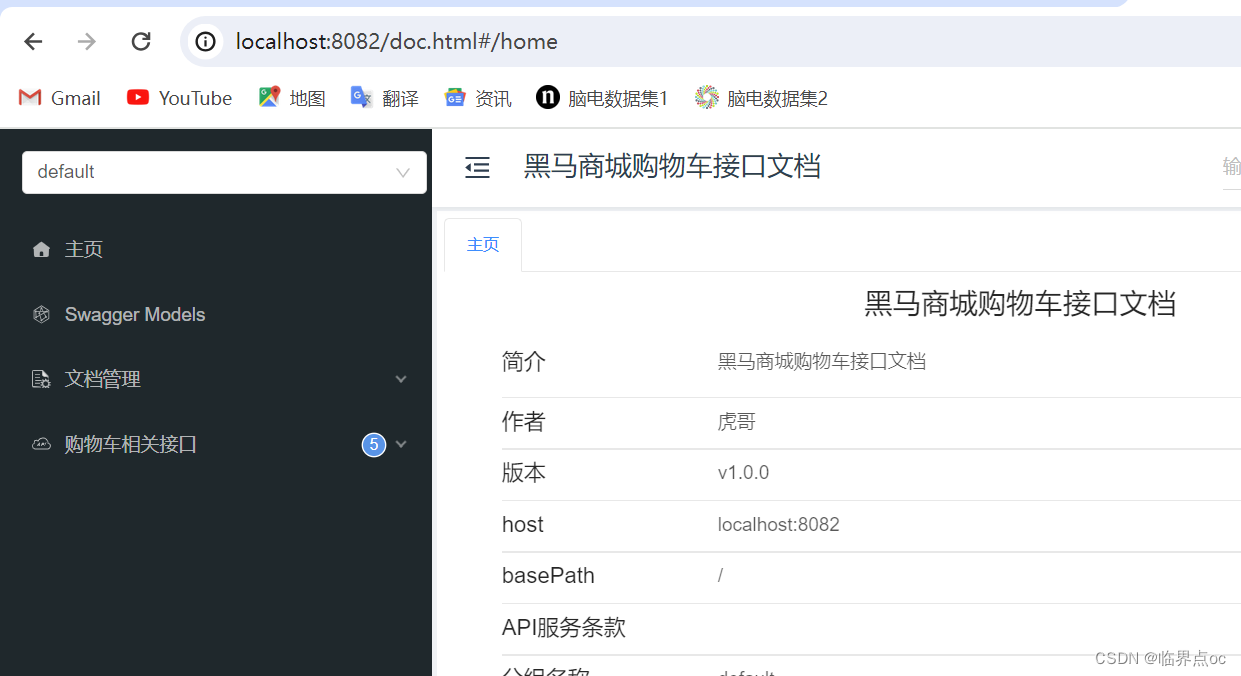
⑨运行测试 http://localhost:8082/doc.html#/home
4. 远程调用
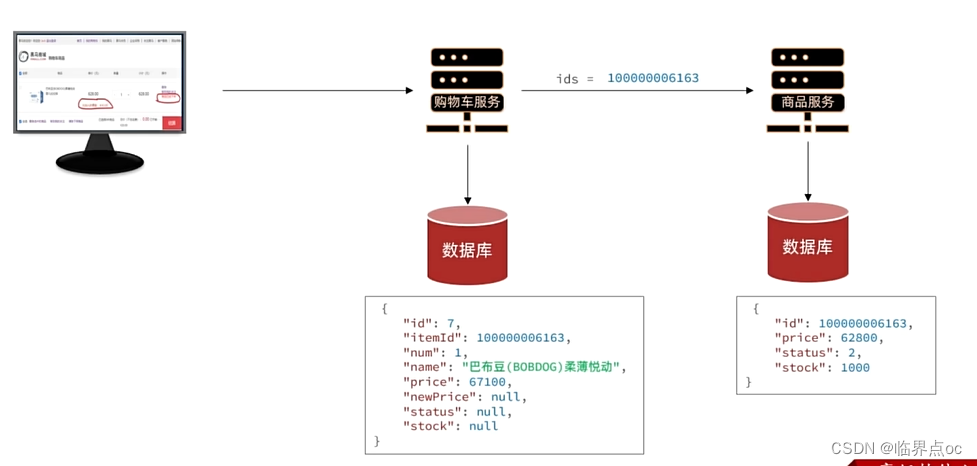
Spring给我们提供了一个RestTemplate工具,可以方便的实现Http请求的发送。使用步骤如下:
①注入RestTemplate到Spring容器
@Bean
public RestTemplate restTemplate() {
    return new RestTemplate();
}
②发起远程调用
public <T> ResponseEntity<T> exchange(
    String url, // 请求路径
    HttpMethod method, // 请求方式
    @Nullable HttpEntity<?> requestEntity,  // 请求实体,可以为空
    Class<T> responseType, // 返回值类型
    Map<String, ?> uriVariables  // 请求参数
)
步骤:
①CartApplication
package com.hmall.cart;

import org.mybatis.spring.annotation.MapperScan;
import org.springframework.boot.SpringApplication;
import org.springframework.boot.autoconfigure.SpringBootApplication;
import org.springframework.context.annotation.Bean;
import org.springframework.web.client.RestTemplate;

@MapperScan("com.hmall.cart.mapper")
@SpringBootApplication
public class CartApplication {
    public static void main(String[] args) {
        SpringApplication.run(CartApplication.class, args);
    }

    @Bean
    public RestTemplate restTemplate() {
        return new RestTemplate();
    }
}
②CartServiceImpl
package com.hmall.cart.service.impl;

import cn.hutool.core.collection.CollUtil;
import cn.hutool.core.util.StrUtil;
import com.baomidou.mybatisplus.core.conditions.query.QueryWrapper;
import com.baomidou.mybatisplus.extension.service.impl.ServiceImpl;
import com.hmall.cart.domain.dto.CartFormDTO;
import com.hmall.cart.domain.dto.ItemDTO;
import com.hmall.cart.domain.po.Cart;
import com.hmall.cart.domain.vo.CartVO;
import com.hmall.cart.mapper.CartMapper;
import com.hmall.cart.service.ICartService;
import com.hmall.common.exception.BizIllegalException;
import com.hmall.common.utils.BeanUtils;
import com.hmall.common.utils.CollUtils;
import com.hmall.common.utils.UserContext;
import lombok.RequiredArgsConstructor;
import org.springframework.core.ParameterizedTypeReference;
import org.springframework.http.HttpMethod;
import org.springframework.http.ResponseEntity;
import org.springframework.stereotype.Service;
import org.springframework.web.client.RestTemplate;

import java.util.Collection;
import java.util.List;
import java.util.Map;
import java.util.Set;
import java.util.function.Function;
import java.util.stream.Collectors;

/**
 * <p>
 * 订单详情表 服务实现类
 * </p>
 *
 * @author 虎哥
 * @since 2023-05-05
 */
@Service
@RequiredArgsConstructor // 必备参数的构造函数
public class CartServiceImpl extends ServiceImpl<CartMapper, Cart> implements ICartService {

    private final RestTemplate restTemplate;
    // private final IItemService itemService;

    // ... ...

    private void handleCartItems(List<CartVO> vos) {
        // TODO 1.获取商品id
        Set<Long> itemIds = vos.stream().map(CartVO::getItemId).collect(Collectors.toSet());
        // 2.查询商品
        // List<ItemDTO> items = itemService.queryItemByIds(itemIds);
        // 2.1 利用RestTemplate发起http请求,得到http响应
        ResponseEntity<List<ItemDTO>> response = restTemplate.exchange(
                "http://localhost:8081/items?ids={ids}",
                HttpMethod.GET,
                null,
                new ParameterizedTypeReference<List<ItemDTO>>() {
                },
                Map.of("ids", CollUtil.join(itemIds, ","))
        );
        // 2.2 解析响应
        if(!response.getStatusCode().is2xxSuccessful()) {
            // 查询失败,直接结束
            return;
        }
        List<ItemDTO> items = response.getBody();
        if (CollUtils.isEmpty(items)) {
            return;
        }
        // 3.转为 id 到 item的map
        Map<Long, ItemDTO> itemMap = items.stream().collect(Collectors.toMap(ItemDTO::getId, Function.identity()));
        // 4.写入vo
        for (CartVO v : vos) {
            ItemDTO item = itemMap.get(v.getItemId());
            if (item == null) {
                continue;
            }
            v.setNewPrice(item.getPrice());
            v.setStatus(item.getStatus());
            v.setStock(item.getStock());
        }
    }

    // ... ...
}
③同时启动ItemApplication和CartApplication
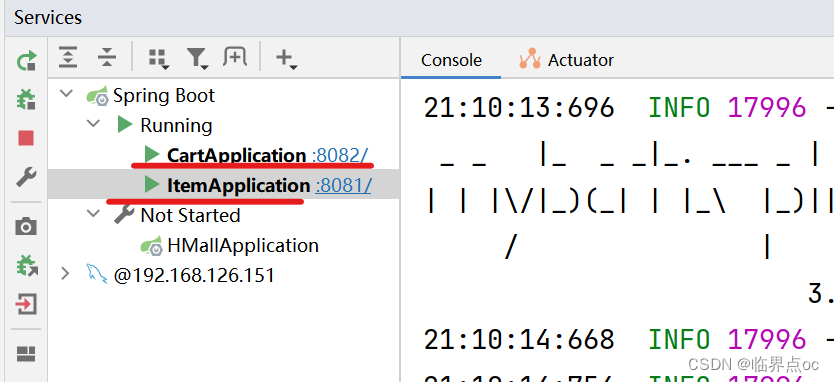
④调试 http://localhost:8082/doc.html#/home

⑤打开console,查询id为100000006163的商品,修改其价格
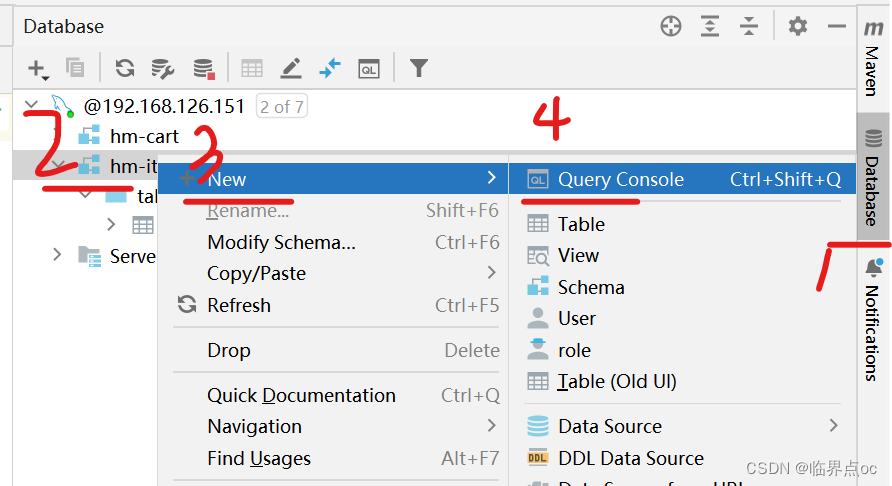
SELECT * FROM item WHERE id = 100000006163;
重新调试
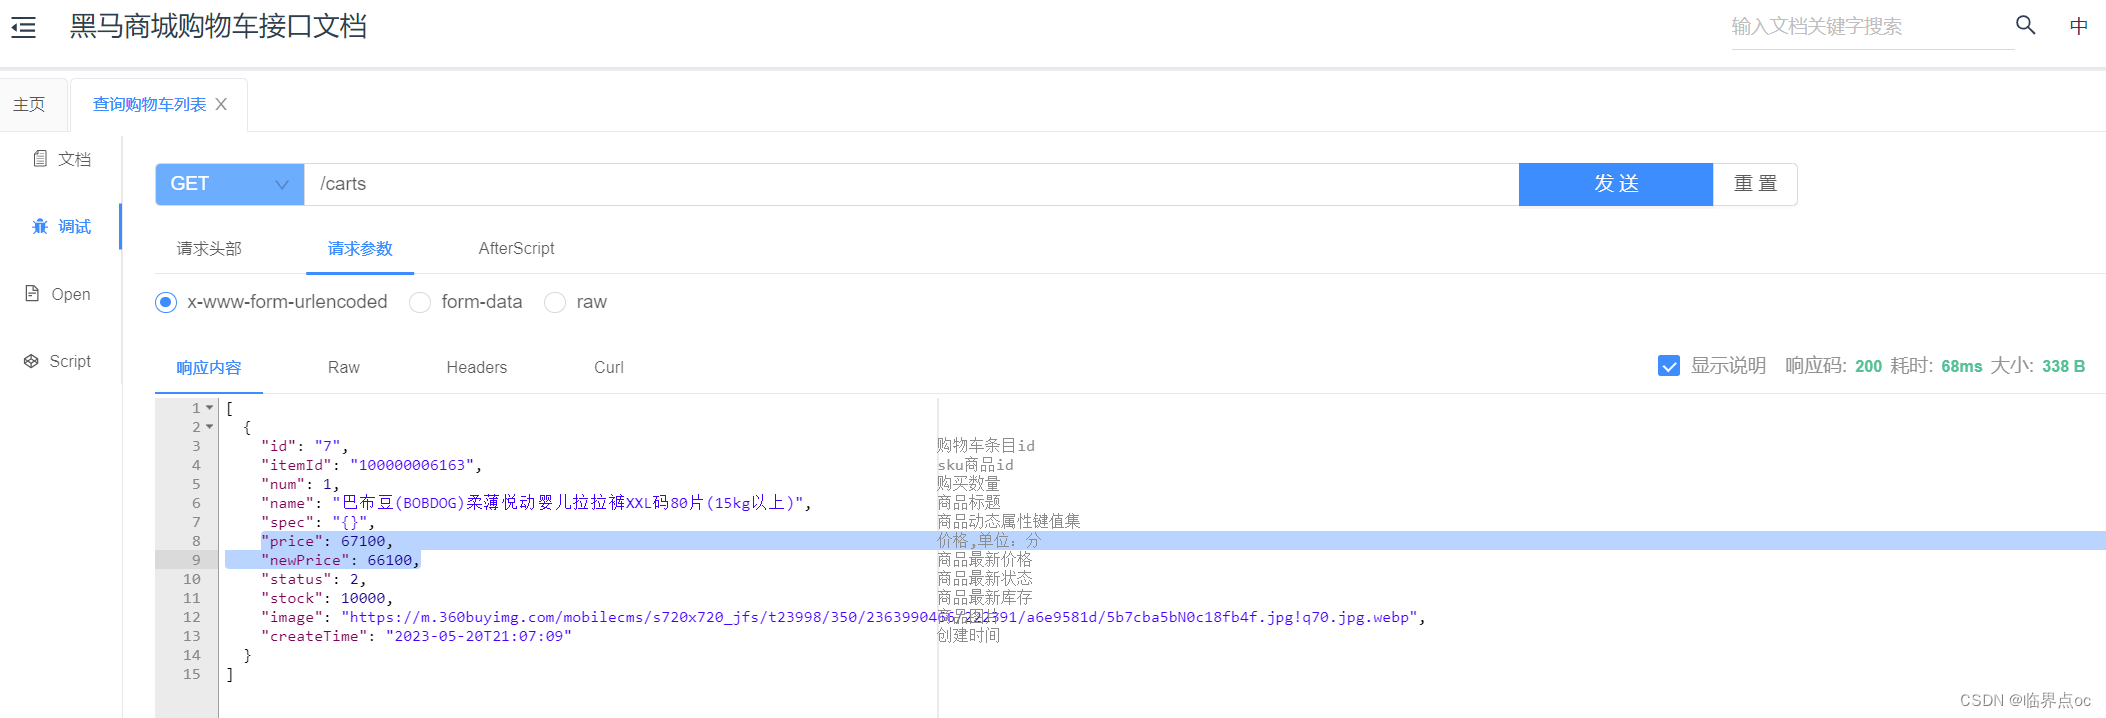
5. 总结
1. 什么时候拆分微服务?
答:初创型公司或项目尽量采用单体项目,快速试错。随着项目发展到达一定规模再做拆分。
2. 如何拆分微服务?
答:目标:高内聚、低耦合。方式:纵向拆分、横向拆分。
3. 拆分后碰到的第一个问题是什么,如何解决?
答:拆分后,某些数据在不同服务,无法直接调用本地方法查寻数据。利用RestTemplate发送Http请求,实现远程调用。
四、服务治理
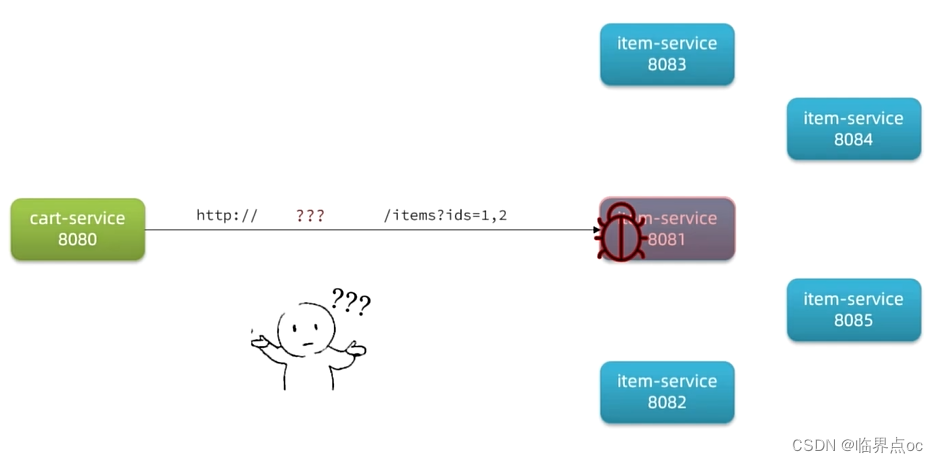
1. 服务远程调用时存在的问题
2. 注册中心原理
 1. 服务治理中的三个角色分别是什么?
- 服务提供者:暴露服务接口,供其他服务调用
- 服务消费者:调用其他服务提供的接口
- 注册中心:记录并监控微服务各实例状态,推送服务变更信息
2. 消费者如何指导提供者的地址?
- 服务提供者会在启动时注册自己的信息到注册中心,消费者可以从注册中心订阅和拉取服务信息
3. 消费者如何知道服务状态变更?
- 服务提供者通过心跳机制向注册中心报告自己的健康状态,当心跳异常时注册中心会将异常服务剔除,并通知订阅了该服务的消费者。
4. 当提供者有多个实例时,消费者该选择哪一个?
- 消费者可以通过负载均衡算法,从多个实例中选择一个
3. Nacos注册中心
Nacos是目前国内企业中占比最多的注册中心组件。它是阿里巴巴的产品,目前已经加入SpringCloudAlibaba中。

官网:Nacos官网| Nacos 配置中心 | Nacos 下载| Nacos 官方社区 | Nacos
课程资料:Docs
步骤:
①执行nacos.sql脚本
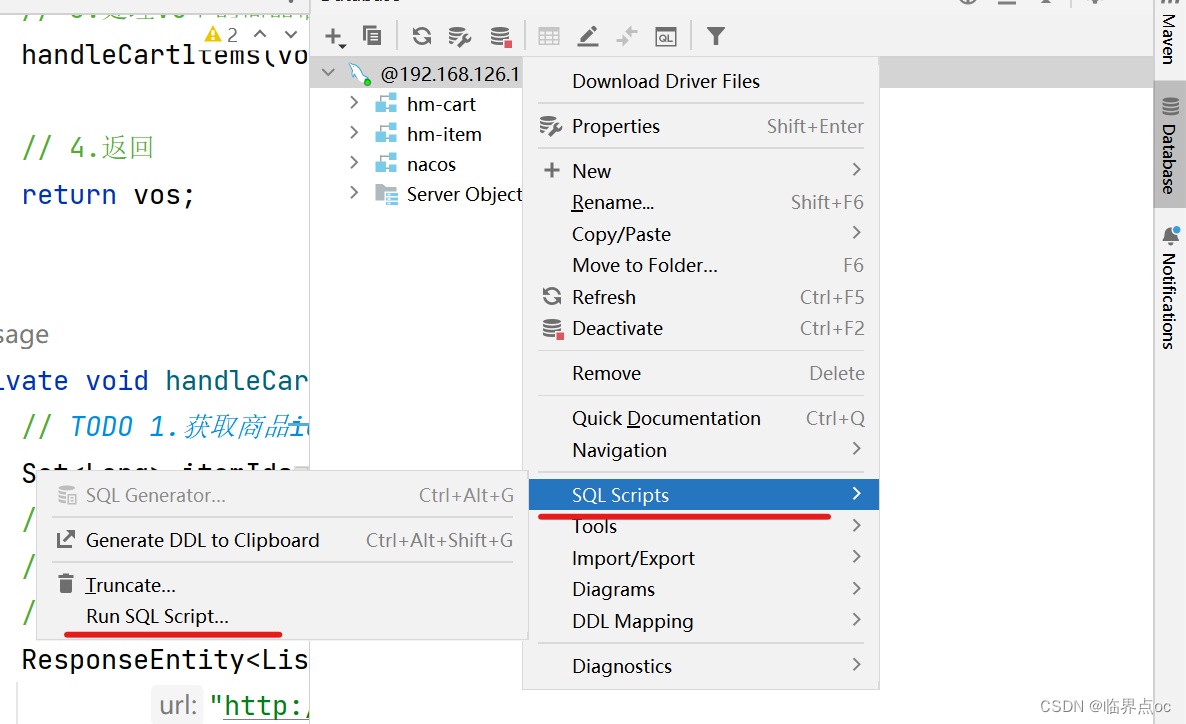
②根据自己的情况修改课前资料里的custom.env文件

PREFER_HOST_MODE=hostname
MODE=standalone
SPRING_DATASOURCE_PLATFORM=mysql
MYSQL_SERVICE_HOST=192.168.126.151
MYSQL_SERVICE_DB_NAME=nacos
MYSQL_SERVICE_PORT=3306
MYSQL_SERVICE_USER=root
MYSQL_SERVICE_PASSWORD=123456
MYSQL_SERVICE_DB_PARAM=characterEncoding=utf8&connectTimeout=1000&socketTimeout=3000&autoReconnect=true&useSSL=false&allowPublicKeyRetrieval=true&serverTimezone=Asia/Shanghai
③上传nacos文件夹以及nacos.tar到虚拟机的root目录下

④加载nacos镜像
docker load -i nacos.tar

⑤创建并运行nacos
docker run -d \
--name nacos \
--env-file ./nacos/custom.env \
-p 8848:8848 \
-p 9848:9848 \
-p 9849:9849 \
--restart=always \
nacos/nacos-server:v2.1.0-slim
⑥查看nacos的运行日志
docker logs -f nacos
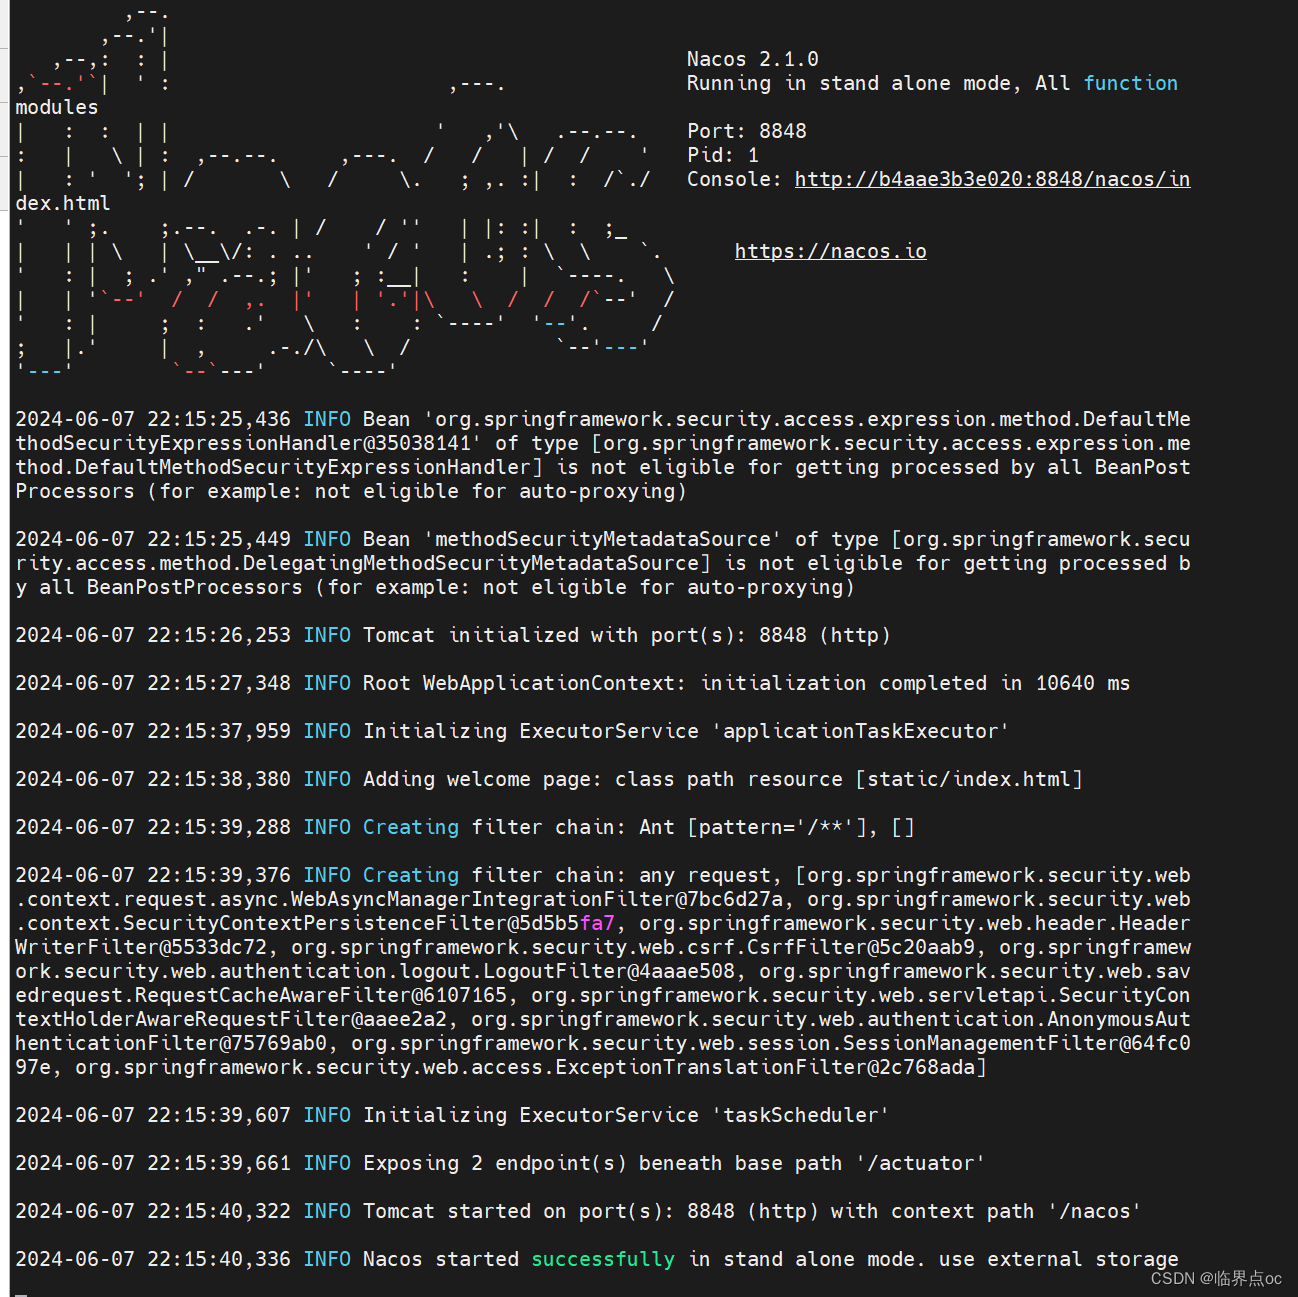
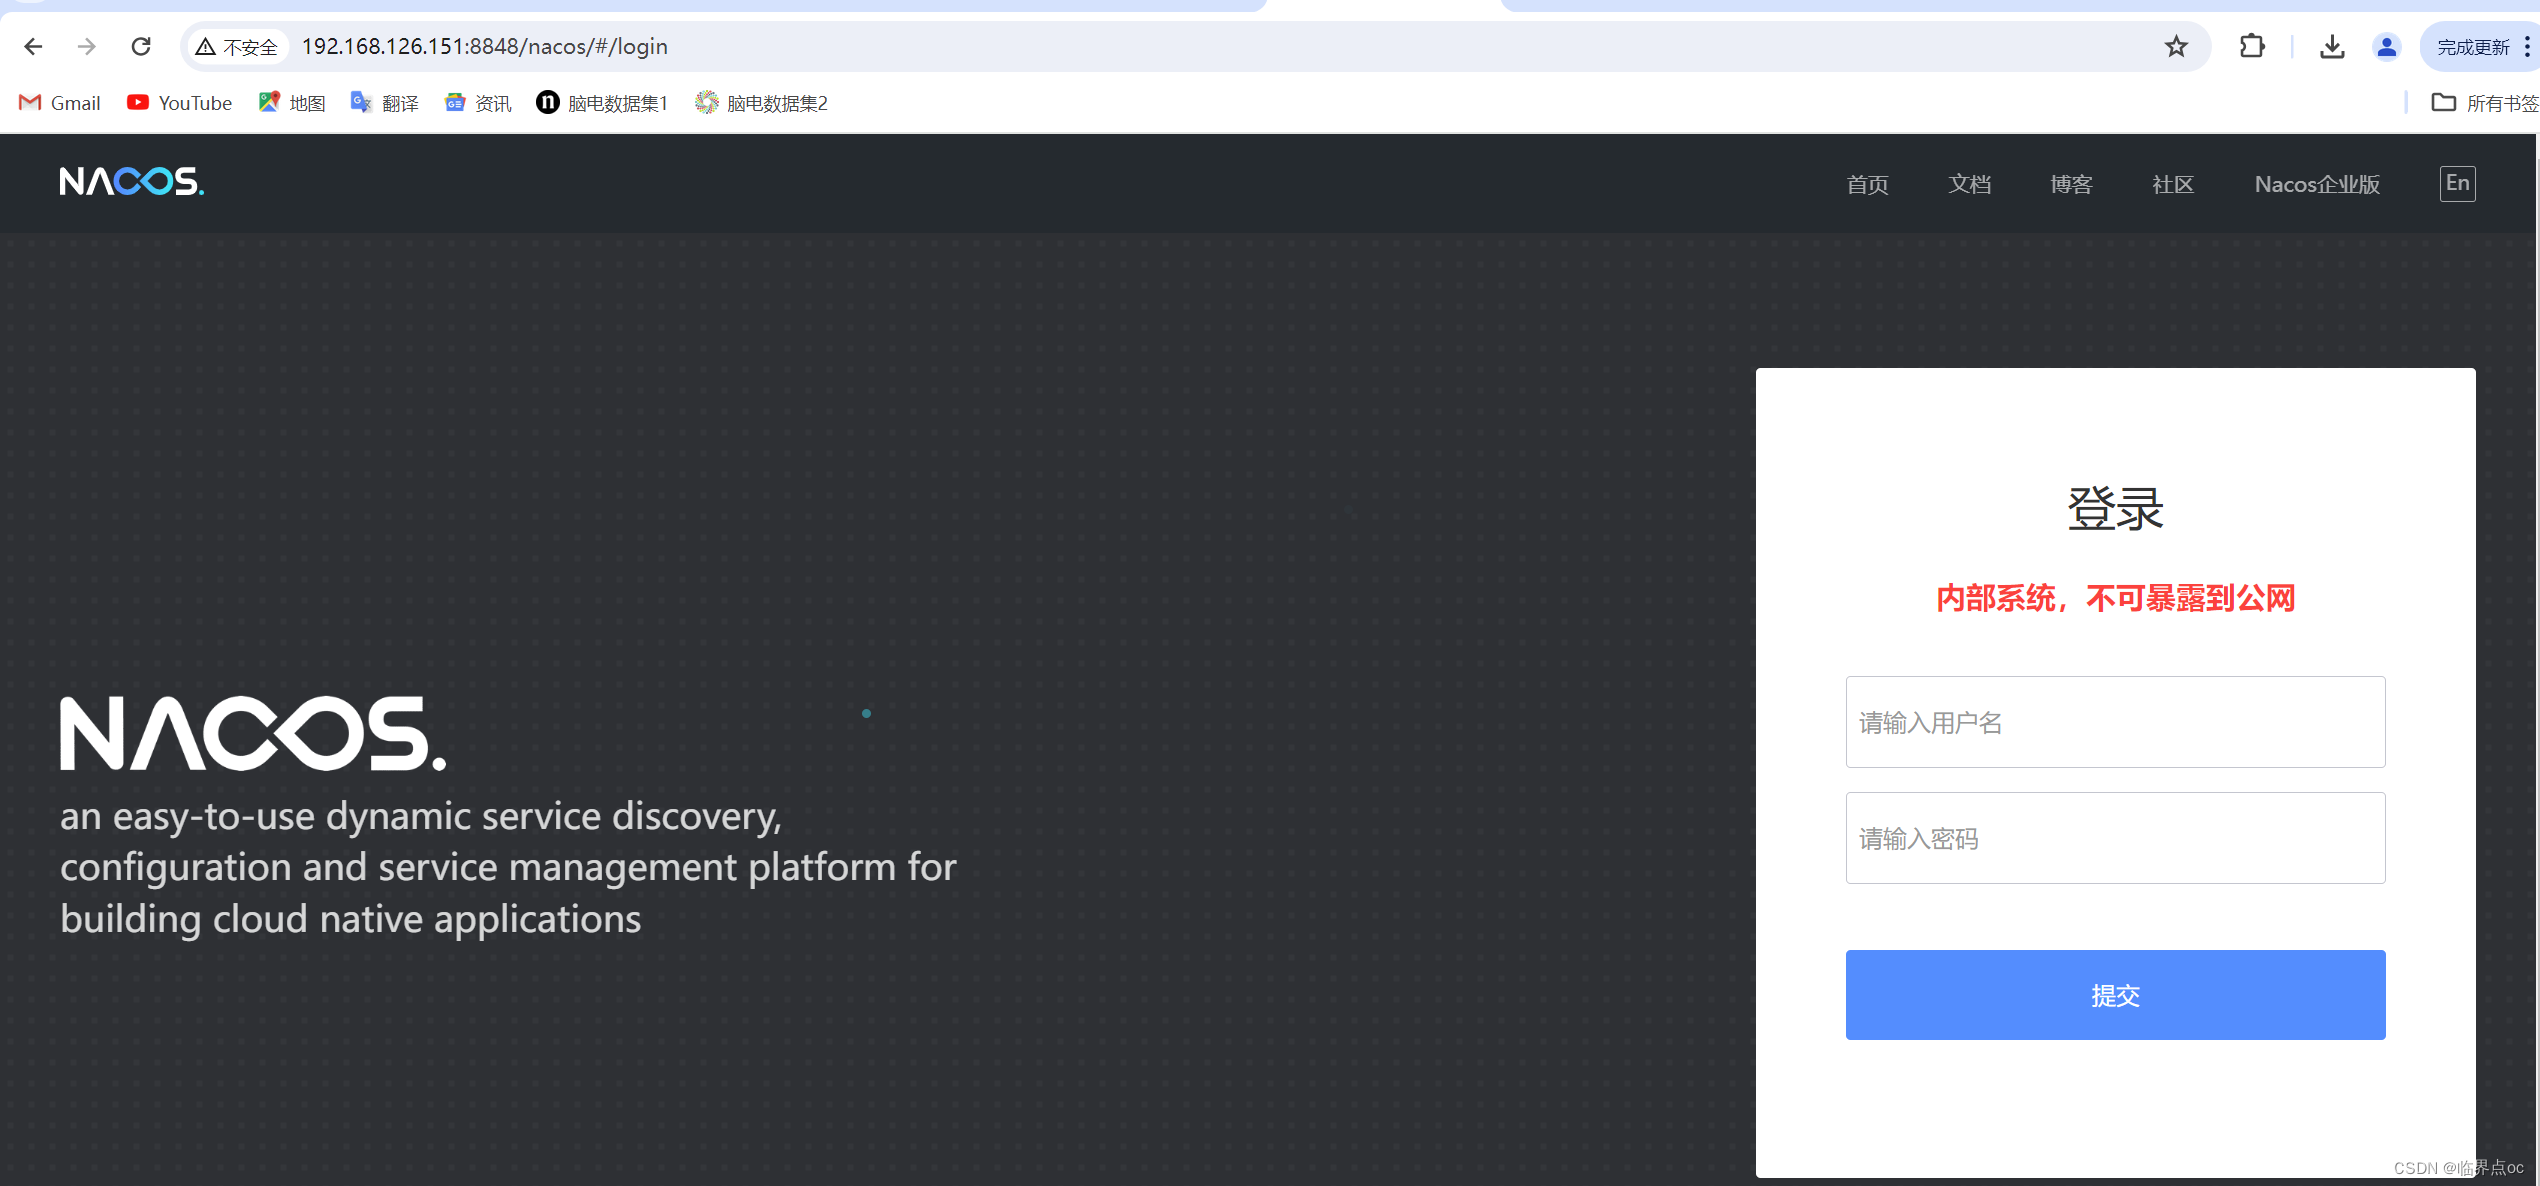
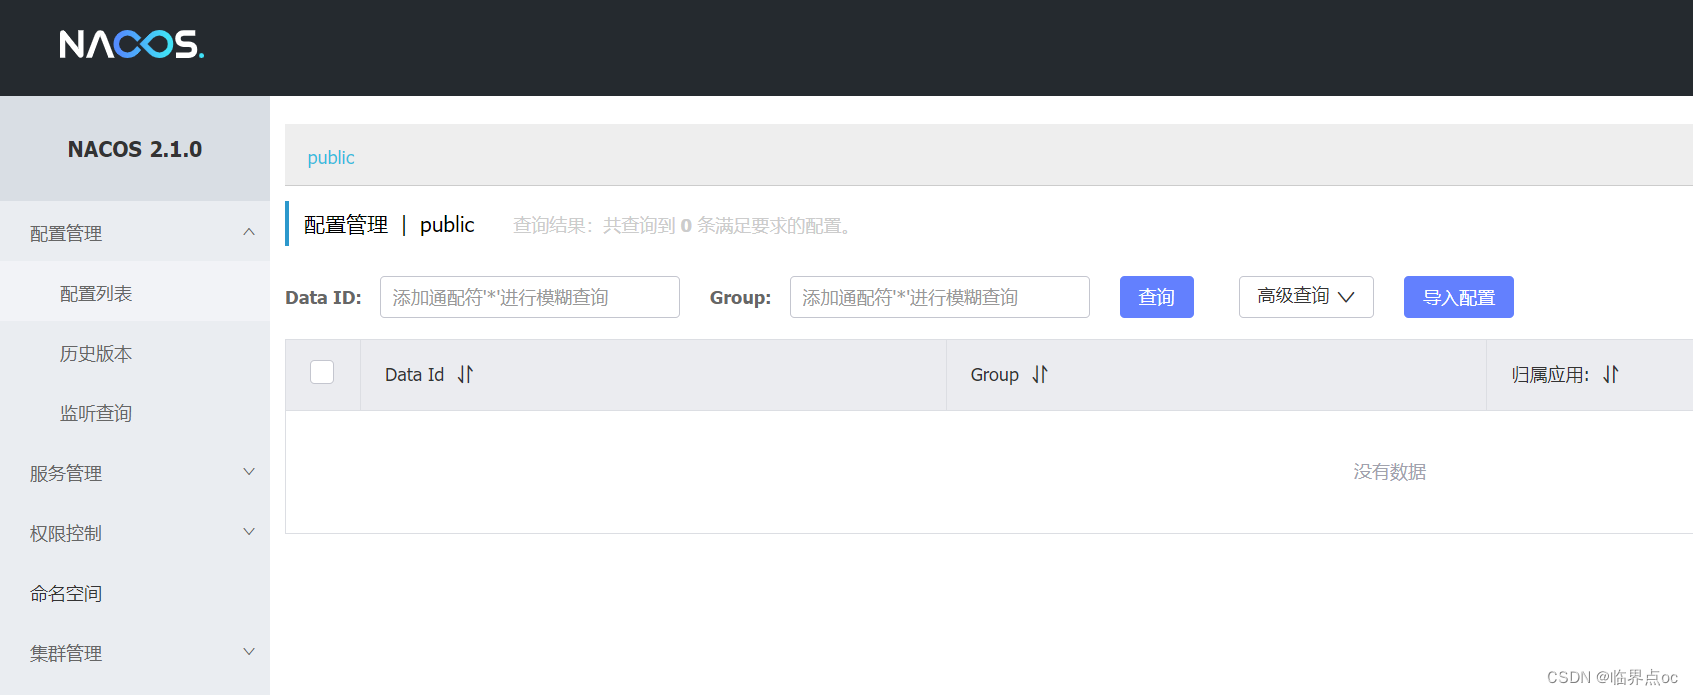
⑦访问测试 http://192.168.126.151:8848/nacos/#/login
用户名和密码都是:nacos
4. 服务注册
服务注册步骤如下:
①引入nacos discovery依赖:
<dependency>
    <groupId>com.alibaba.cloud</groupId>
    <artifactId>spring-cloud-starter-alibaba-nacos-discovery</artifactId>
</dependency>
②配置nacos地址
spring:
  application:
    name: item-service # 服务名称
  cloud:
    nacos:
      servcer-addr: 192.168.126.151:8848 # nacos地址
步骤:item-service模块
①引入依赖
pom.xml(item-service)
<!--nacos 服务注册发现-->
<dependency>
    <groupId>com.alibaba.cloud</groupId>
    <artifactId>spring-cloud-starter-alibaba-nacos-discovery</artifactId>
</dependency>
②配置nacos地址
spring:
  application:
    name: item-service  # 微服务名称
  cloud:
    nacos:
      server-addr: 192.168.126.151:8848
③右键点击ItemApplication,点击Copy Configuration
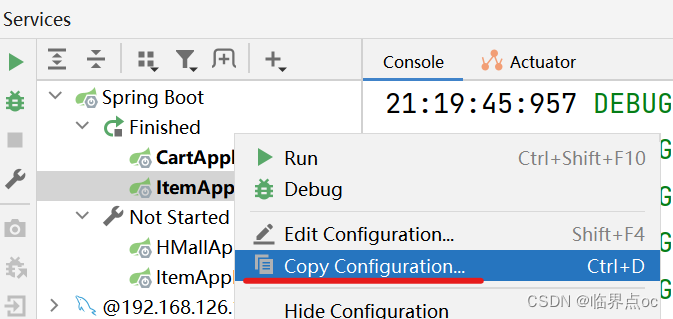
在弹框中点击“Modify options”,选择“Add VM options”

填写如下:

④启动ItemApplication以及ItemApplication2,查看nacos信息


5. 服务发现
消费者需要连接nacos以拉取和订阅服务,因此服务发现的前两步与服务注册是一样的,后面再加上服务调用即可:
①引入nacos discovery依赖
<dependency>
    <groupId>com.alibaba.cloud</groupId>
    <artifactId>spring-cloud-starter-alibaba-nacos-discovery</artifactId>
</dependency>
②配置nacos地址
spring:
  application:
    name: item-service  # 微服务名称
  cloud:
    nacos:
      server-addr: 192.168.126.151:8848
③服务发现
private final DiscoveryClient discoveryClient;

private void handleCartItems(List<CartVO> vos) {
    // 1. 根据服务名称,拉取服务的实例列表
    List<ServiceInstance> instances = discoveryClient.getInstances("item-service");
    // 2. 负载均衡,挑选一个实例
    ServiceInstance instance = instances.get(RandomUtil.randomInt(instances.size()));
    // 3. 获取实例的IP和窗口
    URI uri = instance.getUri();
    // ... ... 略
}
步骤:cart-service模块
①引入nacos discovery依赖 pom.xml(cart-service)
<!--nacos 服务注册发现-->
<dependency>
    <groupId>com.alibaba.cloud</groupId>
    <artifactId>spring-cloud-starter-alibaba-nacos-discovery</artifactId>
</dependency>
②application.yaml
spring:
  application:
    name: cart-service  # 微服务名称
  cloud:
    nacos:
      server-addr: 192.168.126.151:8848
③CartServiceImpl
package com.hmall.cart.service.impl;

import cn.hutool.core.collection.CollUtil;
import cn.hutool.core.util.RandomUtil;
import cn.hutool.core.util.StrUtil;
// ... ...
import com.hmall.common.utils.CollUtils;
import com.hmall.common.utils.UserContext;
import lombok.RequiredArgsConstructor;
import org.springframework.cloud.client.ServiceInstance;
import org.springframework.cloud.client.discovery.DiscoveryClient;
import org.springframework.core.ParameterizedTypeReference;
import org.springframework.http.HttpMethod;
import org.springframework.http.ResponseEntity;
import org.springframework.stereotype.Service;
import org.springframework.web.client.RestTemplate;

/**
 * <p>
 * 订单详情表 服务实现类
 * </p>
 *
 * @author 虎哥
 * @since 2023-05-05
 */
@Service
@RequiredArgsConstructor // 必备参数的构造函数
public class CartServiceImpl extends ServiceImpl<CartMapper, Cart> implements ICartService {

    private final RestTemplate restTemplate;

    private final DiscoveryClient discoveryClient;

    // ... ...

    private void handleCartItems(List<CartVO> vos) {
        // TODO 1.获取商品id
        Set<Long> itemIds = vos.stream().map(CartVO::getItemId).collect(Collectors.toSet());
        // 2.查询商品
        // List<ItemDTO> items = itemService.queryItemByIds(itemIds);
        // 2.1 根据服务名称获取服务的实例列表
        List<ServiceInstance> instances = discoveryClient.getInstances("item-service");
        if(CollUtil.isEmpty(instances)) {
            return;
        }
        // 2.2 手写负载均衡,从实例列表中挑选一个实例
        ServiceInstance instance = instances.get(RandomUtil.randomInt(instances.size()));
        // 2.3 利用RestTemplate发起http请求,得到http响应
        ResponseEntity<List<ItemDTO>> response = restTemplate.exchange(
                instance.getUri() + "/items?ids={ids}",
                HttpMethod.GET,
                null,
                new ParameterizedTypeReference<List<ItemDTO>>() {},
                Map.of("ids", CollUtil.join(itemIds, ","))
        );
        // 2.4 解析响应
        if (!response.getStatusCode().is2xxSuccessful()) {
            // 查询失败,直接结束
            return;
        }
        List<ItemDTO> items = response.getBody();
        if (CollUtils.isEmpty(items)) {
            return;
        }
        // 3.转为 id 到 item的map
        Map<Long, ItemDTO> itemMap = items.stream().collect(Collectors.toMap(ItemDTO::getId, Function.identity()));
        // 4.写入vo
        for (CartVO v : vos) {
            ItemDTO item = itemMap.get(v.getItemId());
            if (item == null) {
                continue;
            }
            v.setNewPrice(item.getPrice());
            v.setStatus(item.getStatus());
            v.setStock(item.getStock());
        }
    }

    // ... ...
}
④同时启动CartApplication、ItemApplication以及ItemApplication2在接口文档(查询购物车)以及nacos中进行测试
http://localhost:8082/doc.html#/home
五、OpenFeign
1. 快速入门
OpenFeign是一个声明式的http客户端,是SpringCloud在Eureka公司开源的Feign基础上改造而来。
官方地址:GitHub - OpenFeign/feign: Feign makes writing java http clients easier
其作用就是基于SpringMVC的常见注解,帮我们优雅的实现http请求的发送。

复杂:

OpenFeign已经被SpringCloud自动装配,实现起来非常简单:
①引入依赖,包括OpenFeign和负载均衡组件SpringCloudLoadBalancer
<!--OpenFeign-->
<dependency>
    <groupId>org.springframework.cloud</groupId>
    <artifactId>spring-cloud-starter-openfeign</artifactId>
</dependency>
<!--负载均衡-->
<dependency>
    <groupId>org.springframework.cloud</groupId>
    <artifactId>spring-cloud-starter-loadbalancer</artifactId>
</dependency>
②通过@EnableFeignClients注解,开启OpenFeign功能
@EnableFeignClients
@SpringBootApplication
public class CartApplication { // ... ... }
③编写FeignClient
@FeignClient(value="item-service")
public interface ItemClient {
    @GetMapping("/items")
    List<ItemDTO> queryItemByIds(@RequestParam("ids") Collection<Long> ids);
}
④使用FeignClient,实现远程调用
List<ItemDTO> items = itemClient.queryItemByIds(List.of(1,2,3));步骤:cart-service模块
①pom.xml(cart-service)
  <!--openFeign-->
  <dependency>
      <groupId>org.springframework.cloud</groupId>
      <artifactId>spring-cloud-starter-openfeign</artifactId>
  </dependency>
  <!--负载均衡器-->
  <dependency>
      <groupId>org.springframework.cloud</groupId>
      <artifactId>spring-cloud-starter-loadbalancer</artifactId>
  </dependency>
②CartApplication
package com.hmall.cart;

import org.mybatis.spring.annotation.MapperScan;
import org.springframework.boot.SpringApplication;
import org.springframework.boot.autoconfigure.SpringBootApplication;
import org.springframework.cloud.openfeign.EnableFeignClients;
import org.springframework.context.annotation.Bean;
import org.springframework.web.client.RestTemplate;

@EnableFeignClients
@MapperScan("com.hmall.cart.mapper")
@SpringBootApplication
public class CartApplication {
    public static void main(String[] args) {
        SpringApplication.run(CartApplication.class, args);
    }

    @Bean
    public RestTemplate restTemplate() {
        return new RestTemplate();
    }
}
③ItemClient
package com.hmall.cart.client;

import com.hmall.cart.domain.dto.ItemDTO;
import org.springframework.cloud.openfeign.FeignClient;
import org.springframework.web.bind.annotation.GetMapping;
import org.springframework.web.bind.annotation.RequestParam;

import java.util.Collection;
import java.util.List;

@FeignClient("item-service")
public interface ItemClient {
    @GetMapping("/items")
    List<ItemDTO> queryItemByIds(@RequestParam("ids") Collection<Long> ids);
}
④CartServiceImpl
package com.hmall.cart.service.impl;

import cn.hutool.core.util.StrUtil;
import com.baomidou.mybatisplus.core.conditions.query.QueryWrapper;
import com.baomidou.mybatisplus.extension.service.impl.ServiceImpl;
import com.hmall.cart.client.ItemClient;
import com.hmall.cart.domain.dto.CartFormDTO;
import com.hmall.cart.domain.dto.ItemDTO;
import com.hmall.cart.domain.po.Cart;
import com.hmall.cart.domain.vo.CartVO;
import com.hmall.cart.mapper.CartMapper;
import com.hmall.cart.service.ICartService;
import com.hmall.common.exception.BizIllegalException;
import com.hmall.common.utils.BeanUtils;
import com.hmall.common.utils.CollUtils;
import com.hmall.common.utils.UserContext;
import lombok.RequiredArgsConstructor;
import org.springframework.stereotype.Service;


import java.util.Collection;
import java.util.List;
import java.util.Map;
import java.util.Set;
import java.util.function.Function;
import java.util.stream.Collectors;

/**
 * <p>
 * 订单详情表 服务实现类
 * </p>
 *
 * @author 虎哥
 * @since 2023-05-05
 */
@Service
@RequiredArgsConstructor // 必备参数的构造函数
public class CartServiceImpl extends ServiceImpl<CartMapper, Cart> implements ICartService {
    private final ItemClient itemClient;

    // ... ...
    private void handleCartItems(List<CartVO> vos) {
        // TODO 1.获取商品id
        Set<Long> itemIds = vos.stream().map(CartVO::getItemId).collect(Collectors.toSet());
        // 2.查询商品
        List<ItemDTO> items = itemClient.queryItemByIds(itemIds);
        if (CollUtils.isEmpty(items)) {
            return;
        }
        // 3.转为 id 到 item的map
        Map<Long, ItemDTO> itemMap = items.stream().collect(Collectors.toMap(ItemDTO::getId, Function.identity()));
        // 4.写入vo
        for (CartVO v : vos) {
            ItemDTO item = itemMap.get(v.getItemId());
            if (item == null) {
                continue;
            }
            v.setNewPrice(item.getPrice());
            v.setStatus(item.getStatus());
            v.setStock(item.getStock());
        }
    }

   // ... ...
}
2. 连接池
OpenFeign对Http请求做了优雅的伪装,不过其底层发起http请求,依赖于其他的框架。这些框架可以自己选择,包括以下三种:
- HttpURLConnection:默认实现,不支持连接池
- Apache HttpClient:支持连接池
- OKHttp:支持连接池
具体源码可以参考FeighBlockingLoadBalancerClient类中的delegate成员变量。
OpenFeign整合OKHttp的步骤如下:cart-service模块
①引入依赖pom.xml
<!--OK http 的依赖 -->
<dependency>
  <groupId>io.github.openfeign</groupId>
  <artifactId>feign-okhttp</artifactId>
</dependency>
②开启连接池功能application.yaml
feign:
  okhttp:
    enabled: true # 开启OKHttp功能
3. 最佳实践

- 方案1抽取更加简单,工程结构也比较清晰,但缺点是整个项目耦合度偏高。
- 方案2抽取相对麻烦,工程结构相对更复杂,但服务之间耦合度降低。
由于item-service已经创建好,无法继续拆分,因此这里我们采用方案1.
步骤:hm-api模块
①新建hm-api模块

②把pom.xml(cart-service)里有关OpenFeign的依赖剪切到pom.xml(hm-api)
<!--openFeign-->
<dependency>
  <groupId>org.springframework.cloud</groupId>
  <artifactId>spring-cloud-starter-openfeign</artifactId>
</dependency>
<!--负载均衡器-->
<dependency>
  <groupId>org.springframework.cloud</groupId>
  <artifactId>spring-cloud-starter-loadbalancer</artifactId>
</dependency>
引入swagger的依赖
<dependency>
  <groupId>io.swagger</groupId>
  <artifactId>swagger-annotations</artifactId>
  <version>1.5.22</version>
  <scope>compile</scope>
</dependency>
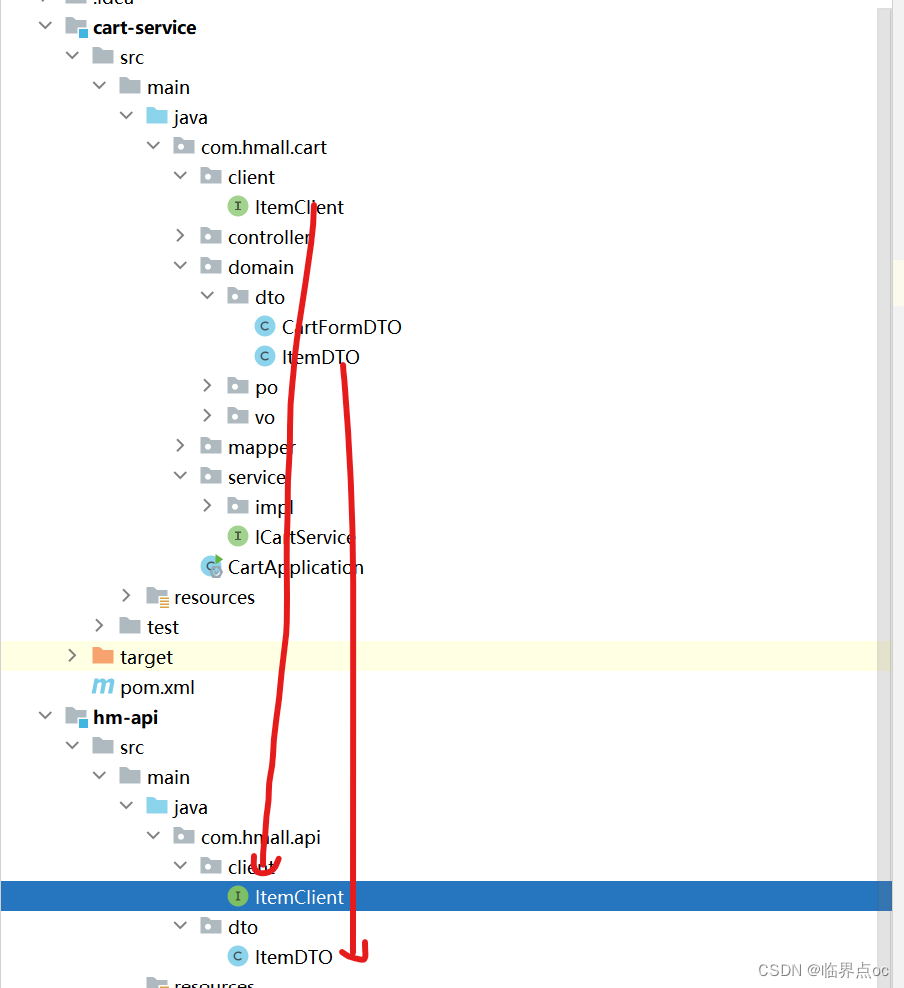
③拷贝cart-service下 domain里的ItemDTO 以及 client下的ItemClient 到hm-api模块下
④修改pom.xml(cart-service),导入hm-api依赖
<!--hm-api-->
<dependency>
  <groupId>com.heima</groupId>
  <artifactId>hm-api</artifactId>
  <version>1.0.0</version>
</dependency>
⑤修改CartServiceImpl,注意别导错包(可以把cart-service下的ItemDTO和ItemClient删除)
import com.hmall.api.client.ItemClient;
import com.hmall.api.dto.ItemDTO;
⑥在cart-service的启动类上添加声明即可(两种方式),否则会报错。

方式一:声明扫描包
package com.hmall.cart;

import org.mybatis.spring.annotation.MapperScan;
import org.springframework.boot.SpringApplication;
import org.springframework.boot.autoconfigure.SpringBootApplication;
import org.springframework.cloud.openfeign.EnableFeignClients;
import org.springframework.context.annotation.Bean;
import org.springframework.web.client.RestTemplate;

@EnableFeignClients(basePackages = "com.hmall.api.client")
@MapperScan("com.hmall.cart.mapper")
@SpringBootApplication
public class CartApplication {
    public static void main(String[] args) {
        SpringApplication.run(CartApplication.class, args);
    }

    @Bean
    public RestTemplate restTemplate() {
        return new RestTemplate();
    }
}
方式二:声明要用的FeignClient
package com.hmall.cart;

import com.hmall.api.client.ItemClient;
import org.mybatis.spring.annotation.MapperScan;
import org.springframework.boot.SpringApplication;
import org.springframework.boot.autoconfigure.SpringBootApplication;
import org.springframework.cloud.openfeign.EnableFeignClients;
import org.springframework.context.annotation.Bean;
import org.springframework.web.client.RestTemplate;

//@EnableFeignClients(basePackages = "com.hmall.api.client")
@EnableFeignClients(clients = {ItemClient.class})
@MapperScan("com.hmall.cart.mapper")
@SpringBootApplication
public class CartApplication {
    public static void main(String[] args) {
        SpringApplication.run(CartApplication.class, args);
    }

    @Bean
    public RestTemplate restTemplate() {
        return new RestTemplate();
    }
}
4. 日志
OpenFeign只会在FeignClient所在包的日志级别为DEBUG时,才会输出日志。而且其日志级别有4级:
- NONE:不记录任何日志信息,这是默认值。
- BASIC:仅记录请求的方法,URL以及响应状态码和执行时间
- HEADERS:在BASIC的基础上,额外记录了请求和响应的头信息
- FULL:记录所有请求和响应的明细,包括头信息、请求体、元数据。
由于Feign默认的日志级别就是NONE,所以,我们默认看不到请求日志。
步骤:
①要自定义日志级别需要声明一个类型为Logger.Level的Bean,在其中定义日志级别:
public class DefaultFeignConfig {
    @Bean
    public Logger.level feignLogLevel() {
        return Logger.Level.FULL;
    }
}
②此时这个Bean并未生效,要想配置某个FeignClient的日志,可以在@FeignClient注解中声明
@FeignClient(value = "item-service", configuration = DefaultFeignConfig.class)如果想要全局配置,让所有FeignClient都按照这个日志配置,则需要在@EnableFeignClients注解中声明
@EnableFeignClients(defaultConfiguration = DefaultFeignConfig.class)步骤:
①DefaultFeignConfig
package com.hmall.api.config;

import feign.Logger;
import org.springframework.context.annotation.Bean;

public class DefaultFeignConfig {
    @Bean
    public Logger.Level feignLoggerLevel() {
        return Logger.Level.FULL;
    }
}
②CartApplication
package com.hmall.cart;

import com.hmall.api.client.ItemClient;
import com.hmall.api.config.DefaultFeignConfig;
import org.mybatis.spring.annotation.MapperScan;
import org.springframework.boot.SpringApplication;
import org.springframework.boot.autoconfigure.SpringBootApplication;
import org.springframework.cloud.openfeign.EnableFeignClients;
import org.springframework.context.annotation.Bean;
import org.springframework.web.client.RestTemplate;

//@EnableFeignClients(basePackages = "com.hmall.api.client")
@EnableFeignClients(clients = {ItemClient.class}, defaultConfiguration = DefaultFeignConfig.class)
@MapperScan("com.hmall.cart.mapper")
@SpringBootApplication
public class CartApplication {
    public static void main(String[] args) {
        SpringApplication.run(CartApplication.class, args);
    }

    @Bean
    public RestTemplate restTemplate() {
        return new RestTemplate();
    }
}
③重启CartApplication进行测试

5. 总结
1. 如何利用OpenFeign实现远程调用?
- 引入OpenFeign和SpringCloudLoadBalancer依赖
- 利用@EnableFeignClients注解开启OpenFeign功能
- 编写FeignClient
2. 如何配置OpenFeign的连接池?
- 引入http客户端依赖,例如OKHttp、HttpClient
- 配置yaml文件,打开OpenFeign连接池开关
3. OpenFeign使用的最佳实践方式是什么?
- 由服务提供者编写独立module,将FeignClient及DTO抽取
4. 如何配置OpenFeign输出日志的级别?
- 声明类型为Logger.Level的Bean
- 在@FeignClient或@EnableFeignClients注解上使用
六、微服务拆分
1. 用户服务
①执行SQL脚本


②新建模块user-service

③pom.xml(user-service)
<?xml version="1.0" encoding="UTF-8"?>
<project xmlns="http://maven.apache.org/POM/4.0.0"
         xmlns:xsi="http://www.w3.org/2001/XMLSchema-instance"
         xsi:schemaLocation="http://maven.apache.org/POM/4.0.0 http://maven.apache.org/xsd/maven-4.0.0.xsd">
    <parent>
        <artifactId>hmall</artifactId>
        <groupId>com.heima</groupId>
        <version>1.0.0</version>
    </parent>
    <modelVersion>4.0.0</modelVersion>

    <artifactId>user-service</artifactId>

    <properties>
        <maven.compiler.source>11</maven.compiler.source>
        <maven.compiler.target>11</maven.compiler.target>
        <project.build.sourceEncoding>UTF-8</project.build.sourceEncoding>
    </properties>

    <dependencies>
        <!--common-->
        <dependency>
            <groupId>com.heima</groupId>
            <artifactId>hm-common</artifactId>
            <version>1.0.0</version>
        </dependency>
        <!--hm-api-->
        <dependency>
            <groupId>com.heima</groupId>
            <artifactId>hm-api</artifactId>
            <version>1.0.0</version>
        </dependency>
        <!--web-->
        <dependency>
            <groupId>org.springframework.boot</groupId>
            <artifactId>spring-boot-starter-web</artifactId>
        </dependency>
        <!--数据库-->
        <dependency>
            <groupId>mysql</groupId>
            <artifactId>mysql-connector-java</artifactId>
        </dependency>
        <!--mybatis-->
        <dependency>
            <groupId>com.baomidou</groupId>
            <artifactId>mybatis-plus-boot-starter</artifactId>
        </dependency>
        <!--nacos 服务注册发现-->
        <dependency>
            <groupId>com.alibaba.cloud</groupId>
            <artifactId>spring-cloud-starter-alibaba-nacos-discovery</artifactId>
        </dependency>
    </dependencies>
    <build>
        <finalName>${project.artifactId}</finalName>
        <plugins>
            <plugin>
                <groupId>org.springframework.boot</groupId>
                <artifactId>spring-boot-maven-plugin</artifactId>
            </plugin>
        </plugins>
    </build>

</project>
④从cart-service模块中拷贝三个配置文件到user-service模块
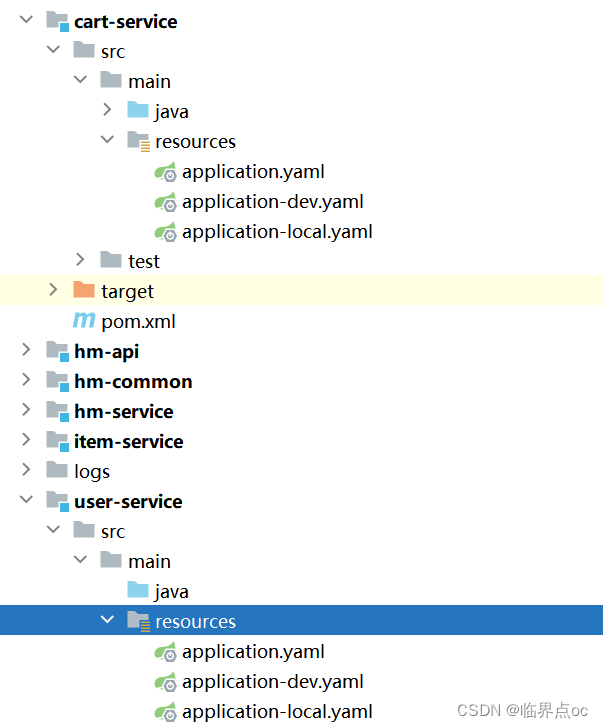
修改application.yaml
server:
  port: 8084
spring:
  application:
    name: user-service  # 微服务名称
  profiles:
    active: dev
  datasource:
    url: jdbc:mysql://${hm.db.host}:3306/hm-user?useUnicode=true&characterEncoding=UTF-8&autoReconnect=true&serverTimezone=Asia/Shanghai
    driver-class-name: com.mysql.cj.jdbc.Driver
    username: root
    password: ${hm.db.pw}
  cloud:
    nacos:
      server-addr: 192.168.126.151:8848
mybatis-plus:
  configuration:
    default-enum-type-handler: com.baomidou.mybatisplus.core.handlers.MybatisEnumTypeHandler
  global-config:
    db-config:
      update-strategy: not_null
      id-type: auto
logging:
  level:
    com.hmall: debug
  pattern:
    dateformat: HH:mm:ss:SSS
  file:
    path: "logs/${spring.application.name}"
knife4j:
  enable: true
  openapi:
    title: 黑马商城用户服务接口文档
    description: "黑马商城用户服务接口文档"
    email: zhanghuyi@itcast.cn
    concat: 虎哥
    url: https://www.itcast.cn
    version: v1.0.0
    group:
      default:
        group-name: default
        api-rule: package
        api-rule-resources:
          - com.hmall.user.controller
hm:
  jwt:
    location: classpath:hmall.jks
    alias: hmall
    password: hmall123
    tokenTTL: 30m
⑤添加启动类UserApplication
package com.hmall.user;

import com.hmall.api.client.ItemClient;
import com.hmall.api.config.DefaultFeignConfig;
import org.mybatis.spring.annotation.MapperScan;
import org.springframework.boot.SpringApplication;
import org.springframework.boot.autoconfigure.SpringBootApplication;
import org.springframework.cloud.openfeign.EnableFeignClients;

@EnableFeignClients(clients = {ItemClient.class}, defaultConfiguration = DefaultFeignConfig.class)
@MapperScan("com.hmall.user.mapper")
@SpringBootApplication
public class UserApplication {
    public static void main(String[] args) {
        SpringApplication.run(UserApplication.class, args);
    }
}
⑥conhm-service中拷贝以下文件(导包错误的重新导一下)
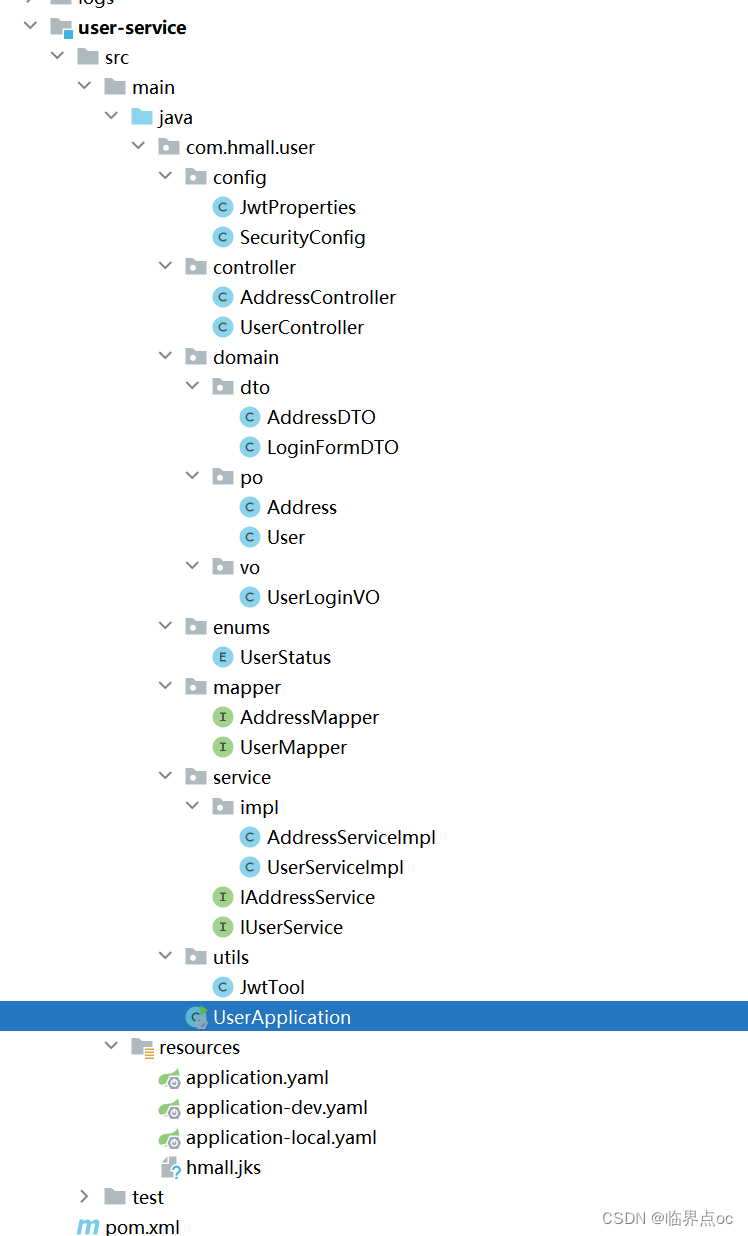
⑦配置启动项

⑧启动UserApplication进行测试
http://localhost:8084/doc.html#/home
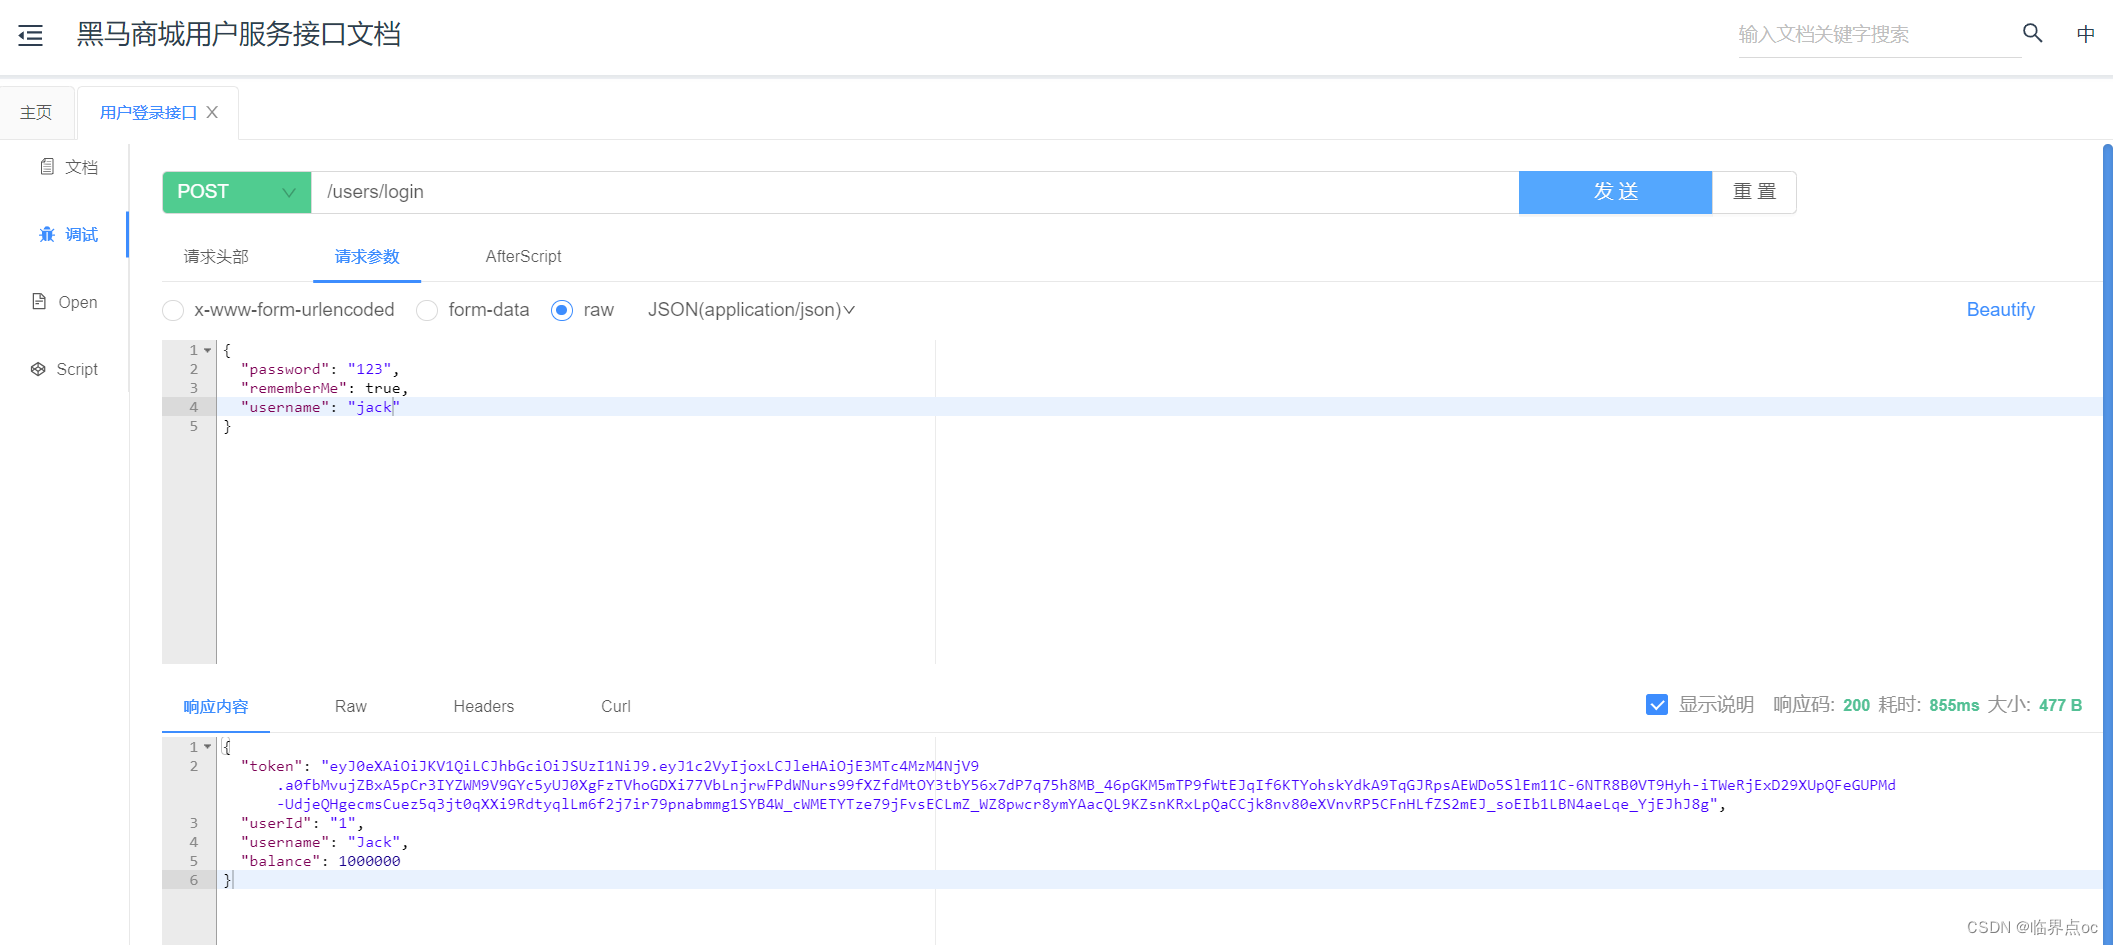
2. 交易服务
①创建一个新的模块trade-service
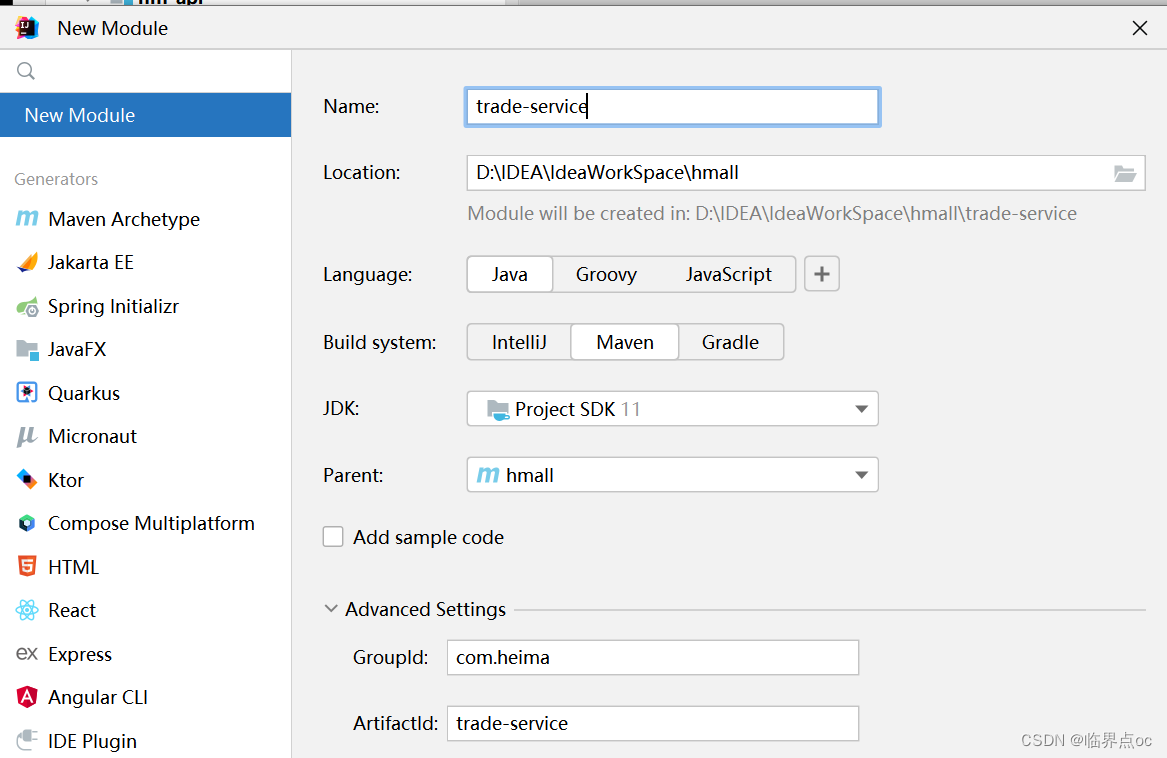
②pom.xml引入依赖
<?xml version="1.0" encoding="UTF-8"?>
<project xmlns="http://maven.apache.org/POM/4.0.0"
         xmlns:xsi="http://www.w3.org/2001/XMLSchema-instance"
         xsi:schemaLocation="http://maven.apache.org/POM/4.0.0 http://maven.apache.org/xsd/maven-4.0.0.xsd">
    <parent>
        <artifactId>hmall</artifactId>
        <groupId>com.heima</groupId>
        <version>1.0.0</version>
    </parent>
    <modelVersion>4.0.0</modelVersion>

    <artifactId>trade-service</artifactId>

    <properties>
        <maven.compiler.source>11</maven.compiler.source>
        <maven.compiler.target>11</maven.compiler.target>
        <project.build.sourceEncoding>UTF-8</project.build.sourceEncoding>
    </properties>

    <dependencies>
        <!--common-->
        <dependency>
            <groupId>com.heima</groupId>
            <artifactId>hm-common</artifactId>
            <version>1.0.0</version>
        </dependency>

        <!--hm-api-->
        <dependency>
            <groupId>com.heima</groupId>
            <artifactId>hm-api</artifactId>
            <version>1.0.0</version>
        </dependency>
        <!--web-->
        <dependency>
            <groupId>org.springframework.boot</groupId>
            <artifactId>spring-boot-starter-web</artifactId>
        </dependency>
        <!--数据库-->
        <dependency>
            <groupId>mysql</groupId>
            <artifactId>mysql-connector-java</artifactId>
        </dependency>
        <!--mybatis-->
        <dependency>
            <groupId>com.baomidou</groupId>
            <artifactId>mybatis-plus-boot-starter</artifactId>
        </dependency>
        <!--nacos 服务注册发现-->
        <dependency>
            <groupId>com.alibaba.cloud</groupId>
            <artifactId>spring-cloud-starter-alibaba-nacos-discovery</artifactId>
        </dependency>
    </dependencies>
    <build>
        <finalName>${project.artifactId}</finalName>
        <plugins>
            <plugin>
                <groupId>org.springframework.boot</groupId>
                <artifactId>spring-boot-maven-plugin</artifactId>
            </plugin>
        </plugins>
    </build>
</project>
③从user-service拷贝三个配置文件,并修改application.yaml
server:
  port: 8085
spring:
  application:
    name: trade-service  # 微服务名称
  profiles:
    active: dev
  datasource:
    url: jdbc:mysql://${hm.db.host}:3306/hm-trade?useUnicode=true&characterEncoding=UTF-8&autoReconnect=true&serverTimezone=Asia/Shanghai
    driver-class-name: com.mysql.cj.jdbc.Driver
    username: root
    password: ${hm.db.pw}
  cloud:
    nacos:
      server-addr: 192.168.126.151:8848
mybatis-plus:
  configuration:
    default-enum-type-handler: com.baomidou.mybatisplus.core.handlers.MybatisEnumTypeHandler
  global-config:
    db-config:
      update-strategy: not_null
      id-type: auto
logging:
  level:
    com.hmall: debug
  pattern:
    dateformat: HH:mm:ss:SSS
  file:
    path: "logs/${spring.application.name}"
knife4j:
  enable: true
  openapi:
    title: 黑马商城交易服务接口文档
    description: "黑马商城交易服务接口文档"
    email: zhanghuyi@itcast.cn
    concat: 虎哥
    url: https://www.itcast.cn
    version: v1.0.0
    group:
      default:
        group-name: default
        api-rule: package
        api-rule-resources:
          - com.hmall.trade.controller
④添加启动类TradeApplication
package com.hmall.trade;

import com.hmall.api.client.ItemClient;
import com.hmall.api.config.DefaultFeignConfig;
import org.mybatis.spring.annotation.MapperScan;
import org.springframework.boot.SpringApplication;
import org.springframework.boot.autoconfigure.SpringBootApplication;
import org.springframework.cloud.openfeign.EnableFeignClients;

@EnableFeignClients(basePackages = "com.hmall.api.client", defaultConfiguration = DefaultFeignConfig.class)
@MapperScan("com.hmall.trade.mapper")
@SpringBootApplication
public class TradeApplication {
    public static void main(String[] args) {
        SpringApplication.run(TradeApplication.class, args);
    }
}
⑤从hm-service拷贝相关文件到trader-service

⑥从hm-service模块拷贝OrderDetailDTO到hm-api模块
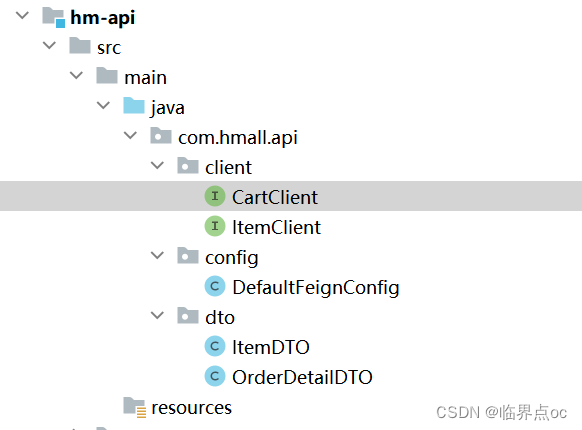
修改ItemClient
package com.hmall.api.client;

import com.hmall.api.dto.ItemDTO;
import com.hmall.api.dto.OrderDetailDTO;
import org.springframework.cloud.openfeign.FeignClient;
import org.springframework.web.bind.annotation.GetMapping;
import org.springframework.web.bind.annotation.PutMapping;
import org.springframework.web.bind.annotation.RequestBody;
import org.springframework.web.bind.annotation.RequestParam;

import java.util.Collection;
import java.util.List;

@FeignClient("item-service")
public interface ItemClient {
    @GetMapping("/items")
    List<ItemDTO> queryItemByIds(@RequestParam("ids") Collection<Long> ids);

    @PutMapping("/items/stock/deduct")
    public void deductStock(@RequestBody List<OrderDetailDTO> items);
}
添加一个CartClient
package com.hmall.api.client;

import org.springframework.cloud.openfeign.FeignClient;
import org.springframework.web.bind.annotation.DeleteMapping;
import org.springframework.web.bind.annotation.RequestParam;

import java.util.Collection;

@FeignClient("cart-service")
public interface CartClient {
    @DeleteMapping("/carts")
    void deleteCartItemByIds(@RequestParam("ids") Collection<Long> ids);
}
⑦修改OrderServiceImpl
package com.hmall.trade.service.impl;

import com.baomidou.mybatisplus.extension.service.impl.ServiceImpl;
import com.hmall.api.client.CartClient;
import com.hmall.api.client.ItemClient;
import com.hmall.api.dto.ItemDTO;
import com.hmall.api.dto.OrderDetailDTO;
import com.hmall.common.exception.BadRequestException;
import com.hmall.common.utils.UserContext;
import com.hmall.trade.domain.dto.OrderFormDTO;
import com.hmall.trade.domain.po.Order;
import com.hmall.trade.domain.po.OrderDetail;
import com.hmall.trade.mapper.OrderMapper;
import com.hmall.trade.service.IOrderDetailService;
import com.hmall.trade.service.IOrderService;
import lombok.RequiredArgsConstructor;
import org.springframework.stereotype.Service;
import org.springframework.transaction.annotation.Transactional;

import java.time.LocalDateTime;
import java.util.ArrayList;
import java.util.List;
import java.util.Map;
import java.util.Set;
import java.util.stream.Collectors;

/**
 * <p>
 * 服务实现类
 * </p>
 *
 * @author 虎哥
 * @since 2023-05-05
 */
@Service
@RequiredArgsConstructor
public class OrderServiceImpl extends ServiceImpl<OrderMapper, Order> implements IOrderService {

    private final ItemClient itemClient;
    private final IOrderDetailService detailService;
    private final CartClient cartClient;

    @Override
    @Transactional
    public Long createOrder(OrderFormDTO orderFormDTO) {
        // 1.订单数据
        Order order = new Order();
        // 1.1.查询商品
        List<OrderDetailDTO> detailDTOS = orderFormDTO.getDetails();
        // 1.2.获取商品id和数量的Map
        Map<Long, Integer> itemNumMap = detailDTOS.stream()
                .collect(Collectors.toMap(OrderDetailDTO::getItemId, OrderDetailDTO::getNum));
        Set<Long> itemIds = itemNumMap.keySet();
        // 1.3.查询商品
        List<ItemDTO> items = itemClient.queryItemByIds(itemIds);
        if (items == null || items.size() < itemIds.size()) {
            throw new BadRequestException("商品不存在");
        }
        // 1.4.基于商品价格、购买数量计算商品总价:totalFee
        int total = 0;
        for (ItemDTO item : items) {
            total += item.getPrice() * itemNumMap.get(item.getId());
        }
        order.setTotalFee(total);
        // 1.5.其它属性
        order.setPaymentType(orderFormDTO.getPaymentType());
        order.setUserId(UserContext.getUser());
        order.setStatus(1);
        // 1.6.将Order写入数据库order表中
        save(order);

        // 2.保存订单详情
        List<OrderDetail> details = buildDetails(order.getId(), items, itemNumMap);
        detailService.saveBatch(details);

        // 3.清理购物车商品
        cartClient.deleteCartItemByIds(itemIds);

        // 4.扣减库存
        try {
            itemClient.deductStock(detailDTOS);
        } catch (Exception e) {
            throw new RuntimeException("库存不足!");
        }
        return order.getId();
    }

    @Override
    public void markOrderPaySuccess(Long orderId) {
        Order order = new Order();
        order.setId(orderId);
        order.setStatus(2);
        order.setPayTime(LocalDateTime.now());
        updateById(order);
    }

    private List<OrderDetail> buildDetails(Long orderId, List<ItemDTO> items, Map<Long, Integer> numMap) {
        List<OrderDetail> details = new ArrayList<>(items.size());
        for (ItemDTO item : items) {
            OrderDetail detail = new OrderDetail();
            detail.setName(item.getName());
            detail.setSpec(item.getSpec());
            detail.setPrice(item.getPrice());
            detail.setNum(numMap.get(item.getId()));
            detail.setItemId(item.getId());
            detail.setImage(item.getImage());
            detail.setOrderId(orderId);
            details.add(detail);
        }
        return details;
    }
}
⑧OrderFormDTO重新导包
package com.hmall.trade.domain.dto;

import com.hmall.api.dto.OrderDetailDTO;
import io.swagger.annotations.ApiModel;
import io.swagger.annotations.ApiModelProperty;
import lombok.Data;

import java.util.List;

@Data
@ApiModel(description = "交易下单表单实体")
public class OrderFormDTO {
    @ApiModelProperty("收货地址id")
    private Long addressId;
    @ApiModelProperty("支付类型")
    private Integer paymentType;
    @ApiModelProperty("下单商品列表")
    private List<OrderDetailDTO> details;
}
⑨删除item-service中的两个dto
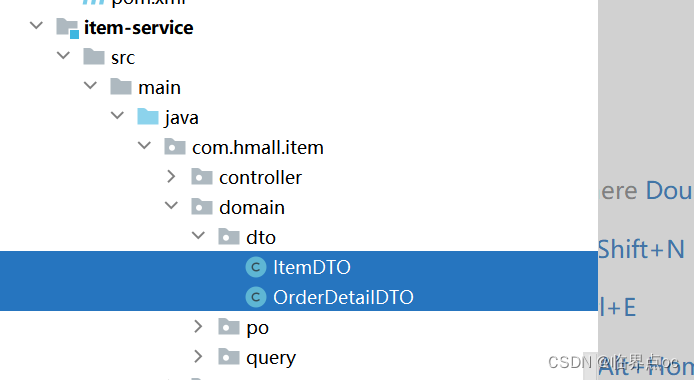
在pom.xml(item-service)中引入hm-api依赖
<!--hm-api-->
<dependency>
  <groupId>com.heima</groupId>
  <artifactId>hm-api</artifactId>
  <version>1.0.0</version>
</dependency>
ItemController、ItemService、ItemServiceImpl、ItemMapper重新导包
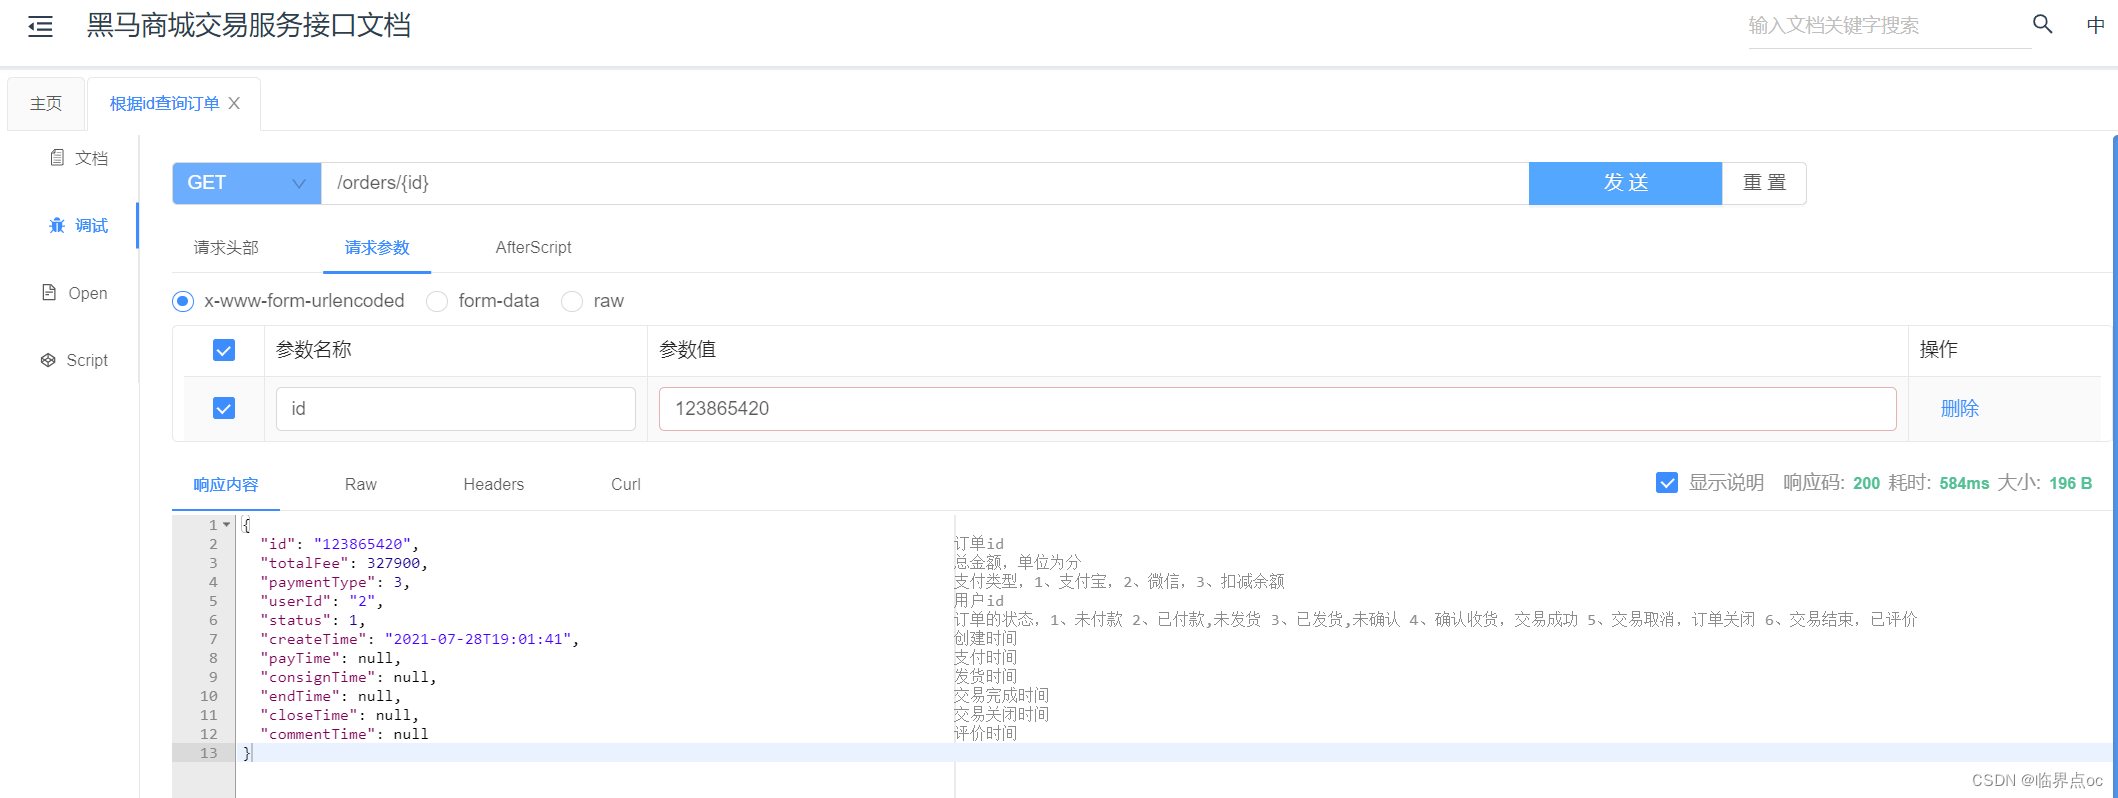
⑩修改运行配置,启动trade-service服务进行测试

http://localhost:8085/doc.html#/home
3. 支付服务
步骤:pay-service
①创建模块pay-service

②pom.xml(pay-service)
<?xml version="1.0" encoding="UTF-8"?>
<project xmlns="http://maven.apache.org/POM/4.0.0"
         xmlns:xsi="http://www.w3.org/2001/XMLSchema-instance"
         xsi:schemaLocation="http://maven.apache.org/POM/4.0.0 http://maven.apache.org/xsd/maven-4.0.0.xsd">
    <parent>
        <artifactId>hmall</artifactId>
        <groupId>com.heima</groupId>
        <version>1.0.0</version>
    </parent>
    <modelVersion>4.0.0</modelVersion>

    <artifactId>pay-service</artifactId>

    <properties>
        <maven.compiler.source>11</maven.compiler.source>
        <maven.compiler.target>11</maven.compiler.target>
        <project.build.sourceEncoding>UTF-8</project.build.sourceEncoding>
    </properties>

    <dependencies>
        <!--common-->
        <dependency>
            <groupId>com.heima</groupId>
            <artifactId>hm-common</artifactId>
            <version>1.0.0</version>
        </dependency>
        <!--api-->
        <dependency>
            <groupId>com.heima</groupId>
            <artifactId>hm-api</artifactId>
            <version>1.0.0</version>
        </dependency>
        <!--web-->
        <dependency>
            <groupId>org.springframework.boot</groupId>
            <artifactId>spring-boot-starter-web</artifactId>
        </dependency>
        <!--数据库-->
        <dependency>
            <groupId>mysql</groupId>
            <artifactId>mysql-connector-java</artifactId>
        </dependency>
        <!--mybatis-->
        <dependency>
            <groupId>com.baomidou</groupId>
            <artifactId>mybatis-plus-boot-starter</artifactId>
        </dependency>
        <!--nacos 服务注册发现-->
        <dependency>
            <groupId>com.alibaba.cloud</groupId>
            <artifactId>spring-cloud-starter-alibaba-nacos-discovery</artifactId>
        </dependency>
    </dependencies>
    <build>
        <finalName>${project.artifactId}</finalName>
        <plugins>
            <plugin>
                <groupId>org.springframework.boot</groupId>
                <artifactId>spring-boot-maven-plugin</artifactId>
            </plugin>
        </plugins>
    </build>

</project>
③添加启动类PayApplication
package com.hmall.pay;

import com.hmall.api.config.DefaultFeignConfig;
import org.mybatis.spring.annotation.MapperScan;
import org.springframework.boot.SpringApplication;
import org.springframework.boot.autoconfigure.SpringBootApplication;
import org.springframework.cloud.openfeign.EnableFeignClients;

@EnableFeignClients(basePackages = "com.hmall.api.client", defaultConfiguration = DefaultFeignConfig.class)
@MapperScan("com.hmall.pay.mapper")
@SpringBootApplication
public class PayApplication {
    public static void main(String[] args) {
        SpringApplication.run(PayApplication.class, args);
    }
}
④从hm-service模块拷贝三个配置文件到pay-service,修改application.yaml
server:
  port: 8086
spring:
  application:
    name: pay-service  # 微服务名称
  profiles:
    active: dev
  datasource:
    url: jdbc:mysql://${hm.db.host}:3306/hm-pay?useUnicode=true&characterEncoding=UTF-8&autoReconnect=true&serverTimezone=Asia/Shanghai
    driver-class-name: com.mysql.cj.jdbc.Driver
    username: root
    password: ${hm.db.pw}
  cloud:
    nacos:
      server-addr: 192.168.126.151:8848
mybatis-plus:
  configuration:
    default-enum-type-handler: com.baomidou.mybatisplus.core.handlers.MybatisEnumTypeHandler
  global-config:
    db-config:
      update-strategy: not_null
      id-type: auto
logging:
  level:
    com.hmall: debug
  pattern:
    dateformat: HH:mm:ss:SSS
  file:
    path: "logs/${spring.application.name}"
knife4j:
  enable: true
  openapi:
    title: 黑马商城支付服务接口文档
    description: "黑马商城支付服务接口文档"
    email: zhanghuyi@itcast.cn
    concat: 虎哥
    url: https://www.itcast.cn
    version: v1.0.0
    group:
      default:
        group-name: default
        api-rule: package
        api-rule-resources:
          - com.hmall.pay.controller
⑤在hm-api模块中新增一个UserClient
package com.hmall.api.client;

import org.springframework.cloud.openfeign.FeignClient;
import org.springframework.web.bind.annotation.PutMapping;
import org.springframework.web.bind.annotation.RequestParam;

@FeignClient("user-service")
public interface UserClient {
    @PutMapping("/users/money/deduct")
    void deductMoney(@RequestParam("pw") String pw, @RequestParam("amount") Integer amount);
}
⑥在hm-api模块中新增一个TradeClient
package com.hmall.api.client;

import org.springframework.cloud.openfeign.FeignClient;
import org.springframework.web.bind.annotation.PathVariable;
import org.springframework.web.bind.annotation.PutMapping;

@FeignClient("trade-service")
public interface TradeClient {
    @PutMapping("/orders/{orderId}")
    public void markOrderPaySuccess(@PathVariable("orderId") Long orderId);
}
⑦从hm-service拷贝以下文件到pay-service
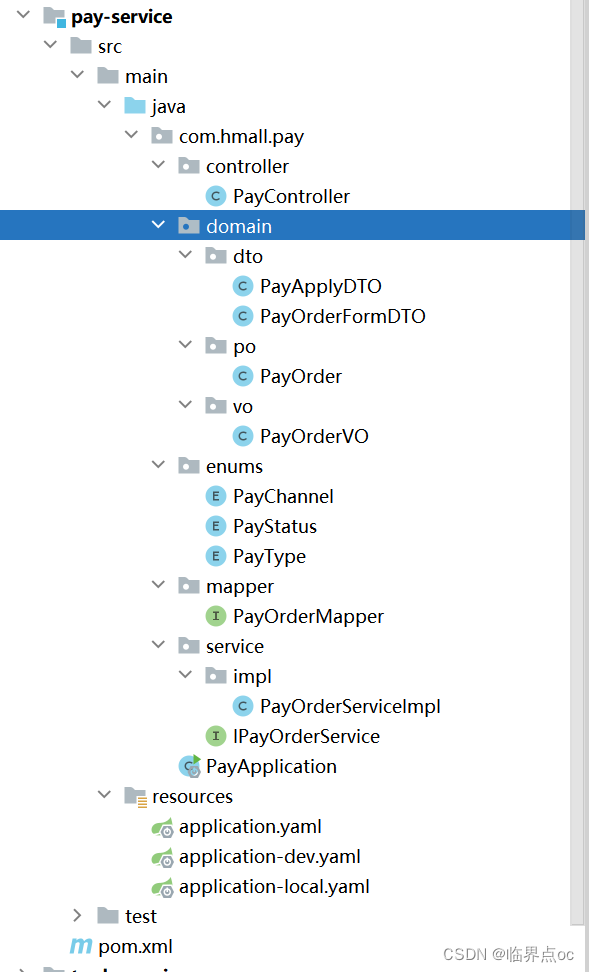
PayOrderServiceImpl
package com.hmall.pay.service.impl;

import com.baomidou.mybatisplus.core.toolkit.IdWorker;
import com.baomidou.mybatisplus.core.toolkit.StringUtils;
import com.baomidou.mybatisplus.extension.service.impl.ServiceImpl;
import com.hmall.api.client.TradeClient;
import com.hmall.api.client.UserClient;
import com.hmall.common.exception.BizIllegalException;
import com.hmall.common.utils.BeanUtils;
import com.hmall.common.utils.UserContext;
import com.hmall.pay.domain.dto.PayApplyDTO;
import com.hmall.pay.domain.dto.PayOrderFormDTO;
import com.hmall.pay.domain.po.PayOrder;
import com.hmall.pay.enums.PayStatus;
import com.hmall.pay.mapper.PayOrderMapper;
import com.hmall.pay.service.IPayOrderService;
import lombok.RequiredArgsConstructor;
import org.springframework.stereotype.Service;
import org.springframework.transaction.annotation.Transactional;

import java.time.LocalDateTime;

/**
 * <p>
 * 支付订单 服务实现类
 * </p>
 *
 * @author 虎哥
 * @since 2023-05-16
 */
@Service
@RequiredArgsConstructor
public class PayOrderServiceImpl extends ServiceImpl<PayOrderMapper, PayOrder> implements IPayOrderService {

    private final UserClient userClient;

    private final TradeClient tradeClient;

    @Override
    public String applyPayOrder(PayApplyDTO applyDTO) {
        // 1.幂等性校验
        PayOrder payOrder = checkIdempotent(applyDTO);
        // 2.返回结果
        return payOrder.getId().toString();
    }

    @Override
    @Transactional
    public void tryPayOrderByBalance(PayOrderFormDTO payOrderFormDTO) {
        // 1.查询支付单
        PayOrder po = getById(payOrderFormDTO.getId());
        // 2.判断状态
        if(!PayStatus.WAIT_BUYER_PAY.equalsValue(po.getStatus())){
            // 订单不是未支付,状态异常
            throw new BizIllegalException("交易已支付或关闭!");
        }
        // 3.尝试扣减余额
        userClient.deductMoney(payOrderFormDTO.getPw(), po.getAmount());
        // 4.修改支付单状态
        boolean success = markPayOrderSuccess(payOrderFormDTO.getId(), LocalDateTime.now());
        if (!success) {
            throw new BizIllegalException("交易已支付或关闭!");
        }
        // 5.修改订单状态
       tradeClient.markOrderPaySuccess(po.getBizOrderNo());
    }

    // ... ... 省略
}
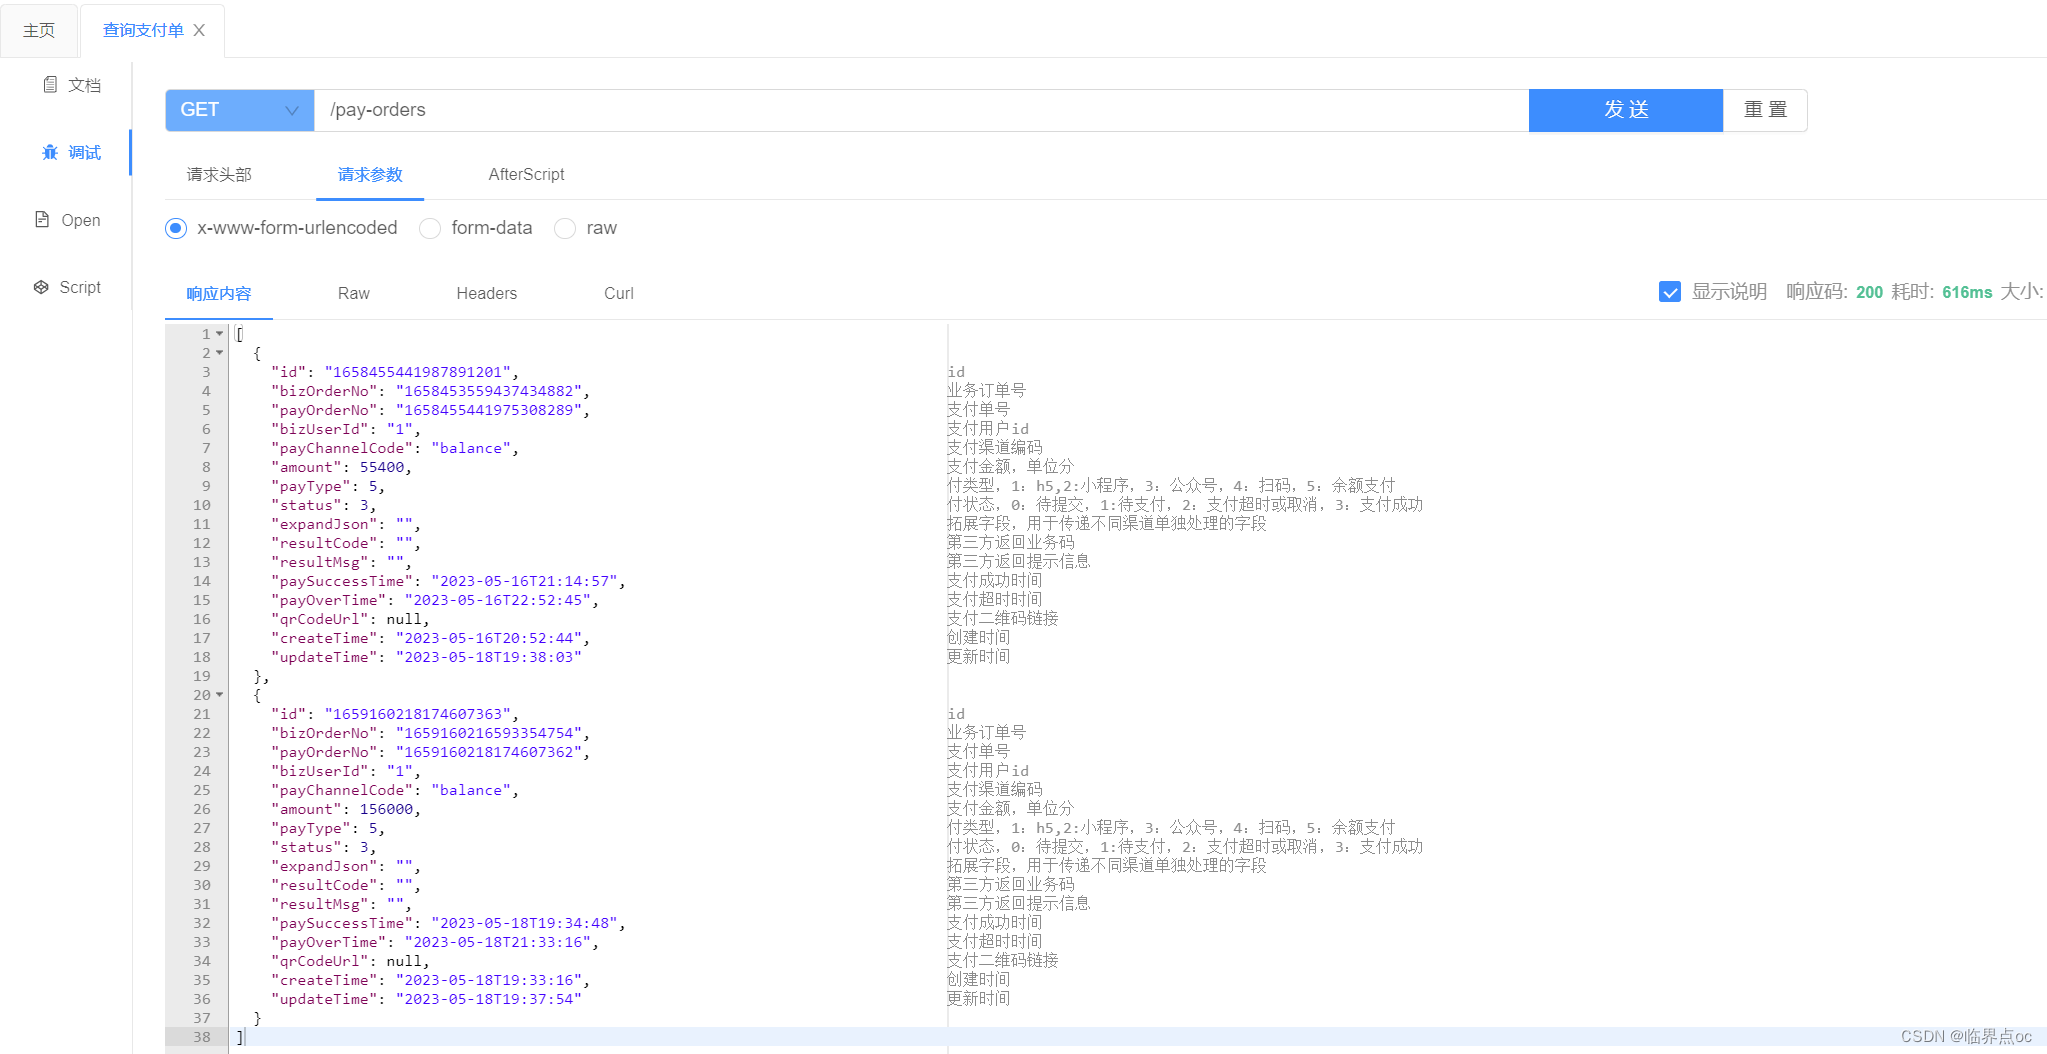
⑧在PayController中添加一个接口方便测试
@ApiOperation("查询支付单")
@GetMapping
public List<PayOrderVO> queryPayOrders(){
    return BeanUtils.copyList(payOrderService.list(), PayOrderVO.class);
}
⑨启动项配置
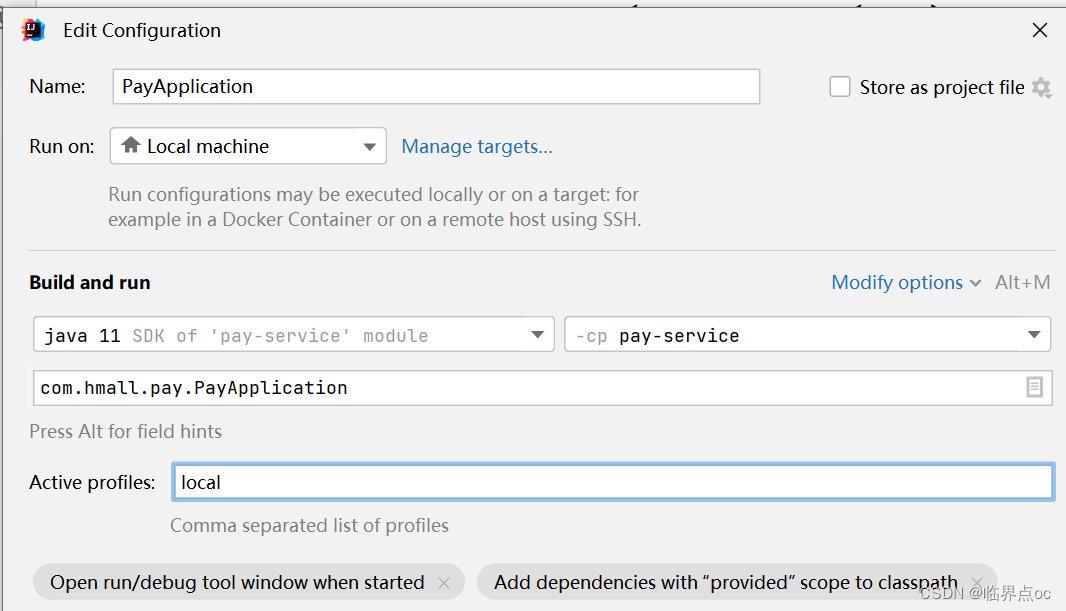
⑩启动测试
http://localhost:8086/doc.html#/home
