文章目录
- 1 内容介绍
- 2 课程分类前端实现
- 3 课程列表功能实现
- 4 课程管理概括
- 5 添加课程信息后端实现
- 6 添加课程信息前端实现
- 7 前端完善
1 内容介绍
- 添加课程分类前端实现
- 课程分类列表显示功能(树形结构)
- 课程管理模块需求
- 添加课程基本信息功能
2 课程分类前端实现
1 添加课程分类的路由
router/index.js
{
  path: '/subject',
  component: Layout,
  redirect: '/subject/list',
  name: '课程分类管理',
  meta: { title: '课程分类管理', icon: 'example' },
  children: [
    {
      path: 'list',
      name: '课程分类列表',
      component: () => import('@/views/edu/subject/list'),
      meta: { title: '课程列表', icon: 'table' }
    },
    {
      path: 'save',
      name: '添加课程分类',
      component: () => import('@/views/edu/subject/save'),
      meta: { title: '添加课程分类', icon: 'tree' }
    },
  ]
},
2 创建课程分类页面,修改路由对应页面路径
views/edu/subject/list.vue save.vue
**3 在添加课程分类页面,实现效果 **
- 添加上传组件实现
<template>
  <div class="app-container">
    <el-form label-width="120px">
      <el-form-item label="信息描述">
        <el-tag type="info">excel模版说明</el-tag>
        <el-tag>
          <i class="el-icon-download"/>
          <a :href="'/static/write.xlsx'">点击下载模版</a>
        </el-tag>

      </el-form-item>

      <el-form-item label="选择Excel">
        <el-upload
          ref="upload"
          :auto-upload="false"
          :on-success="fileUploadSuccess"
          :on-error="fileUploadError"
          :disabled="importBtnDisabled"
          :limit="1"
          :action="BASE_API+'/eduservice/subject/addSubject'"
          name="file"
          accept="application/vnd.ms-excel">
          <el-button slot="trigger" size="small" type="primary">选取文件</el-button>
          <el-button
            :loading="loading"
            style="margin-left: 10px;"
            size="small"
            type="success"
            @click="submitUpload">上传到服务器</el-button>
        </el-upload>
      </el-form-item>
    </el-form>
  </div>
</template>

<script>
export default {
  data() {
    return {
      BASE_API: process.env.BASE_API, // 接口API地址
      importBtnDisabled: false, // 按钮是否禁用
      loading: false
    }
  },
  methods: {
    // 点击按钮上传文件到接口
    submitUpload() {
      this.importBtnDisabled = true
      this.loading = true
      this.$refs.upload.submit()
    },
    // 上传成功
    fileUploadSuccess() {
      // 提示信息
      this.loading = false
      this.$message({
        type: 'success',
        message: '添加课程分类成功'
      })
      // 跳转课程分类列表
    },
    // 上传失败
    fileUploadError() {
      // 提示信息
      this.loading = false
      this.$message({
        type: 'error',
        message: '添加课程分类失败'
      })
    }
  }
}
</script>
3 课程列表功能实现
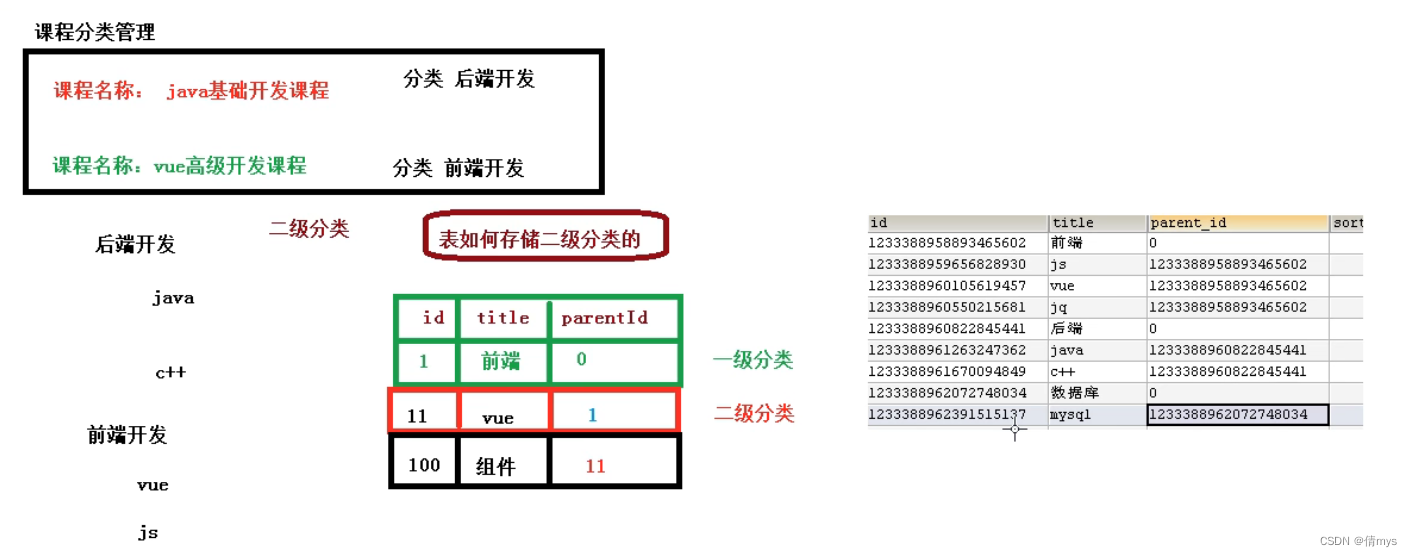
用树形结构显示课程列表
1 参考tree模块,整合前端
需要创建接口,按照分类要求的格式返回数据
- 返回数据格式
[
    {
      id: 1,
      label: '一级分类名称',
      children:
      [
          {
            id: 4,
            label: '二级分类名称',
          }
      ]
    },
	{
		......
	}
],
-
针对返回数据,创建对应的实体类
-
两个实体类:一级和二级 entity/subject/OneSubject TwoSubject
@Data
public class OneSubject {
    private String id;
    private String title;
}

@Data
public class TwoSubject {
    private String id;
    private String title;
}
-
-
在两个实体类之间表示关系(一个一级分类有多个二级分类)
-
OneSubject.java
private List<TwoSubject> children = new ArrayList<>();
-
-
具体封装代码编写
-
封装
List<EduSubject> oneSubjectList ===> List<OneSubject> finalSubject// 课程分类列表 @Override public List<OneSubject> getAllOneTwoSubject() { // 1 查询所有一级分类 parent_id = 0 QueryWrapper<EduSubject> wrapperOne = new QueryWrapper<>(); wrapperOne.eq("parent_id", 0); List<EduSubject> oneSubjectList = baseMapper.selectList(wrapperOne); // List<EduSubject> oneSubjectList = this.list(wrapperOne); // 2 查询所有二级分类 parent_id != 0 QueryWrapper<EduSubject> wrapperTwo = new QueryWrapper<>(); wrapperTwo.ne("parent_id", 0); List<EduSubject> twoSubjectList = baseMapper.selectList(wrapperTwo); // 创建list集合,用于存储最终封装数据 List<OneSubject> finalSubjectList = new ArrayList<>(); // 3 封装一级分类 // oneSubjectList -> finalSubjectList for (EduSubject eduSubject : oneSubjectList) { // eduSubject -> oneSubject -> finalSubjectList OneSubject oneSubject = new OneSubject(); // 基本写法 // oneSubject.setId(eduSubject.getId()); // oneSubject.setTitle(eduSubject.getTitle()); // 简写 BeanUtils.copyProperties(eduSubject, oneSubject); // eduSubject -> oneSubject finalSubjectList.add(oneSubject); // 4 封装二级分类 List<TwoSubject> twoFinalSubjectList = new ArrayList<>(); // twoSubjectList -> twoFinalSubjectList for (EduSubject eduSubject2 : twoSubjectList) { // eduSubject2 -> twoSubject -> twoFinalSubjectList // 二级分类的parent_id == 一级分类的id if (eduSubject2.getParentId().equals(eduSubject.getId())) { TwoSubject twoSubject = new TwoSubject(); BeanUtils.copyProperties(eduSubject2, twoSubject); twoFinalSubjectList.add(twoSubject); } } // 把一级下面的所有二级放到一级分类里 // twoFinalSubjectList -> oneSubject oneSubject.setChildren(twoFinalSubjectList); } return finalSubjectList; }
-
-
完善
save.vue
fileUploadSuccess() {
  // 提示信息
  this.loading = false
  this.$message({
    type: 'success',
    message: '添加课程分类成功'
  })
  // 跳转课程分类列表
  this.$router.push({ path: '/subject/list' })
},
list.vue
created() {
  this.getAllSubjectList()
},
methods: {
  getAllSubjectList() {
    subject.getSubjectList()
      .then(response => {
        this.data2 = response.data.list
      })
  },
  filterNode(value, data) {
    if (!value) return true
    return data.title.toLowerCase().indexOf(value.toLowerCase()) !== -1
  }
}
4 课程管理概括
- 课程添加流程

-
表
- edu_course:课程表,存储课程基本信息
- edu_course_descrpition:课程简介表,存储课程简介信息
- edu_chapter:课程章节表
- edu_video:课程小节表,存储章节里边的小节信息
- edu_teacher:讲师表
- edu_subject:分类表
-
表关系

5 添加课程信息后端实现
1 使用代码生成器生成课程相关代码
-
细节问题
-
创建vo实体类,用于表单数据封装
- 把表单提交过来的数据添加到数据库
- 向两张表添加数据:课程表、课程描述表
- 把表单提交过来的数据添加到数据库
-
把讲师和分类使用下拉列表显示
- 课程表做成二级联动效果
-
2 创建vo类,封装表单提交的数据
@Data
public class CourseInfoVo {
    @ApiModelProperty(value = "课程ID")
    private String id;

    @ApiModelProperty(value = "课程讲师ID")
    private String teacherId;

    @ApiModelProperty(value = "课程专业ID")
    private String subjectId;

    @ApiModelProperty(value = "课程标题")
    private String title;

    @ApiModelProperty(value = "课程销售价格,设置为0则可免费观看")
    private BigDecimal price; // BigDecimal:精度更准确

    @ApiModelProperty(value = "总课时")
    private Integer lessonNum;

    @ApiModelProperty(value = "课程封面图片路径")
    private String cover;

    @ApiModelProperty(value = "课程简介")
    private String description;
}
3 编写controller和service
注意:课程和课程简介是一对一关系,需要对应联系起来
controller
@RestController
@RequestMapping("/eduservice/edu-course")
@CrossOrigin
public class EduCourseController {
    @Autowired
    private EduCourseService courseService;

    // 添加课程基本信息方法
    @PostMapping("addCourseInfo")
    public R addCourseInfo(@RequestBody CourseInfoVo courseInfoVo) {
        courseService.saveCourseInfo(courseInfoVo);
        return R.ok();
    }
}
service
@Service
public class EduCourseServiceImpl extends ServiceImpl<EduCourseMapper, EduCourse> implements EduCourseService {
    @Autowired
    private EduCourseDescriptionService courseDescriptionService;
    // 添加课程基本信息方法
    @Override
    public void saveCourseInfo(CourseInfoVo courseInfoVo) {
        // 1 向课程表添加课程信息
        // courseInfoVo -> eduCourse
        EduCourse eduCourse = new EduCourse();
        BeanUtils.copyProperties(courseInfoVo, eduCourse);
        int insert = baseMapper.insert(eduCourse);
        if (insert <= 0) {
            // 添加失败
            throw new GuliException(20001, "添加课程信息失败");
        }
        // 获取添加之后课程id
        String cid = eduCourse.getId();
        // 2 向课程简介表添加课程简介信息
        EduCourseDescription courseDescription = new EduCourseDescription();
        courseDescription.setDescription(courseInfoVo.getDescription());
        // 设置课程简介id就是课程id
        courseDescription.setId(cid);
        courseDescriptionService.save(courseDescription);
    }
}
其他需要修改的地方:
1、实体类的时间上加注解
@ApiModelProperty(value = "创建时间")
@TableField(fill = FieldFill.INSERT)
private Date gmtCreate;

@ApiModelProperty(value = "更新时间")
@TableField(fill = FieldFill.INSERT_UPDATE)
private Date gmtModified;
2、EduCourseDescription中的id注解修改
@ApiModelProperty(value = "课程ID")
@TableId(value = "id", type = IdType.INPUT)
private String id;
6 添加课程信息前端实现
1 添加课程管理的路由,并添加隐藏路由,做步骤条的页面跳转
router/index.js
{
  path: '/course',
  component: Layout,
  redirect: '/course/list',
  name: '课程管理',
  meta: { title: '课程管理', icon: 'example' },
  children: [
    {
      path: 'list',
      name: '课程列表',
      component: () => import('@/views/edu/course/list'),
      meta: { title: '课程列表', icon: 'table' }
    },
    {
      path: 'info',
      name: '添加课程',
      component: () => import('@/views/edu/course/info'),
      meta: { title: '编辑课程基本信息', icon: 'tree' },
    },
    {
      path: 'info/:id',
      name: '添加课程',
      component: () => import('@/views/edu/course/info'),
      meta: { title: '编辑课程基本信息', icon: 'tree' },
      hidden: true
    },
    {
      path: 'chapter/:id',
      name: '添加课程',
      component: () => import('@/views/edu/course/chapter'),
      meta: { title: '编辑课程大纲', icon: 'tree' },
      hidden: true
    },
    {
      path: 'publish/:id',
      name: '添加课程',
      component: () => import('@/views/edu/course/publish'),
      meta: { title: '发布课程', icon: 'tree' },
      hidden: true
    }
  ]
},
2 实现课程添加的步骤条
info.vue -> chapter.vue -> publish.vue
3 调用接口
api/edu/course.js
4 添加之后,返回课程id
EduCourseController修改:
@PostMapping("addCourseInfo")
public R addCourseInfo(@RequestBody CourseInfoVo courseInfoVo) {
    String id = courseService.saveCourseInfo(courseInfoVo);
    return R.ok().data("courseId", id);
}
对应修改service的代码,返回课程id
info.vue修改:
// 跳转到下一步
// 获取课程id:response.data.courseId
this.$router.push({ path: '/course/chapter/' + response.data.courseId })
7 前端完善
1 讲师下拉列表显示
<el-form-item label="课程讲师">
  <el-select
    v-model="courseInfo.teacherId"
    placeholder="请选择">
    <el-option
      v-for="teacher in teacherList"
      :key="teacher.id"
      :label="teacher.name"
      :value="teacher.id"/>
  </el-select>
</el-form-item>
created() {
  // 初始化所有讲师
  this.getListTeacher()
},
methods: {
  // 查询所有讲师
  getListTeacher() {
    course.getListTeacher()
      .then(response => {
        this.teacherList = response.data.items()
      })
  },
**2 显示分类:二级联动 **
<el-form-item label="课程分类">
  <el-select
    v-model="courseInfo.teacherId"
    placeholder="一级分类"
    @change="subjectLeaveOneChanged">
    <el-option
      v-for="subject in subjectOneList"
      :key="subject.id"
      :label="subject.title"
      :value="subject.id"/>
  </el-select>
  <el-select
    v-model="courseInfo.subjectId"
    placeholder="二级分类">
    <el-option
      v-for="subject in subjectTwoList"
      :key="subject.id"
      :label="subject.title"
      :value="subject.id"/>
  </el-select>
</el-form-item>
// 查询课程列表:一级分类
getOneSubject() {
  subject.getSubjectList()
    .then(response => {
      this.subjectOneList = response.data.list
    })
},
// 点击某个一级分类,触发change,显示对应二级分类
// value是一级分类的id值
subjectLeaveOneChanged(value) {
  // 遍历所有分类,包含一级、二级
  for (let i = 0; i < this.subjectOneList.length; i++) {
    const onsSubject = this.subjectOneList[i]
    if (onsSubject.id === value) {
      this.subjectTwoList = onsSubject.children
      // 清空二级分类的id值
      this.courseInfo.subjectId = ''
    }
  }
},
3 封面上传
<el-form-item label="课程封面">
  <el-upload
    :show-file-list="false"
    :on-success="handleAvatarSuccess"
    :before-upload="beforeAvatarUpload"
    :action="BASE_API+'/eduoss/fileoss'"
    class="avatar-uploader">
    <img :src="courseInfo.cover">
  </el-upload>
</el-form-item>
// 上传封面之前
beforeAvatarUpload(file) {
  const isJPG = file.type === 'image/jpeg'
  const isLt2M = file.size / 1024 / 1024 < 2
  if (!isJPG) {
    this.$message.error('上传头像图片只能是 JPG 格式!')
  }
  if (!isLt2M) {
    this.$message.error('上传头像图片大小不能超过 2MB!')
  }
  return isJPG && isLt2M
},
// 上传封面成功
handleAvatarSuccess(res, file) {
  this.courseInfo.cover = res.data.url
},
4 整合文本编辑器
-
复制文本编辑器相关组件
- components/Tinymce
- static/tinymce4.7.5
-
添加配置build/webpack.dev.conf.js
new HtmlWebpackPlugin({ ......, templateParameters: { BASE_URL: config.dev.assetsPublicPath + config.dev.assetsSubDirectory } }) -
index.html中引入js脚本
<script src=<%= BASE_URL %>/tinymce4.7.5/tinymce.min.js></script> <script src=<%= BASE_URL %>/tinymce4.7.5/langs/zh_CN.js></script> -
页面使用文本编辑器
-
引入组件
import Tinymce from '@/components/Tinymce' -
声明组件
components: { Tinymce }, -
页面中使用标签实现文本编辑器组件
<el-form-item label="课程简介">
  <tinymce :height="300" v-model="courseInfo.description" />
</el-form-item>
-
-
样式
<style scoped> .tinymce-container { line-height: 29px; } </style> -
