设计模式 22 访问者模式 Visitor Pattern
1.定义
访问者模式是一种行为型设计模式,它允许你在不改变已有类结构的情况下,为一组对象添加新的操作。它将算法与对象结构分离,使你能够在不修改现有类的情况下,为这些类添加新的操作。
2.内涵
访问者模式核心概念,有以下几点:
- 访问者 (Visitor): 定义了一个访问具体元素的方法,每个方法对应一个具体元素类。
- 具体访问者 (ConcreteVisitor): 实现访问者接口,定义对具体元素类的访问逻辑。
- 元素 (Element): 定义一个 accept 方法,接受访问者对象并调用访问者的 visit 方法。
- 具体元素 (ConcreteElement): 实现元素接口,提供访问者访问其内部状态的方法。
相关UML 图如下所示:
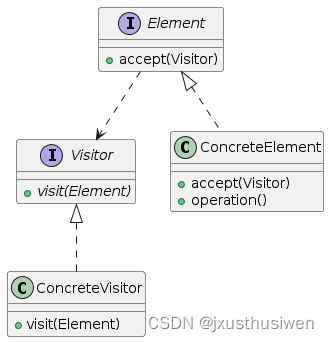
解释:
- Visitor 接口:定义了
visit方法,接受一个Element对象作为参数。 - ConcreteVisitor 类:实现了
Visitor接口,并定义了对Element对象的具体操作逻辑。 - Element 接口:定义了
accept方法,接受一个Visitor对象作为参数,并调用访问者的visit方法。 - ConcreteElement 类:实现了
Element接口,并提供operation方法,用于访问其内部状态。
3.案例分析
/**
 * The Visitor Interface declares a set of visiting methods that correspond to
 * component classes. The signature of a visiting method allows the visitor to
 * identify the exact class of the component that it's dealing with.
 */
class ConcreteComponentA;
class ConcreteComponentB;

class Visitor {
 public:
  virtual void VisitConcreteComponentA(const ConcreteComponentA *element) const = 0;
  virtual void VisitConcreteComponentB(const ConcreteComponentB *element) const = 0;
};

/**
 * The Component interface declares an `accept` method that should take the base
 * visitor interface as an argument.
 */

class Component {
 public:
  virtual ~Component() {}
  virtual void Accept(Visitor *visitor) const = 0;
};

/**
 * Each Concrete Component must implement the `Accept` method in such a way that
 * it calls the visitor's method corresponding to the component's class.
 */
class ConcreteComponentA : public Component {
  /**
   * Note that we're calling `visitConcreteComponentA`, which matches the
   * current class name. This way we let the visitor know the class of the
   * component it works with.
   */
 public:
  void Accept(Visitor *visitor) const override {
    visitor->VisitConcreteComponentA(this);
  }
  /**
   * Concrete Components may have special methods that don't exist in their base
   * class or interface. The Visitor is still able to use these methods since
   * it's aware of the component's concrete class.
   */
  std::string ExclusiveMethodOfConcreteComponentA() const {
    return "A";
  }
};

class ConcreteComponentB : public Component {
  /**
   * Same here: visitConcreteComponentB => ConcreteComponentB
   */
 public:
  void Accept(Visitor *visitor) const override {
    visitor->VisitConcreteComponentB(this);
  }
  std::string SpecialMethodOfConcreteComponentB() const {
    return "B";
  }
};

/**
 * Concrete Visitors implement several versions of the same algorithm, which can
 * work with all concrete component classes.
 *
 * You can experience the biggest benefit of the Visitor pattern when using it
 * with a complex object structure, such as a Composite tree. In this case, it
 * might be helpful to store some intermediate state of the algorithm while
 * executing visitor's methods over various objects of the structure.
 */
class ConcreteVisitor1 : public Visitor {
 public:
  void VisitConcreteComponentA(const ConcreteComponentA *element) const override {
    std::cout << element->ExclusiveMethodOfConcreteComponentA() << " + ConcreteVisitor1\n";
  }

  void VisitConcreteComponentB(const ConcreteComponentB *element) const override {
    std::cout << element->SpecialMethodOfConcreteComponentB() << " + ConcreteVisitor1\n";
  }
};

class ConcreteVisitor2 : public Visitor {
 public:
  void VisitConcreteComponentA(const ConcreteComponentA *element) const override {
    std::cout << element->ExclusiveMethodOfConcreteComponentA() << " + ConcreteVisitor2\n";
  }
  void VisitConcreteComponentB(const ConcreteComponentB *element) const override {
    std::cout << element->SpecialMethodOfConcreteComponentB() << " + ConcreteVisitor2\n";
  }
};
/**
 * The client code can run visitor operations over any set of elements without
 * figuring out their concrete classes. The accept operation directs a call to
 * the appropriate operation in the visitor object.
 */
void ClientCode(std::array<const Component *, 2> components, Visitor *visitor) {
  // ...
  for (const Component *comp : components) {
    comp->Accept(visitor);
  }
  // ...
}

int main() {
  std::array<const Component *, 2> components = {new ConcreteComponentA, new ConcreteComponentB};
  std::cout << "The client code works with all visitors via the base Visitor interface:\n";
  ConcreteVisitor1 *visitor1 = new ConcreteVisitor1;
  ClientCode(components, visitor1);
  std::cout << "\n";
  std::cout << "It allows the same client code to work with different types of visitors:\n";
  ConcreteVisitor2 *visitor2 = new ConcreteVisitor2;
  ClientCode(components, visitor2);

  for (const Component *comp : components) {
    delete comp;
  }
  delete visitor1;
  delete visitor2;

  return 0;
}
输出:
The client code works with all visitors via the base Visitor interface:
A + ConcreteVisitor1
B + ConcreteVisitor1

It allows the same client code to work with different types of visitors:
A + ConcreteVisitor2
B + ConcreteVisitor2
上述代码类之间关系 UML图,如下所示

4.注意事项
访问者模式在实施过程中,需要考虑以下几个方面,以确保代码的正确性、可维护性和可扩展性:
1. 元素接口的设计:
元素接口应该定义一个 accept 方法,用于接受访问者对象。
accept 方法应该调用访问者的 visit 方法,并将自身作为参数传递给 visit 方法。
元素接口的设计应该尽可能通用,以支持不同类型的元素。
2. 访问者接口的设计:访问者接口应该定义一个或多个 visit 方法,每个方法对应一个具体元素类。
visit 方法应该接受对应元素类对象作为参数,并执行对该元素类的操作。
访问者接口的设计应该尽可能灵活,以支持不同的操作。
3. 具体访问者类的实现:每个具体访问者类应该实现访问者接口,并定义对不同元素类的操作逻辑。
具体访问者类的实现应该尽可能清晰、简洁,以提高代码可读性和可维护性。
4. 访问者模式的应用场景:访问者模式适用于需要为一组对象添加新的操作,而不想修改这些对象的类的情况。
访问者模式也适用于需要对一组对象进行不同的操作,而这些操作之间没有明显的关联的情况。
访问者模式还可以用于将算法逻辑与对象结构分离,提高代码的可读性和可维护性。
5. 访问者模式的局限性:访问者模式可能会增加代码的复杂性,尤其是当需要处理多种类型的元素时。
访问者模式可能会破坏元素类的封装性,因为访问者需要访问元素类的内部状态。
5.最佳实践
访问者模式是一种强大的工具,但使用不当会导致代码复杂化或破坏封装性。以下是一些最佳实践,帮助你有效地使用访问者模式:
1. 限制访问者数量:
避免过度使用访问者,只在需要为一组对象添加新操作,且不希望修改这些对象本身时使用。
尽量保持访问者数量较少,否则会增加代码复杂度,难以维护。
2. 保持访问者职责单一:每个访问者应该只负责一种操作,避免将多个操作混杂在一个访问者中。
职责单一的访问者更容易理解和维护,也更容易进行扩展。
3. 避免访问者修改元素状态:访问者应该主要负责执行操作,而不是修改元素状态。
如果需要修改元素状态,应该通过元素本身的方法来进行,而不是通过访问者。
4. 使用泛型或模板:对于需要处理多种类型元素的访问者,可以使用泛型或模板来简化代码。
泛型或模板可以避免重复代码,提高代码可读性和可维护性。
5. 考虑使用组合模式:如果需要对多个层次结构的元素进行操作,可以考虑将访问者模式与组合模式结合使用。
组合模式可以帮助你构建树形结构,而访问者模式可以帮助你遍历树形结构并执行操作。
6. 谨慎使用访问者模式:访问者模式并非万能的,在某些情况下,其他设计模式可能更适合。
仔细分析你的需求,选择最合适的模式来解决问题。
6.总结
访问者模式是一种强大的设计模式,但需要谨慎使用。在实施访问者模式时,需要仔细考虑元素接口和访问者接口的设计,以及具体访问者类的实现。同时,需要了解访问者模式的局限性,并选择合适的应用场景。
