参考资料
- https://aws.amazon.com/cn/blogs/china/certification-vending-machine-intelligent-device-access-aws-iot-platform-solution/
IoT 设备与 AWS IoT Core 的 MQTT 通信使用基于证书的 TLS 1.2双向认证体系。所谓的双向认证,即意味着 IoT 设备端需安装 IoT 设备证书,并且,签发该证书所使用的 CA 证书需要被 IoT Core 授信,从而完成 IoT Core 对 IoT 设备端的认证。并且IoT 设备也会验证 IoT Core 的身份(aws的root_CA)
双向TLS验证模式就会要求设备上所使用的证书需要具备以下条件之一:
- IoT终端设备上所使用的证书为AWS IoT平台所签发的
- IoT终端设备上所使用的证书的CA证书预先导入了AWS IoT平台
因此存在两种方式获取设备认证
- 当用户希望使用从第三方机构购买或者自签发的 CA 证书,并将由该 CA 证书签发的设备证书的设备连接到 AWS IoT Core 时,可以利用即时注册功能来实现。
- 如果希望直接利用 AWS IoT CA 证书签发的设备证书对设备进行注册激活,参考 Certificate Vending Machine 方案。
Certification Vending方案
- https://aws.amazon.com/cn/blogs/china/certification-vending-machine-intelligent-device-access-aws-iot-platform-solution/
生产出厂的IoT设备,可能在生产过程中没有预装IoT证书,又希望这些设备连接至AWS IoT平台
- 主要目的是让设备自行向IoT平台申请CA签发的授信证书,并且通过AWS IoT管理平台控制证书权限
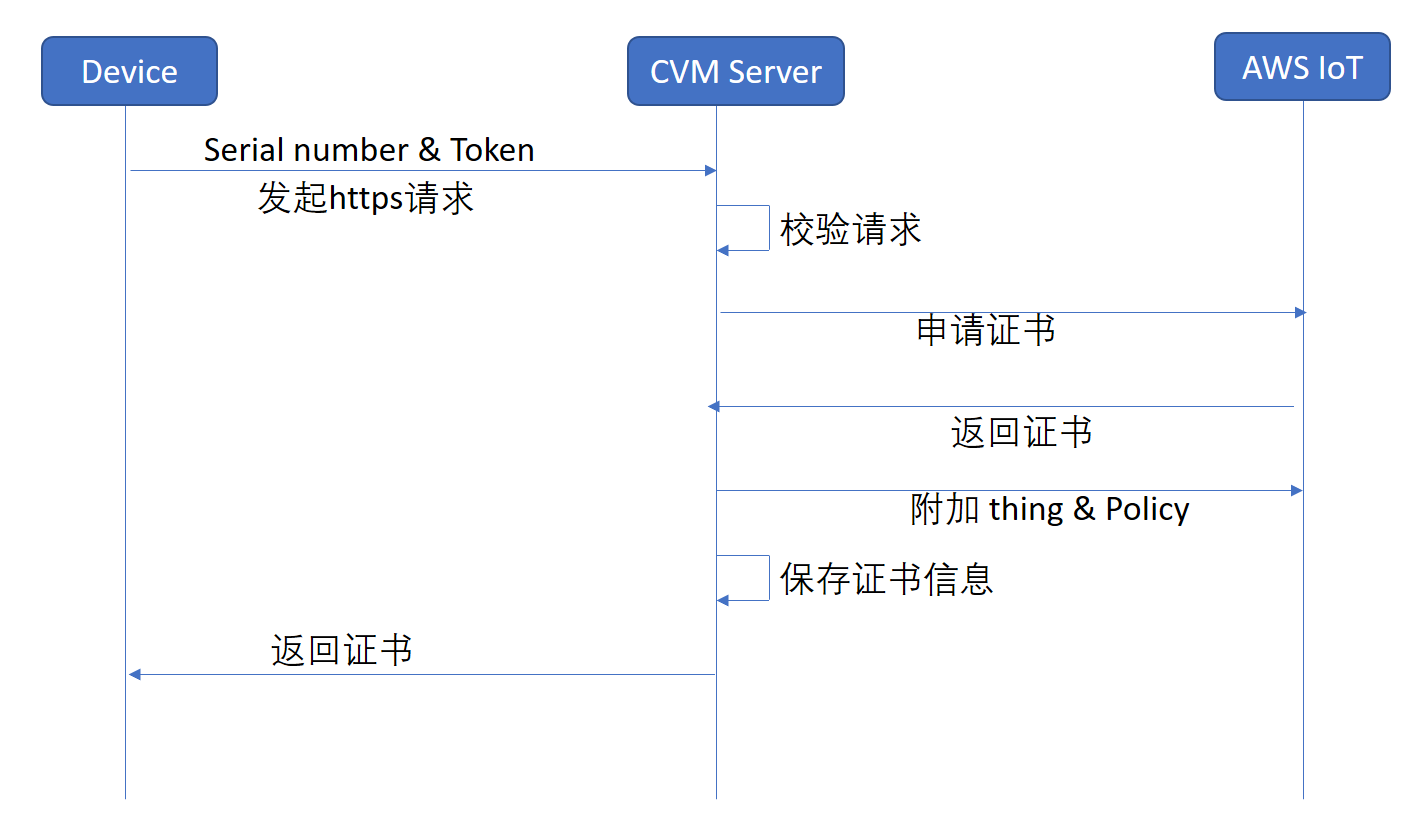
cvs需要客户自行实现
自签证书方案
自签证书JITR
- https://aws.amazon.com/cn/blogs/china/aws-iot-series-1/
签发ca和私钥
mkdir cert
cd cert
openssl genrsa -out CA_Private.key 2048
openssl req -x509 -new -nodes -key CA_Private.key -sha256 -days 3650 -out CA_Certificate.pem
为了安全AWS IOT Core 提供了相应的审核流程确保你同时持有 CA 证书和对应的私钥,先获取认证码
aws iot get-registration-code
{
    "registrationCode": "c0700df329cedx68def0c7385c83709b4da075"
}
生成另一个私钥和csr,在csr中填入认证码
openssl genrsa -out Verification_Private.key 2048
openssl req -new -key Verification_Private.key -out Verification.csr

# Organization Name (eg, company) []:
# Organizational Unit Name (eg, section)
# Common Name (e.g. server FQDN or YOUR name) []: XXXXXREGISTRATIONCODEXXXXX
使用ca和私钥,生成中间证书(确保ca和私钥的正确性)
openssl x509 -req -in Verification.csr -CA CA_Certificate.pem -CAkey CA_Private.key -CAcreateserial -out Verification.crt -days 3650 -sha256
导入ca和中间证书
aws iot register-ca-certificate --ca-certificate file://CA_Certificate.pem --verification-certificate file://Verification.crt --set-as-active --allow-auto-registration
{
    "certificateArn": "arn:aws-cn:iot:cn-north-1:037047667284:cacert/6713ebaf9c20cddc742fb91207216ecdda87bf0f0b719e49c28fede72e87e6e6",
    "certificateId": "6713ebaf9c20cddc742fb91207216ecdda87bf0f0b719e49c28fede72e87e6e6"
}

生成设备私钥和csr
openssl genrsa -out Device.key 2048
openssl req -new -key Device.key -out Device_Certificate.csr
使用ca签发设备证书
openssl x509 -req -in Device_Certificate.csr -CA CA_Certificate.pem -CAkey CA_Private.key -CAcreateserial -out Device_Certificate.crt -days 3650 -sha256
在设备上安装设备证书
!!!重要
- 此ca证书并非aws签发,因此显示在Certificate authorities中
- 外部设备使用该三方证书签发的设备证书访问iot会自动创建Certificates(并非ca certificates)
- 之后需要为该设备绑定策略授权
也可以在控制台直接生成上面的这些,区别在于自动生成的实际上是由aws ca签发的
- 可以直接签发,设备私钥和证书一起生成
- 或者创建设备私钥和csr后,使用aws ca签发

当 IoT 设备第一次连接 AWS IoT Core 时,如果它集成的设备证书是由已在 Core 上注册的 CA 证书签发而来,那么相应的设备证书会实现自动注册
-
注册后的默认状态为“PENDING_ACTIVATION”,意味着虽然设备证书已经成功注册,但是还处于等待激活的状态。同时,这个连接动作默认会发一条消息到 AWS IoT Core 的 MQTT Topic “$aws/events/certificates/registered/” 上,格式如下
{ "certificateId": "<certificateID>", "caCertificateId": "<caCertificateId>", "timestamp": "<timestamp>", "certificateStatus": "PENDING_ACTIVATION", "awsAccountId": "<awsAccountId>", "certificateRegistrationTimestamp": "<certificateRegistrationTimestamp>" } -
可以通过iot规则触发lambda函数完成证书激活
通过lambda函数授权,主要逻辑如下
- 创建policy
- 附加在证书上
- 激活证书
var AWS = require('aws-sdk');

exports.handler = function (event, context, callback) {

  // 根据实际部署区域写入,在certificateARN一处也是。
  var region = "cn-north-1";
  var accountId = event.awsAccountId.toString().trim();
  var iot = new AWS.Iot({
    'region': region,
    apiVersion: '2015-05-28'
  });

  var certificateId = event.certificateId.toString().trim();

  //这里你可以替换成你想要的topic名称
  var topicName = `JITR/test`;
  var certificateARN = `arn:aws-cn:iot:${region}:${accountId}:cert/${certificateId}`;
  var policyName = `Policy_${certificateId}`;

  //定义Policy并赋予权限,允许IoT设备连接,发布,订阅和接受消息
  var policy = {
    "Version": "2012-10-17",
    "Statement": [
      {
        "Action": [
          "iot:Publish",
          "iot:Subscribe",
          "iot:Connect",
          "iot:Receive"
        ],
        "Effect": "Allow",
        "Resource": [
          "*"
        ]
      }
    ]
  };

  //创建Policy
  iot.createPolicy({
    policyDocument: JSON.stringify(policy),
    policyName: policyName
  }, (err, data) => {
    //Ignore if the policy already exists
    if (err && (!err.code || err.code !== 'ResourceAlreadyExistsException')) {
      console.log(err);
      callback(err, data);
      return;
    }
    console.log(data);

    //附加Policy到设备证书上
    iot.attachPrincipalPolicy({
      policyName: policyName,
      principal: certificateARN
    }, (err, data) => {
      //Ignore if the policy is already attached
      if (err && (!err.code || err.code !== 'ResourceAlreadyExistsException')) {
        console.log(err);
        callback(err, data);
        return;
      }
      console.log(data);

      //激活证书
      iot.updateCertificate({
        certificateId: certificateId,
        newStatus: 'ACTIVE'
      }, (err, data) => {
        if (err) {
          console.log(err, err.stack);
          callback(err, data);
        } else {
          console.log(data);
          callback(null, "Success, created, attached policy and activated the certificate " + certificateId);
        }
      });
    });
  });
}
在控制台订阅此ca

在ec2上下载mosquitto
sudo wget http://download.opensuse.org/repositories/home:/oojah:/mqtt/CentOS_CentOS-7/home:oojah:mqtt.repo -O /etc/yum.repos.d/mqtt.repo
sudo yum install mosquitto mosquitto-clients -y

# 如果上面的命令执行时报依赖缺少的错误,可以加上--skip-broken再执行一遍即可
sudo yum install mosquitto mosquitto-clients -y --skip-broken
合并证书链
cd cert
cat Device_Certificate.crt CA_Certificate.pem > Device_CA_Certificate.crt
发布消息,连接会失败
mosquitto_pub --cafile root-CA.crt --cert Device_CA_Certificate.crt --key Device.key -h xxxxxxxxxxxxxx.iot.cn-north-1.amazonaws.com.cn -p 8883 -q 1 -t JITR/test -i anyclientID --tls-version tlsv1.2 -m "Hello" -d
证书自动创建

关联admin权限(iot策略)后再次连接
成功连接

#对于自动生成的证书
mosquitto_sub --cafile AmazonRootCA1.pem --cert 94505e987e73a5b0e380bb25a68bea19874d741b3907cdef0ba903eeef6d9049-certificate.pem.crt  --key 94505e987e73a5b
0e380bb25a68bea19874d741b3907cdef0ba903eeef6d9049-private.pem.key -h a1zwdkk9p50qtr.ats.iot.cn-north-1.amazonaws.com.cn  -p 8883 -q 0 -t sensor -d
控制台订阅test的topic,成功收到消息
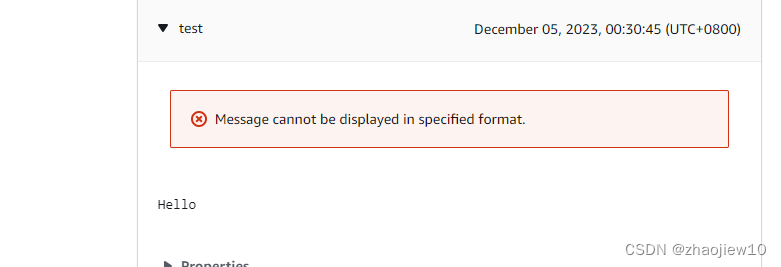
创建thing的逻辑和上面几乎一致,只不过证书可以选择多种方式
使用mosquitto模拟连接后活动能够看到记录
- 可以看到连接记录和保活记录
# mosquitto_sub --cafile AmazonRootCA1.pem --cert Device_CA_Certificate.crt --key Device.key -h a1zwdkk9p50qtr.ats.iot.cn-north-1.amazonaws.com.cn  -p 8883 -q 1 -t sensor
s/switch/livingroom/open -i bubble --tls-version tlsv1.2  -d
Client bubble sending CONNECT
Client bubble received CONNACK (0)
Client bubble sending SUBSCRIBE (Mid: 1, Topic: sensors/switch/livingroom/open, QoS: 1, Options: 0x00)
Client bubble received SUBACK
Subscribed (mid: 1): 1
Client bubble sending PINGREQ
Client bubble received PINGRESP
- id为设备名称,用于区分不同的设备证书

测试发布消息

在mosquitto成功收到消息

自签证书JITP
步骤类似,但是使用模板自动在iot上注册

