Midjourney Describe API 使用文档
Midjourney Describe API 的主要功能是通过上传图片,获取对图片的描述。使用该 API,只需要传递图片文件,API 会返回图片的详细描述。无需繁琐的参数设置,即可获得高质量的图片描述。
支持多种图片格式:无论是 JPEG、PNG 还是 GIF 等主流图片格式,均能被轻松识别和处理。
本文档将详细介绍 Midjourney Describe API 的对接说明,帮助您轻松集成并充分利用该 API 的强大功能。通过 Midjourney Describe API,您可以轻松实现图片描述的自动化,提高业务效率。
申请流程
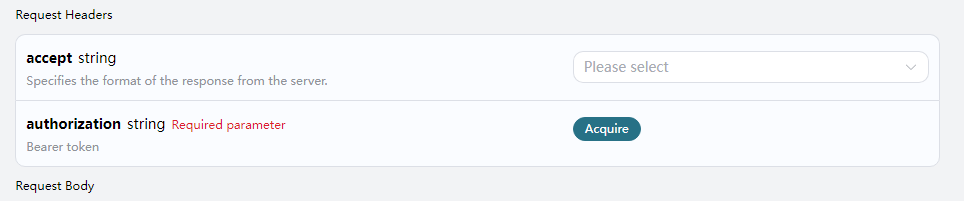
要使用 Midjourney Describe API,需要先到 申请页面 Midjourney Describe API 申请相应的服务,进入页面之后,点击「Acquire」按钮,如图所示:
如果您尚未登录或注册,会自动跳转到登录页面邀请您来注册和登录,登录注册之后会自动返回当前页面。
首次申请时会有免费额度赠送,可以免费使用该 API。
请求示例
我们以一张图片为例,演示如何使用该 API。假设我们有一张风景图片,接下来演示如何上传该图片并获取描述。
请求示例图

设置请求头和请求体
Request Headers 包括:
accept:指定接收 JSON 格式的响应结果,这里填写为application/json。authorization:调用 API 的密钥,申请之后可以直接下拉选择。
Request Body 包括:
image_url:上传的图片文件地址。
代码示例
CURL
curl -X POST 'https://api.acedata.cloud/midjourney/describe' \
-H 'accept: application/json' \
-H 'authorization: Bearer a25106ab37dc4e1fb49fa30fcfa189c1' \
-H 'content-type: application/json' \
-d '{
  "image_url": "https://mmbiz.qpic.cn/mmbiz_png/KfpsxXibsEXicPX7AicBeqcx1RrlzQFWJTUcCckPVRfsUqicP3AgFIic3kWnEr3d77uc5J9C2FlKwjqaibEc7HpX1ib1w/640?wx_fmt=png&from=appmsg""
}'
Python
import requests

url = "https://api.acedata.cloud/midjourney/describe"

headers = {
    "accept": "application/json",
    "authorization": "Bearer 173186e544784a94a6a1ceee7c98f333",
    "content-type": "application/json"
}

payload = {
    "image_url": "https://mmbiz.qpic.cn/mmbiz_png/KfpsxXibsEXicPX7AicBeqcx1RrlzQFWJTUcCckPVRfsUqicP3AgFIic3kWnEr3d77uc5J9C2FlKwjqaibEc7HpX1ib1w/640?wx_fmt=png&from=appmsg""
}

response = requests.post(url, json=payload, headers=headers)
print(response.text)
响应示例
请求成功后,API 将返回图片的4条描述信息。例如:
{
  "descriptions": [
    "A cross-shaped road sign stands in the middle of an outdoor park, surrounded by trees and grasslands. The background is sunny with warm colors. There is sunlight shining through the leaves onto part of it. On one side of that street post there was also another sign with the lettering \"Kunming Park\", which looked very beautiful. This photo shows how wonderful nature can be. It gives people feelings like relaxation or tranquility in the style of nature. --ar 75:44",
    "A photo of a \"K鬥\" road sign in the park, with trees and grass on both sides. In front is a light yellow metal pole with two signs attached to it. The background features sunlight shining through green leaves onto one side of the street, creating a warm atmosphere. There is also water mist floating around. It was taken in the style of Sony A7R IV camera using Leica M lens. This scene conveys tranquility and harmony between nature and human creation. --ar 75:44",
    "A cross-shaped street sign stands in the middle of an open park, surrounded by trees and grassland. The sun shines through the leaves on part of it, creating a warm light effect. In front is a road leading to another green space. There's also some information about \"Inside Shilin Park\" on one side of that post. This scene gives people feelings of tranquility and harmony with nature. Natural lighting, 3D rendering in the style of Unreal Engine, Realistic photography style. --ar 75:44",
    "A cross-shaped signpost stands in the park, surrounded by lush trees and vibrant green grass under sunlight. Signs say \"VIDEO ANNattacks\" in an unknown language, creating an atmosphere of mystery and intrigue. The scene is captured with high-definition photography using Canon EOS R5 cameras, presenting a stunning visual effect that showcases intricate details in the style of modern photography. --ar 75:44"
  ]
}
错误处理
在调用 API 时,如果遇到错误,API 会返回相应的错误代码和信息。例如:
400 token_mismatched:Bad request, possibly due to missing or invalid parameters.400 api_not_implemented:Bad request, possibly due to missing or invalid parameters.401 invalid_token:Unauthorized, invalid or missing authorization token.429 too_many_requests:Too many requests, you have exceeded the rate limit.500 api_error:Internal server error, something went wrong on the server.
错误响应示例
{
  "success": false,
  "error": {
    "code": "api_error",
    "message": "fetch failed"
  },
  "trace_id": "2cf86e86-22a4-46e1-ac2f-032c0f2a4e89"
}
结论
通过本文档,您已经了解了如何使用 Midjourney Describe API 进行图片描述。希望本文档能帮助您更好地对接和使用该 API。如有任何问题,请随时联系我们的技术支持团队。
体验站点:
https://chat.morecale.com/describe.html
示例代码:
<!DOCTYPE html>
<html lang="en">
<head>
    <meta charset="UTF-8">
    <meta name="viewport" content="width=device-width, initial-scale=1.0">
    <title>Midjourney Describe API Demo</title>
    <style>
        body {
            font-family: Arial, sans-serif;
            margin: 0;
            padding: 20px;
            display: flex;
            flex-direction: column;
            align-items: center;
            background-color: #f0f0f0;
        }
        .container {
            max-width: 600px;
            width: 100%;
            padding: 20px;
            background: #fff;
            box-shadow: 0 0 10px rgba(0, 0, 0, 0.1);
            border-radius: 8px;
            margin-bottom: 20px;
            text-align: center;
            position: relative;
        }
        .header {
            display: flex;
            justify-content: center;
            align-items: center;
        }
        .header h1 {
            margin: 0;
        }
        .tooltip {
            margin-left: 10px;
            display: inline-block;
            cursor: pointer;
            position: relative;
        }
        .tooltip .tooltiptext {
            visibility: hidden;
            width: 150px;
            background-color: #555;
            color: #fff;
            text-align: center;
            border-radius: 6px;
            padding: 5px;
            position: absolute;
            z-index: 1;
            bottom: 125%;
            left: 50%;
            margin-left: -75px;
            opacity: 0;
            transition: opacity 0.3s;
            font-size: 12px;
        }
        .tooltip:hover .tooltiptext {
            visibility: visible;
            opacity: 1;
        }
        .tooltip img {
            width: 20px;
            height: 20px;
        }
        input[type="text"], input[type="url"], button {
            width: 100%;
            padding: 10px;
            margin: 10px 0;
            box-sizing: border-box;
        }
        button {
            background-color: #4CAF50;
            color: white;
            border: none;
            cursor: pointer;
        }
        button:hover {
            background-color: #45a049;
        }
        .loading {
            margin-top: 10px;
            color: #666;
            display: none;
        }
        .descriptions {
            margin-top: 20px;
        }
        .description {
            background: #e7e7e7;
            padding: 10px;
            border-radius: 5px;
            margin-bottom: 10px;
        }
        .footer {
            margin-top: 20px;
            text-align: center;
        }
        .footer a {
            color: #4CAF50;
            text-decoration: none;
            margin: 0 10px;
        }
        .footer a:hover {
            text-decoration: underline;
        }
    </style>
</head>
<body>
    <div class="container">
        <div class="header">
            <h1>Midjourney Describe API Demo</h1>
            <a href="https://platform.acedata.cloud/documents/870e973b-712a-4686-ab8b-beae27f129ce?inviter_id=7f5af0eb-5da1-42ee-a1ab-8f420e2ab2c4" target="_blank" class="tooltip">
                <img src="https://img.icons8.com/color/48/000000/arrow.png" alt="info icon">
                <span class="tooltiptext">去申请API KEY</span>
            </a>
        </div>
        <input type="text" id="apiKey" placeholder="Enter API Key" required>
        <input type="url" id="imageUrl" placeholder="Enter Image URL" required>
        <button id="describeButton">Generate Descriptions</button>
        <div id="loading" class="loading">Generating descriptions...</div>
        <div id="result" class="descriptions"></div>
        <div class="footer">
            <a href="https://platform.acedata.cloud/documents/870e973b-712a-4686-ab8b-beae27f129ce?inviter_id=7f5af0eb-5da1-42ee-a1ab-8f420e2ab2c4" target="_blank">Acedata</a>
           <a href="https://mj.morecale.com" target="_blank">https://mj.morecale.com</a>
        </div>
    </div>

    <script>
        document.getElementById('describeButton').addEventListener('click', function() {
            const apiKey = document.getElementById('apiKey').value;
            const imageUrl = document.getElementById('imageUrl').value;
            const loading = document.getElementById('loading');
            const resultDiv = document.getElementById('result');

            if (!apiKey || !imageUrl) {
                alert("Please enter both API Key and Image URL.");
                return;
            }

            loading.style.display = 'block';
            resultDiv.innerHTML = '';

            const options = {
                method: "post",
                headers: {
                    "accept": "application/json",
                    "authorization": `Bearer ${apiKey}`,
                    "content-type": "application/json"
                },
                body: JSON.stringify({
                    "image_url": imageUrl
                })
            };

            fetch("https://api.acedata.cloud/midjourney/describe", options)
                .then(response => response.json())
                .then(data => {
                    loading.style.display = 'none';
                    if (data.descriptions && data.descriptions.length > 0) {
                        data.descriptions.forEach(description => {
                            const descDiv = document.createElement('div');
                            descDiv.className = 'description';
                            descDiv.textContent = description;
                            resultDiv.appendChild(descDiv);
                        });
                    } else {
                        resultDiv.textContent = 'No descriptions available.';
                    }
                })
                .catch(err => {
                    loading.style.display = 'none';
                    console.error(err);
                    alert('Error generating descriptions. Please try again.');
                });
        });
    </script>
</body>
</html>


![[GUET-CTF2019]encrypt](https://img-blog.csdnimg.cn/direct/5bc6fba5252b4ba1927931c4edfa2653.png)