<template>
{{ tabaleData }}
<Params />
<el-row>
<el-col :span="6"><el-button type="primary" @click="loadData">导入样本表</el-button></el-col>
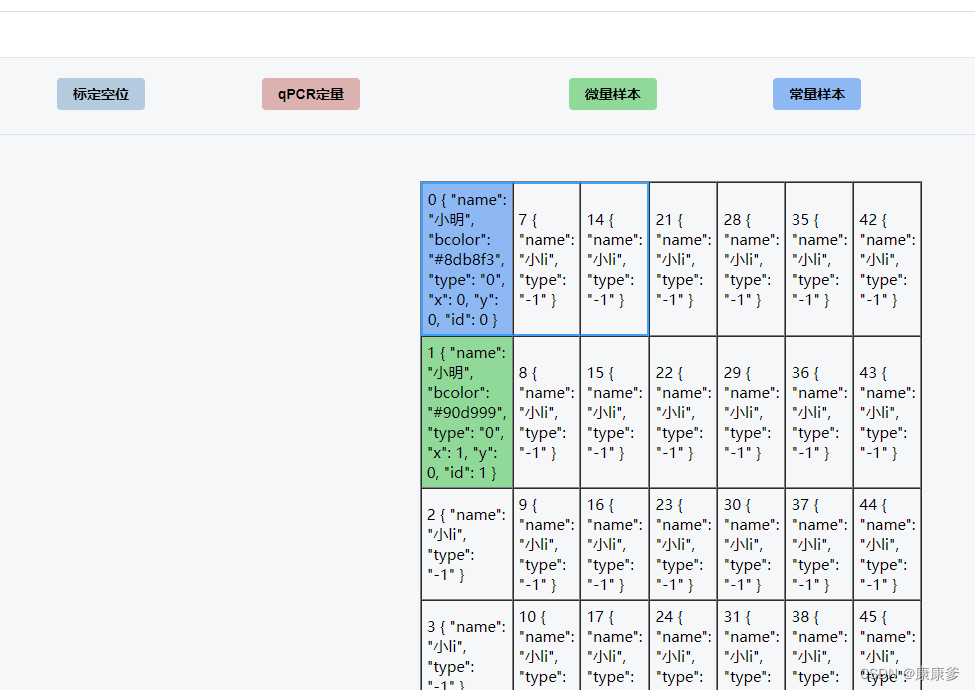
<el-col :span="2"><el-button type="c1" @click="changeData('#90d999')">标定空位</el-button></el-col>
<el-col :span="3"><el-button type="c2" @click="changeData('#8db8f3')">qPCR定量</el-button></el-col>
<el-col :span="2"><el-button type="c3">微量样本</el-button></el-col>
<el-col :span="2"><el-button type="c4">常量样本</el-button></el-col>
<el-col :span="2"><el-button type="c5">阴性对照</el-button></el-col>
<el-col :span="2"><el-button type="c6">阳性对照</el-button></el-col>
<el-col :span="2"><el-button type="c7">直扩样本</el-button></el-col>
<el-col :span="2"><el-button type="c8">梯度样本</el-button></el-col>
</el-row>
<el-divider />
<Cab ref="cab" :tabaleData="tabaleData" @update:tabaleData="tabaleData = $event" :test="test" @update:test="test = $event" :colNum="colNum" :rowNum="rowNum"/>
<el-row style="height: 10px;"/>
<ElRow :gutter="20" justify="space-between" >
<ElCol v-for="item in testTypes" :key="item.ItemID" :xl="6" :lg="6" :md="12" :sm="12" :xs="24">
<ElCard shadow="hover" class="mb-20px hand" >
<ElSkeleton :loading="loading" animated :rows="2">
<template #default>
<div :class="` flex justify-between`">
<div class="flex flex-col">
<div :class="` text-26px text-gray-700 text-right`">{{ item.ItemCode }}</div>
</div>
</div>
</template>
</ElSkeleton>
</ElCard>
</ElCol>
</ElRow>
</template>
<script setup lang="ts">
import Params from './components/Params.vue'
import TableSel from './components/TableSel.vue'
import Cab from './components/Cab.vue'
import { CountTo } from '@/components/CountTo'
import { useDesign } from '@/hooks/web/useDesign'
import { useI18n } from '@/hooks/web/useI18n'
import { ref, reactive } from 'vue'
import { getCountApi } from '@/api/dashboard/analysis'
import type { AnalysisTotalTypes } from '@/api/dashboard/analysis/types'
import { sampleItemList } from '@/api/bokun/b1'
import { ElRow, ElCol, ElCard, ElSkeleton } from 'element-plus'
const { t } = useI18n()
const tabaleData = ref<any>([])
const colNum = ref(7)
const rowNum = ref(7)
const getCellId = (rindex,cindex) =>{
return (cindex ) * colNum.value + (rindex )
}
//填充数据横纵
const addCell = () => {
// let colNum = 7
// let rowNum = 7
let dataArr =<any> []
console.log('rowNum ',rowNum)
const myRow = 1
const myCol = 2
for (let i = 0; i <myCol; i++) {
for (let j = 0; j <myRow; j++) {
const obj = { name: '小明',bcolor: '#ab9996', type: '0' ,x:i,y:j }
dataArr.push(obj)
}
}
let tabaleDataTemp =<any> []
for (let i = 0; i <dataArr.length; i++) {
const obj = dataArr[i]
const cellId =getCellId (obj.x,obj.y)
obj['id'] = cellId
tabaleDataTemp.push(obj)
}
tabaleData.value = tabaleDataTemp
console.log('tabaleData ', tabaleData)
}
addCell()
const loading = ref(true)
const oo = '名'
let ss = ref(oo)
let test = ref('123')
const cab = ref()
const changeData = (color) =>{
cab.value.changeData(color)
}
let testTypes=ref<any[]>([])
const getSampleItemList = async () => {
const res = await sampleItemList()
.catch(() => {})
.finally(() => {
loading.value = false
})
if (res) {
ss.value = "往往"
testTypes.value = [...res]
console.log("后台请求实验类型的结果:",ss.value)
}
}
getSampleItemList()
</script>
<style lang="less" scoped>
@c1:#b4cade;
@c2:#dcb2b0;
@c3:#90d999;
@c4:#8db8f3;
@c5:#bb98d4;
@c6:#eb8596;
@c7:#f49c08;
@c8:#efdbdb;
@font-s:
// color1
.el-button--c1.is-active,
.el-button--c1:active {
background: @c1;
border-color: @c1;
font-weight: bold;
color: #000000;
}
.el-button--c1:focus,
.el-button--c1:hover {
background: @c1;
border-color: @c1;
font-weight: bold;
color: #000000;
}
.el-button--c1 {
background-color: @c1;
border-color: @c1;
font-weight: bold;
color: #000000;
}
// color2
.el-button--c2.is-active,
.el-button--c2:active {
background: @c2;
border-color: @c2;
font-weight: bold;
color: #000000;
}
.el-button--c2:focus,
.el-button--c2:hover {
background: @c2;
border-color: @c2;
font-weight: bold;
color: #000000;
}
.el-button--c2 {
background-color: @c2;
border-color: @c2;
font-weight: bold;
color: #000000;
}
// color3
.el-button--c3.is-active,
.el-button--c3:active {
background: @c3;
border-color: @c3;
font-weight: bold;
color: #000000;
}
.el-button--c3:focus,
.el-button--c3:hover {
background: @c3;
border-color: @c3;
font-weight: bold;
color: #000000;
}
.el-button--c3 {
background-color: @c3;
border-color: @c3;
font-weight: bold;
color: #000000;
}
// color4
.el-button--c4.is-active,
.el-button--c4:active {
background: @c4;
border-color: @c4;
font-weight: bold;
color: #000000;
}
.el-button--c4:focus,
.el-button--c4:hover {
background: @c4;
border-color: @c4;
font-weight: bold;
color: #000000;
}
.el-button--c4 {
background-color: @c4;
border-color: @c4;
font-weight: bold;
color: #000000;
}
// color5
.el-button--c5.is-active,
.el-button--c5:active {
background: @c5;
border-color: @c5;
font-weight: bold;
color: #000000;
}
.el-button--c5:focus,
.el-button--c5:hover {
background: @c5;
border-color: @c5;
font-weight: bold;
color: #000000;
}
.el-button--c5 {
background-color: @c5;
border-color: @c5;
font-weight: bold;
color: #000000;
}
// c6
.el-button--c6.is-active,
.el-button--c6:active {
background: @c6;
border-color: @c6;
font-weight: bold;
color: #000000;
}
.el-button--c6:focus,
.el-button--c6:hover {
background: @c6;
border-color: @c6;
font-weight: bold;
color: #000000;
}
.el-button--c6 {
background-color: @c6;
border-color: @c6;
font-weight: bold;
color: #000000;
}
// c7
.el-button--c7.is-active,
.el-button--c7:active {
background: @c7;
border-color: @c7;
font-weight: bold;
color: #000000;
}
.el-button--c7:focus,
.el-button--c7:hover {
background: @c7;
border-color: @c7;
font-weight: bold;
color: #000000;
}
.el-button--c7 {
background-color: @c7;
border-color: @c7;
font-weight: bold;
color: #000000;
}
// c8
.el-button--c8.is-active,
.el-button--c8:active {
background: @c8;
border-color: @c8;
font-weight: bold;
color: #000000;
}
.el-button--c8:focus,
.el-button--c8:hover {
background: @c8;
border-color: @c8;
font-weight: bold;
color: #000000;
}
.el-button--c8 {
background-color: @c8;
border-color: @c8;
font-weight: bold;
color: #000000;
}
.hand{
background-color: #afd4e6;
cursor: pointer;
-webkit-user-select: none; /* Chrome/Safari/Opera */
-moz-user-select: none; /* Firefox */
-ms-user-select: none; /* Internet Explorer/Edge */
user-select: none; /* Non-prefixed version, currently not supported by any browser */
}
</style>
<template>

  {{ colNum }}
  {{ rowNum }}
  <table
    border="1"
    id="cabinet_latte_table"
    align="center"
    cellpadding="10"
    cellspacing="0"
  >

  <tr  v-for="rindex of rowNum" :key="rindex" :id="rindex" style="height: 30px;" >
      <td
        :id="getCellId(rindex,cindex)"
        :initRow="rindex"
        :initCol="cindex"
        :type = "getObject(rindex,cindex).type"
        :col="JSON.stringify(getObject(rindex,cindex))"
        :myData="col"
        @mousedown="handleMouseDown"
        @mouseup="handleMouseUp"
        @contextmenu="openContextMenu($event)"
        v-for="cindex of colNum" :key="cindex"
        :style="{width:widthp,height:heightp,backgroundColor:getObject(rindex,cindex).bcolor}"
        class="cell"
      >
        {{getCellId(rindex,cindex) }} {{getObject(rindex,cindex) }}
      </td>
    </tr>

    <!-- <tr v-for="(row, rindex) in tabaleData" :key="row.id" :id="rindex" style="height: 30px;" >


      <td
        :id="col.id"
        :initRow="rindex"
        :initCol="cindex"
        :col="JSON.stringify(col)"
        :myData="col"
        @mousedown="handleMouseDown"
        @mouseup="handleMouseUp"
        @contextmenu="openContextMenu($event)"
        v-for="(col, cindex) in row"
        :key="col.id"
        :style="{width:widthp,height:heightp,backgroundColor:getBackgroundColor(col.bcolor)}"
        class="cell"
      >
        {{ col.name }}-{{ col.id }}-{{ cindex }}-{{ rindex }}-{{ col.bcolor }}
      </td>
    </tr> -->
  </table>
</template>
<script setup>
import guid from '@/utils/generator'
import { reactive, ref, nextTick, defineProps,defineEmits  } from 'vue'


// 定义props
const props = defineProps({

  whStyle:{
    type: [Array, Object],
    default: () => {
      return { width: '50px', height: '40px' ,backgroundColor : '#eb8596'}
    }
  },
  test:{
    type: String,
    default:''

  },
  colNum:{
    type: Number,
    default:''

  },
  rowNum:{
    type: Number,
    default:''

  },
  widthp:{
    type: String,
    default:'50px'

  },
  heightp:{
    type: String,
    default:'50px'
  },
  tabaleData:{
    type: [Array],
    default: () => {
      return []
    }
  }
});

const { tabaleData,colNum,rowNum } = props;
let emit=defineEmits(["update:tabaleData","update:test"]);//自定义的更新num事件
const changeData = (color)=>{

  for(let i=0;i<chooseCellsArea.length;i++){
    const chooseCell = chooseCellsArea[i]
   // console.log('chooseCell ',chooseCell)
    const id = chooseCell.getAttribute('id')
    console.log('chooseCell id',id)
    const findCell = tabaleData.find(item => item.id ==  id)
    if(findCell){
      console.log('找到一个 tabaleData : findCell ')
      findCell.bcolor = color
    }

  }
  emit("update:tabaleData",tabaleData);
  emit("update:test",color);
}


const getCellId  = (rindex,cindex) =>{
  return (cindex - 1) * colNum + (rindex - 1)
}

const getObject = (rindex,cindex) =>{
  const pDataVarName = getCellId(rindex,cindex)
  if (tabaleData != null && tabaleData[pDataVarName]) {
      return tabaleData[pDataVarName]
    } else {
      return { name: '小li', type: '-1'}
    }
}


const dragging = ref(false)
const tableId = 'cabinet_latte_table'
const contextMenuTool = ref()
let chooseCellsArea = reactive([])
let startCell = ref({})
let endCell = ref({})


const openContextMenu = (event) => {
  contextMenuTool.value.openContextMenu(event)
}

const isOkRang = (initRow, initCol, startRow, startCol, endRow, endCol) => {
  return initRow >= startRow && initRow <= endRow && initCol >= startCol && initCol <= endCol
  //  ||(initRow >= endRow && initRow <= startRow && initCol >= endCol && initCol <= startCol)
}

// 获取范围并且将改变边框颜色
const applyBorderStyles = (tableId, startRow, startCol, endRow, endCol) => {
  clearBorderStyles(tableId)
  const cellList = document.getElementById(tableId).querySelectorAll('td')

  //   let endRowNum = endRow;
  //   let endColNum = endCol;
  const cellsInRange = []
  const cellsIdsRange = []
  cellList.forEach((cell) => {
    //遍历所有的td,在那个开始和当前停留位置的td的范围内的都设置选中样式 huang
    const initRow = parseInt(cell.getAttribute('initrow'), 10)
    const initCol = parseInt(cell.getAttribute('initcol'), 10)
    // 判断单元格是否在指定范围内
    // if (initRow >= startRow && initRow <= endRow && initCol >= startCol && initCol <= endCol) {
    if (isOkRang(initRow, initCol, startRow, startCol, endRow, endCol)) {
      // console.log('我看真正添加的 initRow ',initRow)
      // console.log('我看真正添加的 initCol ',initCol)
      cellsInRange.push(cell)

      chooseCellsArea = cellsInRange


      const type =cell.getAttribute('type')
      if(type=='-1'){
        cell.style.backgroundColor = '#c0bfbf'
      }


      // 应用顶部边框样式
      if (initRow === startRow) {
        cell.style.borderTop = '2px solid #409eff'
      }

      // 应用底部边框样式
      if (initRow === endRow) {
        cell.style.borderBottom = '2px solid #409eff'
      }

      // 应用左侧边框样式
      if (initCol === startCol) {
        cell.style.borderLeft = '2px solid #409eff'
      }

      // 应用右侧边框样式
      if (initCol === endCol) {
        cell.style.borderRight = '2px solid #409eff'
      }
    }
  })
  //console.log('选中的单元格', chooseCellsArea)
}

const clearBorderStyles = (tableId) => {
  const rowList = document.getElementById(tableId).querySelectorAll('tr')
  if (!rowList) return

  // 遍历所有行和单元格,清除边框样式
  for (const row of rowList) {
    for (const cell of row.cells) {
      cell.style.borderTop = ''
      cell.style.borderBottom = ''
      cell.style.borderLeft = ''
      cell.style.borderRight = ''
      const type =cell.getAttribute('type')
      if(type=='-1'){
        cell.style.backgroundColor = 'transparent'
      }

    }
  }
}
const handleMouseDown = (event) => {
  nextTick(() => {
    if (event.button === 0) {
      dragging.value = true

      // 获取起始单元格信息,这里可能需要一些逻辑来确定单元格的行和列
      const target = event.currentTarget
      if (target) {
        console.log('摁下initrow.value ', target.attributes.initrow.value)
        console.log('摁下initcol.value ', target.attributes.initcol.value)
        const row = Number(target.attributes.initrow.value)
        const col = Number(target.attributes.initcol.value)
        const cellId = target.id
        //记录左键点击开始位置 huang
        startCell.value = { cellId, row, col }
        console.log('按完了 加里没有', startCell.value)
      }

      // 添加全局鼠标移动事件监听
      window.addEventListener('mousemove', handleMouseMove)
    }
  })
}
const handleMouseUp = (event) => {
  dragging.value = false

  // 移除全局鼠标移动事件监听
  window.removeEventListener('mousemove', handleMouseMove)
}

const handleMouseMove = (event) => {
  //   if (!this.dragging) {
  //     return;
  //   }
  //   console.log('的高亮显示');
  // 这里可以根据需要添加逻辑,例如更新当前单元格的高亮显示
  nextTick(() => {})
  if (event.button === 0) {
    //当前鼠标位置的组件
    const { target } = event
    // console.log('target.parentNode', event);
    if (target) {
      //当前鼠标位置的行数 huang
      const row = Number(target.attributes.initrow.value)
      //当前鼠标位置的列数 huang
      const col = Number(target.attributes.initcol.value)

      clearBorderStyles(tableId)
      applyBorderStyles(tableId, startCell.value.row, startCell.value.col, row, col, target.id)
    }
  }
}

defineExpose({
  changeData,
})
</script>

<style lang="scss" scoped>
table {
  -moz-user-select: none;
  -webkit-user-select: none;
  -ms-user-select: none;
  -khtml-user-selece: none;
  /*上面都是兼容性问题,具体看浏览器版本或什么浏览器*/
  user-select: none;
}
.cell {
  padding: 5px;
  font-size: 15px;
}
</style>
