目录
- Spring Boot
- Spring Boot 项目开发环境
- 1、快速创建SpringBoot项目
- 2、pom.xml 添加 Meavn 依赖
- 3、配置application.yml
- 4、验证数据库是否连接成功
- 5、配置 Druid 数据源
- Spring Boot 整合 MyBatis
- 1、准备依赖
- 2、application-dev.yml 配置
- 3、启动类添加Mapper接口扫描器
- 4、设置日志log
- 5、实现 MyBatis 进行增删改查操作
- 1、数据库创建表格
- 2、新建实体类和 Mapper 接口
- 3、创建 Mapper 接口的映射文件
- 4、新建 UserController
- 5、功能测试
- Spring Boot 整合 Lombok
- Spring Boot 整合 Swagger
- 1、添加依赖文件
- 2、创建 Swagger 配置类
- 3、Swagger 接口测试
- 接口参数处理和统一响应结果
- 接口参数处理和统一响应结果
Spring Boot
Spring Boot 项目开发环境
1、快速创建SpringBoot项目
1、打开idea 选择 File => New => Project 选中 Spring Boot 快速创建。
如果是创建JAVA8 需要把 Server URL 地址修改为 阿里云地址 https://start.aliyun.com
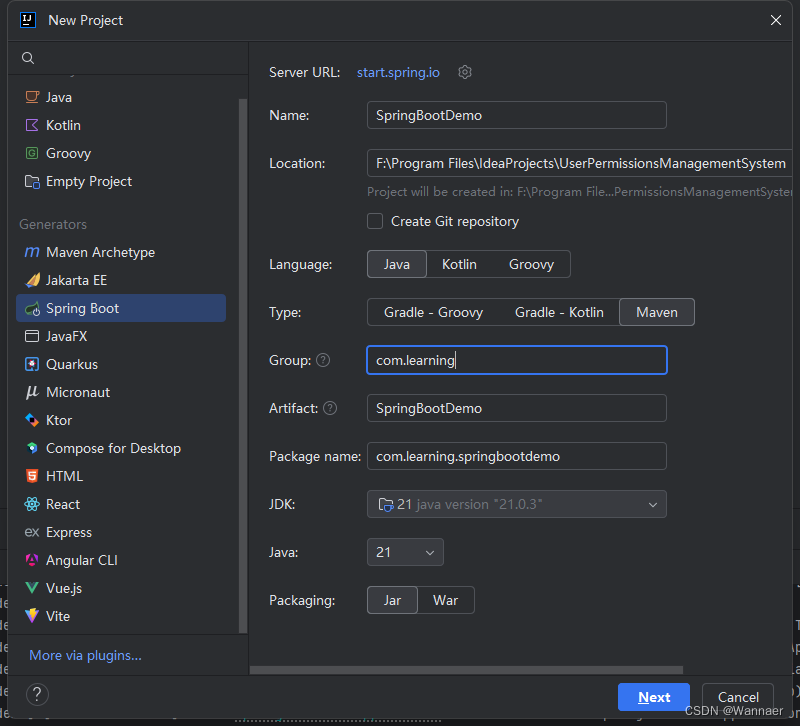
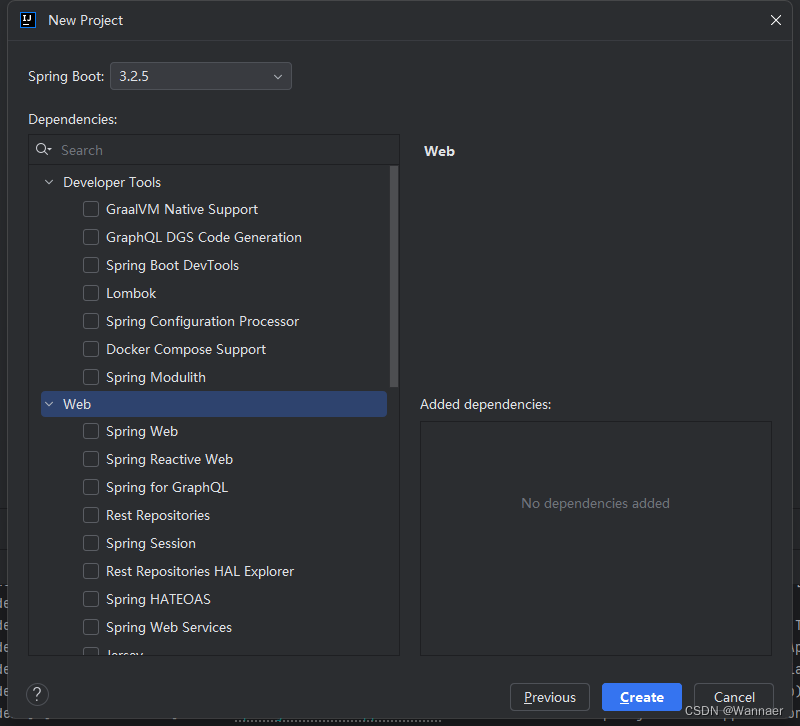
2、Dependencies 依赖 可以直接在这里先勾选,但我们先不选后面通过pom.xml Maven加载
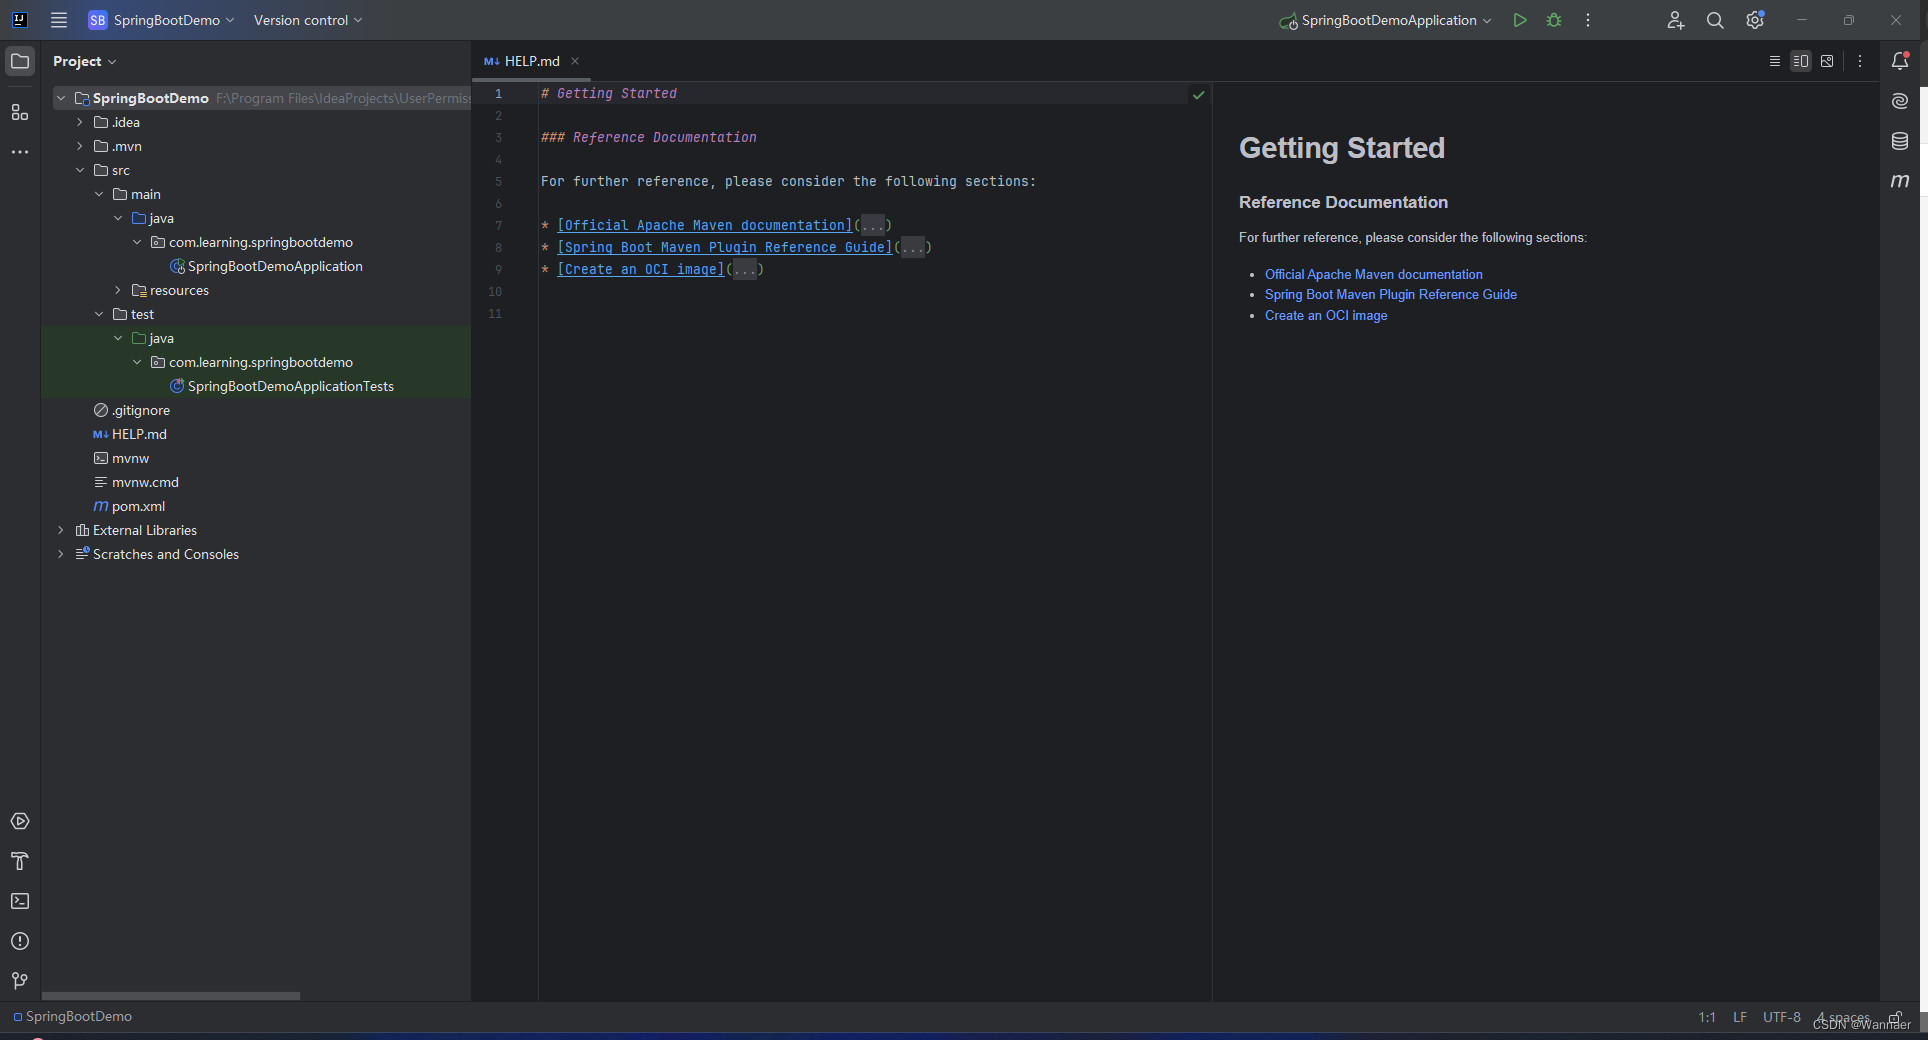
3、创建后的项目结构如下
2、pom.xml 添加 Meavn 依赖
1、添加 spring-boot-start-web
使用SpringMVC构建web(包括RESTful)应用程序。使用Apache Tomcat作为默认的嵌入式容器。
<dependency>
    <groupId>org.springframework.boot</groupId>
    <artifactId>spring-boot-starter-web</artifactId>
</dependency>
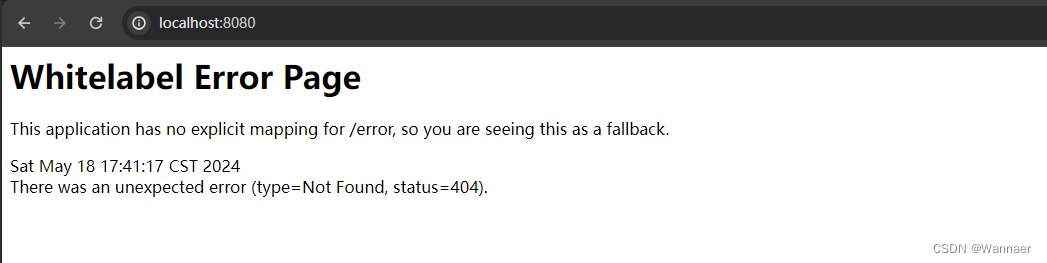
运行项目后,浏览器输入localhost:8080 Web服务正常
2、添加 Lambok 依赖
Lombok依赖可在编译时,自动添加JavaBean结构。例如常用的getter、setter、toString、构造器和equals等方法。
<!-- lombok 依赖 -->
<dependency>
    <groupId>org.projectlombok</groupId>
    <artifactId>lombok</artifactId>
</dependency>
3、单元测试
对单元测试的支持在于提供了一系列注解和工具的集成
<dependency>
    <groupId>org.springframework.boot</groupId>
    <artifactId>spring-boot-starter-test</artifactId>
    <scope>test</scope>
</dependency>
4、数据库连接依赖
 <!-- mysql驱动包 -->
 <dependency>
     <groupId>mysql</groupId>
     <artifactId>mysql-connector-java</artifactId>
     <version>8.0.28</version>
 </dependency>
 <!-- druid -->
 <dependency>
     <groupId>com.alibaba</groupId>
     <artifactId>druid-spring-boot-starter</artifactId>
     <version>1.2.14</version>
 </dependency>
 <!-- JDBC数据库连接 -->
 <dependency>
     <groupId>org.springframework.boot</groupId>
     <artifactId>spring-boot-starter-jdbc</artifactId>
 </dependency>
3、配置application.yml
将默认 application.properties 修改为 application.yml 添加配置更加直观
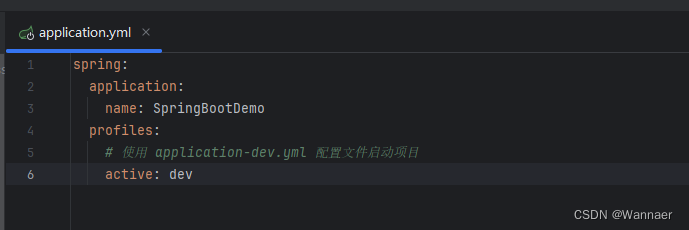
# application.yml
spring:
  application:
    name: SpringBootDemo
  profiles:
    # 使用 application-dev.yml 配置文件启动项目
    active: dev
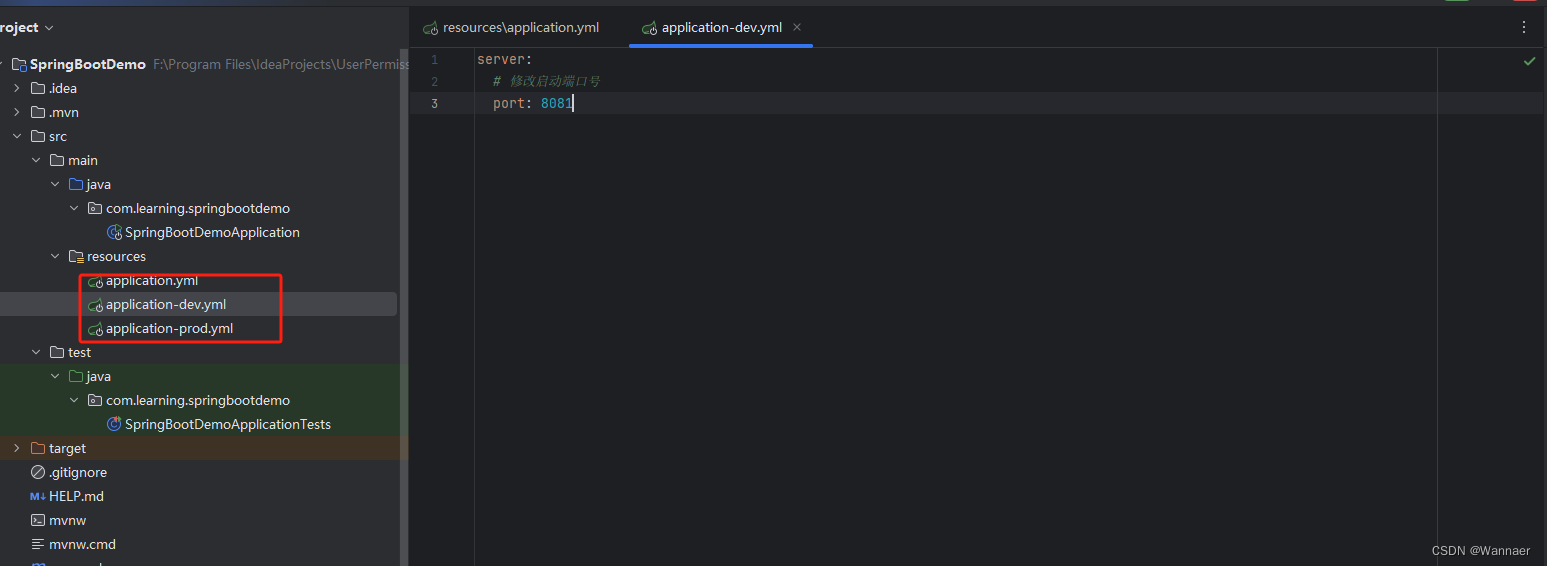
# application-dev.yml
spring:
  datasource:
    url: jdbc:mysql://localhost:3306/springboot_db?allowPublicKeyRetrieval=true&useUnicode=true&characterEncoding=utf8&autoReconnect=true&useSSL=false
    driver-class-name: com.mysql.cj.jdbc.Driver
    username: root
    password: Hu903157935
server:
  # 修改启动端口号
  port: 8080
4、验证数据库是否连接成功
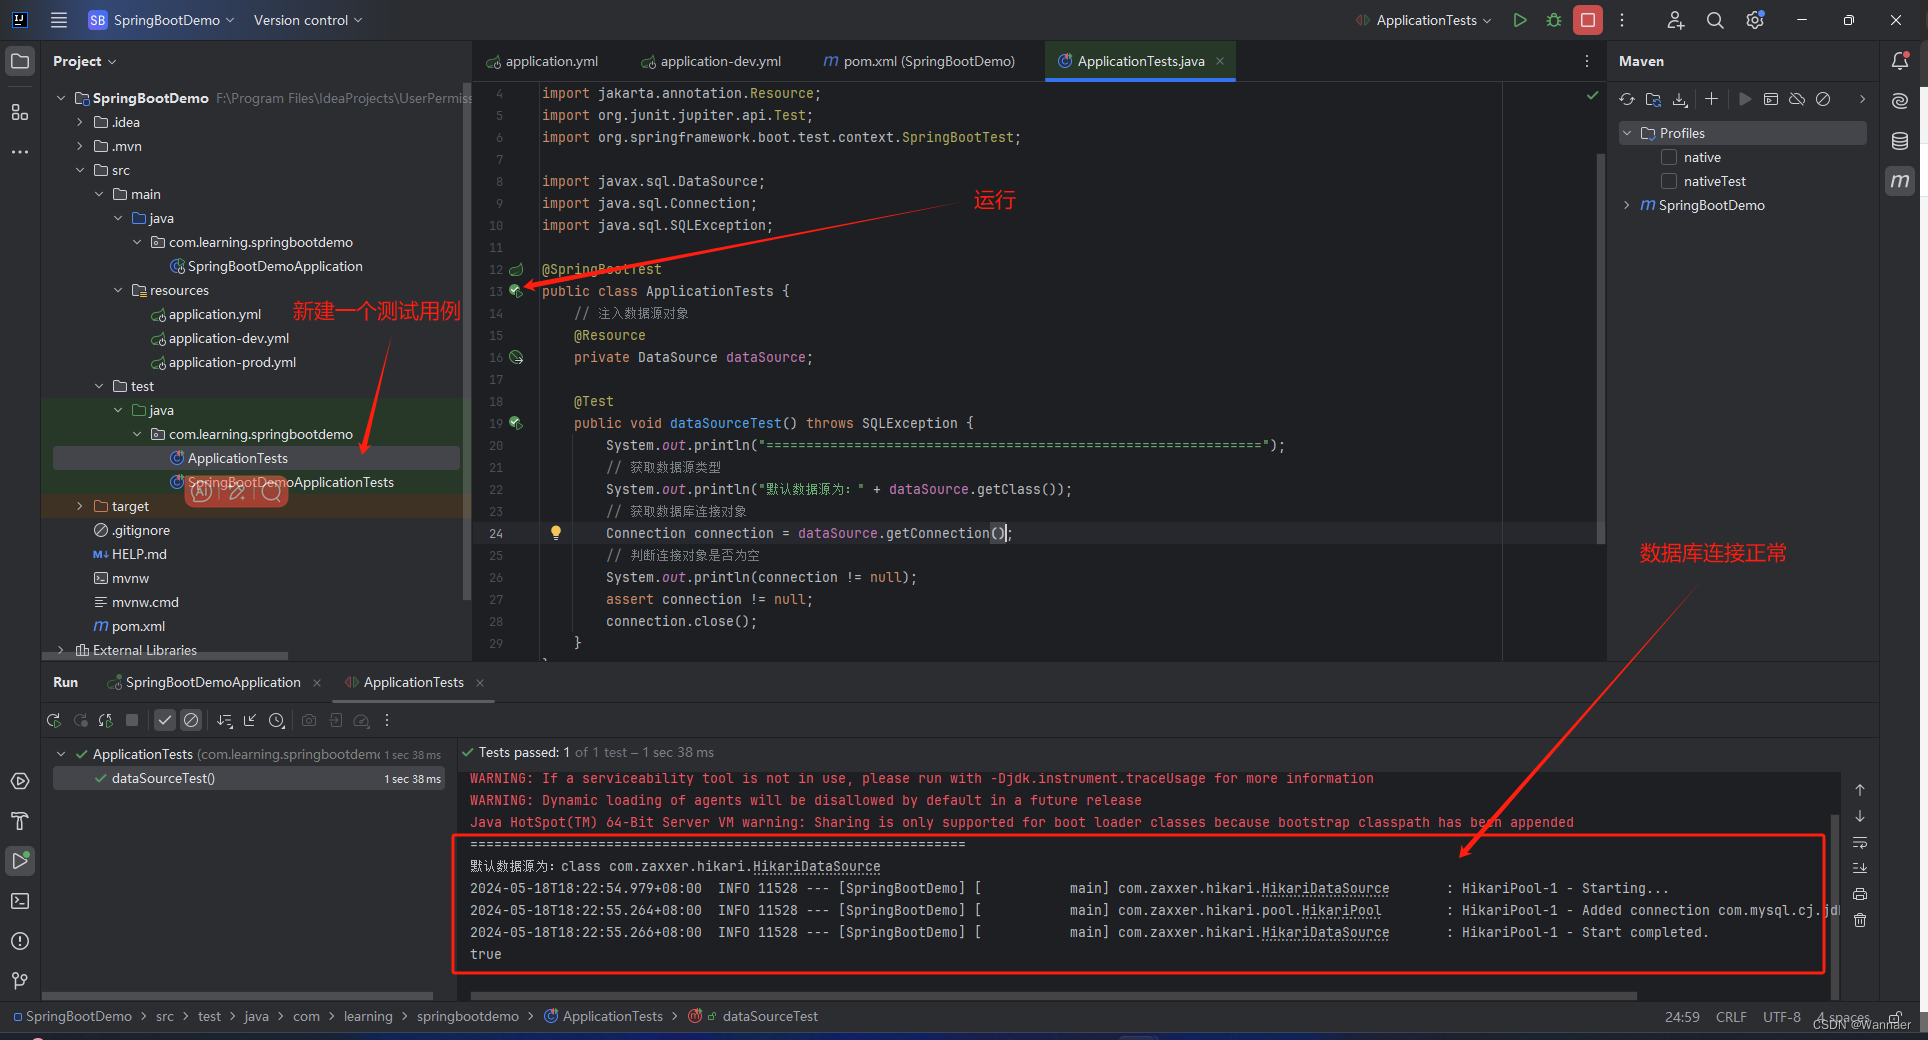
// ApplicationTests.java
package com.learning.springbootdemo;


import jakarta.annotation.Resource;
import org.junit.jupiter.api.Test;
import org.springframework.boot.test.context.SpringBootTest;

import javax.sql.DataSource;
import java.sql.Connection;
import java.sql.SQLException;

@SpringBootTest
public class ApplicationTests {
    // 注入数据源对象
    @Resource
    private DataSource dataSource;

    @Test
    public void dataSourceTest() throws SQLException {
        System.out.println("==============================================================");
        // 获取数据源类型
        System.out.println("默认数据源为:" + dataSource.getClass());
        // 获取数据库连接对象
        Connection connection = dataSource.getConnection();
        // 判断连接对象是否为空
        System.out.println(connection != null);
        assert connection != null;
        connection.close();
    }
}
5、配置 Druid 数据源
默认数据源-Hikari
在springboot2.0之后 , 采用的默认连接池就是Hikari, 号称"史上最快的连接池", 所以我们没有添加依赖也能直接用, springboot的自动配置中含有DataSourceAutoConfiguration配置类, 会先检查容器中是否已经有连接池对象, 没有则会使用默认的连接池, 并根据特定的属性来自动配置连接池对象, 用到的属性值来源于DataSourceProperties对象。
需要添加依赖和配置yml 此时加的是Druid的springboot自动配置包, 里面包含了DruidDataSourceAutoConfigure自动配置类,会自动创建druid的连接池对象, 所以springboot发现已经有连接池对象了,则不会再使用Hikari。(前面配置了,没有自行添加)
<!-- pom.xml -->
<!-- druid -->
<dependency>
  <groupId>com.alibaba</groupId>
  <artifactId>druid-spring-boot-starter</artifactId>
  <version>1.2.14</version>
</dependency>
# application-dev.yml
spring:
  datasource:
	type: com.alibaba.druid.pool.DruidDataSource
Spring Boot 整合 MyBatis
1、准备依赖
<!--mybatis集成到SpringBoot中的依赖-->
<dependency>
    <groupId>org.mybatis.spring.boot</groupId>
    <artifactId>mybatis-spring-boot-starter</artifactId>
    <version>3.0.3</version>
</dependency>
2、application-dev.yml 配置
Spring Boot 整合 MyBatis 时几个比较需要注意的配置参数:
mybatis.config-location

配置 mybatis-config.xml 路径,mybatis-config.xml 中配置 MyBatis 基础属性,如果项目中配置了 mybatis-config.xml文件需要设置该参数。

mybatis.mapper-locations

配置 Mapper 文件对应的 XML 文件路径。

mybatis.type-aliases-package

配置项目中实体类包路径
我们只配置 mapper-locations 即可,最终的 application-dev.yml文件如下:
mybatis:
#  config-location: classpath:mybatis-config.xml
mapper-locations: classpath:mapper/*Dao.xml
#  type-aliases-package: com.learning.springboot.springbootdemo
3、启动类添加Mapper接口扫描器
在启动类中添加对 Mapper 包扫描 @MapperScan,Spring Boot 启动的时候会自动加载包路径下的 Mapper 接口:
@SpringBootApplication
@MapperScan("com.learning.springbootdemo.dao") // 添加 @Mapper 注解
public class SpringBootDemoApplication {

    public static void main(String[] args) {
        SpringApplication.run(SpringBootDemoApplication.class, args);
    }
}
当然也可以直接在每个 Mapper 接口上面添加 @Mapper 注解,但是如果 Mapper 接口数量较多,在每个 Mapper 加注解是挺繁琐的,建议使用扫描注解。
4、设置日志log
logging:
  level:
    root: info
  file:
    name:
      springboot-site.log
5、实现 MyBatis 进行增删改查操作
1、数据库创建表格
首先创建了springboot_db 的数据库,之后在数据库中新建了一个名称为 tb_user 的数据表,表中有 id , name , password 三个字段,在测试时可以直接将以上 SQL 拷贝到 MySQL 中执行即可。
CREATE DATABASE /*!32312 IF NOT EXISTS*/ `springboot_db` /*!40100 DEFAULT CHARACTER SET utf8 */;
USE `springboot_db`;
DROP TABLE IF EXISTS `tb_user`;
CREATE TABLE `tb_user` (
  `id` INT(11) NOT NULL AUTO_INCREMENT COMMENT '主键',
  `name` VARCHAR(100) NOT NULL DEFAULT '' COMMENT '登录名',
  `password` VARCHAR(100) NOT NULL DEFAULT '' COMMENT '密码',
  PRIMARY KEY (`id`)
) ENGINE=INNODB AUTO_INCREMENT=1 DEFAULT CHARSET=utf8;
2、新建实体类和 Mapper 接口
1、在 entity 包下新建 User 类,将 tb_user 中的字段映射到该实体类中:
package com.learning.springbootdemo.entity;

public class User {

    private Integer id;
    private String name;
    private String password;

    public Integer getId() {
        return id;
    }

    public void setId(Integer id) {
        this.id = id;
    }

    public String getName() {
        return name;
    }

    public void setName(String name) {
        this.name = name;
    }

    public String getPassword() {
        return password;
    }

    public void setPassword(String password) {
        this.password = password;
    }
}
2、在 dao 包中新建 UserDao 接口,并定义增删改查四个接口:
package com.learning.springbootdemo.dao;

import com.learning.springbootdemo.entity.User;

import java.util.List;

public interface UserDao {
    /**
     * 返回数据列表
     */
    List<User> findAllUsers();

    /**
     * 添加
     */
    int insertUser(User User);

    /**
     * 修改
     */
    int updUser(User User);

    /**
     * 删除
     */
    int delUser(Integer id);
}
3、创建 Mapper 接口的映射文件
在 resources/mapper 目录下新建 Mapper 接口的映射文件 UserDao.xml,之后进行映射文件的编写。
<?xml version="1.0" encoding="UTF-8" ?>
<!DOCTYPE mapper
        PUBLIC "-//mybatis.org//DTD Mapper 3.0//EN"
        "http://mybatis.org/dtd/mybatis-3-mapper.dtd">
<!-- 配置文件头 不加会报错 文档根元素 "mapper" 必须匹配 DOCTYPE 根 "null"。 -->
<!-- 1、首先,定义映射文件与 Mapper 接口的对应关系,比如该示例中,需要将 UserDao.xml 的与对应的 UserDao 接口类之间的关系定义出来: -->
<mapper namespace="com.learning.springbootdemo.dao.UserDao">

<!-- 2、配置表结构和实体类的对应关系:-->
    <resultMap type="com.learning.springbootdemo.entity.User" id="UserResult">
        <result property="id" column="id"/>
        <result property="name" column="name"/>
        <result property="password" column="password"/>
    </resultMap>

<!-- 3、针对对应的接口方法,编写具体的 SQL 语句,最终的 UserDao.xml 文件如下: -->
    <select id="findAllUsers" resultMap="UserResult">
        select id,name,password from tb_user
        order by id desc
    </select>
    <insert id="insertUser" parameterType="com.learning.springbootdemo.entity.User">
        insert into tb_user(name,password)
        values(#{name},#{password})
    </insert>
    <update id="updUser" parameterType="com.learning.springbootdemo.entity.User">
        update tb_user
        set
        name=#{name},password=#{password}
        where id=#{id}
    </update>
    <delete id="delUser" parameterType="int">
        delete from tb_user where id=#{id}
    </delete>
</mapper>
4、新建 UserController
为了对 MyBatis 进行功能测试,在 controller 包下新建 UserController 类,并新增 4 个方法分别接收对于 tb_user 表的增删改查请求,代码如下:
package com.learning.springbootdemo.controller;

import com.alibaba.druid.util.StringUtils;
import com.learning.springbootdemo.dao.UserDao;
import com.learning.springbootdemo.entity.User;
import jakarta.annotation.Resource;
import org.springframework.web.bind.annotation.GetMapping;
import org.springframework.web.bind.annotation.RestController;

import java.util.List;

@RestController
public class UserController {
    @Resource
    UserDao userDao;

    // 查询所有记录
    @GetMapping("/users/mybatis/queryAll")
    public List<User> queryAll() {
        return userDao.findAllUsers();
    }

    // 新增一条记录
    @GetMapping("/users/mybatis/insert")
    public Boolean insert(String name, String password) {
        if (StringUtils.isEmpty(name) || StringUtils.isEmpty(password)) {
            return false;
        }
        User user = new User();
        user.setName(name);
        user.setPassword(password);
        return userDao.insertUser(user) > 0;
    }

    // 修改一条记录
    @GetMapping("/users/mybatis/update")
    public Boolean insert(Integer id, String name, String password) {
        if (id == null || id < 1 || StringUtils.isEmpty(name) || StringUtils.isEmpty(password)) {
            return false;
        }
        User user = new User();
        user.setId(id);
        user.setName(name);
        user.setPassword(password);
        return userDao.updUser(user) > 0;
    }

    // 删除一条记录
    @GetMapping("/users/mybatis/delete")
    public Boolean insert(Integer id) {
        if (id == null || id < 1) {
            return false;
        }
        return userDao.delUser(id) > 0;
    }
}
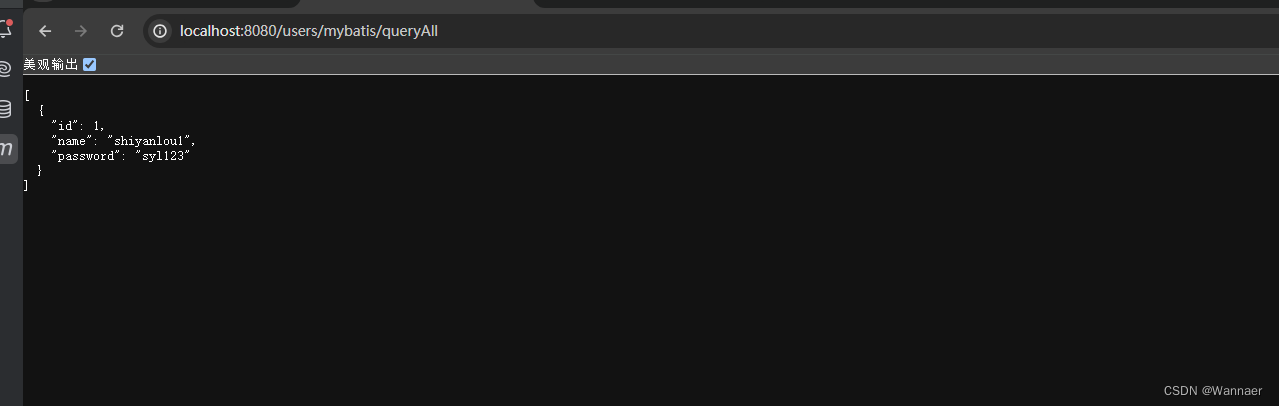
5、功能测试
1、启动 Spring Boot 项目
2、浏览器输入测试地址
查询:http://localhost:8080/users/mybatis/queryAll
新增:http://localhost:8080/users/mybatis/insert?name=mybatis1&password=1233333
修改:http://localhost:8080/users/mybatis/update?id=3&name=mybatis2&password=1233222
删除:http://localhost:8080/users/mybatis/delete?id=3
Spring Boot 整合 Lombok
Lombok 项目是一个第三方的 Java 工具库,它会自动插入编辑器和构建工具中,Lombok 提供了一组非常有用的注释,用来消除 Java 类中的大量样板代码,比如 setter getter 方法、构造方法等等, 仅仅在原来的 JavaBean 类上使用 @Data 注解就可以替换数百行代码从而使代码变得更加清爽、简洁且易于维护。
注意:Lombok 它并不是一个必要的插件。暂时先跳过。
Spring Boot 整合 Swagger
Swagger 是一款 RESTful 接口的文档在线自动生成+功能测试功能软件
它可以轻松的整合到 Spring Boot 中并生成 RESTful API 文档,既可以减少我们创建文档的工作量,同时说明内容又整合入实现代码中,让维护文档和修改代码整合为一体,可以让我们在修改代码逻辑的同时方便的修改文档说明,另外 Swagger 也提供了强大的页面测试功能来调试每个 API 接口。
1、添加依赖文件
首先,在 pom.xml 中加入 Swagger 的依赖信息,如下:
<!-- swagger -->
 <dependency>
     <groupId>org.springdoc</groupId>
     <artifactId>springdoc-openapi-starter-webmvc-ui</artifactId>
     <version>2.0.2</version>
 </dependency>
2、创建 Swagger 配置类
新建 config 包,在 config 包中新增 Swagger2Config.java,代码如下:
package com.learning.springbootdemo.config;

import io.swagger.v3.oas.models.Components;
import io.swagger.v3.oas.models.OpenAPI;
import io.swagger.v3.oas.models.info.Contact;
import io.swagger.v3.oas.models.info.Info;
import io.swagger.v3.oas.models.info.License;
import io.swagger.v3.oas.models.security.SecurityRequirement;
import io.swagger.v3.oas.models.security.SecurityScheme;
import org.springdoc.core.models.GroupedOpenApi;
import org.springframework.context.annotation.Bean;
import org.springframework.context.annotation.Configuration;

@Configuration
public class SpringDocConfig {

    // 扫描路径
    private static final String basePackage = "com.learning.springbootdemo.controller";
    // 请求头名称
    private static final String headerName = "token";

    @Bean
    public GroupedOpenApi group01() {
        return GroupedOpenApi.builder()
                .group("group01")
                .addOperationCustomizer((operation, handlerMethod) -> {
                    operation.addSecurityItem(new SecurityRequirement().addList(headerName));
                    return operation;
                })
                .packagesToScan(basePackage)
                .build();
    }

    @Bean
    public OpenAPI customOpenAPI() {
        Components components = new Components();
        //添加右上角的统一安全认证
        components.addSecuritySchemes(headerName,
                new SecurityScheme()
                        .type(SecurityScheme.Type.APIKEY)
                        .scheme("basic")
                        .name(headerName)
                        .in(SecurityScheme.In.HEADER)
                        .description("请求头")
        );
        return new OpenAPI()
                .components(components)
                .info(apiInfo());
    }

    private Info apiInfo() {
        Contact contact = new Contact();
        contact.setName("Wannaer");
        return new Info()
                .title("Swagger文档")
                .version("1.0")
                .contact(contact)
                .license(new License().name("Apache 2.0").url("http://springdoc.org"));
    }
}
group01() 方法用于返回生成 Swagger API 时的接口摘要信息,也是在该方法中指定需要扫描的控制器包路径,只有此路径下的 Controller 类才会自动生成 Swagger API 文档。如果想要根据不同的包对 API 文档进行分组,可以配置多个 GroupedOpenApi 实例,比如再写一个方法 group02,扫描的包是 cn.lanqiao.springboot3.controller2。
apiInfo() 方法中主要是配置一些基础信息,包括配置页面展示的基本信息包括,标题、描述、版本、服务条款、联系方式等。
配置完成之后启动项目,在浏览器中输入网址 /swagger-ui/index.html,即可看到 Swagger 页面,效果如下:
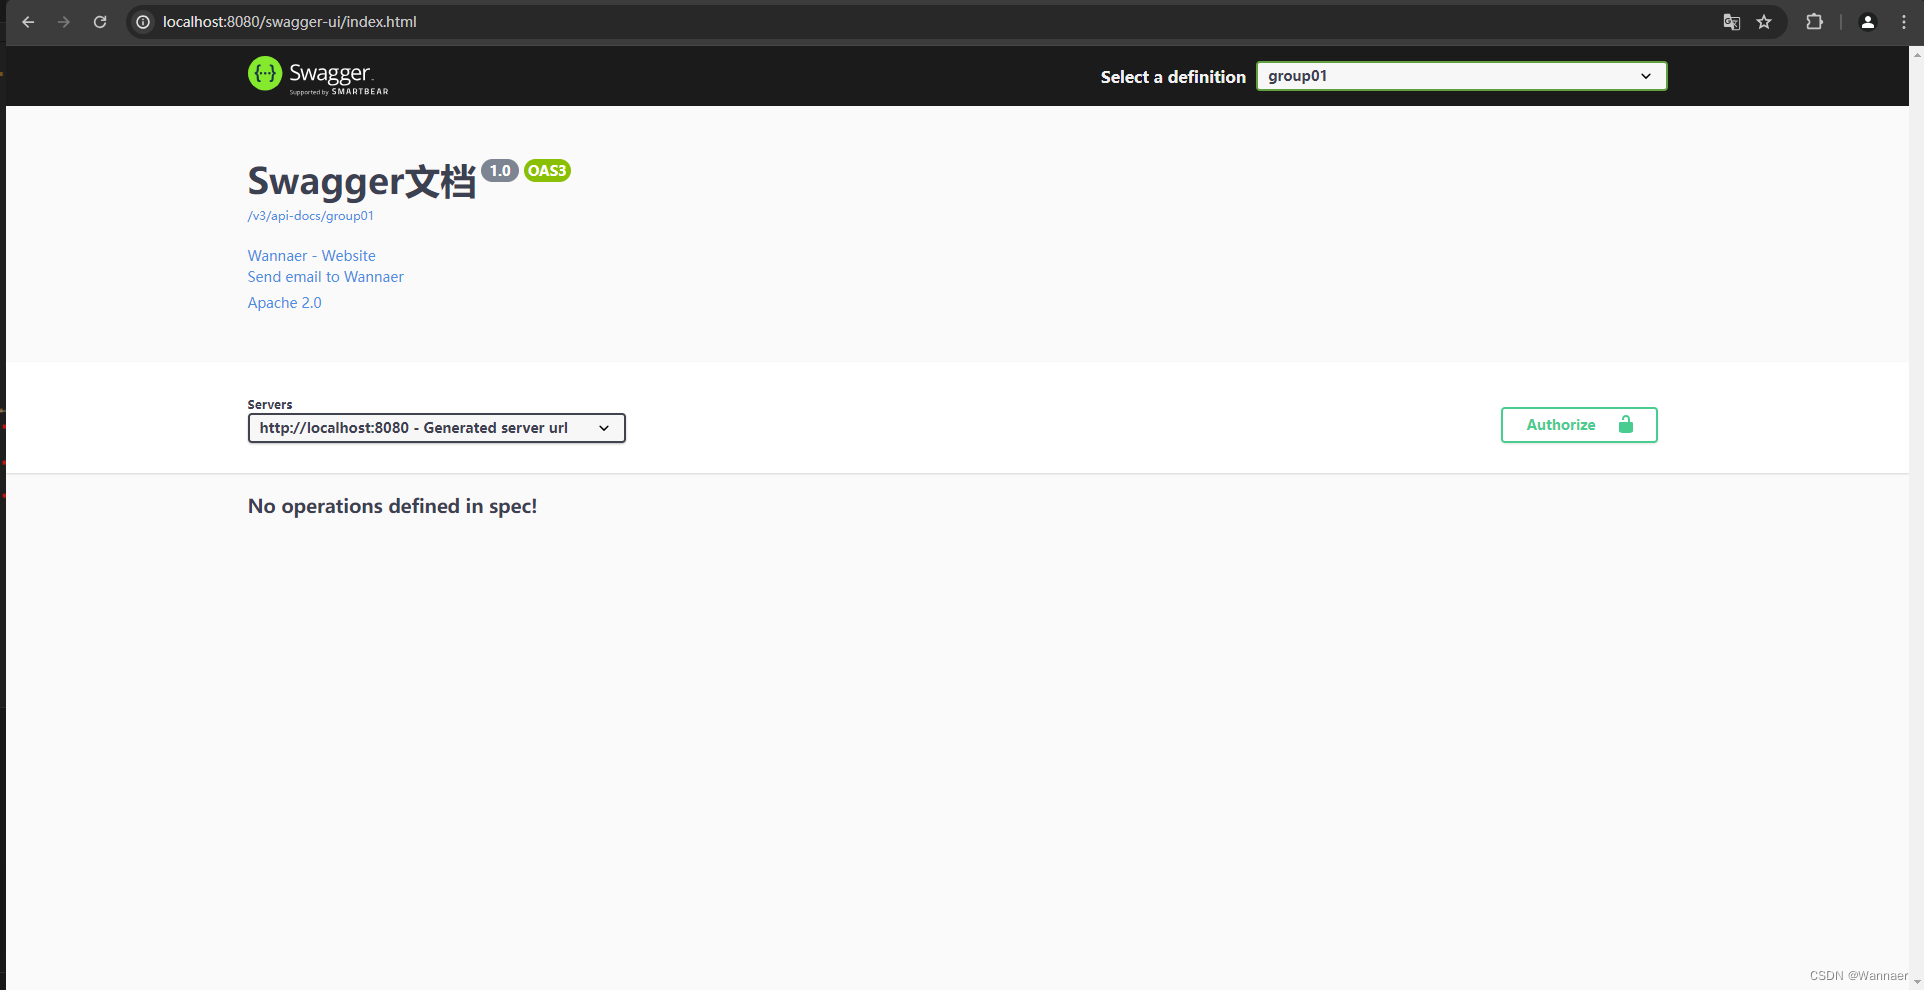
此时只有基础的配置信息,并没有文档信息,接下来我们需要在我们的 Controller 类。
@Tag(name = "用户模块接口")
@RestController
public class UserController {
	// 查询所有记录
    @Operation(summary = "查询所有记录")
    @GetMapping("/users/mybatis/queryAll")
    public List<User> queryAll() {
        return userDao.findAllUsers();
    }
}
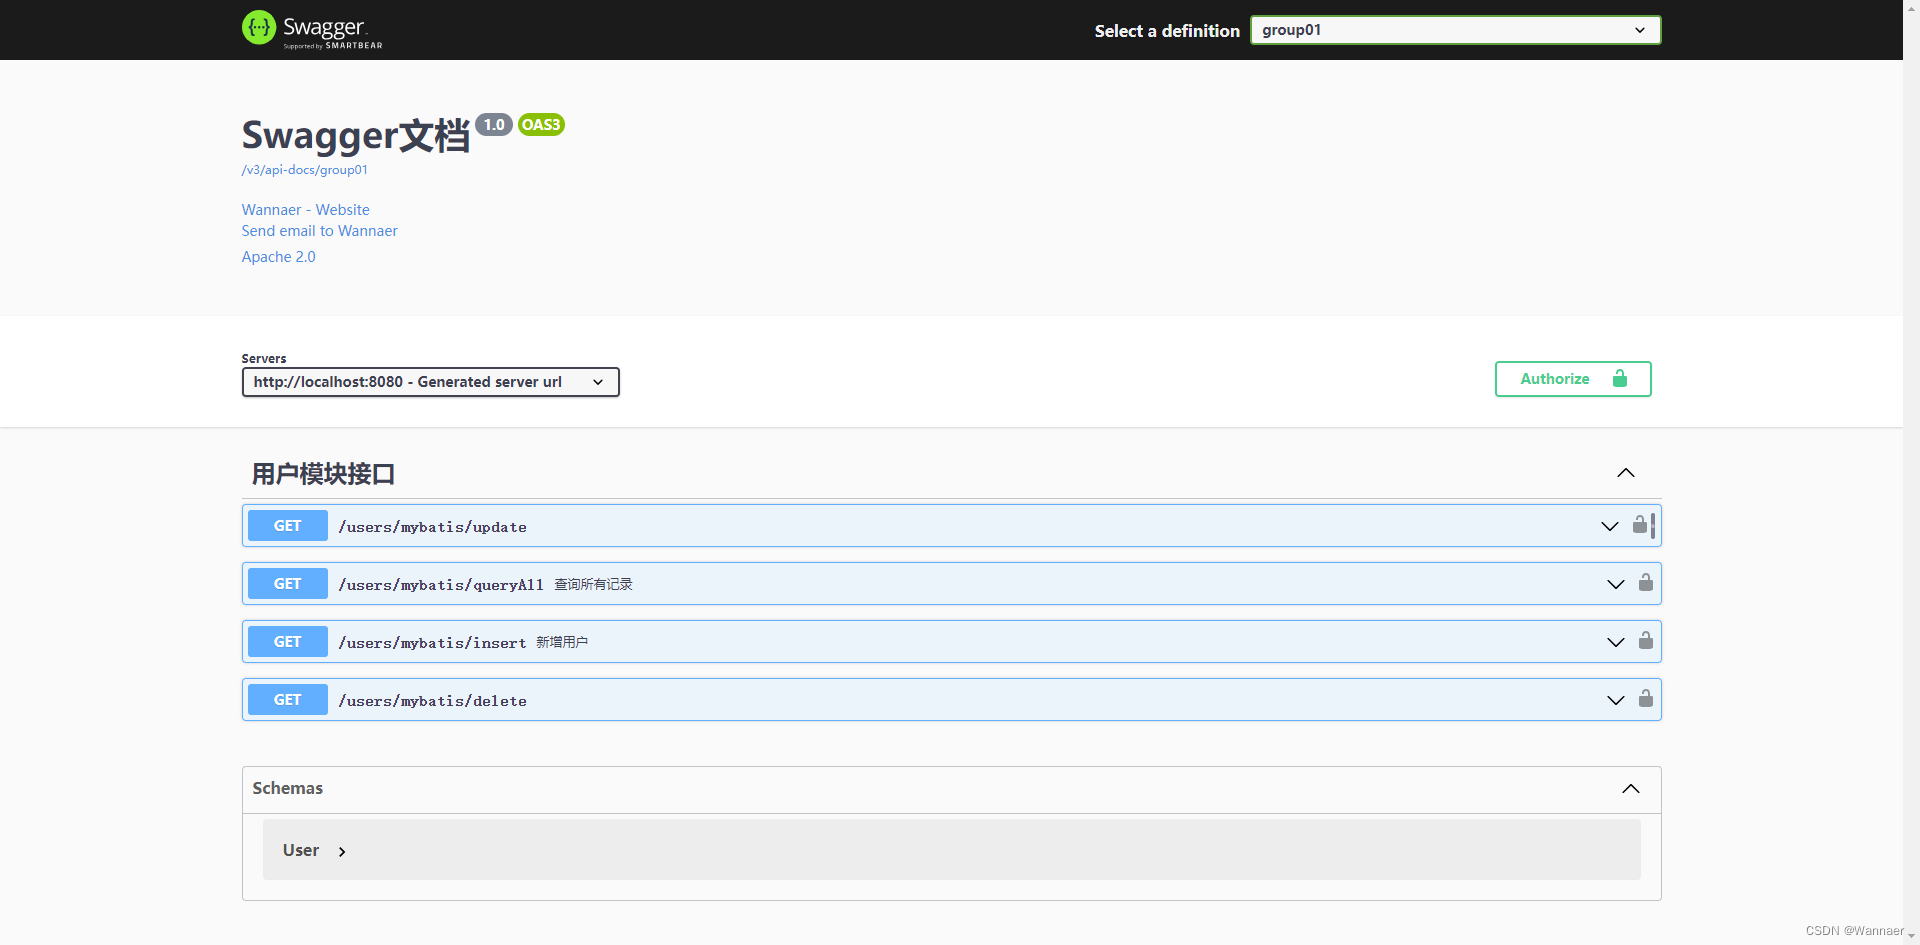
在项目启动成功后,查看swagger接口文档页面 包括参数信息、请求方法、注意事项等等我们已经在代码中定义的信息都会在接口文档中显示。
// 完整 UserController 代码
package com.learning.springbootdemo.controller;

import com.alibaba.druid.util.StringUtils;
import com.learning.springbootdemo.dao.UserDao;
import com.learning.springbootdemo.entity.User;
import io.swagger.v3.oas.annotations.Operation;
import io.swagger.v3.oas.annotations.Parameter;
import io.swagger.v3.oas.annotations.tags.Tag;
import jakarta.annotation.Resource;
import org.springframework.web.bind.annotation.GetMapping;
import org.springframework.web.bind.annotation.RestController;

import java.util.List;

@Tag(name = "用户模块接口")
@RestController
public class UserController {
    @Resource
    UserDao userDao;

    // 查询所有记录
    @Operation(summary = "查询所有记录")
    @GetMapping("/users/mybatis/queryAll")
    public List<User> queryAll() {
        return userDao.findAllUsers();
    }

    // 新增一条记录
    @Operation(summary = "新增用户", description = "根据User对象新增用户")
    @GetMapping("/users/mybatis/insert")
    public Boolean insert(String name, String password) {
        if (StringUtils.isEmpty(name) || StringUtils.isEmpty(password)) {
            return false;
        }
        User user = new User();
        user.setName(name);
        user.setPassword(password);
        return userDao.insertUser(user) > 0;
    }

    // 修改一条记录
    @GetMapping("/users/mybatis/update")
    public Boolean insert(Integer id, String name, String password) {
        if (id == null || id < 1 || StringUtils.isEmpty(name) || StringUtils.isEmpty(password)) {
            return false;
        }
        User user = new User();
        user.setId(id);
        user.setName(name);
        user.setPassword(password);
        return userDao.updUser(user) > 0;
    }

    // 删除一条记录
    @GetMapping("/users/mybatis/delete")
    public Boolean insert(Integer id) {
        if (id == null || id < 1) {
            return false;
        }
        return userDao.delUser(id) > 0;
    }
}
3、Swagger 接口测试
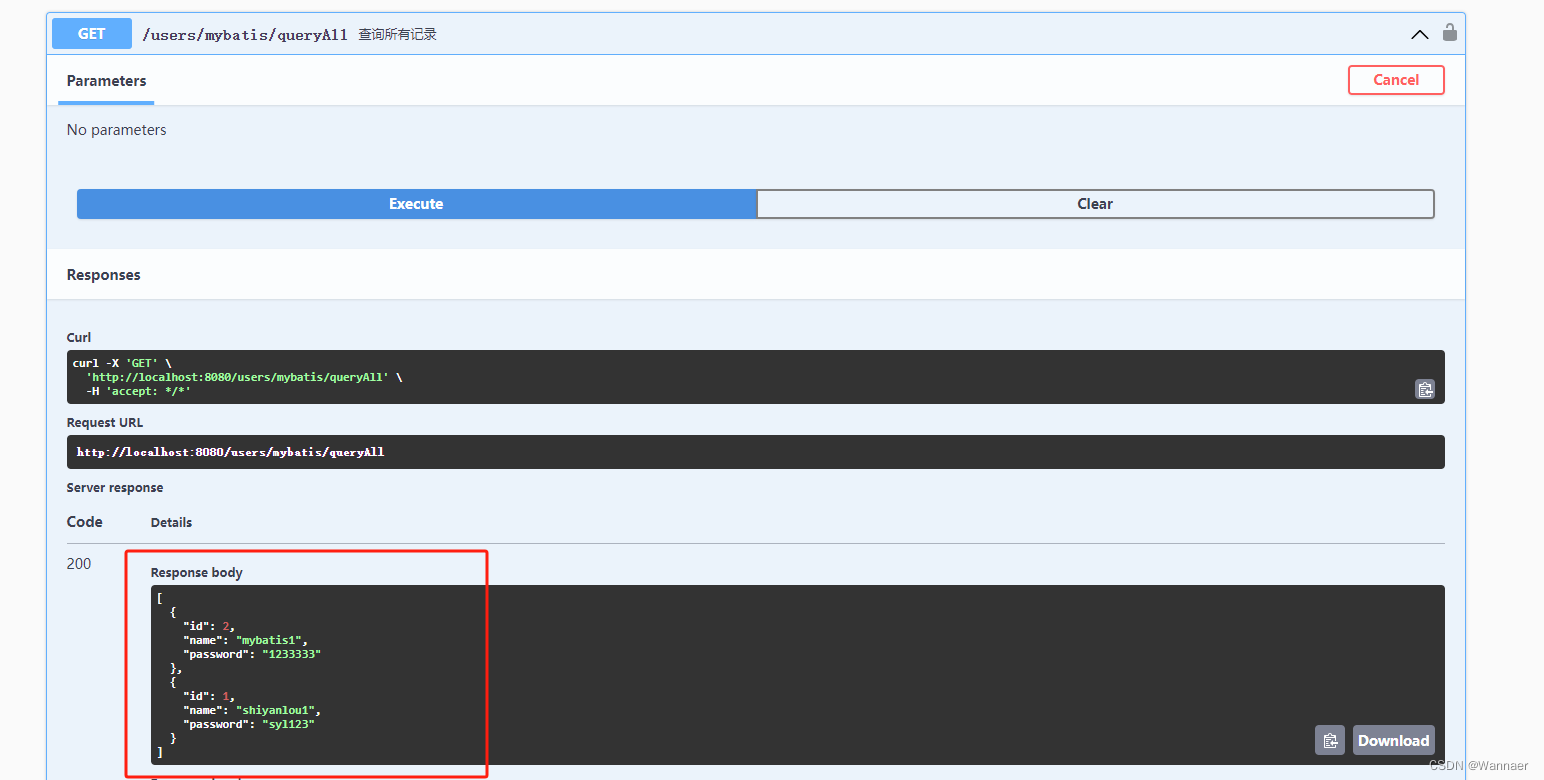
首先我们点进列表接口,接口的右上方有 Try it out 按钮,点击它来尝试发送请求。

之后页面上会出现 Execute 按钮,点击它之后会实际的向后端发送用户列表请求,请求成功后可以在页面中看到请求信息,以及返回数据,在 Response body 信息框中我们可以看到两条用户数据,接口请求成功且数据如预期中的数据一致,证明这个接口是没有问题的,结果如下图所示。
接口参数处理和统一响应结果
关于传参的规范和返回结果的统一,尽可能的使得控制层业务层处理的数据格式统一化,保证了接口和编码规范的统一性。
规范的参数定义和结果响应极大程度的降低了开发成本及沟通成本。