小程序实现容器图片流式布局功能,因为目前论坛上也有很多博主出过类似的文章,这里我就以一个小白角度去讲一下如何实现的吧。给作者一点点鼓励,先点个赞赞吧👍,蟹蟹!!
目标
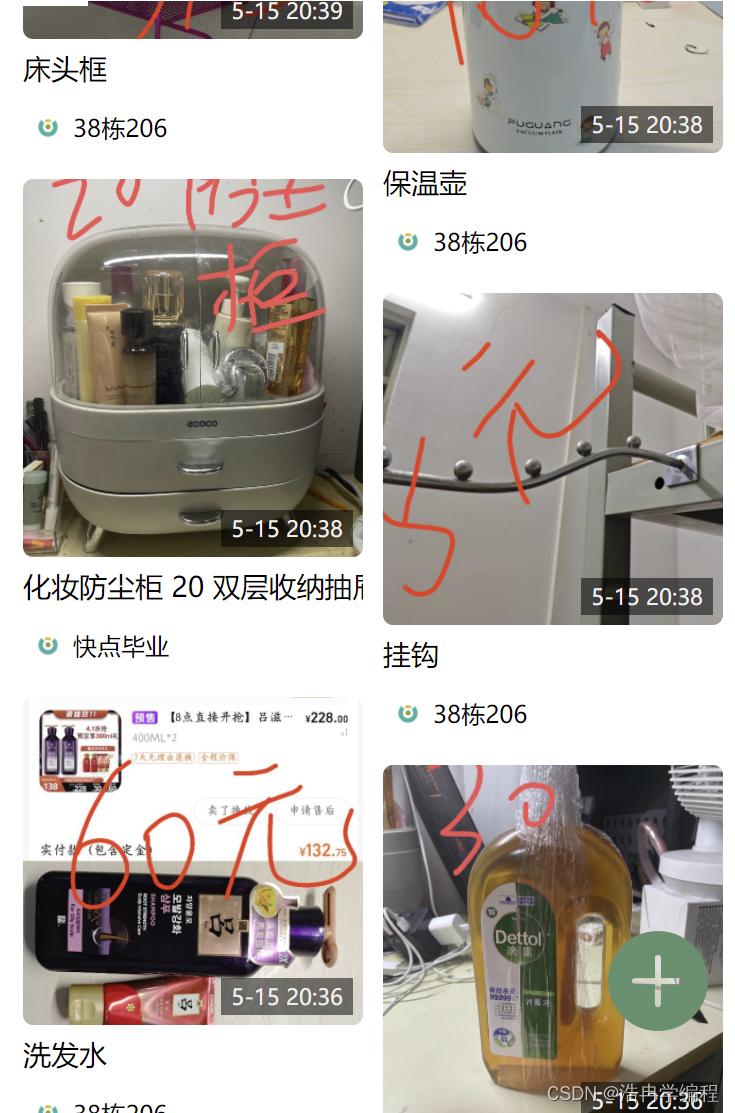
实现下方效果图
技术栈
微信小程序原生框架,wxml+wxss+js,因为后端是云开发的,所以网络请求是官方的api,比如wx.cloud.database().collection("community") .get()
这样做的好处
能根据图片的高度自适应容器高度,整体美观,易读
实现逻辑
1.页面布局wxml,一个大容器(宽度撑满屏幕高度)中,包含两列容器,左边一列,右边一列。如图所示,有图清晰一点。

2.首先获取一个数组dataList,用于渲染到页面上的数据,这里就用闲置帖子为例。
3.准备两个变量,一个是整型leftheight,作为左边容器实时高度,另一个是整型rightheight,作为右边容器实时高度。
4.获取数组后将回调值res中的data赋值给list局部变量,并循环这个list数组,同时判断左边的容器高度和右边的容器哪个更低,将子元素(子元素为对象)设置一个index属性标记属于左边容器,还是右边容器,这里的例子是index == 0 时候是左边容器,index==1时候是右边容器。每一次循环渲染子元素的时候判断左右容器高低,左边容器低则index设置为0标记到左边容器中去,否则亦反。
注意:picheight为数据库中数据已有的字段属性,为图片的高度
var that = this
var list = res.data //res.data为获取数据库中返回的数据数组 ,list为临时存储变量
var dataList = that.data.dataList //dataList为最终渲染到页面的数组数据
var leftheight = that.data.leftheight // 获取全局变量保存的左边容器高度
var rightheight = that.data.rightheight // 获取全局变量保存的右边容器高度

for (let i = 0; i < list.length; i++) {

//这里的picheight为存储到数据库时候的高度
  if (leftheight <= rightheight) {
      leftheight = leftheight + list[i].picheight + 120
      list[i].index = 0
  } else {
      rightheight = rightheight + list[i].picheight + 120
      list[i].index = 1
  }

   dataList.push(list[i])
}
    that.setData({
      dataList: dataList,
      leftheight: leftheight,
      rightheight: rightheight
  })
5.在wxml通过for循环渲染出来
部分关键代码:
 <view class="shop-big-box flex-row-center-x">
    <!-- 左列表 -->
    <view class='shop'>
      <block wx:for="{{dataList}}" wx:key="_id" wx:if="{{item.index == 0}}">
        <my-datalist item="{{item}}" index="{{index}}" data-src="{{item.pictures[0]}}" data-index="{{index}}" bind:getimage="getimage" />
      </block>
    </view>

    <!-- 右列表 -->
    <view class='shop'>
      <block wx:for="{{dataList}}" wx:key="_id" wx:if="{{item.index == 1}}">
        <my-datalist item="{{item}}" index="{{index}}" data-src="{{item.pictures[0]}}" data-index="{{index}}" bind:getimage="getimage" />
      </block>
    </view>
  </view>
my-datalist组件
<view class="shop-detail" bindtap="godetail" data-id="{{item._id}}">
  <view class='imagecont' style="height:{{item.picheight}}rpx;">
    <block wx:if="{{item.pictures.length > 0}}">
      <image src="{{item.pictures[0]}}" data-index="{{index}}" class="prodimg" style="height:{{item.picheight}}rpx;z-index: 3;"  mode="aspectFill" />
    </block>
    </view>
  </view>
  <view style="width: 100%;display: flex;flex-wrap: wrap;height: 120rpx;">
    <view class="shop-detail-text">{{item.text}}</view>
    <view class="shop-detail-user flex-row-center">
      <image src="{{item.user.imagavatares}}" style="border-radius: 50%;width: 30rpx;height: 30rpx;margin: 0 10rpx;background-color: rgb(247, 247, 247);" />
      <text>{{item.user.username}}</text>
    </view>
  </view>
</view>
完整代码
index.wxml
  <view class="shop-big-box flex-row-center-x">
    <!-- 左列表 -->
    <view class='shop'>
      <block wx:for="{{dataList}}" wx:key="_id" wx:if="{{item.index == 0}}">
        <my-datalist item="{{item}}" index="{{index}}" data-src="{{item.pictures[0]}}" data-index="{{index}}" bind:getimage="getimage" />
      </block>
    </view>

    <!-- 右列表 -->
    <view class='shop'>
      <block wx:for="{{dataList}}" wx:key="_id" wx:if="{{item.index == 1}}">
        <my-datalist item="{{item}}" index="{{index}}" data-src="{{item.pictures[0]}}" data-index="{{index}}" bind:getimage="getimage" />
      </block>
    </view>
  </view>
index.wxss
.shop-big-box{
width: 100%;
}
.shop{
width: 340rpx;
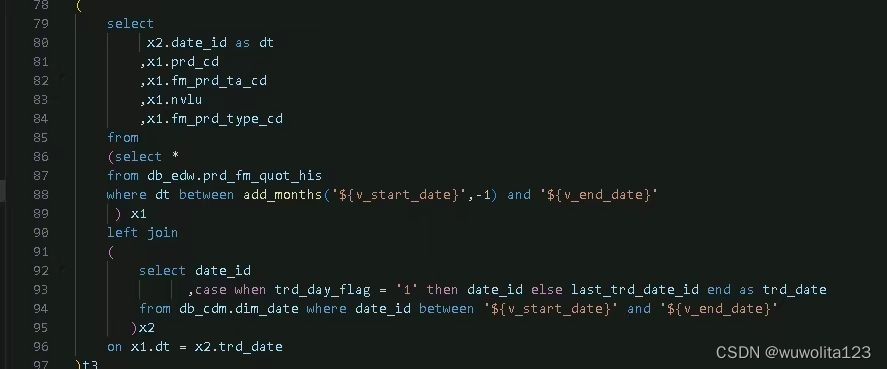
margin: 0 10rpx;
}
/* 盒子水平摆放并水平居中 */
.flex-row-center-x{
display: flex;
flex-direction: row;
justify-content: center;
}
index.js
// pages/index/index.js
const app = getApp()
const db = wx.cloud.database()
const _ = db.command
Page({

  /**
   * 页面的初始数据
   */
  data: {
    dataList: [],
    leftheight: 0,
    rightheight: 0,
  },
  /**
   * 生命周期函数--监听页面加载
   */
  onLoad() {

    this.getList()


  },


  getList() {
    var that = this
    wx.cloud.database().collection("community")
      .orderBy('top', 'desc')
      .orderBy('date', 'desc')
      .get({
        success(res) {
          console.log("出来的数据", res.data);
          if (res.data.length > 0) {
            var list = res.data
            var dataList = that.data.dataList
            var leftheight = that.data.leftheight
            var rightheight = that.data.rightheight

            for (let i = 0; i < list.length; i++) {
              if (leftheight <= rightheight) {
                leftheight = leftheight + list[i].picheight + 120
                list[i].index = 0
              } else {
                rightheight = rightheight + list[i].picheight + 120
                list[i].index = 1
              }
              dataList.push(list[i])
            }
            that.setData({
              dataList: dataList,
              leftheight: leftheight,
              rightheight: rightheight,
            })

          }
        },
        fail(err) {
          wx.showToast({
            title: '网络出错啦!' + err,
            icon: 'none'
          })


        }
      })


  },


})
index.json
{
  "usingComponents": {
    "my-datalist": "../../components/datalist/datalist"
  },
  "navigationStyle": "custom",
  "enablePullDownRefresh": true
}
components/datalist.js
const app = getApp()
const db = wx.cloud.database()
const _ =db.command
Component({
  properties: {
    item: JSON,
    index:String,
  },
  methods: {

      godetail(e) {
        wx.navigateTo({
          url: '/pages/Filecommunity/detail/detail?id=' + e.currentTarget.dataset.id,
        })
      },
      getimage() {
        this.triggerEvent('getimage');
      },

  },
});
components/datalist.json
{
  "component": true,
  "usingComponents": {}
}
components/datalist.wxml
<view class="shop-detail" bindtap="godetail" data-id="{{item._id}}">
  <view class='imagecont' style="height:{{item.picheight}}rpx;">
    <block wx:if="{{item.pictures.length > 0}}">
      <image src="{{item.pictures[0]}}" data-index="{{index}}" class="prodimg" style="height:{{item.picheight}}rpx;z-index: 3;" mode="aspectFill" />
    </block>

  </view>
  <view style="width: 100%;display: flex;flex-wrap: wrap;height: 120rpx;">
    <view class="shop-detail-text">{{item.text}}</view>

    <view class="shop-detail-user flex-row-center">
      <image src="{{item.user.imagavatares}}" style="border-radius: 50%;width: 30rpx;height: 30rpx;margin: 0 10rpx;background-color: rgb(247, 247, 247);" />
      <text>{{item.user.username}}</text>
    </view>
  </view>
</view>
components/datalist.wxss
.shop-detail{
  border-radius: 10rpx;
  width: 340rpx;
  background: #fff;
  display: inline-block;
   font-size: 28rpx;
  margin: 10rpx 0;
}


.shop-detail-text{
  font-size: 28rpx;
  width: 100%;
  margin: 10rpx 0;
  overflow:hidden;
  white-space:nowrap;
  display: -webkit-box;
  -webkit-line-clamp: 1;
  -webkit-box-orient: vertical;
}
.shop-detail-user{
  display: flex;
  flex-direction: row;
  align-items: center;
  overflow:hidden;
  white-space:nowrap;
  font-size: 24rpx;
  height: 26rpx;
  margin: 10rpx 0 10rpx 0;
  text-overflow: ellipsis;
  width: 100%;
}


.imagecont{
  width: 100%;
  font-size: 0;
  position: relative;
}
.prodimg {
  width: 100% !important;
  vertical-align: middle !important;
  border-radius: 10rpx !important;
  position: absolute !important;
  font-size:0 !important;

}
/* 盒子水平摆放并垂直居中 */
.flex-row-center{
  display: flex;
  flex-direction: row;
  align-items: center;
}
这篇对您有所帮助的话,来个点赞或关注吧❀❀~,另外要预览效果的可以搜索邑学宝微信小程序呦~