paper:RepPoints: Point Set Representation for Object Detection
code:https://github.com/microsoft/RepPoints
背景
在目标检测中,包含图像矩形区域的边界框bounding box作为处理的基本元素,贯穿整个检测流程,从anchors到proposals再到final predictions。矩形框的形式之所以流行,一是因为最通用的评价检测模型性能的指标IoU就是计算目标gt边界框和预测边界框的重叠区域,二是因为矩形框的形式便于在深度网络中提取特征。
存在的问题
虽然边界框便于计算,但它只提供了对象的粗略定位,并不能提供反映对象形状和姿态的精确定位。因此,从矩形框中提取的特征可能会受到背景内容或包含较少语义信息的前景的影响,从而降低目标检测中的分类性能。
本文的创新点
本文提出一种新的对象边界表示方法,即用一组点集来表示对象的空间区域。文中设置为9个点,这9个点并不需要事先定义或标注,还是采用边界框的标注方式,通过定位和分类的联合监督,模型可以自动学习到这9个点的位置,学习到的9个点通常位于对象空间区域的极值位置处或重要语义位置处。
方法介绍
本文提出对一组自适应点进行建模,如下,其中n=9

逐步refine边界框的定位和特征提取对多阶段目标检测非常有意义,对于RepPoints,refine过程可表示如下

其中 \(\left \{ \left ( \bigtriangleup x_{k},\bigtriangleup y_{k} \right ) \right \} ^{n}_{k=1}\) 是预测的新的采样点相对于旧的采样点的偏移。
对于模型最终预测的9个点,通过转换函数 \(\mathcal{T} \) 将其转换成bounding box的形式,一方面可以有效利用对象bounding box形式的标注,另一方面可以通过IoU的指标评估模型性能。本文考虑以下三种转换函数:
Min-max function. 即沿xy方向取最小和最大值,得到bounding box。
Partial Min-max function. 选择9个点中的前4个点,然后再沿xy方向取最小和最大值,得到bounding box。
Moment-based function. 用9个点的均值和方差来计算bbox的中心点和尺度,然后结合可学习的调节因子得到bounding box。
利用RepPoints表示方法,作者设计了一个anchor-free的多阶段目标检测模型,其中将可变形卷积与RepPoints巧妙地结合到一起,整体结构如下所示

因为是anchor-free的方法,采用center point作为对象的初始表示。第一阶段学习center point到初始RepPoints9个点的偏移,学习过程受到两方面的监督,一是通过转换函数\(\mathcal{T} \)得到的初始预测bounding box的左上角和右下角与gt box之间的distance loss,二是分类loss。第二阶段进一步refine边界框的定位,学习初始RepPoints9个点到最终的RepPoints的偏移,最终的RepPoints通过转换函数就得到了边界框的最终预测结果。
Head结构如下图所示

其中有两个子分支分别用于分类和定位,具体结构后面结合代码再详细介绍。
代码解析
这里以mmdetection中的实现为例,讲解下具体实现过程
输入batch_size=2,经过数据增强等预处理后,input_shape=(2, 3, 300, 300),backbone='ResNet-50',neck='FPN',输入经过backbone和neck后得到输出[(2,256,38,38), (2,256,19,19), (2,256,10,10), (2,256,5,5), (2,256,3,3)]。本文的创新主要在head结构、标签分配以及损失函数,head结构如图3所示,代码文件在mmdetection/mmdet/models/dense_heads/reppoints_head.py中,接下来介绍head的具体实现。
Head Architecture
head部分的完整代码如下
def forward_single(self, x):  # (2, 256, 38, 38)
"""Forward feature map of a single FPN level."""
dcn_base_offset = self.dcn_base_offset.type_as(x)  # (1, 18, 1, 1)
# tensor([[[[-1.]],
#
#          [[-1.]],
#
#          [[-1.]],
#
#          [[ 0.]],
#
#          [[-1.]],
#
#          [[ 1.]],
#
#          [[ 0.]],
#
#          [[-1.]],
#
#          [[ 0.]],
#
#          [[ 0.]],
#
#          [[ 0.]],
#
#          [[ 1.]],
#
#          [[ 1.]],
#
#          [[-1.]],
#
#          [[ 1.]],
#
#          [[ 0.]],
#
#          [[ 1.]],
#
#          [[ 1.]]]], device='cuda:0')

# If we use center_init, the initial reppoints is from center points.
# If we use bounding bbox representation, the initial reppoints is
#   from regular grid placed on a pre-defined bbox.
if self.use_grid_points or not self.center_init:  # False, True
    scale = self.point_base_scale / 2
    points_init = dcn_base_offset / dcn_base_offset.max() * scale
    bbox_init = x.new_tensor([-scale, -scale, scale,
                              scale]).view(1, 4, 1, 1)
else:
    points_init = 0
cls_feat = x
pts_feat = x
for cls_conv in self.cls_convs:
    cls_feat = cls_conv(cls_feat)
# (2,256,38,38)
for reg_conv in self.reg_convs:
    pts_feat = reg_conv(pts_feat)
# (2,256,38,38)
# initialize reppoints
pts_out_init = self.reppoints_pts_init_out(
    self.relu(self.reppoints_pts_init_conv(pts_feat)))  # (2,18,38,38)
if self.use_grid_points:  # False
    pts_out_init, bbox_out_init = self.gen_grid_from_reg(
        pts_out_init, bbox_init.detach())
else:
    pts_out_init = pts_out_init + points_init
# refine and classify reppoints
pts_out_init_grad_mul = (1 - self.gradient_mul) * pts_out_init.detach(
) + self.gradient_mul * pts_out_init
dcn_offset = pts_out_init_grad_mul - dcn_base_offset  # (2,18,38,38)
cls_out = self.reppoints_cls_out(
    self.relu(
        self.reppoints_cls_conv(cls_feat, dcn_offset)))  # (2,256,38,38),(2,18,38,38)->(2,256,38,38)->(2,20,38,38)
pts_out_refine = self.reppoints_pts_refine_out(
    self.relu(self.reppoints_pts_refine_conv(pts_feat,
                                             dcn_offset)))  # (2,256,38,38),(2,18,38,38)->(2,256,38,38)->(2,18,38,38)
if self.use_grid_points:  # False
    pts_out_refine, bbox_out_refine = self.gen_grid_from_reg(
        pts_out_refine, bbox_out_init.detach())
else:
    pts_out_refine = pts_out_refine + pts_out_init.detach()

if self.training:
    return cls_out, pts_out_init, pts_out_refine  # (2,20,38,38),(2,18,38,38),(2,18,38,38)
else:
    return cls_out, self.points2bbox(pts_out_refine)
这里以FPN的单层输出为例,shape=(2, 256, 38, 38),FPN所有层的输出后续head都是一样的。
首先,如上文所述,这里采用center_init的方式,即feature_map上每个点映射回原图对应的坐标作为初始点,因此偏移points_init=0。
self.cls_convs和self.reg_convs中分别是分类分支和定位分支中一开始的三个3x3-256卷积,得到的输出shape=(2, 256, 38, 38)保持不变。
self.reppoints_pts_init_conv和self.reppoints_pts_init_out分别是定位分支中间线上的3x3-256卷积和1x1-18卷积,得到pts_out_init的shape=(2, 18, 38, 38),就是图中的Offset 1。
然后将偏移与初始坐标相加得到RepPoints的9个点的初始坐标,pts_out_init = pts_out_init + points_init,这里对应图中的convert部分,注意这里转换过程还没完,还要加上该层FPN输出特征图上的点乘上stride得到原图上的对应坐标才能得到图中的RepPoints 1。
下面这行代码的目的是为了降低该分支的梯度权重,其中self.gradient_mul=0.1,即将梯度减小为十分之一。
pts_out_init_grad_mul = (1 - self.gradient_mul) * pts_out_init.detach(
) + self.gradient_mul * pts_out_init然后dcn_offset = pts_out_init_grad_mul - dcn_base_offset是将偏移值Offset 1减去3x3卷积核内每个点的相对坐标作为可变形卷积的偏移输入,其中dcn_base_offset是3x3卷积核内以中心点为(0, 0),
左上为(-1, -1)的9个点的相对坐标。
self.reppoints_cls_conv是分类分支的3x3-256的可变形卷积,self.reppoints_cls_out是分类分支最终的1x1-num_classes卷积,最终得到cls_out就是分类分支的最终输出,即图中的Class。
分类分支只有一个阶段,定位分支包括init和refine两个阶段。
接下来self.reppoints_pts_refine_conv是图中定位分支的3x3-256的可变形卷积,self.reppoints_pts_refine_out是后面的1x1-18卷积,得到定位分支第二阶段9个点refine后的偏移值pts_out_refine,即图中的Offset 2。
最终与9个点第一阶段的坐标相加就得到了最终的位置,pts_out_refine = pts_out_refine + pts_out_init.detach(),即图中的\(\oplus \),但注意这里和第一阶段的RepPoints一样,都是不是在原图上的坐标,还需要加上对应center points的坐标才是。
Label Assignment
在计算loss之前,还需要先进行lable assignment,计算对应的target。loss函数也在reppoints_head.py文件中,首先计算FPN各层输出映射到原图的坐标,如下。其中len(center_list)=batch_size,center_list[0] = [(1444,4),(,361,4),(100,4),(25,4),(9,4)],前两个值为x,y坐标,后两个值为对应的步长。
center_list, valid_flag_list = self.get_points(featmap_sizes,
                                               img_metas, device)
下面就是将上面head中计算的偏移与center point相加得到对应阶段模型预测的9个点在原图上的位置坐标,这里输入是pts_preds_init,输出的是第一阶段的坐标,即上图中的RepPoints 1,shape为[(2,1444,18),(2,361,18),(2,100,18),(2,25,18),(2,9,18)] 。
pts_coordinate_preds_init = self.offset_to_pts(center_list,
                                               pts_preds_init)
接着self.get_targets计算分类、回归对应的目标,在其中进行标签分配
第一阶段回归标签分配
第一阶段采用的是PointAssigner,完整代码如下
class PointAssigner(BaseAssigner):
    """Assign a corresponding gt bbox or background to each point.

    Each proposals will be assigned with `0`, or a positive integer
    indicating the ground truth index.

    - 0: negative sample, no assigned gt
    - positive integer: positive sample, index (1-based) of assigned gt
    """

    def __init__(self, scale=4, pos_num=3):
        self.scale = scale
        self.pos_num = pos_num

    def assign(self, points, gt_bboxes, gt_bboxes_ignore=None, gt_labels=None):
        # points.shape=(1939,4)
        # 只有init阶段采用point_assigner,这里points就是每一层feature_map上的每个点乘以stride对应到原图上的点的坐标
        """Assign gt to points.

        This method assign a gt bbox to every points set, each points set
        will be assigned with  the background_label (-1), or a label number.
        -1 is background, and semi-positive number is the index (0-based) of
        assigned gt.
        The assignment is done in following steps, the order matters.

        1. assign every points to the background_label (-1)
        2. A point is assigned to some gt bbox if
            (i) the point is within the k closest points to the gt bbox
            (ii) the distance between this point and the gt is smaller than
                other gt bboxes

        Args:
            points (Tensor): points to be assigned, shape(n, 3) while last
                dimension stands for (x, y, stride).
            gt_bboxes (Tensor): Groundtruth boxes, shape (k, 4).
            gt_bboxes_ignore (Tensor, optional): Ground truth bboxes that are
                labelled as `ignored`, e.g., crowd boxes in COCO.
                NOTE: currently unused.
            gt_labels (Tensor, optional): Label of gt_bboxes, shape (k, ).

        Returns:
            :obj:`AssignResult`: The assign result.
        """
        num_points = points.shape[0]  # 1939
        num_gts = gt_bboxes.shape[0]

        if num_gts == 0 or num_points == 0:
            # If no truth assign everything to the background
            assigned_gt_inds = points.new_full((num_points, ),
                                               0,
                                               dtype=torch.long)
            if gt_labels is None:
                assigned_labels = None
            else:
                assigned_labels = points.new_full((num_points, ),
                                                  -1,
                                                  dtype=torch.long)
            return AssignResult(
                num_gts, assigned_gt_inds, None, labels=assigned_labels)

        points_xy = points[:, :2]
        points_stride = points[:, 2]
        points_lvl = torch.log2(
            points_stride).int()  # [3...,4...,5...,6...,7...]
        # (1939,)
        lvl_min, lvl_max = points_lvl.min(), points_lvl.max()

        # assign gt box
        gt_bboxes_xy = (gt_bboxes[:, :2] + gt_bboxes[:, 2:]) / 2
        gt_bboxes_wh = (gt_bboxes[:, 2:] - gt_bboxes[:, :2]).clamp(min=1e-6)
        scale = self.scale
        gt_bboxes_lvl = ((torch.log2(gt_bboxes_wh[:, 0] / scale) +
                          torch.log2(gt_bboxes_wh[:, 1] / scale)) / 2).int()
        gt_bboxes_lvl = torch.clamp(gt_bboxes_lvl, min=lvl_min, max=lvl_max)  # (2,), tensor([5, 5], device='cuda:0', dtype=torch.int32)

        # stores the assigned gt index of each point
        assigned_gt_inds = points.new_zeros((num_points, ), dtype=torch.long)
        # stores the assigned gt dist (to this point) of each point
        assigned_gt_dist = points.new_full((num_points, ), float('inf'))
        points_range = torch.arange(points.shape[0])  # 1939

        for idx in range(num_gts):
            gt_lvl = gt_bboxes_lvl[idx]
            # get the index of points in this level
            lvl_idx = gt_lvl == points_lvl  # (1939,), 对应位置为True或False
            points_index = points_range[lvl_idx]  # (100,)
            # get the points in this level
            lvl_points = points_xy[lvl_idx, :]  # (100,2)
            # get the center point of gt
            gt_point = gt_bboxes_xy[[idx], :]  # (1,2)
            # get width and height of gt
            gt_wh = gt_bboxes_wh[[idx], :]  # (1,2)
            # compute the distance between gt center and
            #   all points in this level
            points_gt_dist = ((lvl_points - gt_point) / gt_wh).norm(dim=1)  # (100,2)->(100,)
            # find the nearest k points to gt center in this level
            min_dist, min_dist_index = torch.topk(
                points_gt_dist, self.pos_num, largest=False)  # (1,)
            # the index of nearest k points to gt center in this level
            min_dist_points_index = points_index[min_dist_index]  # (1,)
            # The less_than_recorded_index stores the index
            #   of min_dist that is less then the assigned_gt_dist. Where
            #   assigned_gt_dist stores the dist from previous assigned gt
            #   (if exist) to each point.
            less_than_recorded_index = min_dist < assigned_gt_dist[
                min_dist_points_index]  # (1,), tensor([True], device='cuda:0')
            # The min_dist_points_index stores the index of points satisfy:
            #   (1) it is k nearest to current gt center in this level.
            #   (2) it is closer to current gt center than other gt center.
            min_dist_points_index = min_dist_points_index[
                less_than_recorded_index]  # tensor([1870]), tensor([True], device='cuda:0'), tensor([1870])
            # assign the result
            assigned_gt_inds[min_dist_points_index] = idx + 1
            assigned_gt_dist[min_dist_points_index] = min_dist[
                less_than_recorded_index]

        if gt_labels is not None:
            assigned_labels = assigned_gt_inds.new_full((num_points, ), -1)
            pos_inds = torch.nonzero(
                assigned_gt_inds > 0, as_tuple=False).squeeze()
            if pos_inds.numel() > 0:
                assigned_labels[pos_inds] = gt_labels[
                    assigned_gt_inds[pos_inds] - 1]
        else:
            assigned_labels = None

        return AssignResult(
            num_gts, assigned_gt_inds, None, labels=assigned_labels)
首先按下式将gt映射到FPN对应的输出层级

scale = self.scale  # 4
gt_bboxes_lvl = ((torch.log2(gt_bboxes_wh[:, 0] / scale) +
                  torch.log2(gt_bboxes_wh[:, 1] / scale)) / 2).int()
gt_bboxes_lvl = torch.clamp(gt_bboxes_lvl, min=lvl_min, max=lvl_max)
# (2,), tensor([5, 5], device='cuda:0', dtype=torch.int32)
只有落在同一level的center point才作为candidate继续计算,其它层级的points都不负责该gt。如下,其中gt_lvl是某个gt所属的level,points_lvl是FPN输出的5个level所有points对应的层级,最后lvl_points是与gt属于同一层级的所有points的坐标。
lvl_idx = gt_lvl == points_lvl  # (1939,), 对应位置为True或False
points_index = points_range[lvl_idx]  # (100,)
# get the points in this level
lvl_points = points_xy[lvl_idx, :]  # (100,2)
然后计算该gt box的中心点与同一层级所有points的距离,选择距离最近的topk的points作为正样本,负责回归该gt,文中取k=1。
# compute the distance between gt center and
#   all points in this level
points_gt_dist = ((lvl_points - gt_point) / gt_wh).norm(dim=1)  # (100,2)->(100,)
# find the nearest k points to gt center in this level
min_dist, min_dist_index = torch.topk(
    points_gt_dist, self.pos_num, largest=False)  # (1,)
# the index of nearest k points to gt center in this level
min_dist_points_index = points_index[min_dist_index]  # (1,)
这里还需要注意一种情况,当多个gt box挨得很近时,且大小相近映射到同一层级,这是可能存在一个point同时负责多个gt box的回归的情况,这时选择距离该point最近的那个gt box作为回归目标,如下
# The less_than_recorded_index stores the index
#   of min_dist that is less then the assigned_gt_dist. Where
#   assigned_gt_dist stores the dist from previous assigned gt
#   (if exist) to each point.
less_than_recorded_index = min_dist < assigned_gt_dist[
    min_dist_points_index]  # (1,), tensor([True], device='cuda:0')
# The min_dist_points_index stores the index of points satisfy:
#   (1) it is k nearest to current gt center in this level.
#   (2) it is closer to current gt center than other gt center.
min_dist_points_index = min_dist_points_index[
    less_than_recorded_index]  # tensor([1870]), tensor([True], device='cuda:0'), tensor([1870])
第二阶段回归标签分配
第二阶段采用的是MaxIoUAssigner,即将第二阶段的9个点根据转换函数转换成bounding box的形式,然后根据与gt box的IoU大小来分配标签,上面提到一共有3种转换函数,代码如下,mmdet中默认采用'moment'转化函数。MaxIoU是最常见的标签分配方法,这里不多做介绍。
    def points2bbox(self, pts, y_first=True):
        """Converting the points set into bounding box.

        :param pts: the input points sets (fields), each points
            set (fields) is represented as 2n scalar.
        :param y_first: if y_first=True, the point set is represented as
            [y1, x1, y2, x2 ... yn, xn], otherwise the point set is
            represented as [x1, y1, x2, y2 ... xn, yn].
        :return: each points set is converting to a bbox [x1, y1, x2, y2].
        """
        pts_reshape = pts.view(pts.shape[0], -1, 2, *pts.shape[2:])  # (2,18,38,38)->(2,9,2,38,38)
        pts_y = pts_reshape[:, :, 0, ...] if y_first else pts_reshape[:, :, 1,
                                                                      ...]  # (2,9,38,38)
        pts_x = pts_reshape[:, :, 1, ...] if y_first else pts_reshape[:, :, 0,
                                                                      ...]  # (2,9,38,38)
        if self.transform_method == 'minmax':
            bbox_left = pts_x.min(dim=1, keepdim=True)[0]  # (2,1,38,38)
            bbox_right = pts_x.max(dim=1, keepdim=True)[0]
            bbox_up = pts_y.min(dim=1, keepdim=True)[0]
            bbox_bottom = pts_y.max(dim=1, keepdim=True)[0]
            bbox = torch.cat([bbox_left, bbox_up, bbox_right, bbox_bottom],
                             dim=1)
        elif self.transform_method == 'partial_minmax':
            pts_y = pts_y[:, :4, ...]  # (2,4,38,38)
            pts_x = pts_x[:, :4, ...]
            bbox_left = pts_x.min(dim=1, keepdim=True)[0]
            bbox_right = pts_x.max(dim=1, keepdim=True)[0]
            bbox_up = pts_y.min(dim=1, keepdim=True)[0]
            bbox_bottom = pts_y.max(dim=1, keepdim=True)[0]
            bbox = torch.cat([bbox_left, bbox_up, bbox_right, bbox_bottom],
                             dim=1)
        elif self.transform_method == 'moment':
            pts_y_mean = pts_y.mean(dim=1, keepdim=True)  # (2,1,38,38)
            pts_x_mean = pts_x.mean(dim=1, keepdim=True)
            pts_y_std = torch.std(pts_y - pts_y_mean, dim=1, keepdim=True)  # (2,1,38,38)
            pts_x_std = torch.std(pts_x - pts_x_mean, dim=1, keepdim=True)
            moment_transfer = (self.moment_transfer * self.moment_mul) + (
                self.moment_transfer.detach() * (1 - self.moment_mul))  # torch.Size([2])
            moment_width_transfer = moment_transfer[0]
            moment_height_transfer = moment_transfer[1]
            half_width = pts_x_std * torch.exp(moment_width_transfer)  # (2,1,38,38)
            half_height = pts_y_std * torch.exp(moment_height_transfer)
            bbox = torch.cat([
                pts_x_mean - half_width, pts_y_mean - half_height,
                pts_x_mean + half_width, pts_y_mean + half_height
            ],
                             dim=1)
        else:
            raise NotImplementedError
        return bbox  # (2,4,38,38)
分类标签分配
分类是第一阶段即图中的RepPoints 1进行标签分配的,代码如下,其中bbox_list是将第一阶段pts_preds_init转换成bbox,然后后续再与gt进行标签分类,分配方法也是MaxIoUAssign,当与某个gt box的iou大于0.5时作为正样本,小于0.4时作为负样本,0.4到0.5之间的忽略。
# target for refinement stage
center_list, valid_flag_list = self.get_points(featmap_sizes,
                                               img_metas, device)
pts_coordinate_preds_refine = self.offset_to_pts(
    center_list, pts_preds_refine)
bbox_list = []
for i_img, center in enumerate(center_list):
    bbox = []
    for i_lvl in range(len(pts_preds_refine)):
        bbox_preds_init = self.points2bbox(
            pts_preds_init[i_lvl].detach())  # (2,4,38,38)
        bbox_shift = bbox_preds_init * self.point_strides[i_lvl]  # (2,4,38,38)
        bbox_center = torch.cat(
            [center[i_lvl][:, :2], center[i_lvl][:, :2]], dim=1)  # (1444,4)
        bbox.append(bbox_center +
                    bbox_shift[i_img].permute(1, 2, 0).reshape(-1, 4))  # (1444,4)
    bbox_list.append(bbox)
Loss
第一阶段和第二阶段的回归损失采用的都是Smooth L1 Loss,分别将RepPoints 1和RepPoints 2转换成bbox,然后计算bbox左上角坐标和右下角坐标与对应gt box的对应点的Smooth L1 Loss。
分类采用的Focal Loss。
实验结果
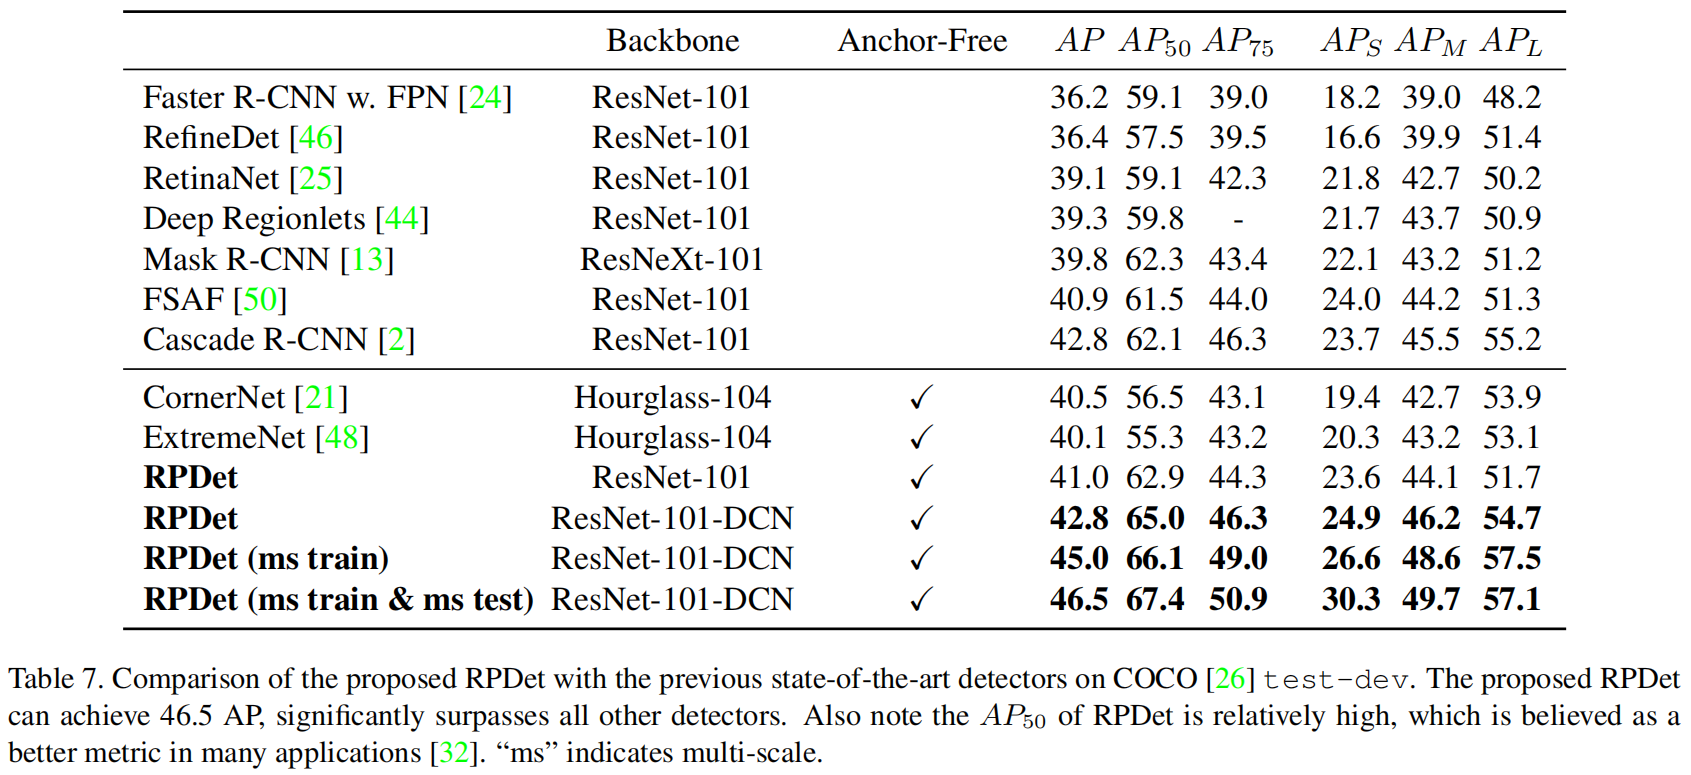
下图是与当时其它一些sota方法的精度对比,可以看出当时RPDet取得了最优的性能。
下面是一些消融实验的结果
为了证明本文提出的RepPoints的表示方法的有效性,作者将两阶段的RepPoints换成bounding box作为baseline,标签分配方法都是max iou assignment,下面是RepPoints和bounding box的对比结果

然后对比了用center point和单一anchor作为初始表示的性能,如下可以看出,center point的精度更高。

下面是points2bbox转换函数的比较,可以看出区别不大,moment-based方法稍好一点。

参考
https://zhuanlan.zhihu.com/p/326058238


