快速了解
package java.lang;

public class Thread implements Runnable {}
Thread是lang包下的一个类,实现了Runnable接口。源码如下
@FunctionalInterface
public interface Runnable {

    public abstract void run();
}
Runnable是一个函数式接口不会抛出异常没有返回值。
    @Override
    public void run() {
        if (target != null) {
            target.run();
        }
    }

    private Runnable target;

	this.target = target;
target通过init初始化方法赋值,通过run方法调用。
构造函数
    public Thread() {
        init(null, null, "Thread-" + nextThreadNum(), 0);
    }
    public Thread(Runnable target) {
        init(null, target, "Thread-" + nextThreadNum(), 0);
    }
    public Thread(Runnable target, String name) {
        init(null, target, name, 0);
    }
    public Thread(String name) {
        init(null, null, name, 0);
    }
    public Thread(ThreadGroup group, Runnable target) {
        init(group, target, "Thread-" + nextThreadNum(), 0);
    }
    public Thread(ThreadGroup group, Runnable target, String name) {
        init(group, target, name, 0);
    }
    public Thread(ThreadGroup group, Runnable target, String name,
                  long stackSize) {
        init(group, target, name, stackSize);
    }
    public Thread(ThreadGroup group, String name) {
        init(group, null, name, 0);
    }
所有的构造函数都调用了init方法进行初始化。
    private void init(ThreadGroup g, Runnable target, String name, long stackSize) {
        init(g, target, name, stackSize, null, true);
    }

    private void init(ThreadGroup g, Runnable target, String name,
                      long stackSize, AccessControlContext acc,
                      boolean inheritThreadLocals) {}
线程启动
    public synchronized void start() {
        if (threadStatus != 0)
            throw new IllegalThreadStateException();

        group.add(this);

        boolean started = false;

        try {
            start0();
            started = true;
        } finally {
            try {
                if (!started) {
                    group.threadStartFailed(this);
                }
            } catch (Throwable ignore) {
            }
        }
    }

    private native void start0();
run和start的区别
run没有启动线程的效果,仅仅是执行一段代码,start是真正的启动一个异步线程执行代码。
线程类方法弃用
Java线程原语弃用
常见的过时方法
public final void stop()
public final synchronized void stop(Throwable obj)
public void destroy()
public final void suspend()
public final void resume()
public native int countStackFrames();
线程的状态
    public enum State {
        NEW,
        RUNNABLE,
        BLOCKED,
        WAITING,
        TIMED_WAITING,
        TERMINATED;
    }
案例1 线程的所有状态。
public class UseThreadState {

    private final static Logger logger = LoggerFactory.getLogger(UseThread.class);

    static UseThreadState obj = new UseThreadState();

    static Thread t1 = new Thread(UseThreadState::testBlock, "thread-01");

    static Thread t2 = new Thread(UseThreadState::testBlock, "thread-02");

    public static void testBlock() {
        synchronized (obj) {
            System.out.println(System.currentTimeMillis() + " " + Thread.currentThread().getName() + "抢到了锁");
            try {
                Thread.sleep(200);
            } catch (InterruptedException e) {
                logger.info(e.toString());
            }
            System.out.println(System.currentTimeMillis() + " " + Thread.currentThread().getName() + "释放锁");
        }
    }


    public static void main(String[] args) throws Exception {
        t1.start();
        Thread.sleep(10);
        System.out.println(System.currentTimeMillis() + " " + t2.getName() + ":" + t2.getState());
        t2.start();
        System.out.println(System.currentTimeMillis() + " " + t2.getName() + ":" + t2.getState());
        Thread.sleep(10);
        System.out.println(System.currentTimeMillis() + " " + t2.getName() + ":" + t2.getState());
        Thread.sleep(200);
        System.out.println(System.currentTimeMillis() + " " + t2.getName() + ":" + t2.getState());
        t2.join();
        System.out.println(System.currentTimeMillis() + " " + t2.getName() + ":" + t2.getState());
    }
}
-----
1662540085314 thread-01抢到了锁
1662540085327 thread-02:NEW
1662540085327 thread-02:RUNNABLE
1662540085343 thread-02:BLOCKED
1662540085515 thread-01释放锁
1662540085515 thread-02抢到了锁
1662540085548 thread-02:TIMED_WAITING
1662540085720 thread-02释放锁
1662540085720 thread-02:TERMINATED
BLOCKED状态等待对象锁,TIMED_WAITING状态有限期等待。
等待和唤醒
常见方法
Object 类中相关实现
    public final void wait() throws InterruptedException {
        wait(0);
    }
    public final native void wait(long timeout) throws InterruptedException;

    public final void wait(long timeout, int nanos) throws InterruptedException

    public final native void notify();

    public final native void notifyAll();
native方法实现参考 openjdk\hotspot\src\share\vm\runtime\objectMonitor.cpp
虚假唤醒
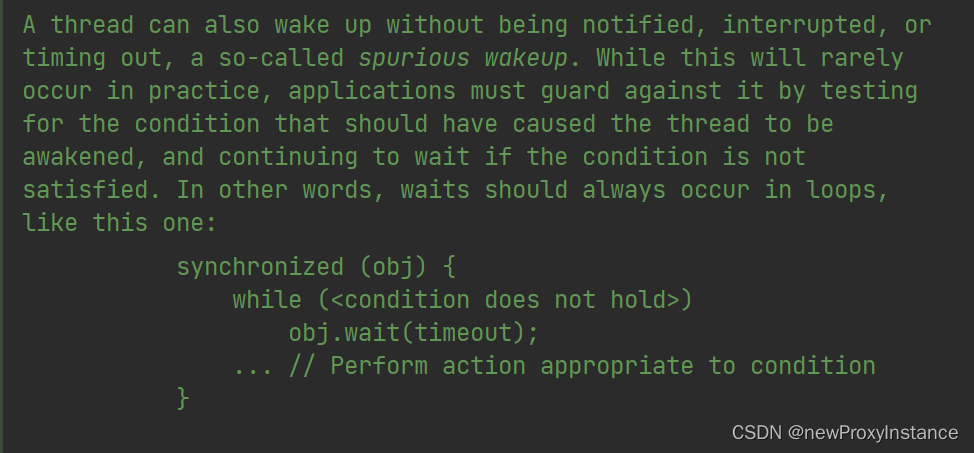
虚假唤醒:线程可以在没有通知、中断或者超时的情况下唤醒。
为什么 wait 语句要放在循环里而不是 if 语句 ?
示例如下
public class FakeWake {

    private final static Logger logger = LoggerFactory.getLogger(FakeWake.class);

    static Integer size = 5;

    static Integer stock = 1;

    static BlockingQueue<Integer> queue = new ArrayBlockingQueue<>(1);

    public static void main(String[] args) {
        consume.start();
        consume2.start();
        product.start();
        product2.start();
    }

    static Thread product = new Thread(() -> {
        synchronized (queue) {
            for (int i = 0; i < size; i++) {
                try {
                    while (queue.size() == 1) {
                        queue.wait();
                    }
                } catch (InterruptedException e) {
                    logger.info(e.toString());
                }
                stock++;
                logger.info("生产1号 生产 {}", stock);
                queue.add(stock);
                queue.notifyAll();
            }
        }
    }, "product-01");

    static Thread product2 = new Thread(() -> {
        synchronized (queue) {
            for (int i = 0; i < size; i++) {
                try {
                    while (queue.size() == 1) {
                        queue.wait();
                    }
                } catch (InterruptedException e) {
                    logger.info(e.toString());
                }
                stock++;
                logger.info("生产2号 生产 {}", stock);
                queue.add(stock);
                queue.notifyAll();
            }
        }
    }, "product");


    static Thread consume = new Thread(() -> {
        synchronized (queue) {
            for (int i = 0; i < size; i++) {
                try {
                    while (queue.size() == 0) {
                        queue.wait();
                    }
                    Integer poll = queue.poll();
                    logger.info("消费1 消费 {}", poll);
                    queue.notifyAll();
                } catch (InterruptedException e) {
                    logger.info(e.toString());
                }
            }
        }
    }, "consume");

    static Thread consume2 = new Thread(() -> {
        synchronized (queue) {
            for (int i = 0; i < size; i++) {
                try {
                    while (queue.size() == 0) {
                        queue.wait();
                    }
                    Integer poll = queue.poll();
                    logger.info("消费2 消费 {}", poll);
                    queue.notifyAll();
                } catch (InterruptedException e) {
                    logger.info(e.toString());
                }
            }
        }

    }, "consume");


}

-----
16:09:26.553 [product-01] INFO com.example.miccommon.juc.thread.FakeWake - 生产1号 生产 2
16:09:26.553 [consume] INFO com.example.miccommon.juc.thread.FakeWake - 消费2 消费 2
16:09:26.553 [product] INFO com.example.miccommon.juc.thread.FakeWake - 生产2号 生产 3
16:09:26.553 [consume] INFO com.example.miccommon.juc.thread.FakeWake - 消费1 消费 3
16:09:26.553 [product-01] INFO com.example.miccommon.juc.thread.FakeWake - 生产1号 生产 4
16:09:26.553 [consume] INFO com.example.miccommon.juc.thread.FakeWake - 消费2 消费 4
16:09:26.553 [product] INFO com.example.miccommon.juc.thread.FakeWake - 生产2号 生产 5
16:09:26.553 [consume] INFO com.example.miccommon.juc.thread.FakeWake - 消费1 消费 5
16:09:26.553 [product-01] INFO com.example.miccommon.juc.thread.FakeWake - 生产1号 生产 6
16:09:26.553 [consume] INFO com.example.miccommon.juc.thread.FakeWake - 消费2 消费 6
16:09:26.553 [product] INFO com.example.miccommon.juc.thread.FakeWake - 生产2号 生产 7
16:09:26.553 [consume] INFO com.example.miccommon.juc.thread.FakeWake - 消费1 消费 7
16:09:26.553 [product-01] INFO com.example.miccommon.juc.thread.FakeWake - 生产1号 生产 8
16:09:26.553 [consume] INFO com.example.miccommon.juc.thread.FakeWake - 消费2 消费 8
16:09:26.553 [product] INFO com.example.miccommon.juc.thread.FakeWake - 生产2号 生产 9
16:09:26.553 [consume] INFO com.example.miccommon.juc.thread.FakeWake - 消费1 消费 9
16:09:26.553 [product-01] INFO com.example.miccommon.juc.thread.FakeWake - 生产1号 生产 10
16:09:26.553 [consume] INFO com.example.miccommon.juc.thread.FakeWake - 消费2 消费 10
16:09:26.553 [product] INFO com.example.miccommon.juc.thread.FakeWake - 生产2号 生产 11
16:09:26.553 [consume] INFO com.example.miccommon.juc.thread.FakeWake - 消费1 消费 11
修改为 if 的后果
16:56:54.635 [product-01] INFO com.example.common.juc.thread.FakeWake - 生产1号 生产 2
16:56:54.638 [consume] INFO com.example.common.juc.thread.FakeWake - 消费2 消费 2
16:56:54.638 [consume] INFO com.example.common.juc.thread.FakeWake - 消费1 消费 null
16:56:54.638 [product] INFO com.example.common.juc.thread.FakeWake - 生产2号 生产 3
16:56:54.638 [consume] INFO com.example.common.juc.thread.FakeWake - 消费1 消费 3
16:56:54.638 [consume] INFO com.example.common.juc.thread.FakeWake - 消费2 消费 null
16:56:54.638 [product-01] INFO com.example.common.juc.thread.FakeWake - 生产1号 生产 4
16:56:54.638 [consume] INFO com.example.common.juc.thread.FakeWake - 消费2 消费 4
16:56:54.638 [consume] INFO com.example.common.juc.thread.FakeWake - 消费1 消费 null
16:56:54.638 [product] INFO com.example.common.juc.thread.FakeWake - 生产2号 生产 5
16:56:54.638 [consume] INFO com.example.common.juc.thread.FakeWake - 消费1 消费 5
16:56:54.638 [consume] INFO com.example.common.juc.thread.FakeWake - 消费2 消费 null
16:56:54.638 [product-01] INFO com.example.common.juc.thread.FakeWake - 生产1号 生产 6
16:56:54.639 [consume] INFO com.example.common.juc.thread.FakeWake - 消费2 消费 6
16:56:54.639 [consume] INFO com.example.common.juc.thread.FakeWake - 消费1 消费 null
16:56:54.639 [product] INFO com.example.common.juc.thread.FakeWake - 生产2号 生产 7
16:56:54.639 [product-01] INFO com.example.common.juc.thread.FakeWake - 生产1号 生产 8
Exception in thread "product-01" java.lang.IllegalStateException: Queue full
	at java.util.AbstractQueue.add(AbstractQueue.java:98)
	at java.util.concurrent.ArrayBlockingQueue.add(ArrayBlockingQueue.java:312)
	at com.example.common.juc.thread.FakeWake.lambda$static$0(FakeWake.java:38)
	at java.lang.Thread.run(Thread.java:748)
首先声明,这个例子不是虚假唤醒,真正的虚假唤醒不可预知。
原因分析,首先理解 wait 和 notify,线程一执行了百分之10的代码进入 wait,醒来后会继续执行后续 90的代码。使用 if 虽然第一次会进入 wait ,但是如果下一次还是它被唤醒,那么会跳过 if 包裹的代码,出现错误场景,而使用 while 可以使得唤醒后重复判断临界条件从而避免不可预知的唤醒。
由于虚假唤醒是不可预知的,所以 wait 出现的地方判断条件要使用 while 而不是 if。
wait 必须使用 while 循环来判断临界条件
中断和停止
stop
Forces the thread to stop executing.
强制停止线程执行,不推荐使用,原因参照 线程类方法弃用
interrupt
给一个线程发送中断信号
public class UseInterrupt {

    static Thread t1 = new Thread(() -> {
        while (true) {
            if (Thread.currentThread().isInterrupted()) {
                System.out.println("有人希望我退出...");
                return;
            }
            // if (Thread.interrupted()) {
            //     System.out.println("有人希望我退出...");
            //     return;
            // }
        }
    });

    public static void main(String[] args) throws Exception {
        t1.start();
        TimeUnit.SECONDS.sleep(1);
        t1.interrupt();
        t1.join();
        System.out.println("end...");
    }
}
-----
有人希望我退出...
end...
主线程发起中断,线程收到中断信号,由实际实现来决定是否结束。
唤醒一个正在睡觉的线程
public class UseInterruptSleep {
    static Thread t1 = new Thread(() -> {
        try {
            System.out.println(System.currentTimeMillis() + "开始睡觉...");
            TimeUnit.SECONDS.sleep(10);
        } catch (InterruptedException e) {
            System.out.println("t1:"+Thread.currentThread().isInterrupted());
            System.out.println(System.currentTimeMillis() + "被唤醒了...");
        }

    });

    public static void main(String[] args) throws Exception {
        t1.start();
        TimeUnit.SECONDS.sleep(1);
        System.out.println(t1.isInterrupted());
        t1.interrupt();
        System.out.println(t1.isInterrupted());
        t1.join();
        System.out.println("end...");
    }
}
-----
1662543320726开始睡觉...
false
true
t1:false
1662543321739被唤醒了...
end...
关键是这一行输出 t1:false,我们没有清除标记位,看起来好像是抛出异常的时候清除了,等下我们去源码寻找答案。
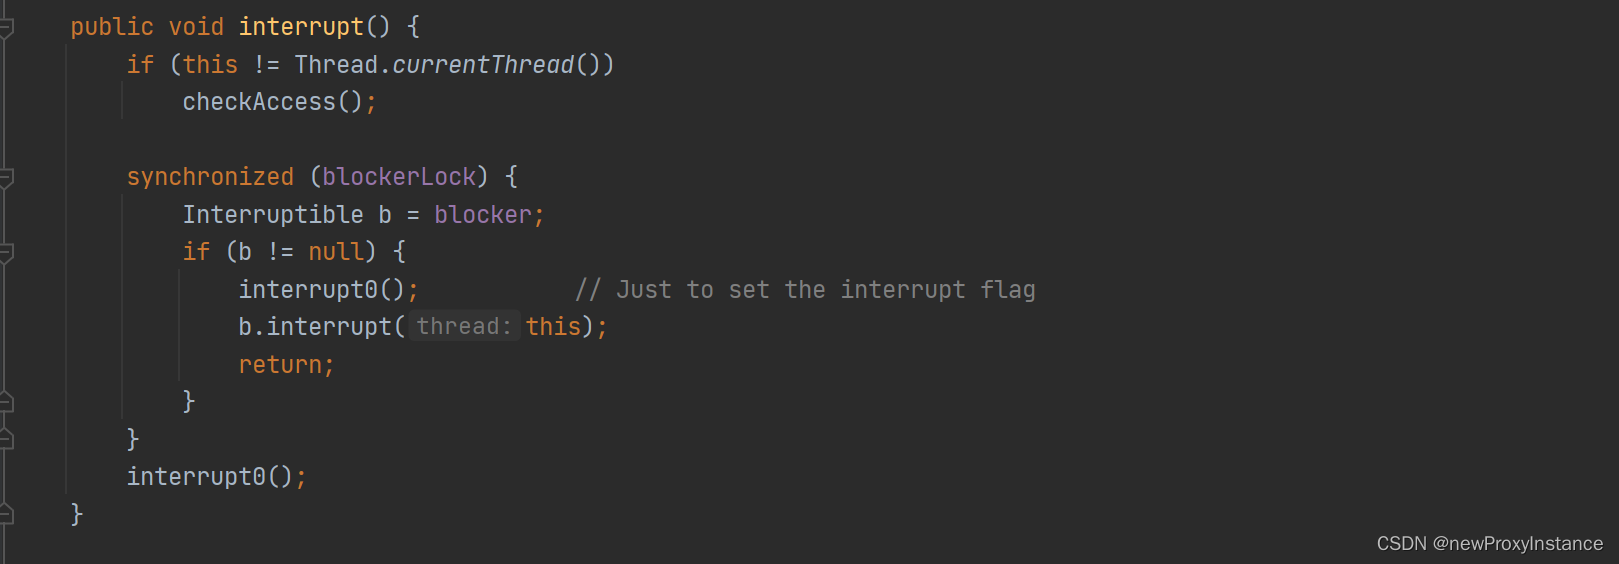
interrupt方法源码和注释
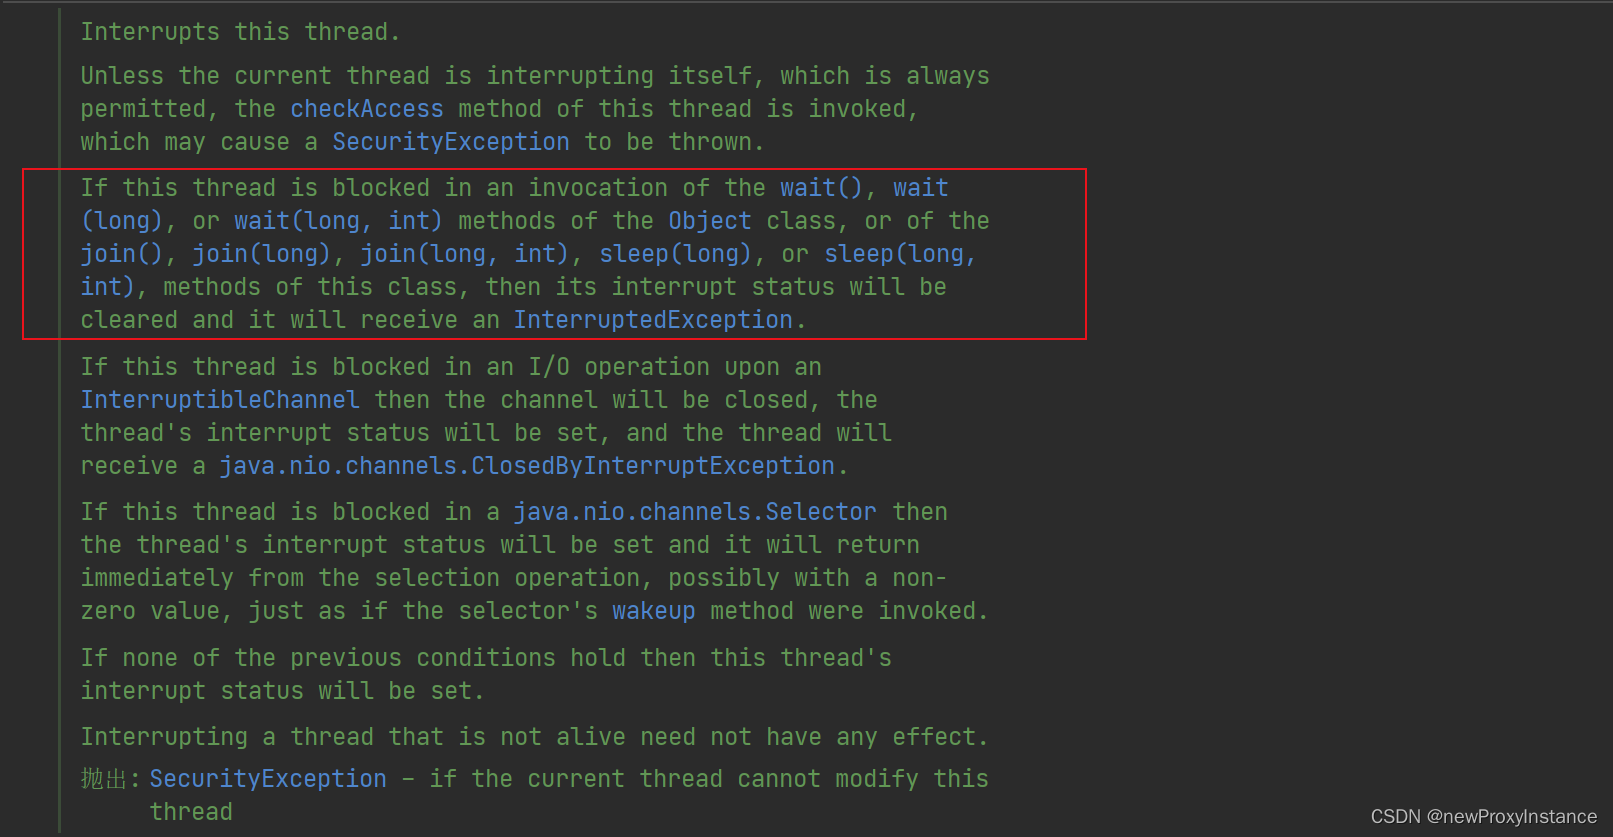
then its interrupt status will be cleared and it will receive an InterruptedException.
清除中断位置并抛出异常
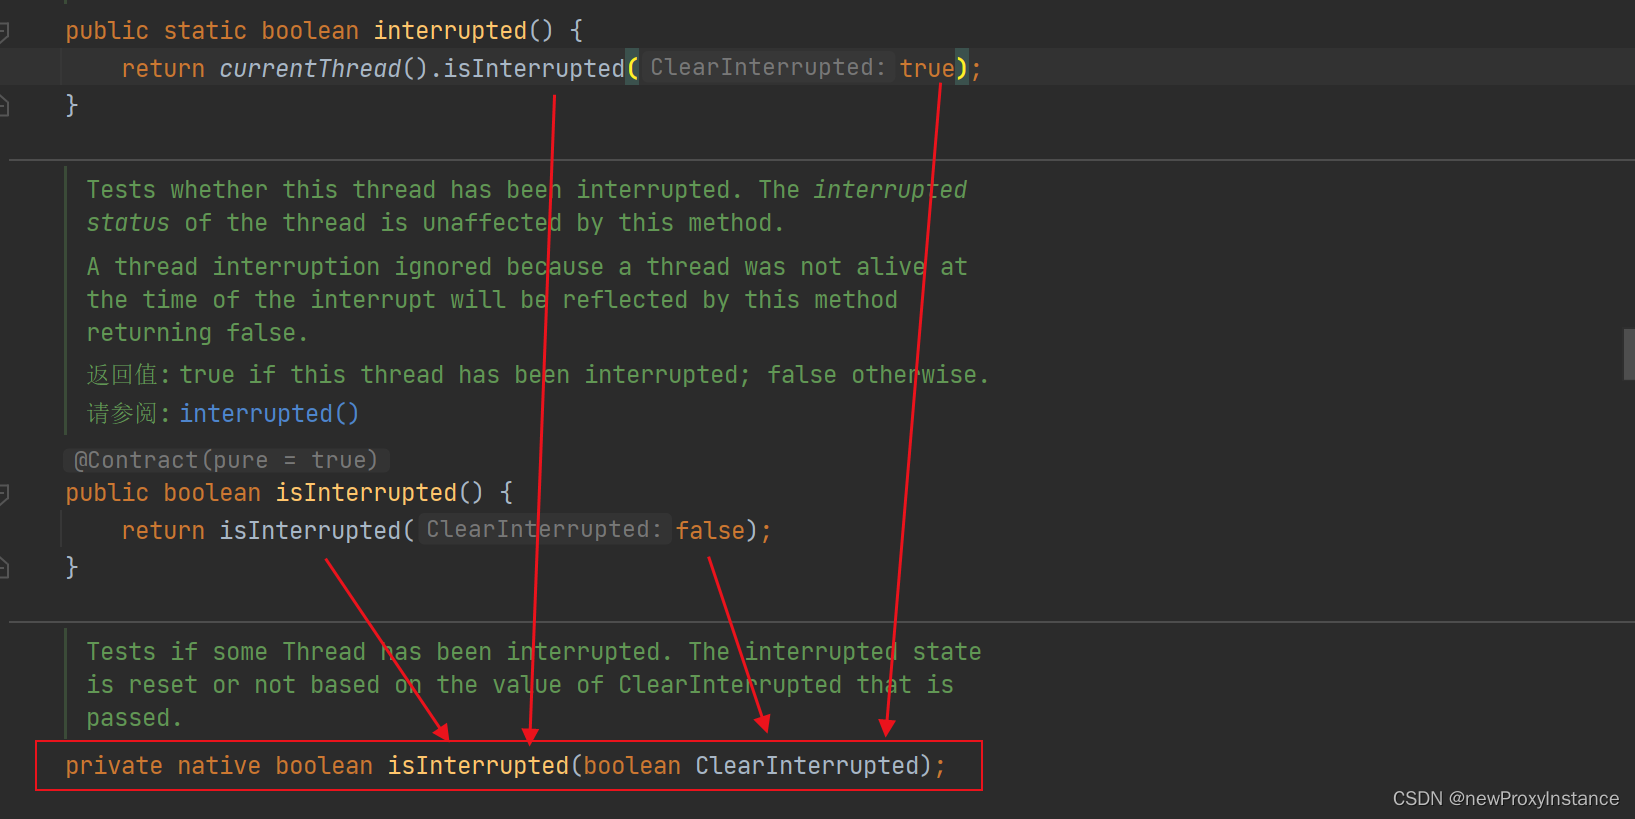
实例方法 isInterrupted 和 静态方法 interrupted 源码。
主线程对子线程发起中断不代表子线程立刻结束,如果子线程不对标志位进行相应则中断不会产生任何效果。
yield
public static native void yield();
当前线程让出cpu时间片,下一时刻仍有可能获取时间片。
join
Waits for this thread to die.
    public final void join() throws InterruptedException

    public final synchronized void join(long millis) throws InterruptedException

    public final synchronized void join(long millis, int nanos) throws InterruptedException
一个简单的join例子
public class D5 {
    public static void main(String[] args) throws InterruptedException {
        Thread thread = new Thread(()->{
            try {
                System.out.println("我是子线程,我先睡一秒");
                Thread.sleep(1000);
                System.out.println("我是子线程,我睡完了一秒");
            } catch (InterruptedException e) {
                e.printStackTrace();
            }
        });
        thread.start();
        thread.join(0);
        System.out.println("如果不加join方法,我会先被打出来,加了就不一样了");
    }
}
那么为什么 t1 调用 join 挂起的是主线程呢 ?
join的原理
我们点进去 join ,重点看蓝色选中区域的代码。
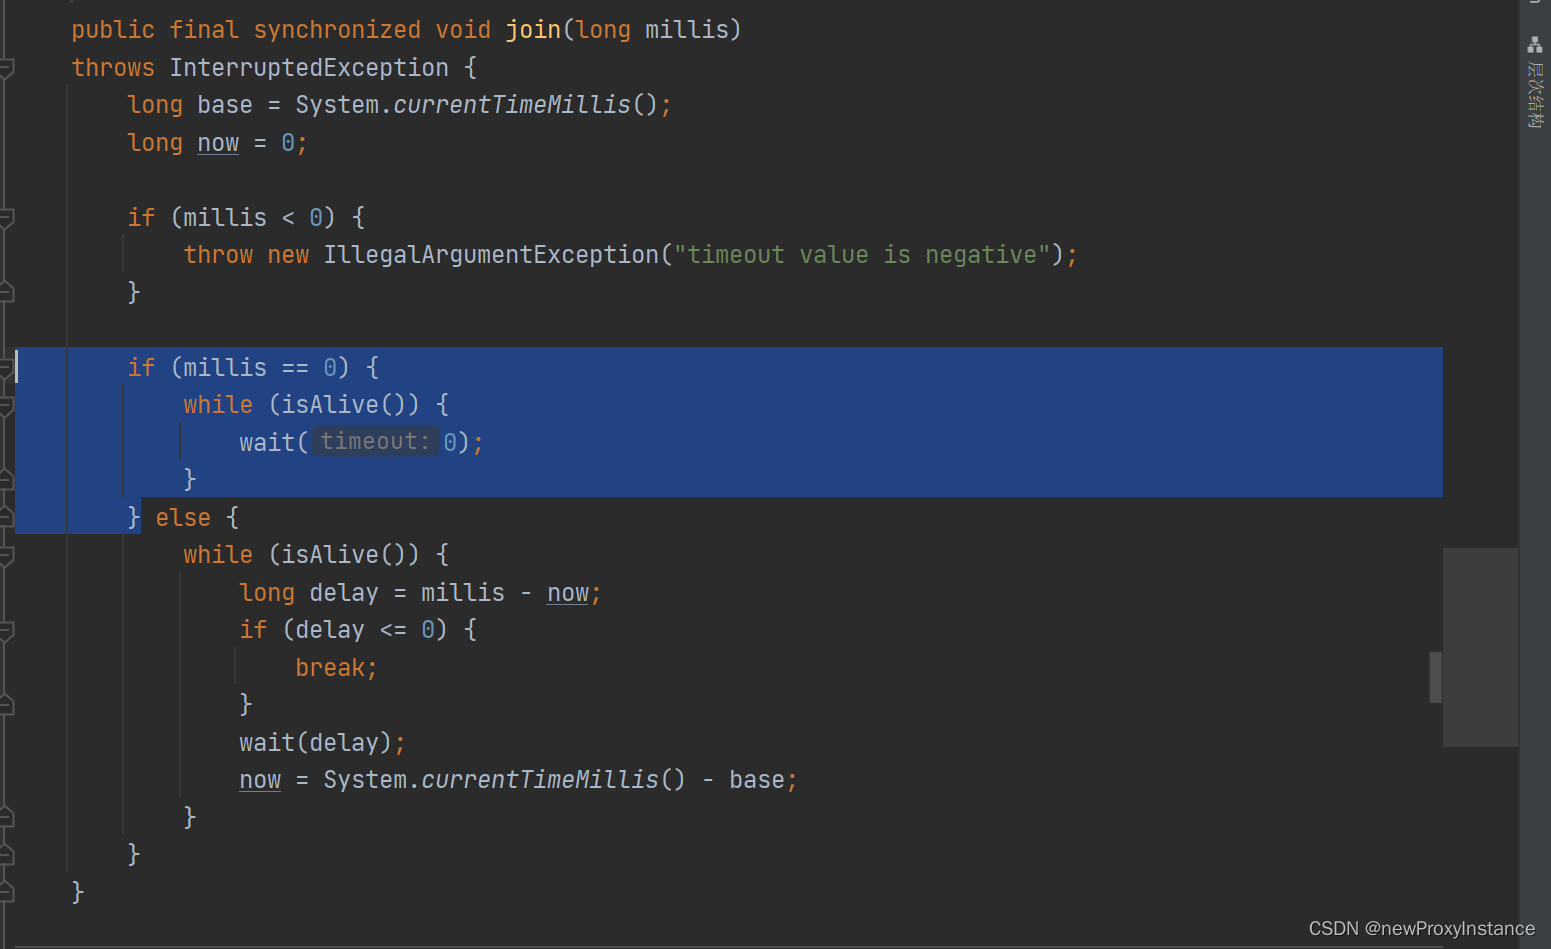
我们自定义一个类继承 Thread 并将 join的实现拿出来改造,来打印 this 和 Thread.currentThread()
public class D5 {

    public static void main(String[] args) throws Exception {
        MyThread t1 = new MyThread(() -> {
            try {
                System.out.println(System.currentTimeMillis() + "我是子线程,我先睡一秒");
                Thread.sleep(1000);
                System.out.println(System.currentTimeMillis() + "我是子线程,我睡完了一秒");
            } catch (InterruptedException e) {
                e.printStackTrace();
            }
        }, "thread-01");
        t1.start();
        t1.join2(0);
        System.out.println(System.currentTimeMillis() + "如果不加join方法,我会先被打出来,加了就不一样了");
    }


    static class MyThread extends Thread {

        public MyThread(Runnable target, String name) {
            super(target, name);
        }

        public final synchronized void join2(final long millis)
                throws InterruptedException {
            System.out.println(this);
            if (millis > 0) {
                if (isAlive()) {
                    final long startTime = System.nanoTime();
                    long delay = millis;
                    do {
                        wait(delay);
                    } while (isAlive() && (delay = millis -
                            TimeUnit.NANOSECONDS.toMillis(System.nanoTime() - startTime)) > 0);
                }
            } else if (millis == 0) {
                while (isAlive()) {
                    Thread thread = Thread.currentThread();
                    wait(0);
                }
            } else {
                throw new IllegalArgumentException("timeout value is negative");
            }
        }
    }
}
------
this:Thread[thread-01,5,main]
Thread.currentThread:Thread[main,5,main]
1666281297418我是子线程,我先睡一秒
1666281298419我是子线程,我睡完了一秒
1666281298419如果不加join方法,我会先被打出来,加了就不一样了
分析:t1.join在主线程调用,所以在方法内部获取当前线程是主线程。
因为 wait 会挂起当前线程而不是当前对象,所以挂起了主线程。
那么主线程什么时候被唤醒的呢 ?
线程终结
在thread.cpp中

void JavaThread::exit(bool destroy_vm, ExitType exit_type) {}
exit调用ensure_join然后调用notify_all唤醒所有线程
static void ensure_join(JavaThread* thread) {
  lock.notify_all(thread);
}
用户线程和守护线程
daemon:守护,true 代表守护线程,false 代表用户线程,默认为false用户线程。
    /* Whether or not the thread is a daemon thread. */
    private boolean     daemon = false;
在初始化init方法中设置为当前线程的类型
        Thread parent = currentThread();
        this.daemon = parent.isDaemon();
可以调用set方法赋值,如果线程已经启动则会报错。
    public final void setDaemon(boolean on) {
        checkAccess();
        if (isAlive()) {
            throw new IllegalThreadStateException();
        }
        daemon = on;
    }

    public final native boolean isAlive();
案例1:当程序只剩下守护线程的时候,程序会退出
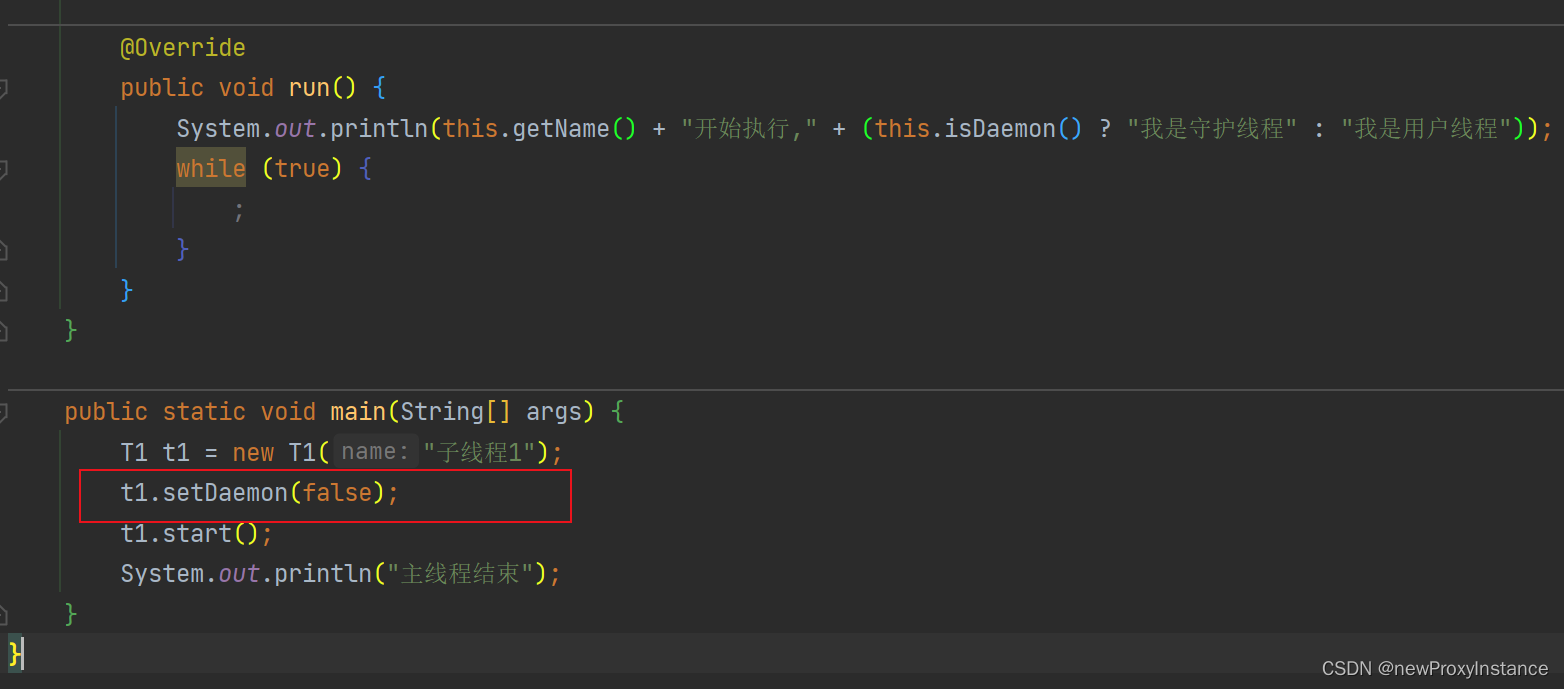
线程安全和synchronized关键字
一个经典的线程安全例子
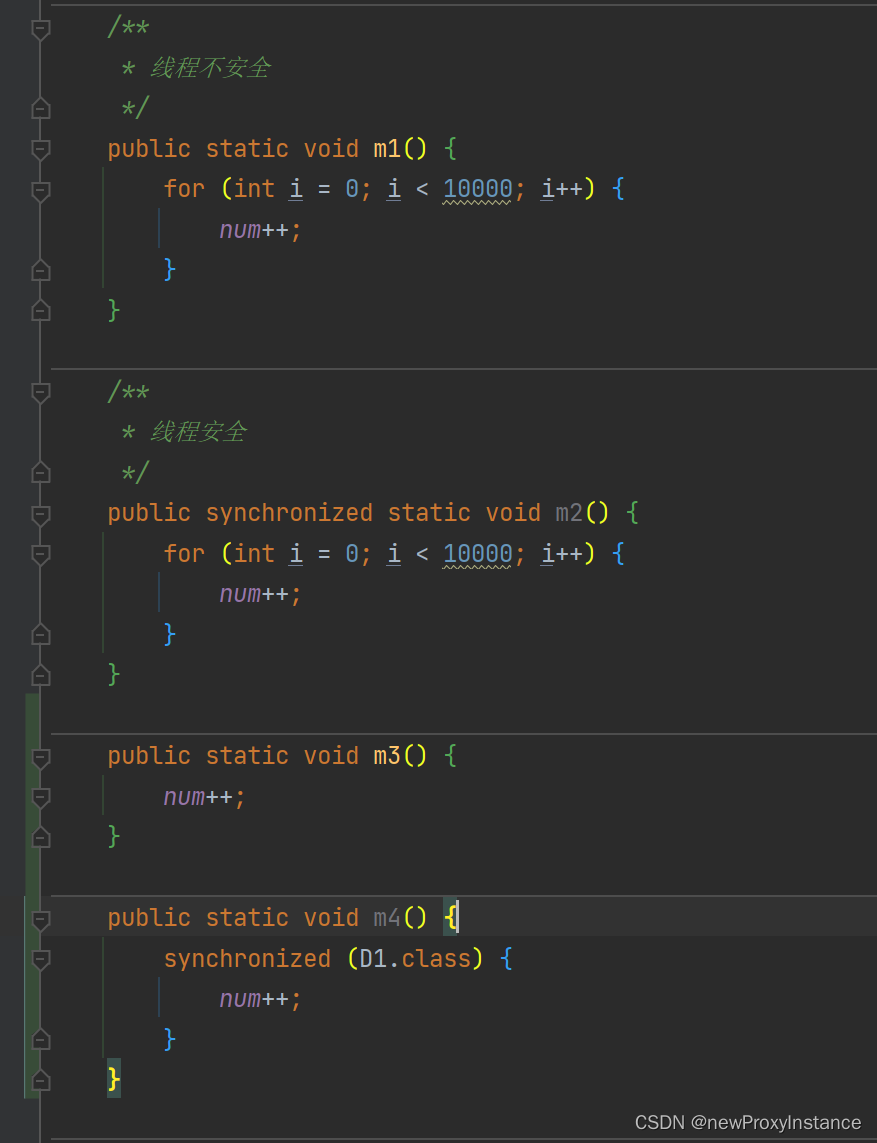
javap 反编译字节码后的效果
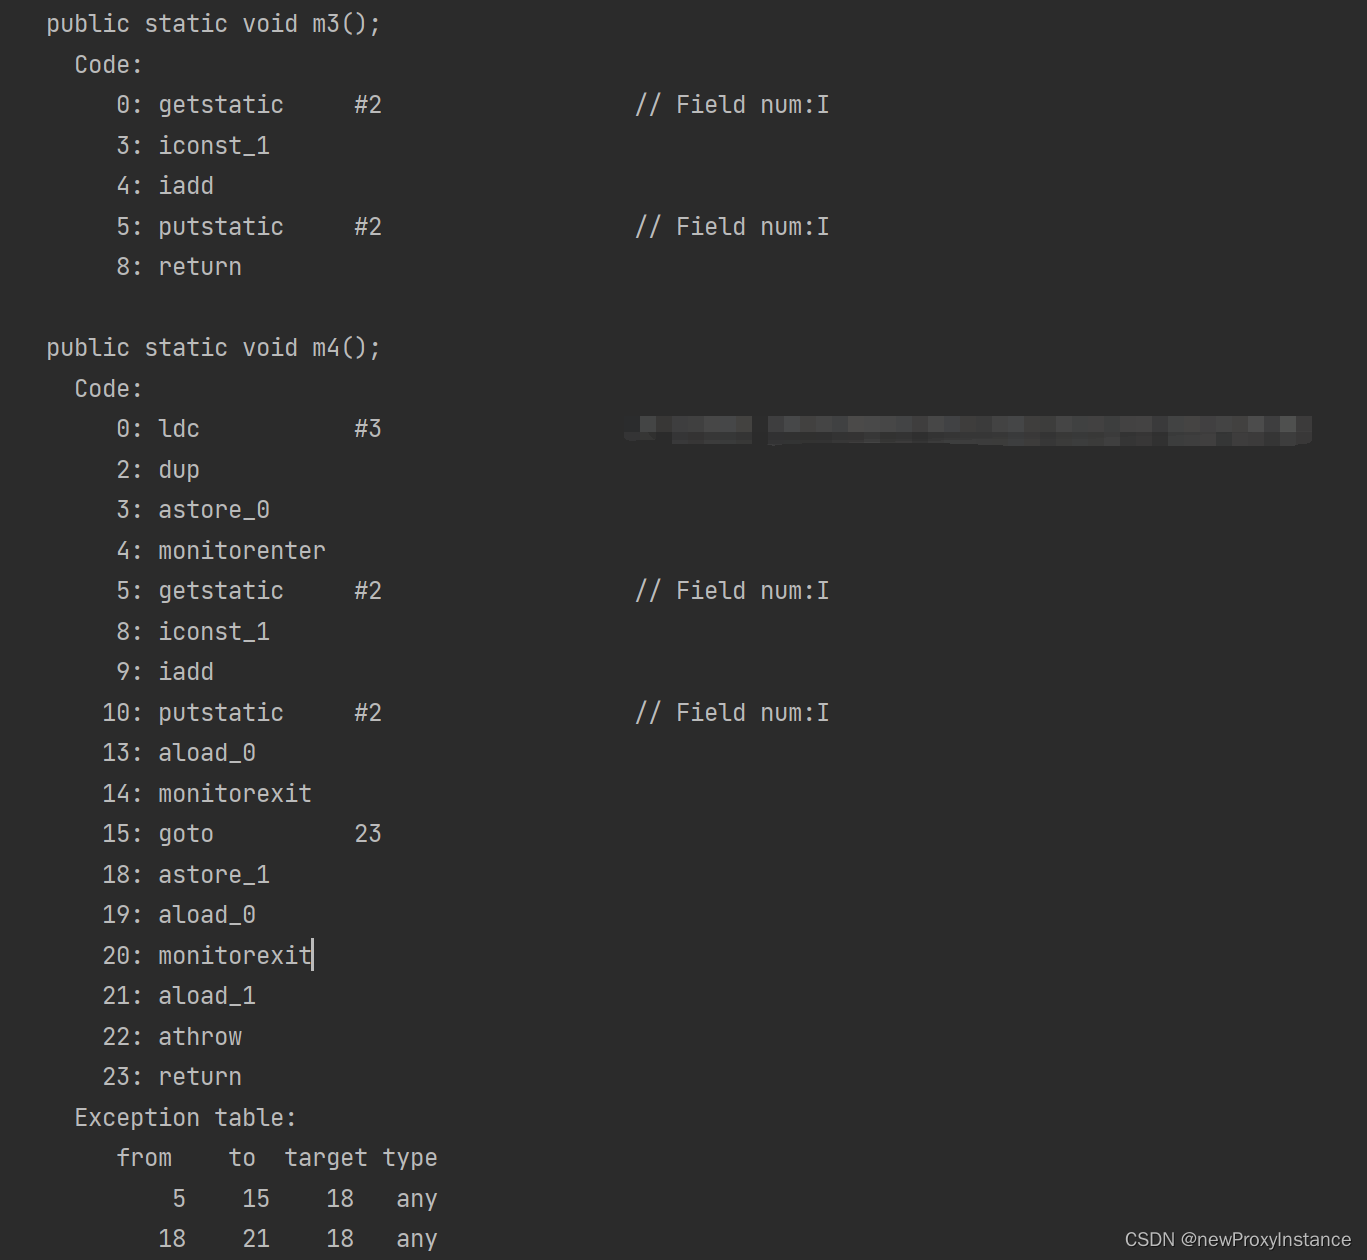
m3静态变量自增的过程,获取静态变量,放入操作数栈顶,加操作,放回静态变量,返回。
在多线程访问的过程中,在每一行的间隔都应该拉大,会发生A线程还没有写回静态变量就被获取的情况。
加了 synchronized 关键字 ,5 8 9 10 行对应之前的操作。 其他详细的解释可以参考 虚拟机规范。
Java Language and Virtual Machine Specifications
线程退出
thread.cpp文件搜索JavaThread::exit
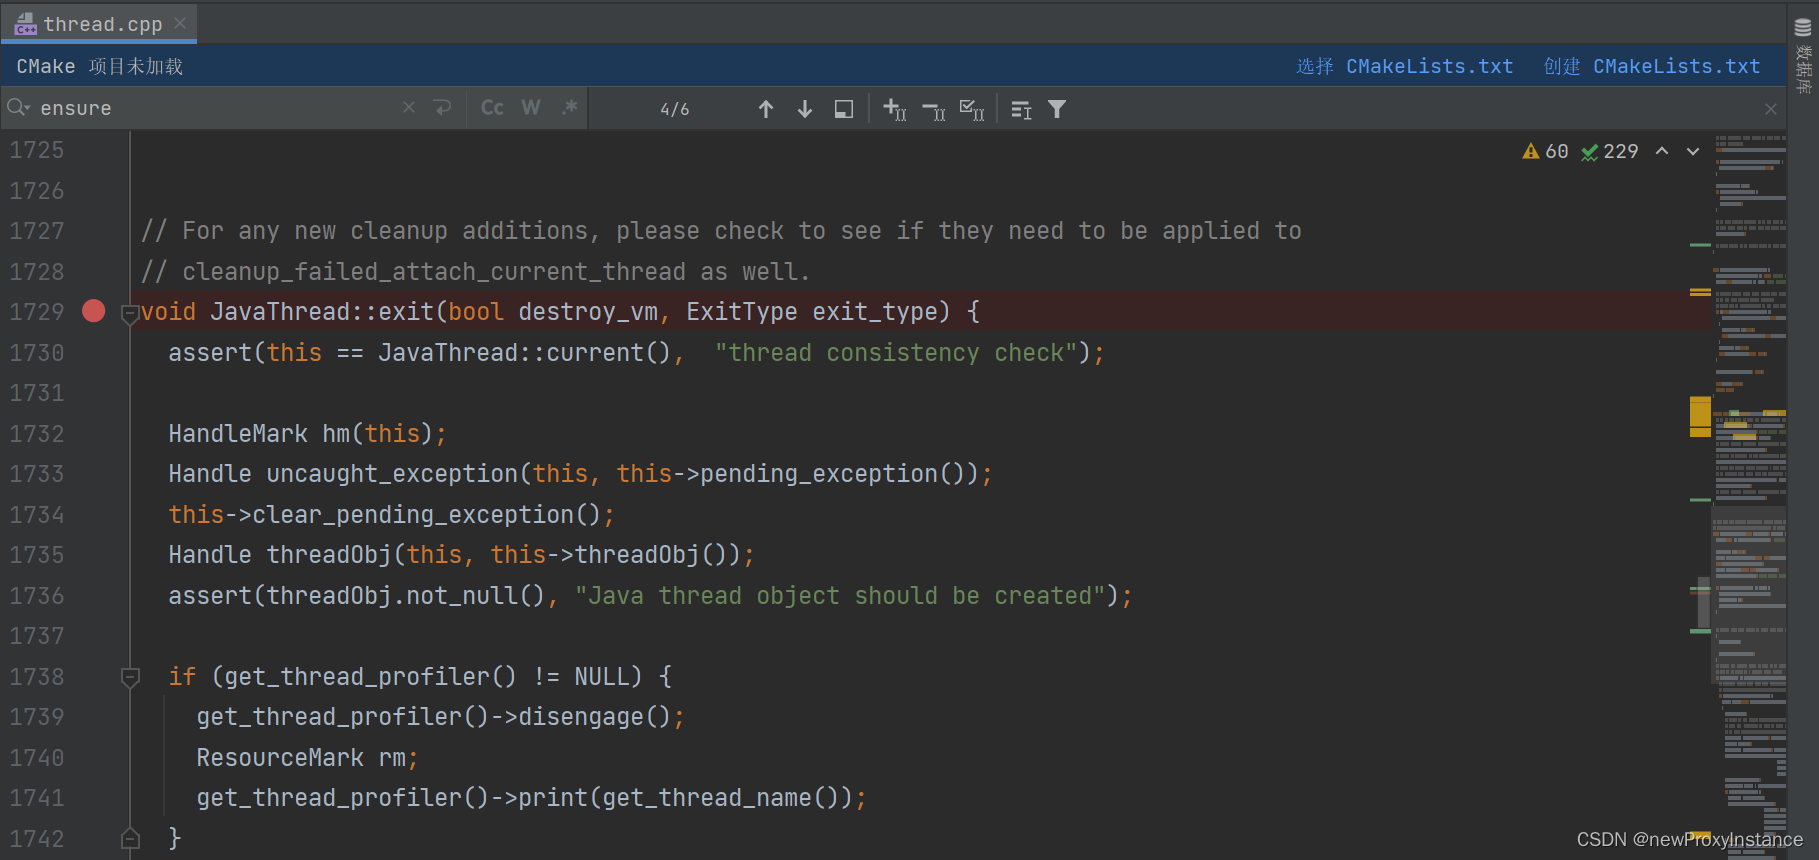
1870行 调用了 ensure_join(this)

ensure_join(this) 方法
static void ensure_join(JavaThread* thread) {
  // We do not need to grap the Threads_lock, since we are operating on ourself.
  Handle threadObj(thread, thread->threadObj());
  assert(threadObj.not_null(), "java thread object must exist");
  ObjectLocker lock(threadObj, thread);
  // Ignore pending exception (ThreadDeath), since we are exiting anyway
  thread->clear_pending_exception();
  // Thread is exiting. So set thread_status field in  java.lang.Thread class to TERMINATED.
  java_lang_Thread::set_thread_status(threadObj(), java_lang_Thread::TERMINATED);
  // Clear the native thread instance - this makes isAlive return false and allows the join()
  // to complete once we've done the notify_all below
  java_lang_Thread::set_thread(threadObj(), NULL);
  lock.notify_all(thread);
  // Ignore pending exception (ThreadDeath), since we are exiting anyway
  thread->clear_pending_exception();
}
第9行将线程的状态改为死亡。
倒数第4行唤醒所有阻塞等待的线程,也就是上面join提到的主线程。
子线程异常问题
如果子线程执行异常怎么办?
        Thread thread = new Thread(() -> {
            throw new RuntimeException("sdasds");
        });
        ----
        this is main
Exception in thread "Thread-0" java.lang.RuntimeException: sdasds
	at com.example.common.juc.thread.ThreadError.lambda$main$0(ThreadError.java:24)
	at java.lang.Thread.run(Thread.java:748)
处理方法一:在子线程中try-catch可能发生异常的代码块处理
        Thread thread = new Thread(() -> {
            try {
                throw new RuntimeException("sdasds");
            } catch (RuntimeException e) {
                System.out.println(Thread.currentThread().getName() + "发生了异常");
            }
        });
那么我如果想要在主线程处理呢 ? 尝试 try-catch子线程启动
        try {
            thread.start();
        } catch (Exception e) {
            System.out.println("error ..");
        }
结果发现在启动阶段添加try-catch不起作用,那么应该怎么处理?
在Thread类中有一个UncaughtExceptionHandler
public class ThreadError {

    static UncaughtExceptionHandler h = new UncaughtExceptionHandler() {
        @Override
        public void uncaughtException(Thread t, Throwable e) {
            System.out.println("开始处理异常....");
            System.out.println(t.getName());
            System.out.println(e.toString());

        }
    };

    public static void main(String[] args) throws Exception {
        Thread thread = new Thread(() -> {
                throw new RuntimeException("sdasds");
        });
        thread.setUncaughtExceptionHandler(h);

        thread.start();

        // try {
        //     thread.start();
        // } catch (Exception e) {
        //     System.out.println("error ..");
        // }

        System.out.println("this is main");
    }
}
-----
this is main
开始处理异常....
Thread-0
java.lang.RuntimeException: sdasds
activeCount
    public static int activeCount() {
        return currentThread().getThreadGroup().activeCount();
    }
返回当前线程的线程组中活跃的线程数量。
currentThread
public static native Thread currentThread();
返回当前线程。
ThreadGroup
线程在创建的过程中允许指定线程组,如下图部分方法所示。
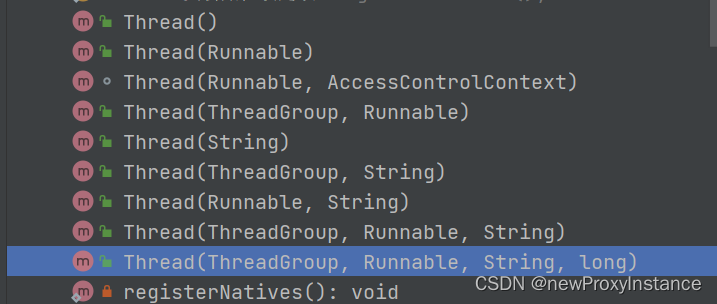
而线程组的构造函数仍然可以指定线程组

不指定线程组的话 ,会获取当前线程的线程组

下面我们测试构造函数
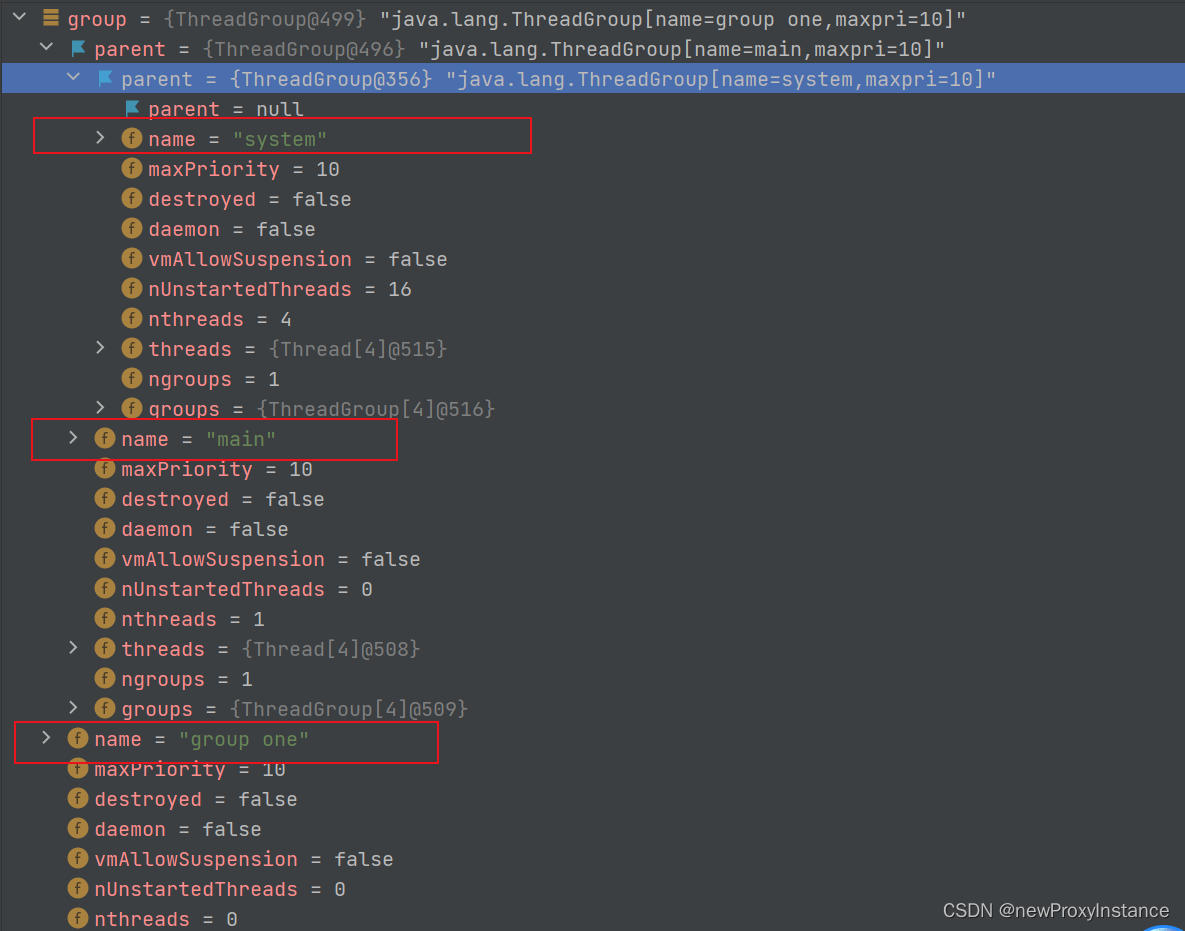
public class UseThreadGroup {
    public static void main(String[] args) {
        ThreadGroup group = new ThreadGroup("group one");
        System.out.println(group);

    }
}
自定义线程组的parent是main,main的parent是system,而system以上就没有parent了。
批量中断
public class UseThreadGroup {
    static Run r = new Run();
    public static void main(String[] args) throws InterruptedException {
        ThreadGroup group1 = new ThreadGroup("first");
        ThreadGroup group2 = new ThreadGroup(group1, "second");
        ThreadGroup group3 = new ThreadGroup(group2, "third");
        Thread t1 = new Thread(group1, r, "t1");
        Thread t2 = new Thread(group1, r, "t2");
        Thread t3 = new Thread(group2, r, "t3");
        Thread t4 = new Thread(group2, r, "t4");
        Thread t5 = new Thread(group3, r, "t5");
        Thread t6 = new Thread(group3, r, "t6");
        t1.start();
        t2.start();
        t3.start();
        t4.start();
        t5.start();
        t6.start();
        Thread.sleep(5);
        group1.interrupt();
    }

    public static class Run implements Runnable {
        @Override
        public void run() {
            Thread thread = Thread.currentThread();
            System.out.println("线程组:" + thread.getThreadGroup().getName() + ",线程名称:" + thread.getName());
            while (true) {
                if (thread.isInterrupted()) {
                    System.out.println("线程:" + thread.getName() + "停止了!");
                    break;
                }
            }
        }
    }
}
-------
线程组:first,线程名称:t1
线程组:third,线程名称:t5
线程组:second,线程名称:t4
线程组:third,线程名称:t6
线程组:second,线程名称:t3
线程组:first,线程名称:t2
线程:t1停止了!
线程:t2停止了!
线程:t5停止了!
线程:t6停止了!
线程:t4停止了!
线程:t3停止了!
在线程组 group1 中释放中断信号,所有的子线程组以及子线程都收到了中断信号退出了。


