Ubuntu系统下RPKI体系的搭建
Ubuntu安装Nginx
一、安装
apt-get update
apt-get install nginx
nginx -v  #查看安装版本
二、目录说明
/usr/sbin/nginx:主程序,启动文件
/etc/nginx:存放配置文件
/var/www/html:存放项目目录
/var/log/nginx:存放日志
三、管理命令
service nginx start
service nginx restart
service nginx stop
Ubuntu安装node.js
一、先卸载已经安装的旧版本
sudo apt-get remove nodejs
二、安装新版本
wget https://nodejs.org/dist/v14.18.0/node-v14.18.0-linux-x64.tar.xz
tar xf node-v14.18.0-linux-x64.tar.xz
sudo cp -r node-v14.18.0-linux-x64 /usr/local/lib/nodejs
echo "export export PATH=/usr/local/lib/nodejs/bin:$PATH" >> ~/.bashrc
echo "export export PATH=/usr/local/lib/nodejs/bin:$PATH" >> ~/.bashrc
. ~/.profile
. ~/.bashrc
#进行软链接
sudo ln -s /usr/local/lib/nodejs/bin/node /bin/node
sudo ln -s /usr/local/lib/nodejs/bin/npm /bin/npm

node -v
#v14.18.0
npm  -v
#6.14.15
安装node.js运行yarn报错解决
安装cmdtest
apt install cmdtest
进入前端程序目录下执行yarn报错
00h00m00s 0/0: : ERROR: There are no scenarios; must have at least one.
解决方法:
一、卸载原有yarn
sudo apt remove yarn
并按照 官方网站的说明 安装它,在我的情况下(Ubuntu 20.04.6 LTS \n \l)如下:
curl -sS https://dl.yarnpkg.com/debian/pubkey.gpg | sudo apt-key add -

echo "deb https://dl.yarnpkg.com/debian/ stable main" | sudo tee /etc/apt/sources.list.d/yarn.list

sudo apt update && sudo apt install yarn

yarn
RPKI体系结构搭建
1、相关文章
- krill:
https://krill.docs.nlnetlabs.nl/en/stable/index.html
-
Krill as a Trust Anchor
https://krill.docs.nlnetlabs.nl/en/stable/trust-anchor.html
-
Running a Publication Server
https://krill.docs.nlnetlabs.nl/en/stable/publication-server.html
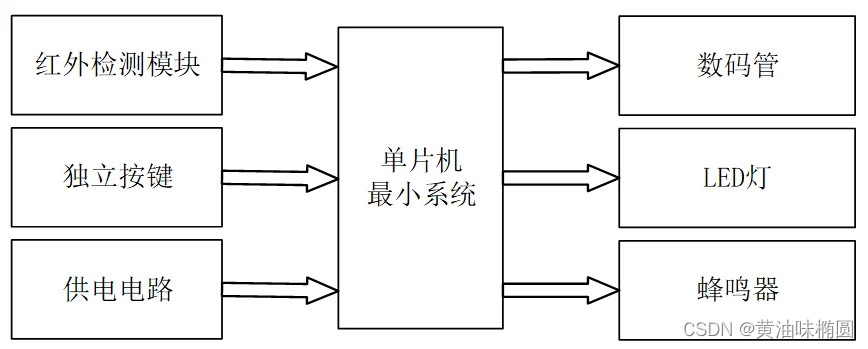
2、基于KRILL TA的逻辑结构
RPKI Trust Anchor(TA)由TA代理和TA签名者组成。
TA签名者负责生成和使用TA RPKI密钥。它被设计成使用自己的独立命令行工具krillta来操作。为了提高安全性,可以在不使用此工具时将此工具用于与网络断 开连接并处于脱机状态的系统,并且可以选择使用HSM来处理密钥。
TA Proxy始终位于Krill内部,负责所有在线操作,例如处理与子CA的RFC 6492通信,以及发布由TA签名者使用RFC 8181通信协议与发布服务器签署的材料。TA代理对这些协议使用自己的“身份”密钥和证书。
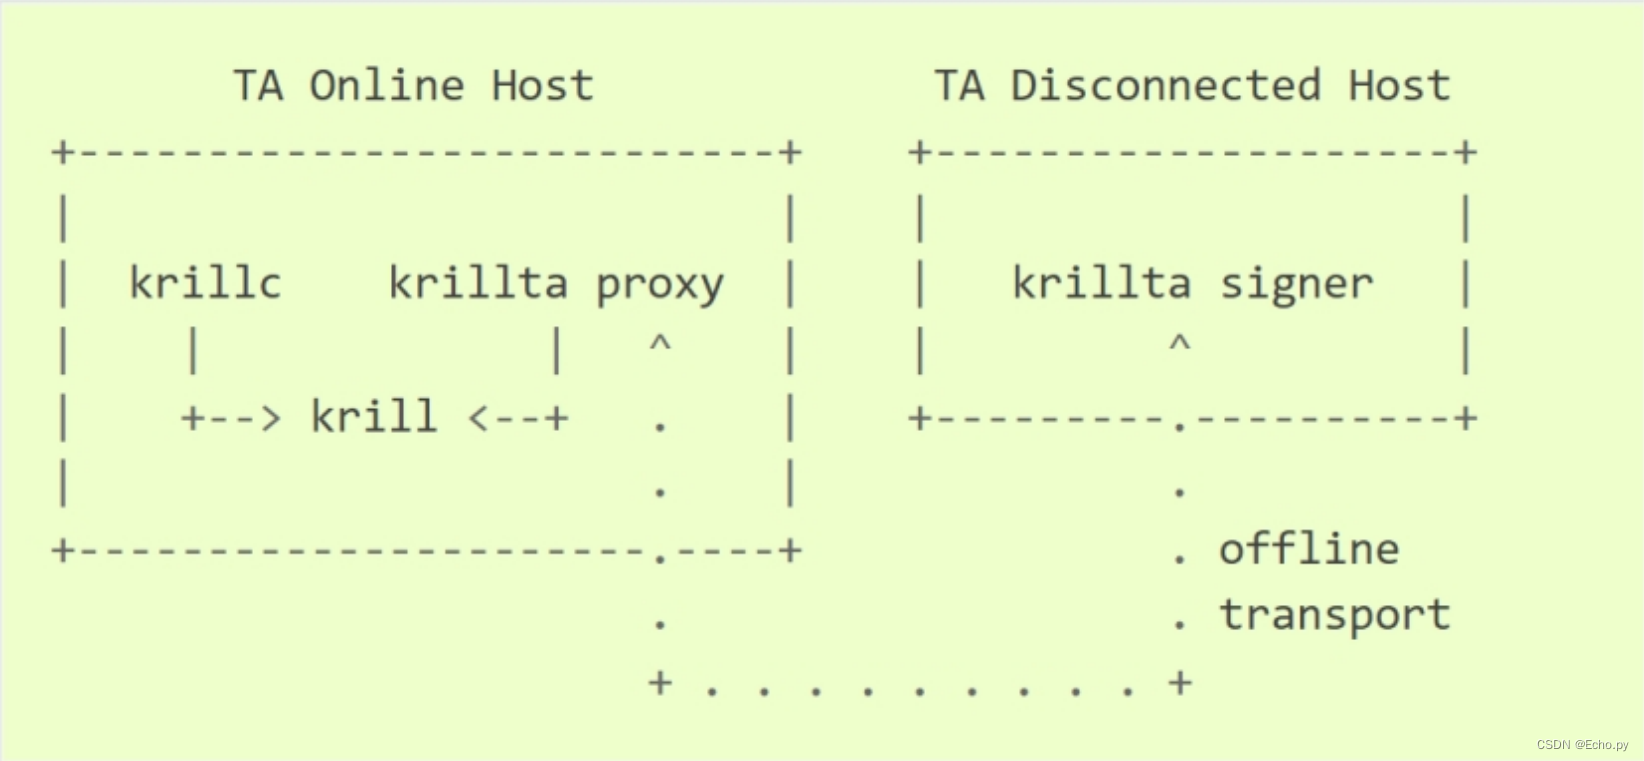
图1:Trust Anchor 体系结构
3、实验环境搭建
在ca、ta、repository在一台物理机中,RPKI Trust Anchor(TA)、children ca、publication目前安装在一台物理机内,通过创建的TA来签发children ca,将children ca作为一个publication server,管理和发布ROA。
1.安装Nginx
详细请看Ubutu安装Nginx
2.生成SSL自签名证书
详细请看生成SSL自签名证书.mk
3.nginx.conf
user  root;
worker_processes  1;

#error_log  logs/error.log;
#error_log  logs/error.log  notice;
#error_log  logs/error.log  info;

#pid        logs/nginx.pid;


events {
    worker_connections  1024;
}


http {
    include       mime.types;
    default_type  application/octet-stream;
    sendfile        on;
    keepalive_timeout  65;
    #server {
    #    listen       8000;
    #    listen       somename:8080;
    #    server_name  somename  alias  another.alias;

    #    location / {
    #        root   html;
    #        index  index.html index.htm;
    #    }
    #}

    server {
        listen       443 ssl;
        server_name  rpki.qcl.edu.cn;

        ssl_certificate       /etc/nginx/blog.crt;
        ssl_certificate_key   /etc/nginx/blog_nopass.key;
        ssl_session_cache    shared:SSL:1m;
        ssl_session_timeout  5m;

        ssl_ciphers  HIGH:!aNULL:!MD5;
        ssl_prefer_server_ciphers  on;
        #if ($request_uri = "/") {
        #    return 301 https://qcl.caroot.com/index.html#/testbed;
        #}
        location / {
            proxy_pass http://127.0.0.1:5173/;
            proxy_ssl_verify off;
        }
        location /rfc6492 {
            proxy_pass https://127.0.0.1:3000/rfc6492;
            proxy_set_header Host $host;
            proxy_set_header X-Real-IP $remote_addr;
            proxy_set_header X-Forwarded-For $proxy_add_x_forwarded_for;
            proxy_set_header X-Forwarded-Proto $scheme;

          # krill does not use a valid certificate/tls is handled by nginx
            proxy_ssl_verify off;
        }
        location /rfc8181 {
          proxy_pass https://127.0.0.1:3000/rfc8181;
          proxy_set_header Host $host;
          proxy_set_header X-Real-IP $remote_addr;
          proxy_set_header X-Forwarded-For $proxy_add_x_forwarded_for;
          proxy_set_header X-Forwarded-Proto $scheme;

          # krill does not use a valid certificate/tls is handled by nginx
          proxy_ssl_verify off;
        }

        location /api {
          proxy_pass https://127.0.0.1:3000/api;
          proxy_set_header Host $host;
          proxy_set_header X-Real-IP $remote_addr;
          proxy_set_header X-Forwarded-For $proxy_add_x_forwarded_for;
          proxy_set_header X-Forwarded-Proto $scheme;

          # allow IPv4 and IPv6 documentation ranges
          #allow 192.0.2.0/24;
          #allow 2001:0db8::/32;
          #deny  all;

          # krill does not use a valid certificate/tls is handled by nginx
          proxy_ssl_verify off;
        }
        location /rrdp {
            proxy_pass https://127.0.0.1:3000/rrdp;
            proxy_set_header Host $host;
            proxy_set_header X-Real-IP $remote_addr;
            proxy_set_header X-Forwarded-For $proxy_add_x_forwarded_for;
            proxy_set_header X-Forwarded-Proto $scheme;

          # krill does not use a valid certificate/tls is handled by nginx
            proxy_ssl_verify off;
        }

        #location / {
        #          root   html;
        #          index  index.html index.htm;
        #   }
    }

}
4.安装krill
If you have a machine with an amd64/x86_64 architecture running Ubuntu 16.x, 18.x, 20.x or 22.x, you can install Krill from our software package repository.
First update the
aptpackage index:sudo apt updateThen install packages to allow
aptto use a repository over HTTPS:sudo apt install \ ca-certificates \ curl \ gnupg \ lsb-releaseAdd the GPG key from NLnet Labs:
curl -fsSL https://packages.nlnetlabs.nl/aptkey.asc | sudo gpg --dearmor -o /usr/share/keyrings/nlnetlabs-archive-keyring.gpgNow, use the following command to set up the main repository:
echo \
"deb [arch=$(dpkg --print-architecture) signed-by=/usr/share/keyrings/nlnetlabs-archive-keyring.gpg] https://packages.nlnetlabs.nl/linux/ubuntu \
$(lsb_release -cs) main" | sudo tee /etc/apt/sources.list.d/nlnetlabs.list > /dev/null
After updating the
aptpackage index you can install Krill:sudo apt update sudo apt install krillReview the generated configuration file at
/etc/krill.conf. Pay particular attention to theservice_uriandadmin_tokensettings. Tip: The configuration file was generated for you using thekrillc config simplecommand.Warning If you modify the default storage_uri, or if you decide to symlink its default directory /var/lib/krill/data to another location or volume, you will need to: ensure the user krill has write permissions configure systemd to give the krill process access The easiest way to achieve the latter is by using systemctl edit krill and adding the following: ` [Service] ReadWritePaths=/your/path/to/data `
Once happy with the settings use sudo systemctl enable --now krill to instruct systemd to enable the Krill service at boot and to start it immediately. The krill daemon runs as user krill and stores its data in /var/lib/krill/data, unless you modified the storage_uri setting.
You can check the status of Krill with:
sudo systemctl status krillYou can view the logs with:
sudo journalctl --unit=krill
5.krill.conf
###########################################################################
#                                                                        #
#                              DATA                                      #
#                                                                        #
###########################################################################

# Specify the directory where the publication server will store its data.
# Note that clustering through a shared data directory is not supported.
# But, we plan to look into a proper clustering solution later.
#
data_dir = "/var/lib/krill/data/"

# Specify the path to the PID file for Krill.
#
# Defaults to "krill.pid" under the 'data_dir' specified above.
#
pid_file = "/var/lib/krill/data/krill.pid"


###########################################################################
#                                                                        #
#                           LOGGING                                      #
#                                                                        #
###########################################################################

# Log level
#
# The maximum log level ("off", "error", "warn", "info", or "debug") for
# which to log messages.
#
# Defaults to "warn"
#
log_level = "debug"

# Log type
#
# Where to log to. One of "stderr" for stderr, "syslog" for syslog, or "file"
# for a file. If "file" is given, the "log_file" field needs to be given, too.
#
### log_type = "file"
log_type = "syslog"

# Syslog facility
#
# The syslog facility to log to if syslog logging is used. Defaults to "daemon".
#
### syslog_facility = "daemon"

# Log file
#
# The path to the file to log to if file logging is used. If the path is
# relative, it is relative to the current working directory from which
# the binary is executed.
#
### log_file = "./krill.log"


###########################################################################
#                                                                        #
#                           ACCESS                                      #
#                                                                        #
###########################################################################
# Admin Token
#
# Define an admin token that can be used to interact with the API. Token use
# is modelled after OAuth 2.0 Bearer Tokens (RFC 6750), which are expected be
# included as an HTTP header in requests by clients.
#
# If you do not specify a value here, the server will insist that you provide
# a token as an environment variable with the key "KRILL_ADMIN_TOKEN".
#
admin_token = "rpkiqcl"
# Specify the ip addresses and port number that the server will use.
#
# Note: by default Krill uses "127.0.0.1" (IPv4 localhost) as its IP address.
# We recommend that you keep this setting and use a proxy server such as NGINX
# or Apache if you must make your Krill instance accessible remotely.
#
# You can use the 'ip' setting in this config file to override the default. You
# can specify a single IP address or an array of addresses.
#
# If you want to support remote delegated CAs to be children under a CA and/or
# publish their content, then you should set the "service uri" setting described
# below. If you do not set this, then Krill will use the (first) IP address as
# the hostname for this settting.
#
#
### ip             = "127.0.0.1"            # default
### ip             = [ "127.0.0.1", "::1" ] # multiple IP addresses
### port           = 3000                   # applies to all ip addresses


# Specify the base public service URI hostname and port.
#
# The default service URI is set to https://localhost:3000/. This is fine for
# setups where you use Krill to run your own CA only. You do not need to set this
# to enable remote access to the UI or API (e.g. for using the CLI remotely).
# Simply setting up a proxy suffices for this.
#
# However, if you are serving as a parent CA or Publication Server that needs
# to be accessible by remote CAs, then you will need to tell your Krill instance
# what its public (base) URI will be, so that it can include the proper URIs
# in responses to those CAs.
#
# Note that Krill insists on HTTPS for this, even if you elect to use "disable"
# for the https_mode. The reason is that, while RFC 6492 (provisioning) and
# RFC 8181 (publication) allow for plain HTTP and provide security through
# signed messages, we believe it is better if this (remote) traffic is also
# encrypted and one can (and should) use an HTTPS capable proxy in this case.
#
# At present this MUST be an https URI with a hostname and optional port number only.
# It is not allowed to use a Krill specific path prefix. If you have a strong
# motivation for this, then please comment on the following github issue:
# https://github.com/NLnetLabs/krill/issues/263
#
# Krill UI, API and service URIs will be derived as follows:
#  <service_uri>api/v1/...                (api)
#  <service_uri>rfc6492                   (for remote children)
#  <service_uri>...                       (various UI resources)
service_uri = "https://rpki.qcl.edu.cn/"
ta_support_enabled = true
bgp_risdumps_enabled = false
# Disable the download of BGP information. Unless you are also using
# this server to host your CAs there is no need to keep this information
# in memory.
6.安装krillta
sudo apt install krillta
创建一个工作目录,您的 TA 签名者可以在其中保存其状态和日志文件。然后创建一个配置文件。如果您使用/etc/krillta.conf 作为配置文件,那么krillta将能够自动找到它
######################################################################################
#                                                                                    #
#                                      DATA                                          #
#                                                                                    #
######################################################################################

# Specify the directory where the TA Signer will store its data.
data_dir = "/var/lib/krillta/data"

######################################################################################
#                                                                                    #
#                                     LOGGING                                        #
#                                                                                    #
######################################################################################

# Log level
#
# The maximum log level ("off", "error", "warn", "info", or "debug") for
# which to log messages.
#
# Defaults to "warn"
#
### log_level = "warn"

# Log type
#
# Where to log to. One of "stderr" for stderr, "syslog" for syslog, or "file"
# for a file in which case $data_dir/krillta.log will be used. This cannot (yet)
# be overridden.
#
# Defaults to "file"
#
### log_type = "file"

######################################################################################
#                                                                                    #
#                                SIGNER CONFIGURATION                                #
#                                                                                    #
######################################################################################

#
# By default OpenSSL is used for key generation and signing.
#
# But.. The usual Krill HSM support should also work in this context. If you want to
# use an HSM please read the documentation here:
# https://krill.docs.nlnetlabs.nl/en/stable/hsm.html
#
# Note that this configuration cannot be changed after the TA Signer has been
# initialised. Or rather.. where for normal Krill CAs defaults may be changed and
# key rolls can be used to start using a different signer, there is no key roll
# support for the TA. This may be implemented in future in which case we would
# also support RPKI Signed TALs for this process.
7.安装krill-sync
按照https://github.com/NLnetLabs/krill-sync中“Build with Cargo”介绍安装
For Ubuntu 20.04 with Rust 1.51.0:
apt update && apt install -y build-essential curl libssl-dev openssl pkg-config
curl --proto '=https' --tlsv1.2 -sSf https://sh.rustup.rs | sh
source $HOME/.cargo/env
cargo install --git https://github.com/NLnetLabs/krill-sync.git --tag v0.2.0-rc1 --locked
Krill-sync配置文件(/etc/rsync.conf)
uid = nobody
gid = nobody
max connections = 50

[repo]
path = /var/lib/krill/data/repo/rsync/current/
comment = RPKI repository
read only = yes
8.配置环境变量
export KRILL_CLI_TOKEN=rpkiqcl(备注:必须与/ect/krill.conf中的一致)
9.具体配置步骤
1. krillta proxy init
2. krillc pubserver server init --rrdp https://rpki.qcl.edu.cn/rrdp/ 	--rsync rsync://rpki.qcl.edu.cn/repo/
3. rsync --list-only rsync://rpki.qcl.edu.cn/repo/
4. krillta proxy repo request > ./pub-req.xml
5. krillc pubserver publishers add --request ./pub-req.xml >./repo-res.xml
6. krillta proxy repo configure --response ./repo-res.xml
7. krillta proxy id --format json > ./proxy-id.json
8. krillta proxy repo contact --format json  >./proxy-repo.json
9. krillta signer init --proxy_id ./proxy-id.json --proxy_repository_contact ./proxy-repo.json --tal_https https://rpki.qcl.edu.cn/ta/ta.cer --tal_rsync rsync://rpki.qcl.edu.cn/ta/ta.cer
10. krillta signer show > ./signer-info.json
11. krillta proxy signer init --info ./signer-info.json

12. krillc add --ca rpkiqcl
13. krillc show --ca rpkiqcl --format json >./rpkiqcl.json
14. krillta proxy children add --info ./rpkiqcl.json >./res.xml
15. krillta proxy children response --child rpkiqcl >./res.xml
16. krillc parents add --ca rpkiqcl --parent ta --response ./res.xml
17. krillc repo request --ca rpkiqcl > ./pub-req.xml
18. krillc pubserver publishers add --request ./pub-req.xml > ./repo-res.xml
19. krillc repo configure --ca rpkiqcl --response ./repo-res.xml
20. krillta proxy signer make-request
21. krillta proxy signer show-request --format json > ./request.json
22. krillta signer process --request ./request.json
23. krillta signer last > ./response.json
24. krillta proxy signer process-response --response ./response.json
常用命令
配置环境变量
export KRILL_CLI_TOKEN=Rpki_Qcl@2024
启动krill
sudo systemctl enable --now krill
查看krill运行状态
sudo systemctl status krill
查看krill运行中日志输出
sudo journalctl --unit=krill
查看CA信息
krillc show --ca rpkiqcl
移除子CA
krillc children remove --ca qcl_admin --child qcl_admin3 --token krill_qcl
移除父CA
krillc parents remove --ca qcl_admin --parent testbed --token krill_qcl
查看CA的ROA信息
krillc roas list --ca rpkiqcl
删除ROA
krillc roas update --remove '10.0.0.0/8 => 1' --ca rpki_qcl
添加CA
krillc add --ca rpkiqcl
删除CA
krillc delete --ca rpkiqcl
查看公共服务状态
krillc pubserver server stats
列出资源库
krillc pubserver publishers list --token krill_qcl
删除资源库
krillc pubserver publishers remove --publisher rpkiqcl
查看父级连接状态
krillc parents statuses
后台启动前端源码项目
nohup yarn dev --host >/dev/null 2>&1 & exit


![[vue] nvm](https://img-blog.csdnimg.cn/direct/8d8f3c4cc22747658dcd267f9f6298a6.png)