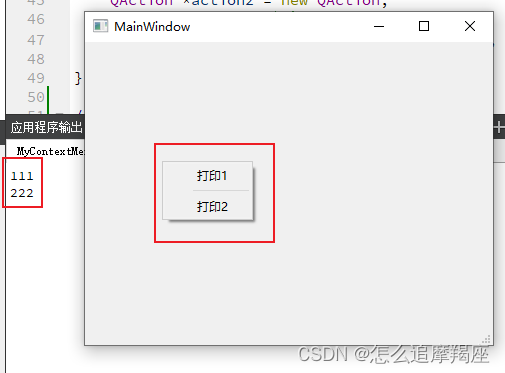
说明:使用四种方式实现鼠标右击界面,显示出菜单,菜单上有两个动作,选择两个动作,分别打印“111”和“222”。
界面样式如下:
一、方法1:重写鼠标事件mousePressEvent
.h中的代码如下:
#ifndef MAINWINDOW_H
#define MAINWINDOW_H

#include <QMainWindow>

QT_BEGIN_NAMESPACE
namespace Ui { class MainWindow; }
QT_END_NAMESPACE

class MainWindow : public QMainWindow
{
    Q_OBJECT

public:
    MainWindow(QWidget *parent = nullptr);
    ~MainWindow();

protected:
    void mousePressEvent(QMouseEvent *event);

private:
    void createContextMenu();

private slots:
    void onDebug1();

    void onDebug2();

private:
    Ui::MainWindow *ui;

    QMenu *m_menu;
};
#endif // MAINWINDOW_H
.cpp中的代码如下:
#include "MainWindow.h"
#include "ui_MainWindow.h"
#include <QDebug>
#include <QContextMenuEvent>
#include <QMouseEvent>

MainWindow::MainWindow(QWidget *parent)
    : QMainWindow(parent)
    , ui(new Ui::MainWindow)
{
    ui->setupUi(this);
    createContextMenu();
}

MainWindow::~MainWindow()
{
    delete ui;
}

/** 重写鼠标事件
* @brief MainWindow::mousePressEvent
* @param event
*/
void MainWindow::mousePressEvent(QMouseEvent *event)
{
    if(event->button() == Qt::RightButton) //鼠标右键单击
    {
        m_menu->exec(QCursor::pos()); //显示菜单
    }
}

/** 初始化菜单
* @brief MainWindow::createContextMenu
*/
void MainWindow::createContextMenu()
{
    m_menu = new QMenu(this);

    QAction *action1 = new QAction;
    action1->setText("打印1");
    connect(action1, &QAction::triggered, this, &MainWindow::onDebug1);
    m_menu->addAction(action1);
    m_menu->addSeparator(); //分隔符

    QAction *action2 = new QAction;
    action2->setText("打印2");
    connect(action2, &QAction::triggered, this, &MainWindow::onDebug2);
    m_menu->addAction(action2);
}

/** 打印1对应的槽函数
* @brief MainWindow::onDebug1
*/
void MainWindow::onDebug1()
{
    qDebug() << "111";
}

/** 打印2对应的槽函数
* @brief MainWindow::onDebug2
*/
void MainWindow::onDebug2()
{
    qDebug() << "222";
}
二、方法2:setContextMenuPolicy(Qt::DefaultContextMenu)
setContextMenuPolicy()的参数设置为Qt::DefaultContextMenu,右击界面会触发contextMenuEvent()事件。
.h中的代码如下:
#ifndef MAINWINDOW_H
#define MAINWINDOW_H

#include <QMainWindow>

QT_BEGIN_NAMESPACE
namespace Ui { class MainWindow; }
QT_END_NAMESPACE

class MainWindow : public QMainWindow
{
    Q_OBJECT

public:
    MainWindow(QWidget *parent = nullptr);
    ~MainWindow();

protected:
    void contextMenuEvent(QContextMenuEvent *event);

private:
    void createContextMenu();

private slots:
    void onDebug1();

    void onDebug2();

private:
    Ui::MainWindow *ui;

    QMenu *m_menu;
};
#endif // MAINWINDOW_H
.cpp中的代码如下:
#include "MainWindow.h"
#include "ui_MainWindow.h"
#include <QDebug>
#include <QContextMenuEvent>
#include <QMouseEvent>

MainWindow::MainWindow(QWidget *parent)
    : QMainWindow(parent)
    , ui(new Ui::MainWindow)
{
    ui->setupUi(this);

    createContextMenu();

    this->setContextMenuPolicy(Qt::DefaultContextMenu);
}

MainWindow::~MainWindow()
{
    delete ui;
}

/** 上下文菜单事件
* @brief MainWindow::contextMenuEvent
* @param event
*/
void MainWindow::contextMenuEvent(QContextMenuEvent *event)
{
    Q_UNUSED(event);

    m_menu->exec(QCursor::pos()); //显示菜单
}

/** 初始化菜单
* @brief MainWindow::createContextMenu
*/
void MainWindow::createContextMenu()
{
    m_menu = new QMenu(this);

    QAction *action1 = new QAction;
    action1->setText("打印1");
    connect(action1, &QAction::triggered, this, &MainWindow::onDebug1);
    m_menu->addAction(action1);
    m_menu->addSeparator(); //分隔符

    QAction *action2 = new QAction;
    action2->setText("打印2");
    connect(action2, &QAction::triggered, this, &MainWindow::onDebug2);
    m_menu->addAction(action2);
}

/** 打印1对应的槽函数
* @brief MainWindow::onDebug1
*/
void MainWindow::onDebug1()
{
    qDebug() << "111";
}

/** 打印1对应的槽函数
* @brief MainWindow::onDebug2
*/
void MainWindow::onDebug2()
{
    qDebug() << "222";
}
三、方法3:setContextMenuPolicy(Qt::CustomContextMenu);
setContextMenuPolicy()的参数设置为Qt::CustomContextMenu,右击界面会发射on_XXX_customContextMenuRequested(const QPoint &pos)信号。
.h中的代码如下:
#ifndef MAINWINDOW_H
#define MAINWINDOW_H

#include <QMainWindow>

QT_BEGIN_NAMESPACE
namespace Ui { class MainWindow; }
QT_END_NAMESPACE

class MainWindow : public QMainWindow
{
    Q_OBJECT

public:
    MainWindow(QWidget *parent = nullptr);
    ~MainWindow();

private:
    void createContextMenu();

private slots:
    void onDebug1();

    void onDebug2();

    void on_MainWindow_customContextMenuRequested(const QPoint &pos);

private:
    Ui::MainWindow *ui;

    QMenu *m_menu;
};
#endif // MAINWINDOW_H
.cpp中的代码如下:
#include "MainWindow.h"
#include "ui_MainWindow.h"
#include <QDebug>
#include <QContextMenuEvent>
#include <QMouseEvent>

MainWindow::MainWindow(QWidget *parent)
    : QMainWindow(parent)
    , ui(new Ui::MainWindow)
{
    ui->setupUi(this);

    createContextMenu();

    this->setContextMenuPolicy(Qt::CustomContextMenu);
}

MainWindow::~MainWindow()
{
    delete ui;
}

/** 初始化菜单
* @brief MainWindow::createContextMenu
*/
void MainWindow::createContextMenu()
{
    m_menu = new QMenu(this);

    QAction *action1 = new QAction;
    action1->setText("打印1");
    connect(action1, &QAction::triggered, this, &MainWindow::onDebug1);
    m_menu->addAction(action1);
    m_menu->addSeparator(); //分隔符

    QAction *action2 = new QAction;
    action2->setText("打印2");
    connect(action2, &QAction::triggered, this, &MainWindow::onDebug2);
    m_menu->addAction(action2);
}

/** 打印1对应的槽函数
* @brief MainWindow::onDebug1
*/
void MainWindow::onDebug1()
{
    qDebug() << "111";
}

/** 打印1对应的槽函数
* @brief MainWindow::onDebug2
*/
void MainWindow::onDebug2()
{
    qDebug() << "222";
}

/** on_类名_customContextMenuRequested
* @brief MainWindow::on_MainWindow_customContextMenuRequested
* @param pos
*/
void MainWindow::on_MainWindow_customContextMenuRequested(const QPoint &pos)
{
    QPoint gloPos = this->mapToGlobal(pos);
    m_menu->exec(gloPos);
}
四、方法4:setContextMenuPolicy(Qt::ActionsContextMenu);
setContextMenuPolicy()的参数设置为Qt::ActionsContextMenu,右击界面会将其 QWidget::actions() 显示为上下文菜单。
.h中的代码如下:
#ifndef MAINWINDOW_H
#define MAINWINDOW_H

#include <QMainWindow>

QT_BEGIN_NAMESPACE
namespace Ui { class MainWindow; }
QT_END_NAMESPACE

class MainWindow : public QMainWindow
{
    Q_OBJECT

public:
    MainWindow(QWidget *parent = nullptr);
    ~MainWindow();

private:
    void createContextMenu();

private slots:
    void onDebug1();

    void onDebug2();

private:
    Ui::MainWindow *ui;
};
#endif // MAINWINDOW_H
.cpp中的代码如下:
#include "MainWindow.h"
#include "ui_MainWindow.h"
#include <QDebug>
#include <QContextMenuEvent>
#include <QMouseEvent>

MainWindow::MainWindow(QWidget *parent)
    : QMainWindow(parent)
    , ui(new Ui::MainWindow)
{
    ui->setupUi(this);

    createContextMenu();

    this->setContextMenuPolicy(Qt::ActionsContextMenu);
}

MainWindow::~MainWindow()
{
    delete ui;
}

/** 初始化菜单
* @brief MainWindow::createContextMenu
*/
void MainWindow::createContextMenu()
{
    QAction *action1 = new QAction;
    action1->setText("打印1");
    connect(action1, &QAction::triggered, this, &MainWindow::onDebug1);
    this->addAction(action1);
    //this->addSeparator(); //分隔符

    QAction *action2 = new QAction;
    action2->setText("打印2");
    connect(action2, &QAction::triggered, this, &MainWindow::onDebug2);
    this->addAction(action2);
}

/** 打印1对应的槽函数
* @brief MainWindow::onDebug1
*/
void MainWindow::onDebug1()
{
    qDebug() << "111";
}

/** 打印1对应的槽函数
* @brief MainWindow::onDebug2
*/
void MainWindow::onDebug2()
{
    qDebug() << "222";
}


![[译文] 恶意代码分析:2.LNK文件伪装成证书传播RokRAT恶意软件(含无文件攻击)](https://img-blog.csdnimg.cn/direct/f615cf28f3084158957e6d5f6e0d1384.png#pic_center)
