文章目录
- Threejs 学习笔记 | 灯光与阴影
- 如何让灯光照射在物体上有阴影
- LightShadow - 阴影类的基类
- 平行光的shadow计算投影属性 - DirectionalLightShadow类
- 平行光的投射相机
- 聚光灯的shadow计算投影属性- SpotLightShadow类
- 聚光灯的投射相机
- 平行光 DirectionalLight
- 聚光灯 SpotLight
- 聚光灯的使用
- 点光源 PointLight
- 案例:使用小球可视化点光源
- 案例:光源围绕三维物体做圆周运动 - 模拟太阳
Threejs 学习笔记 | 灯光与阴影
- 总结1:灯光与是否可以投影
| 灯光 | 描述 | 是否可以投射阴影 |
|---|---|---|
| AmbientLight 环境光 | 1.环境光没有特定方向 2.整体改变场景的光照,会均匀的照亮场景中的所有物体。 | × 因为没有方向,所以不能用来投射阴影。 |
| DirectionalLight 平型光 | 平行光是沿着特定方向发射的光。这种光的表现像是无限远,从它发出的光线都是平行的。 常用来模拟太阳光的效果。太阳足够远,因此认为太阳的位置是无限远且发生的光是平行的。 | √ |
| SpotLight 聚光灯 | 光线从一个点沿一个方向射出,随着光线照射的变远,光线圆锥体的尺寸也逐渐增大。 | √ |
| PointLight 点光源 | 从一个点向各个方向发射的光源。 常用于模拟灯泡 | √ |
| RectAreaLight 平面光光源 | 平面光光源从一个矩形平面上均匀地发射光线(矩形的正反面两个方向) 用来模拟像明亮的窗户或者条状灯光光源。 | × |
- 总结2:材质与是否受灯光影响
使用Light模拟光照对网格模型mesh(物体表面)的影响,如果使用受光照影响的材质,在不开灯的情况下是看不见的。如果希望光源照在模型的外表面,就需要将光源放在模型的外面。
| 材质 | 描述 | 是否受光照影响 | 其他 |
|---|---|---|---|
MeshBasicMaterial 基础光照模型 | 一个以简单着色(平面或线框)方式来绘制几何体的材质。 | × | |
MeshStandardMaterial 标准网格材质 | 属于PBR物理材质(基于物理的渲染physically-based rendering),可以提供更加真实的材质效果 | √ | 在实践中,该材质提供了比MeshLambertMaterial 或MeshPhongMaterial 更精确和逼真的结果,代价是计算成本更高。标准网格材质的纹理贴图属性基本覆盖了哑光和高光材质的特点,所以平时常用标准网格材质 |
MeshLambertMaterial Lambert网格材质(漫反射) | 一种非光泽表面的材质(模拟木材或石材),没有镜面高光。(偏向于哑光的效果) 该材质使用基于非物理的Lambertian模型来计算反射率。 | √ | 由于反射率和光照模型的简单性,MeshPhongMaterial,MeshStandardMaterial或者MeshPhysicalMaterial 上使用这种材质时会以一些图形精度为代价,得到更高的性能。 |
MeshPhongMaterial Phong网格材质(漫反射、高光反射) | 一种用于具有镜面高光的光泽表面的材质(模拟具有镜面高光的光泽表面)。 该材质使用非物理的Blinn-Phong模型来计算反射率。 | √ | 在MeshStandardMaterial或MeshPhysicalMaterial上使用此材质时,性能通常会更高,但会牺牲一些图形精度。 |
MeshPhysicalMaterial 物理网格材质 | MeshPhysicalMaterial是MeshStandardMaterial的扩展子类,提供了更高级的渲染属性(透明度,非金属材质提供更多的光线反射) | √ | 物理网格材质使用了更复杂的着色器功能,每个像素的渲染都要比其他材质更费性能,大部分的特性是默认关闭的,需要手动开启。 |
MeshToonMaterial 卡通材质 | 一种实现卡通着色的材质 | √ |
如何让灯光照射在物体上有阴影
import { OrbitControls } from 'three/addons/controls/OrbitControls.js';
import * as THREE from "three";

const scene = new THREE.Scene();
const camera = new THREE.PerspectiveCamera(
  45,
  window.innerWidth / window.innerHeight,
  1,
  8000
);
camera.position.set(0,0,10)
const renderer = new THREE.WebGLRenderer();
renderer.setSize(window.innerWidth, window.innerHeight); // 设置渲染的尺寸大小
const worldAxesHelper = new THREE.AxesHelper(10);
scene.add(worldAxesHelper);

// 物体
const SphereGeometry = new THREE.SphereGeometry(1,20,20);
const material =  new THREE.MeshStandardMaterial();//1.材质要受光照影响
const sphere = new THREE.Mesh(SphereGeometry, material);
scene.add(sphere);

// 创建平面
const planeGeometry = new THREE.PlaneGeometry(10,10);
const plane = new THREE.Mesh(planeGeometry, material);
plane.position.set(0,-1,0);
plane.rotation.x = -Math.PI / 2;
scene.add(plane);

// 灯光
const light = new THREE.AmbientLight(0xffffff,0.5);
scene.add(light);
const directionalLight = new THREE.DirectionalLight(0xffffff,0.5);
directionalLight.position.set(10,10,10);
scene.add(directionalLight);

document.body.appendChild(renderer.domElement);
new OrbitControls(camera, renderer.domElement)
const animation= () => {
  requestAnimationFrame(animation);
  renderer.render(scene, camera);
};
animation();
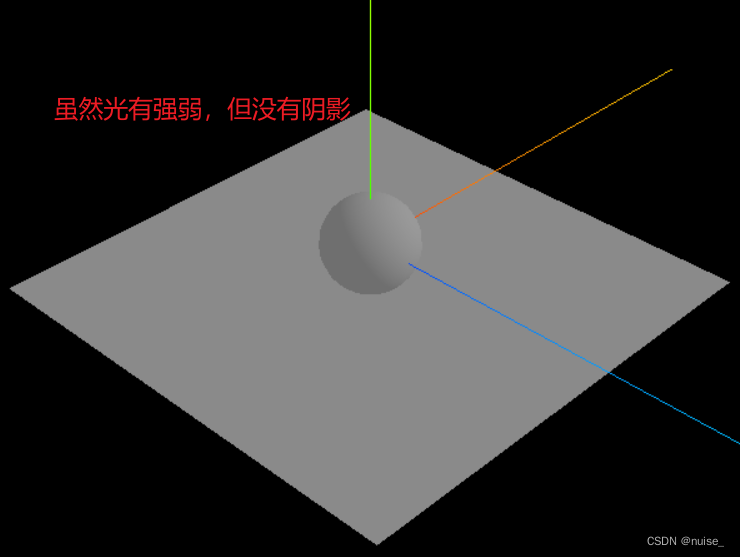
1.材质要受光照影响
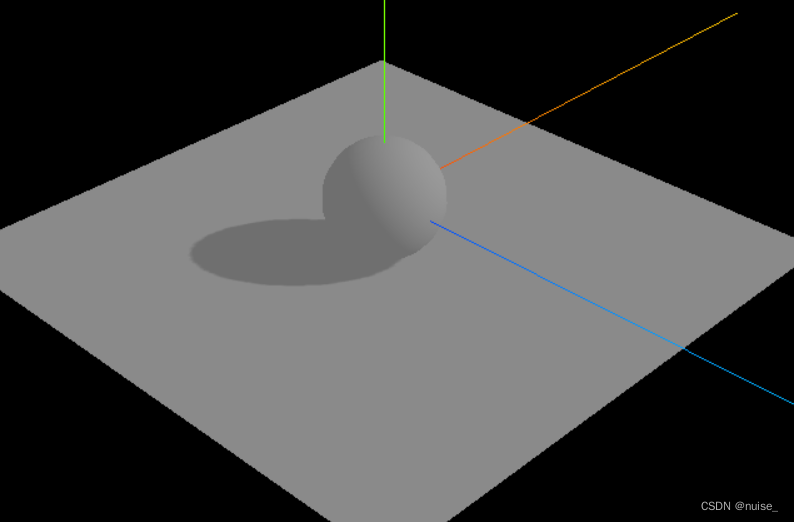
2.设置渲染器开启阴影的计算 renderer.shadowMap.enabled=true
该设置默认是false,如果开启允许再场景中使用阴影贴图。
3.设置光照投射阴影directionalLight.castShadow = true
此属性设置为true灯光将投射阴影。注意:这样做的代价比较高,需要通过调整让阴影看起来正确。
4.设置物体投射阴影object3D.castShadow = true
默认值为false,对象是否被渲染到阴影贴图中。(将物体投影出去)
5.设置物体接受阴影object3D.receiveShadow = true
默认值为false,是否接收阴影。
import { OrbitControls } from 'three/addons/controls/OrbitControls.js';
import * as THREE from "three";

const scene = new THREE.Scene();
const camera = new THREE.PerspectiveCamera(
  45,
  window.innerWidth / window.innerHeight,
  1,
  8000
);
camera.position.set(0,0,10)
const renderer = new THREE.WebGLRenderer();
renderer.setSize(window.innerWidth, window.innerHeight);
//2.设置渲染器开启阴影的计算,允许在场景中使用阴影贴图
renderer.shadowMap.enabled=true

const worldAxesHelper = new THREE.AxesHelper(10);
scene.add(worldAxesHelper);


// 物体
const SphereGeometry = new THREE.SphereGeometry(1,20,20);
const material =  new THREE.MeshStandardMaterial();//1.材质要受光照影响
const sphere = new THREE.Mesh(SphereGeometry, material);
scene.add(sphere);
//4.投影球
sphere.castShadow = true;

// 创建平面
const planeGeometry = new THREE.PlaneGeometry(10,10);
const plane = new THREE.Mesh(planeGeometry, material);
plane.position.set(0,-1,0);
plane.rotation.x = -Math.PI / 2;
scene.add(plane);
// 5.在平面上接受投影
plane.receiveShadow = true;

// 灯光
const light = new THREE.AmbientLight(0xffffff,0.5);
scene.add(light);
const directionalLight = new THREE.DirectionalLight(0xffffff,0.5);
directionalLight.position.set(10,10,10);
scene.add(directionalLight);
//3.设置光照投射阴影
directionalLight.castShadow = true;

document.body.appendChild(renderer.domElement);
new OrbitControls(camera, renderer.domElement)
const animation= () => {
  requestAnimationFrame(animation);
  renderer.render(scene, camera);
};
animation();
LightShadow - 阴影类的基类
| 属性 | 描述 |
|---|---|
| lightShadow .radius : Float | 将此值设置为大于1的值将模糊阴影的边缘。 |
| lightShadow .mapSize : Vector2 | 参数Vector2定义阴影贴图的宽度和高度,默认值为512*512. 较高的值会以计算时间为代价提供更好的阴影质量。值必须是2的幂,直到给定设备的 WebGLRenderer.capabilities.maxTextureSize,阴影贴图的宽高不一定相等。 |
平行光的shadow计算投影属性 - DirectionalLightShadow类
语法:directionalLight.shadow : DirectionalLightShadow
DirectionalLightShadow对象,用于计算该平行光产生的阴影。与其他阴影类不同,平行光阴影使用OrthographicCamera正交相机来计算阴影,而不是PerspectiveCamera透视相机。
继承链:LightShadow → DirectionalLightShadow
理解:通过光来设置阴影贴图的参数?光照产生了阴影贴图?
平行光的投射相机
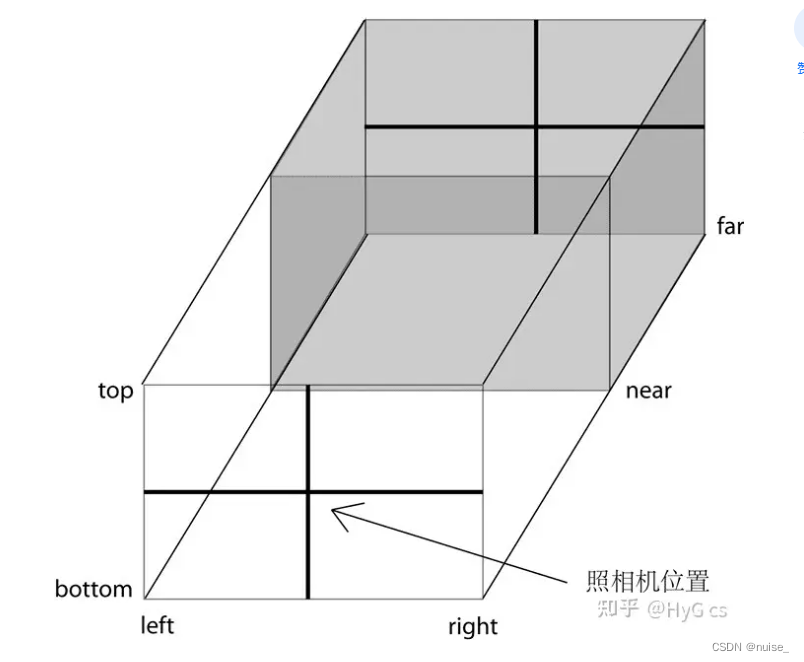
directionalLightShadow.camera : Camera:类似正交相机,超出范围不会计算阴影贴图(范围类似一个6面体 长方体),
边缘模糊与阴影贴图分辨率案例
radius的效果感觉有重影不是很光滑,原因是阴影贴图分辨率不够。可以通过lightShadow mapSize 调整阴影贴图的分辨率。
directionalLight.shadow.radius = 20; // 设置边缘模糊
directionalLight.shadow.mapSize.set(2048,2048); // 设置分辨率

设置平行光投射相机的属性案例
left:摄像机所在点为原点,向左的最大距离。
right:摄像机所在点为原点,向右的最大距离
top:摄像机所在点为原点,向上的最大距离
bottom:摄像机所在点为原点,向下最大距离。
near :摄像机所在点为原点,垂直于left\right\top\bottom构成的十字坐标系,从距离原点什么位置开始进行渲染。
far:摄像机所在点为原点,垂直于left\right\top\bottom构成的十字坐标系,到距离原点什么位置结束渲染。
import { GUI } from 'three/addons/libs/lil-gui.module.min.js';
const gui = new GUI();


// 设置平行光投射相机的属性
directionalLight.shadow.camera.near = 0.5 // 近端
directionalLight.shadow.camera.far = 20 // 远端
directionalLight.shadow.camera.top = 5
directionalLight.shadow.camera.bottom = -5
directionalLight.shadow.camera.left = -5 // 摄像机所在点为原点,向左的最大距离。
directionalLight.shadow.camera.right = 5 // 摄像机所在点为原点,向右的最大距离

// 采用gui观察效果
gui.add(directionalLight.shadow.camera,'near').min(0).max(10).step(0.1).onChange(()=>{
  directionalLight.shadow.camera.updateProjectionMatrix () ;//更新摄像机投影矩阵。在任何参数被改变以后必须被调用。
})
聚光灯的shadow计算投影属性- SpotLightShadow类
说明: 聚光灯使用PerspectiveCamera透视相机来计算投影。
继承链:LightShadow → SpotLightShadow
聚光灯的投射相机
directionalLightShadow.camera : Camera:默认值为PerspectiveCamera透视相机,可以设置透视相机的属性
平行光 DirectionalLight
语法:new THREE.DirectionalLight( color : Color, intensity : Float );
color:默认为一个白色(0xffffff)的 Color 对象。
intensity:光照的强度。默认值为 1
聚光灯 SpotLight
说明:聚光灯的照射范围是一个圆锥体
语法:new THREE.SpotLight( color : Color, intensity : Float, distance : Float, angle : Radians, penumbra : Float, decay : Float )
color:默认为一个白色(0xffffff)的 Color 对象。
intensity:光照强度。默认值为 1。
distance:光源照射的最大距离。默认值为 0(无限远)。
angle:光线照射范围的角度。默认值为 Math.PI/3。
penumbra :聚光锥的半影衰减百分比,默认值为 0。
decay: 沿着光照距离的衰减量,默认值为 2。想象灯光,越靠近光源,光线越亮,光线会随距离的增而衰弱。
继承链:Object3D → Light → 聚光灯(SpotLight)
聚光灯的使用
| 属性 | 描述 | 注意点 |
|---|---|---|
| spotLight .decay : Float | 光线随着距离增加变暗的衰减量,默认值为 2。 | |
| spotLight .angle : Float | 光线照射范围的角度,用弧度表示。不应超过 Math.PI/2,默认值为 Math.PI/3。 | |
| spotLight .target: Object3D | 灯光从它的位置(position)指向目标位置。默认的目标位置为(0, 0, 0) | 1.可以将目标设置为场景中的其他对象(任意拥有 position 属性的对象),可以实现光源追踪目标对象的效果 2.如果要改为除默认值之外的其他位置,该位置必须被添加到场景(scene)中。 - 为了让目标的 matrixWorld 在每一帧自动更新。 |
| spotLight .shadow : SpotLightShadow | SpotLightShadow 对象,用与计算此光照的阴影。 |
聚光灯投射阴影案例
import { OrbitControls } from 'three/addons/controls/OrbitControls.js';
import * as THREE from "three";

const scene = new THREE.Scene();
const camera = new THREE.PerspectiveCamera(
  45,
  window.innerWidth / window.innerHeight,
  1,
  8000
);
camera.position.set(0,0,10)
const renderer = new THREE.WebGLRenderer();
renderer.setSize(window.innerWidth, window.innerHeight);
renderer.shadowMap.enabled=true

const worldAxesHelper = new THREE.AxesHelper(10);
scene.add(worldAxesHelper);

// 物体
const SphereGeometry = new THREE.SphereGeometry(1,20,20);
const material =  new THREE.MeshStandardMaterial();
const sphere = new THREE.Mesh(SphereGeometry, material);
scene.add(sphere);
sphere.castShadow = true;

// 创建平面
const planeGeometry = new THREE.PlaneGeometry(10,10);
const plane = new THREE.Mesh(planeGeometry, material);
plane.position.set(0,-1,0);
plane.rotation.x = -Math.PI / 2;
scene.add(plane);
plane.receiveShadow = true;

// 灯光
const light = new THREE.AmbientLight(0xffffff,1);
scene.add(light);
const spotLight = new THREE.SpotLight(0xffffff,1);
spotLight.position.set(5,5,5);
spotLight.decay  = 0;  // 注意需要设置衰减为0,不然可能到三维物体的位置时聚光灯的光照已经衰减完了-也可以使用gui调整聚光灯的位置
spotLight.castShadow = true;
scene.add(spotLight);

document.body.appendChild(renderer.domElement);
new OrbitControls(camera, renderer.domElement)
const animation = () => {
  requestAnimationFrame(animation);
  renderer.render(scene, camera);
};
animation();
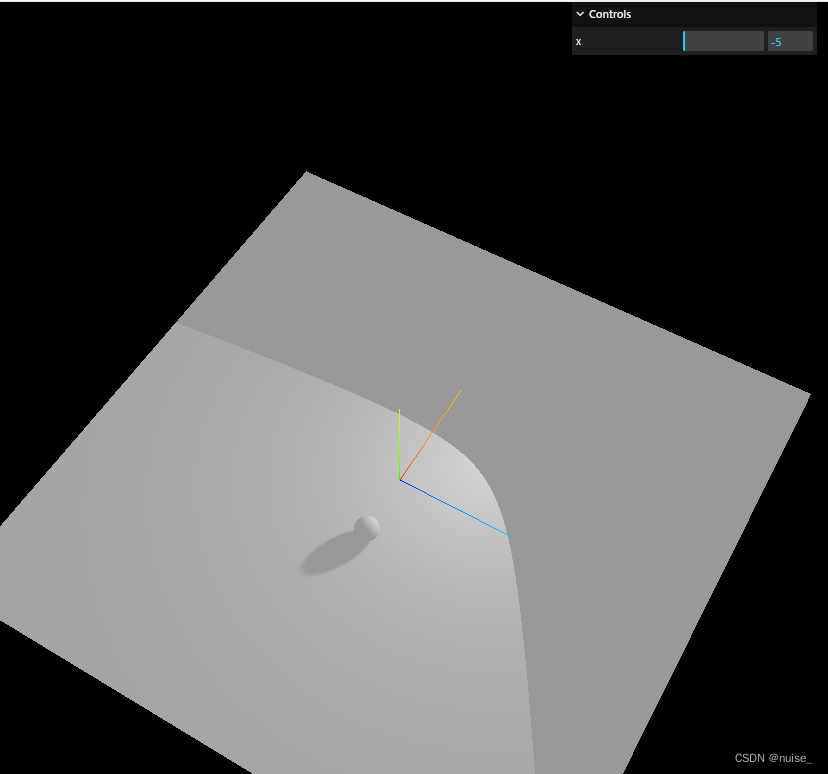
光源追踪目标对象案例
const planeGeometry = new THREE.PlaneGeometry(50,50); // 调大平面便于观察

// ...其他代码省略同上述案例一致

const spotLight = new THREE.SpotLight(0xffffff,1);
spotLight.position.set(5,5,5);
spotLight.decay  = 0;  // 注意需要设置衰减为0,不然可能到三维物体的位置时聚光灯的光照已经衰减完了-也可以使用gui调整聚光灯的位置
spotLight.castShadow = true;
scene.add(spotLight);
// spotLight的target属性
spotLight.target = sphere;
// gui 调整三维物体的位置,观察光源是否追踪物体
gui.add(sphere.position,'x').min(-5).max(5).step(0.5)
点光源 PointLight
语法:new PointLight( color : Color, intensity : Float, distance : Number, decay : Float )
color:默认为一个白色(0xffffff)的 Color 对象。
intensity:光照强度,默认值为 1。
distance :光源照射的最大距离,默认值为 0(无限远)。
decay:沿着光照距离的衰退量,默认值为 2。
案例:使用小球可视化点光源
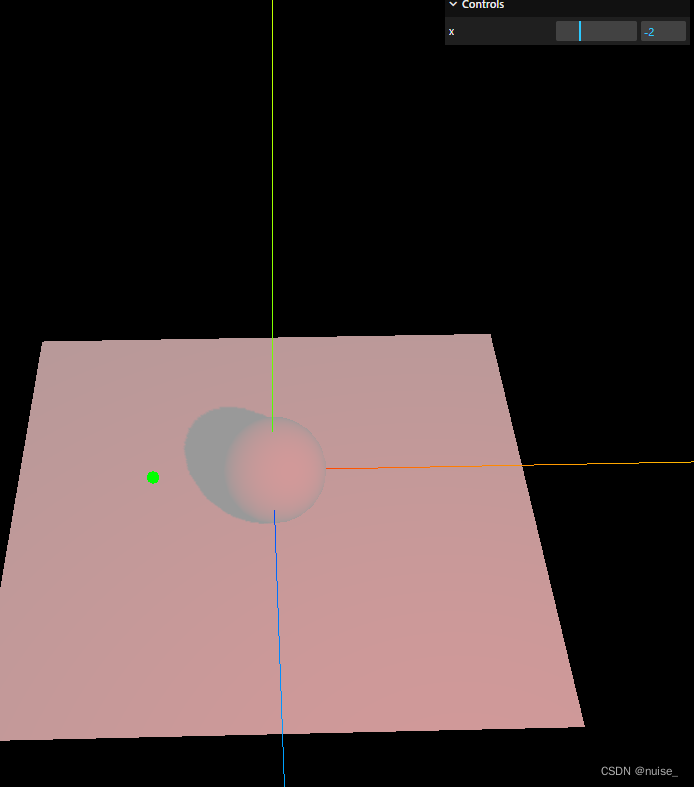
1.选择不受光源影响的MeshBasicMaterial 基础光照材质,来创建一个小球。(本案例中设置了环境灯,所有材质都可以。但如果没有环境等,灯光在小球里面,场景中灯光仍在但小球看不见)
2.将点光源添加到小球的children中,这样小球就成为点光源的父级。修改父级小球的position,灯光的世界坐标会跟随一起改变。
关于世界坐标、本地坐标、层级模型的笔记
import { OrbitControls } from 'three/addons/controls/OrbitControls.js';
import * as THREE from "three";
import { GUI } from 'three/addons/libs/lil-gui.module.min.js';
const gui = new GUI();

const scene = new THREE.Scene();
const camera = new THREE.PerspectiveCamera(
  45,
  window.innerWidth / window.innerHeight,
  1,
  8000
);
camera.position.set(0,0,10)
const renderer = new THREE.WebGLRenderer();
renderer.setSize(window.innerWidth, window.innerHeight);
renderer.shadowMap.enabled=true

const worldAxesHelper = new THREE.AxesHelper(10);
scene.add(worldAxesHelper);


// 物体
const SphereGeometry = new THREE.SphereGeometry(1,20,20);
const material =  new THREE.MeshStandardMaterial();
const sphere = new THREE.Mesh(SphereGeometry, material);
scene.add(sphere);
sphere.castShadow = true;

// 创建平面
const planeGeometry = new THREE.PlaneGeometry(10,10); // 调大平面便于观察
const plane = new THREE.Mesh(planeGeometry, material);
plane.position.set(0,-1,0);
plane.rotation.x = -Math.PI / 2;
scene.add(plane);
plane.receiveShadow = true;

// 灯光
const light = new THREE.AmbientLight(0xffffff,1);
scene.add(light);
// 可视化点光源
const smallBall = new THREE.Mesh(new THREE.SphereGeometry(0.1,20,20),new THREE.MeshBasicMaterial({color:0x00ff00})) // 选择不受灯光影响的材质

const pointLight = new THREE.PointLight(0xff0000,1);
pointLight.decay  = 0;
pointLight.castShadow = true;

smallBall.add(pointLight); // 将点光源添加到小球的children中,小球是点光源的父级
smallBall.position.set(2,2,2) // 小球position改变,点光源的世界坐标跟着改变
scene.add(smallBall); // 将小球添加进场景,子元素点光源会跟着被添加


// gui 调整小球位置可观察点光源的移动
gui.add(smallBall.position,'x').min(-5).max(5).step(0.5)

document.body.appendChild(renderer.domElement);
new OrbitControls(camera, renderer.domElement)
const animation = () => {
  requestAnimationFrame(animation);
  renderer.render(scene, camera);
};
animation();
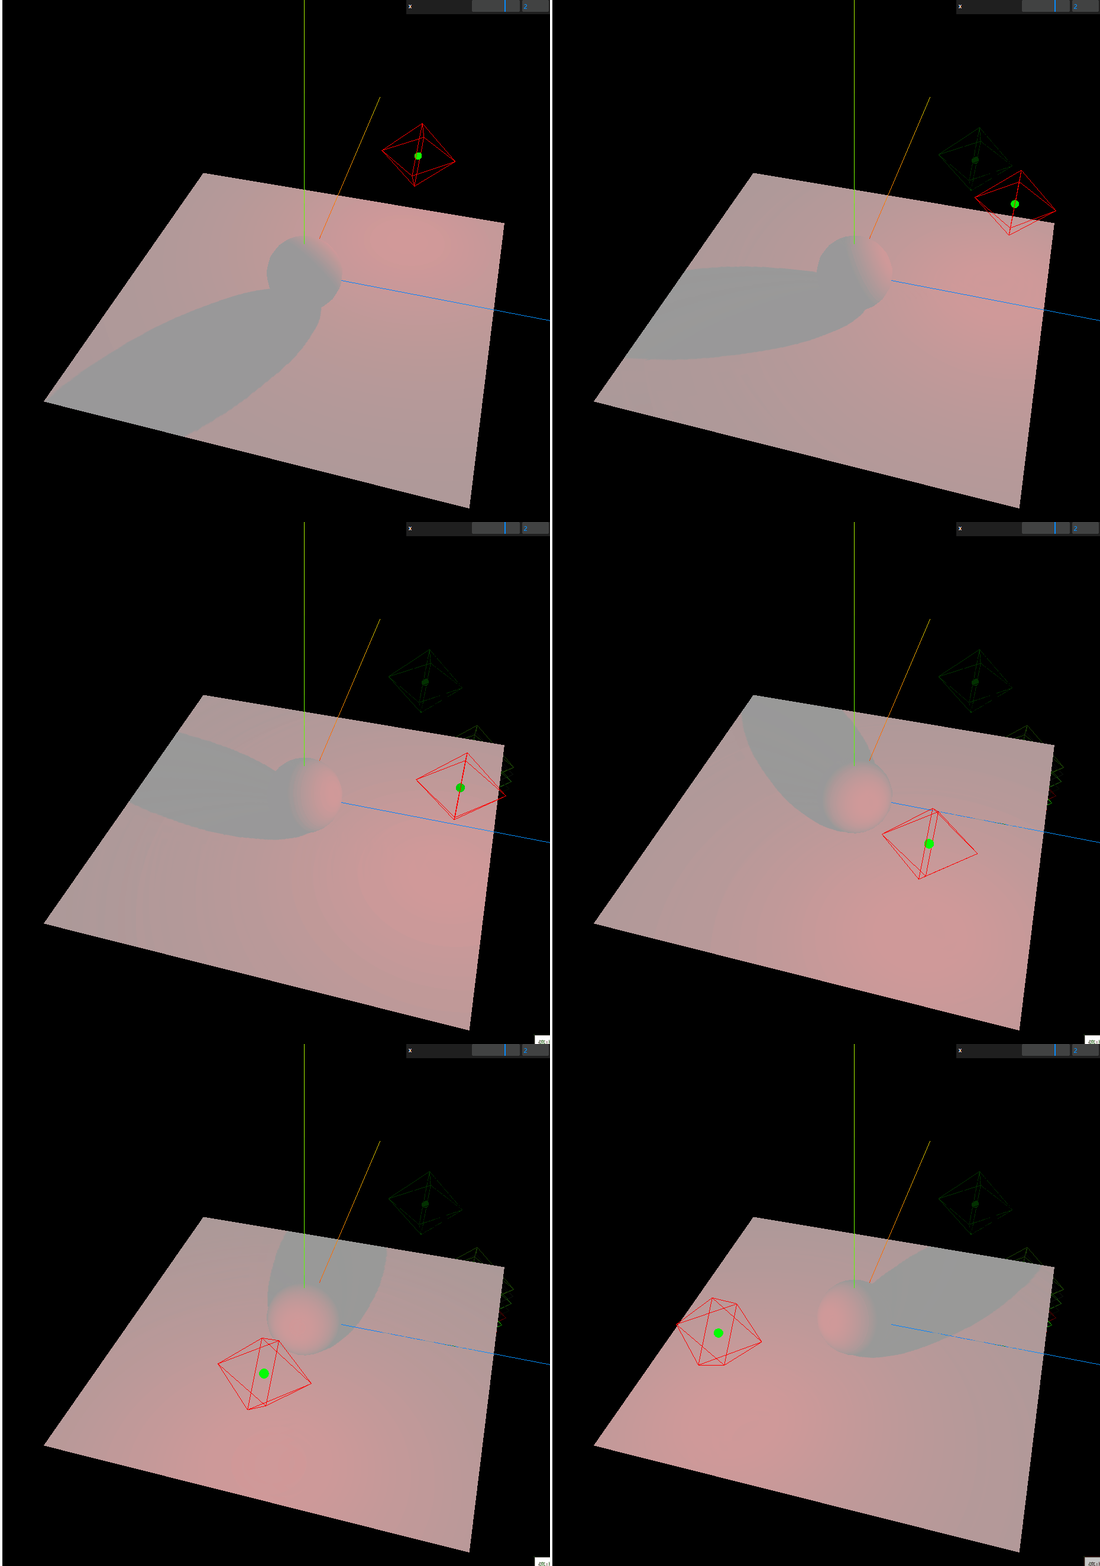
案例:光源围绕三维物体做圆周运动 - 模拟太阳
思路:每一帧渲染时,都改变小球的坐标 - 可以通过Clock时钟来控制
const clock = new THREE.Clock();

const animation = () => {
  let time = clock.getElapsedTime(); // 返回Clock变量被创建以来所经历的时间。

  // 在xoz平面做圆周运动 改变小球的x与z坐标
  smallBall.position.x = Math.cos(time) * 4; // sin(单位圆上点的y轴坐标)和cos(单位圆上点的x轴坐标) * r(表示圆的半径)
  smallBall.position.z = Math.sin(time) * 4;
  requestAnimationFrame(animation);
  renderer.render(scene, camera);
};
animation();
