1:介绍:
Qt与QWebEngineView的交互 简介之前文章解释过,链接在下面
传送门:Qt与QWebEngineView 交互完整示例参考_qt qwebview-CSDN博客
一般在使用这种方式时,可能会出现各种问题而不好调试,如果能够像web界面F12一样调试的话就会更方面。还可以调试js代码。
所以这次再完善下,增加 Qt与QWebEngineView的调试输出,和调用vis.js绘画 拓扑图的示例。
2:示例代码:
因为这这块逻辑实现比较简单,所以直接展示代码不做再详细的介绍,给需要的朋友作为参考,可以主要关注 调试、交互,想要详细了解vis.js画拓扑图这块功能,也可以去官网传送门:vis.js官方示例 去看下详细示例。有问题可以留言讨论。
//------------------globaldef.h------------
//这里的数据结构 为demo,自己随便创建的。
//根据你的项目数据 具体设置


//vis.js 节点信息结构
typedef struct _NodeInfo {
	QString sn; // 节点ID
	QString label; // 节点标签
	QString customText; // 自定义文本,用于鼠标悬停时显示
}WebNodeInfo;

//vis.js 连接线边 信息结构
typedef struct _EdgeInfo {
	QString from; // 起始节点ID
	QString to; // 目标节点ID
	QString label; // 链接质量参数
	QString customText; // 自定义文本,用于鼠标悬停时显示
}webEdgeInfo;

//vis.js  拓扑图信息结构
typedef struct _TopologyInfo {
	QList<WebNodeInfo> nodes; // 节点信息列表
	QList<webEdgeInfo> edges; // 边信息列表
}webTopologyInfo;

//****************web 拓扑图 结构体
typedef struct _mHNodeInfo
{
	int id;
	QString sn;
	QString ip;
	_mHNodeInfo()
	{
		id = -1;
		sn = "";
		ip = "";
	}

}mHNodeinfo;

//网络拓扑 本节点网络信息
typedef struct _mHLocalNodeNetWorkInfo
{
	int centerFrequency;//中心频率
	int bandwidthIndex;//带宽枚举值
	int airTimePercentageIndex;//空中时间占比时间枚举
	int totalOutputRate;//输出总功率
	_mHLocalNodeNetWorkInfo()
	{
		centerFrequency = 0;
		bandwidthIndex = 0;
		airTimePercentageIndex = 0;
		totalOutputRate = 0;
	}
}mHLocalNodeNetWorkInfo;

//网络拓扑 指向【To】 其他节点的网络信息
typedef struct _mHToNodeNetWorkInfo
{
	QString localNodeSN ;//本节点名称 sn
	QString neighborNodeSN ;//指向目标邻节点的名称 sn
	QString antenna1SNR ;//本节点天线1 指向邻节点的 snr 信噪比
	QString antenna2SNR ;//本节点天线2 指向邻节点的 snr 信噪比
	int airTime ;//指向邻节点的 空中时间
	int dataSendRate;//指向邻节点的 数据发送速率
	int BLER;// 指向邻节点 的BLER
	QString rssiAntenna1 ;//本节点天线1 指向邻节点的 rssi
	QString rssiAntenna2;//本节点天线2 指向邻节点的 rssi
	int distance ;// 指向邻节点的 距离
	_mHToNodeNetWorkInfo()
	{
		localNodeSN ="";
		neighborNodeSN = "";
		antenna1SNR = "";
		antenna2SNR = "";
		airTime =0;
		dataSendRate = 0;
		BLER = 0;
		rssiAntenna1 = "";
		rssiAntenna2 = "";
		distance = 0;
	}

}mHToNodeNetWorkInfo;

//网络拓扑节点参数信息
typedef struct _mHNodeNetWorkInfo
{
	mHNodeinfo nodeinfo;//本节点信息 ip sn id

	QList<QString> neighborNodeSNList;//这里只保存拓扑中 邻节点的sn
	mHLocalNodeNetWorkInfo localNodeNetInfo;//本节点网络信息
	QList<mHToNodeNetWorkInfo> toNodeNetInfoList;//指向节点 的网络信息

	int neighbourTotalNums;//邻节点个数
	_mHNodeNetWorkInfo()
	{
		neighbourTotalNums = 0;
	}
}mHNodeNetWorkInfo;
//-------------------------------


#pragma once

#include <QWidget>
#include <QJsonObject>
#include "globaldef.h"

class QWebEngineView;
class QWebChannel;
class QKeyEvent;

class frmgplot : public QWidget
{
	Q_OBJECT
	Q_PROPERTY(QJsonObject jsonData MEMBER qtjsonData NOTIFY qtdataChanged)

public:
	frmgplot(QWidget *parent);
	~frmgplot();

	void initfrm();

	void setQtjsonData(const QJsonObject & jsonData);

public slots:
	void jscallQt(const QString &str);
	void jsCallQt_webRefreshData(const QString &str);
private slots:
	void onPageLoadFinished(bool success);
	void fillTopologyData(webTopologyInfo &topologyInfo);

private:
	void queryTopologyData();
	void clearTopologyInfo(webTopologyInfo & topologyInfo);

protected:
	void keyPressEvent(QKeyEvent *event) override;


signals:
	void qtdataChanged(const QJsonObject &jsonData);

private:
	QWebEngineView *m_webView;
	QWebEngineView *m_webView_debug;

	QWebChannel *m_webChannel;
	QJsonObject qtjsonData;

	webTopologyInfo topologyInfo;// 获取拓扑图信息
};


#include "frmgplot.h"
#include <QWebEngineView>
#include <QWebChannel>
#include <QFileInfo>
#include <QDir>
#include <QApplication>
#include <QVBoxLayout>
#include <qmessagebox.h>
#include <QTimer>
#include <QJsonDocument>
#include <QJsonArray>
#include <QWebEngineSettings>
#include <QKeyEvent>

#include "globaldef.h"

static void fillNodeCustomText(WebNodeInfo &node, const QList<mHNodeNetWorkInfo> &networkInfoList) {
	// 根据node的sn在networkInfoList中查找对应的节点信息
	for (const auto &networkInfo : networkInfoList) {
		if (networkInfo.nodeinfo.sn == node.sn) {
			// 找到对应的节点信息后,填充customText字段
			QString customText;

			// 填充电台ID:id/电台名称:sn
			customText += QString::fromLocal8Bit("ID:") + QString::number(networkInfo.nodeinfo.id) + "\n";

			customText += QString::fromLocal8Bit("名称:") + networkInfo.nodeinfo.sn + "\n";

			// 填充IP:IP_adress
			customText += "IP:" + networkInfo.nodeinfo.ip + "\n";

			// 填充发送功率:Transmission power
			customText += QString::fromLocal8Bit("发送功率:" )+ QString::number(networkInfo.localNodeNetInfo.totalOutputRate) + "\n";

			// 填充中心频率:centerFrequency
			customText += QString::fromLocal8Bit("中心频率:") + QString::number(networkInfo.localNodeNetInfo.centerFrequency) + "\n";

			// 填充带宽:bandwidthIndex
			customText += QString::fromLocal8Bit("带宽:") + QString::number(networkInfo.localNodeNetInfo.bandwidthIndex) + "M\n";

			// 填充总空中时间:airTimePercentageIndex
			customText += QString::fromLocal8Bit("总空中时间:") + QString::number(networkInfo.localNodeNetInfo.airTimePercentageIndex) + "\n";

			// 填充总输出速率:totalOutputRate (bps)
			customText += QString::fromLocal8Bit("总输出速率:") + QString::number(networkInfo.localNodeNetInfo.totalOutputRate) + " bps\n";

			// 填充邻节点数量:neighbourTotalNums
			customText += QString::fromLocal8Bit("邻节点数量:") + QString::number(networkInfo.neighbourTotalNums) + "\n";

			 将填充好的customText赋值给node
			node.customText = customText;
			// 将填充好的customText赋值给node
			// 找到节点信息后退出循环
			break;
		}
	}
}


static void fillEdgeCustomText(webEdgeInfo &edge, const QList<mHNodeNetWorkInfo> &networkInfoList) {
	// 遍历网络信息列表
	for (const auto &networkInfo : networkInfoList) {
		// 找到起始节点的网络信息
		if (networkInfo.nodeinfo.sn == (edge.from)) {
			// 找到对应的目标节点信息
			for (const auto &toNodeInfo : networkInfo.toNodeNetInfoList) {
				// 找到目标节点信息
				if (toNodeInfo.neighborNodeSN ==(edge.to)) {
					// 填充customText字段
					QString customText;

					// 填充RSSI
					customText += "RSSI 1: " + toNodeInfo.rssiAntenna1 + " / RSSI 2: " + toNodeInfo.rssiAntenna2 + "\n";

					// 填充SNR
					customText += "SNR 1: " + toNodeInfo.antenna1SNR + " / SNR 2: " + toNodeInfo.antenna2SNR + "\n";

					// 填充噪声级别
					customText += QString::fromLocal8Bit("噪声级别 1: " )+ toNodeInfo.antenna1SNR + QString::fromLocal8Bit(" / 噪声级别 2: ") + toNodeInfo.antenna2SNR + "\n";

					// 填充空中时间
					customText += QString::fromLocal8Bit("空中时间: ") + QString::number(toNodeInfo.airTime) + "\n";

					// 填充数据速率
					customText += QString::fromLocal8Bit("数据速率: ") + QString::number(toNodeInfo.dataSendRate) + " (Kpbs)\n";

					// 填充距离
					customText += QString::fromLocal8Bit("距离: ") + QString::number(toNodeInfo.distance) + "m\n";

					// 将填充好的customText赋值给edge
					edge.customText = customText;

					// 找到目标节点信息后退出循环
					break;
	}
}
			// 找到起始节点信息后退出循环
			break;
		}
	}
}


frmgplot::frmgplot(QWidget *parent)
	: QWidget(parent)
{
	initfrm();

	//填充
	fillTopologyData(topologyInfo);
}

frmgplot::~frmgplot()
{
}

void frmgplot::initfrm()
{
	qputenv("QTWEBENGINE_REMOTE_DEBUGGING", "7777");

	/*在Qt中,QWebEngineView是用于显示Web内容的组件,而QTWEBENGINE_REMOTE_DEBUGGING是一个环境变量,用于启用Qt WebEngine的远程调试功能。
	当你将QTWEBENGINE_REMOTE_DEBUGGING设置为一个端口号(比如7777),
	然后在程序中调用qputenv设置这个环境变量时,它会告诉Qt WebEngine在指定的端口上启动一个调试服务器,
	使得可以通过远程连接来调试Web页面。这在开发过程中特别有用,
	因为你可以使用类似Chrome开发者工具这样的工具来检查、调试和修改Web页面的内容。
	因此,设置QTWEBENGINE_REMOTE_DEBUGGING环境变量可以让你在Qt中使用远程调试工具来调试QWebEngineView显示的Web内容,以便发现和解决问题。*/


	QVBoxLayout *layout = new QVBoxLayout(this);
	setLayout(layout);

	// 创建 Web 视图
	m_webView = new QWebEngineView(this);
	layout->addWidget(m_webView);

	/*m_webView->settings()->setAttribute(QWebEngineSettings::PluginsEnabled, true);
	m_webView->settings()->setAttribute(QWebEngineSettings::SpatialNavigationEnabled, true);*/

	m_webView_debug = new QWebEngineView(this);
	m_webView_debug->load(QUrl("http://127.0.0.1:7777/"));//用作调试的QWebEngineView。加载地址的端口便是7777
	layout->addWidget(m_webView_debug);
	m_webView_debug->hide();

	// 创建 Web 通道
	m_webChannel = new QWebChannel(this);
	// 注册到 Web 页面,使 JavaScript 能够调用 setBackgroundColor 槽函数
	m_webChannel->registerObject("frmplot", this);
	m_webView->page()->setWebChannel(m_webChannel);//设备交互通道

	// 加载 HTML 页面
	QString filePath = QFileInfo(QApplication::applicationDirPath() + "/web/gplot/js/gplot.html").absoluteFilePath();

	m_webView->load(QUrl::fromLocalFile(filePath));

	// 连接信号槽以在通道初始化后调用 JavaScript 函数
	connect(m_webView, &QWebEngineView::loadFinished, this, &frmgplot::onPageLoadFinished);

}


void frmgplot::onPageLoadFinished(bool success)
{
//这里加载成功后 调用js去画拓扑图,这里认为 拓扑的相关数据 ,已经正确获取过了
	if (success) {

		QTimer::singleShot(1000, this, [=]() {
			// 封装节点信息和边信息为 JSON 对象
			QJsonObject nodesObject;
			QJsonArray nodesArray;
			QJsonObject edgesObject;
			QJsonArray edgesArray;

			// 封装节点信息
			for (const WebNodeInfo &node : topologyInfo.nodes) {
				QJsonObject nodeObject;
				nodeObject["id"] = node.sn;
				nodeObject["label"] = node.label;
				nodeObject["customText"] = node.customText;
				//nodeObject["color"] = "green";
				nodesArray.append(nodeObject);
			}

			nodesObject["nodes"] = nodesArray;

			// 封装边信息
			for (const webEdgeInfo &edge : topologyInfo.edges) {
				QJsonObject edgeObject;
				edgeObject["from"] = edge.from;
				edgeObject["arrows"] = "to";//添加 属性才能有箭头
				edgeObject["to"] = edge.to;
				edgeObject["label"] = edge.label;
				edgeObject["customText"] = edge.customText;
				//edgeObject["color"] = "red";

				edgesArray.append(edgeObject);
			}

			edgesObject["edges"] = edgesArray;

			// 将 JSON 对象转换为 JSON 字符串
			QJsonDocument nodesDocument(nodesObject);
			QString nodesJson = nodesDocument.toJson(QJsonDocument::Compact);

			QJsonDocument edgesDocument(edgesObject);
			QString edgesJson = edgesDocument.toJson(QJsonDocument::Compact);

			// 将 JSON 字符串传递给 JavaScript 函数
			QString script = QString("qtCalledCreateTopology('%1', %2, %3);")
				.arg("mynetwork")
				.arg(nodesJson)
				.arg(edgesJson);
			qDebug() << "nodesJson:" << nodesJson;
			qDebug() << "edgesJson:" << edgesJson;

			m_webView->page()->runJavaScript(script);

		});
#if 0  //传入的不是json格式  这里是测试的,要注意 调用qtCalledCreateTopology时,要注意看js代码里写的注释,数据源不是json!!
		QTimer::singleShot(3000, this, [=]() {
			// 页面加载完成后调用 JavaScript 函数
			m_webView->page()->runJavaScript(QString("qtCalledCreateTopology('%1', %2, %3);")
				.arg("mynetwork")
				.arg("[{id: 1, label: 'Node 1', customText: 'Custom text for Node 1'},"
					"{id: 2, label: 'Node 2', customText: 'Custom text for Node 2'},"
					"{ id: 3, label: 'Node 3', customText: 'Custom text for Node 3' },"
					"{ id: 4, label : 'Node 4', customText: 'Custom text for Node 4' },"
					"{ id: 5, label : 'Node 5', customText: 'Custom text for Node 5' }]")
				.arg("["
					"{ from: 1, to: 3, label: '10', arrows: 'to', customText: 'Custom text for edge 1' },"
					"{ from: 3, to : 1, label : '10', arrows : 'to', customText: 'Custom text for edge 2' },"
					"{ from: 1, to : 2, label : '8', arrows : 'to', customText: 'Custom text for edge 3' },"
					"{ from: 2, to : 1, label : '8', arrows : 'to', customText: 'Custom text for edge 4' },"
					"{ from: 2, to : 4, label : '9', arrows : 'to', customText: 'Custom text for edge 5' },"
					"{ from: 4, to : 2, label : '9', arrows : 'to', customText: 'Custom text for edge 6' },"
					"{ from: 2, to : 5, label : '7', arrows : 'to', customText: 'Custom text for edge 7' },"
					"{ from: 5, to : 2, label : '7', arrows : 'to', customText: 'Custom text for edge 8' },"
					"{ from: 3, to : 3, label : '5', arrows : 'to', customText: 'Custom text for edge 9' }"
					"]"));
		});

#endif

	}
}

//填充函数
void frmgplot::fillTopologyData(webTopologyInfo &topologyInfo) {

#if 0  //传入的不是json格式  这里是测试的,要注意 调用qtCalledCreateTopology时,要注意看js代码里写的注释,数据源不是json!!

	// 填充节点信息
	topologyInfo.nodes.append({ "1", "Node 1", "Custom text for Node 1" });
	topologyInfo.nodes.append({ "2", "Node 2", "Custom text for Node 2" });
	topologyInfo.nodes.append({ "3", "Node 3", "Custom text for Node 3" });
	topologyInfo.nodes.append({ "4", "Node 4", "Custom text for Node 4" });
	topologyInfo.nodes.append({ "5", "Node 5", "Custom text for Node 5" });

	topologyInfo.nodes.append({ "6", "Node 6", "Custom text for Node 1" });
	topologyInfo.nodes.append({ "7", "Node 7", "Custom text for Node 2" });
	topologyInfo.nodes.append({ "8", "Node 8", "Custom text for Node 3" });
	topologyInfo.nodes.append({ "9", "Node 9", "Custom text for Node 4" });
	topologyInfo.nodes.append({ "10", "Node 10", "Custom text for Node 5" });
	// 填充边信息
	topologyInfo.edges.append({ "1", "3", "10", "Custom text for edge 1" });
	topologyInfo.edges.append({ "3", "1", "10", "Custom text for edge 2" });
	topologyInfo.edges.append({ "1", "2", "8", "Custom text for edge 3" });
	topologyInfo.edges.append({ "2", "1", "8", "Custom text for edge 4" });
	topologyInfo.edges.append({ "2", "4", "9", "Custom text for edge 5" });
	topologyInfo.edges.append({ "4", "2", "9", "Custom text for edge 6" });
	topologyInfo.edges.append({ "2", "5", "7", "Custom text for edge 7" });
	topologyInfo.edges.append({ "5", "2", "7", "Custom text for edge 8" });
	topologyInfo.edges.append({ "3", "3", "5", "Custom text for edge 9" });

	topologyInfo.edges.append({ "1", "6", "16", "Custom text for edge 3" });
	topologyInfo.edges.append({ "6", "1", "6-1", "Custom text for edge 4" });
	topologyInfo.edges.append({ "2", "7", "2-9", "Custom text for edge 5" });
	topologyInfo.edges.append({ "7", "2", "7-2", "Custom text for edge 6" });
	topologyInfo.edges.append({ "3", "8", "3-8", "Custom text for edge 7" });
	topologyInfo.edges.append({ "8", "3", "8-3", "Custom text for edge 8" });
	topologyInfo.edges.append({ "3", "3", "5-3", "Custom text for edge 9" });


#else

	// 清空拓扑图信息
	clearTopologyInfo(topologyInfo);
	这里主要获取拓扑节点数据,进行填充!。拓扑数据从哪里拿 根据你的具体情况定
	QList<mHNodeinfo> tmpOnlineNodeInfoList = getOnlineNodeInfoList();
	QList<mHNodeNetWorkInfo>tmpnetworkInfoList =getNodeNetWorkInfoList();

	// 填充节点信息
	for (const auto &node : tmpOnlineNodeInfoList) {
		// 创建WebNodeInfo对象
		WebNodeInfo webNode;
		webNode.sn = node.sn;//node.id;这里要区分sn,先测试
		webNode.label = node.sn;
		// 调用函数填充customText字段
		fillNodeCustomText(webNode, tmpnetworkInfoList);

		// 将填充好的节点信息添加到topologyInfo.nodes中
		topologyInfo.nodes.append(webNode);
	}

	// 填充边信息
	for (const auto &node : topologyInfo.nodes) {
		for (const auto &networkInfo : tmpnetworkInfoList) {
			if (networkInfo.nodeinfo.sn == node.sn) {
				// 找到起始节点信息后,填充边信息
				for (const auto &toNodeInfo : networkInfo.toNodeNetInfoList) {
					// 创建边信息
					webEdgeInfo edge;
					edge.from = node.sn;
					edge.to = toNodeInfo.neighborNodeSN;
					edge.label = "";//node.label;
					// 调用函数填充customText字段
					fillEdgeCustomText(edge, tmpnetworkInfoList);

					// 将填充好的边信息添加到topologyInfo.edges中
					topologyInfo.edges.append(edge);
				}
				// 找到起始节点信息后退出循环
				break;
			}
		}
	}
#endif
}


void frmgplot::jscallQt(const QString &str)
{
	QMessageBox::warning(this, QString::fromLocal8Bit("title"), str);

	QJsonObject json;
	json["a"] = 2;
	json["b"] = 3.336;
	json["c"] = "sdef";
	this->setProperty("jsonData", json);
	setQtjsonData(json);
}

void frmgplot::setQtjsonData(const QJsonObject &jsonData)
{
	//if (qtjsonData != jsonData)
	{
		qtjsonData = jsonData;//会自动触发qtdataChanged
	}
}

void frmgplot::jsCallQt_webRefreshData(const QString & str)
{
	//1:请求数据
	queryTopologyData();
	//2:填充数据
	fillTopologyData(topologyInfo);

	//3:调用刷新数据

	// 封装节点信息和边信息为 JSON 对象
	QJsonObject nodesObject;
	QJsonArray nodesArray;
	QJsonObject edgesObject;
	QJsonArray edgesArray;

	// 封装节点信息
	for (const WebNodeInfo &node : topologyInfo.nodes) {
		QJsonObject nodeObject;
		nodeObject["id"] = node.sn;
		nodeObject["label"] = node.label;
		nodeObject["customText"] = node.customText;
		//nodeObject["color"] = "green";
		nodesArray.append(nodeObject);
	}

	nodesObject["nodes"] = nodesArray;

	// 封装边信息
	for (const webEdgeInfo &edge : topologyInfo.edges) {
		QJsonObject edgeObject;
		edgeObject["from"] = edge.from;
		edgeObject["arrows"] = "to";//添加 属性才能有箭头
		edgeObject["to"] = edge.to;
		edgeObject["label"] = edge.label;
		edgeObject["customText"] = edge.customText;
		//edgeObject["color"] = "red";

		edgesArray.append(edgeObject);
	}

	edgesObject["edges"] = edgesArray;

	// 将 JSON 对象转换为 JSON 字符串
	QJsonDocument nodesDocument(nodesObject);
	QString nodesJson = nodesDocument.toJson(QJsonDocument::Compact);

	QJsonDocument edgesDocument(edgesObject);
	QString edgesJson = edgesDocument.toJson(QJsonDocument::Compact);

	// 将 JSON 字符串传递给 JavaScript 函数
	QString script = QString("qtCalledCreateTopology('%1', %2, %3);")
		.arg("mynetwork")
		.arg(nodesJson)
		.arg(edgesJson);

	qDebug() << "nodesJson:" << nodesJson;
	qDebug() << "edgesJson:" << edgesJson;

	m_webView->page()->runJavaScript(script);

	// Qt启用刷新按钮
	QString enablescript = QString("enableWebTopologyRefreshButton();");
	m_webView->page()->runJavaScript(enablescript);
}

void frmgplot::queryTopologyData()
{
	这里主要获取拓扑节点数据!。拓扑数据从哪里拿 根据你的具体情况定

	//...........获取拓扑节点数据

	//到这里,就把所有在线节点、在线节点的拓扑相邻信息、相邻信息的指向参数 全部获取完成

}

void frmgplot::keyPressEvent(QKeyEvent * event)
{
//F12调试  F11关闭调试窗口
	if (event->key() == Qt::Key_F12) {
		m_webView_debug->setVisible(true);
	}
	else if (event->key() == Qt::Key_F11) {
		m_webView_debug->setVisible(false);
	}
	else {
		// Pass the event to the base class for normal processing
		QWidget::keyPressEvent(event);
	}
}


void frmgplot::clearTopologyInfo(webTopologyInfo &topologyInfo) {
	topologyInfo.nodes.clear();
	topologyInfo.edges.clear();
}
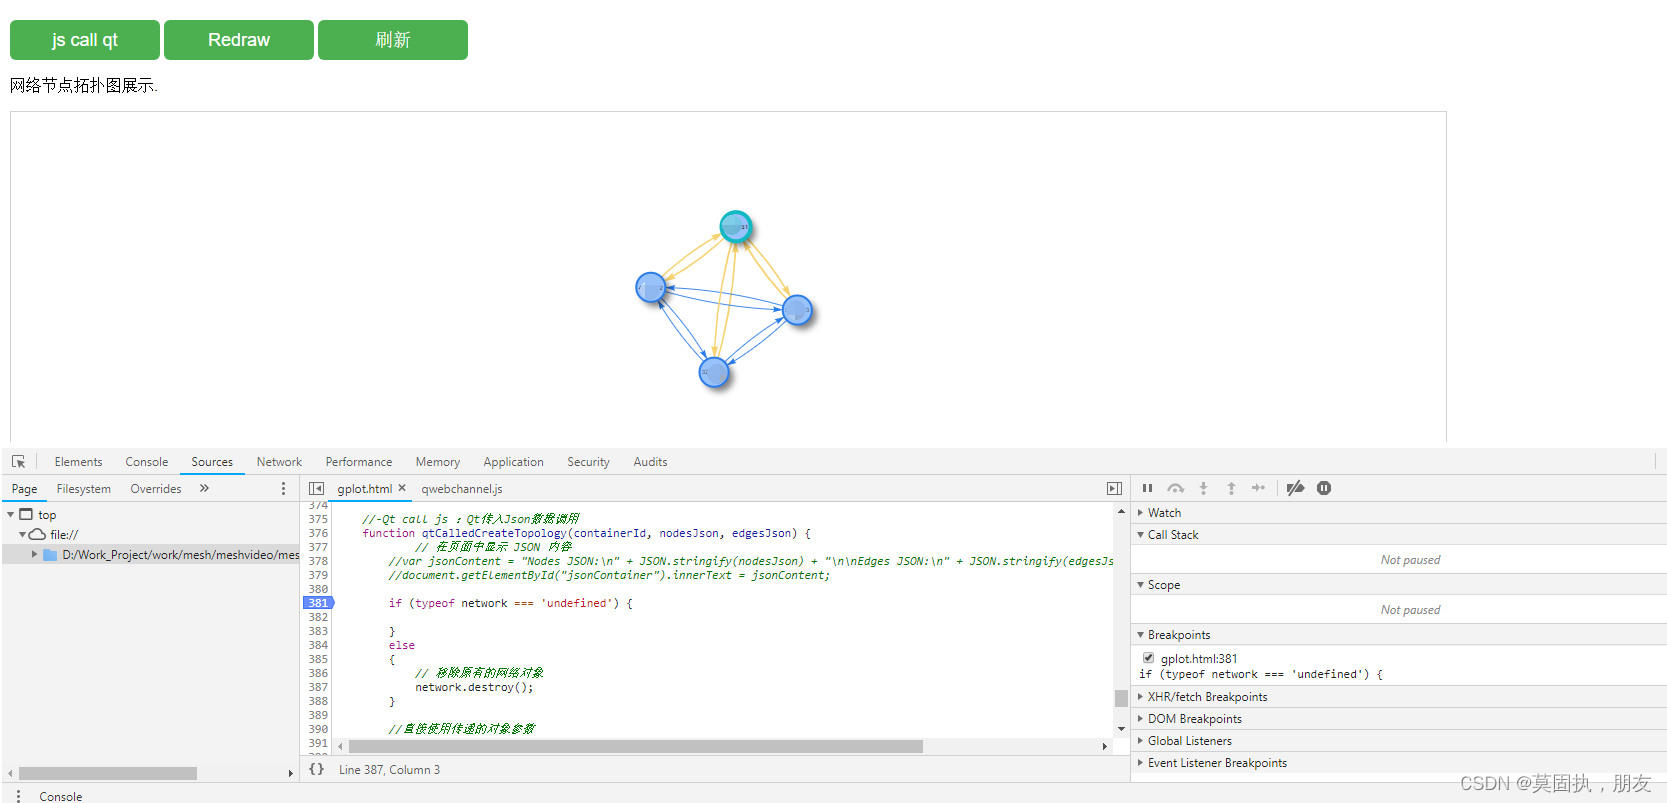
HTML JS代码:
<!DOCTYPE html>
<html>
<head>
    <title>Network | Basic usage</title>
    <script src="qwebchannel.js"></script>
    <script type="text/javascript" src="../dist/vis.js"></script>
    <link href="../dist/vis-network.min.css" rel="stylesheet" type="text/css" />
    <style type="text/css">

        #mynetwork {
            width: 85vw; /* 设置为全屏宽度的 85% */
            height: 85vh; /* 设置为全屏高度的 85% */
            border: 1px solid lightgray;
        }

		/*#jsonContainer {
            width: 80vw; /* 设置为父容器宽度的 20% */
            border: 1px solid lightgray;
            padding: 10px;
        }*/

        /* 设置 body 和 html 的宽度和高度为100%,以使 #mynetwork 占据整个屏幕 */
        body, html {
            width: 100%;
            height: 100%;
            margin: 0;
            padding: 0;

        }
		/* Your CSS styles here */
        .refreshButton {
            width: 150px; /* Set the width */
            height: 40px; /* Set the height */
            background-color: #4CAF50; /* Green background */
            color: white; /* White text */
            border: none; /* Remove border */
            border-radius: 6px; /* Rounded corners */
            font-size: 18px; /* Font size */
            cursor: pointer; /* Add a pointer cursor on hover */
            margin-top: 10px; /* Add some top margin */
        }

        .refreshButton:hover {
            background-color: #45a049; /* Darker green on hover */
        }

		.refreshButton:enabled {
            /* Styles for enabled state */
            background-color: #4CAF50; /* Green background */
        }

        .refreshButton:disabled {
            /* Styles for disabled state */
            background-color: #999999; /* Gray background */
            cursor: not-allowed; /* Change cursor to not-allowed */
        }
	 .pre-line {
		white-space: pre-line;
	}
    </style>
</head>
<body>
   <button id="jscallqtbutton" class="refreshButton">js call qt</button>
	<button id="redrawButton" class="refreshButton">Redraw </button>

	<button id="refreshButton" class="refreshButton">刷新</button>
    <p>
        网络节点拓扑图展示.
    </p>

    <div id="mynetwork"></div>
	<div id="jsonContainer"></div>

    <script type="text/javascript">
	/*document.getElementById("jscallqtbutton").style.display = "none";
	document.getElementById("redrawButton").style.display = "none";
	document.getElementById("jsonContainer").style.display = "none";*/


	var network; // 在全局范围内声明 network 变量

	//----------- webchannel qt js 交互

	/*var updatejson=function(text){
		// 使用JSON.stringify将QJsonObject转换为字符串,然后再输出
		alert(JSON.stringify(text));
	}*/

	var webObject;

	// Connect to the QWebChannel
	new QWebChannel(qt.webChannelTransport, function(channel) {
		webObject = channel.objects.frmplot;

		window.foo = webObject;//对象赋值给了全局对象 window 的属性 foo

		/*

		//qt信号{qtdataChanged}与js函数连接,就像 qt的信号槽一样
		webObject.qtdataChanged.connect(updatejson);

		// 1: web view -> qt :web上按钮(jscallqtbutton)按下后,调用qt函数jscallQt
		document.getElementById("jscallqtbutton").onclick = function() {
			webObject.jscallQt("jscall-qt");
			alert("jscallQt");
		};
		*/
	});


	//js 调用Qt: - 按下刷新按钮后 调用Qt程序
	document.getElementById("refreshButton").onclick = function() {
		// 禁用按钮
		this.disabled = true;
		webObject.jsCallQt_webRefreshData("webRefreshDataClicked");
	};

	 // Qt 调用js: -启用刷新按钮
	function enableWebTopologyRefreshButton() {
		document.getElementById("refreshButton").disabled = false;

	}

	//----下面是vis.js拓扑图的使用----
	function createTopology(containerId, nodesData, edgesData) {
		/*
		vis.js 的 DataSet 构造函数可以接受多种数据形式,包括数组、JSON 字符串、或者已经解析的 JSON 对象。
		因此,当将 JSON 对象传递给 DataSet 构造函数时,vis.js 库会自动识别并处理这些对象,无需手动解析。
		*/

		var nodes;
		var edges;

		if(0){
			/*例如我html下面的示例代入的数据:
			eg:
			 当nodesData和edgesData数据是 { id: 1, label: 'Node 1', customText: 'Custom text for Node 1' }
			 { from: 1, to: 3, label: '10', arrows: 'to', customText: 'Custom text for edge 1' }
			 时,直接new vis.DataSet(nodesData);即可,vis可以识别出来
			 */
			// 创建节点数据集
			nodes = new vis.DataSet(nodesData);

			// 创建边数据集
			edges = new vis.DataSet(edgesData);
		}
		else
		{
			/*
			当nodesData和edgesData数据是json数据:例如我Qt程序代入的json
			eg:
			{"nodes":[{"customText":"Custom text for Node 1","id":1,"label":"Node 111"},{"customText":"Custom text for Node 3","id":3,"label":"Node 3"}]}

			时,需要去掉json的对象名称“nodes”,直接读取对应json数据才行
			例如:new vis.DataSet(nodesData.nodes);否则vis识别不出来
			*/

		  // 创建节点数据集
		   nodes = new vis.DataSet(nodesData.nodes);

			// 创建边数据集
		   edges = new vis.DataSet(edgesData.edges);
		}

		// 创建拓扑图
		var container = document.getElementById(containerId);
		var data = { nodes: nodes, edges: edges };
	   //默认的 v1.0
		/*var options = {
			interaction: {
				hover: true
			}
		};*/

		//完善距离 v2.0
		/*var options = {
		interaction: {
			hover: true
		},
		physics: {
		  stabilization: true,
		  barnesHut: {
			centralGravity: 0.01,//控制中心引力的强度。较大的值会使节点更靠近布局的中心点。
			springLength: 200,//控制连线的长度,影响节点之间的距离。较长的值会导致节点之间距离更远。
			springConstant: 0.005, //控制弹簧的弹性常数,影响节点之间的连线的弹性。较大的值会使连线更硬,较小的值会使连线更软。
			nodeDistance: 200,//控制节点之间的最小距离。当节点间距小于此值时,物理引擎会施加排斥力来防止节点过于靠近。
			damping: 0.1//控制节点的阻尼,即节点停止移动的速度。较大的值会使节点更快停止移动,较小的值会使节点移动更持久。
		  },
		},
	  };*/

	  //增加字体样式 v3.0
	  var options = {
		  interaction: {
				hover: true
			},
			physics: {
			  stabilization: true,
			  barnesHut: {
				centralGravity: 0.01,//控制中心引力的强度。较大的值会使节点更靠近布局的中心点。
				springLength: 200,//控制连线的长度,影响节点之间的距离。较长的值会导致节点之间距离更远。
				springConstant: 0.005, //控制弹簧的弹性常数,影响节点之间的连线的弹性。较大的值会使连线更硬,较小的值会使连线更软。
				nodeDistance: 200,//控制节点之间的最小距离。当节点间距小于此值时,物理引擎会施加排斥力来防止节点过于靠近。
				damping: 0.1//控制节点的阻尼,即节点停止移动的速度。较大的值会使节点更快停止移动,较小的值会使节点移动更持久。
			  },
			},
			nodes: {
				font: {
					multi: 'html',
					face: 'Arial',
					size: 14,
					color: '#343434',
				},
				borderWidth: 2,
				shape: 'circle',
				color: {
					background: '#97C2FC', // 节点背景颜色
					border: '#2B7CE9', // 节点边框颜色
					highlight: {
						background: '#97C2FC', // 高亮背景颜色
						border: '#12B9C3', // 高亮边框颜色
					},
				},
				shadow: true,
				chosen: true,
			},
			edges: {
				font: {
					multi: 'html',
					face: 'Arial',
					size: 12,
					color: '#000000',
				},
				color: {
					color: '#2B7CE9', // 连线颜色
					highlight: '#F5D26F', // 高亮连线颜色
					hover: '#29D9B7', // 悬停连线颜色
					inherit: false,
				},
				smooth: {
					type: 'continuous' // 设置连线为直线 //取消后默认的就是曲线
				},
				arrows: {
					to: {
						enabled: true,
						scaleFactor: 1,
						type: 'arrow',
						color: '#11C47B', // 设置箭头指向的颜色
					},
					from: {
						enabled: true,
						scaleFactor: 1,
						type: 'arrow',
						color: '#E8767A', // 设置箭头起始的颜色
					},
				},
				width: 2,
			},
		};

		network = new vis.Network(container, data, options);

		// 添加鼠标悬停节点显示文本的功能
		network.on("hoverNode", function (params) {
			var nodeId = params.node;
			var node = nodes.get(nodeId);
			network.canvas.body.container.style.cursor = 'pointer'; // 更改鼠标样式为指针
			// 设置鼠标悬停时的提示文本为连接线的自定义文本内容
			network.canvas.body.container.title = node.customText; // 设置鼠标悬停时的提示文本为节点的标签内容
		});

		network.on("blurNode", function (params) {
			network.canvas.body.container.style.cursor = 'default'; // 恢复鼠标样式为默认
			network.canvas.body.container.title = ''; // 清空鼠标悬停时的提示文本
		});

		// 添加鼠标悬停连接线显示文本的功能
		network.on("hoverEdge", function (params) {
			var edgeId = params.edge;
			var edge = edges.get(edgeId);
			network.canvas.body.container.style.cursor = 'pointer'; // 更改鼠标样式为指针
			network.canvas.body.container.title = edge.customText; // 设置鼠标悬停时的提示文本为连接线的自定义文本内容

		});

		network.on("blurEdge", function (params) {
			network.canvas.body.container.style.cursor = 'default'; // 恢复鼠标样式为默认
			network.canvas.body.container.title = ''; // 清空鼠标悬停时的提示文本
		});

		//鼠标点击时 也显示文本,好像效果不是太明显
		network.on("click", function (params) {
			if (params.nodes.length > 0) {
				var nodeId = params.nodes[0];
				var node = nodes.get(nodeId);
				network.canvas.body.container.title = node.customText;
			} else if (params.edges.length > 0) {
				var edgeId = params.edges[0];
				var edge = edges.get(edgeId);
				network.canvas.body.container.title = edge.customText;
			}
		});

		return network; // 返回网络对象,以便在后续重新绘制时使用
	}


	//网页自己创建拓扑的测试代码 打开即可
	// 调用函数创建拓扑图
  /* //v1 版本的测试数据
  var nodesData = [
		{ id: 1, label: 'Node 1', customText: 'Custom text for Node 1' },
		{ id: 2, label: 'Node 2', customText: 'Custom text for Node 2' },
		{ id: 3, label: 'Node 3', customText: 'Custom text for Node 3' },
		{ id: 4, label: 'Node 4', customText: 'Custom text for Node 4' },
		{ id: 5, label: 'Node 5', customText: 'Custom text for Node 5' }
	];

	var edgesData = [
		{ from: 1, to: 3, label: '10', arrows: 'to', customText: 'Custom text for edge 1' },
		{ from: 3, to: 1, label: '10', arrows: 'to', customText: 'Custom text for edge 2' },
		{ from: 1, to: 2, label: '8', arrows: 'to', customText: 'Custom text for edge 3' },
		{ from: 2, to: 1, label: '8', arrows: 'to', customText: 'Custom text for edge 4' },
		{ from: 2, to: 4, label: '9', arrows: 'to', customText: 'Custom text for edge 5' },
		{ from: 4, to: 2, label: '9', arrows: 'to', customText: 'Custom text for edge 6' },
		{ from: 2, to: 5, label: '7', arrows: 'to', customText: 'Custom text for edge 7' },
		{ from: 5, to: 2, label: '7', arrows: 'to', customText: 'Custom text for edge 8' },
		{ from: 3, to: 3, label: '5', arrows: 'to', customText: 'Custom text for edge 9' }
	];

	*/

	/*//v2 版本的测试数据
	var nodesData = [
	{ id: "3230047", label: 'Node 1', customText: 'Custom text for Node 1' },
	{ id: "3230843", label: 'Node 2', customText: 'Custom text for Node 2' }
	];

	var edgesData = [
	{ from: "3230047", to: "3230843", label: '10', arrows: 'to', customText: 'Custom text for edge 1' },
	{ from: "3230843", to: "3230047", label: '10', arrows: 'to', customText: 'Custom text for edge 2' }
	];

		var network = createTopology('mynetwork', nodesData, edgesData);

		// 按钮点击事件:重新绘制拓扑图
		document.getElementById("redrawButton").onclick = function() {
			// 移除原有的网络对象
			network.destroy();

			// 调用函数重新创建拓扑图
			network = createTopology('mynetwork', nodesData, edgesData);
		};

	*/

	//-----Qt call js :
	// ok bk
	/*function qtCalledCreateTopology(containerId, nodesData, edgesData)
	{
		if (typeof network === 'undefined') {

		}
		else
		{
			// 移除原有的网络对象
			network.destroy();
		}

		// 调用函数重新创建拓扑图
		network = createTopology(containerId, nodesData, edgesData);
	}*/

	//-Qt call js :Qt传入Json数据调用
	function qtCalledCreateTopology(containerId, nodesJson, edgesJson) {
			// 在页面中显示 JSON 内容
		//var jsonContent = "Nodes JSON:\n" + JSON.stringify(nodesJson) + "\n\nEdges JSON:\n" + JSON.stringify(edgesJson);
		//document.getElementById("jsonContainer").innerText = jsonContent;

		if (typeof network === 'undefined') {

		}
		else
		{
			// 移除原有的网络对象
			network.destroy();
		}

		//直接使用传递的对象参数
		var nodesData = nodesJson;
		var edgesData = edgesJson;
		 // 调用函数重新创建拓扑图
		network = createTopology(containerId, nodesJson, edgesJson);

	}


	//---------
    </script>
</body>
</html>
效果图: