目录
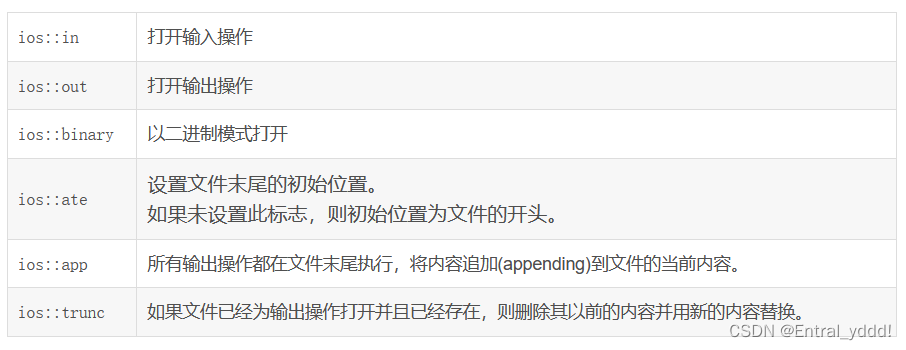
一、文件操作方式
二、Linux底层文件操作
1. open
2. write
3. read
4. close
5. lseek
6. chmod
7. sync、syncfs、fsync、fdatasync
三、 Linux 系统调用
四、总结
linux中,一切皆文件(网络设备除外)
硬件设备也“是”文件,通过文件来使用设备
目录(文件夹)也是一种文件
这篇文章将记录open、write、read、close、lseek等Linux系统函数的用法。
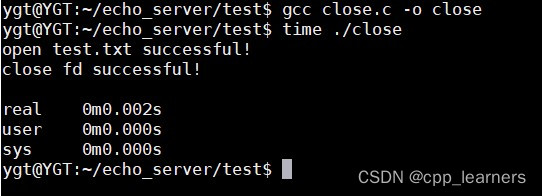
补充:time 命令
time命令分别输出:
real - 程序总的执行时间;
usr - 该程序本身所消耗的时间;
sys - 系统调用所消耗的时间.
例:
一、文件操作方式
1. 文件描述符 fd
是一个 >= 0 的整数
每打开一个文件,就创建一个文件描述符,通过文件描述符来操作文件
多次打开同一个文件,可得到多个不同的文件描述符。
预定义的文件描述符:(具体请看下面 课外补充)
0:标准输入(stdin),对应于已打开的标准输入设备(键盘)
1:标准输出(stdout),对应于已打开的标准输出设备(控制台)
2:标准错误(stderr), 对应于已打开的标准错误输出设备(控制台)
这里可以使用write在控制台输出信息,跟printf性质一样,例:
#include <unistd.h>
#include <stdio.h>
#include <string.h>

int main(void) {

    char buf[1024];

    memset(buf, 0, sizeof(buf));
    read(0, buf, sizeof(buf));     // 标准输入

    printf("%s", buf);             // 输出到控制台

    write(1, buf, sizeof(buf));    // 标准输出到控制台

    write(2, buf, sizeof(buf));    // 标准错误输出到控制台

    return 0;
}
运行结果:
ygt@YGT:~/echo_server/test$ gcc demo1.c -o demo1
ygt@YGT:~/echo_server/test$ ./demo1
使用read输入。。。。
使用read输入。。。。
使用read输入。。。。
使用read输入。。。。
ygt@YGT:~/echo_server/test$第一条信息是我们手动输入的,因为程序运行后,read函数通过 0 这个文件描述符,在等待我们输入;
第二条输出信息是printf函数输出的;
第三条输出信息是write函数通过 1 这个文件描述符输出的;
第四条输出信息是write函数通过 2 这个文件描述符输出的。
1 和 2 都是一样输出到控制台,就他们的性质不一样而已。
2. 使用底层文件操作(系统调用)
比如:read、write
可使用man 2 查看
(将在下面进行讲解)
3. 使用I/O库函数
比如:fread
可使用man 3 查看
(就是C语言的文件操作函数,这里不进行讲解)
课外补充:
我们运行以下程序:
#include <unistd.h>

int main(void) {

    char buf[1024] = "0, 1, 2 到底是个什么?\n";
    while (1) {
        write(1, buf, sizeof(buf));
        sleep(1);
    }

    return 0;
}
编译运行:
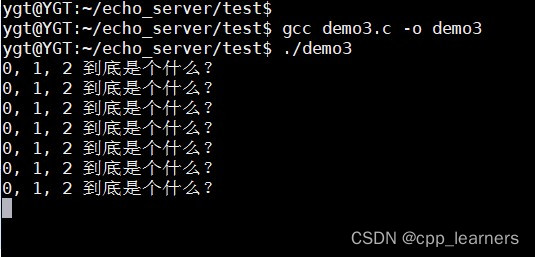
可以看到,其每一秒都会向控制台输出一段字符串。
接下来我们重写打开一个终端,在终端运行以下命令查看demo3程序的进程号:
ps -ef | grep demo3 注意:demo3是上面运行的程序名字

可以看到,./demo3的程序的进程号是 6893.
然后执行以下命令:
ll /proc/6893/fd/

我们通过查看对应程序进程号里的fd文件夹,就可以看出,Linux系统已经给./demo3这个程序默认创建了三个fd,分别是0,1,2;他们分别对应也就是标准输入,标准输出,标准出错;
所以这也就是为什么我们可以使用 write 和 read 函数和 0,1,2 进行输入和输出的操作了。
注意:
/proc/6898/ 这个文件夹是Linux系统为程序./demo3临时创建的文件夹,当这个程序结束,Linux也会随之将他们删除掉。
任何程序已启动Linux系统都会为他们创建一个属于他们自己的对应进程号的文件夹,这个进程号是随机的,文件夹的名字是对应进程号的。
例:
将./demo3这个程序退出后,再次运行命令:ll /proc/6893/fd/

二、Linux底层文件操作
1. open
#include <sys/types.h>
#include <sys/stat.h>
#include <fcntl.h>
int open (const char *pathname, int flags);
int open (const char *pathname, int flags, mode_t mode);
描述:打开指定路径的文件,返回一个文件描述符。
pathname
文件路径名;
flags
打开文件的方式;
mode
设置文件的权限;
返回值
成功:返回新的文件描述符;
失败:-1,并且设置错误编号 errno ,可用( strerror(errno) ) 查看;
注意:
返回的文件描述符是该进程未打开的最小的文件描述符;
(1) 描述
在Linux中,使用命令:man 2 open
(2) 打开方式
O_RDONLY    只读

O_WRONLY    只写

O_RDWR      读写

O_CREAT     如果文件不存在,则创建该文件,并使用第3个参数设置权限,如果文件存在 ,则只打开文件;

O_EXCL      如果同时使用O_CREAT而且该文件又已经存在时,则返回错误, 用途:以防止多个进程同时创建同一个文件;

O_APPEND    尾部追加方式(打开后,文件指针指向文件的末尾);

O_TRUNC     若文件存在,则长度被截为0,属性不变.
例: open("/dev/hello", O_RDONLY|O_CREAT|O_EXCL, 0777)
多个设置可用 “|” 进行分割。
(3) 参数3 (设置权限)
当参数2使用了O_CREAT时,就得使用参数3
S_I(R/W/X)(USR/GRP/OTH)
S_IRWXU  00700  用户拥有 读 写 执行 权限

S_IRUSR  00400  用户拥有 读 权限

S_IWUSR  00200  用户拥有 写 权限

S_IXUSR  00100  用户拥有 执行 权限

S_IRWXG  00070  同组拥有 读 写 执行 权限

S_IRGRP  00040  同组拥有 读 权限

S_IWGRP  00020  同组拥有 写 权限

S_IXGRP  00010  同组拥有 执行 权限

S_IRWXO  00007  其他人拥有 读 写 执行 权限

S_IROTH  00004  其他人拥有 读 权限

S_IWOTH  00002  其他人拥有 写 权限

S_IXOTH 00001 其他人拥有 执行 权限可以发现,读写执行权限,是由 读 + 写 + 执行 而得来的;
例如用户的 00700,是由 00400 + 00200 + 00100 而得来的。
例:
S_IRUSR | S_IWUSR 文件的所有者对该文件可读可写
(八进制表示法)00600 文件的所有者对该文件可读可写
多个设置可用 “|” 进行分割。
代码示例:
#include <stdio.h>
#include <sys/types.h>
#include <sys/stat.h>
#include <fcntl.h>
#include <string.h>
#include <stdlib.h>
#include <errno.h>

int main(void) {

    int fd = 0;
    char fileName[] = "test.txt";

    // 读写,如果文件不存在则创建,如果文件存在则报错(O_EXCL);
    // 设置本用户拥有读写执行权限,同组用户拥有读写权限,其他人拥有读权限
    // fd = open(fileName, O_RDWR|O_CREAT|O_EXCL, 00764); // 可以使用数字代替参数三
    fd = open(fileName, O_RDWR|O_CREAT|O_EXCL, S_IRWXU|S_IRGRP|S_IWGRP|S_IROTH);
    if (-1 == fd) {
        fprintf(stderr, "open %s fail. reason: %s\n", fileName, strerror(errno));
        exit(-1);
    }

    printf("open %s successful!\n", fileName);

    // 关闭文件
    close(fd);

    return 0;
}
运行结果:
ygt@YGT:~/echo_server/test$ gcc open.c -o open
ygt@YGT:~/echo_server/test$ ./open
open test.txt successful!

ygt@YGT:~/echo_server/test$ ll
-rwxrwxr-x 1 ygt  ygt  8945 11月 10 16:02 open*
-rw-rw-r-- 1 ygt  ygt   554 11月 10 16:02 open.c
-rwxrw-r-- 1 ygt  ygt     0 11月 10 16:02 test.txt*
可以看出文件已正确运行!且test.txt的权限也是正确设置的 -rwxrw-r--.
test.txt 文件已经存在,当我们再一次运行 ./open 会怎么样呢?

出现报错了,报错提示“File exists”,文件已经存在了。
因为我们设置了O_EXCL,当文件存在时,他会进行报错处理!
2. write
#include <unistd.h>
ssize_t write (int fd, const void *buf, size_t count);
描述:write()从指向buf的缓冲区向文件描述符fd引用的文件写入count个字节。
fd:
文件描述符;
buf:
需要写入的数据;
count:
指定最多写入的大小;
返回值:
成功: 返回写入的字节数;
失败: 返回 -1,并且设置错误编号 errno ,可用( strerror(errno) ) 查看.
描述
在Linux中,使用命令:man 2 write
注意:是从文件的当前指针位置写入!文件刚打开时,文件的位置指针指向文件头.
代码示例:
#include <unistd.h>
#include <string.h>
#include <stdlib.h>
#include <errno.h>
#include <stdio.h>
#include <sys/types.h>
#include <sys/stat.h>
#include <fcntl.h>


#define W_LEN   1024

int main(void) {

    int ret = 0;
    int fd = -1;
    char fileName[] = "test.txt";
    char buf[W_LEN] = "这是要写入的内容:Hello write!";

    // 打开以文件,只写方式打开,不懂00764是什么意思上面open介绍
    fd = open(fileName, O_WRONLY|O_CREAT|O_EXCL, 00764);
    if (-1 == fd) {
        fprintf(stderr, "open %s fail. reason: %s\n", fileName, strerror(errno));
        exit(-1);
    }

    // 往文件中写入数据
    ret = write(fd, buf, strlen(buf));
    if(-1 == ret) {
        fprintf(stderr, "write error. reason: %s\n", strerror(errno));
        exit(-2);
    }

    printf("write successful! write lenght: %d\n", ret);

    close(fd);

    return 0;
}
运行结果:
ygt@YGT:~/echo_server/test$ gcc write.c -o write
ygt@YGT:~/echo_server/test$ ./write
write successful! write lenght: 41
ygt@YGT:~/echo_server/test$
ygt@YGT:~/echo_server/test$ cat test.txt
这是要写入的内容:Hello write!ygt @YGT:~/echo_server/test$
ygt@YGT:~/echo_server/test$
3. read
#include <unistd.h>
ssize_t read (int fd, void *buf, size_t count);
描述:read()尝试从文件描述符fd上读取数据放入buf中,读count字节。
fd:
文件描述符;
buf:
存储读取到的数据,一般传char *类型或字符数组;
count:
指定最多读取的大小;表示最多能接受的字节数,而不是指一定要读取的字节数;
返回值:
成功: 返回读取到的字节数;如果返回 0,表示文件读完了;
失败: 返回 -1,并且设置错误编号 errno ,可用( strerror(errno) ) 查看.
描述
在Linux中,使用命令:man 2 read
注意:是从文件的当前指针位置读取!文件刚打开时,文件的位置指针指向文件头.
代码示例:
#include <unistd.h>
#include <string.h>
#include <stdlib.h>
#include <errno.h>
#include <stdio.h>
#include <sys/types.h>
#include <sys/stat.h>
#include <fcntl.h>


#define R_LEN   1024

int main(void) {

    int ret = 0;
    int fd = -1;
    char fileName[] = "test.txt";
    char buf[R_LEN] = { '\0' };

    // 打开以文件,只读方式打开,不懂00764是什么意思上面open介绍
    fd = open(fileName, O_RDONLY, 00764);
    if (-1 == fd) {
        fprintf(stderr, "open %s fail. reason: %s\n", fileName, strerror(errno));
        exit(-1);
    }

    // 从文件中读取数据
    ret = read(fd, buf, sizeof(buf));
    if(-1 == ret) {
        fprintf(stderr, "read error. reason: %s\n", strerror(errno));
        exit(-2);
    }

    printf("read successful! read lenght: %d\n", ret);
    printf("%s\n", buf);
    //write(1, buf, strlen(buf));

    close(fd);

    return 0;
}
运行结果:
ygt@YGT:~/echo_server/test$ gcc read.c -o read
ygt@YGT:~/echo_server/test$ ./read
read successful! read lenght: 41
这是要写入的内容:Hello write!
ygt@YGT:~/echo_server/test$
4. close
#include <unistd.h>
int close (int fd);
描述:close()关闭一个文件描述符,这样它就不再引用任何文件,可以被重用。
fd:
文件描述符;
返回值:
成功: 返回 0;
失败: 返回 -1,并且设置错误编号 errno ,可用( strerror(errno) ) 查看.
描述
在Linux中,使用命令:man 2 close
终止指定文件描述符与对应文件之间的关联,并释放该文件描述符,即该文件描述符可被重新使用.
当出现错误后,错误形式有三种:
(1). EBADF fd不是有效的打开文件描述符;
(2). EINTR close()调用被一个信号打断;
(3). EIO I/O错误.
代码示例:
#include <sys/types.h>
#include <sys/stat.h>
#include <fcntl.h>
#include <string.h>
#include <stdlib.h>
#include <errno.h>

int main(void) {

    int ret = -1;
    int fd = 0;
    char fileName[] = "test.txt";

    fd = open(fileName, O_RDWR|O_CREAT, 00764);
    if (-1 == fd) {
        fprintf(stderr, "open %s fail. reason: %s\n", fileName, strerror(errno));
        exit(-1);
    }

    printf("open %s successful!\n", fileName);

    // 关闭文件
    ret = close(fd);
    if (-1 == ret) {
        int err = errno;
        fprintf(stderr, "close error. reason: %s\n", strerror(err));

        // 错误原因
        if (EBADF == err) {
            printf("fd不是有效的打开文件描述符\n");
        } else if (EINTR == err) {
            printf("close()调用被一个信号打断\n");
        } else if (EIO == err) {
            printf("I/O错误\n");
        }

        exit(-2);
    }

    printf("close fd successful!\n");

    return 0;
}
运行结果:
ygt@YGT:~/echo_server/test$ gcc close.c -o close
ygt@YGT:~/echo_server/test$ ./close
open test.txt successful!
close fd successful!
ygt@YGT:~/echo_server/test$
我们模拟将错误的文件描述符传参给close函数 :
在 ret = close(fd); 这行代码前面加上:fd = -1;
然后再运行程序运行结果如下:

达到我们的预期!
注意:
如果在日常的demo中close()之后程序就结束了,那么也就无需对close的返回进行判断了,因为程序结束后,系统会回收所有资源;但是如果是在大型项目中,close之后还有很多其他操作,且文件fd的开销很大时,得进行返回值的判断,否则有可能会造成不必要的资源浪费。例如报错是EINTR,我们可以再一次调用close进行关闭fd!
5. lseek
#include <sys/types.h>
#include <unistd.h>
off_t lseek (int fd, off_t offset, int whence);
描述:移动文件光标偏移。
fd:
文件描述符;
offset:
文件指针(光标)移动的大小;往文件头部移动设负数,往文件尾部移动设正数;
whence:
文件指针(光标)移动的依据;
返回值:
成功: 返回 移动后文件指针的所在位置;
失败: 返回 -1,并且设置错误编号 errno ,可用( strerror(errno) ) 查看.
描述
在Linux中,使用命令:man 2 lseek
移动文件光标指针在文件的位置,方便read和write操作!
文件指针移动的依据:
SEEK_SET 相对于文件头部开始偏移;
例:移动文件指针(光标)到第100个位置处
sleek(fd, 100, SEEK_SET); // 直接从开头位置往文件尾部移动100即可
SEEK_CUR 从当前位置开始偏移;
例:文件指针已经再100位置了,现在把他移动到80的位置
sleek(fd, -20, SEEK_CUR); // 在文件指针当前位置往文件头部移动-20个位置即可
SEEK_END 相对于文件尾部开始偏移;
例:文件指针已经再80位置了,现在把他移动到倒数第5个位置
sleek(fd, -5, SEEK_END); // 直接在文件尾部往文件头部移动-5个位置即可
代码示例:
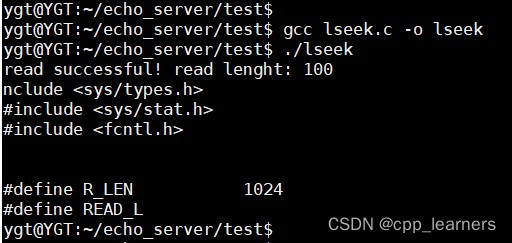
需求,移动文件光标到100的位置,然后读取100个字节打印输出。
#include <unistd.h>
#include <string.h>
#include <stdlib.h>
#include <errno.h>
#include <stdio.h>
#include <sys/types.h>
#include <sys/stat.h>
#include <fcntl.h>


#define R_LEN           1024
#define READ_LEN        100

int main(void) {

    int ret = 0;
    int fd = -1;
    char fileName[] = "lseek.c";
    char buf[R_LEN] = { '\0' };

    fd = open(fileName, O_RDONLY);
    if (-1 == fd) {
        fprintf(stderr, "open %s fail. reason: %s\n", fileName, strerror(errno));
        exit(-1);
    }

    // 从文件头部往文件尾部移动100位置
    ret = lseek(fd, 100, SEEK_SET);
    if (-1 == ret) {
        fprintf(stderr, "lseek error. reason: %s\n", strerror(errno));
        exit(-2);
    }

    // 从文件中读取100个字节
    ret = read(fd, buf, READ_LEN);
    if(-1 == ret) {
        fprintf(stderr, "read error. reason: %s\n", strerror(errno));
        exit(-3);
    }

    printf("read successful! read lenght: %d\n", ret);
    printf("%s\n", buf);
    //write(1, buf, strlen(buf));

    close(fd);

    return 0;
}
运行结果:
可以通过SEEK_END来获取文件大小:
int fileSize = lseek(fd, 0, SEEK_END);6. chmod
#include <sys/stat.h>
int chmod (const char *path, mode_t mode);
int fchmod (int fd, mode_t mode);
描述:修改文件的权限。
fd:
文件描述符;
path
文件路径名;
mode
修改的文件的权限;
返回值
成功:返回 0
失败:-1,并且设置错误编号 errno ,可用( strerror(errno) ) 查看
(1) 描述
在Linux中,使用命令:man 2 chmod
当文件已打开,那么使用fchmod函数,如果文件没打开,那么使用chmod函数。
(2) 参数二 mode (修改的权限)
S_I(R/W/X)(USR/GRP/OTH)
S_IRWXU  00700  用户拥有 读 写 执行 权限

S_IRUSR  00400  用户拥有 读 权限

S_IWUSR  00200  用户拥有 写 权限

S_IXUSR  00100  用户拥有 执行 权限

S_IRWXG  00070  同组拥有 读 写 执行 权限

S_IRGRP  00040  同组拥有 读 权限

S_IWGRP  00020  同组拥有 写 权限

S_IXGRP  00010  同组拥有 执行 权限

S_IRWXO  00007  其他人拥有 读 写 执行 权限

S_IROTH  00004  其他人拥有 读 权限

S_IWOTH  00002  其他人拥有 写 权限

S_IXOTH 00001 其他人拥有 执行 权限可以发现,读写执行权限,是由 读 + 写 + 执行 而得来的;
例如用户的 00700,是由 00400 + 00200 + 00100 而得来的。
例:
S_IRUSR | S_IWUSR 文件的所有者对该文件可读可写
(八进制表示法)00600 文件的所有者对该文件可读可写
多个设置可用 “|” 进行分割。
例:
新建文件 test.txt, 查看其权限:
touch test.txt

可以看到,默认的权限是 读写|读|读;
即本用户有 读写 权限,同组其他用户有 读 的权限;其他组用户有 读 的权限。
fchmod:将test.txt文件的权限修改为 执行|执行|执行
#include <stdio.h>
#include <sys/types.h>
#include <fcntl.h>
#include <string.h>
#include <stdlib.h>
#include <errno.h>
#include <sys/stat.h>

int main(void) {

    int ret = 0;
    int fd = 0;
    char fileName[1024] = "test.txt";

    //fd = open(fileName, O_RDWR|O_CREAT|O_EXCL, S_IRWXU|S_IRGRP|S_IWGRP|S_IROTH);
    fd = open(fileName, O_RDWR, 00764); // 权限:读写执行|读写|读
    if (-1 == fd) {
        fprintf(stderr, "open %s fail. reason: %s\n", fileName, strerror(errno));
        exit(-1);
    }


    // 修改文件权限
    //ret = fchmod(fd, S_IXUSR|S_IXGRP|S_IXOTH);
    ret = fchmod(fd, 00111);    // 修改权限为:执行|执行|执行
    if (-1 == ret) {
        fprintf(stderr, "fchmod %s fail. reason: %s\n", fileName, strerror(errno));
        exit(-2);
    }

    printf("fchmod successful!\n");

    close(fd);

    return 0;
}
运行结果:
root@YGT:/home/ygt/echo_server/test# gcc fchmod.c -o fchmod
root@YGT:/home/ygt/echo_server/test# ./fchmod
fchmod successful!
root@YGT:/home/ygt/echo_server/test#
root@YGT:/home/ygt/echo_server/test# ll
---x--x--x 1 root root    0 11月 16 12:04 test.txt*
root@YGT:/home/ygt/echo_server/test#
可以看到,test.txt文件的权限已经被修改为 执行|执行|执行 了,即用户只有 执行 权限,同组的用户也只有 执行 权限,其他组的用户也只有 执行 权限。
chmod:将test.txt文件的权限修改为 读|读|读
#include <stdio.h>
#include <string.h>
#include <stdlib.h>
#include <errno.h>
#include <sys/stat.h>   // chmod

int main(void) {

    int ret = 0;

    // 修改文件权限
    //ret = chmod("test.txt", S_IRUSR|S_IRGRP|S_IROTH);
    ret = chmod("test.txt", 00444);     // 修改权限为:读|读|读
    if (-1 == ret) {
        fprintf(stderr, "fchmod %s fail. reason: %s\n", "test.txt", strerror(errno));
        exit(-1);
    }

    printf("fchmod successful!\n");

    return 0;
}
运行结果:
root@YGT:/home/ygt/echo_server/test# gcc chmod.c -o chmod
root@YGT:/home/ygt/echo_server/test# ./chmod
fchmod successful!
root@YGT:/home/ygt/echo_server/test#
root@YGT:/home/ygt/echo_server/test# ll
-r--r--r-- 1 root root    0 11月 16 12:04 test.txt
root@YGT:/home/ygt/echo_server/test#
可以看到,test.txt文件的权限已经被修改为 读|读|读 了,即用户只有 读 权限,同组的用户也只有 读 权限,其他组的用户也只有 读 权限。
7. sync、syncfs、fsync、fdatasync
Linux同步机制。
简单来讲,使用上面介绍的write后,或者做其他对文件有修改的操作后,需要进行同步,将数据从内核缓冲区写入磁盘;否则如果断电或系统宕机,即使已经调用了write或fwrite函数,数据都还没有写入磁盘。
#include <unistd.h>
1. sync
void sync(void);
描述:将所有修改过的块缓冲区排入写队列,然后就返回,它并不等待实际写磁盘操作结束! sync不会执行失败!
2. syncfs
int syncfs(int fd);
描述:syncfs()类似于sync(),但只同步包含由打开的文件描述符fd引用的文件的文件系统。
fd:
文件描述符;
返回值:
成功: 返回 0;
失败: 返回 -1,并且设置错误编号 errno ,可用( strerror(errno) ) 查看.
3. fsync
int fsync(int fd); // 推荐使用!
描述:fsync()将文件描述符fd引用的文件(即修改的缓冲区缓存页)的所有修改的内核数据传输(“刷新”)到磁盘设备(或其他永久存储设备),以便即使在系统崩溃或重新启动后也可以检索所有更改的信息。这包括写入磁盘缓存或刷新磁盘缓存(如果存在的话)。他会一直阻塞,直到执行完毕!
fd:
文件描述符;
返回值:
成功: 返回 0;
失败: 返回 -1,并且设置错误编号 errno ,可用( strerror(errno) ) 查看.
4. fdatasync
int fdatasync(int fd);
描述:fdatasync()类似于fsync(),但它只影响文件的数据部分。而除数据外,fsync还会同步更新文件的属性。
fd:
文件描述符;
返回值:
成功: 返回 0;
失败: 返回 -1,并且设置错误编号 errno ,可用( strerror(errno) ) 查看.
使用案例一:C语言 I/O
FILE *fp = NULL;
fp = fopen(filename,"rw" );

// 函数int fileno(FILE*stream) 把文件流描述符(fp)转换为文件描述符(fd)
int fd = fileno(fp);

char buff[64] = "hello world";
fwrite(buff, sizeof(buff), 1, fp);

fflush(fp);
fsync(fd);
fclose(fp);
使用案例二:Linux系统调用
int fd = open(filename, O_RDWR);
char buff[64] = "hello world";

write(fd, buff,sizeof(buff));

fsync(fd);
close(fd);
三、 Linux 系统调用
根据我个人的理解,系统调用就是调用Linux内核中的函数。
Linux系统中分为 用户空间 和 内核空间;
用户空间是我们程序运行所在的空间;
例如,我们的程序中有个open函数,open函数内部会调用函数syscall函数,这个函数就会调用系统内部的sys_open函数,进入内核空间进行相应操作,然后再将相应返回值进行返回;
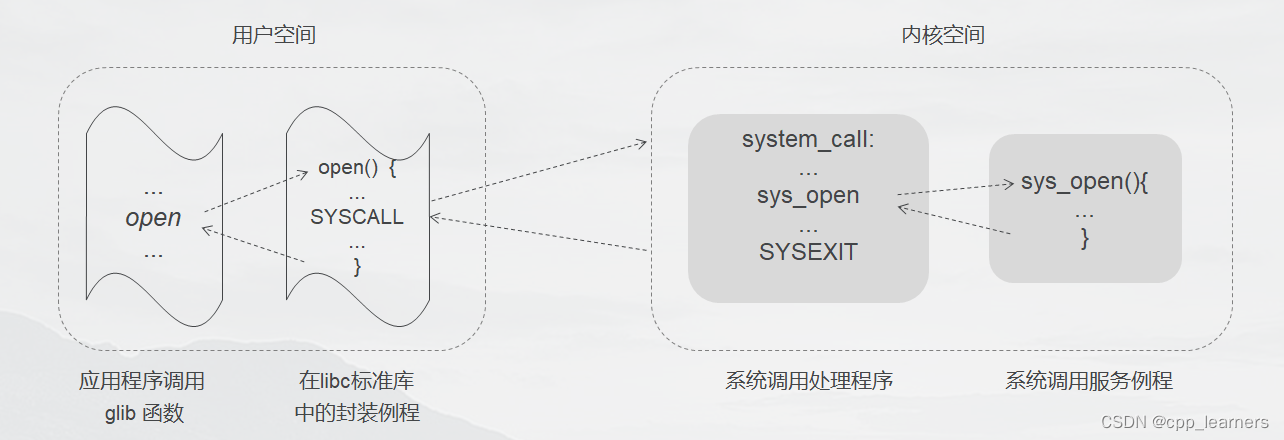
每执行一次上面介绍的open、write、read等函数,就是再执行一次系统调用!
为什么要有系统调用?
1. 举个例子,我们所用的硬盘有很多品牌,但每个品牌所用的读取写入参数接口函数可能都是不一样的(硬件编码),将用户与底层分离开来,用户只需调用read、write等函数即可对所有类型的硬盘做操作;
2. 为了安全性。分为用户空间和内核空间,用户没法直接对内核空间做操作,确保系统的安全性;
3. 可移植性。不同平台,不同硬件,不同Linux系统他们的内核都差不多,都会有open、write等函数。
系统调用两个关键要素:
1. 系统调用号
每个系统调用被赋予一个系统调用号,与具体的系统调用相关联。

2. 系统调用表
内核维护系统调用表,保存系统调用函数的起始地址,系统调用号对应系统调用在调用表中的偏移量。

系统调用会影响效率嘛?
会!频繁使用底层系统调用会影响程序的执行效率。
因为频繁的从用户空间去到内核空间去访问,然后再返回到用户空间去继续执行,会有消耗。
例:
两个程序:写一个1G的文件,定义数组buf,大小为2048和16,循环每次往数组写入2048和16字节大小,比较两次所耗费的时间。
#define W_LEN 16
#define W_LEN 2048
循环次数:
一个程序写入次数:(1024*1024*1000) / 16 == 65,536,000 次
一个程序写入次数:(1024*1024*1000) / 2048 == 512,000 次
#include <stdio.h>
#include <sys/types.h>
#include <sys/stat.h>
#include <fcntl.h>


//#define W_LEN           16
#define W_LEN           2048
#define FILE_SIZE       (1024*1024*1000)

int main(void) {

    int ret = 0;
    int fd = -1;
    char fileName[] = "test.txt";
    char buf[W_LEN];


    // 打开以文件,只写方式打开,不懂00764是什么意思上面open介绍
    fd = open(fileName, O_WRONLY|O_CREAT|O_EXCL, 00764);
    if (-1 == fd) {
        fprintf(stderr, "open %s fail. reason: %s\n", fileName, strerror(errno));
        exit(-1);
    }

    memset(buf, '6', sizeof(buf));

    int count = FILE_SIZE / sizeof(buf);    // 次数
    int i = 0;
    for (; i < count; i++) {
        // 往文件中写入数据
        ret = write(fd, buf, strlen(buf));
        if(-1 == ret) {
            fprintf(stderr, "write error. reason: %s\n", strerror(errno));
            exit(-2);
        }
    }

    printf("write successful!\n");

    close(fd);

    return 0;
}
运行程序,通过上面所介绍的,使用time参数去显示程序运行所耗费的时间:
gcc systemCall_2048.c -o systemCall_2048      // #define W_LEN    2048

gcc systemCall_2048.c -o systemCall_16        // #define W_LEN    16

可以看出,系统调用执行的次数越多,所耗费的时间就越长;所以,以此证明,多次执行系统调用是会耗费资源的。
那如何解决这样的问题呢?
尽可能少调用系统接口,能一次搞定的避免多次!
另外,网上说,如果多调用GLIBC库 和 GLIB库!
反正不会的话,就直接用C语言的 I/O 文件操作函数即可,即fopen、fwrite、fread等这类函数!
四、总结
Linux操作文件的函数已经介绍完毕。
我们学会的同时也要注意系统调用带来的后果,只要有了这方面的意识,在写C/C++代码时,就会注意到,就不会写出效率慢的代码。
